NEFF C47D42.0 User manual


3
ÚTable of contents
[en]Instructionmanual
Safety precautions .....................................................................4
Safety notes .........................................................................................4
Causes of damage .............................................................................4
Your new appliance .................................................................... 5
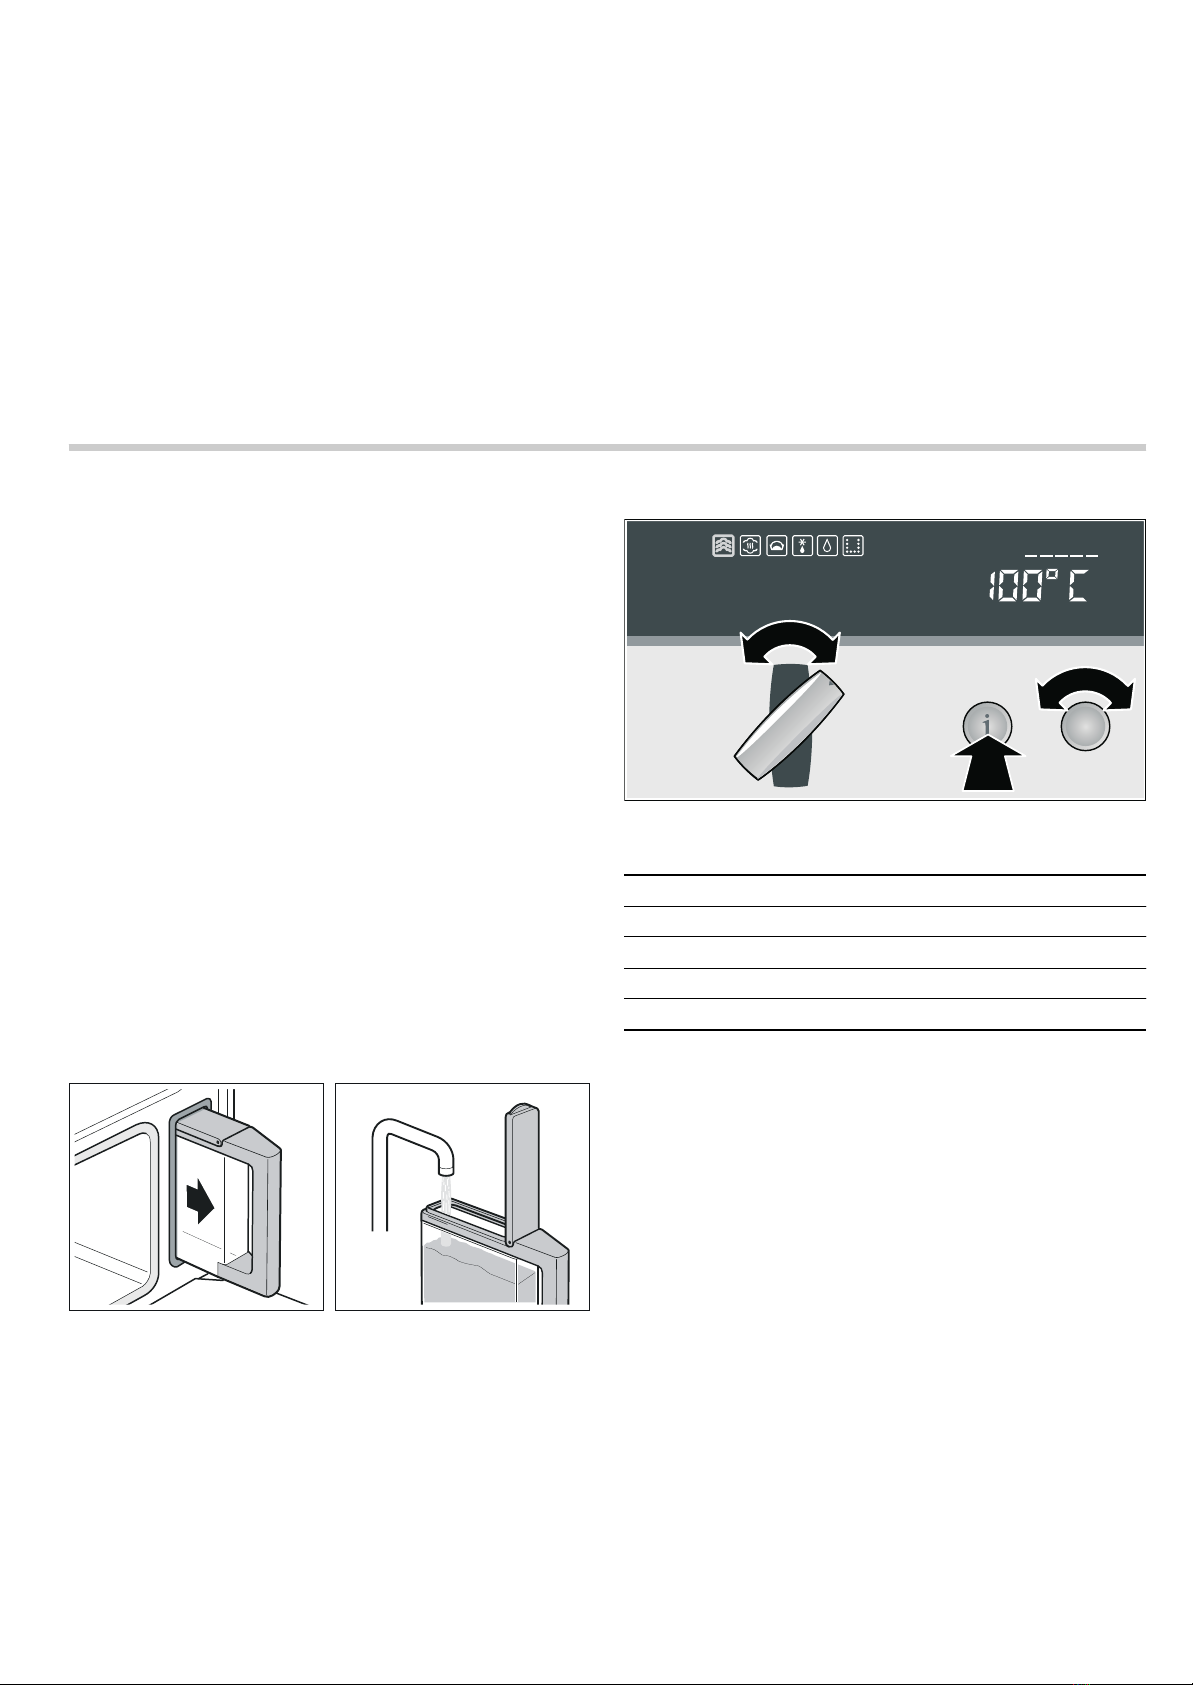
Control panel .......................................................................................5
Operating modes ................................................................................6
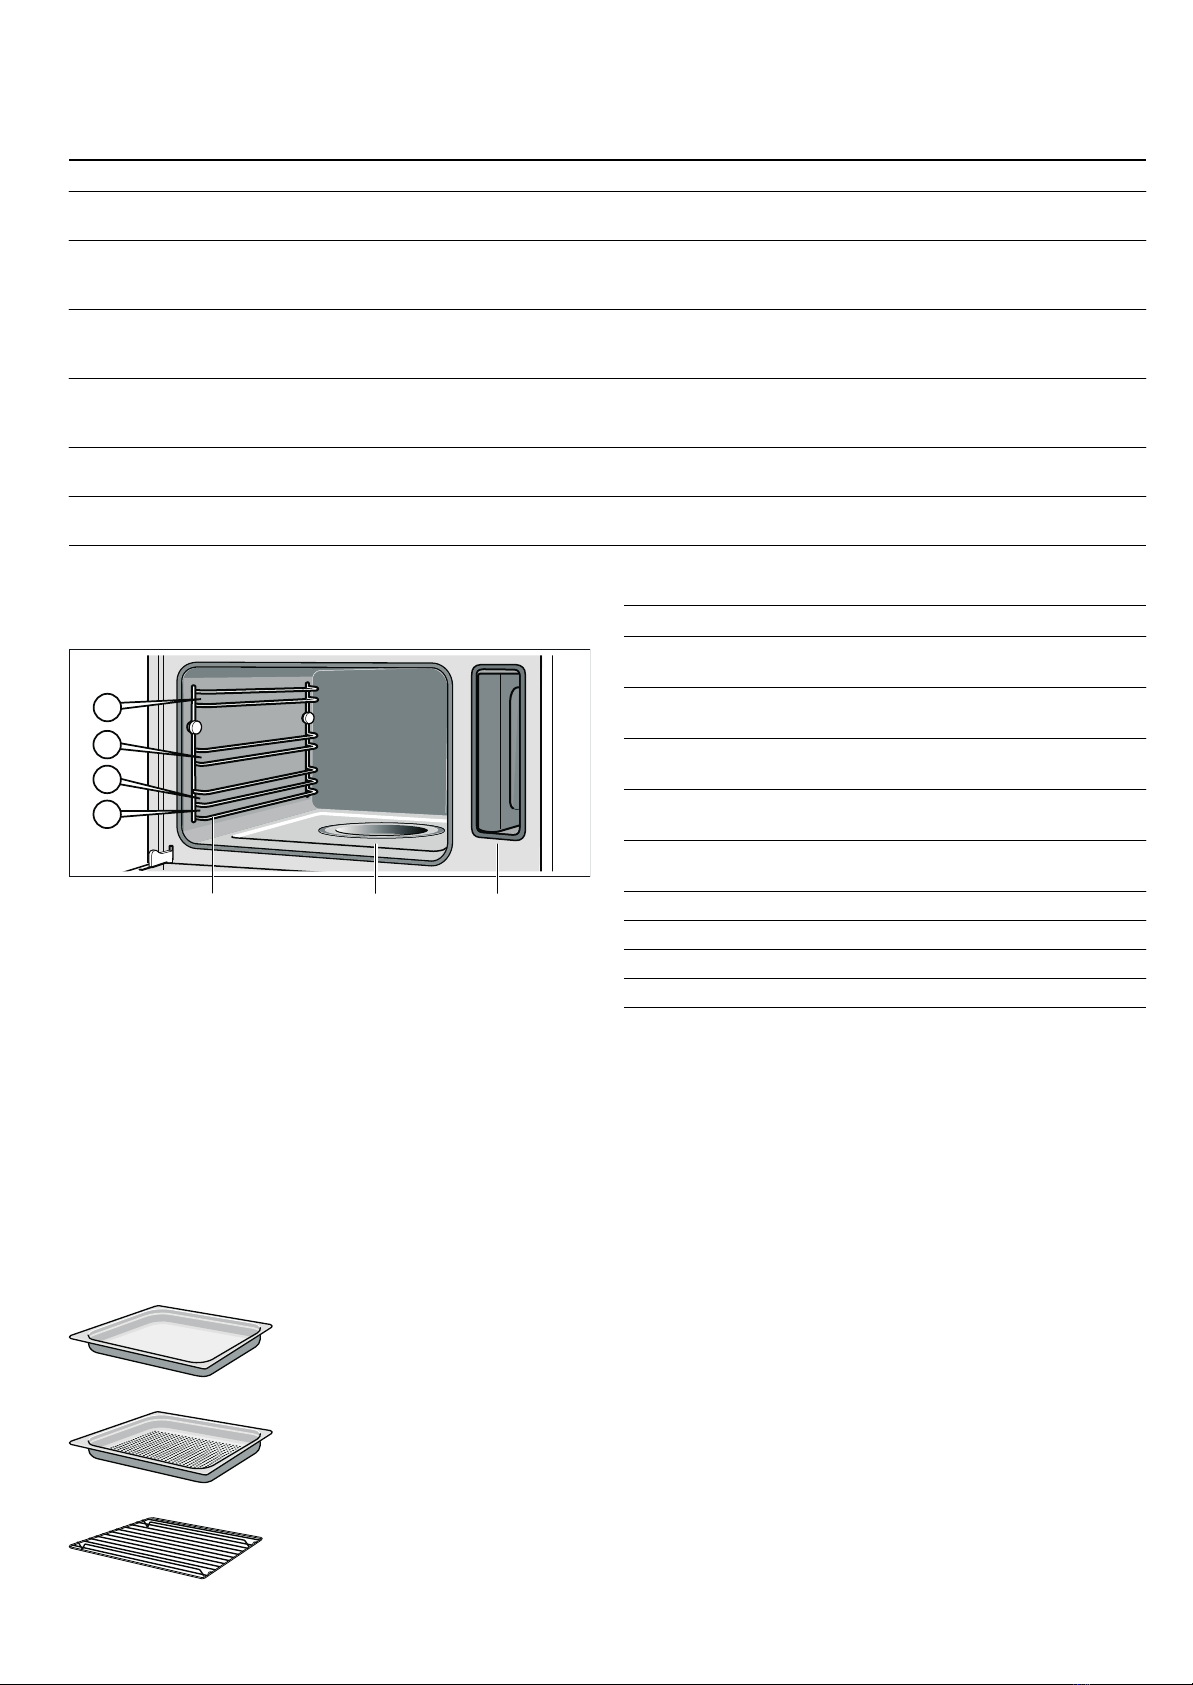
Cooking compartment .......................................................................6
Accessories .........................................................................................6
Automatic calibration .........................................................................6
Before using the appliance for the first time ........................... 7
Setting the language ..........................................................................7
Setting the clock .................................................................................7
Setting the water hardness range ...................................................7
First use ................................................................................................7
Cleaning the accessories before use .............................................8
Operating the appliance ............................................................ 8
Filling the water tank ..........................................................................8
Switching on the appliance...............................................................8
Switching off the appliance...............................................................9
After each use .....................................................................................9
Electronic clock.......................................................................... 9
Clock display .......................................................................................9
Timer .................................................................................................. 10
Cooking time .................................................................................... 10
Preset operation ............................................................................... 10
Setting the clock .............................................................................. 10
Checking, correcting or deleting settings ................................... 11
Automatic programmes ........................................................... 11
Setting a programme ...................................................................... 11
Notes about the programmes ....................................................... 11
Programme tables ........................................................................... 12
Memory...................................................................................... 14
Saving to the Memory function ..................................................... 15
Starting the memory function ........................................................ 15
Deleting a memory setting ............................................................. 15
Childproof lock ......................................................................... 15
Lock .................................................................................................... 15
Permanent lock ................................................................................ 15
Basic settings ........................................................................... 16
Care and cleaning .................................................................... 16
cleaning agents................................................................................ 17
Oven cleaning aid............................................................................ 17
Descaling........................................................................................... 18
Removing and fitting the appliance door.................................... 19
Cleaning the door panels............................................................... 19
Cleaning the rails ............................................................................. 20
Troubleshooting .......................................................................20
Replacing the cooking compartment bulb ................................. 21
Changing the door seal .................................................................. 22
After-sales service ................................................................... 22
E number and FD number ............................................................. 22
Environmental protection ........................................................ 22
Environmentally-friendly disposal.................................................. 22
Tips for saving energy .................................................................... 22
Tables and tips ......................................................................... 22
Accessories ..................................................................................... 22
Cookware .......................................................................................... 23
Cooking time and quantity ............................................................. 23
Distributing food evenly .................................................................. 23
Pressure-sensitive food .................................................................. 23
Cooking a menu .............................................................................. 23
Vegetables ........................................................................................ 23
Side dishes and pulses .................................................................. 24
Poultry and meat.............................................................................. 24
Fish ..................................................................................................... 25
Soup vegetables, Miscellaneous .................................................. 25
Dessert, compote ............................................................................ 25
Reheating food................................................................................. 26
Defrosting .......................................................................................... 26
Dough proving.................................................................................. 26
Juicing................................................................................................ 26
Preserve............................................................................................. 27
Frozen products ............................................................................... 27
Produktinfo
Additional information on products, accessories, replacement
parts and services can be found at www.neff-
international.com and in the online shop www.neff-
eshop.com

4
: Safety precautions
Read these instructions for use carefully.
Please keep the instructions for use and
installation instructions in a safe place. If the
appliance changes owners, the instructions
should always be included.
Safety notes
This appliance is intended for domestic use only. This
appliance must only be used for food preparation.
Adults and children must not operate the appliance without
supervision,
■if they are physically or mentally incapable of doing so or
■if they have insufficient knowledge or experience.
Never let children play with the appliance.
Risk of scalding!
Hot steam may escape when the appliance door is opened.
Open the appliance door carefully during or after cooking.
When opening the door, do not lean over it. Ensure that,
depending on the temperature, steam is not visible.
Risk of burns!
Never touch the interior surfaces of the cooking compartment
or the heating elements when they are hot. Small children must
be kept at a safe distance from the appliance.
Risk of fire!
Never store combustible items in the cooking compartment.
Risk of scalding!
Never pour water into the cooking compartment when it is hot.
This will create hot steam.
Risk of short circuit!
Never trap connecting cables of electrical appliances in the hot
appliance door. The cable insulation could melt.
Risk of burning!
Never prepare food containing large quantities of drinks with a
high alcohol content. Alcoholic vapours can catch fire in the
cooking compartment. Only use small quantities of drinks with
a high alcohol content and take care when opening the
appliance door.
Risk of burning!
Never remove hot accessories or ovenware from the cooking
compartment without oven gloves.
Risk of scalding!
Do not clean the appliance immediately after switching it off.
The water in the evaporator dish is still hot. Wait until the
appliance has cooled down.
Risk of electric shock!
Incorrect repairs are dangerous. Repairs may only be carried
out by one of our trained aftersales engineers. If the appliance
is defective, pull out the mains plug or switch off the appliance
at the circuit breaker in the fuse box. Call the aftersales
service.
Causes of damage
Caution!
■Do not place anything on the cooking compartment floor. Do
not cover it with aluminium foil. A build-up of heat could
damage the appliance.
The cooking compartment floor and the evaporator dish must
always be kept clear. Always place ovenware in a perforated
cooking container or on a wire rack.
■Aluminium foil in the cooking compartment must not come
into contact with the door panel. This could cause permanent
discolouration of the door panel.
■Ovenware must be heat and steam resistant.
■Do not use ovenware that shows signs of rust. Even the
smallest spots of rust can lead to corrosion in the cooking
compartment.
■When steaming with a perforated cooking container, always
insert the baking tray or the solid cooking container
underneath. Dripping liquid is caught.
■Do not store moist food in the closed cooking compartment
for long periods. It can lead to corrosion in the cooking
compartment.
■If the door seal is very dirty, the appliance door will no longer
close properly during operation. The fronts of adjacent units
could be damaged. Always keep the door seal clean and
replace when necessary.
■Do not place anything on the open appliance door. The
appliance could be damaged.
■Do not carry or hold the appliance by the door handle. The
door handle cannot support the weight of the appliance, and
could break.
■The cooking compartment in your appliance is made of high
grade stainless steel. Improper care can lead to corrosion in
the cooking compartment. Refer to the care and cleaning
instructions in the instruction manual. Remove food residues
from the cooking compartment as soon as the appliance has
cooled.

5
Your new appliance
In this section, you will find information on
■the control panel
■the operating modes
■the cooking compartment
■accessories
■automatic calibration
Control panel
Pop-out operating knob
The rotary, temperature and operating mode selectors can all
be popped out. Push the required operating knob to pop it in or
out.
Control element Use/meaning
Operating mode selector Switching the appliance on and off
Selects the desired operating mode
Electronic clock
KJ Clock function button Selects the clock function (see section: Electronic clock)
Rotary selector Makes settings within a clock function (see section: Electronic clock)
Temperature display (Basic settings)
±Info button Press briefly: calls up additional information, for example the current temperature
during the heating up phase
Press and hold: calls up the Basic settings menu (see section: Changing the Basic
settings)
Temperature selector Sets the temperature
Changes the settings in the Basic settings menu (see section: Changing the Basic
settings)
Buttons
iNavigation button Switches between the different lines of the text display. The settings are saved as
you do so. If the Msymbol lights up in the text display, there are further selection
options. Press the inavigation button to move to these.
XProgramme button Selects automatic programmes (see section: Steam)
lMemory button Saves and accesses the settings (see section: Memory)
ƒStart button Starts the operation
„Stop button Short press: stops the operation (pause)
Press and hold: ends the operation
6WRS
0
36WDUW
(OHFWURQLFFORFN 7HPSHUDWXUHGLVSOD\
,QIREXWWRQ
7HPSHUDWXUHVHOHFWRU
7H[WGLVSOD\
2SHUDWLQJPRGHVHOHFWRU
5RWDU\VHOHFWRU
&ORFNIXQFWLRQEXWWRQ
1DYLJDWLRQEXWWRQ
XWRPDWLFSURJUDPPHV
6WRSEXWWRQ6WDUWEXWWRQ
0HPRU\

6
Operating modes
You can use the operating mode selector to set your appliance
for various different applications.
Cooking compartment
The cooking compartment has four shelf heights. The shelf
positions are counted from the bottom up.
Caution!
■Do not place anything on the cooking compartment floor. Do
not cover it with aluminium foil. A build-up of heat could
damage the appliance.
The cooking compartment floor and the evaporator dish must
always be kept clear. Always place ovenware in a perforated
cooking container or on a wire rack.
■Do not slide any accessories between the shelf positions, or
they may tip.
Accessories
Use only the accessories supplied with the product or available
from the after-sales service. They are specially designed for
your appliance.
Your appliance is equipped with the following accessories:
You can obtain further accessories from specialist retailers:
Automatic calibration
The boiling temperature of water depends on the air pressure.
During calibration, the appliance is adapted to the pressure
conditions in the location where it is installed. This happens
automatically when you first use the appliance (see section:
First use). More steam develops than usual.
It is important that the appliance steams without interruption for
20 minutes at 100 °C. Do not open the appliance door during
this time.
If the appliance was not able to calibrate itself automatically (for
example, because the appliance door was opened), the
calibration process is carried out again during the next cooking
operation.
After moving house
So that the appliance automatically adjusts itself to its new
location, you must reset the appliance to the factory settings
(see section: Basic settings) and repeat the initial start-up
process (see section: First use).
After a power cut
The appliance saves the calibration settings even in the event
of a power cut or disconnection from the mains. Recalibration
is not necessary.
Operating mode Application
éSteam cooking 35 - 100 °C For vegetables, fish, side dishes, for juicing fruit and for blanching.
äReheat 80 - 100 °C For plated meals and baked items.
Cooked food is gently reheated. The steam ensures that the food does not dry
out.
êDough proving 35 - 50 °C For yeast dough and sour dough.
Dough will prove considerably more quickly than at room temperature. The sur-
face of the dough does not dry out.
ADefrost 35 - 60 °C For vegetables, meat, fish and fruit.
The moisture gently transfers the heat to the food. The food does not dry out or
lose shape.
>EasyClean® Makes cleaning the cooking compartment easier
(see section: EasyClean® cleaning aid)
ÍDescaling For descaling the water system and the evaporator dish
(see section: Descaling)
Cooking container, solid, GN Z,
40 mm deep
For catching dripping liquid when
steaming and for cooking rice,
pulses and cereals
Cooking container, perforated,
GN Z, 40 mm deep
for the steaming of whole fish or
large quantities of vegetables, for
juicing berries, etc.
Wire rack
For dishes including preserving
jars, baking and blancmange
moulds
(YDSRUDWRUGLVK
5DLOVIRU
WKHDFFHVVRULHV
:DWHUWDQN
Accessories Order no.
Cooking container, solid, GN Z, 40 mm
deep
Z1683X0
Cooking container, perforated, GN Z,
40 mm deep
Z1682X0
Cooking container, solid, GN Z, 28 mm
deep (baking tray)
Z1673X0
Cooking container, solid, GN Y, 40 mm
deep
Z1663X0
Cooking container, perforated, GN Y,
40 mm deep
Z1662X0
Wire rack Z1664X0
Cleaning sponge 643 254
Descaler 311 138
Honeycomb microfibre cloth 460 770

7
Before using the appliance for the first time
In this section you will find out which steps are required before
using the appliance for the first time:
■Setting the clock and language
■Setting the water hardness range
■Starting the appliance for the first time
■cleaning the accessories before use
Setting the language
Once the appliance has been connected to the power supply,
you must set the language for the text display.
1. Turn the temperature selector until the language you require
appears on the text display.
2. Press and hold the ±info button for 3 seconds.
Your setting is saved.
Changing the language
Your appliance must be switched on.
1. If required, turn the operating mode selector to the Ûposition.
2. Press and hold the ±info button for 3 seconds.
This takes you directly to the language selection screen.
3. Turn the temperature selector until the language you require
appears on the text display.
4. Press and hold the ±info button for 3 seconds.
Your setting is saved.
Setting the clock
Note: When you press the KJ clock function button, you have
3 seconds to set the clock using the rotary selector. Should this
have been insufficient for you, you can amend the clock time
later.
‹:‹‹ flashes in the clock display.
1. Briefly press the KJ clock function button to go to the
setting mode.
The KJ and 3symbols light up. ‚ƒ:‹‹ appears in the
clock display.
2. Set the current time using the rotary selector.
Your setting is accepted after 3 seconds.
Changing the clock
To subsequently change the time, press the KJclock function
button repeatedly until the KJ and 3symbols light up again.
Change the time with the rotary selector.
Setting the water hardness range
Caution!
The appliance may become damaged due to the use of
unsuitable liquids.
Do not use distilled water, highly chlorinated tap water
(> 40 mg/l) or other liquids.
Only use cold, fresh tap water, softened water or uncarbonated
mineral water.
The water hardness "medium" (™‡ƒ) is the default setting.
Change the value if your water is softer or harder.
You can check the water hardness with the test strips supplied
or ask your water supplier.
Notes
■If your water is very hard, we recommend that you use
softened water.
■If you use only softened water, you can set your appliance to
the "softened" water hardness range.
■If you use mineral water, set the water hardness to hard.
■If you use mineral water, you must only use non-carbonated
mineral water (see section "Filling and emptying the water
tank").
You can change the water hardness range in the basic settings
when the appliance is switched on.
1. If required, turn the operating mode selector to the Ûposition.
2. Press and hold the ±info button until "Select language"
appears in the text display.
3. Briefly press the ±information button repeatedly until ™‡ƒ
appears in the temperature display (water
hardness "medium").
4. Use the temperature selector to set the water hardness.
5. Press and hold the ±info button for 3 seconds.
Your setting is saved.
First use
Before first use, heat the empty appliance with éSteam
cooking for 20 minutes at 100 °C. Do not open the appliance
door during this time. The appliance is automatically calibrated
(see section: Automatic calibration).
6SUDFKHZlKOHQ
'HXWVFK
Water hardness Setting symbol (temperature dis-
play)
softened ™‡‹
soft ™‡‚
medium ™‡ƒ
hard ™‡„
very hard ™‡…

8
1. Press the operating mode selector so that it pops out.
The appliance switches on.
2. Fill and insert the water tank (see section: Filling the water
tank).
Before using for the first time, moisten the seal in the tank
cover with a little water.
3. Turn the operating mode selector round to éSteam
cooking.
4. Press the Start button.
The appliance heats up to 100 °C. The cooking time
(20 minutes) does not start to count down until the set
temperature has been reached. Do not open the appliance
door during this time.
The cooking operation ends automatically and an audible
signal sounds.
5. Press theKJ clock function button to exit the clock function.
6. Turn the operating mode selector back to the Ûposition and
click in place to turn off the appliance.
Leave the appliance door ajar until the appliance has cooled
down.
Cleaning the accessories before use
Using soapy water and a soft cloth, clean the accessories
thoroughly before first use.
Operating the appliance
In this section, you can read about
■how to fill the water tank
■how to switch the appliance on and off
■what to note after each cooking operation
Filling the water tank
When you open the appliance door, you will see the water tank
on the right-hand side.
Caution!
Use of unsuitable liquids may damage the appliance
■Only use fresh tap water, softened water or uncarbonated
mineral water.
■If your tap water is very hard, we recommend that you use
softened water.
■Do not use distilled water, highly chlorinated tap water
(> 40 mg/l) or other liquids.
You can obtain information about your tap water from your
water supplier. The water hardness can be checked with the
test strips enclosed.
Fill the water tank before each use:
1. Open the appliance door and take out the water tank.
2. Fill the water tank with cold water up to the "max" mark.
3. Close the tank cover until you feel it engage.
4. Slide in the water tank until it engages.
Switching on the appliance
1. Press the operating mode selector to make it pop out.
The appliance switches on. "Appliance is ready for use"
appears in the text display.
2. Turn the operating mode selector until the desired operating
mode appears on the text display.
A default temperature appears on the temperature display.
3. Turn the temperature selector to change the default
temperature.
A default cooking time is displayed on the electronic clock.
The KJ and x(cooking time) symbols light up.
4. Turn the rotary selector to change the default cooking time.
The new cooking time is saved automatically after 3 seconds.
5. Press the Start button.
If you do not press the Start button, a signal sounds and
"Press Start button" appears in the text display.
When ésteam cooking, the cooking time does not start until
the heating up time has elapsed.
"Fill water tank?" message
This message appears if you set an operating mode and the
water tank is only half full.
If you think that the water in the water tank is sufficient for the
cooking procedure, you can start the appliance. If not, fill the
water tank to the "max" mark, slide it back in and start the
appliance.
PD[
Operating mode Temperature range
éSteam cooking 35 - 100 °C
äReheat 80 - 100 °C
êDough proving 35 - 50 °C
ADefrost 35 - 60 °C
6WHDPFRRNLQJ

9
Heating indicator
The heating indicator displays the rising temperature in the
cooking compartment.
■Temperature reached (fig. A)
■Appliance reheating (fig. B)
Current temperature
Press the ±info button.
The current temperature is displayed for 3 seconds.
Displaying and changing the cooking time.
Press the KJ clock function button repeatedly until the KJ
and xsymbols light up. The current cooking time is displayed.
Turn the rotary selector to change the cooking time. The
change is saved automatically.
Changing the temperature
You can change the temperature at any time. To change the
temperature, turn the temperature selector until the required
temperature is displayed.
Pause
Briefly press the Stop button to interrupt cooking (pause). The
cooling fan may continue running. Press the Start button to
restart.
If you open the appliance door during cooking, operation is
interrupted. Close the appliance door and press the Start
button to restart.
If you have switched on the Auto start, there is no need to
restart the appliance (see section: Basic settings).
"Fill water tank" message
If the water tank is empty, a signal sounds. “Fill water tank”
appears on the display. Cooking is interrupted.
1. Open the appliance door carefully.
N.B.: Hot steam will escape.
2. Remove the water tank, fill up to the "max" mark and slide the
tank back in.
3. Press the Start button.
Switching off the appliance
: Risk of scalding!
Hot steam may escape when the appliance door is opened.
Open the appliance door carefully during or after cooking.
When opening the door, do not lean over it. Ensure that,
depending on the temperature, steam is not visible.
Press and hold the Stop button to stop the cooking operation.
Once the cooking time has elapsed, the appliance switches off
automatically. A signal sounds. Press the KJ clock function
button to stop the signal.
The cooling fan may continue to run when you open the
appliance door.
Turn the operating mode selector back to the Ûposition and
push it in to turn off the appliance.
You can see on the temperature display whether there is high
or low residual heat in the cooking compartment.
After each use
Emptying the water tank.
1. Open the appliance door carefully.
Hot steam will escape.
2. Remove and clean the water tank.
3. Thoroughly dry the seal in the tank cover and the tank recess
in the appliance.
Caution!
Do not dry the water tank in the hot cooking compartment. This
will damage the water tank.
Drying the cooking compartment
: Risk of scalding!
The water in the evaporator dish may still be hot. Allow it to cool
before wiping.
1. Leave the appliance door ajar until the appliance has cooled
down.
2. Once it has cooled down, wipe out the cooking compartment
and the evaporator dish with the enclosed cleaning sponge
and dry well with a soft cloth.
3. Remove food residues in the cooking compartment as soon
as the appliance has cooled down.
4. Wipe units and handles dry where condensation has formed.
Electronic clock
In this section, you can read about
■how to set the timer
■how to switch off your appliance automatically
■how to switch your appliance on and off automatically
(preset operation)
■how to set the time
Clock display
%
Temperature display Text display
•Residual heat high
œResidual heat low
&ORFNIXQFWLRQEXWWRQ 5RWDU\VHOHFWRU

10
Notes
■When you set a clock function, the time interval increases
when you set higher values (e.g. a cooking time of up to
‚:‹‹œ can be set exactly to the minute, more than ‚:‹‹œ in
intervals of 5 minutes).
■For the clock functions QTimer, xCooking time and y
Preselection mode, an audible signal sounds and the Q or
ysymbol flashes after the settings have elapsed. To cancel
the audible signal before it ends, press the KJ clock
function button.
■Briefly press the KJ clock function button to select a clock
function. You then have 3 seconds to set the selected clock
function. After this time, the setting mode is exited
automatically.
Switching the clock display on and off
1. Press and hold the KJclock function button for 6 seconds.
The clock display switches off. If a clock function is active,
the associated symbol remains lit.
2. Press the KJclock function button briefly.
The clock display switches on.
Timer
1. Press the KJclock function button repeatedly until the KJ
and Qsymbols light up.
2. Set the duration using the rotary selector (e.g. †:‹‹ minutes).
The setting is applied automatically. Then the clock is
displayed again and the minute minder starts counting down.
Cooking time
Automatic switch-off after a cooking time setting has elapsed.
1. Set the operating mode and temperature.
A default cooking time is displayed on the electronic clock.
The KJ and x(cooking time) symbols light up.
2. Set the cooking time with the rotary selector
(e.g. ‚:„‹ hours).
The new cooking time is saved automatically after 3 seconds.
3. Press the Start button.
The appliance heats up.
In the éSteam cooking operating mode, the cooking time
does not start counting down until the heating up time has
finished.
Once the cooking time has elapsed, the appliance switches off
automatically.
1. Turn the operating mode selector back to the Ûposition.
2. Press the KJ clock function button to exit the clock function.
Preset operation
The appliance switches on automatically, then switches off
automatically at the time preselected for the end of operation.
Bear in mind that food that spoils easily must not stay in the
cooking compartment for too long.
Preselection mode is not possible with some of the automatic
programmes.
When éSteam cooking, the cooking time does not start until
the heating up time has elapsed. The end of operation which
was set is therefore delayed by the length of time required for
heating-up.
1. Set the operating mode and temperature.
2. Press the clock function button repeatedly until the KJ and
xsymbols light up.
3. Set the cooking time with the rotary selector
(e.g. ‚:„‹ hours).
4. Press the clock function button repeatedly until the KJ
andysymbols light up.
5. Set the end of operation using the rotary selector
(e.g. ‚ƒ:„‹).
6. Press the Start button.
The appliance waits until the appropriate time to switch on (in
the example at ‚‚:‹‹).
The appliance switches off automatically at the time set for the
end of operation (‚ƒ:„‹). A signal sounds and the ysymbol
flashes.
1. Turn the operating mode selector back to the Ûposition.
2. Press the clock function button to end the preselection mode.
Setting the clock
You can only change the clock when no other clock function is
active.
1. Press the KJ clock function button repeatedly until
the KJand 3symbols light up.
2. Set the clock using the rotary selector.
The setting is applied automatically.
Clock function Use
QTimer You can use the timer as an egg timer or a kitchen timer. The appliance does not switch
on or off automatically
xCooking time The appliance switches off automatically after a cooking time setting has elapsed (e.g.
‚:„‹ hours)
yPreset operation The appliance switches on and off automatically
3Clock Setting the clock

11
Checking, correcting or deleting settings
1. To check your settings, press the KJ clock function button
repeatedly until the corresponding symbol lights up.
2. If necessary, you can correct your setting using the rotary
selector.
3. If you wish to cancel your setting, turn the rotary selector anti-
clockwise to the original value.
Automatic programmes
The automatic programmes make preparing food very easy.
There are 9 programme groups with a total of 40 programmes.
In this section, you will find out
■how to set one of the automatic programmes
■Hints and tips on the programmes
■Which programmes you can set (programme tables)
Setting a programme
Select the appropriate programme from the programme table.
Follow the instructions for the programmes.
Example in the picture: you want to steam 500 g fresh chicken
breast.
■“Meat, poultry” programme group
■“Chicken breast, fresh, steamed” programme
Selecting a programme group
1. Press on the operating mode selector to turn on the
appliance.
2. Press the Xbutton.
The first programme group is shown on the text display.
3. Turn the operating mode selector until the desired
programme group appears.
Selecting the programme
4. Press the ìbutton.
The first programme in the programme group is shown on
the text display.
5. Turn the operating mode selector until the desired
programme is displayed.
Adjusting the cooking result individually
6. Press the ìbutton.
Individual adjustment is highlighted “- ÙÙÙØÙÙÙ +”.
7. Turn the operating mode selector to adjust the cooking result:
■anti-clockwise: set a less intensive cooking result
■clockwise: set a more intensive cooking result
You can also modify the cooking result permanently for all
programmes at the same time (see section: Basic settings)
Entering the weight
A default weight appears on the temperature display.
8. Turn the temperature selector to set the weight of the items to
be cooked.
Press the ±info button to request information on the
accessories. The information is displayed for a few seconds.
9. Press the Start button to start the programme.
No heating indicator appears.
Checking the cooking time
Press the KJ clock function button repeatedly until the KJ
and xsymbols light up.
Programme with preselected mode
For some programmes, you can set a y Preselection mode.
The programme will be started later and finish at the desired
time (see Section: Electronic clock).
Cancelling the programme
Press and hold the Start button to cancel the programme.
End of the programme
A signal sounds. Cooking has finished. To turn off the
appliance, press in the operating mode selector so that it clicks
into place.
: Risk of scalding!
Hot steam may escape when the appliance door is opened.
Open the appliance door carefully during or after cooking.
When opening the door, do not lean over it. Ensure that,
depending on the temperature, steam is not visible.
Notes about the programmes
All programmes are designed for cooking on one level.
The cooking result can vary according to the size and quality of
the food.
3
9HJHWDEOHV
3
3RXOWU\
&KLFNHQEUHDVWIUHVKVWHDPHG
6WDUW
03
0HDWSRXOWU\
&KLFNHQEUHDVWIUHVKVWHDPHG

12
Ovenware
Use the suggested ovenware. All meals have been tested using
this ovenware. The cooking result may change if you use
different ovenware.
When cooking in the perforated cooking container, also insert
the solid cooking container at level 1. Dripping liquid is caught.
Amount/ weight
Do not fill the food more than 4 cm deep in the accessories.
The automatic programmes require the weight of the food. With
individual pieces always use the weight of the largest. The total
weight must be within the specified weight range.
Cooking time
After the programme is started the cooking time is displayed. It
may change during the first 10 minutes, as the heating-up time
depends, among other things, on the temperature of the food
and the water.
Programme tables
Follow the instructions for the programmes.
Vegetables
Do not season vegetables until after cooking.
Potatoes
Do not season potatoes until after cooking.
Cereal products
Weigh the food and add the correct ratio of water:
■Rice 1:1.5
■Couscous 1:1
■Millet 1:3
■Lentils 1:2
Enter the weight excluding liquid.
Stir cereal products after cooking. The remaining water is then
quickly absorbed.
Making risotto
Add water to the risotto in the ratio of 1:2. Enter the total weight
including water. The message “Stir” appears after approx.
15 minutes. Stir the risotto and, if required, press the Start
button.
Programme Note Accessories Level
Steam cauliflower/In florets* florets of equal size perforated +
solid cooking container
3
1
Steam cauliflower / Cauliflower, whole* - perforated +
solid cooking container
3
1
Steam broccoli florets* florets of equal size perforated +
solid cooking container
3
1
Steam green beans* - perforated +
solid cooking container
3
1
Steam sliced carrots* slices, approx. 3 mm thick perforated +
solid cooking container
3
1
Steam sliced kohlrabi* slices, approx. 3 mm thick perforated +
solid cooking container
3
1
Steam Brussels sprouts* - perforated +
solid cooking container
3
1
Steam asparagus/White asparagus* - perforated +
solid cooking container
3
1
Steam asparagus/Green asparagus* - perforated +
solid cooking container
3
1
Steam frozen mixed vegetables - perforated +
solid cooking container
3
1
* You can set a preselection mode for this programme
Programme Note Accessories Level
Boiled potatoes* medium-sized, quartered,
30 - 40 g each
perforated +
solid cooking container
3
1
Unpeeled boiled potatoes* medium-sized, dia. 4 - 5 cm perforated +
solid cooking container
3
1
* You can set a preselection mode for this programme

13
Meat, poultry
Do not place meat or poultry on top of one another in the
ovenware.
The chicken breasts can be marinated beforehand.
Fish
When preparing fish, grease the perforated cooking container. Do not place whole fish or fish fillets on top of each other. Enter
the weight of the heaviest fish and choose pieces as similar in
size as possible.
Pastries, dessert
Making fruit compote
The programme is only suitable for fruits with stones and pips.
Weigh the fruit and add approximately Ythe amount in water,
and add sugar and spices according to taste.
Making rice pudding
Weigh the rice and add 2.5 times the amount of milk. Ensure
the level of rice and milk in the accessory is no higher than
2.5 cm. Stir after cooking. The remaining milk is quickly
absorbed.
Making yoghurt
Heat the milk to 90 °C on the hob. Then leave to cool to 40 °C.
If you are using UHT milk, you do not need to heat it.
Stir in one to two teaspoons of natural yoghurt per 100 ml milk,
or the corresponding amount of yoghurt culture into the milk.
Pour the mixture into clean jars and seal them.
After preparation, leave the glasses to cool in the refrigerator.
Reheat
Programme Note Accessories Level
Rice/Long grain rice max. 0.75 kg solid cooking container 2
Rice/Basmati rice max. 0.75 kg solid cooking container 2
Rice/Brown rice max. 0.75 kg solid cooking container 2
Couscous max. 0.75 kg solid cooking container 2
Millet max. 0.55 kg solid cooking container 2
Risotto max. 2 kg solid cooking container 2
Lentils max. 0.55 kg solid cooking container 2
Programme Note Accessories Level
Chicken breast, fresh, steamed total weight 0.2 - -1.5 kg perforated +
solid cooking container
3
1
Smoked pork, fresh, sliced* - perforated +
solid cooking container
3
1
Boiled sausages* - perforated +
solid cooking container
3
1
* You can set a preselection mode for this programme
Programme Note Accessories Level
Steam whole, fresh fish 0.3 - 2 kg Perforated +
Solid cooking container
3
1
Fish fillet, steam/Fish fillet, fresh max. 2.5 cm thick Perforated +
Solid cooking container
3
1
Fish fillet, steam/ Fish, frozen max. 2.5 cm thick Perforated +
Solid cooking container
3
1
Blue mussels - Perforated +
Solid cooking container
3
1
Programme Note Accessories Level
Fruit compote* - solid cooking container 2
Rice pudding - solid cooking container 2
Yogurt in glass jars - glass jars + perforated cooking
container
2
* You can delay the end time for this programme
Programme Note Accessories Level
Side dishes, cooked* - solid cooking container 2
Vegetables, cooked* - solid cooking container 2
* You can set a preselection mode for this programme

14
Defrosting
When freezing, lay the food as flat as possible and in portion-
sized pieces at -18 °C. Do not freeze excessively large
quantities. Once defrosted, food will not keep for as long and
spoils more quickly than fresh food.
Leave the food to defrost in the freezer bag, on a plate or in the
perforated cooking container. Always insert the solid cooking
container underneath. The food is then not left lying in the
defrost water and the cooking compartment remains clean.
All defrost programmes apply to raw food.
If necessary, the meal can occasionally be split apart or pieces
which have already defrosted can be removed from the
appliance.
After defrosting, allow the food to stand for a further 5 -
15 minutes to come up to room temperature.
: Health risk!
When defrosting food from animal sources, you must remove
the liquid that escapes during defrosting. It must never come
into contact with other food. Bacteria could be transferred.
After defrosting, operate the steam oven for 15 minutes at
100 °C using éSteam cooking.
Defrosting fish fillet
Do not place the fish fillets on top of each other.
Defrosting whole poultry
Remove the packaging before defrosting. Leave the poultry to
stand after defrosting. With large poultry (e.g. small turkeys),
you can remove the giblets after approximately 30 minutes
standing time.
Defrost meat
With this programme you can defrost individual joints of meat.
Only thaw fruit (not defrost)
If you only wish to thaw the fruit slightly, you can make an
individual adjustment to the cooking result.
Special
Disinfecting bottles
Always clean the bottles with a bottle brush immediately after
drinking. Then clean them in the dishwasher.
Place the bottles in the perforated cooking container so that
they do not touch one another.
Dry the bottles with a clean cloth after disinfecting. The process
corresponds to normal sterilisation by boiling.
Preserve
This programme is suitable for fruits with a stone and core and
for vegetables (except beans).
Blanch pumpkin before preserving.
The programme is designed for 1-litre jars. For larger or smaller
jars, you must adjust the cooking result individually.
After the end of the programme, open the appliance door to
prevent cooking from continuing. Leave the jars to cool down
for a few minutes in the cooking compartment.
The programme is designed for firm fruit. If the fruit being used
is no longer firm, adjust the cooking results individually.
Cooking eggs
Pierce the eggs before cooking. Do not place eggs on top of
each other. Size M corresponds to a unit weight of approx.
50 g.
Memory
You can use the Memory function to save up to 6 of your own
settings and recall them for use at any time. The Memory
function is particularly useful for dishes that you make on a
regular basis. You can also store one of the automatic
programmes.
Programme Note Accessories Level
Fish/whole fish max. 2.5 cm thick Perforated +
Solid cooking container
3
1
Fish/Fish fillet max. 2.5 cm thick Perforated +
Solid cooking container
3
1
Whole poultry max. 1.5 kg Perforated +
Solid cooking container
3
1
Meat max. weight per piece 1.5 kg Perforated +
Solid cooking container
3
1
Berries - Perforated +
Solid cooking container
3
1
Programme Note Accessories Level
Disinfect bottles* - perforated cooking container 2
Preserve in 1 litre glass jars perforated +
solid cooking container
3
1
Eggs/Hard-boiled eggs* Eggs, size M, Max. 1.8 kg perforated +
solid cooking container
3
1
Eggs/Soft-boiled eggs* Eggs, size M, max. 1 kg perforated +
solid cooking container
3
1
* You can set a preselection mode for this programme

15
Saving to the Memory function
1. Select the operating mode, temperature and cooking time or
one of the automatic programmes
(Do not press the Start button).
2. Press the lbutton to call up the menu memory.
3. Turn the operating mode selector to choose one of the 6
memory spaces.
4. Press and hold lbutton until a signal sounds.
"Memory saved" is shown in the text display.
Cancelling the memory function
Press the lbutton briefly to exit the Memory menu without
saving.
Starting the memory function
1. Turn the operating mode selector to the Ûposition.
2. Place the meal in the cooking compartment.
3. Press the lbutton to call up the menu memory.
4. Turn the operating mode selector to select the memory
location.
5. Press the Start button.
After starting, you can change the temperature and cooking
time (not with any of the automatic programmes).
If you select the éSteam cooking, the cooking time does not
start until the heating up time has elapsed.
Stopping (pausing) memory
Briefly press the Stop button. The Start button flashes. The
cooling fan may continue running. Press the Start button to
restart.
Cancelling the memory function
Press and hold the Stop button.
Deleting a memory setting
You can delete or replace a memory setting.
1. Turn the operating mode selector to the Ûposition.
2. Press the lbutton to call up the menu memory.
3. Turn the operating mode selector to select the memory
location.
4. Press the ìbutton.
“Delete? No“ appears in the text display.
5. Use the operating mode selector to switch to “Delete? Yes“.
6. Press the ìbutton to delete the memory setting.
7. Press the lbutton briefly to exit the Memory menu.
Childproof lock
In this section, you can read about
■how to lock your appliance
■how to lock your appliance permanently
Lock
Once it has been locked, the appliance cannot be switched on
accidentally or by unauthorised users (e.g. by children playing).
To switch the appliance on again, you must unlock it. After
appliance operation, the appliance is not automatically locked.
Lock it again if necessary or activate the permanent lock.
Lock appliance
1. Switch off the appliance.
2. Press and hold the ±info button for 3 seconds to go to the
basic settings menu.
3. Press the ±info button briefly and repeatedly until ™‚‹
appears in the temperature display.
4. Turn the temperature selector until ™‚‚ appears on the
temperature display.
5. Press and hold the ±info button until the ‚symbol appears
in the temperature display.
Note: If you try to switch on the locked appliance, -†- appears
on the temperature display and “controls locked” appears on
the text display.
Unlocking the appliance
1. Press and hold the ±info button until ™‚‚ appears in the
temperature display.
2. Turn the temperature selector until ™‚‹ appears on the
temperature display.
3. Press and hold the ±info button until the ‚symbol goes
out.
Permanent lock
Once it has been permanently locked, the appliance cannot be
switched on accidentally or by unauthorised users (e.g. by
children playing).
To switch the appliance on, you must interrupt the permanent
lock briefly. After you have switched your appliance off, it locks
again automatically.
Locking the appliance permanently
1. Switch off the appliance.
2. Press and hold the ±info button for 3 seconds to go to the
basic settings menu.
3. Press the ±info button briefly and repeatedly until ™‚‹
appears in the temperature display.
4. Turn the temperature selector until ™ƒ‚ appears on the
temperature display.
5. Press and hold the ±info button for 3 seconds.
Your appliance will be locked after 30 seconds. The ‚
symbol appears in the temperature display
Note: If you try to switch on the locked appliance, -†˜ appears
on the temperature display and “Appliance permanent lock”
appears on the text display.
Interrupting permanent lock
1. Press and hold the ± info button until ™ƒ‚ appears in the
temperature display.
2. Turn the temperature selector until ™ƒ‹ appears on the
temperature display.
3. Press and hold the ±info button until the ‚symbol goes
out.
The permanent lock is interrupted.
4. Switch the appliance on within 30 seconds.
After the permanent lock is switched off, it is reactivated after
30 seconds.

16
Unlocking the appliance permanently
1. Press and hold the ±info button until ™ƒ‚ appears in the
temperature display.
2. Turn the temperature selector until ™ƒ‹ appears on the
temperature display.
3. Press and hold the ±info button until the ‚symbol goes
out.
4. Within 30 seconds, press and hold the ±info button again for
3 seconds to go to the basic settings menu.
5. Press the ±info button briefly and repeatedly until ™ƒ‚
appears in the temperature display.
6. Turn the temperature selector until ™‚‹ appears on the
temperature display.
7. Press and hold the ±info button for 3 seconds.
The appliance is permanently unlocked.
Basic settings
Your appliance has various basic settings, which are preset at
the factory. You can change the basic settings as you require.
If you want to cancel all the changes, you can restore the
factory settings.
You can only change the basic settings if the appliance is
switched on.
1. If required, turn the operating mode selector to the Ûposition.
2. Press and hold the ±info button until "Select language“
appears in the text display.
3. Press the ±button repeatedly until the desired basic setting is
displayed (e.g. “Audible signal off“).
4. Use the temperature selector to change the basic setting
(e.g. to “Audible signal duration 2 minutes“).
5. Press and hold the ±info button for 3 seconds.
The change is saved.
You can change the following basic settings:
Care and cleaning
In this section, you will find information on
■Care and cleaning of your appliance
■Oven cleaning aid EasyClean®
■Descaling
: Risk of short circuit!
Do not use high-pressure cleaners or steam jet cleaners to
clean your appliance.
Caution!
Risk of surface damage: Do not use
■harsh or abrasive cleaning agents
■oven cleaners
■corrosive or aggressive cleaners, or those containing
chlorine
■cleaning agents with a high alcohol content
If such an agent comes into contact with the front of the
appliance, wash it off immediately with water.
Basic settings menu
Sub menu Basic setting Setting
symbol
Select language Additional languages are
possible.
Childproof lock Lock is not activated ™‚‹
Lock is activated ™‚‚
Permanent lock is activated ™ƒ‚
* Restore the appliance to the factory settings:
■all changes to the basic settings are deleted
■Memory is cleared
■automatic calibration is carried out again
Audible signal
duration
Audible signal off ™„‹
Audible signal duration
30 seconds
™„‚
Audible signal duration
2 minutes
™„ƒ
Audible signal duration
10 minutes
™„„
Auto start off ™…‹
on ™…‚
Adjust individually -ÙÙÙØÙÙÙ +™†...
Water hardness
range
softened ™‡‹
1-soft ™‡‚
2-medium ™‡ƒ
3-hard ™‡„
4very hard ™‡…
Steam heating up
signal
off ™ˆ‹
on ™ˆ‚
Factory settings* Do not restore ™‰‹
Restore ™‰‚
Basic settings menu
Sub menu Basic setting Setting
symbol
* Restore the appliance to the factory settings:
■all changes to the basic settings are deleted
■Memory is cleared
■automatic calibration is carried out again

17
Caution!
Risk of surface damage: If descaler comes into contact with the
front of the appliance or any other sensitive surfaces, wash it off
immediately with water.
Remove food residues from the cooking compartment as soon
as the appliance has cooled.
For heavy soiling use the cleaning aid (see section: Cleaning
aid).
Salts are very corrosive and can cause rust. Remove remains
of acidic sauces (ketchup, mustard) or salted food from the
cooking compartment immediately after cooling.
Do not use hard scouring pads or cleaning sponges.
cleaning agents
Cleaning sponge
The enclosed cleaning sponge is very absorbent. Use the
cleaning sponge only for cleaning the cooking compartment
and for removing residual water from the evaporator dish.
Wash the cleaning sponge thoroughly before using for the first
time. You can wash the cleaning sponge in the washing
machine (hot wash).
Microfibre cloth
The honeycomb microfibre cloth is particularly suitable for
cleaning sensitive surfaces such as glass, glass ceramic,
stainless steel or aluminium (product no. 460 770, also
available from our online eShop). It removes liquid and greasy
deposits in one go.
Oven cleaning aid
The cleaning aid loosens dirt in the cooking compartment using
steam. It can then be removed easily.
The cleaning process consists of:
■Cleaning (approx. 30 minutes), then empty the evaporator
dish and wipe out the appliance
■1st rinse (20 seconds), then empty the evaporator dish
■2nd rinse (20 seconds), then remove the remaining water
All three steps must be completed in full. The appliance is
ready for operation again only after the 2nd rinse.
Preparation
Allow the cooking compartment to cool down and remove the
accessories. Clean the evaporator dish with the enclosed
cleaning sponge.
Put a drop of washing-up liquid into the evaporator dish on the
cooking compartment floor.
Starting the cleaning aid
1. Press the operating mode selector to make it pop out.
The appliance switches on.
2. Turn the operating mode selector to >EasyClean®.
3. Fill the water tank with water up to the "max" mark and slide it
in.
4. Press the Start button.
The cleaning aid starts running. The light in the cooking
compartment remains switched off. “’† appears in the
temperature display.
Emptying the evaporator dish and wiping out the appliance
A signal sounds after approx. 30 minutes. "Wipe out appliance"
appears in the text display.
1. Open the appliance door.
2. Take the rails out of the cooking compartment and clean
them (see section: Cleaning the rails).
3. Wipe out all loosened food residues from the cooking
compartment and the evaporator dish using a soft washing-
up brush and the cleaning sponge.
4. If required, fill the water tank with water and reinsert it.
5. Close the appliance door.
1st rinse
Press the Start button.
The appliance starts rinsing. "1st rinse" appears in the display.
Appliance exterior (with aluminium front) Use soapy water and dry with a soft cloth.
Mild window cleaning agent - wipe over the aluminium front horizontally and without
applying pressure using a soft window cloth or a lint-free microfibre cloth.
Appliance exterior (with stainless steel
front)
Use soapy water and dry with a soft cloth.
Always remove flecks of limescale, grease, starch and albumin (e.g. egg white) imme-
diately. Special stainless steel cleaning agents can be obtained from the after-sales
service or from specialist retailers.
Cooking compartment interior with evapo-
rator dish
Hot, soapy water or a vinegar solution use the enclosed cleaning sponge or a soft
washing-up brush.
Caution!
The cooking compartment could rust.: Do not use steel pads or scourers.
Water tank Soapy water - do not clean in the dishwasher.
Tank recess Rub dry after every use
Seal in the water tank lid Thoroughly dry after every use
Rails See section: Cleaning the rails
Door panels See section: Cleaning the door panels
Caution!
Risk of surface damage: After cleaning, wipe the door panels with glass cleaner, then
dry. Otherwise, stains will be caused that will not be able to be removed.
Door seal Hot soapy water
Accessories Soak in hot soapy water. Clean with a brush or washing-up sponge or in the dish-
washer. If the rails are discoloured by starchy foods (e.g. rice), clean them with a vine-
gar solution.

18
Empty evaporator dish
After 20 seconds, "Empty evaporator dish" appears in the text
display.
1. Open the appliance door.
2. Thoroughly rinse out the cleaning sponge.
3. Remove the remaining water from the evaporator dish using
the cleaning sponge.
4. Close the appliance door.
2nd rinse
Press the Start button.
The appliance starts rinsing. "2nd rinse" appears in the display.
Removing the remaining water
After 20 seconds, "End" and "Empty evaporator dish" appear in
the text display.
1. Open the appliance door.
2. Remove the remaining water from the evaporator dish using
the cleaning sponge.
3. Wipe out the cooking compartment using the cleaning
sponge and then dry with a soft cloth.
4. Turn the operating mode selector back to the Ûposition.
5. To turn off the appliance, press in the operating mode
selector so that it clicks into place.
The cleaning aid is complete.
Cancelling the cleaning aid
Note: After cancelling the cleaning aid, the appliance must be
rinsed twice. The appliance is locked against other applications
until the second rinsing operation is complete.
1. Press and hold the Stop button to cancel the Cleaning aid.
To ensure that no washing-up liquid remains in the appliance,
it must be rinsed twice after a cancellation.
2. Press the Start button.
"Wipe out appliance" appears in the display.
3. If required, fill the water tank with water, reinsert it and press
the Start button.
Now proceed as described in the section “Emptying the
evaporator dish and wiping out the appliance”.
Descaling
The appliance must be descaled at regular intervals in order for
it to continue operating correctly. "Descale the appliance"
reminds you of this.
You can only dispense with descaling completely if you
exclusively use softened water.
The descaling consists of:
■Descale (approx. 30 minutes), then empty the evaporator
dish and refill the water tank
■1st rinse (20 seconds), then empty the evaporator dish
■2nd rinse (20 seconds), then remove the remaining water
All three steps must be completed in full. The appliance is
ready for operation again only after the 2nd rinse.
Descaler
Only use the liquid descaler recommended by the after-sales
service for descaling (product no. 311 138, also available
online from the eShop). Other descalers may damage the
appliance.
1. Prepare a descaling solution by mixing 300 ml water and
60 ml liquid descaler.
2. Empty the water tank and fill with descaling solution.
Caution!
Risk of surface damage: If descaler comes into contact with the
front of the appliance or any other sensitive surfaces, wash it off
immediately with water.
Starting descaling
The cooking compartment must have cooled down completely.
1. Press the operating mode selector to make it pop out.
The appliance switches on.
2. Turn the operating mode selector to ÍDescale.
3. Slide in the water tank containing the descaling solution and
close the appliance door.
4. Press the Start button.
The descaling process starts. The light in the cooking
compartment remains switched off.
Emptying the evaporator dish and refilling the water tank
An audible signal sounds after approx. 30 minutes. "Empty
evaporator dish and refill water tank" appears in the text
display.
1. Open the appliance door.
2. Remove the descaling solution from the evaporator dish
using the cleaning sponge provided.
3. Rinse the water tank thoroughly, fill with water and reinsert.
"Appliance ready to rinse" and "1st rinse" appear in the text
display.
4. Close the appliance door.
1st rinse
Press the Start button.
The appliance starts rinsing. "1st rinse" appears in the display.
Empty evaporator dish
After 20 seconds, "Empty evaporator dish" appears in the text
display.
1. Open the appliance door.
2. Thoroughly rinse out the cleaning sponge.
3. Remove the remaining water from the evaporator dish using
the cleaning sponge.
4. Close the appliance door.
2nd rinse
Press the Start button.
The appliance starts rinsing. "2nd rinse" appears in the display.
Removing the remaining water
After 20 seconds, "End" and "Empty evaporator dish" appear in
the text display.
1. Open the appliance door.
2. Remove the remaining water from the evaporator dish using
the cleaning sponge.
3. Wipe out the cooking compartment using the cleaning
sponge and then dry with a soft cloth.
4. Turn the operating mode selector back to the Ûposition.
5. To turn off the appliance, press in the operating mode
selector so that it clicks into place.
Descaling is complete.

19
Cancelling the descaling
Note: After cancelling the descaling, you must rinse the
appliance twice. The appliance is locked against other
applications until the second rinsing operation is complete.
1. Press and hold the Stop button to cancel the descaling
process.
To ensure that no descaling solution remains in the
appliance, it must be rinsed twice after a cancellation.
2. Press the Start button.
"Empty evaporator dish and refill water tank" appears in the
text display.
Now proceed as described in the "Emptying the evaporator
dish and refilling the water tank" section.
Descaling the evaporator dish only
You can also use "Descale" if you do not wish to descale the
whole appliance, but only the evaporator dish in the cooking
compartment.
The only difference is as follows:
1. Prepare a descaling solution by mixing 100 ml water and
20 ml liquid descaler.
2. Completely fill the evaporator dish with descaling solution.
3. Fill the water tank with water only.
4. Start "Descale" as described.
You can also descale the evaporator dish manually.
Removing and fitting the appliance door
You can remove the appliance door to clean it more
thoroughly.
: Risk of injury!
The hinges of the appliance door may snap shut with great
force. Always open the hinge locking lever fully when removing
the appliance door and close it fully after refitting. Do not reach
into the hinge.
: Risk of injury!
If the appliance door has only been unhinged on one side, do
not reach into the hinge. The hinge can snap back with great
force. Call the aftersales service.
Removing the appliance door
1. Open the appliance door fully.
2. Fold out the locking levers on the left and right fully (figure A).
The hinges are secured and cannot snap closed.
3. Close the appliance door until you feel some resistance.
4. With both hands, grip the door on the left and right-hand side,
close the door a little more and pull it out (Fig. B).
Fitting the appliance door
Refit the appliance door after cleaning.
1. Insert the hinges in the left and right-hand bracket (figure C).
The notch on both hinges must engage.
2. Open the appliance door fully.
3. Close the locking levers on the left and right-hand side fully
(figure D).
The appliance door is secured and can no longer be
removed.
4. Close the appliance door.
Cleaning the door panels
To assist with cleaning, the inner door panel can be removed
from the appliance door.
: Risk of injury!
The components inside the appliance door may have sharp
edges. Take care not to cut yourself. Wear protective gloves.
: Risk of injury!
The appliance must not be used again until the door panels
and appliance door have been correctly fitted.
Removing the door panel
1. Remove the appliance door and lay it on a soft, clean surface
with the front side facing downwards (see section: Removing
and installing the appliance door).
2. Using both hands next to the hinges, gently lift the glass
panel and pull it out towards the hinges (figure A).
Cleaning
Clean the door panel with glass cleaner and a soft cloth.
Caution!
Do not use any sharp or abrasive medium or a glass scraper.
The glass could be damaged.
Fitting the door panel
1. Replace the door panel (Fig. B) and press downwards at the
front next to the hinges until it clicks into place.
2. Refit the appliance door.
%
&'
%

20
Cleaning the rails
The rails can be removed for cleaning.
: Risk of burning due to hot components in the cooking
compartment!
Wait until the cooking compartment has cooled down.
1. Pull the rails forwards and unhook them to the side.
2. Clean the rails with washing-up liquid and a sponge/brush
or
Clean the rails in the dishwasher.
3. Hook the rails in at the back and front and slide them back
until they engage.
Each set of rails only fits on one side.
Troubleshooting
Malfunctions often have simple explanations. Please read the
following instructions before calling the after-sales service.
Repairs may only be carried out by fully trained after-sales
service technicians. Incorrect repairs to your appliance may
present considerable risks for the user.
: Risk of electric shock!
■Work on the appliance electronics may only be performed by
a specialist.
■Always disconnect the appliance from the power supply
when work is carried out on the electronics. Switch off the
circuit breaker or remove the fuse from your household fuse
box.
Problem Possible cause Notes/remedy
The appliance does not work The plug is not plugged into the mains. Connect the appliance to the electricity
supply
Power cut Check whether other kitchen appliances
are working
Fuse defective Check in the fuse box to make sure that
the fuse for the appliance is OK
Faulty operation Switch the appliance off using the fuse in
the fuse box. Wait approximately
10 seconds and then switch it back on
The appliance cannot be started. “Des-
cale“ appears in the text display.
Descaling has been cancelled Press the Start button. Then rinse the
appliance twice (see section: Descaling).
Proceed as described in the section “Emp-
tying the evaporator dish and refilling the
water tank”.
The appliance cannot be started. “Clean“
appears in the text display.
Cleaning aid has been cancelled Press the Start button. Then rinse the
appliance twice (see section: EasyClean®
cleaning aid. Proceed as described in the
section "Emptying the evaporator dish and
wiping out the appliance")
The appliance cannot be started The appliance door is not fully closed Close the appliance door.
‹:‹‹ flashes in the clock display Power cut Reset the clock
(see section: Electronic clock)
‹:‹‹ flashes on the clock display, §§§
appears on the temperature display
Power cut during cooking Press the KJ clock function button, reset
the clock (see section: Electronic clock)
The appliance is not in operation. A cook-
ing time is shown in the clock display
The Start button was not pressed after the
setting had been made.
Press the Start button or delete the setting
with the Stop button
“Fill water tank” appears even though the
water tank is full
The water tank has not been pushed in
properly
Slide in the water tank until it clicks into
place
The detection system is not working Call the after-sales service
“Fill water tank” appears even though the
water tank is not yet empty, or the water
tank is empty but “Fill water tank” does not
appear
The water tank is dirty. The mobile water
level indicators are jammed
Shake and clean the water tank. If the
parts cannot be released, obtain a new
water tank from the after-sales service.
Table of contents
Other NEFF Oven manuals

NEFF
NEFF B48FT68G1 User manual

NEFF
NEFF B69FY5CY0 User manual

NEFF
NEFF B12M22 3 Series User manual

NEFF
NEFF B57VS24N0B User manual

NEFF
NEFF B45C42.0 User manual

NEFF
NEFF B45M42.5 User manual

NEFF
NEFF B15FS22 0 Series User manual

NEFF
NEFF B1ACC2A.0 User manual

NEFF
NEFF B57VS24H0B User manual

NEFF
NEFF B15P52.3GB User manual

NEFF
NEFF B12S22.3GB User manual

NEFF
NEFF C47C42.0 Series User manual

NEFF
NEFF B47CR32.1B Series User manual

NEFF
NEFF B56VT64 0 Series User manual

NEFF
NEFF B47CS34.0B User manual

NEFF
NEFF U1HCC0A 0B Series User manual

NEFF
NEFF B46C74 0 Series User manual

NEFF
NEFF B58VT28 0B Series User manual

NEFF
NEFF B1422C0GB Safety guide

NEFF
NEFF C18FT56 1B Series User manual