NENKO 22611130 User manual

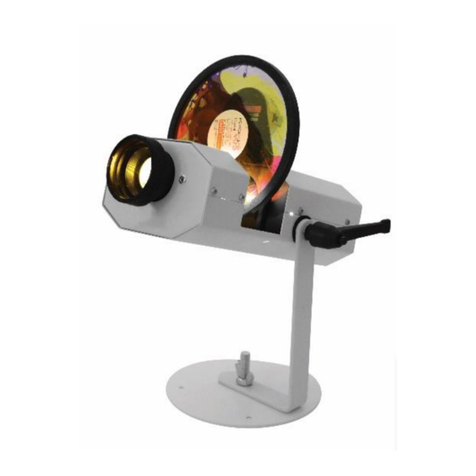
1. Name of the product
LED Projector + wheel rotator
2. Product code
22611130
3. Colour
As pictured.
4. Short description
This LED projector is energy efficient, emits little heat and is virtually maintenance-free due to the
built-in LED lamp. This projector is extremely suitable to place on a sheet or shelf, but due to the
weight of 3.2 kg less suitable for hanging from the ceiling. Comes with magnetic wheel motor. With
85 mm lens.
5. Content
1x LED Projector
1x Wheelrotator
1x 12V DC Transformer with 2 meter cord.
6. Sensory stimulations
Sight
7. In Use
Read this user manual before commissioning. Find a suitable location for the projector, taking into
account the following:
This product requires a grounded outlet, in accordance with the specifications on the projector/
mentioned under point 10.
Make sure the projector is focused on a light surface without obstacles.
Do not place the projector at an angle of more than 90⁰, this may cause the effect and liquidwheel or
other accessories to fall out of the projector at risk of damage and/or injury.
Free ventilation must be possible around the projector, especially at the ventilation grille.
Do not place the projector too close to heat sources such as a radiator.
This product is meant to look at, and does not need to be touched other than when turning it on and
off. However, it may be necessary to touch the projector in the meantime in order to change effects
or liquids.
Mount the projector in a stable location that can support the weight of the projector and accessories,
even if the projector falls. For standing placement, use a central bolt and nut (min. 14 mm e.g.
M10x20mm) and fix the bracket with at least 2 screws e.g. 2x 40 mm (none wood screws).

If you want to hang theprojector, we advise you to use mounting set ST1SI (to be ordered
separately).
Secure the projector using a safety cable or chain attached to a fixed object.
8. Additional information
This product works best in a dark or darkened environment. The visual effect or fluid of the
projections can be enhanced when used in combination with other interactive products.
Take into account the following projection distances:
9. Security
Use this product under supervision only. Check the product for damage and completeness before
commissioning. Report deviations directly to Nenko.
Read this manual carefully and store it in a safe, accessible place for later use.
The projector is only suitable for use in dry, indoor spaces. Make sure that the projectorcannot come
into contact withmoisture, and do not place the projector directly next to highly flammable
materials. Avoid steam, moisture, extreme heat, dust and vibration.
Do not turn on the device when it has fallen, is damaged, has interference, or when the plug or cord
is damaged.
Use only accessories intended for this projector. Use of unsuaddressed accessories may result in
accidents, injury or damage. If in doubt, please contact Nenko.

10. Technical information
Size: 34,7L x 13,3W x 10,2H cm (22,8 cm including bracket)
Power: 62 Watts maximum
Voltage: 22-240V of 11-120V 50/60Hz
12VDC Output: 500mA maximum
Bulb: 40W LED Module
Average lifespan LED Module: 100.000+ hours
Weight: 3.2 kg
Lumens: 850 lumens (scherm)
Colour: Colour temperature 4000⁰ K
Cooling: Axial tube fan
Lens: 85 mm f2.8 42.5 mm Helical Focus Groove
Ambient temperature: Room temperature 10 to 35⁰C
Relative humidity 80 rH max.
Plug: T1AH/250V ceramic (20mm x 5mm diameter)
Functioning plug: 3.5 mm mono of stereo plug
11. Installation
Mount the projector using the bracket in one of the following ways:
Adjust the angle and position of the projector using the
button connecting the bracket to the projector. Unscrew the knob,
place the projector in the desiredpositionand turn the knob again.
To adjust the position of the lever, press the central button,
pull the lever away from the projector, turn it to the desired
point and release.
Make sure that the
ventilation openings
ALWAYS remain free
when installing!

Electrical connection
- Make sure that plug and cord are not trapped. Make sure you can't trip over the loose cable.
- This product should not be switched to an external switch such as a timer or a switch that turns
on/off regularly.
- When using an extension cable, it must meet at least the same technical specifications as the
projector. Cords with a lower amperage can cause overload.
Use with external switches
To avoid thermal protection problems, this projector should NEVER be switched to external switch as
a timer or a switch that turns on/off regularly. Use a switch with a 3.5 mm mono or stereo jack plug
(a mono plug has 1 black ring around it, a stereo 2). You can optionallyadjust aplug from 6.35 mm to
3.5 mm with an adapter.
Make sure you connect the plug to the correct contact –MOTOR or LIGHT. Choose MOTOR when you
want to be able to activate the rotation or effect with an external switch. Select LICHT If you want to
activate the li cht by means of theswitch. Set the switch next to the plug to the correct position.
MOTOR TOGGLE SWITCH POSITIONS
O: the motor parts are on (ON), operate the external switch
to temporarily switch off. As long as the switch remains
pressed, the parts remain off.
II: the motor parts turn on or off depending on the previous switching position. Press the external
switch to turn on or off.
I: the motor parts are off (OFF), operate the external switch to temporarily switch on. As long as the
switch remains pressed, the parts remain on.

LIGHT TOGGLE SWITCH POSITIONS
O: the light is on. Press the external switch to turn off
the light. As long as the switch is pressed, the light remains off.
II: The light turns on or off depending on the previous switching position. Press the external switch to
turn on or off.
I: the light is off. Press the externalswitch to turnon the light. As long as the switchis pulledin,
the light stays on.
Place accessories & turn them on
Slide a suitable wheel motor into the guides of the rear
port (The effect or liquidwheelbelongs in the front conductor) The wheel motor
does it as soon as it is placed.
Turn on the power by plugging the IEC plug into the IEC contact
on the back of the projector. Turn on the projector in the"I" position with the
switch under the plug. ("O" is the OFF position)
Focus the projection by turning the lens in and out to the
desired sharpness has been achieved. Be careful not to use the lens that far
turns out that it comes loose and falls out of the projector. This can be damaged
and/or injury.

12. Maintenance
Always turn off the projector after use, gently remove the plug and let the projector cool down
before moving or storing it.
The lens should only be cleaned with a soft cloth, making sure that the fans remain dust-free.
Use a soft tissue or lens cloth with a little spirit or pure alcohol to clean
the lens.
Do not try to open the projector yourself and never touch the LED module –it may break! In case of
problems, take the projector to a qualified mechanic (Nenko can advise you on this)
To replace the fuse, turn off the device and let it cool sufficiently. Then you can replace the fuse with
a fuse with the same specifications: t1AH/250V Ceramic 20 mm x 5mm diameter) The fuse can be
found in the IEC panel on the back. Remove the fuseholderusing a flat screwdriver. Replace the
fuseholderand press until it no longerprotrudes. If the fusebreaks immediately, contact Nenko, do
not use a fuse with higher values.
For more information, please visit our website www.nenko. com visits.
This manual suits for next models
1
Table of contents
Other NENKO Projector manuals
Popular Projector manuals by other brands
Shenzhen DADAO Technology
Shenzhen DADAO Technology MINI PROJETOR S5 user manual

Samsung
Samsung SP-M205W Owner's instructions
Panasonic
Panasonic PTL797U - LCD PROJECTOR operating instructions
Panasonic
Panasonic PT-JX200FBU operating instructions

Barco
Barco HDX--W14 Technical specifications
Kinoton
Kinoton DCP 30 LX operating manual
