manuals.online logo
Brands
  1. Home
  2. •
  3. Brands
  4. •
  5. Nephros
  6. •
  7. Water Dispenser
  8. •
  9. Nephros HydraGuard 10" UltraFilter - Flush User manual

Nephros HydraGuard 10" UltraFilter - Flush User manual

HydraGuard™ 10” UltraFilter - Flush, Instructions for Use
INTRODUCTION
Information on this sheet must be read before the use of this device to
ensure safe and effective operation.
Recommended Storage: Between 5 and 35°C (41 and 95°F).
INDICATIONS
Description: The HydraGuard 10” UltraFilter - Flush is a hollow fiber
ultrafilter that retains bacteria, viruses, and endotoxin from water.
Indications for Use: The HydraGuard 10” UltraFilter - Flush is intended
to be used to filter EPA quality drinking water. The filter retains bacteria,
viruses and endotoxin. By providing ultrapure water for patient washing
and drinking, the filter aids in infection control. The filter produces
water that is suitable for patient wound cleansing, cleaning of
equipment used in medical procedures and washing of surgeon’s hands.
The filter is not intended to provide water that can be used as a
substitute for USP sterile water.
Use Life: The device is intended for long term continuous use. Once it
completes its useful life, the filter should be replaced and discarded. Do
not attempt to sterilize or reuse it.
CONTRAINDICATIONS
Chemical: The HydraGuard 10” UltraFilter - Flush retains biological
contaminants. To obtain chemically pure water it is necessary to use the
filter in conjunction with other devices such as DI beds or RO systems.
WARNINGS & PRECAUTIONS
Pressure & Temperature: The HydraGuard 10” UltraFilter - Flush is
intended for a maximum incoming water pressure of 60 psi (4 bar) and
a maximum incoming temperature of 27°C (80°F).
Cyclic Use: The HydraGuard 10” UltraFilter - Flush is designed to achieve
a maximum of 6,000 on/off cycles.
Replacement: The filter should be replaced when the flow rate begins
to noticeably decrease. It is recommended to establish a maintenance
schedule of replacing the filter at least every 12 months dependent on
water quality.
Water Monitoring: After installation of the HydraGuard 10” UltraFilter
- Flush, periodic monitoring of the water is recommended. Water
quality is dictated by the intended use and should be established and
monitored by the facilities engineer. Nephros is available to assist with
establishing guidelines and acceptance criteria as needed.
FILTER INSTALLATION & REMOVAL
New Install: If this is the first time any reusable cartridge type filter is
being installed in a location (i.e. there are no cartridge housings in
place), please refer to the second page of these instructions for
installation guidance before proceeding with the instructions below.
Note: Prior to handling a new filter, wash hands and wear disposable
gloves.
•Turn off the water source upstream of the filter and vent any excess
pressure from the housing via its bleed valve or flush port valve.
•Remove both the housing bowl/cover and the old filter.
Open a new filter blister pack and aseptically remove the filter.
•Insert one end of the filter into the head of the housing cap. It may
be necessary to use a twisting motion to ensure that the filter is firmly
in place and the O-rings seat properly. Re-attach the housing
bowl/cover, to the housing cap.
•Open the flush port valve and the upstream water source to prime
the new filter.
•Close the flush port valve after 20-30 seconds, and continue to
prime the filter for 5 minutes to purge it of trapped air (if the
housing has a bleed valve, open it at the same time to assist
purging).
•Close the outlet test valve (and bleed valves if present) and verify
there are no leaks.
OPERATION
After a new HydraGuard 10” UltraFilter - Flush is installed, water should
be run through the filter for approximately 5 minutes to purge it of
trapped air. The pressure drop across the HydraGuard 10” UltraFilter -
Flush generally reduces the flow rate by about 10-20% of the rate
without a filter. The HydraGuard 10” UltraFilter - Flush is designed with
a flush capability for periodic filter flushing. The filter should operate for
up to 12 months of normal use with minimal degradation in flow
(dependent on water quality and flush frequency). If the flow rate
degrades significantly, the filter should be replaced.
INTEGRITY TESTING
•The filter integrity can be verified with a pressure holding test after
the filter has been properly primed and there are no connection
leaks.
•Turn off the water source and open the inlet test valve to bleed off
any residual pressure.
•Connect an air source (compressed air or air pump) to the inlet test
port as shown in Housing and Filter Installation Example. Note that a
pressure gauge must be installed to monitor the inlet filter pressure
to carry out this test.
•Open both test valves, and pressurize the filter inlet; ensure the
outlet test port is venting. Raise the air pressure to 15 psi at the filter
inlet and allow water to exit from the outlet test port. Do not exceed
30 psi to prevent damage to the filter membrane.
•When water stops coming out from the outlet test port close the
outlet test valve and check for external leaks (via pressure gauge).
•Open the outlet test valve and re-pressurize as necessary to reach 15
psi at the filter inlet.
•With the outlet test valve open, close the inlet test valve and allow
the pressure to stabilize for 5 to 10 seconds.
•Monitor the pressure gauge and determine the pressure drop for a
period of 1 minute.
•If the pressure drops by more than 1 psi over a minute, check for leaks
and repeat the test to confirm. If the filter fails, it must be replaced.
•Close the outlet test valve and remove air source. Open water source
valve and re-prime filter to return to operation.
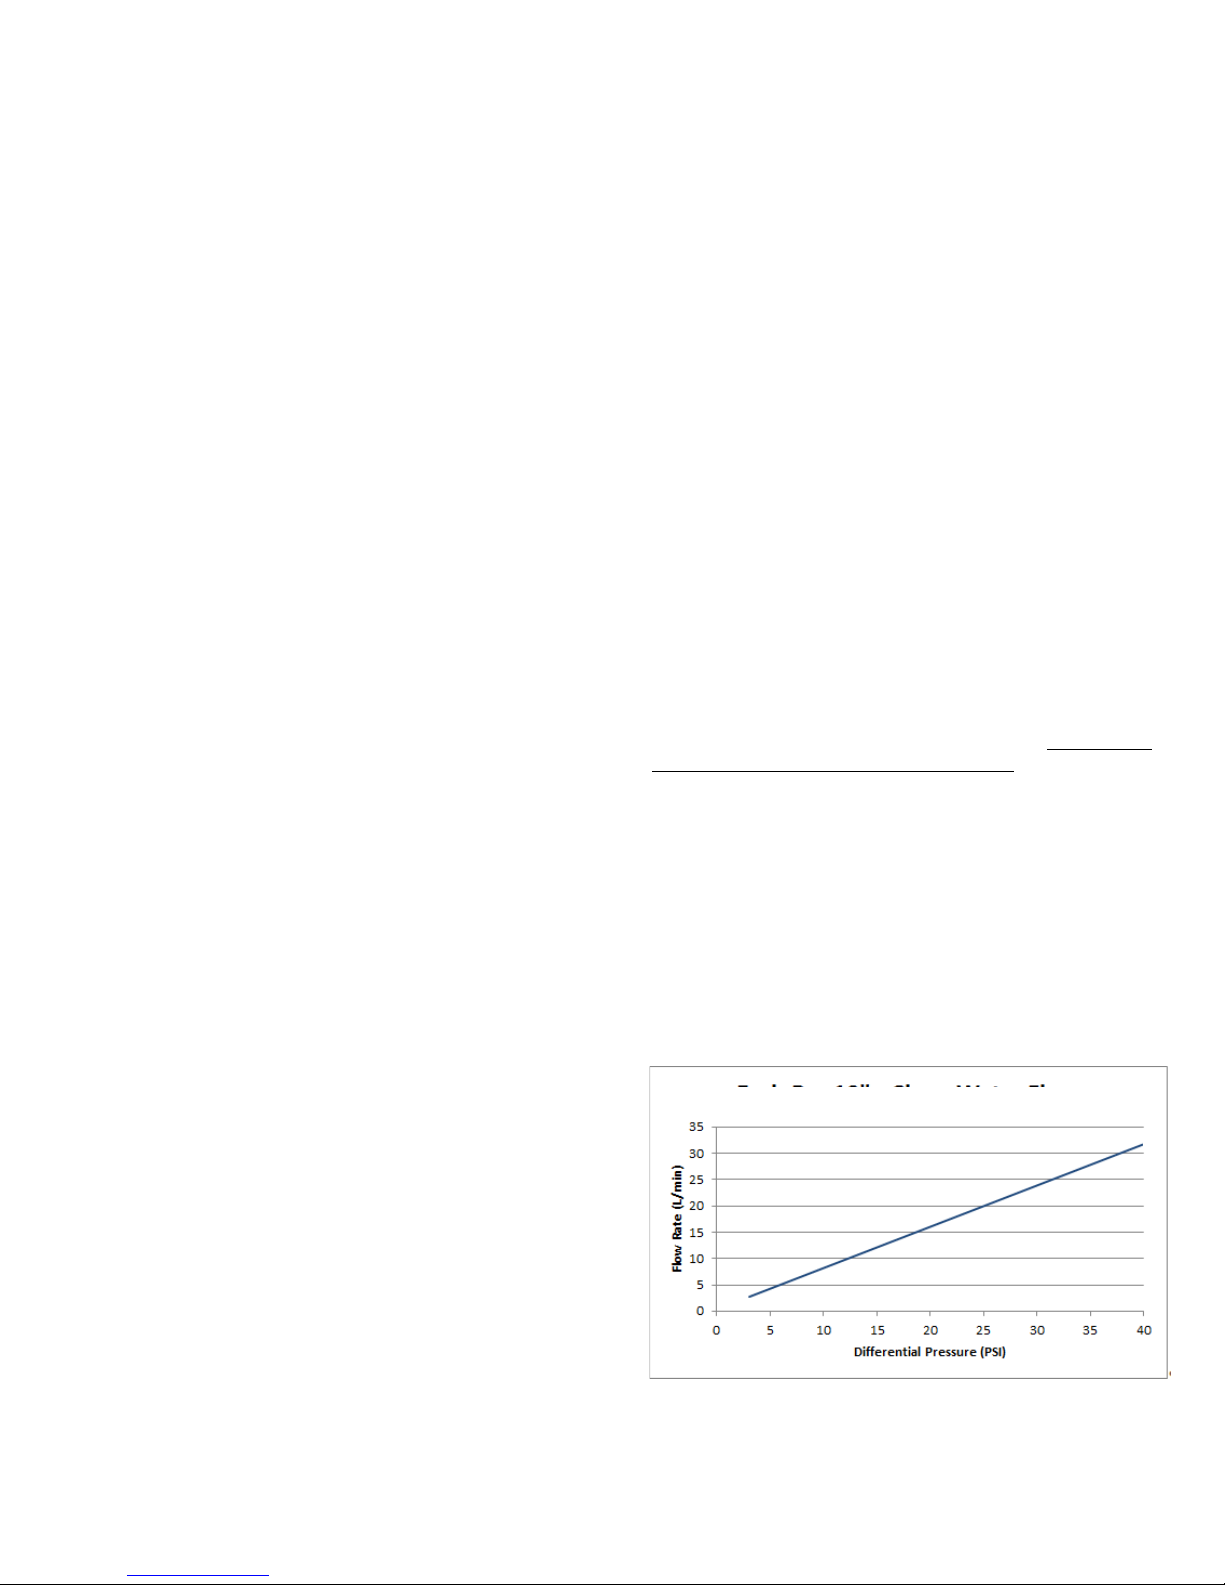
HydraGuard 10” UltraFilter – Flush, Clean Water Flow
HydraGuard™ 10” UltraFilter - Flush, Instructions for Use
Specifications
HydraGuard 10”
UltraFilter - Flush
Max Inlet Pressure
60 psi (4 bar)
Max Inlet Temperature
27°C (80°F)
Max # On/Off Cycles
6,000
Filter Membrane1
Material
MW cut-off
Bacterial Retention
Virus Retention
Endotoxin Retention
Medisulfone®
Polysulfone
15 kDa
>1011 (B. diminuta)
>108 (PhiX-174)
>10
5
EU/ml
Expected Life2
Up to 12 months
1Medisulfone® is a registered trademark of Medica S.p.A.
2Expected life based on daily flush frequency (dependent on water quality).
Housing and Filter Installation Diagram
HOUSING INSTALLATION
If no cartridge filter housing is currently installed, the initial installation
of the HydraGuard-F 10” UltraFilter requires tapping into an existing
section of the distribution line between the water source and the
equipment and plumbing a siphon resistant drain line, which includes a
flush valve, between the flush port of the filter housing and an existing
drain. This can be accomplished with a back-flow prevention device (eg.
check valve) or maintaining a suitable air gap between the outlet of this
line and drain.
It is recommended to incorporate a segment of flexible hose
downstream of the flush valve to enable easy removal of the housing
bowl for replacing the filter cartridge. Contact Nephros for additional
support with housings and install components.
A typical installation of a HydraGuard-F 10” UltraFilter with cartridge
housing is shown in the Housing and Filter Installation Diagram.
Note: HydraGuard 10” UltraFilter - Flush is only to be installed in
reusable flushable cartridge filter housing that are rated to at least 100
psi working pressure and comply with NSF/ANSI Standard 42/61 for
material (or made from pure polypropylene with no fillers, colorants,
plasticizers or lubricants) and accept 10” 222 O-ring head cartridge
filters.
Note: Ensure that the top cap of the housing is oriented such that the
inlet flow is delivered to the center (ring section) of the cap and the
outlet flow comes from the bowl space as some commercial housings
may have reversed inlet/outlet labeling on housing cap). A spacer may
be required for longer housings to properly seat the O-rings (contact
Nephros for acceptable spacers).
HOUSING AND PLUMBING DISINFECTION
In cases where a HydraGuard 10” UltraFilter - Flush housing is being
installed for the first time or the filter is being replaced, it is
recommended to disinfect the cartridge housing and downstream
plumbing (faucet, equipment, etc.). This applies whether it is a new
housing recently installed or an existing housing that may have
contained another cartridge type filter.
Note: Disinfection should be performed with a diluted 1:100
bleach/water solution. Use personal protective equipment (gloves, lab
coat, glasses, etc.) when handling the disinfectant, filter and housing to
decrease any chances of contaminating the water system.
Note: Prior to handling a new filter, wash hands and wear disposable
gloves.
•Turn off water source upstream of the housing and vent any excess
pressure from the housing via its bleed valve (if present) or outlet test
valve.
•Remove the housing bowl & used filter cartridge and empty water.
•Aseptically remove a new filter from its packaging and install the O-
ring end into the top cap of the filter housing.
•Ensure that the flush port valve is closed.
•Fill the housing bowl with 0.5 Liters of a fresh bleach solution
prepared as a 1:100 dilution of standard bleach (8.25%) per the
manufacturer’s instructions.
•Carefully re-assemble the housing bowl containing the bleach
solution to the top cap and tighten. Be careful to avoid spillage of the
bleach solution.
•Open the upstream water source.
•Slowly open the downstream valve on the equipment or faucet to
purge air out of the housing and until disinfectant is observed to be
flowing through the system using a chlorine test trip. Close the
downstream valve.
•Slowly open the outlet test port valve and confirm the presence of
bleach with a chlorine test strip. Close the outlet test valve.
•Allow the disinfectant to dwell for a minimum of 10 minutes, but no
more than 30 minutes. Any longer could damage internal
components of the equipment or faucet.
•Open the downstream valve and allow water to flush the disinfectant
out of the filter housing and the downstream plumbing. To effectively
rinse bleach from the filter housing, the flow rate should be at least
10 L/min (2.6 GPM) for 5 minutes.
•Open the flush port valve for approximately 30 seconds to flush
disinfectant from the flush port.
•Open the outlet test valve for approximately 30 seconds to flush
disinfectant from the outlet test port.
•Test the downstream water to ensure low residual disinfectant levels
relative to the inlet water chlorine levels. If residual level is too high,
repeat rinsing steps above until acceptable results are obtained.
Note: To determine that the chlorine residuals have been effectively
removed from the rinse water, Nephros recommends using Serim®
Guardian Residual Chlorine Test Strips, 5100A. Follow all instructions
from the manufacturer to obtain proper results.
Manufacturer:
Nephros Inc., 380 Lackawanna Place, South Orange, NJ 07079 USA · 201-343-5202 50-3044 Rev. 02
Flex Hose
(To Drain)
Flush Port Valve
Outlet Test
Port
Check Valve
Inlet Test
Port
Spacer
(If Required)
Outlet Test
Valve
Housing
Bowl
Inlet Test
Valve
Purified
Water
(To Point
of Use)
Pressure Gauge
Water
Source

Popular Water Dispenser manuals by other brands

vitapur VWD866W-4 Use & care guide

vitapur

vitapur VWD866W-4 Use & care guide

Cosmetal J Class 30 WG EC Installation, use and maintenance handbook

Cosmetal

Cosmetal J Class 30 WG EC Installation, use and maintenance handbook

Scotsman SCW 8 LBP Service manual

Scotsman

Scotsman SCW 8 LBP Service manual

Kenmore 625.348321 owner's manual

Kenmore

Kenmore 625.348321 owner's manual

Judo JUDOMAT JM 4 WZ-P Installation and operating instructions

Judo

Judo JUDOMAT JM 4 WZ-P Installation and operating instructions

Coffee Queen COFFEE user manual

Coffee Queen

Coffee Queen COFFEE user manual

IBC Water AS1029MP-960 Installation & operating instructions

IBC Water

IBC Water AS1029MP-960 Installation & operating instructions

Hamilton Beach SA-HB-40-DB-CERT owner's manual

Hamilton Beach

Hamilton Beach SA-HB-40-DB-CERT owner's manual

Acorn A171.8 Series Installation, operation & maintenance manual

Acorn

Acorn A171.8 Series Installation, operation & maintenance manual

Hellenbrand TN2 Series Specifications

Hellenbrand

Hellenbrand TN2 Series Specifications

Crystal Mountain Mogul user manual

Crystal Mountain

Crystal Mountain Mogul user manual

Huawei NetCol5000-C030 Series user manual

Huawei

Huawei NetCol5000-C030 Series user manual

Hahn HF-600 installation instructions

Hahn

Hahn HF-600 installation instructions

Primo Water 900162 user manual

Primo Water

Primo Water 900162 user manual

USTM WS-12-1650-PRIMO Manual instruction

USTM

USTM WS-12-1650-PRIMO Manual instruction

WaterLogic WL Cube Operating, installation and service manual

WaterLogic

WaterLogic WL Cube Operating, installation and service manual

Elkay EMABFDTLxC Series Installation, care & use manual

Elkay

Elkay EMABFDTLxC Series Installation, care & use manual

Brita PURITY 450 Quell ST Replacement instructions

Brita

Brita PURITY 450 Quell ST Replacement instructions

manuals.online logo
manuals.online logoBrands
  • About & Mission
  • Contact us
  • Privacy Policy
  • Terms and Conditions

Copyright 2025 Manuals.Online. All Rights Reserved.