East Midlands Water Harveys Block Salt User manual

BLOCK SALT SOFTENER
INSTALLATIONINSTRUCTIONS
Plumbing Regulations
This water softener should be installed in accordance
with the plumbing regulations. Copies are
available from your water softener dealer. Ask for.
WRAS Information for Installation of Ion exchange
Water Softeners for Systems Supplying Water
for Domestic Purposes. June 2007 No 9-07-01.
Water pressure
The recommended operating pressure is between
1.5 and 6 bar (20 and 90psi), but the pressure should
not be below 1 bar (15psi) when water is flowing, or
exceed 8 bar (120psi). To check the water pressure you
need to connect a pressure gauge to the garden tap,
kitchen tap, or any other tap connected directly to the
mains water supply. Alternatively you may contact
the local water supplier who will tell you the water
pressure in your area. If the water pressure is above
6 bar we recommend installing a pressure limiting
valve which is available from your softener supplier.
The diagram above shows how easy it is to install the Block Salt water softener.
There are just four connections: mains water inlet, outlet, drain and overflow.
Hard water
tee to outside
taps and hard
water taps
Rising main
stopcock
Outlet valve
(normally open)
Bypass valve
(normally closed)
Inlet valve
(normally open)
Check valve or
non-return valve
incorporating
backflow
prevention
to BS6282
Terminate at exterior
of the building as a
warning pipe
Waste Pipe
Outlet
Inlet
Drain connection
(connect drain to air gap)
Overflow
connection
Drain
PLUMBING

3PLUMB INLET, OUTLET & DRAIN
Remove the red plastic caps from the softener inlet, outlet
and drain. Run the pipe-work from the bypass to the water
softener using WRAS approved flexible hose. Connect Hose
connectors, nuts and washers as diagram.
Connect the 3/8” drain tube via the air gap fitting by pushing the
tube firmly into the connection. Run the tube to a convenient
drain and connect to the drain via the air gap fitting. If the drain
runs outside it must be protected from freezing.
Important note: If the water
pressure is 2 bar or less the length
of the drain tube
must not exceed
3m and the
discharge point
should be below
the top of the
softener. The
length of the
drain tube may
be increased
by 1m, and the
discharge point
above the top of
the softener may increase by
0.5m, for each 1 bar above 2 bar.
15mm Indirect system
On a traditional indirect system
with a roof storage tank the
pressure limiting valve should
be installed after the rising main
stopcock and before the bypass set.
It may be installed before or after
the hard water tee to the outside
tap and drinking tap etc.
22mm Direct system
On the more modern direct system
there is normally a 3 bar pressure
limiting valve. This must always be
installed after the water softener
bypass. If you connect the 3 bar
pressure reducing valve before
the water softener there will be
insufficient flow.
22mm Direct system
Where you have a direct heating
system with the inlet pressure
above 6 bar then an additional
pressure limiting valve should be
fitted after the stopcock and before
the bypass. Note that the 3 bar
pressure limiting valve must always
be installed after the bypass.
5 bar pressure
limiting valve
4
PLUMB OVERFLOW
Connect the overflow hose to the
overflow elbow on the
side of the cabinet.
No securing clip is
necessary as it is not
under pressure. The
hose should be run
downhill all the way
and terminate at the
exterior of the building
if possible.
Outlet
Washer
Washer
Inlet
Drain
Where to fit a pressure reducing valve 3 bar pressure
limiting valve
3 bar pressure
limiting valve
5 bar pressure
limiting valve
1
DRAIN RISING MAIN
Before cutting the rising main, turn off the stopcock and open an
upstairs tap that is fed from the roof storage tank. Run sufficient
water so that the ball valve feeding the tank opens. Then turn on
the kitchen sink cold tap and let it run until it stops. Your rising
main is now empty.
2INSTALL CHECK
VALVE & BYPASS
Cut the rising main and
fit the three valves as
shown to form a bypass.
Install proprietary valves
with direction of flow as
indicated.Gardentapsand
hard water drinking
taps, if fitted, should
be teed off before
the bypass. You may have
to run additional pipe-
work to alter the existing
plumbing. A check valve
(complying with BS6282)
must be fitted in the rising
main before the bypass.
SEE POINT 3

WARNINGS AND ADVICE
Installation Position
Do not install the water softener
next to a boiler where it may be
subjected to excessive heat.
Freezing
The softener and pipework
including the drain must
be installed such that the
installation is not subjected to
freezing conditions.
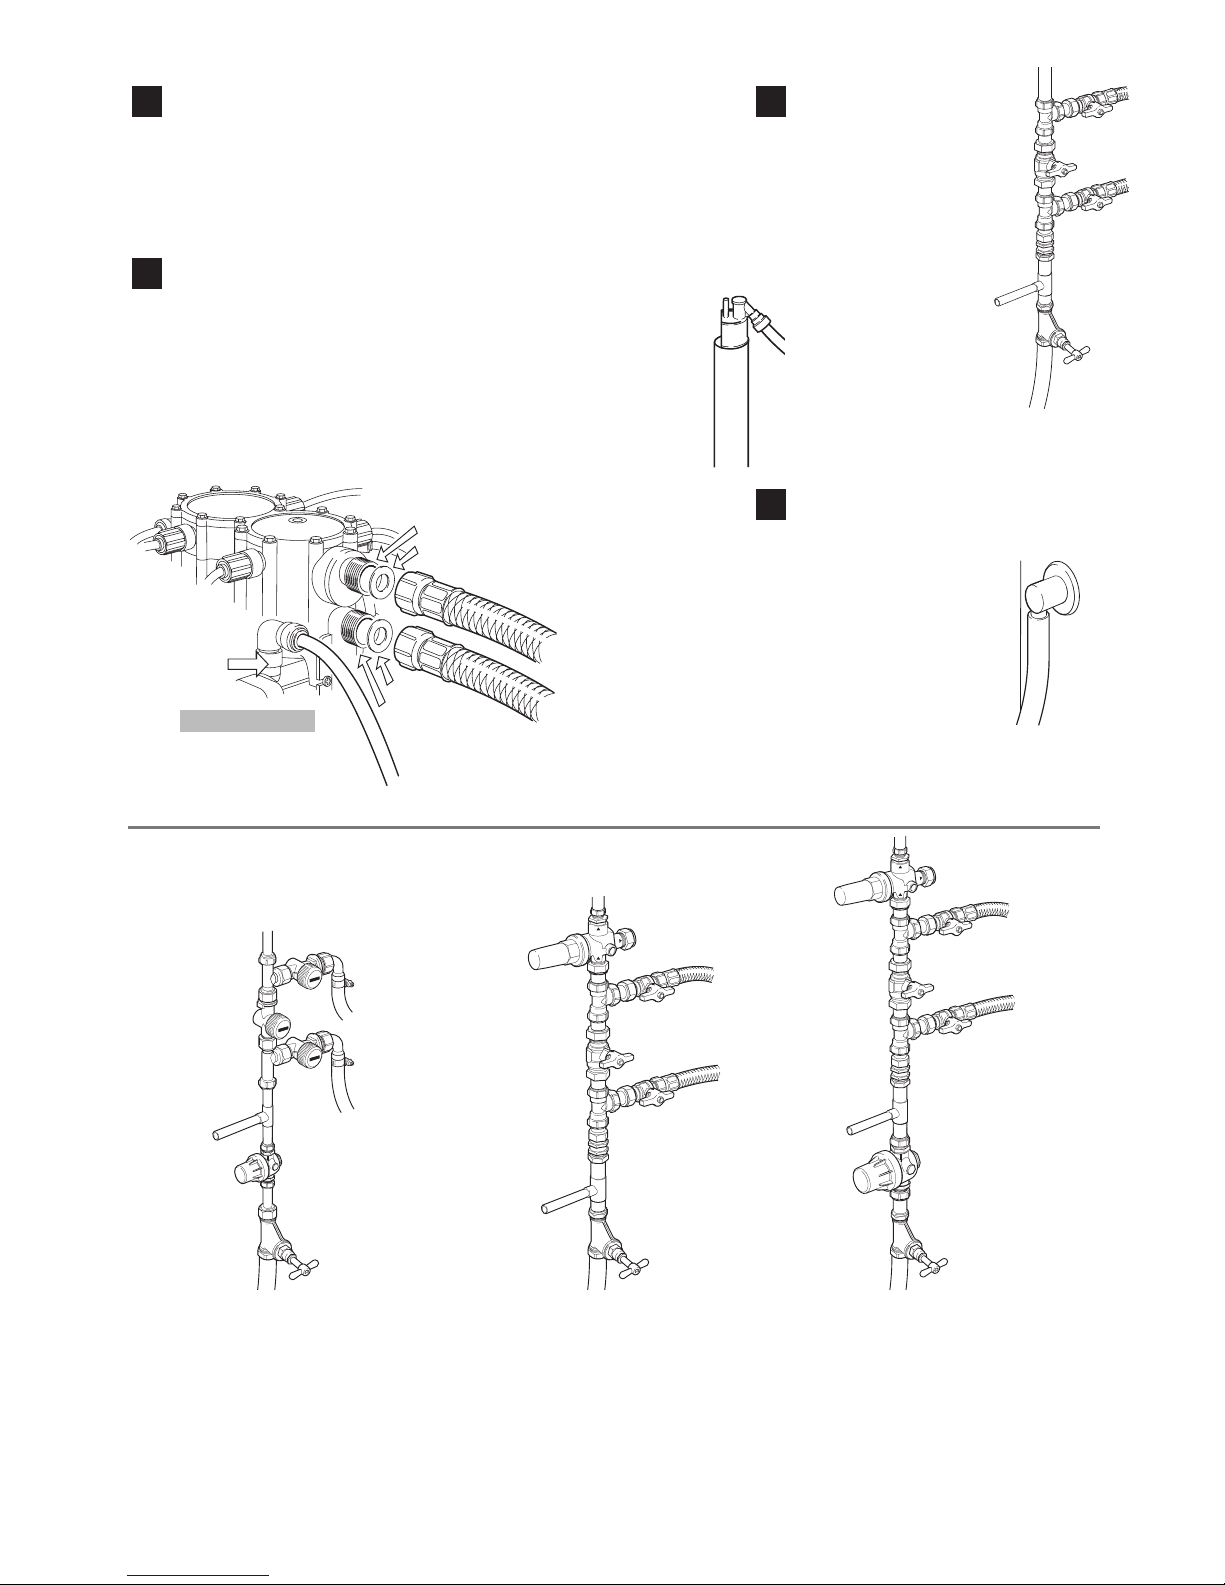
Hoses
The hoses must be approved hoses
as supplied in the recommended
installation kit. Do not use washing
machine or garden hose as these
are not suitable.
Heat
Do not run the hoses close to
boilers, radiators, or hot water
pipes. Never run behind boilers
or radiators. Remember, heat
melts hoses.
Separate Hard Water
Drinking Tap?
Whilst many authorities
recommend a separate hard
water drinking tap it is essentially
the customers choice.
If you do fit a tap it does not
have to be at the kitchen
sink. Any suitable position is
acceptable.
Where the water hardness is
below 400ppm the softened
drinking water is suitable for
everybody.
Above 400ppm the softened
water is not recommended for
the mixing of baby feeds or the
immunocompromised but is ok
for everyone else.
For further information ask
your water softener dealer for
the booklet Softened Drinking
Water L458 or visit www.
ministryofcommonsense.org.
Copies of WRAS guidance
note No 9-07-01 Installation of
Ion Exchange Water Softeners
explain the plumbing regulations
regarding separate drinking
water taps. Copies are available
from your water softener dealer.
Condensation
In some damp kitchen
environments there is a problem
with condensation. To prevent
this lag the pipe-work connected
to the softener.
Electrical Earth Bonding
If you alter the rising main
pipework, ensure that you
maintain the integrity of the
earth bonding.
Dishwashers
When installing a water softener,
note should be taken of whether
the dishwasher should be connected
to the hard or soft supply. Consult
the dishwasher manufacturers’
instructions for advice
.
New Dwellings
When installing a softener into a
new dwelling the softener should
not be put into service before
the entire plumbing system has
been completed and flushed.
Hygiene
Remember that you are dealing
with drinking water. Exercise
normal domestic hygiene
precautions particularly when
breaking into the water supply
and connecting the bypass
system. Flush the system
thoroughly before use.
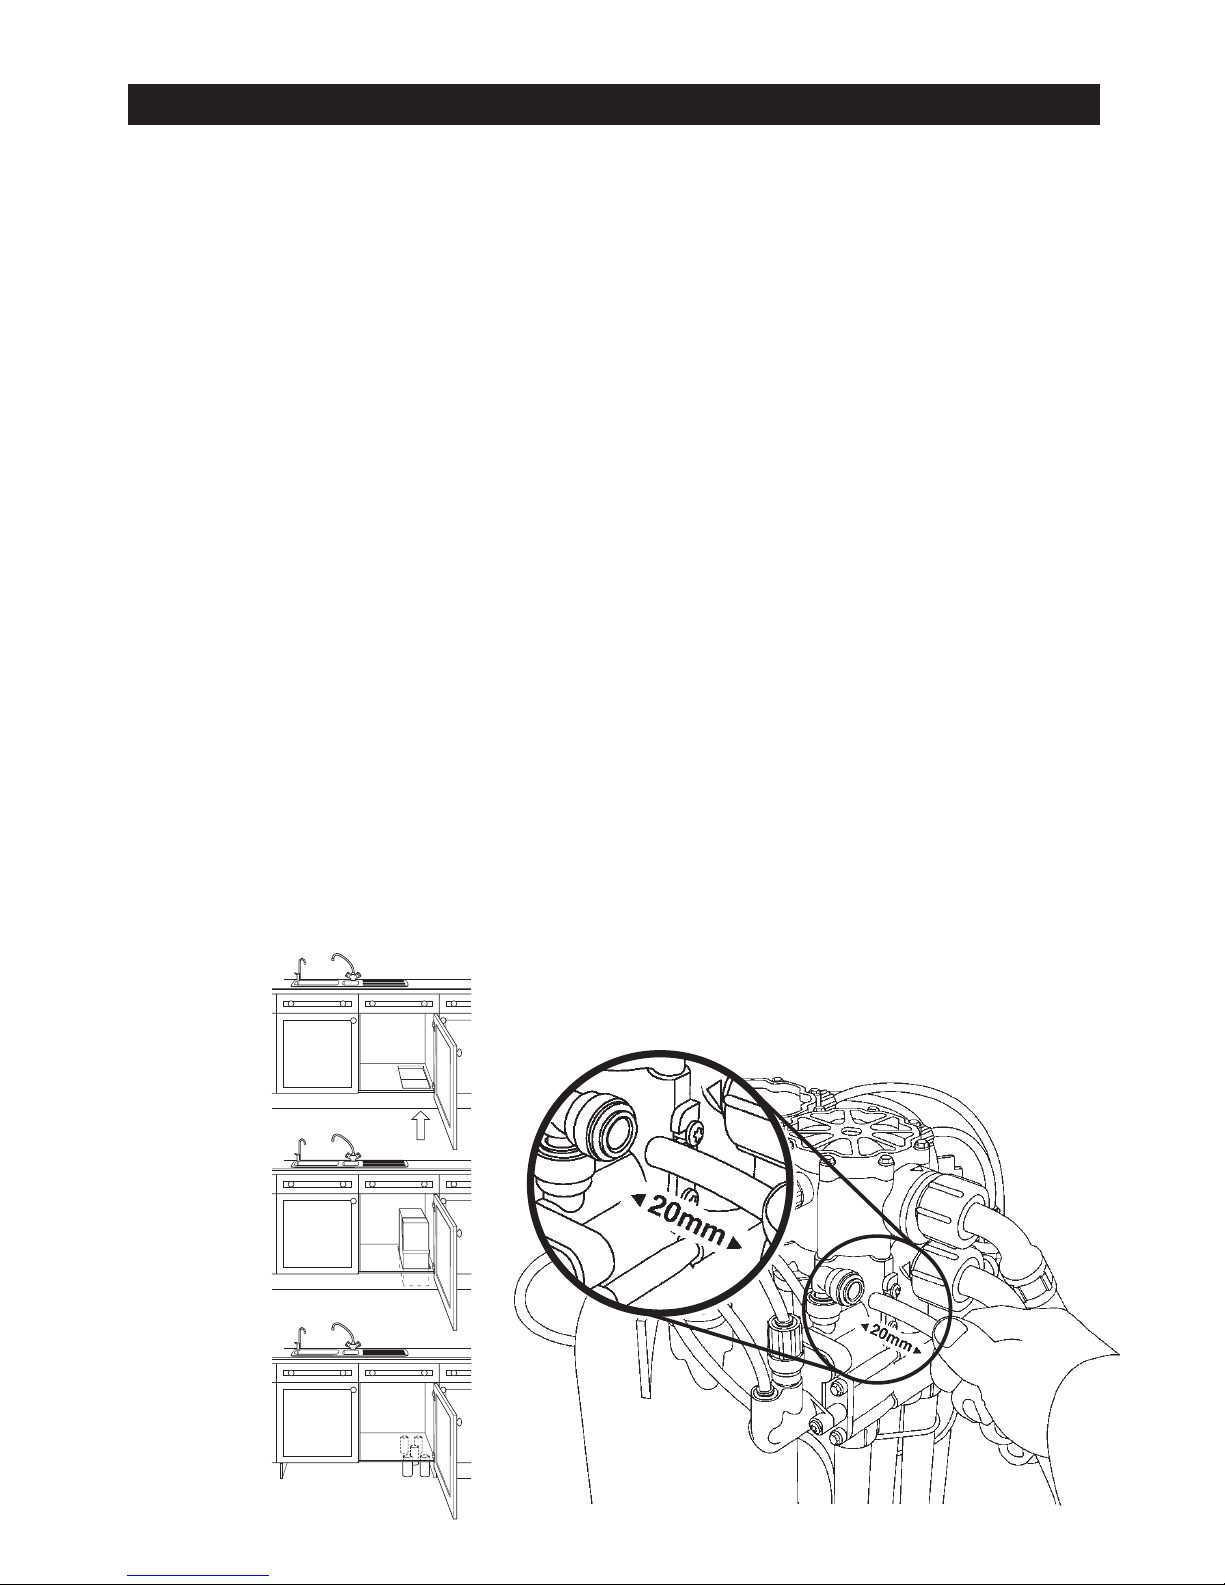
Kitchen Units
When installing a Block Salt
Softener inside a kitchen base unit,
you must either: Acut through the
floor of the unit so that the water
softener sits on the kitchen floor,
or Bfit supports underneath the
floor of the kitchen unit to sustain
the very heavy weight of the
water softener.
Option A
Cut hole to the size
of softener.
Option B
Cut 5 pieces of 11/
2
”
waste pipe to fit
between floor and
base of unit.
Option A
Drop softener
through hole on to
kitchen floor.
Drain connection
The drain tube is connected to the grey JG elbow. The tube must
be pushed into the elbow 20mm to ensure a leak free joint.
Check joint does not leak during regeneration.
Kitchen Units

Setting the softener to work
With the bypass and outlet
valve closed, slowly open
the inlet valve to the
softener. Then open the
outlet valve and
the soft water
kitchen tap to
flush the pipework.
After a few minutes
close the kitchen
tap and check
the pipework
for leaks.
Manually fill with
water via a jug until there
is sufficient to cover the
salt platform, on which the
blocks sit, by approximately
10 mm (1/2”)
LOAD WITH SALT BLOCKS.
Place a saltblock in each of the
two salt bays.
L200(02/09)
Show Customer
Show the customer how to load the salt cabinet with
Harvey’s name on the side and explain that only
Harvey’s Block Salt should be used. Explain that the
first blocks will dissolve rapidly to make up a stock
of brine. They may then place additional blocks on
top of the first blocks as space becomes available.
Also show them where the bypass is and how to use it.
Tell Customer
When they return from holiday, or if the softener has
not been used for more than 4 days, we recommend
that the softener is flushed by allowing the water to
run to drain for a minute or two.
Before leaving check the following:
Bypass
Check that the bypass valve is closed and the inlet and
outlet valves are open.
Soft water
Check at the kitchen tap that soft water is coming
through. If you do not have a hard water test kit wash
your hands in a bowl of cold water with a bar of soap.
When the water is soft you will get lots of lather and
no scum. If you get scum, the water is hard.
Manual regeneration.
Close the outlet valve
Before you regenerate the softener make sure the water
level is above the platform in the salt compartment by
10mm, if not manually fill with a jug to this level.
Manually regenerate the softener by inserting a bladed
screw driver into the white button under the cover and
depress. Rotate slowly one complete turn clockwise,
adjusting the position until the button pops back up.
Make sure the white button pops back up into the D.
Water will now go down the drain for about 12 minutes
removing the water from above the platform in the salt
compartment. Then the cabinet will refill above the
platform.
Now manually regenerate the
softener again.
Make sure the white button pops
back up into the D.
Open the outlet valve
BEFORE YOU GO
Load bearing platform The drain outlet from the softener should be
taken back down into the house and connected
via a suitable connection to the waste system.
Note that there are two
overflows, one for
the tank and one
for the softener
overflow pipe.
The Block Salt Softener may be
installed in the loft or roof cavity
but it should be within a safety tank.
A suitable tank is a plastic roof
storage tank sufficiently large to
accommodate the block salt softener.
Please note that it should be mounted
on a board strong enough to spread
the weight over a load bearing wall.
INSTALLATION
IN THE LOFT
Finally check for leaks and clean up site.
YOU ARE NOW FINISHED BUT BEFORE YOU GO SEE BOTTOM OF PAGE.
Table of contents
Popular Water Dispenser manuals by other brands

Elkay
Elkay VRCHD8 Series Installation, care & use manual

Hellenbrand
Hellenbrand Twin Alternating Water Conditioning System NF 1.5"... Specifications

AAFIRST
AAFIRST Jazz 1000 Installation instruction

AquaScape
AquaScape 95110 Instructions & maintenance

Oasis
Oasis MIR311D-3 Use & care guide

amiad
amiad TAF-750 Installation, operation and maintenance instructions

Norcold
Norcold Water Dispenser Installation and owner's instructions

TVC
TVC 28 owner's manual

Plumbline
Plumbline 3000 Series owner's manual

Ecodyne Water Systems
Ecodyne Water Systems EP 6130 Installation, operation, maintenance & repair parts

Haws
Haws 1201SFH Installation, operation & maintenance instructions

Elkay
Elkay LZ Series Installation, care & use manual