GARANTIE
NetPeppers GmbH garantiert für einen Zeitraum von 12 Monaten ab Verkaufsdatum,
dass das Produkt bei sachgemäßem Gebrauch in Übereinstimmung mit den
Betriebsvorschriften frei von Material- und Verarbeitungsfehlern ist.
KUNDENSERVICE:
NetPeppers GmbH
Perchastr. 8e, 82319 Starnberg Germany
Tel.: +49-89-219097300
www.netpeppers.com
WEEE Reg.-Nr. DE24330012.
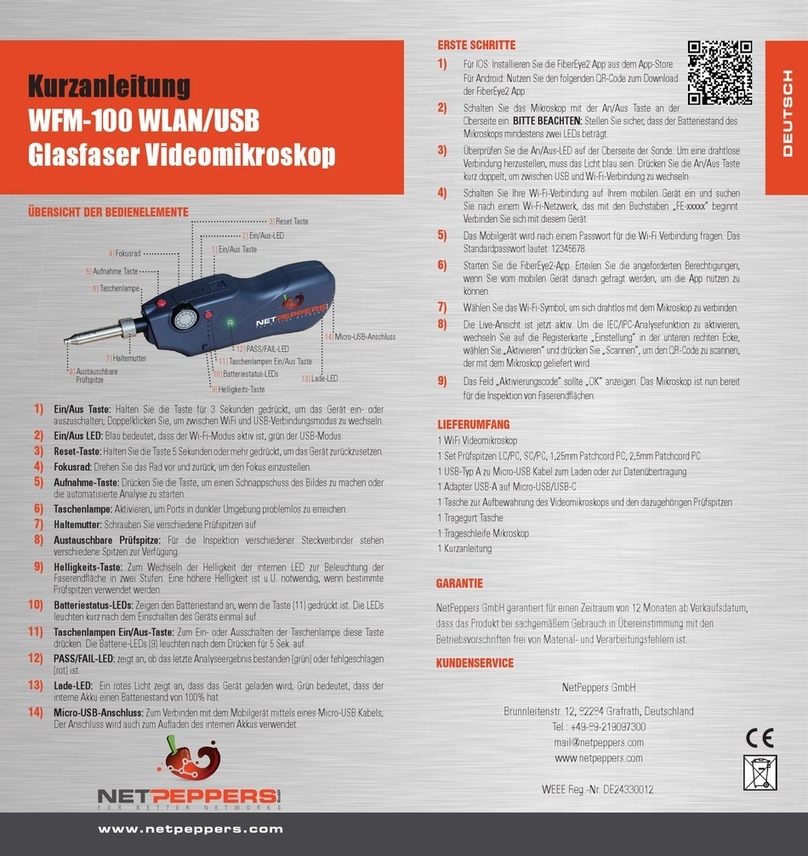
ÜBERSICHT DER BEDIENELEMENTE
1)
Ein- / Ausschalt- und Moduswechseltaste (WLAN/USB): Halten Sie die Taste 3 Sekunden
lang gedrückt, um das Gerät ein- oder auszuschalten. Durch Doppelklicken auf
die Ein/Aus Taste, wechselt der Betriebsmodus zwischen WLAN und USB.
2) LED Statusanzeige (WLAN/USB): Blaues Licht steht für WLAN-Modus, grünes
Licht für USB-Modus.
3) Reset Taste: Halten Sie die Taste mindestens 5 Sekunden lang gedrückt, um
das Gerät neu zu starten.
4) Fokusrad: Drehen Sie das Rad vor oder zurück, um den Fokus der Inspektionskamera
einzustellen.
5) Aufnahme Taste: Drücken Sie die Taste, um ein Foto des Glasfaseranschlusses
zu erstellen.
6) Taschenlampe: Zusätzliche LED für Arbeiten in Umgebungen mit unzureichender
Beleuchtung
7) Adapterfixierung: Verriegeln Sie mit der Schraubmutter die Prüfspitze, um den
optimalen Sitz am Mikroskop zu gewährleisten
8) Prüfspitze: Für die Prüfung verschiedener LWL Steckverbinder stehen verschiedene
Spitzen zur Verfügung (optional sind weitere Prüfspitzen erhältlich).
Kurzanleitung
WFM-100 WLAN/USB
Glasfaser Videomikroskop
www.netpeppers.com
DEUTSCH
9) Akkuanzeige: Die Anzeige leuchtet 5 Sekunden lang, wenn die Taschenlampe
EIN/AUS Taste gedrückt wird, um den Batteriestatus anzuzeigen. Bei
schwachem Akku blinkt die Anzeige.
10) Taschenlampen EIN/AUS Taste: Schalten Sie die zusätzliche Beleuchtung für
Ihr Arbeitsumfeld ein oder aus.
11) Micro-USB-Anschluss:
- Zum Anschluss an einen PC oder ein Mobiltelefon über ein USB-Kabel.
- Zum Aufladen des integrierten Akkus des Mikroskops.
12) Ladeanzeige: Die LED, zeigt Ihnen bei angeschlossenem USB Kabel, den
Ladestatus der Probe an. Rotes Licht bestätigt den Ladevorgang, grünes Licht
zeigt den vollständig geladenen Akkustatus an.
ERSTE SCHRITTE
1)
Laden Sie die FiberEye2-App aus dem App Store auf Ihr mobiles Endgerät
Android/iOS
2) Schalten Sie die WFM-100 mittels der EIN/AUS Taste an der Probe ein.
BITTE BEACHTEN SIE: Der Akku der Sonde muss zu mehr als 10%
aufgeladen sein. Andernfalls verfügt die Sonde nicht über genügend Strom,
um eine WLAN-Verbindung mit Ihrem mobile Endgerät herzustellen.
3) Überprüfen Sie die Leuchtanzeige an dem Mikroskope. Für eine drahtlose
Verbindung, leuchtet die LED blau. Drücken Sie 2x die Ein-/Aus-Taste an der
Probe, um zwischen der USB und der WLAN-Verbindung zu wechseln.
4) Schalten Sie die WLAN-Funktion auf Ihrem Mobilgerät ein und suchen Sie nach
einem WLAN-Netzwerk mit den Anfangsbuchstaben „FE-xxxxx“. Verbinden Sie
sich mit diesem Gerät.
5) Die Sonde fragt nach einem Passwort : Standardpasswort bei Werkseinstellung:
12345678
6) Ihr Mobilgerät ist jetzt mit dem Mikroskop verbunden und Sie können die
Videoinspektion auf Ihrem mobilen Endgerät in der Fiber Eye2-App sehen.
12) Ladeanzeige
3) Reset Taste
1) Ein- / Ausschalt- und Moduswechseltaste (WIFI/USB)
4) Fokusrad
2) LED Statusanzeige (WIFI/USB)
5) Aufnahme Taste
6) Taschenlampe
7) Adapterfixierung
8) Prüfspitze
9) Akkuanzeige
10) Taschenlampen
EIN/AUS Taste
11) Micro-USB-Anschluss
