Neumi BS5P User manual

BS5P Powered Bookshelf Speakers
BS5P
User Manual
LET US HELP!
Our friendly customer service team
is standing by to answer questions,
help with setup, or fix issues.
support@neumitech.com
www.neumitech.com
One Year Warranty

Congratulations on your purchase of the NEUMI BS5P powered bookshelf speakers
We have designed these speakers to deliver an engaging listening experience for
both music and movies. Please read these instructions to get the best quality sound
out of your new speakers
Initial Setup
The BS5P is equipped with an internal amplifier and must be properly connected before it can be
used. Refer to the diagram below and perform the following steps:
1. Install two AAA batteries (not included) into the remote control.
2. Use the included speaker wire to connect the left and right speakers together. Please be
extra careful about the polarity of the connection, going from the positive (+) red connector
from the right speaker to the red connector on the left speaker, and similarly for the negative
(-) black connectors.
3. Plug in the DC power cable on the back of the right speaker.
4. Plug in the AC power cord to a nearby AC outlet.
Note: A reversed speaker wire connection polarity will cause the speakers to lack bass and
sound thin. I something doesn’t sound right, check the speaker connection polarity.
If you are an experienced audio electronics user, this may be all the instructions you need.
However, we strongly recommend that you familiarize yourself with the rest of this manual to get
the maximum performance and enjoyment from these speakers.

Connections
The BS5P offers numerous input connection options that supports a wide range of audio sources.
Please refer to the table below for the list of likely connection options available to you. Your
particular audio source should support at least one of the connection types:
Source Device Bluetooth Analog AUX Optical Coaxial
Smartphones and tablets
Laptop computers
Record Pla ers
Desktop computers
Televisions
Cable set-up boxes
DVD, BD, CD Pla ers
Game Consoles
Bluetooth
If you prefer the convenience of wireless audio, then Bluetooth is the best method for connecting
the BS5P to any audio source that has Bluetooth transmitter capabilities, such as a smartphone,
tablet, or laptop computer. Please note that Analog AUX, Optical, and Coaxial connections offer
better audio quality than Bluetooth, but are not as convenient.
To pair your audio source with the BS5P, follow the steps below:
1.
Power on the BS5P and press the Bluetooth button on the remote. You can also press the
“INPUT” button on the back of the BS5P to cycle through the inputs until Bluetooth is
selected. When Bluetooth is selected, the light on the front of the BS5P will turn blue.
2.
The BS5P automatically enters pairing mode if it is not connected to any Bluetooth audio
source. In pairing mode, the blue light on the front of the BS5P will begin flashing. If the blue
light is on solid, this means a device is connected to the BS5P. In this case, either find and
turn off the connected device, or press the “PAIR” button on the remote control to force the
BS5P into pairing mode. If no device connects within 10 minutes, the BS5P will power off.
3.
On your Bluetooth audio source, enter pairing mode. If you are using a smartphone, tablet,
or laptop computer, open Bluetooth settings and scan for available Bluetooth devices. Look
for NEUMI BS5P in the list of Bluetooth devices found and select it to pair.
4.
Complete the pairing process on your Bluetooth audio source. Once connected, the blue
light on the BS5P will stop flashing.

Additional Notes Regarding Bluetooth:
Volume - The BS5P has its own volume control separate from the volume control that may also be
available on your audio source. For best audio quality, set the volume on your audio source to max
and use the BS5P’s volume control. Doing so reduces background noise and distortion.
Switching Bluetooth Device - The BS5P can only connect to one Bluetooth audio source at a
time. If you would like to use another Bluetooth audio source with the BS5P, turn off the Bluetooth
on the currently connected device, and then perform the pairing process with the second
Bluetooth audio source.
Pairing With Multiple Devices - The BS5P will remember pairing information for up to 8 different
Bluetooth audio sources, and will attempt to automatically reconnect when a paired audio source is
in range. If you have paired multiple devices with the BS5P and would like to use one specific
device to send audio, make sure all other paired devices have their Bluetooth function turned off.
Remote Control Over Bluetooth - Many Bluetooth audio devices support remote control protocol
over a Bluetooth connection. This includes most modern smartphones and tablets, as well as some
laptop computers. When connected to such a device, the BS5P’s remote control can be used to
play/pause the current song, and skip to the previous or next song.
Range - Bluetooth transmission distance can be affected by a variety of environmental factors,
including walls, floors, and windows/doors. Keeping a smartphone in your pocket will also greatly
limit its Bluetooth range when it is transmitting audio to the BS5P. For best results, keep the audio
source in the same room as the BS5P and place it on a table top or device stand.
Analog/AUX
Analog/AUX is the most widely available type of audio connection. Everything from record players,
tape decks, CD players, DVD players, Blu-ray players, to the headphone jacks on laptop
computers, TVs, smartphones, and tablets, are all Analog/AUX connections. While Bluetooth may
be more convenient, and Optical/Coaxial may offer better audio quality, the Analog/AUX
connection provides a simple and effective way to send music to the BS5P.
To connect your audio source to the BS5P using Analog/AUX, follow the steps below:
1.
Use the included RCA stereo cable to connect the output from your Analog/AUX audio
source to the “AUX” input jacks on the back of the BS5P. If your audio source is a
headphone output jack, you will need to obtain a 3.5mm-to-RCA cable (not included).
2.
Power on the BS5P and press the “AUX” button on the remote. You can also press the
“INPUT” button on the back of the BS5P to cycle through the inputs until AUX is selected.
When AUX is selected, the light on the front of the BS5P will turn green.
Additional Notes Regarding Analog/AUX:
Volume - The BS5P has its own volume control separate from the volume control that may also be
available on your audio source. For best audio quality, set the volume on your audio source to max
and use the BS5P’s volume control. Doing so reduces background noise and distortion.

Input Signal Level - The BS5P is designed to accept Analog/AUX input signals up to 1.1Vrms.
Some audio sources, such as pro-audio equipment and the headphone jacks on some
smartphones can produce a signal higher than 1.1Vrms. If you hear audible distortion even when
the BS5P’s volume is turned down, this may be caused by the input signal level being higher than
1.1Vrms. In this case, try reducing the volume on the audio source until the distortion goes away.
Record Players - The BS5P accepts a standard line-level signal through its AUX input jack. If you
connect a record player to the BS5P, make sure that the record player has a built-in phono
amplifier and can send a standard line-level signal to the BS5P. Some record players have a built-in
phono amplifier but must be selected using a switch – consult your record player’s manual to see if
it has such a switch. If your record player does not have a phono amplifier built-in, it will be
necessary to obtain a separate phono amplifier. Instructions on how to connect the phono amplifier
to the record player will be described in the phono amplifier’s user manual.
Optical/Coaxial
The optical and coaxial inputs on the BS5P provides the best audio quality by directly accepting
digital audio from an audio source such as a TV, gaming console, CD/DVD/Blu-ray player, or
desktop computer. If the audio source has an optical or coaxial digital audio output, then it is the
preferred method for sending audio to the BS5P.
To connect your audio source to the BS5P using an optical or coaxial connection, follow the steps
below:
1.
Using either a Toslink optical cable or coaxial digital audio cable (neither is included),
connect the optical or coaxial output from your audio source to the “Optical” or “Coaxial”
input jack on the back of the BS5P.
2.
Power on the BS5P and press the “OPT” or “COAX” button on the remote. You can also
press the “INPUT” button on the back of the BS5P to cycle through the inputs until the
optical or coaxial input is selected. When the optical or coaxial input is selected, the light on
the front of the BS5P will turn purple or red, respectively.
3.
On your source device, make sure that the optical or coaxial output is enabled and
configured to generate a PCM signal. Consult your device’s manual on how to perform this
setting, if available.
Additional Notes Regarding Optical/Coaxial:
Volume - The BS5P has its own volume control separate from the volume control that may also be
available on your audio source. For best audio quality, set the volume on your audio source to max
and use the BS5P’s volume control. Doing so reduces background noise and distortion.
Input Signal Format - The BS5P optical and coaxial input supports industry standard PCM audio
signal at 44.1kHz, 48kHz, and 96kHz sampling rates and either 16 or 24bit resolution. It does not
support other proprietary digital audio formats such as Dolby or DTS. It is important that you
configure your audio source to send a standard PCM audio stream to the BS5P. Otherwise, the
BS5P may generate no audio or random noise. If your audio source cannot be set to produce
standard PCM digital audio, then it is not compatible with the BS5P speakers.

Placement Recommendations
Aside from the engineering and tuning that went into the design of the BS5P speakers, the most
important factor that will determine how good it sounds is the placement of the speakers in your
listening room. In general, the placement of the BS5P should be:
Symmetrical - To the extent possible, place the BS5P speakers about equal distance from the left
and right side walls, forming an equilateral triangle with the main listening area.
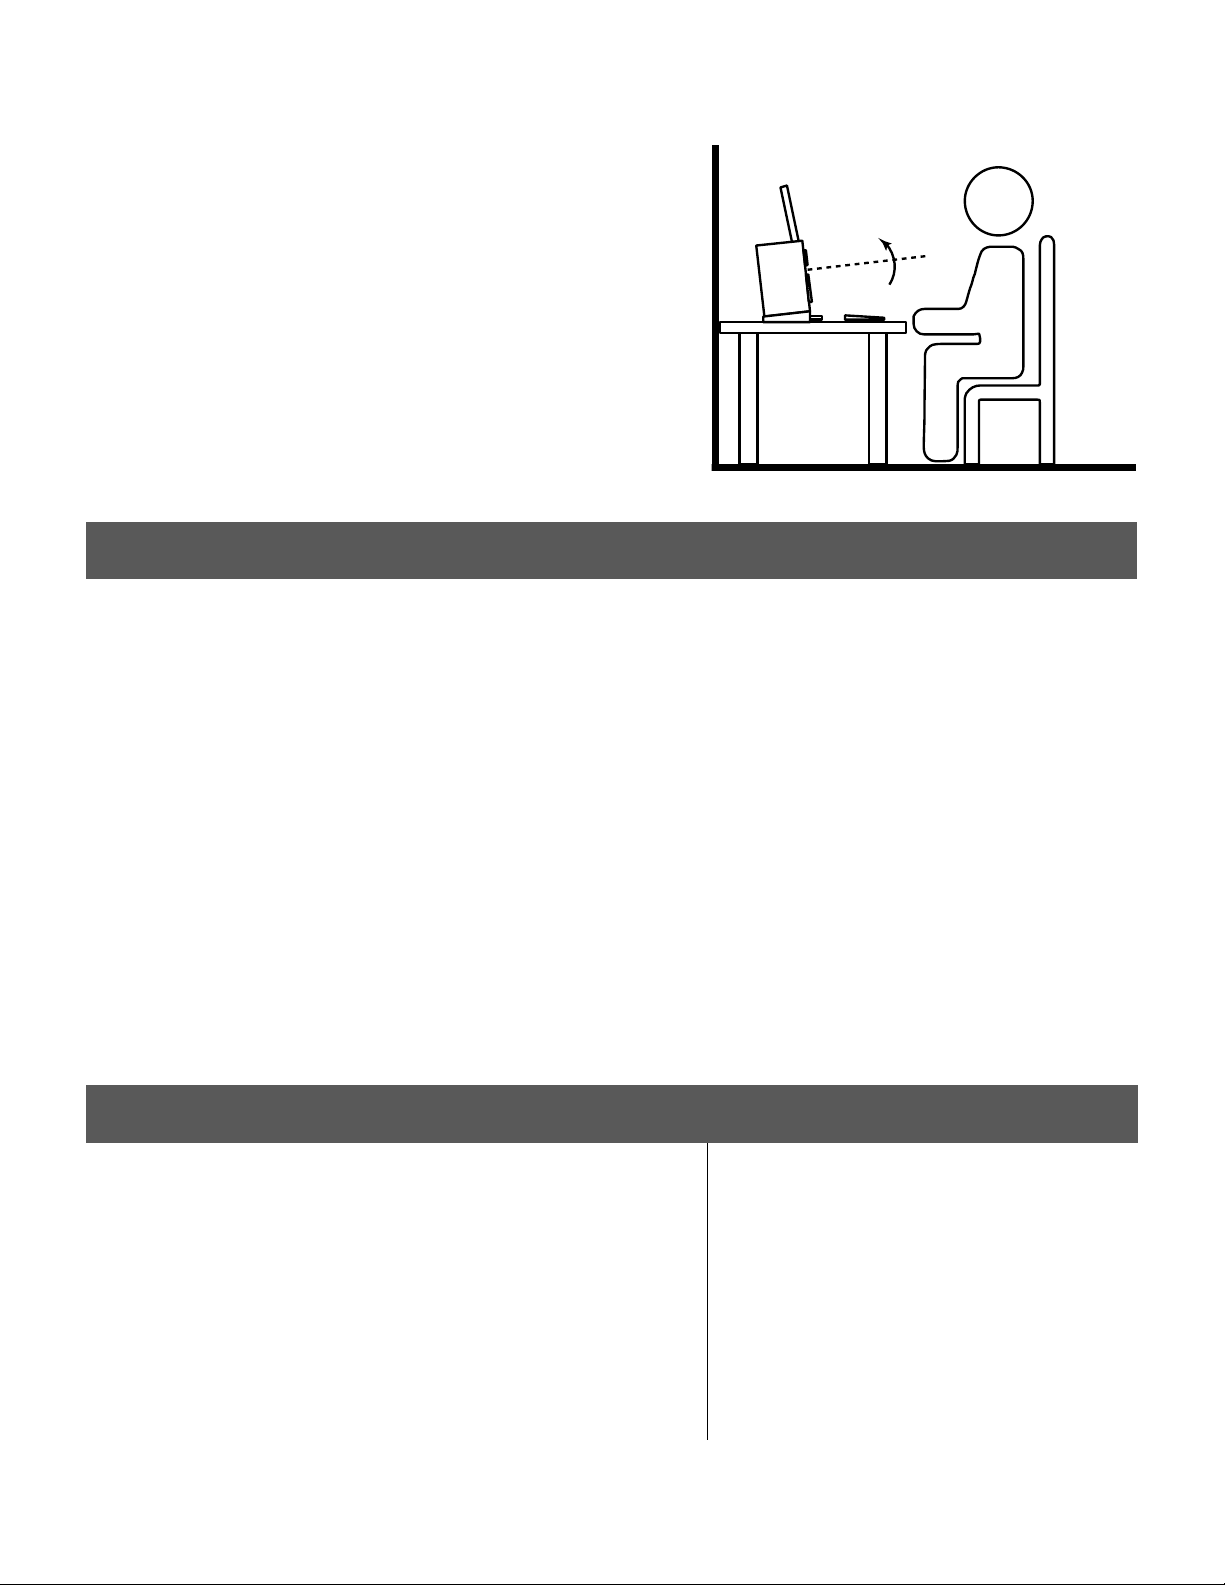
At Ear Level - The speakers should be placed on speaker stands, shelf, or desktop that places it at
the same level as the ear of the listener. Avoid placing the speaker much higher or lower than this
level as it will degrade the sound. If the speakers must be placed at a different height, tilt the
speaker to aim more directly at the listener.
Away From Hard Sur aces - Any hard surfaces such as bare walls, uncovered wood/tile floors, or
tabletop will reflect sound and cause distortion. Keeping the speaker away from these hard
surfaces will minimize these sound reflections and maintain clarity. Use the following as a guide:
Ear Level
Tweeter
Woofer
Floor
•
Back wall - At least 6 inches away from the back
wall.
•
Side walls - At least 2 feet away from a side wall. If
a speaker must be placed close to a side wall,
point it towards the main listening area.
•
Floors - Avoid bare wood/tiles in front of the
speakers. Floor coverings such as thick carpets
and padded area rugs will help.
•
Desktop - If used as desktop computer speakers,
tilt the speaker up toward the listener to reduce
reflections.
Other Tips
Toe Angle: Pointing the speakers forward without being aimed at the main listening area will
generate the largest listening sweet spot. Aiming the speakers towards the listening area will make
the speakers sound brighter, and enhance imaging at the central listening spot. Experiment with
the toe angle to get the desired tonal balance and imaging.
Orientation: The BS5P is designed to be used vertically for optimal results. If needed, it can be
used horizontally to fit space constraints. If horizontal placement is necessary, be sure to point the
speaker more towards the main listening area.
Grill or No Grill: The BS5P was tuned for optimal audio performance without the grill. Using the
grill will introduce a slight change to the audio signature which may be audible to some listeners
due to their hearing acuity.
CRT TVs/Monitors: Do not use the BS5P near CRT TVs or monitors. The magnets inside the
speaker are not shielded and will cause image distortion on CRT-based displays, including
permanent damage if left in place for a prolonged period.
Specification
FCC Statement
Woofer: 5” fiberglass cone with rubber surround
Tweeter: 1” silk dome with waveguide
Crossover: 12dB/Octave tweeter; 12dB/Octave woofer
Enclosure Type: Dual front-ported
Frequency Response: 50Hz-20kHz (Typical In-Room)
Power Output: 37.5 Watts/Channel (75W Total)
Dimensions (each): 10.6” (H) x 7.2” (W) x 8.5” (D)
Digital Audio Format: PCM 44.1/48/96kHz, 16/24-Bit
This device complies with Part 15 of
the FCC Rules. Operation is subject to
the following two conditions: (1) This
device may not cause harmful
interference. (2) This device must
accept any interference received,
including interference that may cause
undesired operation.

LIMITED WARRANTY
Except where indicated differently, the following standard limited warranty is valid for NEUMI
Branded products. Where differences and contradictions occur, warranty terms in product-specific
description, listing, invoices, and receipts, those terms shall take precedence over the following
standard terms.
The manufacturer warrants all NEUMI Branded products against defects in materials and
workmanship for a limited period of 1 year, unless otherwise superseded by product-specific
description, listing, invoices, or receipts. During this limited period, the manufacturer will repair or
replace defective products at the manufacturer’s sole option. Customer must pay for all return
shipping costs during the limited period. The limited warranty period starts at the date of the
original purchase. This limited warranty applies only to purchases from authorized NEUMI retailers.
This limited warranty is extended only to the original purchaser and is valid only to consumers in
the same country as the authorized retailer from which the original purchase was made.
This limited warranty only covers failures due to defects in materials or workmanship that occur
during normal use. It does not cover failures resulting from accident, fire, flood, misuse, abuse,
neglect, mishandling, misapplication, alteration, faulty installation, modification, service by anyone
other than the manufacturer, or damage that is attributable to Acts of God. It does not cover the
costs of transportation to the manufacturer or damage in transit. Customers should return defective
products, freight prepaid and insured, to the manufacturer or authorized warranty service center
only after receiving a Return Merchandise Authorization (RMA). Customers are required to provide
a copy of the original sales invoice from an authorized retailer when making a claim against this
limited warranty.
Within the term of this warranty, defective products sent to the manufacturer or authorized
warranty center for warranty service will be assessed a fee to cover shipping and handling of the
repaired or replacement product back to the customer. The fee amount depends on the product
and covers labor/handling, packaging materials, and standard shipping.
Repair or replacement under the terms of this warranty does not extend the term of this warranty.
Should a product prove to be defective in workmanship or material, the customer’s sole remedy
will be repair or replacement as provided under the terms of this warranty. If the defective product
is discontinued the manufacturer may replace the product with an equivalent or superior product at
its option. The limit of liability under this warranty is the original purchase price of the product. Any
cost of re-installation is the sole responsibility of the customer and that cost shall not be the
responsibility of the manufacturer. Under no circumstances shall the manufacturer or its retailers
be liable for loss or damage, direct, consequential or incidental, arising out of the use of or inability
to use the product. There are no express warranties other than described above.
Table of contents
Other Neumi Speakers manuals


