New Buck Corporation 70 User manual

BUCK
STOVE
~
r=
r
I I I
(Q)
.---
--
II
MODEL 70.
.MODEL
71
FEATURES
,.,
I I
PREPARATION INSTALLATION
I
~
OPERATION MAINTENANCE SAFETY
Contact your Insurance company for coverage and Installation Inspection
SAFETY NOTICE
If
this
heater
Is
not
properly
Installed, a
house
fire
may
result.
For
your
safety,
follow
the Installation directions. Contact
local
building
or
fire
officials
about
restrictions
and
Installation Inspecti
on
requirements
In
your
area.
Iii."\This symbol on
lhe
nameplate means the product
is
listed
by
Underwriters Laboratories, Inc.
'!b)
File No. MH15931, MH15933,
UL
Standard No. 1482
Manufactured
by
New
Buck
Corp. • Spruce Pine, NC 28777 • EFFECTIVE 10/1/89
PN-PI 700660

INTRODUCTION
SECTION
1:
SECTION
II:
SECTION Ill:
Section V:
Section VI:
Section VII:
Section VIII:
TABLE
OF
CONTENTS
Room Heater Features
....•................................
3
Important Statements
......................................
4
Masonry Insert Installation
..................................
7
Minimum Clearances .
......
. .
....
. .
........................
8
Required Fireplace Dimensions
..............................
9
Tools for Installation
.......................................
9
Installation Preparation
Fireplace Preparation
...........
. .
...
..
...................
9
Heater Preparation
..............................
.
.....
.
..
10
Installation Procedure·
(Direct Connect)
....
. .
...
...............................
10
Positioning the Heater
....
.
......
. .
..
......................
10
Mounting the Trim Panels
..................................
10
Direct Connect Installation
......
...
..
.........
.
............
11
Final Check .
..
.
..
.
...
.
.................•........
.
.......
12
Freestanding Installation
••......
..
.....................
.
...
13
Minimum Clearances
••.•......
.
................
.
..........
14
Tools for Installation
.•....................................
14
Installation Preparation
.......
...
............
.
.............
15
Determining the Chimney Location
..
16
Final Check
.........
.....
......
..
.............
...
.......
18
Safety
..•.......
..
......................................
19
Operation .
.....
..
.....
.....
....
.........
.
......
.....
...
.20
Building a Fire
............................................
20
Operating and Safety Tips
...........................
.
....
.
22
Guide to Burning Qualities
of
Wood .
..
......
. .
..........
. .
..
23
Helpful Hints .
....
.
..................
.
..............
.
....
23
Manufacturer's Suggested
Preventive Maintenance
...................................
24
Cleaning Heater
......................................
.
...
24
Catalytic Inspection
.................................
.
....
.
25
Catalytic Replacement
.....................................
26
Gasket Inspection
....•
. • .
...
..
...............
.
....
..
. .
...
27
Gasket Replacement
..........
.
........
.
......
.
..
.
........
28
Electrical Operation
.......................................
29
Troubleshooting Guide
..........
.
.........................
30
WARRANTY-
He
ater .
...
.
........................
Rear Cover
Catalysts
...............................
Insert

~
sECTION
I
The
New
Buck
Corporation
room heaterModels70 and
71
are safe and efficient heating
systems when installed and operated as specified in these instructions and as stipulated
on the operation and installation labels affixed to the unit. The unit is designed to burn
wood fuel only.
Theinstallation and operating instructions found inthis manual
have
been developedthrough
extensive laboratory testing and
in
the field experience. The procedures outlined MUST
be followed exactly
to
ensure a safe andoperational installation as well
as
to
validate your
warranty.
Throughout the manual, you will see this symbol A.This indicates areas of importance
regarding safety.Please make aspecial note of these areas.
Read
these instructions careful-
ly before installing your heater and keep them with your important papers for future
reference.
FIGURE 1 PHYSICAL FEATURES
Install and use only in accordance with the manufacturer's installation and operating in-
structions. Do not connect
th
is unit to a chimney flue serving another appliance.
2

ROOM HEATER FEATURES
Before attempting to install or operate your heater, it is a good idea to familiarize yourself
with the features and operating controls of the unit.
OPERATING
CONTROLS
<See
Figure 1)
1. Bypass Damper: The bypass dampercontrol
is
located in the top center of the heater
front, just underthe top. It is operated by pushing or pulling the rod with the removable
handle. The damper is fully open when the handle is pushed in and fully closed wnen
it is pulled out. The damper must
be
opened before the door(s) are opened.
2. Removable
Door
Handle: The removable door handle is located on the inside of the
ash pan/motorcover door. The handle is held in place with a magnet
or
clip. To use,
simplyopen the cover door and obtainthe handleand useit to adjust the bypass damper
or
to
open and close the door(s).
3.
Blower
Control:
Two blower control switches are located under the hearth and behind
thecoverdoor. Theleft switch isused
to
engage
or
disengage the automatic thermostat
operation. Place in
"Auto"
for thermostat operation
or
place in
"Manual"
to operatethe
blower continuously. In the
"Auto"
position, the thermostat
in
the unit reacts to the
temperature
of
the heater and switches
on
or
off automatically depending
on
heater
temperature.
4.
Primary
Air
Controls:
The primary air intake draft controls are located on the lower
portion of theunitnext tothe hearth extension. Theyare
ore
rated bymovingup
to
open
and down to close the amount of primary
air
entering the firebox.
5. Warm Air
Outlets:
Provides heat extraction from the top and sides of the firebox.
6.
Baffles:
Directs
air
flow around the
unit
for maximum heat transfer.
7.
Air
Inlet: Allows cool airnear the floorto be circulated through
th
eblower and back into
the warm
air
chamber
of
the heater.
8.
Stand
: Elevates heater above the floor for safety and a neat appearance.
9. Door(s): Provides an
"airtight"
feature. The door(s) allow a much higher burning
efficiency than can
be
obtained with
an
open firebox.
10. Hearth
Extension:
Offers protection from spilled ashes and cinders.
11.
Power
Cord:
Provides electrical power
to
operate the blower.
12.
Chimney
Connector:
Used to connect unit
to
chimney or direct connect kit.
13.
Cover
Door: Conceals blower. blower controls and ash pan and provides for removable
handle mounting.
14. Catalysts: Enables the unit to burn cleanly and efficiently.
15.
Temperature
Monitor
locations:
Two
locations are provided. One is located in the
top of the stove and can be used when the heater is installed as a freestanding heater.
The other location can
be
used for eithera fireplace insert or freestanding installation but
the use
of
the New Buck Corp. Electronic Digital Temperature Monitor must be used.
16.
Airwash
: Primary air is preheated
in
internal chambers and is directed in such a way
as
to
provide a
"sweeping"
airwash over the glass to keep
it
clean. This design also
allows higher burning efficiencies in the firebox.
17. Ashpan: Provides
for
easy ash removal.
18.
Outside
Air
Control:
Allows for adjustment of the amount of outside air entering the
unit (installations using outside air kit
II
P58.)
3

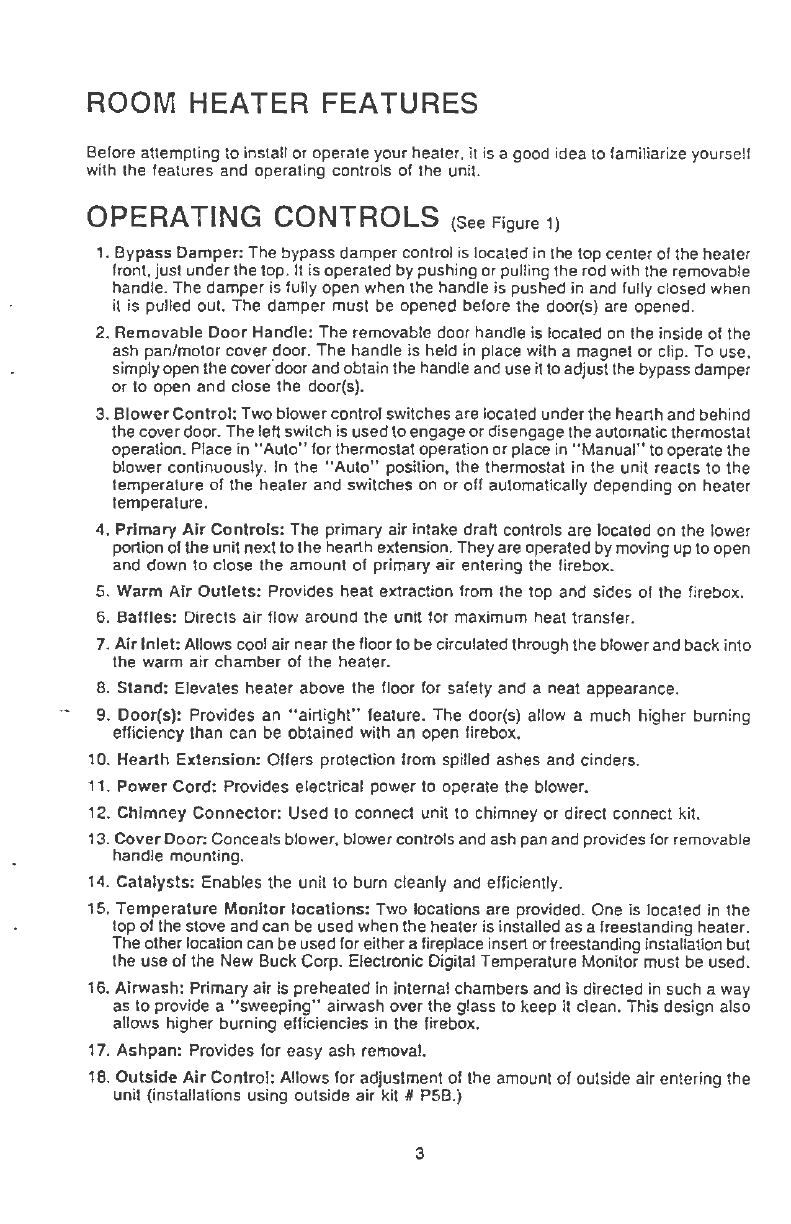
EPA COMPLIANCE STATUS
This manual describesthe installation and operation of the New
Buck
Corporation, Model
70
and
Model
71. The Model 70 Heater meet:; the U.S. Environmental Protection Agen-
cy's Emission limits for catalyst equipped wood heaters sold between July 1, 1990, and
July 1, 1992. Under specific test conditions, the Model
70
heaters have been shown
to
deliver heat at rates ranging from 9800 to
31,100
BTU/Hr. The Model
71
Heater meets
the U.S. Environmental Protection Agency's Emission limits for catalyst equipped wood
heaters sold after July 1. 1992. Underspecific test conditions, the Model
71
heaters have
been shown to deliver heat at rates ranging from 13,100
to
40,200 BTU/Hr.
CATALYST EQUIPPED
This wood heater contains a catalytic combustor, which needs periodic inspection and
replacement for proper operation. It is against the law to operate this wood heater in a
manner inconsistent with operating instructions in this manual, or
if
the catalytic element
is deactivated
or
removed.
CATALYST WARRANTY
The combustor supplied with the Model
70
is a set (2) of corning
2"
x
2"
x
7"
x
25
cell
long life combustors. The combustor supplied with the Model
71
is a set
(3)
of corning
2"
x
2"
x
7"
x 25 cell long life combustors. Consult the catalytic combustor warranty also
supplied with this wood heater. Warranty claims should be addressed to:
Corning Glass Works/Warranty Claim Department
Electronic Materials Plant - A Dock
Addison Road
Painted Post,
NY
14870
See enclosed catalyst warranty for instruction
on
proper packaging for return shipment.
PROPER FUEL SELECTION
This heateris designed to burn natural wood only. Higherefficiencies and lower emissions
generally result when burning air dried seasoned hardwoods, as compared to softwoods
or
to green
or
freshly cut hardwoods.
DO
NOT BURN:
·Treated Wood
·coal
•Garbage
•cardboard
•Solvents ·Trash
·colored
Paper
Burning treated wood, garbage, solvents, colored paper
or
trash may result in release of
toxic fumes and may poison or render ineffective the catalytic combustor.
Burning coal, cardboard,
or
loose paper can produce soot. or large flakes of char
or
fly
ash that can coat the combustor, causing smoke
spilla~e
into the room and rendering the
combustor inellec.tive.
ACHIEVING CATALYTIC LIGHTOFF
The temperature in the stove and the gases
enterin~J
til'.:· combustor must be raised
to
be-
tween 500 deg. F to 700 deg. F for catalytic activity
to
be initiated. During the start up
of
a cold stove
••
'·
)1urn
to high firing rate must be maintained for about 20 minutes. This
ensures that the stove, catalyst. and fuel are all stabilized at proper operating temperatures.
Even though it is possible
to
have gas temperatures reach
600
deg. F within two
to
three
minutes alter a lire is started, if the fire is allowed to die down immediately it may
go
out
or the combustor may stop working. Once the combu5'or starts working, heat generated
in it by burning the smoke will keep it working.
4

ACHIEVING CATALYTIC LIGHTOFF-
WHEN REFUELING
During the refueling
and
rekindling of a cool lire, or a fire that has burned down
to
the char-
coal phase, operate the stove at a
medium
to
high
firing rate
lor
about
10
minutes to ensure
that the catalyst reaches approximately 600 deg.
F.
CATALYST
MONITORING
It is important to periodically monitor
the
operation
of
the catalytic combustor
to
ensure
that it is functioning properly and to determine when it needs to be replaced. A non-
functioning combustor will result
in
a
loss
of heating efficiency, and an increase in creosote
and emissions. Foflowing is a list
of
items
that should
be
checked on a periodic basis.
'Combustors
should
be
visually Inspected at least three times during the heating season
to determine
if
physical degradation
has
occurred. Actual removal of the combustor is not
recommended unless more detailed inspection is warranted because of decrease in per-
formance. If
any
of
these conditions exist, refer to Catalyst Troubleshooting section
of
the
owner's manual.
'This
catalytic heater is
equipped
with
the
means
to instafl a temperature probe to
mon
itor
catalyst operation. Properly functioning combustors typically maintain temperatures
in
ex-
cess
of
1000 deg.
F.
Ifcatalyst temperatures are not in excess of 500deg.
F.
refer to Catalyst
Troubleshooting section
ol
this owner's
manual.
You
can get an indication
of
whether the
catalyst isworking bycomparing the amount
of
smoke leaving the chimneywhen the smoke
is going through the combustor and catalyst light-off has been achieved to the amount
of
smoke leaving the
chimney
when
the smoke is not routed through the combustor (bypass
mode).
Step 1 - Light stove
in
accordance with instructions.
Step 2 •
With
smoke routed through the catalyst.
go
outside and observe the
emissions leaving the chimney.
Step 3 - Engage
the
bypass mechanism and again observe the emissions leaving
the
chimney.
Significantly more smoke should
be
seen when the exhaust
is
not routed through
the
com-
bustor (bypass mode). Be careful not to confuse smoke.with steam from wet wood.
A CAUTION AGAINST OVERFIRING
Do
Not
Overfire
This
Heater.
Attempts to achieve heat
output
rates that exceed heater design specifications can result
in
permanent damage to the heater
and
to the catalytic combustor.
MAINTAIN PROPER DRAFT
Draft isthe force
which
moves airfrom the appliance
up
through
the
chimney. The amount
of draft in your
chimney
depends
on the length
of
the
chimney, local geography,
nea
rby
obstructions, and other factors. Too much draft may cause excessive temperatures
in
the
applianceand
may
damage
the
catalytic combustor. Inadequatedraft
may
cause backpuff-
ing
into
the
room and
"plugging"
of
the
chimney
or the catalyst.
Inadequate draft will cause the appliance to
leak
smoke into
the
room through appliance
and chimney connector joints.
An
uncontroflable burn ora glowing red stove part or chimney connector indicates excessive
draft.
5

ASH REMOVAL
Whenever ashes bui
ld
up
in
the firebox and when tne fire has burned do
wn
and cooh
r
em
ove excess ashes. Leave an ash bed approximately 1inch deep on the firebox
bott<
to help maintain a
hot
charcoal bed.
Ashes should be placed in a metal container with a tight fitting li
d.
The closed contair
of ashes should be placed
on
a noncombustible floor
or
on
the ground, away from all cot
bustible materials, pending final disposal. The ashes should be retained in the closed
cc
I
atn
er until all cinders have thoroughly cooled.
6

~
SECTION II
MASONRY INSERT INSTALLATION
~
--
~
A FIGURE 1
..
INSTALLATION PRECAUTIONS
Extensive field and laboratory testing has shown that catalytic stoves perform best as
fireplace inserts when:
1.
A positive sealing direct connect kit
is
used to connect the stove exhaust outlet
directly to the masonry flue
of
the fireplace when flue liner size is approximately the
same size
as
the heater flue gas exit. A rain cap is also recommended
to
keep flue dry
thus allowing a hotter draft.
NFPA211 Code: The National Fire Protection Association code requires all fireplace
insert heaters
to
be positively connected from the heater to the flue liner.
2. An equivalent sized oval flue liner is installed when the flue liner size is larger than
the heater flue gas exit. Connection must be from stove exhaust outlet extending the
lull height
of
the chimney and must include a rain cap.
3.
Height of the chimney is at least 15 feet tall.
4. Location
of
chimney is interior (not on an outside wall).
Satisfactory results have been reported with installations other than as listed above.
However, as all chimneys draw differently, problems with performance may be encountered
ifsteps are not taken to keep the chimney hot. Adraftbetween .03 and .06 inches of water
is recommended for proper catalytic operation.
Use the following
to
complete the installation of the unit as an insert:
Model 70: #FP70
Model 71: #FP70
7

II
SECTION II:
INSTALLATION (Fireplace Insert)
Figure
2 FIREPLACE INSERT
Minimum Clearances:
The Model 70 and
71
Fireplace Inserts are intended for installation
in
accordance with the
standard for chimneys, fireplaces, vents, and solid-fuel burning appliances, NFPA-211 Code.
This model is not intended for installation intofactory-built metal fireplaces or lor use with
a metal chimney.
1. The hearth must
be
of masonry construction and must extend a minimum
of
16"
in
front of the firebox opening and a minimum
of
8"
to either side ofthe firebox opening.
2. If there is not
16"
from the front of the firebox opening and the front
of
the masonry
hearth, a floor protector must
be
used
in
front of the hearth
to
protect combustible
materials.
2"
of
brick, a listed
"floor
protector"
or
a floor protector made of non-
combustible, inorganic material with a
"K"
f<~C"tor
may be used as follows:
K = 2.5 BTU/((:
iR)
(HJ)
(DF/IN))
ALTERNATE FLOOR PROTECTORS MATERIALS
With the floor protectoror hearth extension material specified as one layer of
2"
thick brick
with a K • factor of 5.0, you may use alternate materials aslong as the Kfactor(s) is calculated
as follows:
Formula: Required thickness =
(K
of alternate material/K of millboard) X (thickness
of
millboard)
Example: An alternate inorganic non-combustible millboard with a K of .9375 would
require a thickness as follows:
Required thickness = (.9375/5.0) x 2
in
.
3/8 inch
8

K
Factors
of
Alternate
Materials:
Material
K
Required
Thickness
Ceraform
126
.21
1/8"
Limestone 8.0
3.2''
Concrete 8.0
3.2"
Sandstone 13.0
5.2"
Marble 18.0
7.2"
Hearthextension
or
floor protector thicknesses above four (4)
inche
s are generally
not
ac-
ceptable due to cost, floor load capacity, and look.
The
alternate we recommend is using
ceroform No. 126 millboard
1/8"
thick minimum and putting any type decorative brick or
stone (any thickness) on
top
of
it.
•
The
"K"
factor represents the thermal conductivity
of
a material and is the time rate or
heat flow through a homogeneousmaterial understeady-state conditions, through unitarea,
per
unit
temperature gradient in the direction perpendicular
to
a surface.
3.
If
your
fireplace
has
wood
trim above it, the wood trim must
be
at
least
8"
above
the
top
of
the
unit
and
may
be a maximum
of
1/2"
thick.
4.
If
your
fireplace
has
a wood mantel,
the
mantel or mantel supports
must
be located
at a height greater
than
12"
above the top of the unit.
REQUIRED FIREPLACE DIMENSIONS
Minimum
and/or
maximum
fireplace dimensions:
Model 70
Model
71
Height
Width
Min.
24-1/8
24-1/8
Max.
Min.
31
36
31
36
Max.
46
46
Depth
Min.
20
20
(17')
(17")
·oepths
from
17
" to
19112"
also accommodate the heaterifthe top panel is cut downin size.
POSSIBLE TOOLS NEEDED FOR INSTALLATION
If you decide to install
your
own
stove, there are several hand tools you
may
need to do
the
job.
If
you
do
not
alreadyhave them, theyare readilyayailable at most hardware stores.
Caulking gun
Large adjustable wrench (may
not
be
needed)
Drop cloths
Vacuum cleaner
or
whisk broom
Flashlight
1 tube
of
RTV silicone, Code
103
or 106,
or
high
temperature rubber cement rated be-
tween
450
deg. • 600
deg.
F.
7/32"
drill bit and drill
SockeVRachet Set
INSTALLATION PREPARATION
Fireplace
1.
Locate furniture and
other
materials away from the front
of
the fireplace to
allow
free
access
to
the fireplace.
2.
Cover the hearth and adjacent floor areaswith the
drop
cloths to protect from soiling
or
marring the surface.
3. Remove the existing fireplace damper plate.
4.
Thoroughly clean the fireplace
of
ashes and soot.
9

I
II
\:
5. Check the chimney and smoke chamber for excessive buildups of creosote or
soot. Also, check for obstructions, such
as
bircs' nest. If the chimney is excessively
dirty, clean it,
or
have someone clean it professionally BEFORE installing or using
the room heater.
6. If the fireplace has an ash dump or outside air provision, these must be sealed off
with metal or tightly packed non-combustible insulation to prevent this cold air from
entering the fireplace chamber.
Heater
Preparation
1. Remove the protective plastic wrapping from the stove.
2. Inspect the unit for
any
obvious physical damage.
3. Plug the power cord into a 115 VAC outlet
to
test the motor and fan. Place the blower
control in the
"MANUAL"
position to test.
4. Check the primary air draft controls to ensure that they slide freely.
5. Check the operations
of
the damper control to ensure that it will ope_n and close
properly.
INSTALLATION
Procedure
(Use a Listed Direct
or
Positive Connect)
Yf.RTH:AL
I'Uitl
UMm.
EIX;I
~\~0
FIGURE 3
FIGURE 4
fll!flU(l
MUU
POSITIONING
MOUNTING TRIM PANELS
10
POSITIONING THE HEATER
When positioning the heater, the
following conditions MUST be
met! (See Figure
3)
1. The front
of
the damper open-
ing must be positioned BEHIND
the rear edge of the lintel
to
ensure proper draft.
(See Figure 3)
2. The vertical plane of the fire-
place front must fall BEHIND
the side cold air vent on top of
the unit. (In other words, it is
possible to have the heater too
far in
as
well asnot farenough.)
3. Center the heater
in
the fire·
place opening.
MOUNTING THE TRIM PANELS
Alter the unit is positioned, as
shown in Figure
3,
mark
the
mounting position
of
the trim
panels as follows:
1. Set the top (long) trim panel
in
place on top of the
un
it. The
panel should be flat against the
outside face of the fireplace,
and standing vertically. Mark
along the loweredge of thetrim
panel with a pencil to make a
reference line for mounting.
2. Set the side trim panels in
place, again flat against the
lace
of the fireplace. Mark
downthe inside edge of the trim
panel
to
make
a
vertical
reference line.
NOTE: For short depth
(17"
to
19112") see Figure 7.

3.
Slide the unit out
of
the fireplace far enough to work behind the trim panel reference
lines.
4. CAUTION: If optional fireplace trim kit brass will be used on the trim panels. set the
trim panels out 5116"
to
allow for brass overhang.
5. Mount the side trim panels. (See Figure 4)
a.
Position the trim panel on the reference line.
b. Drill Mounting Holes in center
of
trim panel mounting brackets to allow for
adjustment in and out if necessary.
c. Mount the trim panel using the self-tapping screws provided.
6.
Mount top trim panel to side panels with screws provided
as
indicated
in
Figure
4.
7.
Ifdesired obtain optional brass trim from box and assemble using
an
"ell"
bracket in each
corner where the top and side trim joins. Tighten set screws joining trim together.
8.
Next slip the brass trim over the top edge of the trim panels and slide all the way
down until sides and tops interlock. Obtain screws provided and lock brass trim in place.
(See Figure
5).
9. Slide the unit back
into
the fireplace. Check to be sure that the trim panels (and brass)
are properly positioned and lie flat against the front ofthe fireplace. Ifone or more of the
panels is out of position, slide the unit out and reset by loosening the mounting screws
and repositioning in the slot. (See Figure
6)
.
NOTE: If side and top panels gap due to unevenness of fireplace (normally on rock
faced fireplaces). you will need to drill a
5/32"
hole through both side and top panels
near where the panels intersect and install a #10 self threading screw to eliminate the
gap (paint screws to match).
FIGURE 5
--.,
Securing
Panels
and
Brass
Trim
FIGURE 6
10. Pull the unit back out of the fireplace and remove the brass and top trim panel to facilitate
tt.a installation of the direct connect or positive connect.
11. Now, follow the installation procedures in the listed direct
or
positive connect kit you
me
using and install the heater and connector kit
in
the fireplace.
12 Reinstall the top trim panel.
1:?.
Obtain the brass trim and slip overthe
top
and sides. You will have to spread out the
side brass pieces and raise the brass approximately 8-10 inches above the top of the
trim panel before the brass will
go
on.
I4. Using the two brass screws provided, secure the brass to the trim panel at each side.
1,

·:1
l
Short
depth
installation:
fv:lo·,
,;
the basic trim kit installation instructions except you will
have to:
1) Cut off beth ends of the top panel
to
the same dimcn:;ion as the side panels
(outside edge)
2) Drill two (2)
5/32"
holes through each side of the top and side panels as shown in
Figure 7 below. .
3) Install 2 each #10 self threading screws persidetojoin panels (paintscrews tomatch).
~H'UP.£
I'AIIEJS
l!~liiC
110
S!:IF-
1"11?.1:\IllliC
SCP£\fS
r.liT
HI
MAH11
Ulllf.fl
UIMF.fi~IIIN
Uf
SlUE
I'AIIE!S
llP.ILL
2 !o/J!'
IIOUS
f'Er.
$1UE
FIGURE 7
Short
Depth
Installation
FINAL CHECK
1. Recheck the specified clearances.
2. Remove all foreign material from the firebox area.
3. Open the primary air drafts and damper bypass.
4. Plug the power cord into a
115
VAC outlet.
5. Place crumpled pieces of newspaper in the stove. Light it and close the doors.
Ensure that the stove draws properly through the primary drafts.
6. Check for smoke leaks around the doors.
7. Open the doors and check for smoke escaping from the front of the stove. Smoking
usually indicates a defective or poorly positionud chimney. Some chimneys with a
marginal draft can be preheated by lighting newspaper and holding it near the open
damper
w1th
a poker or fire tong. Once the chimney heats up, a proper draft can
usually be obtained.
If
athorough review of the Troubleshootin(l
~u
..
•P
in the rear of the manual doesnot reveal
the problem, contact your dealer for
as::HSiarh
..
<:
.
1 i NOTE: The unit is painted with a specially formulated high temperature paint that cures
during the first two or three firings. You may notice a slight smoking effect and an
odor
! of burning paint when you build the first fires. This is normal and is not a cause for alarm.
In some cases, these fumes will activate a smoke alarm. Cracking a window near the unit
will allow these fumes to escape.
DO
NOT
build a large, roaring fire until this curing is
complete
or
the heater finish may be damaged.
12

SECTION Ill
RESIDENTIAL FREESTANDING ROOM HEATER
INSTALLATION
0
.
~
--
~
I I I I I
'\.
A INSTALLATION PRECAUTION
Extensive field and laboratory testing has shown that calalytic stoves perform best as
freestanding stoves when vented into a masonry chimney when:
1. A rain cap is installed
on
the chimney.
2. Height
of
chimney is at least 15 feet tall.
3.
location
of chimney is interior (not on an outside wall).
4. In a high pitch
or
chalet ceiling, use a minimum amount of single wall pipe but never
run more than five
(5)
feet.
long
lengths of single wall pipe will result in rapid cooling
of
the flue gas and heater draft and performance will be affected.
NOTE: Certain types of double wall pipe (close clearance) also cause a substantial drop
in flue
gas
temperature.
If
a double wall pipe connector is being contemplated. check with
the pipe manufacturer to ascertain that the use of their product will not affect the flue gas
temperature. Do not use double wall pipes which reduce flue gas temperatures.
Satisfactory results have been reported with installations otherthan listed above. However.
draft problems are possible if a hot chimney is not maintained.
•Use pedestal kits as follows:
Model 70
Model
71
Kit
#P48
or Kit #P78 (Outside Air Kit)
Kit #P48 or Kit IIP7B (Outside Air Kit)
A CAUTION:
Do
not connect this unit to a chimney flue serving another appliance.
13

MODEL 70 and
71
Minimum Clearances
The New Buck Corporation Models 70 and
71
must be installed in compliance with the
instructions contained
in
this manual.
Clearance
from
combustible
walls
and
ceilings.
The minimum lateraldistance between any part
of
the room heater and combustible walls
is
shown in Figures 1 and
2.
NOTE:
O;mens•ons shown
....
au
I
tv
.
------'~
1/4
37
i
MODEL
70/71
FIGURE 1 Wall Installation
FLOOR PROTECTION
NOTE·
O•mens•vns shown
1re m•rnmum clear·
anee 10 combusl•ble
waU
.
MODEL
70/71
FIGURE 2
Corner
Installation
If a freestanding model is to be installed
on
a combustible floor, a noncombustible pad
must be placed below it to protect the lloorfrom burning material from the stove. The pad
must be
37
inches wide by
42'14
inches deep. U.L. tests were conducted without a floor
protector. Therefore, the protector can be
of
any
thickness and any
"k"
factor.
The unit must be positioned on the pad
so
that there is a minimum
of
16"
from the front
of the door
to
the front of the pad, and a minimum of
8"
measured horizontally from the
sides of the fuel loading and ash removal openings
to
the sides of the pad.
NOTE:
For clearance reductions using wall protectors refer
to
the NFPA
-2
11
Code.
TOOLS FOR INSTALLATION
Drop Cloth
Electric Drill with
7/32"
drill
bit
1
/2"
•
9/16"
combination wrench
3/8"
magnetic socket chuck adapter,
3/8"
wrench (box or socket) or adjustable wrench
Socket Set
Tape Measure
Pencil
Level
Screw Driver
14

I
Preparing
The
Stove for Installation
1.
Remove the protective plastic wrapping from the unit.
2. Inspect the unit for any obvious physical damage.
3. Plug the power cord into a 115 VAC outlet
to
test the motor and fan. Place the blower
control
in
the
"MANUAL"
position to test.
4.
Check the primary air draft controls
to
ensure that they slide freely.
5. Check the operation of the damper bypass control to ensure that it will open and
close property.
6. Remove any items from within the firebox. Spread the drop cloth
on
the floor behind
the heater. Next, tilt the heater so that the back is
on
the dropcloth. (If the unit is installed
using the outside air pedestal kit, remove the
3/4"
hole plug from the bottom
of
the
heater.)
7. Using a tape measure, make a line down
7/16"
from the front of the heater.
8. Open the corresponding freestanding kit and obtain the stand. Place the stand against
the bottom
of
the heater (angle side
to
heater) at the marked line. Center the stand
left and right and mark screw locations on bottom through outer holes
of
stand mount-
ing angles. Set stand aside and drill four
7/32"
holes in heater bottom. (See figure
3)
9. Obtain four
1/4"
self tapping screws and secure the stand to the heater.
10. Reposition the heater
to
the upright position.
FIGURE 3 MOUNTING PEDESTAL
Preparing The Room Heater Location
1.
Select an installation location that will give the best airflowfrom the front of the heater
to
the remainder of the home.
2. Place the protective floor pad
in
position.
3. Place the uniton the pad making sure the minimum clearance specifications are met.
-4. In connecting
to
an
existing masonry flue, first ensure that the flue conforms
to
the
NFPA-211 Code and/or consult your local code for proper procedures.
CHIMNEY
Ceiling Exits:
The Models 70 and
71
are designed for connection
to
either
8"
inside diameter Under-
writers Laboratories, Inc. listed Metal Fab type
"TG"
or
Simpson Dura-Vent type
"SOP"
all fuel residential type and building heating appliance chimney,
"Type
HT"
2100 Deg.
F rated. .
·.
15

goo Wall
Exits:
The Models 70 and
71
are designed for connection to either
8"
inside diameter Under-
woters Laboratories, Inc. listed all fuel residential type and building heating appliance
chimney,
"Type
HT"
2100 deg. F rated. or to a masonry chimneywhich meets the specifica-
tions of the National Fire Protection Association's
211
Code.
DETERMINING THE CHIMNEY LOCATION
A.Ceiling Exit (Using Single Wall ChimneyConnector and Metal Fab type
"TG"
or
Simp-
son Dura-Vent type
"SOP"
chimney)
1.
Suspend a plumb bob from the ceiling above the unit so that the weight is hanging
in
the center of the flue exit. (A small weight on a string will serve as a plumbbob). Mark
the ceiling where the string is suspended
to
locate the center
of
the chimney hole.
2. After locating the center of the hole, install the ceiling support box, chimney, flashing,
storm collar and rain cap per the chimney manufacturer's instructions.
A CAUTION: Use only Metal Fab type
"TG"
or
Simpson Dura-Vent type
"SOP"
chimney.
3. Now, connect the stove
and ceiling support
box
using #24 ga. minimum
blued
or
black
steel
connector pipe(do not use
galvanized pipe). Connect
each
section
so
the
crimped end faces
down·
ward, and secure each
section to each otherusing
at least three (3) sheet
metal screws
or
rivets.
Also, use the screws and
pipe mounting clips pro·
vided in the freestanding
kit and secure the pipe to
the heater.
(See Figure 4)
NOTE: If the optional New
Buck Corp. chimneyconnector
is used, disregard the pipe
mounting clip instructions and
follow the instructions contain-
ed in the chimney connector
kit (PN MABCHIMCNB).
l J
CC:llltc
NOT~
~}L
FAB
CR
~}L
F'}B
S
IJ.PS(N
!X.W.-vrnT
ffi s
ll.f'SCtl
IN5TAU.AT
lctl
IN51R\.cr
Ill
)
1:®.-\fllf
FCR
IN5T}U
Itt
Oillrt{Y
St.PPCm
oox
/
S
ltn.£
WALL
COtECTCR
P
IF£
'
PIPE
LUtiT
ltc
~
QIPS
d
~
0
L__._j
~
LJ
~
LL
I I I
'\.
_/
~
~
FIGURE 4
16

B. Wall Exit into metal tee-box.
1. Mark the plumb line on the wall
directly behind the center of the
heater. (See figure 5).
2. Place the vertical portion of the
heaterpipe and the elbow in position
and project a point onto the plumb
line level with the center of the
elbow.
3. Measure upso there will be at least
1/4"
rise per. foot
of
horizontal
connector pipe, maintaining clear-
ances
to
ceiling
as
noted in Figure
5. This will give you the center of
the hole for the chimney penetration.
4. After locating the center
or
the
penetration, install the tee box and
chimney
as
per
the
chimney
manufacturer's specifications.
5. Connect the chimney collar
to
the
tee-box using #24 ga.-minimum
blued
or
black steel connector
pipe. DO NOTuse galvanized pipe.
~liiC
I
:o
~JUtt;
~
"3"
um.
;j
CBITB
··::::..-~::::.I
I
~
~~
Lll(
:f
:
P-b
a.:c•
U
w.;;x
/
._
P.!J.SLII( / v
tie.
1'1.5·:-rfW..Gl
crm:·:::CR
l.ILL
/
lli
''!CE''
~
1--
!--
~y
•
I I
FIGURE 5 Flue
Exit
into
"T
ee"
box
assembly
Connect each section so the crimped end faces downward. and secure each section
to each other using at least three steel sheet metal screws
or
rivets.
6. Using the screws and pipe mount-
ing clips provided in the free-
standing kit, secure the pipe to
the heater. (See Figure 5)
C.
Wall Exit into Masonry
I
-mtC-
I
I
O:ll..ttC
_....-
11''
VIH.
C!l'ltrr
l;rt
ol (lt.;.. r
~II
I
~
f-
=
llrt
Plu:t
l;~
/)
ll!IV
fV.Jt
'
'
I
1. Before connecting the Models
70
and
71
to a masonry chimney,
determine that the masonry fire-
place
wall
pass-through
connector
thimble
meets
the
NFPA-211 Code and local building
codes and is a minimum
of
18"
from the ceiling.
If
the connector
thimble
does
not
meet
these
codes,
the
pass-through
connector must be modified.
Connectors may pass through walls
or partitions constructed ofcombust-
ible material if the connector is:
I'll./
I
(a)
Either listed for wall pass-through
or is routed through a device listed
for wall pass-through and is installed
in
accordance with theconditions of
the listing.
~
FIGURE 6
I
v ,
Oliii(Y /
Flue Gas
Exit
into
Masonry
Chimney
(b) Selected or fabricated
in
accordancewith the conditions and clearances as stated
in
table 5-7 of the 1988 NFPA 211 Code. Anyunexposed metal that isused as part of a
wall pass-through system and is exposed to flue gases shall be constructed of stainless
steel or other equivalent material that will resist corrosion. softening, or cracking from
flue gases at temperatures
up
to 1
BOO
deg. F.
17
I

In addition, a connector to a masonrychimney
~hall
extend through the wall to the inner
face
or
liner but not beyond, and shall be firmly cemented
to
masonry.
Exception: A thimble may be used
to
facilitate removal of the.chimney connector for clean-
ing,
in
which case the thimble shall be permamr•tly cemented in place with high-temperature
cement.
2. Once the through-the-wall thimble codes are met, simply connect the chimney
collar to the wall pass-through connector using #24 ga. minimum, blued or black
steel connector pipe as follows:
(a) Maintain
1/4"
rise per foot (horizontal length) from the appliance
to
the chimney.
(b) Connect each section so the crimped end faces downward.
(c)
Secure each section to each other using at least three (3) sheet metal screws
or
rivets.
(d) Use the screws and pipe mounting clips provided (or optional chimney connector
PN
MA6CHtMCNB) and secure the chimney connector
to
the heater. (See Figure
6)
CAUTION: A Because
of
the
high
efficiency
and
low
flue gastemperatures, free-
standing
catalytic heaters
connected
to
masonry
chimneys
with
oversized flue liners
may
encounter
drafting
problems.
FINAL CHECK
1.
Recheck the specified clearances.
2. Remove all foreign material from the firebox area.
3. Open the primary air drafts and damper bypass.
4. Plug the power cord into a 115 VAC outlet.
5. Place crumpled pieces of newspaper in the stove. Light it and close the doors. Ensure
that the stove draws properly through the primary drafts.
6. Check for smoke leaks around the doors.
7. Open the doors and check for smoke escaping from the front of the stove. Smoking
usually indicates a defective
or
poorly positioned chimney. Some chimneys with a
marginal draft can be preheated by lighting newspaper and holding it near the open
damper with a poker or fire tong. Once the chimney heats up, a proper draft can
usually be obtained.
Ifa thorough review of the Troubleshooting Guide
in
the rearof.the manual does not reveal;
the problem. contact
your
dealer for assistance,
NOTE: The unit is painted with a specially formulated high temperature paint that cures
during the first two or three firings. You may notice a slight smoking effect and an odor
of burning paint when you build the first fires. This is normal and is not a cause for alarm.
In some cases, these fumes will activate a smoke alarm. Cracking a window near the unit
will allow these fumes
to
escape. DO NOT build a large, roaring fire until this curing is
complete or the heater finish may
be
damaged.
18

SECTION V
WOOD HEATER SAFETY
Certain safety hazards are inherent in
any
wood heater installation. You should be aware
of these so that a safe and proper installation can be made.
1. FAULTY CHIMNEY:
An
older masonry chimney should be thoroughly checked to be
sure there are no holes
or
weak spots which could allow sparks
or
hot gasses to
escape.
2.
HEAT CONDUCTION:Placing combustible materials too close to a heater or chimney
can be a fire hazard.
By
keeping these particular hazards in mind as you install and use your room heater
you can ensure a safe, reliable installation.
SAFETY PRECAUTIONS
For your protection, read and follow these safety precautions closely:
1. Use a spark arresting shield
(3/8"
mesh) on top of the chimney. Check monthly as
this is a code requirement
in
some areas.
2. Use smoke detectors around the heater as well as in sleeping areas.
3. Keep a fire extinguisher rated for Class
"A"
fir&s near the heater.
4.
Check with your insurance company
to
be sure your policy covers the installation
and use
of
a wood fired room heater.
5. Creosote-Formation and Need for Removal: When wood isburned slowly, it produces
tar and other organic vapors, which combine with expelled moisture to form creosote.
The
creosote vapors condense in the relatively coot chimney flue of a slow-burning
fire. As a result, creosote residue accumulates on the flue lining. When ignited this
creosote makes an extremely hot fire.
Theconnectorand/orchimneyshould be inspected at least once a monthduringthe heating
season to determine
if
a creosote buildup has occurred.
If
creosote has accumulated, it should be removed
to
reduce the risk of a chimney fire.
6. Locate furniture and any other combustible away from the heater.
7. Store firewood at a safe distance from the heater.
8. Disposal
of
Ashes:
Ashes should
be
placed in a metal container with a tight fitting
lid. The closed container of ashes should be placed on a noncombustible floor
or
on the
ground, well away from all combustible materials. pending final disposal. If the ashes
are disposed of byburial in soil or otherwise locally dispersed, they should be retained
in the closed container until all cinders have thoroughly cooled. Ashes can ignite
up to 72 hours afer removal.
9. Always exercise caution when using your heater. Be particularly careful when there
are children around an operating heater.
CAUTION!! A NEVER use gasoline, gasoline-type lantern fuel, kerosene, charcoal
lighter fluid
or
similar liquids
to
start
or
"freshen
up"
a fire in the heater. Keep all such
liquids well away from the stove when
it
is in use. All fluids
of
this type give off volatile
fumes and can and
WILL
EXPLODE!! Don't take a chance with the safety
of
your home
and family.
19
This manual suits for next models
1
Table of contents