New Image FITT MILL User manual

ASSEMBLY AND USER GUIDE
BRING IT HOME
To help you get started visit:
newimagefitness.co.uk

We’re passionate about helping you be fit, strong and active!
Whatever your fitness goal, New Image has a range of unique
and easy-to-use fitness solutions to help you be your best.
We know getting started is sometimes the hardest part so we
design all our products to be simple, fun to use and effective.
We hope you enjoy your new FITT Mill and would love to hear
your experiences. Check out our social channels and take a look
at YouTube for videos, tips and workouts.
• Watch exclusive workout videos
• Ask questions to our thriving community
• Check out our nutritional tips and tricks
To find out more about the New Image range of fitness
equipment, tools and accessories to help you achieve your
goals, visit newimagefitness.co.uk
Join the conversation...
to New Image
WELCOME
2

3

Keep hold of your FITT Mill User Guide. It provides product information, workout ideas and
important product maintenance tips.
Please read this assembly and user guide before first using your FITT Mill.
Congratulations on purchasing
your new FITT Mill!
WHAT’S IN THE BOX:
#1
#2
#3
#6
#4
#7
#5
#8
Part name Qty
1 FITT MILL 1
2 Socket Wrench 1
3 Allen Key 1
4 Tablet holder screw 2
5 Tablet Holder 1
6 Remote control 1
7 Magnetic safety clip 1
8 Power cable 1
4

Page 5/6/7
2.
Page 5/6/7
3.
QUICK START GUIDE:
1
2
3 4
Remove packaging and carefully lay
the main unit on the floor near to a
desired power point - It is advised to
lift the unit between two people if the
weight of the unit is too heavy.
Check positioning of running belt and
ensure it is aligned as advised using
the Allen key provided. The orange
strips running parallel on the unit
should be equidistant from the edge
of the frame of the unit. (please see
belt alignment section).
Level surface – Ensure the unit lays
flat on the floor without any wobble
or instability. If this is the case,
flooring may be on level and will
require adjustment to the unit. On
the underside, screw/unscrew the 4
stopper feet in small increments to
suit any uneven surfaces. This should
be done with care when lifting the
unit and should never be completed
whilst plugged into a power source.
Using the screws provided, align the
tablet with the holes on the upper
part of the handle. Insert screws and
tighten using the Allen key. Ensure
the front lip is facing in the direction
of the running belt for correct
orientation.
Insert power cable into the unit and
plug into power point.
5

Page 5/6/7
4.
Page 5/6/7
5.
Page 5/6/7
4.
Page 5/6/7
4.
5
6
To lift the handle into position, release locking lever and lift until upright at its
furthest point. Re-lock the lever again by folding back down and ensure handle is
securely fixed.
Attach the Magnetic safety clip to the connection point on the underside of the
upright handle and unravel ready to connect to clothing.
Page 5/6/7
5.
Note: When the safety key is removed during use, the treadmill will automatically stop, the display will stop
functioning and display E7. To re-start re-attach the magnetic safety clip to the connection point.
6

Page 5/6/7
6.
Power
button
Increase
Decrease
Page 5/6/7
8.
Power
button
Increase
Decrease
Page 5/6/7
8.
SpeakerDisplay
7
8
9
Turn on power switch located next
to the power input. This should light
up red and an audible beep should
sound. If an error message shows
on the display window, ensure the
magnetic safety clip is correctly in
place.
Once ready to operate the product,
holding the remote-control step on
to the treadmill and attach the safety
clip to clothing. When in use, ensure
the safety clip is attached firmly to
clothing and is clear of becoming
entangled with any part of body or
clothing during exercise. (Waistband
or bottom of a T-shirt is advised).
Prepare to start exercise. Using the
remote, press the power button and
listen for a further audible beep and
countdown on the display. Numbers
counting downwards to 1 will display.
The unit will then start to move at low
speed setting and will toggle between
screens (Time, speed & distance). Use
the plus and minus buttons to alter
the speed to suit requirement.
7
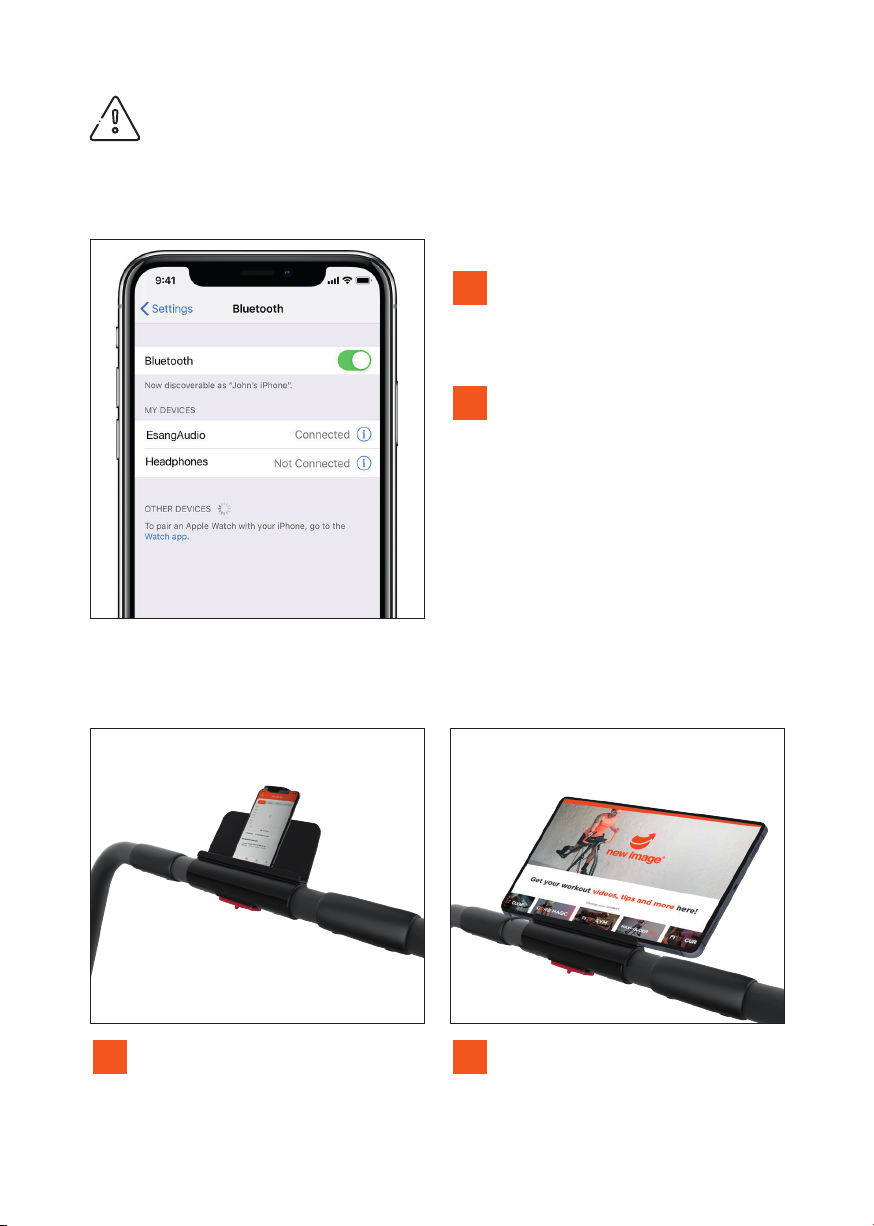
PHONE/TABLET HOLDER
OPERATING THE BLUETOOTH SPEAKER
1
1
2
2
For use with smartphones and smaller
devices, lift the spring-loaded platform
and carefully insert the phone. Release
the platform to fix the phone, ensuring
the device is well secured.
Using smart phone or tablet. Open
the Bluetooth devices settings and
locate the device named ‘EsangAudio’ .
Connect the device.
For tablets and larger devices, place
on the ledge of the holder ensuring it
is placed centrally to avoid any risk of
falling during exercise.
Play chosen media and alter volume
level from smart phone or tablet to
your desired level.
THE UNIT IS LIMITED TO 4KM/H WHEN THE HANDLE REMAINS FOLDED
DOWN. THE UNIT WILL LIMIT AT 12KM’H WITH THE HANDLE FOLDED
UP. IT IS ALWAYS ADVISED TO USE THE HANDLE IN THE UP POSITION.
8

STORING THE UNIT
Once finished exercising, the product can be easily moved to a suitable storage
location using the inbuilt wheels.
1Unplug the power cord from the unit
and power source, ensuring power
source is turned off first. Store this
away safely along with the remote
control and magnetic safety clip.
Page 5/6/7
3.
Page 5/6/7
4.
Page 5/6/7
4.
Page 5/6/7
4.
2Release the locking lever and fold the handle flat, parallel to the unit and then re-
secure locking lever to ensure the handle is fixed in the down position.
9

3
4
5
Tilt the unit onto the transport
wheels using two hands to support
the handle and main unit. Move to
desired location.
If storing flat, this can be placed
under most raised Sofa’s & Beds.
If storing upright, ensure it is always
leaning against a wall at a slight angle
and wheels are not in contact with
the floor to ensure the unit cannot
fall. It is suggested if upright that the
unit should be stored in a cupboard
space to avoid a falling hazard if
contact is made.
10

ADJUSTING THE HANDLE TIGHTNESS
The handle tightness can be maintained by adjusting the tightening nut located
on the lower, left hand side of the house using the socket wrench and Allen key
provided.
1 2
Remove cap to reveal the
tightening nut.
Insert the Allen key through the
socket wrench and attach to the nut.
Rotate clockwise to tighten or anti-
clockwise to loosen.
This should be done with handle
in the down position and regularly
maintained for safety.
RUNNING BELT ALIGNMENT
To avoid fault or unnecessary wear, always check to ensure the belt is aligned in
the centre of the unit and is running parallel. Two orange strips run parallel on
the running belt and should always be equidistant from each side of the FITT Mill
frame. These should be used a clear indicator if the belt does become misaligned.
2Once loose this will reduce the tension
of the running belt and allow the belt
to be realigned. Carefully move the
belt in the required direction, making
sure the belt is repositioned to be
equidistant from each side.
Page 5/6/7
9.
Page 5/6/7
9.
1If the belt is not aligned, use the
Allen key provided to loosen the bolts
as located.
Ensure both are completely loose of
resistance.
11

SAFETY INFORMATION:
• Please read this user guide before first using your FITT Mill. It is important to keep
these instructions for future reference.
• Assemble and operate the equipment on a level surface.
• Ensure the equipment is stable before use.
• Always ensure you have adequate space on all sides when performing exercises, at
least 0.6m on each side.
• The safety level of the equipment can only be maintained if it is regularly examined
for wear and tear e.g ropes, pulleys, handles and connections.
• Replace defective components immediately and keep the equipment out of use
until it is repaired.
• Use only the adjustment setting as described in the instructions. Always use the
correct adjustment plug / fixing.
• Keep hair, fingers and loose clothing away from hinges and other moving parts to
avoid serious injury.
• Always consult your GP before undertaking any exercise programme.
• Always wear suitable clothing and footwear e,g. tracksuit, shorts
and training shoes.
• Remove all personal jewellery before exercising.
• Ensure you warm up well before using the equipment as this will help to reduce
muscle strain.
• After eating, allow 1-2 hours before exercising as this help to prevent strain.
• Never overload the equipment: MAX USER WEIGHT 120kgs.
• Never use the equipment in any other manner other than the ways explained in
these instructions. Any other use, especially misuse, can cause injuries or damage
by electric shock, heat or fire.
• If you feel faint, stop exercising immediately.
• Injuries to health may result from incorrect form / technique or excessive training.
• Care should be taken at all times when getting on and off the equipment. Falling off
the equipment could result in injury
• Children should not be allowed on or around the equipment, especially when it is
not in use and unsupervised.
• Parents and others in charge of children should be aware of their responsibility
because the natural play instinct and the fondness of experimenting of children can
lead to situations and behaviour for which the training equipment is not intended.
• This product is not intended for use by persons with reduced physical, sensory or
mental capabilities, or lack of experience and knowledge, unless they have been
given supervision or instructions concerning the use of the appliance by a person
responsible for their safety.
• This product is not suitable for therapeutic purposes.
• This product is intended for home use only.
• Only use accessory items recommended by the manufacturer.
12

• CAUTION the instructions must be followed carefully in the assembly,
use and maintenance of the equipment.
• Assembly: It is important you assemble the product in a clean
and uncluttered space.
• Keep away from fire.
• This product is not a toy. Do not stand or jump on it.
• If the supply cord is damaged, do not use your Fitt Mill.
• Always unplug your Fitt Mill when it is not in use, and before moving or cleaning
the appliance.
• The power cord must not be knotted, twisted, pulled, strained or squeezed.
• Do not touch the power plug or appliance with wet hands while the appliance is
connected to the mains power supply.
• Do not attempt to repair any power cord.
MAINTENANCE AND STORAGE
• Wipe clean only with a clean, damp cloth. DO NOT use detergents.
• This equipment should not be stored outside, in a garage or outbuilding. Keep the
equipment in a dry place with as little temperature variation as possible.
• We recommend placing a mat beneath the equipment to protect
both the equipment and flooring. New Image mat can be purchased
at newimagefitness.co.uk
• The safety level of the equipment can only be maintained if it is regularly examined
for wear and tear. This includes any ropes, pulleys, handles, nuts, bolts, moving
parts, bushes, chains, wheels, bearings and connections.
LUBRICATING THE BELT
• The running belt must be lubricated using silicone oil to ensure smooth operation
and to help belt longevity, it needs to be lubricated as below:
- usage less than 3 hours per week, once every 5 months
- usage 4 – 7 hours per week, once every 2 months
- usage more than 7 hours per week, once a month.
• To apply the silicone oil, lift the running belt and squeeze a small amount of the oil
on the underneath of the belt.
• To ensure an even application across the belt step from left to right on the belt
whilst running it at 1 kmh.
• Do not over lubricate the belt, after lubrication the underneath of the belt should
feel a little damp.
• NEVER let the belt run dry.
13

To dispose of product and packaging please recycle where facilities
exist. Check with your Local Authority or retailer for recycling
advice in your country.
Made in China
Please read all instructions carefully and retain for future reference
Model Number: K1
Class:HC
CUSTOMER SUPPORT / IMPORTER ADDRESS:
Should you require any support regarding this product please call our customer services
on 0844 8000631 / 0344 800 0631. High Street TV, PO Box 7903, Corby NN17 9HY.
Visit newimagefitness.com for ‘how-to’ guide and workout advice.
14

15

Distributed by:
High Street TV, PO Box 7903,
CORBY, NN17 9HY
Version 1 03/21 CR2899
newimagefitness.co.uk
Table of contents
Popular Treadmill manuals by other brands


Weslo
Weslo WCTL29607.0 user manual

NordicTrack
NordicTrack Incline Trainer X11i Interact Treadmill Manual Del Usuario

York Fitness
York Fitness 51117 owner's manual

Epic
Epic EPTL818040 user manual

Bodyworx
Bodyworx JOSLO owner's manual

Keys Fitness
Keys Fitness Health Trainer 801 Treadmill HT801 owner's manual


