new plast AG200 10250DX Installation guide

Istruzioni di montaggio ed uso
Altalena Deluxe Doppia Metallo

LEGGERE ATTENTAMENTE PRIMA DI
PROCEDERE CON IL MONTAGGIO DEL
PRODOTTO
IT IS ESSENTIAL TO READ THE MANUAL
BEFORE STARTING TO ASSEMBLY YOUR
PRODUCT
Conservare le istruzioni di montaggio per le future operazioni di manutenzione.
Non apportare modifiche al prodotto, ed ogni sostituzione deve essere fatta con componenti originali.
It is imperative that you keep the assembling instructions, which be of use for product maintenance.
Not to bring modifications to the product, and any change must be made with parts of origins.
2

3
ISTRUZIONI PER IL MONTAGGIO
ASSEMBLING INSTRUCTIONS
età (anni)
age (years)
3-12
ref. AG200 10250DX
3 222870 172008
cm 240
cm 150
cm 205

ISTRUZIONI DI MONTAGGIO
Da conservare per ogni futura consultazione.
I nostri articoli sono progettati per uso domestico. Non possono in nessun caso essere utilizzati da enti pubblici o in spazi
verdi aperti al pubblico (scuole, asili, parchi o zone di giochi, etc..).
INFORMAZIONI PER L’ASSEMBLAGGIO
• Seguire con attenzione le istruzioni di montaggio. Il prodotto deve essere assemblato da un adulto.
• Conservare le istruzioni in particolare per l’identicazione delle componenti da comunicare eventualmente al nostro
centro assistenza clienti.
• In accordo con la normativa EN 71-8, capitoli 4-6, è richiesta un’altezza minima di 35 cm tra il suolo e l’altalena. Tale
distanza è importante per ragioni di sicurezza. Dopo aver terminato l’assemblaggio vericare la distanza. In caso di non
conformità non esitate a contattare il nostro centro assistenza clienti.
• Prima dell’utilizzo vericare la presenza di tutte le componenti. Potete conservare le componenti in eccesso come parti
di ricambio per un eventuale utilizzo futuro.
INFORMAZIONI DI SICUREZZA
• Il prodotto non deve essere utilizzato da bambini di età inferiore ai 36 mesi (le parti più piccole potrebbero essere
ingerite). Deve essere utilizzato da bambini tra i 3 ed i 12 anni con un peso massimo di 50kg. L’utilizzo deve avvenire
sempre sotto la sorveglianza di una persona adulta.
• L’altalena va posizionata su di una supercie piana ed ad una distanza di almeno 2 metri da ogni altro oggetto, struttura
od ostacolo (muri, ringhiere, alberi o cavi elettrici etc..) che possa causare rischi durante l’utilizzo.
• Il prodotto non deve essere posizionato su superci rigide (calcestruzzo, asfalto, etc). L’erba o altre superci morbide
sono ideali.
• L’altalena deve essere incorporata solidamente nel terreno, nel rispetto delle istruzioni di montaggio. Utilizzare il
prodotto solamente una volta che il calcestruzzo si è solidicato.
• L’ancoraggio nel terreno deve essere costantemente vericato, così come i ganci e le viti.
• Le estremità dei picchetti devono essere fuori dal calcestruzzo.
• Non disperdere l’imballo nell’ambiente e non lasciarlo a disposizione dei bambini.
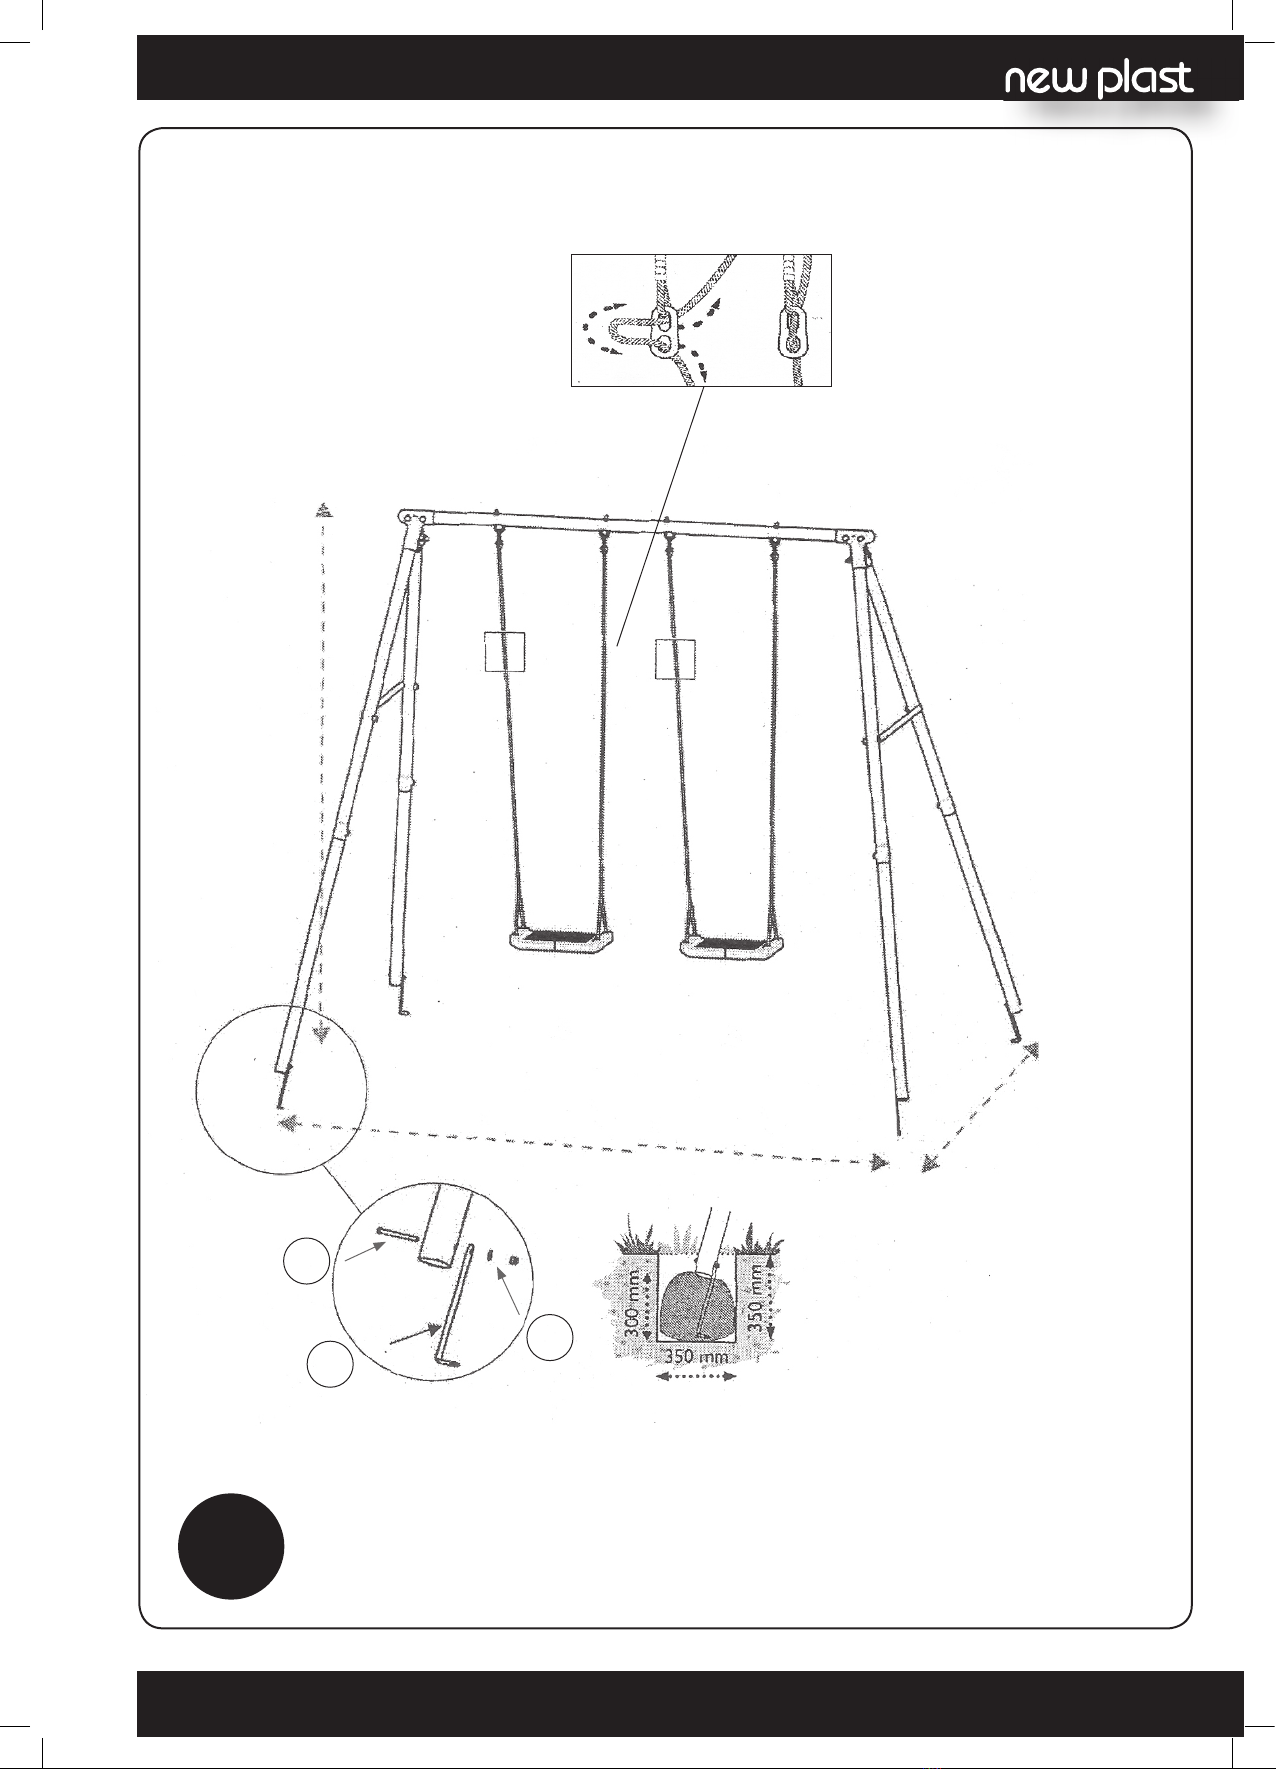
FISSAGGIO NEL TERRENO
• IMPORTANTE: per ragioni di sicurezza l’altalena deve essere incorporata nel terreno.
• Collocare l’altalena nella posizione desiderata, tracciare un quadrato di 35 x 35 cm attorno ad ogni piede (ogni piede
deve essere al centro del quadrato) e scavare una buca di 35 cm di profondità.
• Riempire le buche con un minimo di 30 cm di calcestruzzo. Non andare oltre il livello del suolo. Posizionare al centro
del calcestruzzo il picchetto in modo che le estremità per ssare i picchetti alla struttura dell’altalena siano fuori dal
calcestruzzo.
• Una volta che il calcestruzzo è asciutto, avvitare la struttura con i picchetti interrati.
• IMPORTANTE: aspettare che il cemento sia compattato prima di utilizzare l’altalena e controllarne regolarmente il
fissaggio nel terreno.
4

MANUTENZIONE
• Le componenti in metallo non necessitano di nessuna particolare manutenzione.
Nonostante ciò, in alcune regioni marittime, qualche rivestimento può essere soggetto ad usura. In questo caso, si
consiglia di utilizzare un trattamento preventivo anti ruggine.
• Lo stato di tutte le componenti deve essere controllato almeno una volta al mese, in particolare per quanto
riguarda le viti, i ganci e le barre superiori. Se le viti ed i ganci sono usurati per più del 10% del loro spessore
iniziale devono essere immediatamente rimpiazzati con delle componenti identiche a quelle fornite al momento
dell’acquisto.
• Tutte le componenti sottoposte ad attriti costanti devono essere lubri cate regolarmente con dei prodotti adeguati.
• Il terreno sopra il quale è posta l’altalena deve essere controllato regolarmente. Le pietre e tutti quegli elementi
che potrebbero rappresentare un pericolo in caso di caduta dall’altalena devono essere rimossi.
• Si consiglia di posizionare delle rondelle in plastica tra le rondelle in metallo e la struttura dell’altalena, in modo da
ridurre il rischio di ruggine derivante dallo sfregamento tra le parti metalliche.
• Si consiglia di rimuovere la struttura durante l’inverno, quando non viene utilizzata, in modo da evitare qualsiasi
possibile deterioramento dovuto alle cattive condizioni climatiche.
CONSIGLI PRATICI
• SICUREZZA: alcuni controlli di sicurezza sul seggiolino dell’altalena devono essere fatti regolarmente. Tra questi
potrebbero esserci, se necessario, la rimozione degli spigoli vivi, il serraggio dei dadi e dei bulloni etc. in modo da
evitare ogni pericolo oltre la normale usura ed il capovolgimento del seggiolino.
• COMFORT: l’altezza dell’altalena può essere regolata utilizzando l’occhiello di ancoraggio in plastica. Tirando la
corda attraverso l’occhiello l’altezza del seggiolino può essere modi cata secondo le esigenze dell’utilizzatore. Ad
eccezione della corda tutte le altre componenti possono essere riparate.
5

ASSEMBLING INSTRUCTIONS
To be retained for future use.
This product is only for private use at home and must never be used in parks and public gardens, in school, camp sites,
hotels, public leisure areas etc.
ADVICE FOR ASSEMBLY
• Respect exactly the assembly instructions. This product must be assembled by an adult.
• Keep the instructions sheet especially for the identication of the component by the after sales service.
• The EN 71-8, chapters 4-6 standard requires a 35 cm minimal distance between the ground and the swing.
This distance is important for a safety use. After having assembled the playground check these distances. In case of
non-conformity, do not hesitate to contact our after sales service.
• Before commencing check that none of the parts are missing. You can retain excess parts as spares for future use when
necessary.
ADVICE FOR SAFETY
• This product must not be used by children under 36 months (the small parts could be swallowed). It is only for children
from 3 to 12 with a 50 Kg maximum weight. It must be used under adult supervision.
• The swing set should be set up on a at surface and 2 meters away from all other things, structures or obstacles (walls,
fences, trees, washing lines or electric cables etc..) that could cause injury during use.
• The product must not be set up on hard surfaces (concrete, tarmac, etc..). Grass or soft surfaces are better.
• The play center must be embedded rmly into the ground, respecting the assembly instructions. Only use this product
when concrete is dry.
• The anchorage must be checked regularly, in addition to the hooks and xtures.
• The posts extremity should be out of the concrete.
• Do not throw packaging in nature and do not leave with the range of children.
FIXING INTO THE GROUND
• IMPORTANT: for safety reasons, the play center must be embedded into the ground.
• Place the play center in the desired position, mark a square 350 x 350 mm around each (the feet must be in the center
of the square) and dig a hole 350 mm deep.
• Fill those holes with a minimum of 300 mm of concrete. Do not exceed the ground level. Fit the embedding piece into
the center of the concrete so that xtures for screwing the posts into place rise out of concrete.
• When the concrete is dry, screw the posts to the embedding pieces.
• IMPORTANT: wait until the concrete is set before using play center and check anchorages regularly.
6

MAINTENANCE
• The metal parts do not need any particular care. However, in certain regions (seaside areas), certain coatings could
be prone to damage. In this case, it is advised to use a rust prevention treatment.
• The surfaces of all the parts should be checked at least once a month, especially for the xtures such as
hooks on the overhead beam. If the xtures and hooks show wear over 10% of their initial thickness, then they
should be replaced by exactly the same xtures as those originally provided.
• All parts that are under constant frictions can be oiled regularly with a suitable lubricant.
• The ground on which the play center is placed should be controlled regularly. All elements such as stones or other
object that could cause injury in the case of fall, should be removed.
• It is advised to place some plastic washers between the metal washers and the structure of the swing in order to
avoid any risk of rust caused by the friction of the metal parts.
• It is advised to remove the apparatus during the winter period, when not in use, to avoid any deterioration due to
bad weather conditions.
PRACTICAL ADVICE - FAQ
• SAFETY: certain safety checks should be carried out regularly on the swing set. This check should include, if neces
sary, removing any sharp edges, tightening the nuts and bolts etc , to avoid any danger through normal wear and
tear or any upturning of the swing set.
• COMFORT: the height of the swing can be adjusted using the plastic eyelet xture. By pulling the rope through the
xture the height of the seat can be adjusted to suit the user. Apart from the rope all the other parts can be adju
sted.
7
1
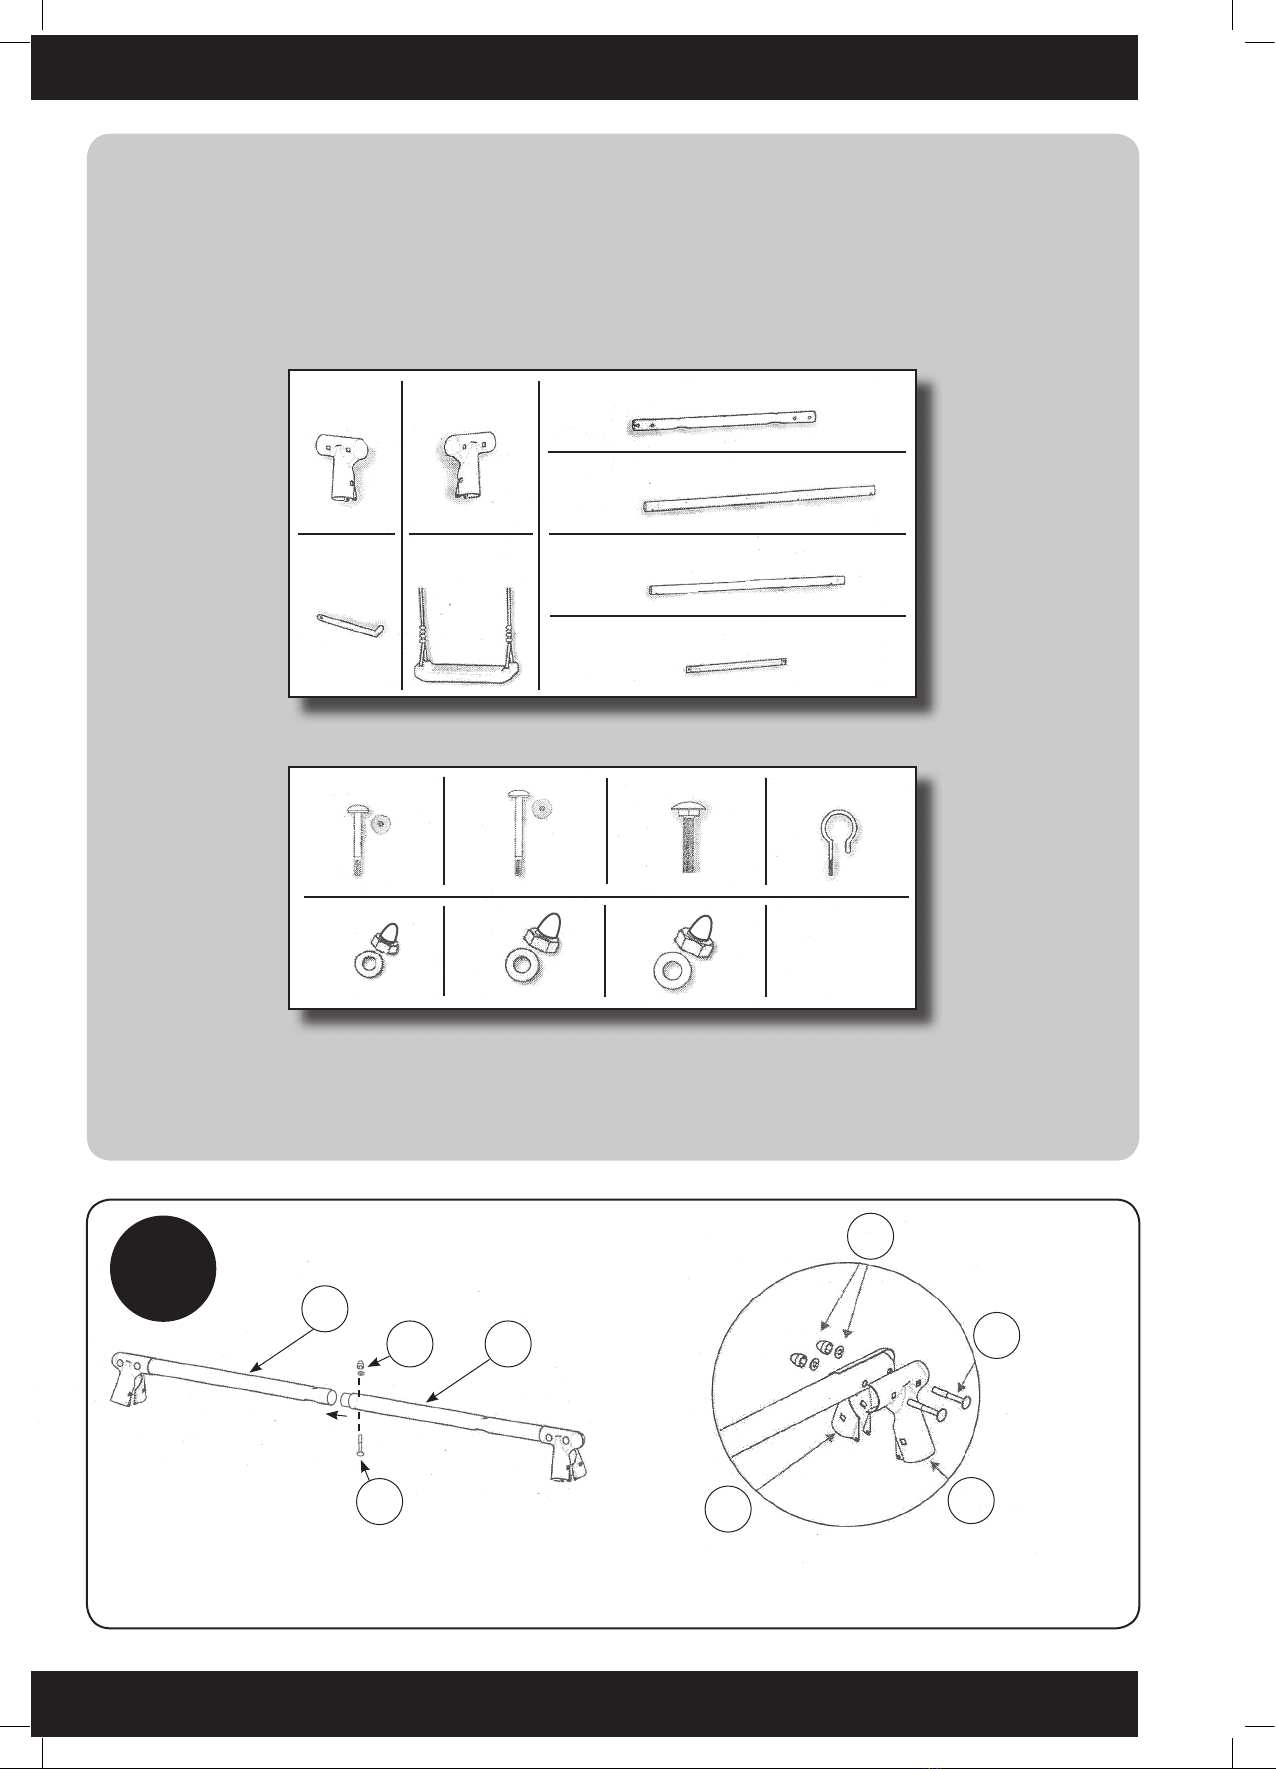
COMPONENTI DI MONTAGGIO
ASSEMBLY COMPONENTS
A x 2 B x 2 C x 2
D x 4
E x 4
F x 2
G x 4 H x 2
I x 4
O x 16
L x 12
P x 4
M x 9
Q x 9
N x 4
Ø6
x 40
Ø6
x 65
Ø10
x 70
Ø6 Ø8 Ø10
C
BA
Q
M
8
C
M
Q

P
HN
2
3
D
M
I
Q
O
OF
L
D
H
9
F
H
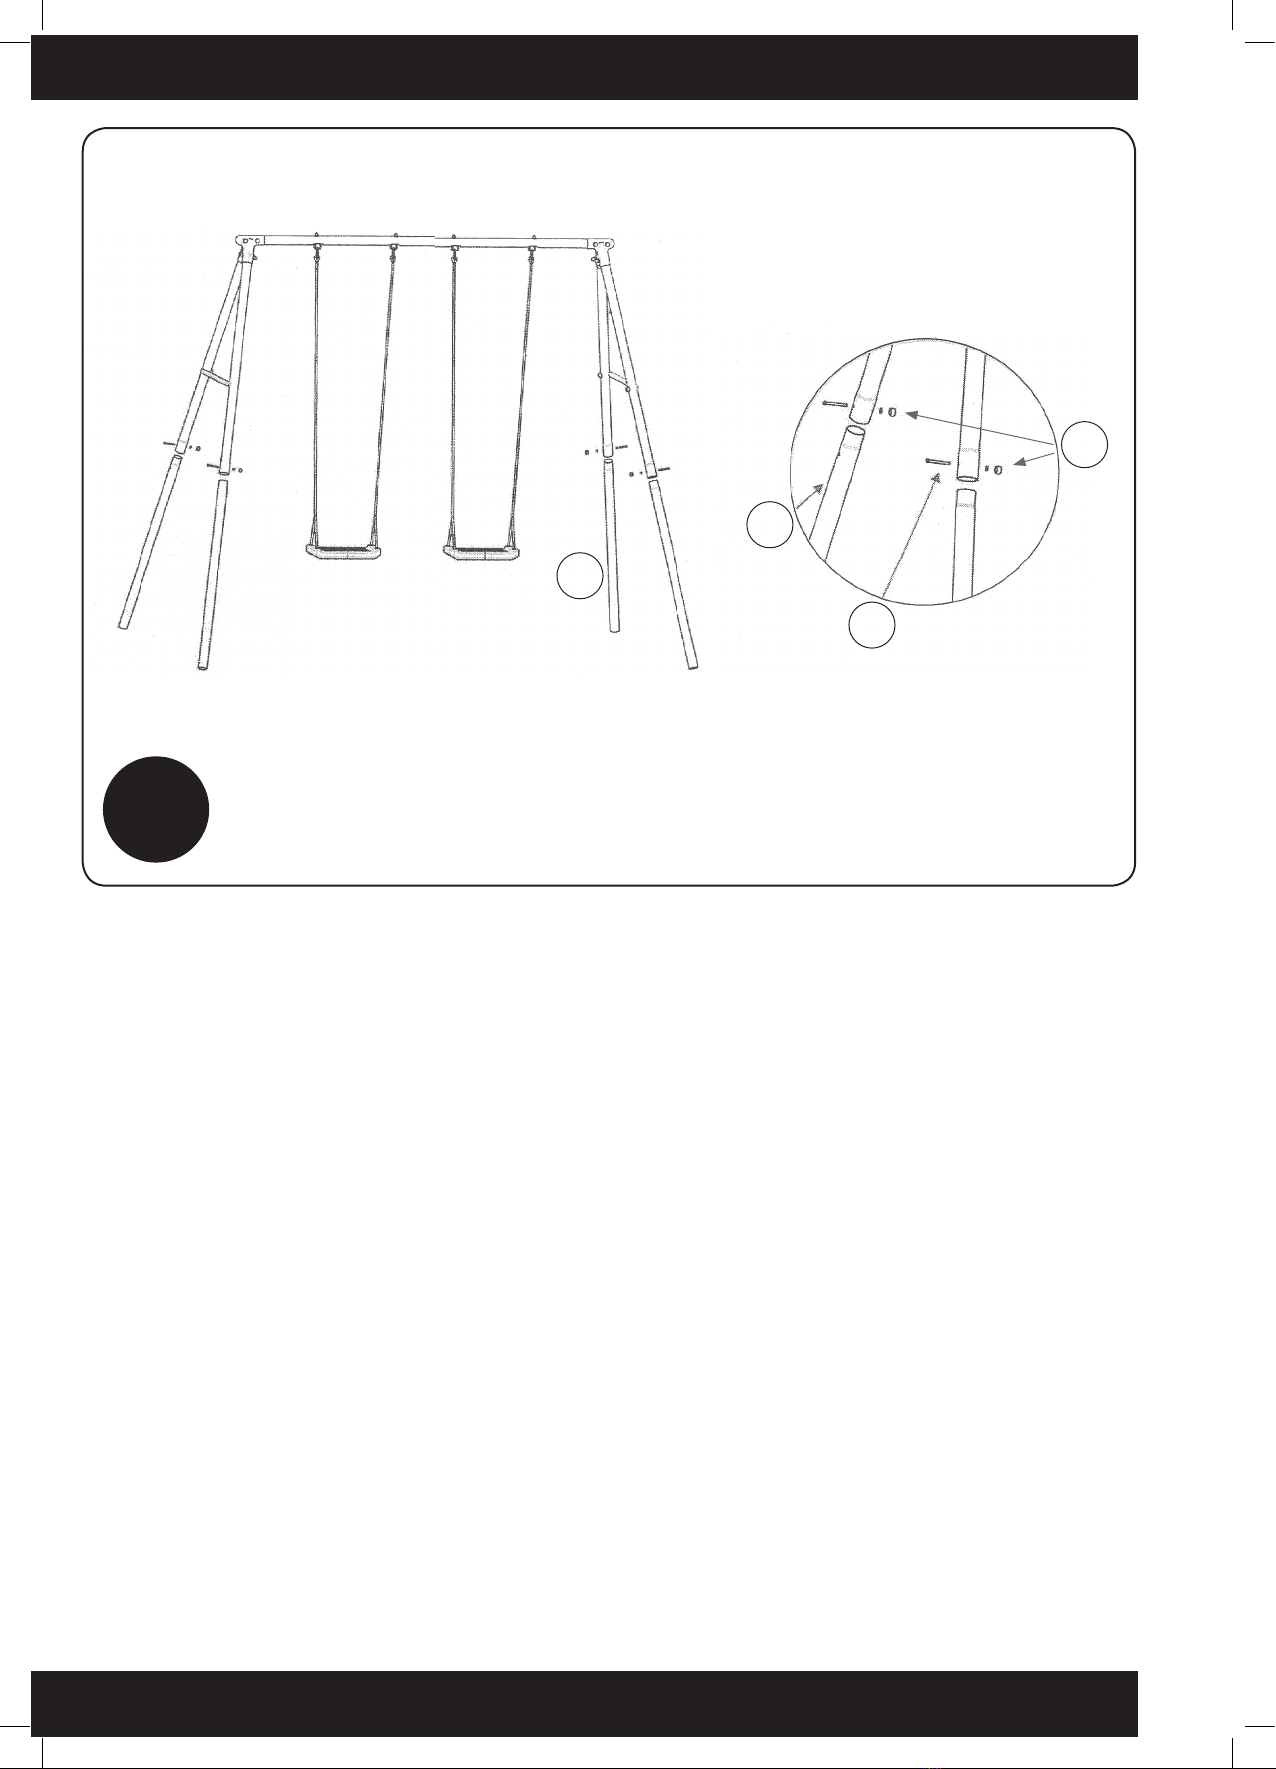
4
E
E
L
O
10
5
cm 240
cm 205
cm 150
O
G
L
11

www.newplastpiscine.com
Table of contents
Popular Swing Set manuals by other brands


Adventure Playsets
Adventure Playsets The Pathfinder 65008 Owner's manual and assembly instructions

LifeSpan Kids
LifeSpan Kids MONASH PE81 owner's manual

Hedstrom
Hedstrom M08835 manual

Lemeks
Lemeks Palmako Mathias Assembly, installation and maintenance manual

Lifetime
Lifetime 90143 Assembly instructions

Ledon
Ledon 1185 Assembly instructions


