NEW POL XS 271EV User manual

ITALIANO 3-10
ENGLISH 11-18
ESPAÑOL
19-26
PORTUGUÊS
27-34
FRANÇAIS
35-42
GB
ES
PT
IT
FR

SM1776
3
NOTE E CONSIGLI PER L’UTILIZZATORE 11-13
• Dati tecnici 11
DESCRIZIONE DELLA MACCHINA 13
INSTALLAZIONE DELLA MACCHINA 14-15
• Installazione 14
• Messa in piano del’asciugatore 14
• Collegamento del tubo di evacuazione aria 14
• Collegamento all’impianto elettrico 15
UTILIZZO DELLA MACCHINA 15-17
• Descrizione delle funzioni 15
•Oblò 16
• Per asciugare la biancheria correttamente 16
• Precauzioni per tessuti 16
• Tabella programmi 17
• Pesi biancheria 17
MANUTENZIONE 18
• Pulizia del filtro 18
• Individuazione guasti 18
• Soluzione dei problemi 18
• Accessori optional 18
INDICE
ITALIANO
Gentile Cliente,
La ringraziamo per aver scelto un nostro prodotto. La preghiamo di leggere attentamente le istru-
zioni per l’uso prima dell’allacciamento e dell’utilizzo della macchina.
La conoscenza dei principi di funzionamento garantirà un corretto e sicuro sfruttamento dell’appa-
recchio.
In caso di vendita, oppure di cessione dell’asciugatore, bisogna ricordarsi di consegnare al nuovo
utilizzatore anche il libretto delle istruzioni per l’uso.
MODELLO: ..........................................................................................................................................................................................................................................
NUMERO DI FABBRICAZIONE: .................................................................................................................................................................................
DATA D’ACQUISTO: .................................................................................................................................................................................................................
IT
NOTE E CONSIGLI PER L’UTILIZZATORE
DATI TECNICI
Larghezza cm.:
Altezza cm.:
Profondità cm.:
Dimensioni:
59.5
85.0
57.0
7 kg (asciutto)
vedi targhetta caratteristiche
vedi targhetta caratteristiche
Capacità Max
Potenza Nominale
Tensione

SM1776
4
NOTE E CONSIGLI PER L’UTILIZZATORE
■L’uso di questo apparecchio
dovrà essere quello di
asciugatore per uso domesti-
co ogni altro utilizzo è da con-
siderarsi improprio e quindi
pericoloso.
■Conservare il presente ma-
nuale d’uso sempre vicino al-
l’asciugatrice in modo da po-
terlo consultare rapidamente
se necessario.
■Qualsiasi modifica o tentativo
di manomissione dell’appa-
recchio può essere pericolo-
sa per l’utilizzatore e provo-
care danni al prodotto.
■Alla consegna dell’elettrodo-
mestico, verificare che risulti
indenne da eventuali danneg-
giamenti dovuti al trasporto.
Se si rilevassero danneg-
giamenti, rivolgersi immedia-
tamente al rivenditore.
■Durante il ciclo d’asciugatura,
l’aria della stanza viene con-
vogliata attraverso il lato po-
steriore dell’elettrodomestico.
Non coprire l’asciugatrice con
biancheria o altro.
■Nel posizionare l’apparecchio
assicurarsi che il cavo di ali-
mentazione non subisca pie-
gature ne compressioni e sia
accessibile, per eventuali in-
terventi.
■Si ricordi che durante il ciclo
d’asciugatura, il vetro dell’oblò
e il tubo di scarico si scalde-
ranno anche fino ad una tem-
peratura di 60°. Non toccare
queste parti prima della fine
del ciclo di raffreddamento.
■E’ vietato l’uso della macchi-
na ai bambini, se non sorve-
gliati.
■Non far mai asciugare capi
che siano stati a contatto di
agenti chimici come ad esem-
pio fluidi di pulitura a secco.
Sono infatti di natura volati-
le e potrebbero causare
esplosioni.
■Non far asciugare capi con
IT
Non attaccare oppure staccare la spi-
na dalla presa della corrente elettrica
con le mani bagnate.
Eseguendo le revisioni o le pulizie ri-
cordarsi di staccare l’apparecchio
dalla presa della corrente elettrica.
Nel caso si voglia staccare la mac-
china dalla presa della corrente non
tirare il cavo elettrico ma la spina.
Non esporre l’apparecchio ad agenti
atmosferici.
La macchina deve essere collegata
ad una presa di corrente elettrica
provvista di messa a terra e confor-
me alle esigenze di sicurezza.
E’ vietato collegare la macchina alla
presa elettrica utilizzando prolunghe
o spine multiple.

SM1776
5
NOTE E CONSIGLI PER L’UTILIZZATORE
DESCRIZIONE DELLA MACCHINA
LA DITTA PRODUTTRICE
DECLINA QUALSIASI RE-
SPONSABILITÀ PER EVEN-
TUALI INCIDENTI PROVO-
CATI DALLA NON OSSER-
VANZA DELLE NORME DI
SICUREZZA NONCHÉ DEL-
LE ISTRUZIONI D’USO
1- Pulsante ON/OFF
2- Pulsante asciugatura
delicata o energica
3- Manopola regolazione
tempi di asciugatura
4- Spia di controllo asciu-
gatore acceso
5-Oblò
6- Filtro
7- Piedini registrabili
1
La macchina è un elettrodomestico che asciuga ogni tipo di tessuto quando Lei vuole.
gomma espansa o parti in
gomma, in quanto potrebbero
sciogliersi e danneggiare altri
capi di biancheria o addirittu-
ra l’elettrodomestico stesso.
■Se l’elettrodomestico viene
venduto o regalato, si ricordi
di consegnare anche il pre-
sente manuale che consenti-
rà al successivo proprietario di
utilizzare l’asciugatrice in
modo corretto e sicuro.
■Non si può tentare di riparare
da soli i guasti dell’apparec-
chio perché le riparazioni ef-
■La struttura é stata realizzata
in pannelli di lamiera trattati e
verniciati in modo che le sue
qualità estetiche possano ri-
manere inalterate nel tempo.
■Il motore e tutte le parti in mo-
fettuate da non professionisti
possono provocare seri dan-
ni e tolgono il diritto alle ripa-
razioni di garanzia.
■Le riparazioni dell’apparec-
chio possono essere effettua-
te esclusivamente da perso-
nale autorizzato dei centri di
assistenza. Per le riparazioni
devono essere usate solo parti
di ricambio originali.
■Centrifugare o strizzare bene
la biancheria prima di caricar-
la nell’asciugatore. La bian-
cheria ben centrifugata si
IT
asciugherà più in fretta.
■Pulire bene il filtro ogni volta
che si utilizza l’asciugatrice, in
modo da garantire una perfet-
ta circolazione dell’aria.
vimento sono state studiate e
realizzate in modo da garanti-
re il massimo della silen-
ziosità.
■Il pannello comandi racchiude
in se la possibilità di utilizzare
facilmente tutte le asciugature
desiderate.
■L’oblò molto ampio facilita il ca-
rico e scarico della bianche-
ria.
8- Sbocco di scarico
9- Raccordo di accoppia-
mento
10- Tubo di scarico
11- Supporto tubo
1243
75
6
11
89 10
2

SM1776
6
INSTALLAZIONE DELLA MACCHINA
INSTALLAZIONE
L’installazione deve essere effettuata da personale professionalmente qualificato, secondo le istruzioni
del costruttore, perché una errata installazione può causare danni a persone e cose.
IT
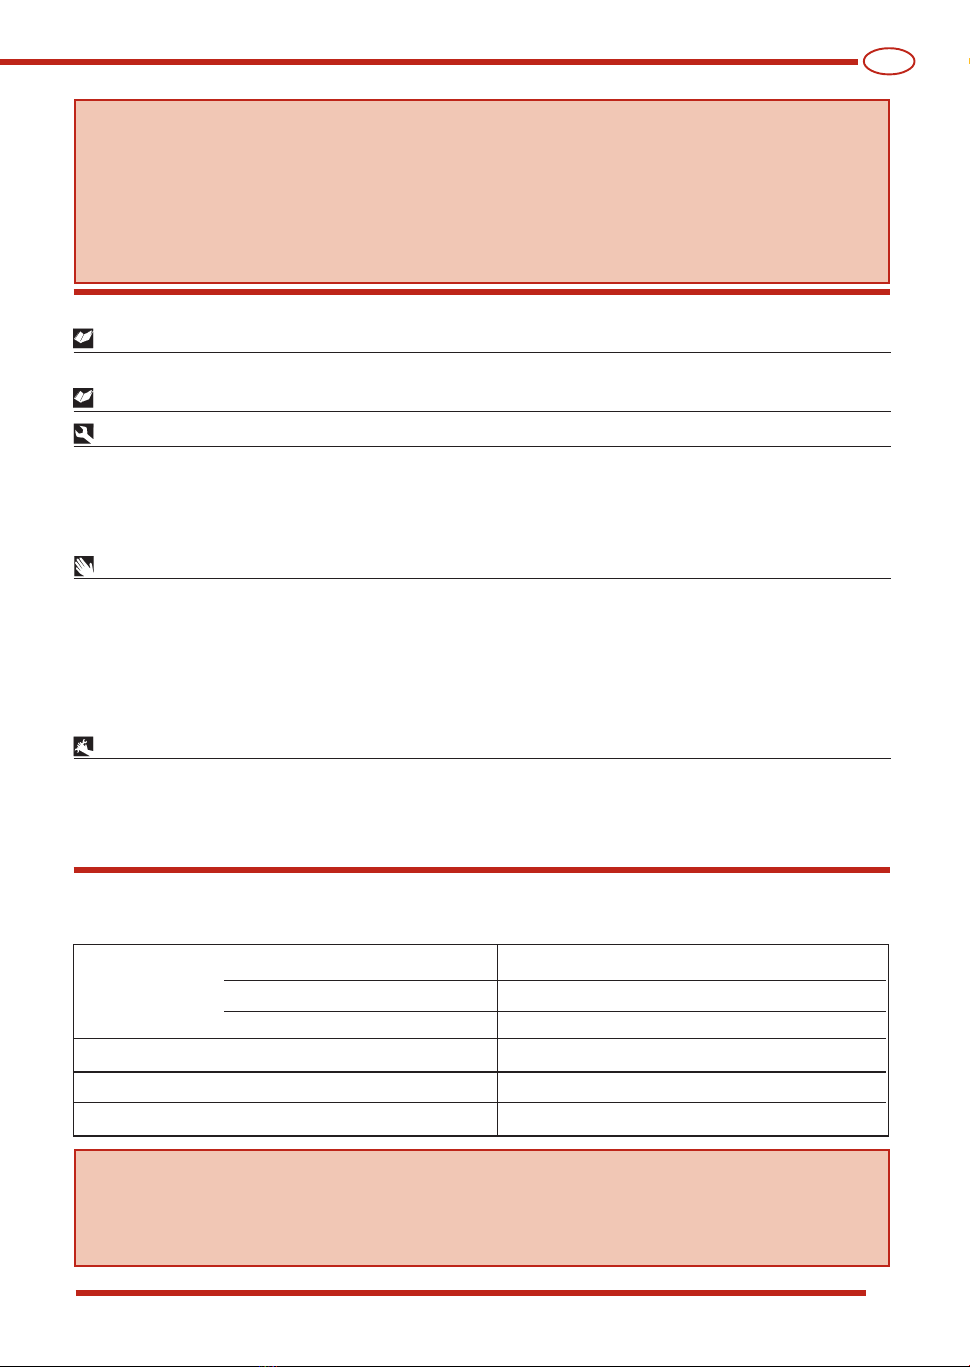
■Installare l’asciugatore vicino
una finestra per facilitare l’eva-
cuazione dell’aria umida.
■Utilizzare il tubo di evacuazio-
ne dell’aria per evitare la con-
densa e fissarlo nel foro Asi-
tuato nella parte posteriore in
basso della macchina (fig. 3).
■Non coprire mai le prese del-
l’aria poste dietro il vostro ap-
parecchio.
■Mettere il filtro nella posizione
di utilizzo (fig. 4).
■Pulire l’interno del cestello di
asciugatura con un panno
umido per togliere l’eventuale
polvere che vi si deposita.
A
MESSA IN PIANO DELL’ASCIUGATORE
COLLEGAMENTO DEL TUBO DI EVACUAZIONE ARIA
Importante: Il tubo di scarico
aria deve essere collegato an-
che se l’aria non viene scari-
cata all’esterno perché altri-
menti l’asciugatrice riassorbe
l’aria umida scaricata e pro-
lunga il ciclo d’asciugatura.
L’aria umida può inoltre dan-
neggiare l’asciugatrice. Dal
tubo di scarico aria viene sca-
ricata solo aria calda e umida
che di per sé non è pericolo-
sa, ma che comunque non
deve essere diretta verso per-
sone, animali, piante.
Importante: L’aria in uscita
non deve essere scaricata in
un condotto che sia utilizza-
to per lo scarico dei fumi ge-
nerati da apparecchi che bru-
ciano gas o altri combustibi-
li.
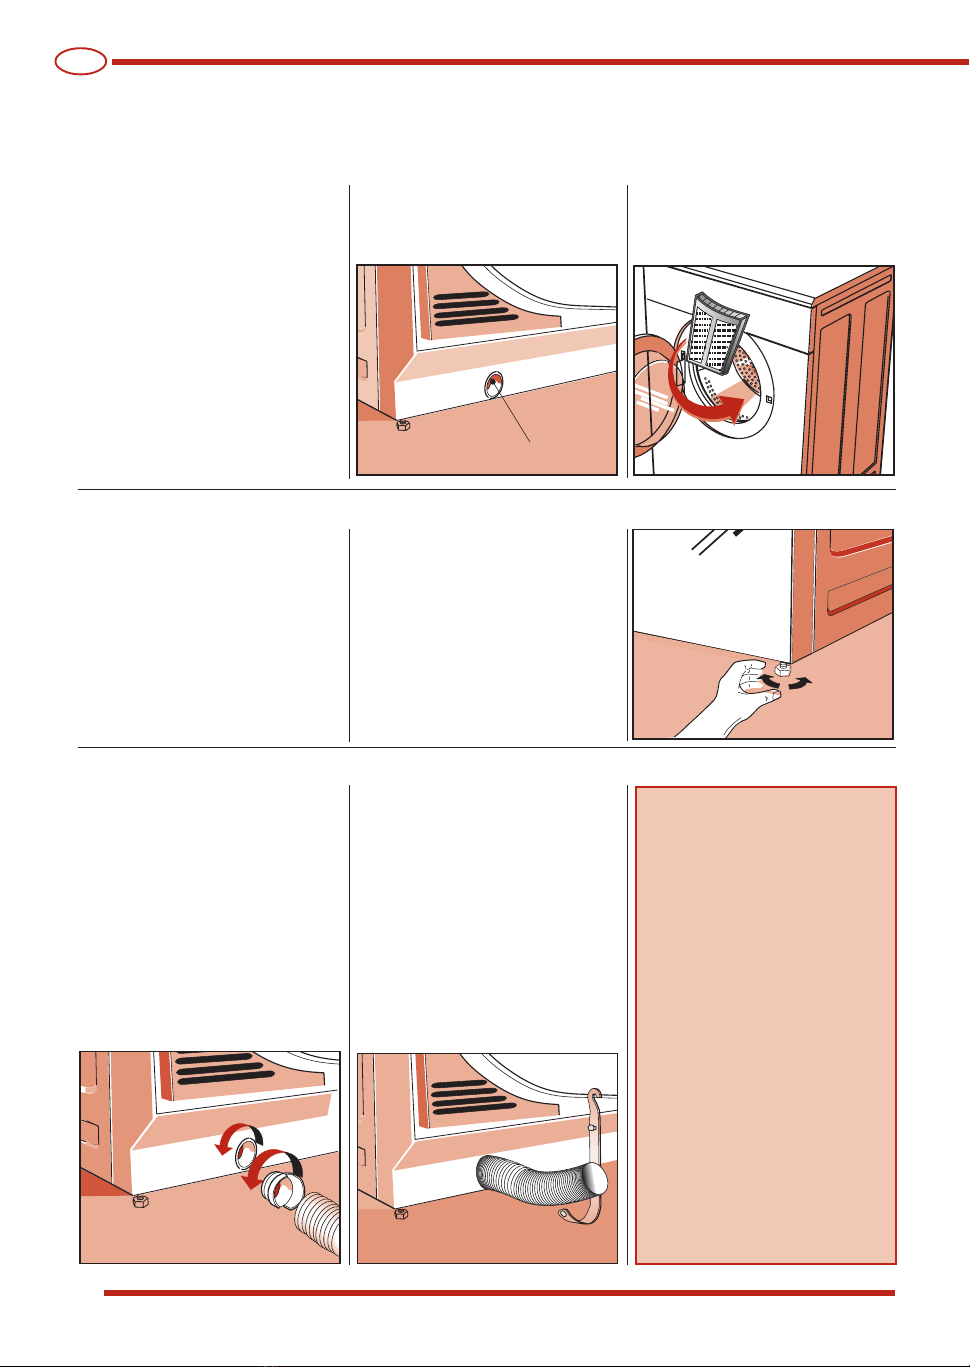
Piedini regolabili. Mettere
l’asciugatrice in posizione vertica-
le in modo che appoggi salda-
mente su tutti e quattro i piedini.
Livellare la macchina registrando
i piedini come di seguito descritto
■Sollevare leggermente la mac-
china.
■Regolare i piedini all’altezza
giusta (fig. 5).
(Non svitare troppo i piedini e
non usare cacciaviti.)
■Abbassare la macchina.
Una macchina mal livellata può
danneggiare i cuscinetti ed
usurarsi prematuramente.Questo
asciugatore non necessita di fis-
saggio al suolo.
34
Collegare il tubo di scarico aria
allo sbocco di scarico sul retro del-
l’asciugatrice (fig.6).
■Collegare un’estremità del
tubo al raccordo fornito.
■
Girare il raccordo (insieme con il
tubo) in senso antiorario nello
sbocco di scarico sull’asciugatrice.
■Spingere il tubo fuori dal retro
della macchina a sinistra o a de-
stra attraverso la nicchia sul fon-
do del cassone della macchina.
■Posizionare l’altra estremità del
tubo in prossimità di una fine-
stra o di uno sbocco di ventila-
zione verso l’esterno. Se ciò
non fosse possibile, accertarsi
che il locale sia ben ventilato
quando la macchina viene uti-
lizzata. Servirsi del supporto
fornito per fissare il tubo (fig.7).
5
67
SM1776
7
INSTALLAZIONE DELLA MACCHINA
IT
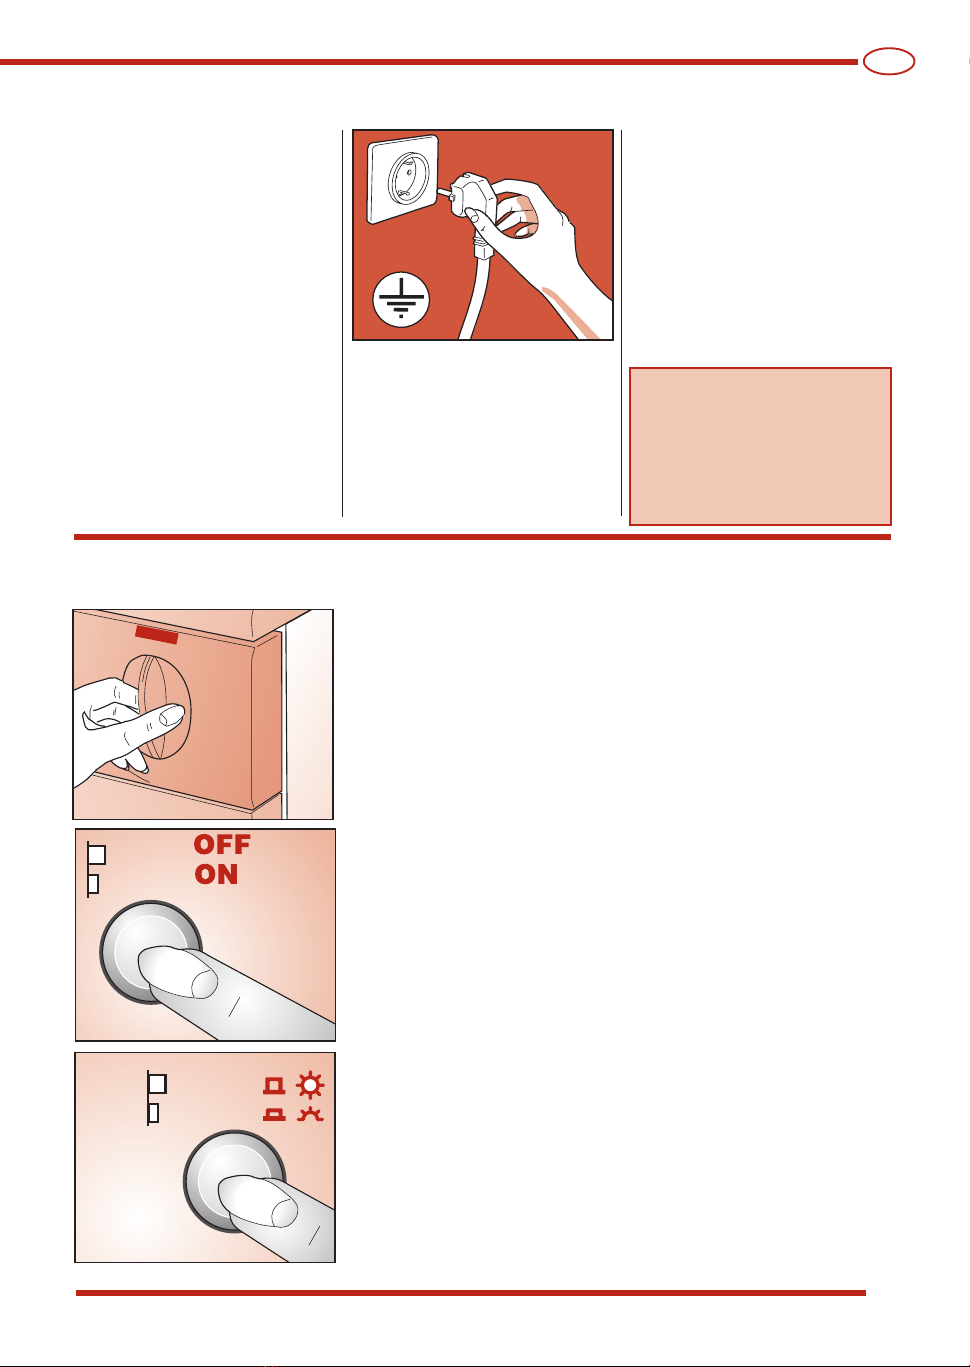
COLLEGAMENTO ELETTRICO
■Accertarsi che la tensione elet-
trica indicata nei dati tecnici
della targhetta posta sul retro
dell’apparecchio, corrisponda
a quella della rete elettrica.
■A seguito dell'installazione,
l'accesso all'alimentazione di
rete deve essere garantito da
un interruttore onnipolare.
■Salvavita, cavi elettrici e pre-
sa della rete devono avere pa-
rametri tali da permettere di
sopportare il carico massimo
indicato sulla targhetta stessa.
■La presa di corrente alla qua-
le viene allacciata la macchi-
na deve essere munita di
messa a terra. In caso contra-
rio, il produttore declina qual-
siasi responsabilità per even-
tuali incidenti (fig. 8).
■Se il cavo d’alimentazione è
danneggiato in qualche
modo,contattare il centro di as-
sistenza tecnica specializzato.
■E’ vietato allacciare l’asciu-
gatore alla rete attraverso ele-
menti indiretti come prolunghe
e prese multiple.
■Posizionare l’apparecchio in
modo che il cavo alimentazio-
ne sia facilmente accessibile in
modo da poterlo di-sconnettere
in caso di necessità.
Importante: Alla fine del ci-
clo di asciugatura, scolle-
gare l’asciugatrice dalla
rete per impedire che un
bambino possa eventual-
mente metterla in funzione.
8
■Manopola regolazione tempi di asciugatura: Ruotare la mano-
pola per selezionare i tempi di asciugatura desiderati (fig. 9).
(vedere tabella programmi per la scelta del programma in base al
tipo di tessuto)
■Alla fine di ciascun ciclo, ci sarà un periodo di raffreddamento di
4-5 minuti durante il quale la macchina rimarrà accesa.
■Pulsante ACCESO/SPENTO (ON/OFF): Premere questo pulsan-
te per collegare la macchina alla rete elettrica e non per avviarla.
(fig. 10).
■Pulsante asciugatura delicata o energica: premendo questo
pulsante si può scegliere il tipo di asciugatura che verrà effettua-
ta: Energica o delicata (fig.11).
■
SPIA: Rimane accesa in modo continuo durante il ciclo d’asciugatura.
In modo intermittente prima che sia impostato il programma, e a fine
ciclo asciugatura contemporaneamente ad un segnale acustico
intermittente.
UTILIZZO DELLA MACCHINA
DESCRIZIONE DELLE FUNZIONI
1
0
1
0
9
10
11

SM1776
8
UTILIZZO DELLA MACCHINA
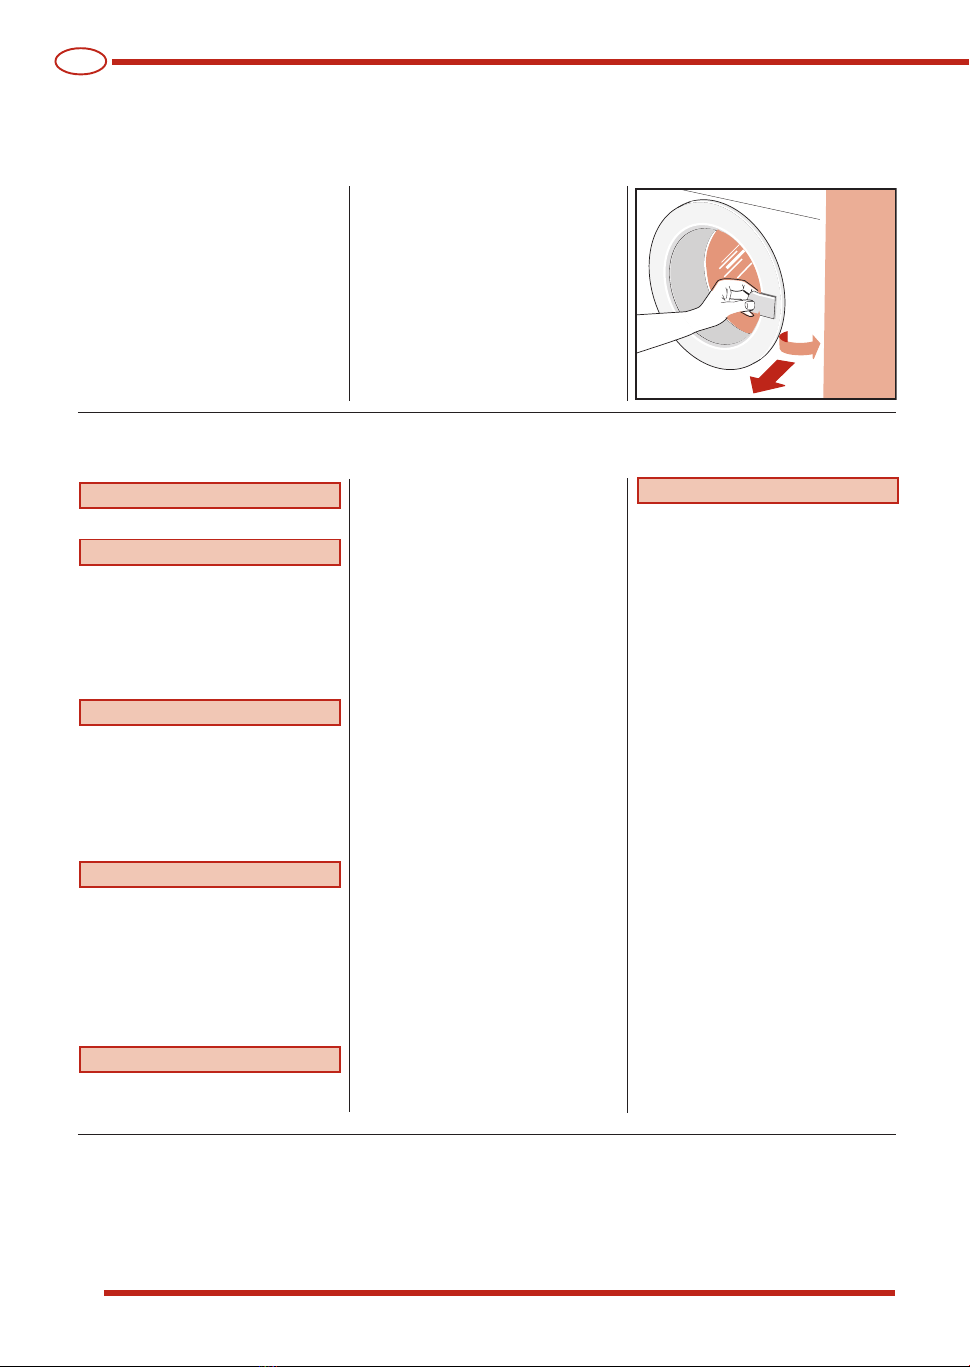
OBLÒ
L’asciugatrice è del tipo a carico frontale.Tirare la maniglia in avanti senza forzare, qundi aprire delicata-
mente l’oblò. La macchina si arresta quando viene aperto l’oblò durante il ciclo d’asciugatura.Il cestello
continua a girare, poi rallenterà fino ad arresto completo.
Importante:
■Durante il ciclo d’asciugatura,
la biancheria sarà natural-
mente calda.
La biancheria viene raffredda-
ta durante il ciclo di raffredda-
mento (Ultimi 4-5 minuti di
ogni ciclo).
IT
■
Fare molta attenzione nell’apri-
re l’oblò durante la fase di
asciugatura per evitare brucia-
ture a causa del vapore caldo
o della biancheria stessa.
PER ASCIUGARE LA BIANCHERIA CORRETTAMENTE
12
In caso di dubbi sul tipo di tessuto, controllare l’etichetta sul capo stesso. Quasi tutti i capi che possono
essere asciugati indicano specificamente che sono idonei per asciugatura a macchina.
Per evitare l’elettricità statica sui capi, durante i cicli di risciacquo della lavatrice usare un ammorbidente.
Togliere subito dal cestello i capi sintetici per evitare che sgualciscano.
Seguire i seguenti punti:
PRECAUZIONI PER TESSUTI
A
▼Centrifugare la biancheria.
B
▼Dividere la biancheria per tipo o
per fibre di tessuto.
▼Chiudere cerniere e allacciare
bottoni, ricordandosi di vuotare le
tasche dei capi d’abbigliamento.
▼Rivoltare i pullover.
C
▼Aprire l’oblò.
▼Caricare la biancheria nel cestel-
lo, ricordando di caricare le len-
zuola da un angolo.
▼Si raccomanda di caricare capi
piccoli e grandi insieme.
D
▼Chiudere l’oblò.
▼Asciugarsi le mani (non toccare
mai apparecchiature elettriche
con le mani bagnate).
▼Verificare che il pulsante ON/
OFF sia su OFF.
▼
Inserire la spina nella presa elettrica.
E
▼Accertarsi che il selettore pro-
grammi sia posizionato su STOP,
premere il pulsante ON/OFF e
dopo il segnale acustico impo-
stare il programma prescelto.
(Vedere tabella programmi)
▼A questo punto la macchina par-
tirà e la spia rimarrà accesa in
modo continuo.
IMPORTANTE:
- Quando si desidera cambiare
il programma in esecuzione.
- Quando si desidera aggiunge-
re la biancheria a ciclo asciu-
gatura iniziato.
- Quando per qualsiasi ragione
si verifica un' interruzione del-
l'alimentazione elettrica, du-
rante l'asciugatura.
Per far ripartire la macchina è ne-
cessario posizionare la manopo-
la su STOP, attendere che la spia
smetta di lampeggiare e quindi
reimpostare il programma deside-
rato.
Alla fine del ciclo d'asciugatura,
se il selettore non viene girato su
STOP o se il pulsante ON/OFF non
è stato posizionato su OFF, la
macchina effettuerà in auto
matico il ciclo antisgualcitura con
simultanea segnalazione acusti-
ca.
F
▼Dopo aver tolto la biancheria
asciutta, pulire il filtro nel modo
seguente:
- sollevare il filtro;
- aprirlo e pulirlo con una
spazzola morbida;
- chiuderlo e rimetterlo in
sede;
- il filtro dovrà essere lavato
periodicamente con acqua
saponata per rimuovere an-
che le più piccole particelle.
▼Scollegare la spina dalla pre-
sa.
SM1776
9
UTILIZZO DELLA MACCHINA
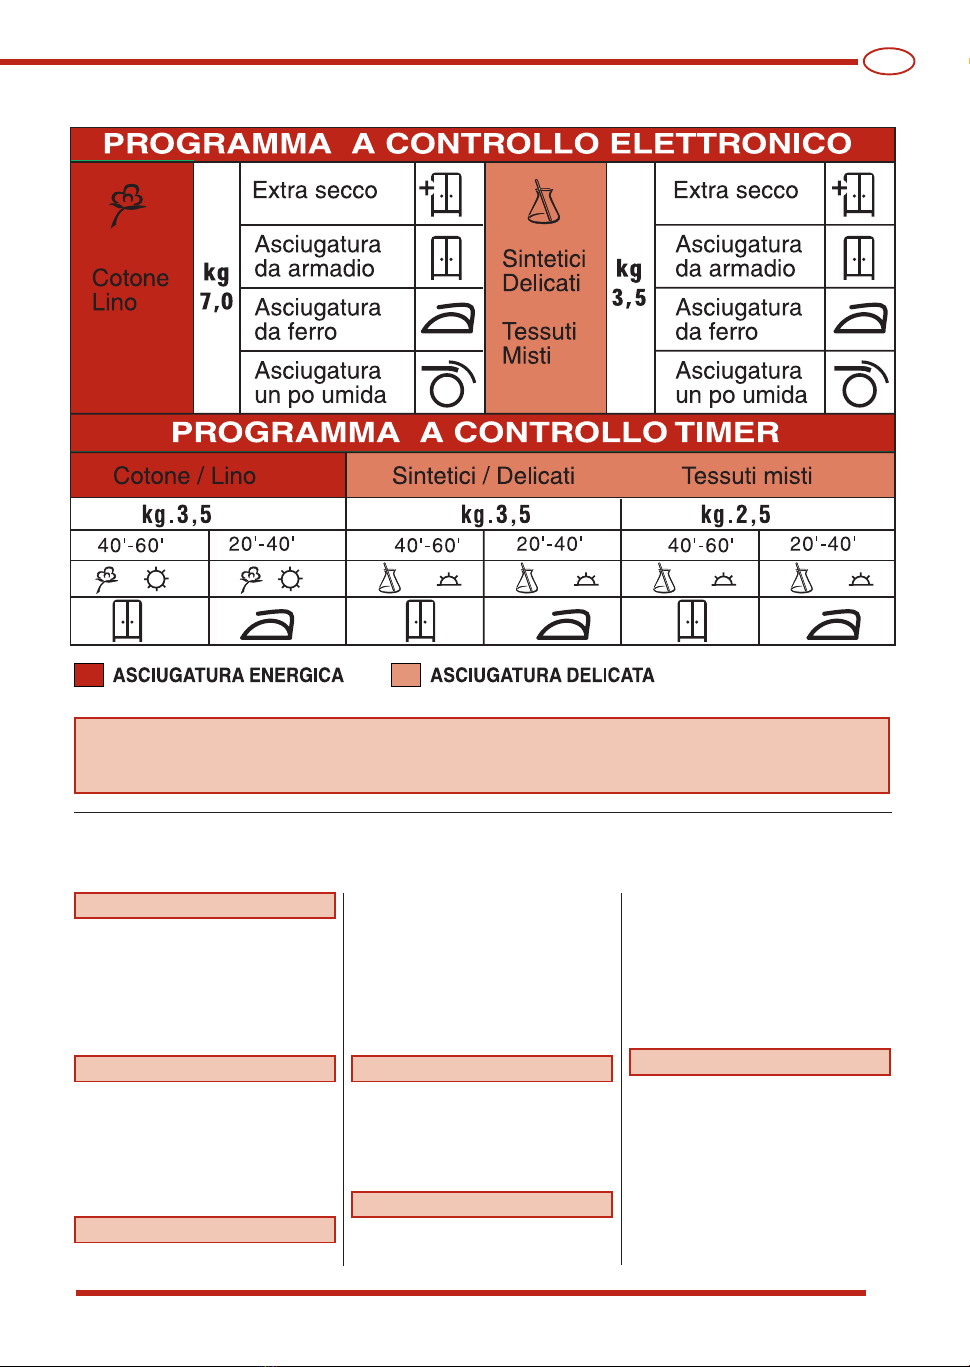
TABELLA PROGRAMMI
IT
Importante: Il tempo di asciugatura dipende da diversi fattori: peso, dimensione dei capi, tipo
di tessuto, umidità. I capi ben strizzati asciugano prima. Per evitare che i capi sgualciscano,
non sovraccaricare l’asciugatrice.
I pesi indicati sono approssimativi e possono variare a seconda del processo di lavorazione, qualità e finitura.
PESI BIANCHERIA
Biancheria da letto
Coperta imbottita 700 g
Lenzuola 550 g
Lenzuola di sopra 600 g
Federa cuscino 180 g
Lino per la casa
Asciugapiatti 90 g
Asciugabicchieri 70 g
Asciugamano grezzo 20 g
Salvietta bagno 200 g
Altri capi di biancheria
Accappatoio 1200 g
Salvietta bagno 800 g
Camicia donna 300 g
Camicia uomo 600 g
Camicie donna/uomo
in tessuto sintetico 300 g
Lino da tavola
Tovaglia 250 g
Tovaglia grande 1000 g
Tovaglioli 80 g
Abbigliamento uomo
Camicia lava e indossa 250 g
Canottiera (senza maniche) 120 g
Mutande 80 g
Mutandoni 250 g
Pigiama 480 g
Camicia da notte 400 g
Fazzoletti 25 g
Abbigliamento donna
Camicia 100 g
Maglietta 100 g
Mutandine 80 g
Sottoveste 150 g
Camicia da notte 180 g
Pigiama 450 g
Fazzoletti 15 g
SM1776
10
IT
Tutte le apparecchiature elettriche sono soggette a guasti. Si ricordi che in questi casi si dovrà chiamare
un elettricista qualificato. Potrete comunque risolvere voi stessi molti dei problemi che si verificano.
Importante: In caso di cattivo funzionamento, si ricordi di scollegare immediamente la mac-
china dalla rete d’alimentazione.
Prima di chiamare il nostro Centro Assistenza,verificare i punti di seguito indicati.
MANUTENZIONE
Per garantire risultati ottimali di asciugatura in ogni circostanza, ricordare che il filtro deve essere sempre
pulito. Ricordare di controllare e pulire il filtro dopo ogni ciclo d’asciugatura.
Importante:
Pulire il filtro solo a macchina fredda! Per la pulizia del filtro seguire questa procedura:
PULIZIA DEL FILTRO
INDIVIDUAZIONE GUASTI
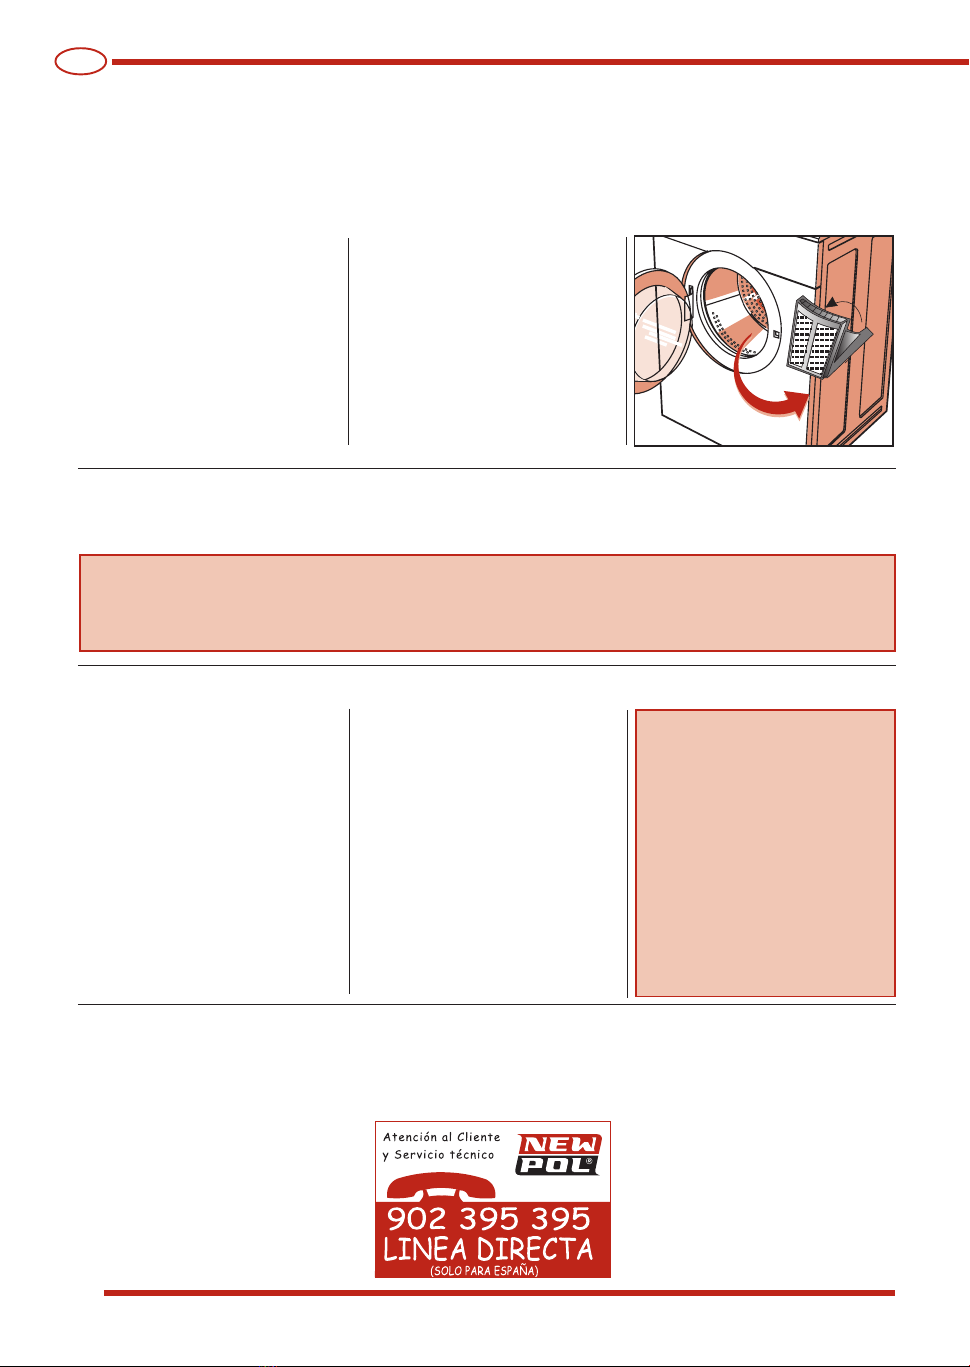
13
▼Aprire l’oblò.
▼Tenere il filtro con entrambe le
mani e spingere verso l’alto
per toglierlo.
▼Allargare leggermente il bor-
do superiore del filtro ed apri-
re il filtro.
▼Togliere la lanugine.
▼Chiudere il filtro accertandosi
che la chiusura ritorni in posi-
zione corretta.
▼Pulire le guide di scorrimento
del filtro della macchina se
necessario con un aspirapol-
vere.
▼Posizionare il filtro sulle sue
guide di scorrimento (fig. 13).
Se la macchina non parte
• assicurarsi che:
1) Verificare di aver effettuato il
collegamento all’alimentazio-
ne di rete.
2) Verificare che la presa sia ef-
ficiente:
2a) è saltato il fusibile? (Il con-
trollo è facile, basta colle-
gare un’altra apparec-
chiatura come una lampa-
da da tavolo).
2b) Sono state seguite tutte le
istruzioni del manuale
d’istruzioni?
Se la macchina non parte
• assicurarsi che:
1) L’oblò è stato chiuso corret-
tamente.
La biancheria non si asciuga
• assicurarsi che:
1) E’ possibile che il tubo scari-
co aria sia piegato o ritorto.
2) E’ possibile che il filtro sia in-
tasato. (Si ricordi che quando si
apre l’oblò, le parti interne del-
l’asciugatrice e la biancheria pos-
sono essere molto calde).
È disponibile presso il vostro venditore l’accessorio per completare la diversa installazione che vi permetterà di
fissare la vostra asciugatrice sopra una lavabiancheria carica frontale per poter economizzare lo spazio. Il modello di
macchina che vi permetterà di fare questo montaggio vi sarà consigliato dal vostro installatore
ACCESSORI OPTIONAL
SOLUZIONE DEI PROBLEMI
Se dopo l’esecuzione delle funzio-
ni descritte, l’apparecchio conti-
nua a non funzionare correttamen-
te segnalare il difetto al centro
assistenza tecnica autorizzato più
vicino. Si prega cortesemente di
comunicare il modello, il numero
di fabbricazione ed il tipo di gua-
sto. Queste informazioni permet-
tono all’operatore dell’assistenza
tecnica di procurarsi le parti di ri-
cambio necessarie e, quindi, ga-
rantiscono una veloce ed efficace
esecuzione della riparazione.
SM1776
11
NOTES AND ADVICE FOR THE USER 3-4
• Technical information 3
DESCRIPTION OF THE APPLIANCE 5
INSTALLING THE APPLIANCE 6-7
• Installation 6
• Levelling the appliance 6
• Connecting the air exhaust tube 6
• Connecting to the mains supply 7
USING THE APPLIANCE 7-9
• Description of the functions 7
• Door 8
• Drying the washing correctly 8
• Precautions for fabrics 8
• Program table 9
• Weights of washing 9
MAINTENANCE 10
• Cleaning the filter 10
• Fault finding 10
• Resolving problems 10
• Optional accessories 10
CONTENTS
ENGLISH
Dear Customer,
Thank you for having chosen our product. Please read these instructions carefully before connect-
ing and using the appliance.
A knowledge of the operating principles will help guarantee correct and safe use of the appliance.
If the appliance is sold or handed over for use by others, remember to give the new user the instruc-
tion booklet.
MODEL: ...................................................................................................................................................................................................................................................
SERIAL NUMBER: ........................................................................................................................................................................................................................
DATE OF PURCHASE: .................................................................................................................................................................................................................
GB
NOTES AND ADVICE FOR THE USER
TECHNICAL INFORMATION
Width cm.:
Height cm.:
Depth cm.:
Dimensions:
59.5
85.0
57.0
7 kg (dry)
see characteristics plate
see characteristics plate
Max. capacity
Power rating
Voltage

SM1776
12
NOTES AND ADVICE FOR THE USER
■This appliance has been de-
signed for use as a domestic
drier.Any other use is consid-
ered as improper and there-
fore dangerous.
■Keep this instruction book
near to the appliance always,
in order that it can be easily
consulted when necessary.
■Any modifications or attempts
to interfere with the appliance
can be dangerous for the user
and may damage the product.
■On delivery of the appliance,
check that it has not been
damaged during transport. If
any damage is discovered,
report the matter to the re-
tailer immediately.
■During the drying cycle, the air in
the room is ducted through the
back of the appliance. Do not
cover the drier with washing or
any other items.
■When positioning the appli-
ance, ensure that the power
supply cable is not kinked or
squashed and is accessible.
■Remember that the door glass
and exhaust tube will heat up
during a drying cycle and can
reach temperatures of up to 60°.
Do not touch these parts be-
fore the cooling cycle has
been completed.
■The appliance must not be used
by children unless supervised.
■Never dry washing that has been
in contact with chemical agents
such as dry-cleaning fluids
These products are volatile
by nature and could cause
an explosion.
■Do not dry items with parts
containing foam rubber or
GB
Never insert or remove the plug from
the mains socket with wet hands.
When servicing or cleaning the appli-
ance, remember to disconnect it from
the mains supply.
Do not pull the power supply cable to
unplug the appliance from the mains
supply. Pull the plug only.
Do not expose the appliance to
atmosphe-ric agents.
The machine must be connected to a
mains socket fitted with an efficient
earth comply-ing with current safety
standards.
Do not use extension leads or multi-
ple plug adapters to connect the ap-
pliance to the mains supply.

SM1776
13
NOTES AND ADVICE FOR THE USER
DESCRIPTION OF THE APPLIANCE
THE MANUFACTURER
WILL NOT BE HELD RE-
SPONSIBLE FOR ANY INCI-
DENTS RESULTING FROM
NON-COMPLIANCE WITH
SAFETY STANDARDS OR
THE REQUIREMENTS OF
THIS INSTRUCTION BOOK.
1- ON/OFF button
2- Delicate or energetic
drying button
3- Drying time control
knob
4- Spin function active in-
dicator light
5- Door
1
The drier is a domestic appliance capable of drying any type of fabric at any time.
rubber in general, in that the
material could melt and dam-
age other items or even the
appliance itself.
■If the appliance is sold or
given away, remember to
hand over this instruction
book with it.This will help the
new owner use the drier both
correctly and safely.
■Do not attempt to repair any
appliance faults alone, in that
repairs carried out by a non-
■The machine has been con-
structed in steel panels which
have been treated and painted
to guarantees that its aesthetic
qualities remain unaltered
over time.
professional may cause seri-
ous damage and will nullify
any rights to repairs under
guarantee.
■Repairs to the appliance can
only be carried out by person-
nel authorised by the cus-
tomer service centres. All re-
pairs must make use of origi-
nal spare parts only.
■Spin dry or wring the wash-
ing well before loading it into
the drier. Spun dry washing
will dry quicker.
GB
■The motor and all moving
parts have been designed and
manufactured to guarantee
the minimum possible noise
levels
■The control panel has been
designed to enable the user to
run the desired drying pro-
gram without difficulty.
■The wide door makes loading
and unloading the washing
much easier.
6- Filter
7- Adjustable feet
8- Exhaust outlet
9- Outlet coupling
10- Exhaust tube
11- Tube support
1243
75
6
11
89 10
2
■Clean the filter thoroughly
each time the drier is used in
order to guarantee perfect air
circulation.
SM1776
14
INSTALLING THE APPLIANCE
INSTALLATION
Installation must be carried out by qualified personnel in line with the instructions supplied by the manu-
facturer. Incorrect installation may result in damage and injury.
GB
■IInstall the drier near to a win-
dow to facilitate the evacuation
of the damp air from the drier.
■The exhaust tube must be
used to prevent condensation,
and must be inserted in hole
Aat the bottom of the back
panel of the appliance (fig. 3).
■Never cover the air intake at
the back of the appliance.
■Place the filter in its normal
position as shown (fig. 4).
A
LEVELLING THE DRIER
CONNECTING THE AIR EXHAUST TUBE
Important: The air exhaust
tube must be connected
even if the air is not dis-
charged outdoors, other-
wise the drier will re-absorb
the discharged damp air and
thus prolong the drying
time. Damp air can also
damage the drier. Although
the air discharged from the
exhaust tube is only warm
and damp and does not con-
stitute a danger, it must
never be directed towards
people, animals or plants.
Important:The exhausted air
must not be conveyed to a
chimney discharging fumes
generated by gas or other
fuel burning appliances.
Adjustable feet. Place the
drier upright so that it rests
firmly on all four feet. Level
the drier by adjusting the feet
as follows:
■Lift the drier slightly.
■Adjust the feet to the correct
height (fig. 5).
(Do not unscrew the feet to
much and do not use a
screwdriver).
■Lower the drier.
A badly levelled machine may
cause damage to the bearings
and lead to their premature
wear. This drier does not need
to be anchored to the floor.
34
Connect the exhaust tube to the
outlet on the back of the drier
(fig.6), as follows:
■Connect one end of the tube to
the connector piece supplied.
■Rotate the connecting piece (to-
gether with the tube) anticlock-
wise in the drier outlet hole.
■Carry the tube away from the
back of the drier to the left or
right by means of the recess
at the bottom of the drier body.
■Position the other end of the tube
near to a window or a ventilation
outlet on an external wall. If this
is not possible, ensure that the
room is well ventilated when the
drier is being used. Use the sup-
port supplied to anchor the tube
(fig. 7).
5
67
■Clean the inside of the drying
drum using a damp cloth to
remove any dust deposits.

SM1776
15
INSTALLING THE APPLIANCE
GB
■Make sure that the voltage in-
dicated on the identification
plate attached to the back of
the appliance corresponds to
that of the mains supply.
■On completion of the installa-
tion, the appliance must be
connected to the mains sup-
ply through a two-pole switch.
■All cutouts, electric wiring and
mains sockets must have a rat-
ing such that enables them to
support the maximum load indi-
cated on the identification plate.
■The mains supply to which the
appliance is connected must
be fitted with an earthing sys-
tem. If this is not the case, the
manufacturer will not be held
liable for any incidents that
may occur (fig. 8).
■If the power supply cable is dam-
aged in any way, contact the ap-
propriate specialised customer
technical service centre.
■The drier must not be con-
nected to the mains supply
using indirect methods such
as extension leads or multiple
adapters.
■Position the appliance so that
the power supply cable is eas-
ily accessible for disconnec-
tion when the need arises.
Important: On completion of
the drying cycle, disconnect
the appliance from the mains
supply to prevent young chil-
dren from operating the
drier.
8
■Drying time control knob:Rotate the knob to select the required
drying times (fig._9). Refer to the program table to select the pro-
gram according to the type of fabric.
■At the end of each drying cycle, the appliance effects a 4-5 minute
cooling cycle, during which time the appliance is still switched on.
■ON/OFF button: Press this button to connect the appliance to the
mains supply and not to start it. (fig. 10).
■Delicate or energetic drying button: This button is used to se-
lect the type of drying cycle to run: Energetic or delicate (fig.11).
■INDICATOR LIGHT: Stays lit during the drying cycle.
Flashes before the program has been set, and at the end of the
drying cycle together with an intermittent audible signal.
USING THE APPLIANCE
DESCRIPTION OF THE FUNCTIONS
1
0
1
0
9
10
11
ELECTRICAL CONNECTION
SM1776
16
USING THE APPLIANCE
DOOR
The drier is the front-loading type. Pull the handle outwards, without forcing it, and gently open the door.
The appliance will stop if the door is opened during a drying cycle. The drum will continue to rotate for a
while, slowing down gradually to a stop.
Important:
■Obviously, during a drying
cycle the washing in the drum
will be hot. The washing is
cooled during the cooling
cycle (Last 4-5 minutes of
each cycle).
■To avoid being scalded by
GB
steam or burned by the hot
washing, pay particular atten-
tion when opening the door
during the drying phase.
DRYING THE WASHING CORRECTLY
12
F
▼After having removed the dry
washing, clean the filter as fol-
lows:
- Lift the filter
- Open it and clean it using a
soft brush
- Close it and replace it in its
seating
- The filter must be washed
periodically using soapy wa-
ter in order to remove very
small particles.
▼Unplug the appliance from the
mains supply.
In the case of doubt as to the type of fabric, read the label on the item itself. Almost all items that can be
machine dried have this information specified on the label. To avoid static electricity being generated in
the items, add a conditioner to the rinse cycle of the washing machine.
Remove synthetic materials from the drum immediately to prevent them from creasing.
Follow the procedure below:
the ON/OFF button and, after the
audible signal, set the required
program. (see program table)
▼At this point, the appliance will
start and the indicator light will
stay on.
IMPORTANT:
- When you want to change the
programme being used;
- When you want to add some
items after the drying cycle
has already started;
- When, for whatever reason,
there is an electric power cut-
out during drying cycle;
In order to re-start the machine,
position the knob on STOP,wait
for the light to stop flashing and
then reset the programme re-
quired.
At the end of the drying cycle, if
the selector is not turned on STOP,
or if the ON/OFF switch is not po-
sitioned on OFF, the machine will
automatically perform an anti-
crease cycle with simultaneous
acoustic signalling.
PRECAUTIONS FOR FABRIC TYPES
A
▼Spin the washing.
B
▼Separate the items into types or
fabrics.
▼Close any zips and fasten buttons
and remember to empty the pock-
ets of any clothing.
▼Turn jumpers inside out.
C
▼Open the door
▼Load the washing in the drum and
remember to load sheets from a
corner first.
▼It is advisable to load small and
large items together.
D
▼Close the door
▼Dry your hands (never touch elec-
tric appliances with wet hands).
▼Make sure that the ON/OFF but-
ton is OFF.
▼Insert the plug in the mains
socket.
E
▼Make sure that the programmer
is positioned on “STOP”, press

SM1776
17
USING THE APPLIANCE
PROGRAM TABLE
GB
Important:The drying time is dependent on a number of factors: weight, size of the items, type
of fabric, degree of dampness.Well wrung/spun items dry quicker.To prevent items from creas-
ing, do not overload the drier.
The indicated weights are approximate and may vary according to their manufacture, quality and finish.
WASHING WEIGHTS
Bedding
Quilt 700 g
Bottom sheet 550 g
Top sheet 600 g
Pillowcase 180 g
Household linen
Tea towel (dishes) 90 g
Tea towel (glasses) 70 g
Flannel 20 g
Hand towel 200 g
Other linen items
Bath robe 1200 g
Bath towel 800 g
Lady’s blouse 300 g
Man’s shirt 600 g
Blouse/shirt in synthetic
material 300 g
Table linen
Tablecloth 250 g
Large tablecloth 1000 g
Napkin 80 g
Men’s clothing
Wash ‘n wear shirt 250 g
Vest (sleeveless) 120 g
Briefs 80 g
Long johns 250 g
Pyjamas 480 g
Nightshirt 400 g
Handkerchief 25 g
Ladies’ clothing
Blouse 100 g
Jumper 100 g
Briefs 80 g
Slip 150 g
Nightdress 180 g
Pyjamas 450 g
Handkerchief 15 g

SM1776
18
GB
All electric appliance may breakdown at some time. Remember to call a qualified electrician in these
cases. However, many problems can be resolved without the need for external intervention.
Important: If a fault occurs, disconnect the appliance from the mains supply immediately.
Before calling the customer service centre, check the points listed below.
MAINTENANCE
In order to guarantee optimum drying results under all circumstances, remember that the filter must be
cleaned regularly. Remember to check and clean the filter after each drying cycle.
Important:
The filter must only be cleaned when the appliance is cold! Clean the filter following the procedure described below:
CLEANING THE FILTER
FAULT FINDING
13
▼Open the door.
▼Grasp the filter in both hands
and push it upwards to remove
it.
▼Carefully widen the top edge
and open the filter.
▼Remove the woollen particles.
▼Close the filter, making sure
that the catch closes at the
correct position.
▼Clean the filter slide guides on
the appliance, using a vacuum
cleaner if necessary.
▼Reposition the filter in the slide
guides (fig. 13).
If the drier doesn’t start
• Check that:
1) The appliance is plugged
into the mains supply.
2) The mains socket is work-
ing correctly:
2a)The fuse has not
blown. (Check by plug-
ging in another appli-
ance such as a table
lamp).
2b) All the instructions in
the manual have been
followed.
If the drier doesn’t start
• Check that:
1) The door is closed properly.
The washing does not dry
• Check that:
1) The air exhaust tube is not
twisted or kinked.
2) The filter is not blocked.
(Remember that when the
door is opened, the internal
parts of the drier and the
washing may be very hot).
The retailer can provide an accessory to enable the drier to be mounted on top of a front-loading washing machine,
thus saving space. The installer will inform you of the appliance model for which this option is possible.
OPTIONAL ACCESSORIES
RESOLVING PROBLEMS
If, after all these checks have been
carried out, the appliance still
does not work, inform the nearest
customer service centre.
When contacting the service cen-
tre, inform them of the appliance
model, serial number and type of
fault.
This information will help the ser-
vice centre operator in procuring
the necessary spare parts, thus
guaranteeing a speedy and
efficient repair.

SM1776
19
NOTAS Y CONSEJOS PARA EL USUARIO 43-45
• Datos técnicos 43
DESCRIPCIÓN DE LA MÁQUINA 45
INSTALACIÓN DE LA MÁQUINA 45-47
• Instalación 45
• Puesta en plano del secador 46
• Conexión del tubo de evacuación del aire 46
• Conexión a la instalación eléctrica 47
USO DE LA MÁQUINA 47-49
• Descripción de las funciones 47
• Puerta 48
• Para secar correctamente la ropa 48
• Precauciones con los tejidos 48
• Tabla de los programas 49
• Pesos de la ropa 49
MANTENIMIENTO 50
• Limpieza del filtro 50
• Investigación de las averías 50
• Solución de los problemas 50
• Accesorios opcionales 50
ÍNDICE
ESPAÑOL
Estimado Cliente,
Le damos las gracias por haber elegido uno de nuestros productos. Le rogamos leer cuidadosamente
las instrucciones para el uso antes de la conexión y el uso de la máquina.
Conocer los principios de funcionamiento le garantizará un uso correcto y seguro del aparato.
En caso de venta, o bien de cesión de la secadora, recuerde entregar el manual de uso al nuevo
Propietario.
MODELO: ...................................................................................................................................................................................................................................................
NÚMERO DE FABRICACIÓN: .................................................................................................................................................................................................
FECHA DE ADQUISICIÓN: .........................................................................................................................................................................................................
ES
NOTAS Y CONSEJOS PARA EL USUARIO
DATOS TÉCNICOS
Ancho cm.:
Altura cm.:
Profundidad cm.:
Dimensiones:
59.5
85.0
57.0
7 kg (secos)
ver etiqueta características
ver etiqueta características
Capacidad Máx
Potencia Nominal
Tensión

SM1776
20
NOTAS Y CONSEJOS PARA EL USUARIO
■El empleo de este aparato
debe ser el de secadora para
uso doméstico, cualquier otro
empleo debe considerarse im-
propio y por lo tanto peligroso.
■Conserve siempre el presen-
te manual de uso, cerca de la
secadora para poder consul-
tarlo rápidamente en caso de
necesidad.
■Cualquier modificación o in-
tento de manipulación del
aparato puede ser peligroso
para el usuario y provocar da-
ños al producto.
■A la entrega del electrodo-
méstico, verifique que esté
íntegro sin daños debidos al
transporte. Si detecta algún
daño diríjase al revendedor.
■Durante el ciclo de secado, el
aire de la habitación es encau-
zado a través del lado poste-
rior del electrodoméstico. No
cubra la secadora con ropa u
otras cosas.
■Al posicionar el aparato verifi-
que que el cable de alimenta-
ción no quede plegado ni com-
primido y quede accesible para
eventuales intervenciones.
■Recuerde que durante el ciclo
de secado, el vidrio de la puer-
ta y el tubo de vaciado se ca-
lientan hasta a una tempera-
tura de 60°. No toque estas
partes antes que termine el
ciclo de enfriamiento.
■Está prohibido que los niños
usen la máquina sin vigilancia.
■No haga secar nunca prendas
de ropa que hayan estado en
contacto con agentes químicos
como por ejemplo líquidos para
la limpieza en seco.
En efecto, éstos son de na-
turaleza volátil y pueden
causar explosiones.
■No seque prendas que tengan
esponja de goma o partes de
goma, porque pueden disolver-
ES
No conecte o desconecte el enchufe
de la toma de corriente con las ma-
nos
mojadas.
Al ejecutar las revisiones o la limpie-
za recuerde desconectar el aparato
de la toma de corriente eléctrica.
Si desea desconectar la máquina de
la toma de corriente tire del enchufe
y no del cable eléctrico.
No exponga el aparato a los agentes
atmosféricos.
La máquina debe conectarse a una
toma de corriente eléctrica provista
de puesta a tierra y conforme a las
exigencias de seguridad.
Está prohibido conectar la máquina
a la toma eléctrica utilizando exten-
siones o enchufes múltiples.
This manual suits for next models
1
Table of contents
Languages:
Other NEW POL Dryer manuals


