Nexigo B10 User manual

User Manual
NexiGo ADD-ON BABY CAMERA UNIT
B10
Register to get an EXTRA ONE year warranty. Only
valid if registering within 14 days of product delivery.
nexigo.com/warranty

Welcome to the NexiGo Family!
Thank you for choosing the NexiGo B10 Add-On Baby Camera Unit!
You are now part of an exclusive club: the NexiGo family! It's our job to
make sure you enjoy your membership. If you have any problems
This product is covered by our industry-leading 1-year manufacturer’s
warranty. Make sure to register your purchase at nexigo.com/warranty
within 14 days of the delivery date to extend your warranty coverage
to TWO Years!
From all of us here at NexiGo, we want to welcome you again to the
family. We thank you deeply for your trust and for your business. We
know you'll love it here. We look forward to serving you again in the
near future.
Yours Sincerely,
The NexiGo Team
Website: www.nexigo.com
Manufacturer: Nexight INC
Email: [email protected]
Tel: +1(458) 215-6088
Address: 11075 SW 11th St, Beaverton, OR, 97005, US
- 1 -
The NexiGo B10 ADD-ON BABY CAMERA can be paired with the B200
Monitor only. It has a night vision mode so even in total darkness you
make sure that everything is exactly the way you want in your childs
room. Finally, with built-in Lullaby's if you just are not able to get them
to go to sleep you can put on the music and leave the room so they
B10 is here to help your sleep-addled brain and to make sure you
always know exactly what is going on in your baby's room.
What’s in the Box?
1 x Video Baby Camera
1 x Camera Wall Bracket
1 x 3M Double-Sided Adhesive Tape
- 2 -

Wide-Angle Lens
Microphone
Speaker
1
3
1
3
2
2
45
4
5
6
6
7
7
Temperature Sensor Antenna
Product Name NexiGo Add-On Baby Camera Unit
Model B10
- 3 -
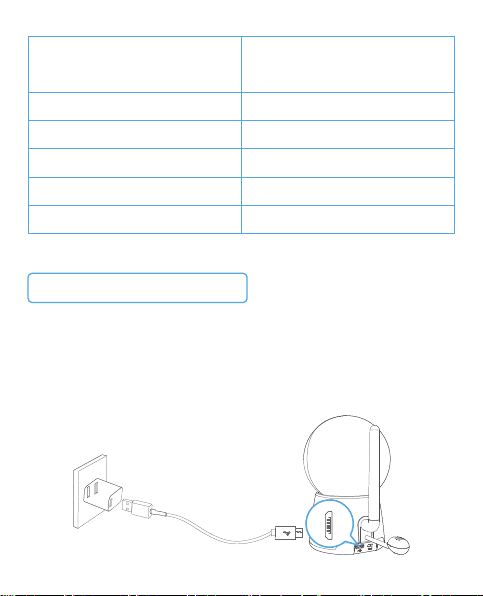
Camera Micro-USB Power Cable into the Camera, and
then insert the other end of the cable into the Camera Power
Adapter.
Transmission Range
Power Input
Working Temperature
Storage Temperature
Speaker
1280 x 720
-10°C ~ +50°C
-20°C ~ +60°C
1W
- 4 -

1. CameraMonitor you’ve
already had.
on the right side of the Monitor
for two seconds to turn it on.
and select to enter the
corresponding interface.
MENU
OK
- 5 -

4. Select Camera Pairing from the list below. Choose the Camera
number you wish to add, then press OK Add
to begin pairing.
Pairing
- 6 -

1. To disconnect a camera, navigate to:
. Select the Camera you wish to disconnect, then
select Delete to disconnect the camera.
- 7 -

2. If a Camera becomes disconnected unexpectedly for any reason, an
camera:
corner or on a . Do
not mount this from a ceiling, it is not intended to hang and may
become detached and fall.
from where it is mounted.
The camera must have a nearby power outlet that can be reached
without using an extension cord.
- 8 -

Camera Wall Bracket where you want it and locate
the screw holes in the mount. Mark each hole carefully with a
2) Set aside the bracket and then drill a hole at least 6.0 mm deep
at each mark. (Drill and drill bits NOT included.)
NOT included.)
heads.
b. For Flat Walls
- 9 -

with the notch in the back facing upwards as shown below. DO NOT
5) Align the Slide Locks on the Camera Wall Bracket with the holes
b. For Flat Walls
- 10 -

Camera Wall Bracket
camera:
from where it is mounted.
The camera must have a nearby power outlet that can be reached
without using an extension cord.
on your Monitor.
1) Adhere the to both outer
sidewalls of the Camera Wall Bracket as shown below.
MENU
OK
- 11 -

Camera Wall Bracket
are securely touching the wall.
3) Align the Slide Locks on the Camera Wall Bracket with the holes
secure it in place.
- 12 -

on your Monitor.
MENU
OK
- 13 -

chargers may cause damage to the products and void any warranty.
should be properly stored out of reach of children.
Do not use or store the Camera in temperatures below 14°F or above
122°F (-10°C to 50°C).
sunlight. If in direct sunlight ensure that it is shaded and has
- 14 -
responsible for compliance could void the user’s authority to operate
(1) this device may not cause harmful interference, and
(2) this device must accept any interference received, including

facebook.com/nexigo1
Get in touch with FREE online services.
interference by one or more of the following measures:
that to which the receiver is connected.
FCC ID: 2AWDN-B10
Model: B10
RF Exposure Warning Statements:
for an uncontrolled environment.
distance 20cm between the radiator & body.
Table of contents
Other Nexigo Baby Monitor manuals


