Nidec COPAL CLM-20 User manual

CLM-20
CardMark Manual
Version 1.2
Nidec Copal Corporation
History of Changes
Version
Date
Description
1.0
16-May-2013
Released initial version with contents separated from the
maintenance manual.
1.1
16-May-2015
Reviewed
1.2
15-Jun-2016
Added Sequential numbering
Changed the face image

CLM-20 CardMark
Page 2 of 27 Nidec Copal Corporation
Table of Contents
1. Installation and Uninstallation................................................................................................... 3
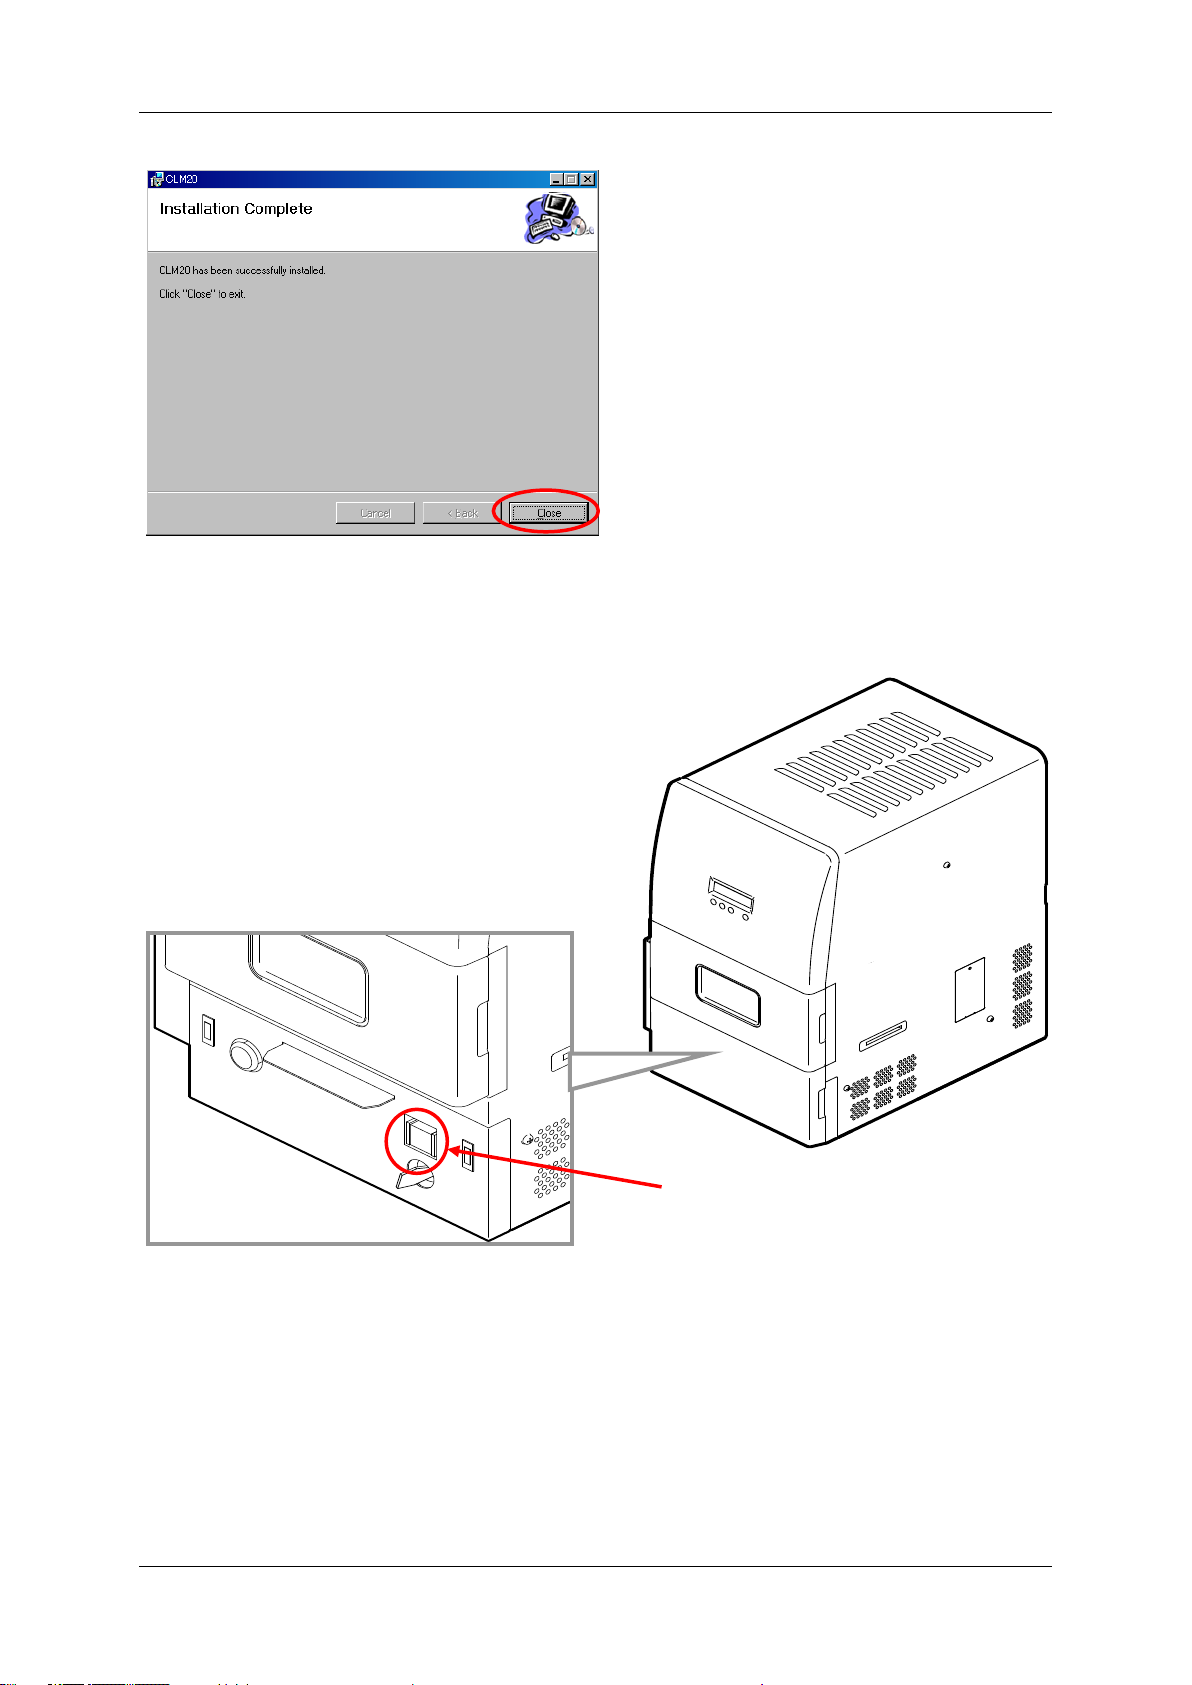
1.1. Installation.......................................................................................................................... 3
1.2. Verifying Installation........................................................................................................... 5
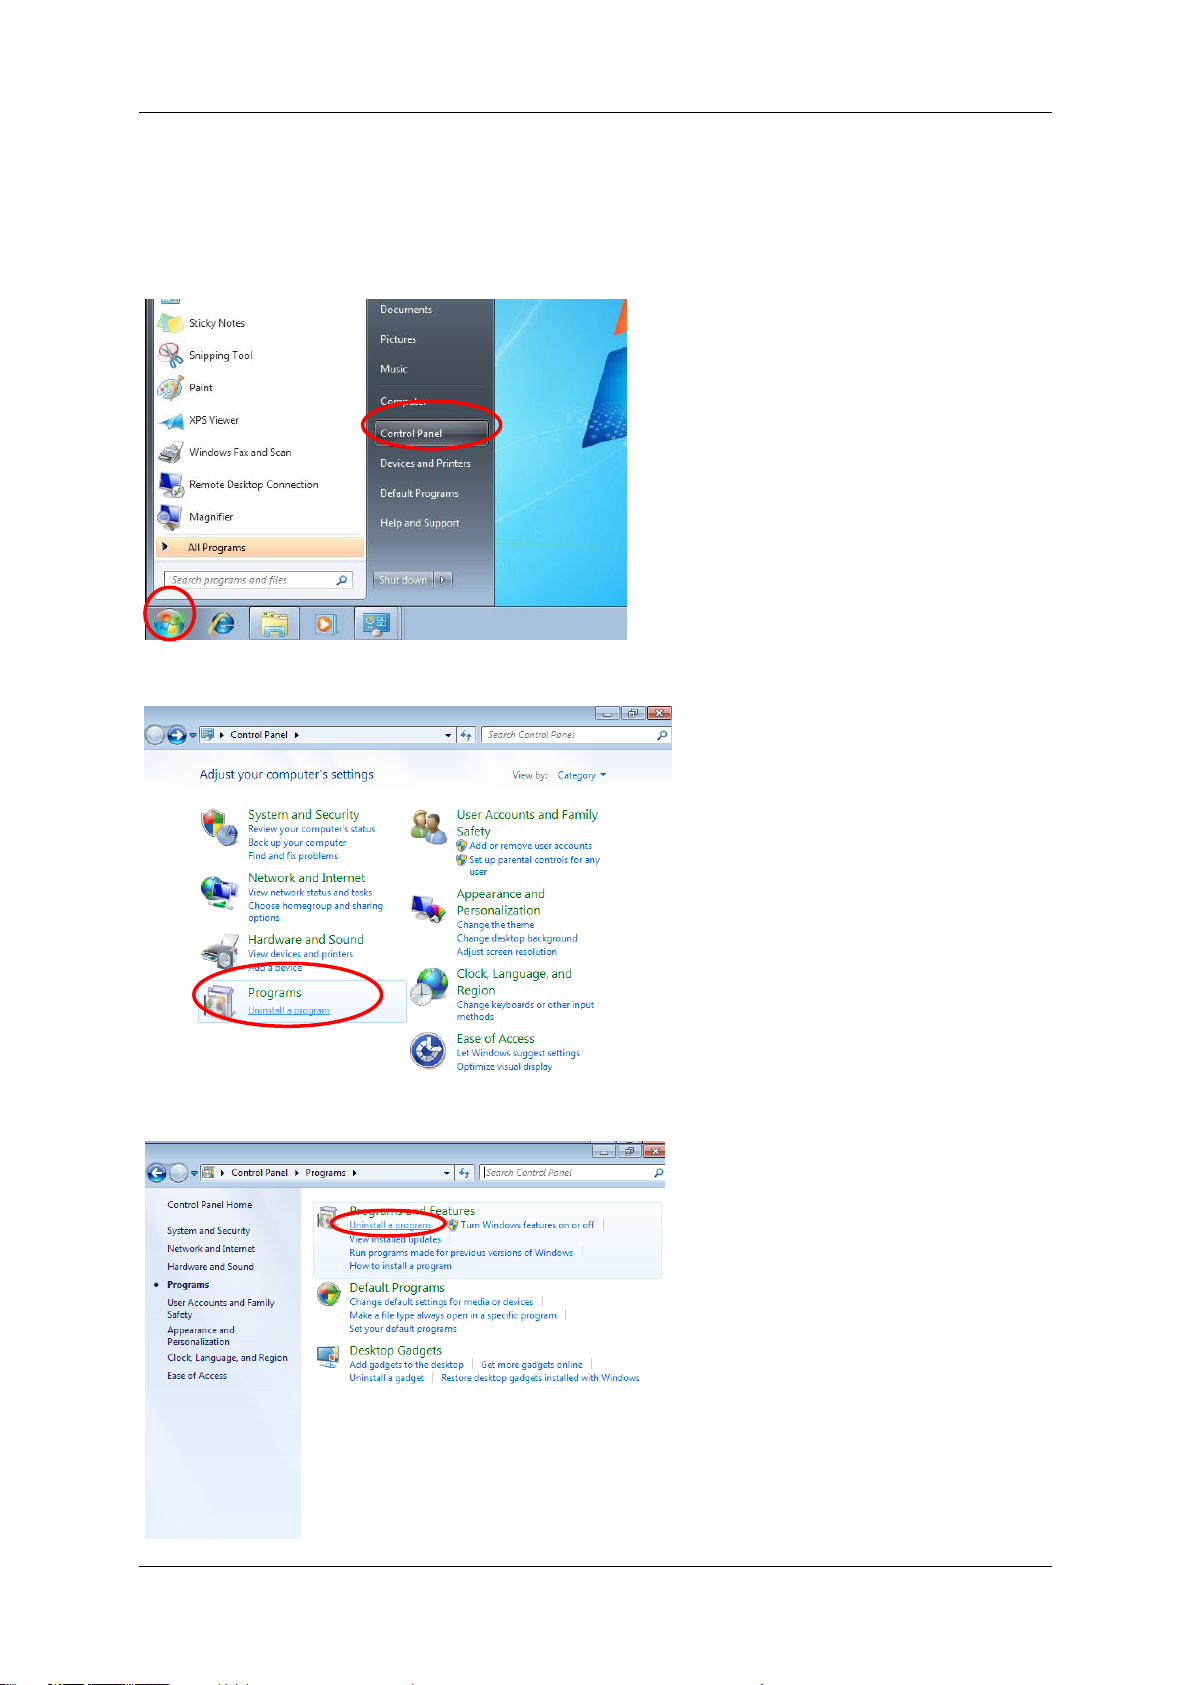
1.3. Uninstallation ..................................................................................................................... 8
2. Screen Images.........................................................................................................................11
2.1. Startup...............................................................................................................................11
2.2. Laser Control ................................................................................................................... 12
2.3. Add item........................................................................................................................... 12
2.4. Edit item........................................................................................................................... 12
2.5. Total Control..................................................................................................................... 13
2.6. Manual Control................................................................................................................. 13
2.7. Other................................................................................................................................ 13
3. Automatic Marking .................................................................................................................. 14
3.1. Select Marking File .......................................................................................................... 14
3.2. Specify number of Marking.............................................................................................. 14
3.3. Start Marking.................................................................................................................... 14
4. Add/Edit/Delete....................................................................................................................... 15
4.1. Common........................................................................................................................... 15
4.2. Add Text........................................................................................................................... 16
4.3. Add Bar Code .................................................................................................................. 17
4.4. Import File button............................................................................................................. 18
4.5. Edit/Delete ....................................................................................................................... 19
4.6. Sequential Numbering..................................................................................................... 20
5. Example for Ordinary Marking................................................................................................ 21
5.1. Example........................................................................................................................... 21
5.2. Creating the data ............................................................................................................. 22
5.3. Saving the marking data (.lcpl)........................................................................................ 26
5.4. Marking ............................................................................................................................ 26

Installation and Uninstallation CLM-20 CardMark
Page 3 of 27 Nidec Copal Corporation
1. Installation and Uninstallation
CardMark is the sample application developed based on the SDK of CLM-20. This application is
developed to evaluate each function and performance of CLM-20 such as card transports, test
marking and single unit movement. The applicable OS is Windows 7.
Attention: This application is subject to change without any notice due to improvements or any
other reasons.
The functions or performance may not be satisfied due to PC conditions,
software environment or any other reasons.
Disclaimer:
Nidec Copal shall not be held responsible for any claims, losses or expenses suffered, directly
or indirectly, by Users or any third party related to the Software or the use of Software
regardless of whether any possibility of such claims, losses or expenses were made known to
Nidec Copal beforehand and Users agree to hold Nidec Copal harmless against any such
claims, losses or expenses.
THIS SOFTWARE IS PROVIDED WITHOUT WARRANTY OF ANY KIND WHETHER
EXPRESS OR IMPLIED, INCLUDING BUT NOT LIMITED TO IMPLIED WARRANTIES OF
MERCHANTABILITY, FITNESS FOR A PARTICULAR PURPOSE, RELIABILITY OF
OPERATION AND NONINFRINGEMENT OF THIRD PARTY RIGHTS.
1.1. Installation
Installation is required to use the CardMark. You also need to install the laser marker SDK and
the card control SDK separately. For the procedure to install those SDK, refer to those
specifications.
Run “setup.exe” in “App¥CardMark¥Release_????” of the disk, then the following screen will
appear. Click “Install”.
Note: ???? of the filename represents version of the setup.

Installation and Uninstallation CLM-20 CardMark
Page 4 of 27 Nidec Copal Corporation
Click “Next”according to the descriptions on the screen.

Installation and Uninstallation CLM-20 CardMark
Page 5 of 27 Nidec Copal Corporation
When the following screen appears, the installation has been successfully completed.
1.2. Verifying Installation
Check if the drivers and CardMark software are correctly installed.
1) Turn the power of CLM-20 on and connect it to your PC.
Turn the sub-power switch on check
if the orange lamp changes from
blinking to lighting.

Installation and Uninstallation CLM-20 CardMark
Page 6 of 27 Nidec Copal Corporation
2) Click CardMark icon on the desktop.
3) The installation of laser control drivers and the CardMark has been successful, if the screen of
your PC is displayed like the above,
If something is wrong, try restarting the CLM-20 several times.
If your PC does not recognize the CLM-20, the screen may be like the following.
The cause can be wrong connection between your PC and the CLM-20 or failure in the driver
installation. Check the connection again and try installation of driver again.
Also refer to the chapter 4 “Installation Failure on both 32-bit and 64-bit OS” of the CLM-20
Press “Status Check”
Check if green, green,
green and yellow
colors light from left to
right.
Check if the
background is white.
Check if the serial
number of laser
equipment is indicated
here.
Background is not
white.

Installation and Uninstallation CLM-20 CardMark
Page 7 of 27 Nidec Copal Corporation
software installation manual
Check Serial number and Laser status.
(Display can be slightly different.)
If the problem is not solved though you restart the “Card Mark”and restart the CLM-20, you should
check if wrong version of “CardMark”has been installed. Uninstall the “CardMark”and then
install the correct version of “CardMark”.
The serial number of
laser equipment is
displayed as 0.
Colors are other than
green, green, green
yellow.
Background is white.

Installation and Uninstallation CLM-20 CardMark
Page 8 of 27 Nidec Copal Corporation
1.3. Uninstallation
If you install 64-bit version of CardMark into the 32-bit OS or vice versa by mistake, you need to
uninstall the software and install the correction version.
1.3.1. Windows 7
1) Open “Control Panel”.
2) Select “Programs”
3) Select “Uninstall a program”.

Installation and Uninstallation CLM-20 CardMark
Page 9 of 27 Nidec Copal Corporation
4) Select (double-click) “CLM20”.
5) Press “Yes”.

Installation and Uninstallation CLM-20 CardMark
Page 10 of 27 Nidec Copal Corporation
1.3.2. Windows XP
1) Open “Control Panel”.
2) Select “Add or Remove Programs”.
3) Select “CLM20”and press “Remove”.

Screen Images CLM-20 CardMark
Page 11 of 27 Nidec Copal Corporation
2. Screen Images
CardMark enables feeding of Card and marking using the application created by SDK. It is used
for evaluation and adjustment.
2.1. Startup
Run CardMark.exe. Following dialogue will be displayed.

Screen Images CLM-20 CardMark
Page 12 of 27 Nidec Copal Corporation
2.2. Laser Control
Add item
Edit item
2.3. Add item
2.4. Edit item
Clicking this will make the connection
with CLM-20 (normally this is not
needed because of automatic
connection)
When the connection is made, serial
number of the laser control unit will be
indicated.
Laser switch
(Push switch at the
front of power
supply)
Guide beam
illumination center
Guide beam illumination
Marking range
Laser status
Check and display
Laser status
Displayed in code
(hexadecimal)
Marking
Time-out period [s]
Specify marking speed
Normal speed: displayed as [speed (normal)]
At high speed: displayed as [speed (fast)]
Power: On: Yellow / Off: Gray
Emergency: On: Red / Off: Green
LD fault: On: Red / Off: Green
Interlock: On: Red / Off: Green
Add Circle/Ellipse
Add Text button
Add Rectangle
Import File button
Add Bar Code button
Change Parameter
button
Select item for edit
Delete button
Save button
Load data button

Screen Images CLM-20 CardMark
Page 13 of 27 Nidec Copal Corporation
2.5. Total Control
This is the operation to automatically feed in Card, marking and feed out Card.
2.6. Manual Control
This is to make each individual operation one by one
2.7. Other
Number of card to
be marked
Automatic Marking Start
button
Clear Front File designation
Button to select
marking Image for the
front side
Button to select
marking Image for the
back side
Select and set MLI/CLI marking
Clear Back File designation
MLI/CLI Setting
To reverse card
To insert card
To eject card
Reset CLM-20
Obtain Information
Display Information
Shift card position for
optional lens
Manual Marking Start button
*Make sure that the card
is correctly set before
starting marking
CLM-20-IRD
CLM-20-CAM
Forward card
to camera unit
Send card to
reject stacker
Display image of the card in camera
unit. You can save the card image
and OCR it.
Display image of the card in camera
unit. You can extract and save the
image for template matching.
Set card at contact
card R/W
Set card at
contactless card R/W
Reject card
Finish
Display card frame

Automatic Marking CLM-20 CardMark
Page 14 of 27 Nidec Copal Corporation
3. Automatic Marking
3.1. Select Marking File
Select image for the front side by clicking [Button to select marking image for front side]. If
continue to mark on the back side, select image by clicking [Button to select marking image for
back side]. Select file from folder. File Extension is “lcpl”
3.2. Specify number of Marking
Specify number of marking by altering the number as shown below.
3.3. Start Marking
Clicking [Automatic Marking Start button] will let you start the Marking (it is common between
manual insert and hopper connection).

Add/Edit/Delete CLM-20 CardMark
Page 15 of 27 Nidec Copal Corporation
4. Add/Edit/Delete
4.1. Common
4.1.1. Specify position
Enter values at [X:] and [Y:] of the popup window. Specify coordinate with upper left corner of the
item being the basis (unit: mm)
4.1.2. Power
Specify laser output between 0 and 100 %
4.1.3. Step
Resolution
Enter a value between 7 and 100 μm.
Input value
Converted to dpi
84
300
64
400
51
500
42
600
36
700
32
800
Selecting finer resolution will increase the marking time as well as increasing energy per unit area
therefore resulting in a darker density. Adjust density by power.
4.1.4. Speed
Enter a value between 2 and 100 %.
4.1.5. Pulse
Times of marking for pixel.
Enter a value between 1 and 10 times.
4.1.6. Pass
Times of marking for object.
Enter a value between 1 and 10 times.
Edited data may be saved by clicking [Save] button
X
Y
(0,0)
(+)
(+)
(-)
(-)

Add/Edit/Delete CLM-20 CardMark
Page 16 of 27 Nidec Copal Corporation
4.2. Add Text
By Clicking [Add Text…] button, following Window will appear on the screen.
Specify font
Specify font style
Click [OK] after specifying parameters will fix the selected parameters.
Specify character string
Specify character size
(letter height)
Specify coordinate
Specify whether fill is on or
off
Specify alignment
Specify rotation
angle

Add/Edit/Delete CLM-20 CardMark
Page 17 of 27 Nidec Copal Corporation
4.3. Add Bar Code
By clicking [Add Bar Code...], Widow shown below will appear.
Code examples
QR-Code
Data Matrix
FPD417
Specify Data
Specify Bar
Code type
Specify
Coordinate
Specify
Coordinate
Specify rotation angle (in a
unit of 90 degrees)
Click [OK] after specifying parameters will fix the selected parameters

Add/Edit/Delete CLM-20 CardMark
Page 18 of 27 Nidec Copal Corporation
4.4. Import File button
By clicking [Import File] button, window to select file as indicated below will appear.
Select file and click [Open (O)].
Select file to add and click [Open].
Note: Specify [Width] and [Height] in the same ratio as the original image data.
Example if the
image is 750 pixels
x 1000 pixels,
30mm (width) and
40mm (height)
could be among the
combinations of
width and height.
With a wrong
combination,
resulting image
could be like
followings.
Specify coordinate
Maintain Width as
basis, alter Height
to keep the ratio the
same as the original
image
Maintain Height as
basis, alter Width to
keep the ratio the
same as the original
image
Specify image file
Specify rotation
angle (in a unit of
90 degrees)
SpecifyAlignment

Add/Edit/Delete CLM-20 CardMark
Page 19 of 27 Nidec Copal Corporation
4.5. Edit/Delete
Click arrow and select item you wish to edit or delete
Selecting item you wish to delete and clicking [Delete] will cause item to be deleted (Please note
that you cannot “undo” delete).
Text
Code
Rectangle
Circle

Add/Edit/Delete CLM-20 CardMark
Page 20 of 27 Nidec Copal Corporation
Image
By selecting the item you wish to change and clicking [Change Param.], property dialog will appear.
If you click [Check], displayed information will be updated. If you click [OK] edited information will
be fixed.
4.6. Sequential Numbering
Characters and barcodes can be designated the sequential numbering function.
It is for the marking of serial number or anything required of sequential numbering on a card. In the
use of characters and barcodes, designate the following sections.
Attention:
Number is counted up after the marking operation is done.
It is counted up even when the marking ended in error.
Please do not forget to save the file each time you temporary stop marking operation using
this function.
After read the file, please make sure a number is correct.
In the use of Auto marking function, an updated default value is saved automatically in a file.
Specify characters
coming after digits.
Specify the default
number.
Specify number of
digits.
Specify numbers
increasing on each
marking.
You can display and check the print result before printing.
Check to specify
numbers.
Specify characters to
precede the numbers.
Table of contents
Popular Desktop manuals by other brands

Addonics Technologies
Addonics Technologies ST3 user guide

aspenhome
aspenhome IML-303-GRY Assembly instructions

Compaq
Compaq Compaq Evo D310 MT Hardware reference guide

HP
HP Pavilion t200 - Desktop PC Technical specifications

HP
HP Proliant ML350 Generation 3 specification

Lenovo
Lenovo 7061 Hardware installation and replacement guide