Nippon Genetics FastGene FAS-V User manual
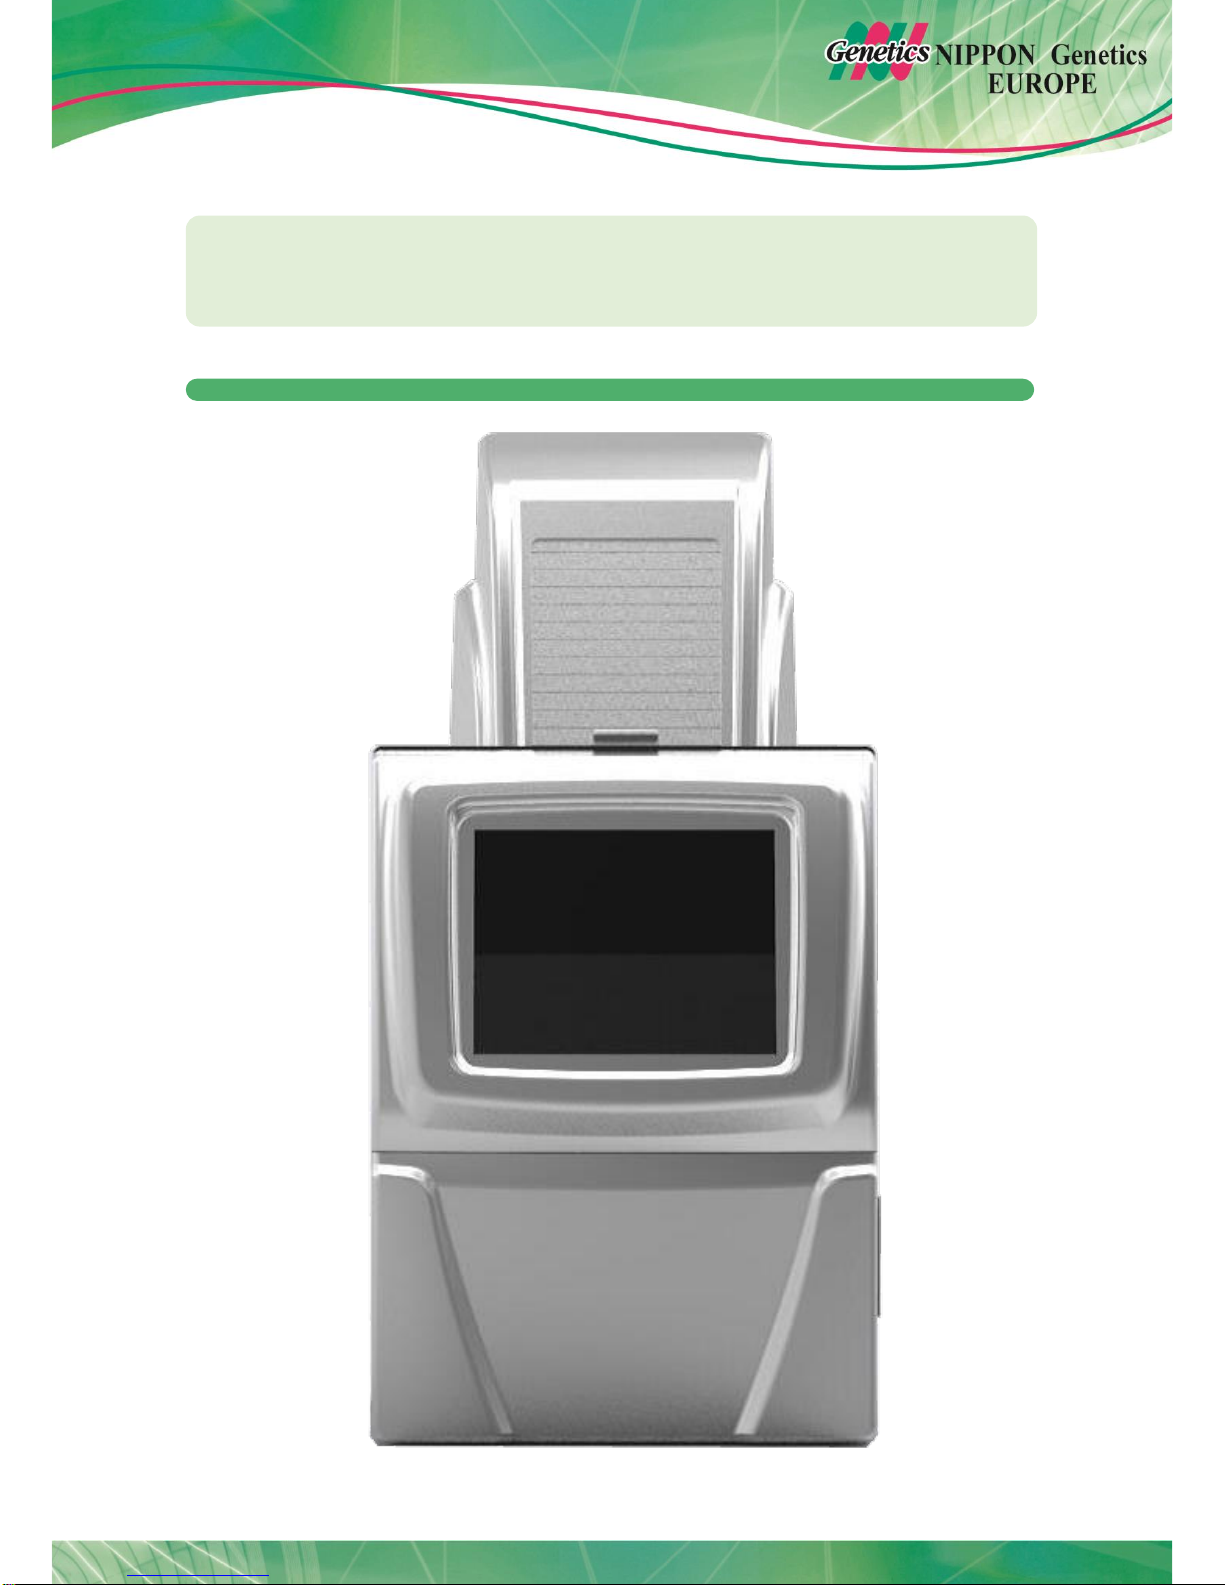
FastGene®FAS-V Imaging System
Catalogue Number GP-FAS-V

2
Content
1. SAFETY INFORMATION 3
2. WARRANTY 3
3. CONTACT DETAILS 3
4. REGULATORY NOTICE 4
5. IMPORTANT NOTICE 4
6. SPECIFICATION 5
7. NOMENCLATURE 6
8. OPERATING THE FASTGENE®FAS-V IMAGING SYSTEM 7
7.1. SELECTING THE LIGHT SOURCE 8
7.2. SELECTING THE EXPOSURE TIME 8
7.3. SELECTING THE GAIN AND GAMMA VALUE 8
7.4. FREEZING THE IMAGE 9
7.5. CAPTURING THE IMAGE 10
7.6. LOADING AN IMAGE 11
7.7. SETTING UP THE SYSTEM 11
7.8. REVERSING IMAGES 11
9. TRANSFERRING TO AN EXTERNAL USB-STICK 13
10. EDITING CAPTURED IMAGES 14
11. HOW TO PRINT IMAGES USING P95D: 15

3
1. Safety Information
Please read carefully the following notes to be able to properly use the FastGene®FAS-V
imaging system.
Please wear the appropriate personal protective equipment
Using FastGene®Blue/Green LED Transilluminator instrument will normally not injure
eyes, skins, and samples. However, prolonged exposure of human naked eyes with
light irradiation in the blue spectrum may increase the probability of suffering from retina
diseases. Therefore, we recommend wearing the amber goggle included in the box,
when handling the transilluminator while the FastGene®FAS-V box is open.
2. WARRANTY
The FastGene®Blue/Green LED Transilluminator and the FastGene®FAS-V is warranted
against defects in materials and workmanship for 1 year. In case of any defects occurring in
the instrument or accessories during this warranty period, Nippon Genetics Europe will repair
or replace the defective parts at its discretion without charge.
The following defects, however, are specifically excluded:
Defects caused by improper operation.
Repair or modification done by anyone other than Nippon Genetics Europe or an
authorized agent.
Damage caused by substituting alternative parts.
Use of fittings or spare parts supplied by anyone other than Nippon Genetics Europe.
Damage caused by accident or misuse.
Damage caused by disaster.
Corrosion caused by improper solvent or sample.
For any inquiry or request for repair service, contact Nippon Genetics Europe or your local
distributer. Please send a message containing information about the model and serial number
of your instrument.
3. Contact Details
Please contact our support: support@nippongenetics.eu
NIPPON Genetics EUROPE GmbH
Binsfelder Strasse 77
52351 Dueren
Germany
Fon: +49 2421 55 496 0
Fax: +49 2421 55 496 11

4
4. REGULATORY NOTICE
IMPORTANT: This Nippon Genetics Europe instrument is designed and certified to meet
safety standards and EMC regulations. Certified products are safe to use when operated in
accordance with the instruction manual. This instrument must not be modified or altered in any
way. Alteration of this instrument will:
Void the manufacturer’s warranty
Void the safety and EMC certification
Create a potential safety hazard
Nippon Genetics Europe is not responsible for any injury or damage caused by the use of this
instrument for purposes other than those for which it is intended, or by modifications of the
instrument not performed by Nippon Genetics Europe or an authorized agent.
5. IMPORTANT NOTICE
Please, read the installation instruction carefully before installing the FastGene®Blue/Green
LED Transilluminator and the FastGene®FAS Digi Imaging System. This instrument is
intended for clinical and research laboratory use with DNA gel activation and it must be
operated only by specialized personnel aware of the potential risks associated with the
chemical and biological agents normally used with this unit. This instrument is meant for use
only by specialized personnel that know the health risks associated with blue light radiation
and with reagents that are normally used with this instrument. Please wear the amber goggle
for your own protection!

5
6. Specification
Camera
Camera type
2.0MP CCD
Image Sensor
Monochrome CCD camera
Resolution/Image Size
1600 x 1200
Video Output Format
12-bit
Pixel size
4.40 x 4.40 um
Max. frame rate
15 fps
Digital interface
USB 2.0
Aperture
F/1.2
Lens
12.5 –75 mm, 6 X Zoom Lens , manual, parfocal
Exposure time
0.001 to 30 seconds
Filter
Midori Green Amber Filter 580 nm
Control & Display
Control panel
10.4” color touch screen
Saved Image Format
PNG/TIFF /BMP/JPEG for 8-bit
Image storage
16 GB SSD (Built-in memory); USB stick (External memory)
Interface
Ethernet Port - 10/100Mb Ethernet Port
USB flash drive
Front x 1, Back x 2 (one port first comes and services only)
and printer printing (all three ports).
Supports Mitsubishi thermal-printer P95D
Darkroom
Inner white light
1W x 6 lamps built-in white light LED
Access
Front door, 180°opened
Illuminator
Built-in Blue-Green light source
~490 nm with optical filter
View Area
26 x 21 cm
White Light Plate
26 x 21 cm
Unit
Material
Painted iron metal, ABS front door
Unit Dimensions
Approx. 382 x 400 x 785 mm
Rated Voltage
100-240 V~, 50/60 Hz, 2 A
Weight
35 kg
Certification
CE

6
7. Nomenclature
Left side view
Right side view
Optical Unit
2MPixel CCD-Camera
Amber Filter
10.4“ Touchscreen
FastGene®FAS-V Blue/Green LED
Transilluminator
FastGene®FAS-V White LED light plate
FastGene®FAS-V White LED room light
Front Door
USB-Port
2 x USB-Port
Ethernet-Port
Optical Unit
2 MPixel CCD-Camera
Amber Filter
Front door opener
Power switch
7
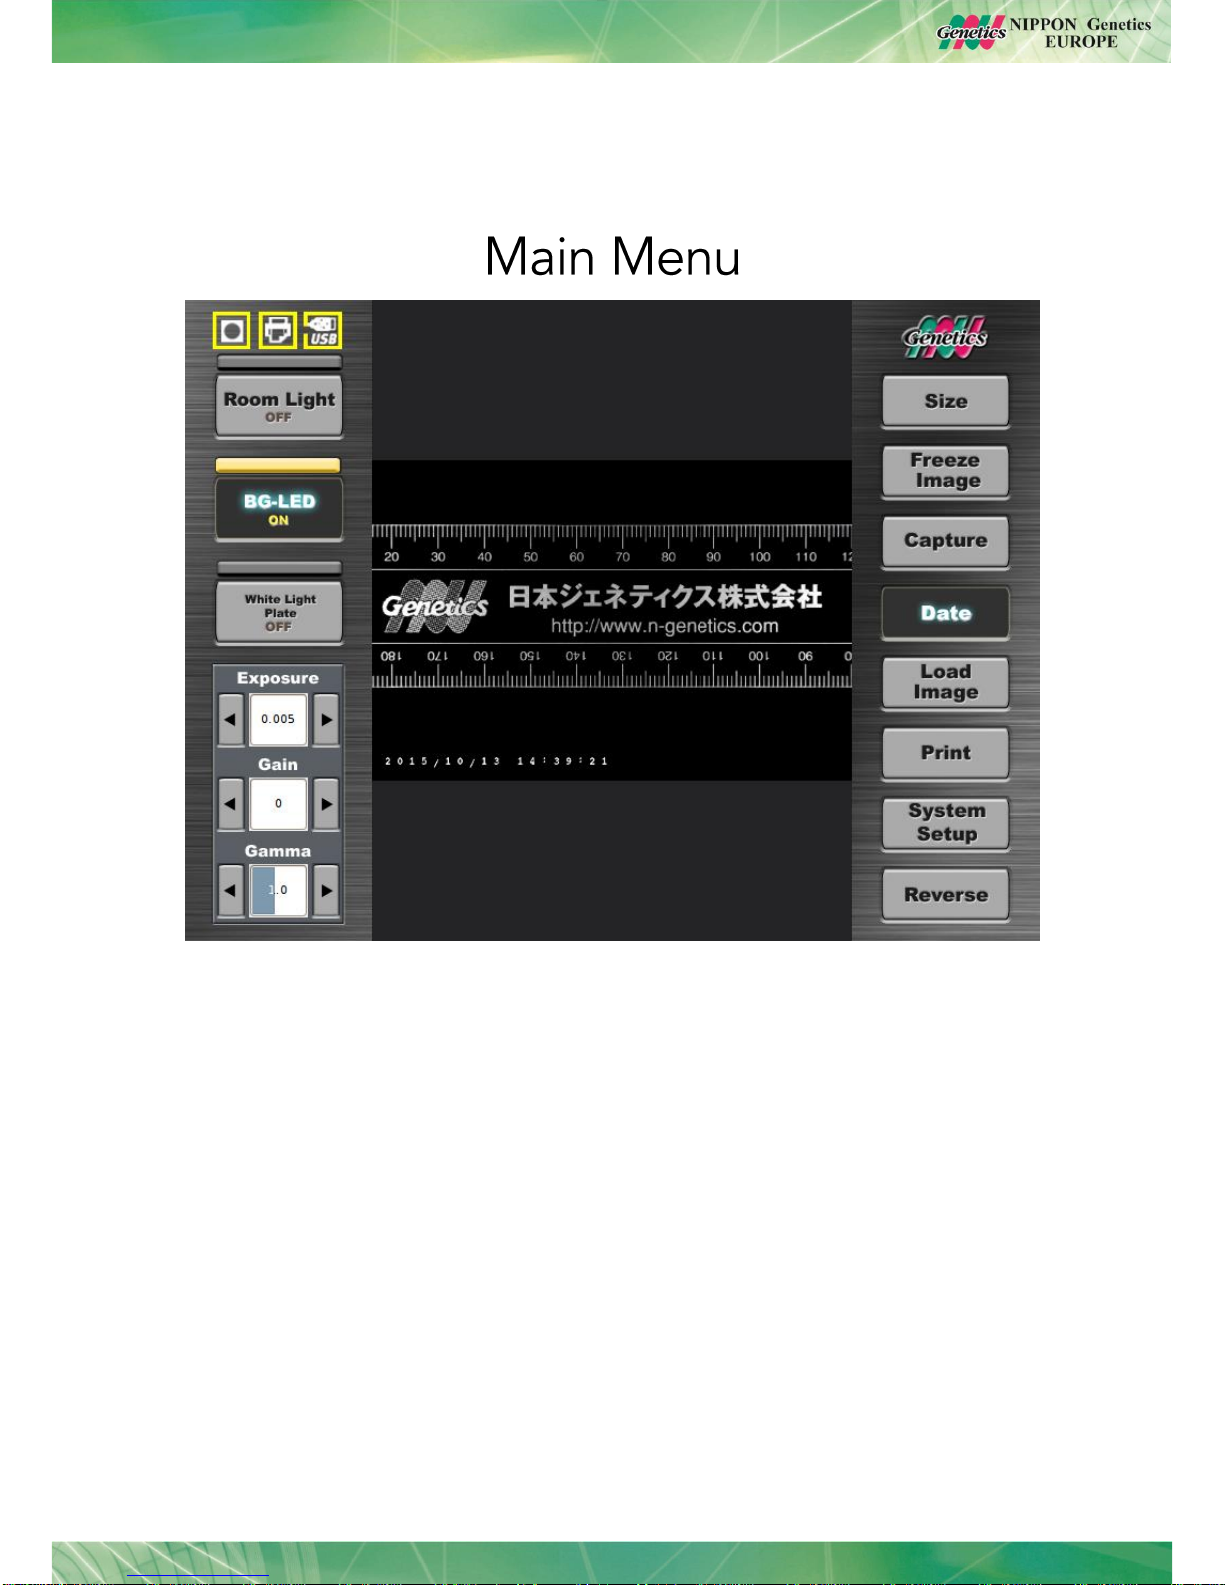
8. Operating the FastGene®FAS-V imaging system
The FastGene®FAS-V is operated through the central window:
All the following operations can be performed or accessed via the main menu:
7.1.Selecting the size of the image
7.2.Selecting the light source
7.3.Selecting the exposure time
7.4.Selecting the Gain and Gamma value
7.5.Freezing the image
7.6.Capturing the image
7.7.Loading an image
7.8.Setting up the system
7.9.Reversing the image

8
7.1. Selecting the size of the image
The image size can vary between 50 –100 % of the total possible image.
The size of the file will vary as follows:
1. 50 %: Image Size 1.0 MPixel
2. 75 %: Image Size 1.5 MPixel
3. 100 %: Image Size 2.0 MPixel
You can select among 50-100% depending on your gel size or required image size.
7.2. Selecting the light source
The light sources (blue/green LED light, white LED light plate, white LED room light) can be
selected by pressing the buttons on the left side of the main menu:
7.3. Selecting the exposure time
The exposure time can be selected by using the arrows or by pressing into the number area
and entering the desired exposure times in seconds:
7.4. Selecting the Gain and Gamma value
The Gain increases the sensitivity of the sensor in live view mode while the Gamma setting is
applied when the image is frozen.

9
Please be aware that increasing the Gain can lead to a higher noise level in the image!
7.5. Freezing the image
The live view of the image can be frozen before capturing the image. Press the button Freeze
Image:
The gamma value can be changed while the image is frozen.
10
7.6. Capturing the image
Capturing images with the FastGene®FAS-V is very easy. Press the Capture button after
adjusting the exposure of the image to the desired level.
The FastGene®FAS-V will take 6 images with different exposure times:
Select the best image by pressing on it. The following menu will be displayed:
Here, the type of image is selected as well as the file is named. On the top part, the
selection of storage place can be chosen (please note that external USB is only possible to
select if a USB-stick has been recognized by the system before).
11
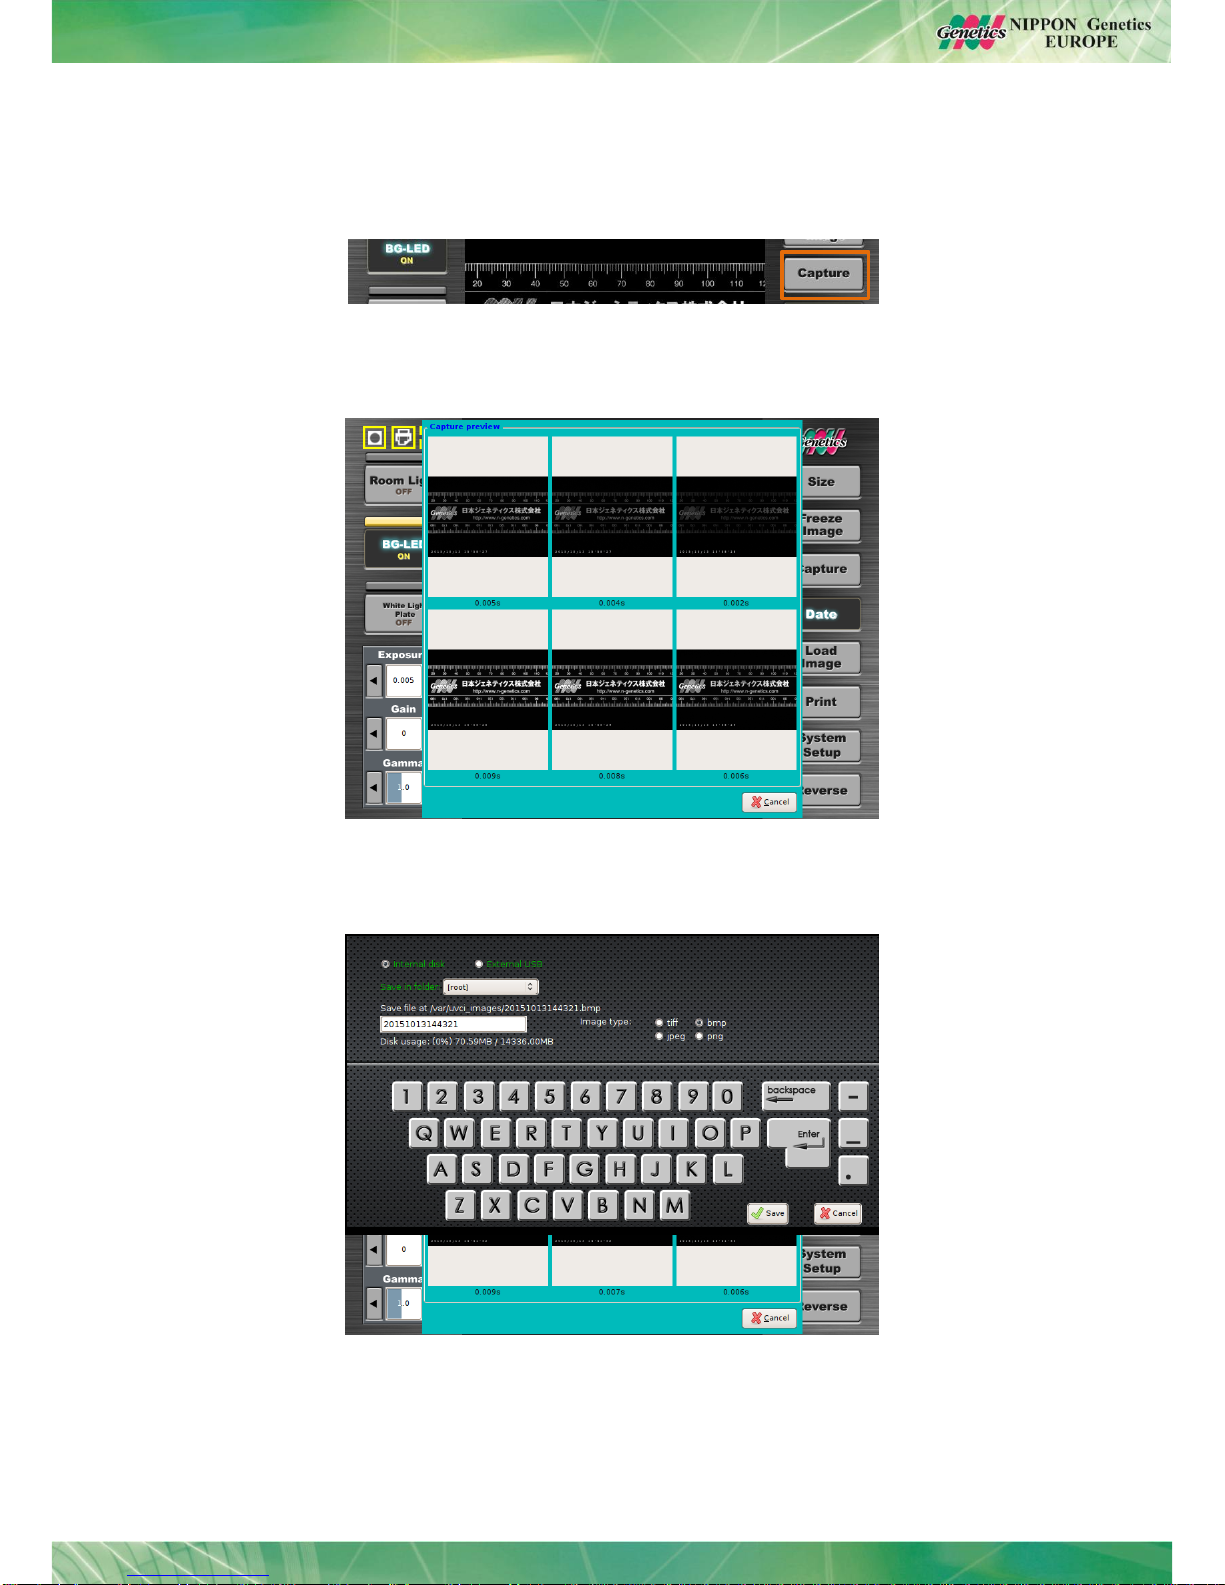
7.7. Loading an image
Recorded images can be loaded from the storage by using the Load Image button:
The menu with the recorded images will appear.Select the desired image:
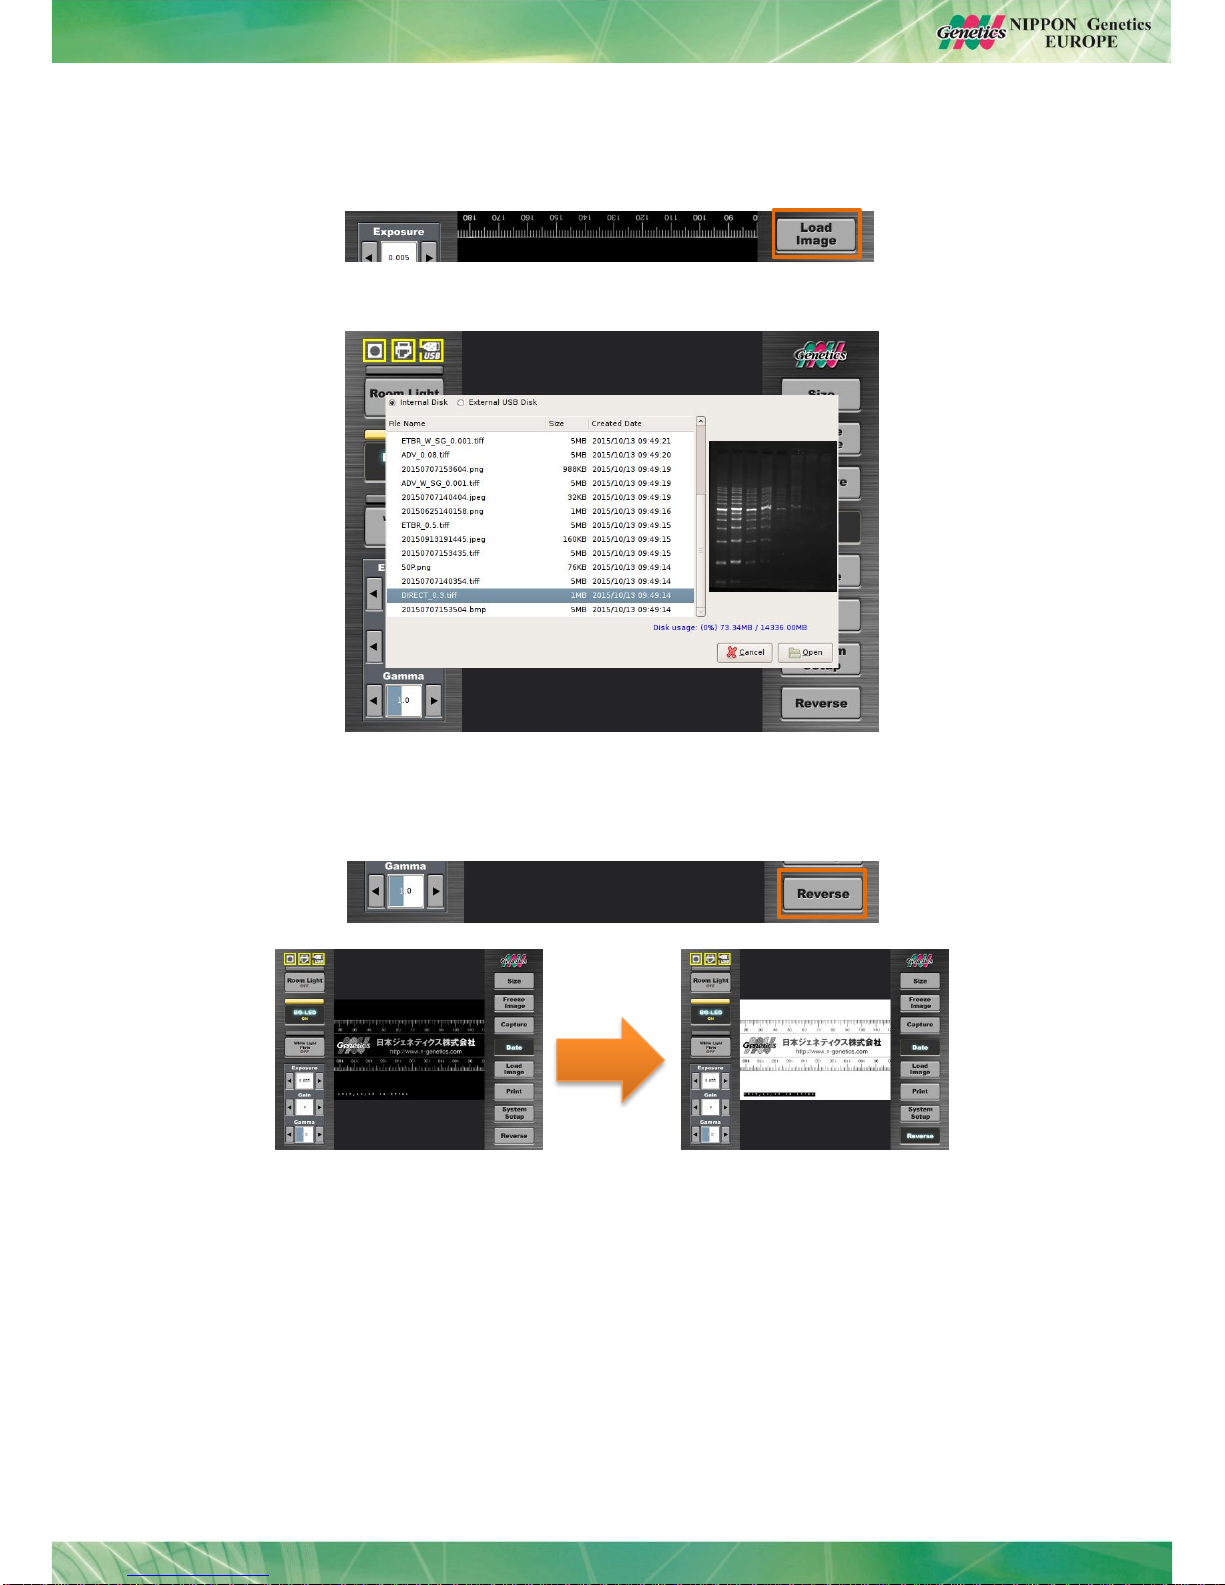
7.1. Reversing Images
The images in live view or previously captured and loaded can be inverted by pressing the
button Invert:

12
7.2. Setting up the system
Press the System Setup button to enter the setup menu:
All the following operations can be performed or accessed via the setup menu:
Calibration of the touchscreen (only by qualified staff)
Network setup
Defining system time
Upgrading the software (only by qualified staff)
The default settings can be changed by pressing the Default Settings button:
In this menu you can select:
If the light sources are turned on or off when the system is booting.

13
The standard image file type can be chosen.
The option of taken six images at the same time can be switched off by changing
from multiple exposure mode to single exposure mode.
Additionally the saturation limit detection threshold can be set.
9. Transferring to an external USB-stick
Images taken with the FastGene®FAS-V and stored in the internal SSD storage can be
transferred easily to an external USB-stick:
1. Connect the USB-Stick with the USB-port on the top left side of the FastGene®FAS-V.
2. Make sure the USB-stick control sign is yellow:
3. Press the menu System Set-up:

14
4. Select the image you want to transfer and press copy to USB or press copy all to USB:
5. The images are now saved on the external USB-stick.
10. Editing captured images
The FastGene®FAS-V can edit images which are available in the internal storage or on an
external storage place.
There for load the image using the Load Image button. There will be a selection of tools
available:
After editing the image it is pivotal that the save button is pressed otherwise all changes will
be lost. Please be also aware that saved edited images cannot be restored to their original
state.

15
11. How to print images using P95D
The FastGene®FAS-V comes with the driver for the thermal printer Mitsubishi P95D
preinstalled:
1. To print your images, connect the printer with the FastGene®FAS-V using one of the
ports on the right hand side. Turn on the FastGene®FAS-V.
2. Verify that the control sign for the printer is yellow:
3. Print the live view or a selected saved image by pressing the button Print :
The image will be printed.

16
Table of contents
Other Nippon Genetics All In One Printer manuals


