Nitchi MH-5 User manual

ELECTRIC CHAIN HOISTS
MH-5 / MHT-5 / MHC-5
SERVICE MANUAL No.1

Contents
1.Precautions 1
2.Inspection & Replacement/Adjustment 1
2−1.Load chains 1
2−2.Hooks 1
2−3.Electromagnetic brake 2
2−4.Lubricant oil 4
3.Disassembly 5
3−1.Disassembly procedures 5
3−2.Electromagnetic brake ‑ Inspections during disassembly 8
4.Assembly 9
4−1.Frame section 9
4−2.Gear section 11
4−3.Motor section (incl. Electromagnetic brake) 15
4−4.Limit switch section 17
4−5.Electrical parts & Wiring 18
4−6.Top hook assembly 20
4−7.Load chain, Bottom hook assembly, Stop holder
& Chain bucket assembly 21
4−8.Lubricant oil pouring 22
5.Spare parts list 23

-1-
1.Precautions
・Always cut off the power supply whenever the electric chain hoist is attempted for m
aintenanc or repair. Be sure to conduct maintenance or repair without load.
・Always remove dirt from gears, load sheave, load chain and other related parts
after disassembly.
・Never attempt to clean nor fix the bearings. Replace if it is damaged.
・Never reuse deformed, worn or corroded parts. Always replace them with new ones.
・Never use other than NITCHI genuine parts.
2.Inspections & Replacement/Adjustment
2−1.Load chains
Measure dimensions φd (link diameter) and P (link pitch) as shown in Table 1.
The load chain must be replaced if it falls into any of the following state.
1.Dimension "d" falls below the limit dimension given in Table 1.
2.Dimension "P" exceeds the limit dimension given in Table 1.
Also, replace entire load chain if any link is damaged, deformed or rusty.
Table 1 Dimensions, Load chain (㎜)
φd P Discard limit
Rated load Type pitch
(t) Std. Limit Std. Limit per 10 links
0.5〜1 φ7.1 7.1 6.7 21.2 21.8 216
2〜5 φ11.2 11.2 10.6 34.3 35.3 350
(Remark): In case wear is found on the load chain, please also check (p/B4) Load sheave
and (p/B6) Load chain guide as they are the counterparts each other.
Fig. 1 How to measure pitch dimension per 10 links with a caliper.
2−2.Hooks
Measure dimension"A"for hook opening and dimension"H"for the thickness as per Table 2.
Replace the hook if it falls into any of the following conditions.
1.Dimension"A"exceeds the standard dimension given in Table 2.
2.Dimension"H"falls below the limit dimension given in Table 2.
Also, replace with new one if a crack is found on the part.
3.The hook does not swivel on the level smoothly.

-2-
Table 2 Dimensions, Hook (㎜)
Top hook Bottom hook
Rated load A H A H
(t) Std. Std. Limit Std. Std. Limit
0.5 23 23 21.9
32 31 29.5
1 28 27 25.7
2 33 35 33.3 33 35 33.3
2.5, 3 41 42 39.9 41 42 39.9
5 48 55 52.3 48 55 52.3
2−3.Electromagnetic brake
・Electromagnetic brake for 3‑Phase models (MH‑5 & MHT‑5)
Measure the dimension of the brake clearance between (p/C59‑4) Armature and (p/C59‑5)
Brake coil (Dimension A as per Fig 2 below) with a thickness gauge. The brake needs
adjustment according to the procedures through 1‑4 as given below if the measured
value is 0.8mm or over.
Fig.2 Electromagnetic brake for 3‑Phase models
1. Loosen Fixing screws for Detent plate and remove (p/C59‑6) Detent plate.
2. Screw up Hex. nylon nut to adjust the clearance (Dimension A) to be between
0.3mm and 0.5mm while checking with a thickness gauge. (The arrowed points ①,②,③
show the measuring positions for equal setting.)
3. Attach (p/C59‑6) Detent plate after the adjustment. Turn the hex. nylon nuts so
that either their corners or sides touch the side of Detent plate.
(The corners of the nuts are in touch with Detent plate in the above figure.)
4. Fix Detent plate with Fixing screws.
①
③
②

-3-
・Electromagnetic brake for 1‑Phase model (MHC‑5)
Measure the dimension of the brake clearance between (p/C59‑4) Armature and (p/C59‑5)
Brake coil (Dimension A as per Fig 3. below) with a thickness gauge. The brake needs
adjustment according to the procedures through 1‑8 as given below if the measured
value is 0.8mm or over at the condition the brake is being mounted on the hoist
(or, 1.8mm or over if the brake is set loose.)
Fig.3 Electromagnetic brake for 1‑Phase model
1. Loosen Fixing screws for Detent plate and remove (p/C59‑6) Detent plate.
2. Screw up Hex. nylon nut to adjust the clearance (Dimension A) to be between
1.3mm and 1.5mm while checking with a thickness gauge. (The arrowed points ①,②,③
show the measuring positions for equal setting.)
3. Attach (p/C59‑6) Detent plate after the adjustment. Turn the hex. nylon nuts so
that either their corners or sides touch the side of Detent plate.
(The corners of the nuts are in touch with Detent plate in the above figure.)
4. Fix Detent plate with Fixing screws.
5. Lace brake lead‑wires through (p/C49) Pipe for lead wire, and outfit the hoist
with the brake assembly using M6 Cap bolts.
6. Screw up (p/C20) Adjusting nut for brake to the bottom, then turn it reversely
for one complete turn (for 1mm pitch).
7. Fasten (p/C555) Cap bolts. If the holes of (p/C20) Adjusting nut for brake and
the tap holes of (p/C4) Brake wheel do not align each other, match the holes by
turning C20 clockwise or counterclockwise within the turning range of max. 45°.
8. Screw up (p/C719) Bearing U nut to complete the brake installation.
Fig.4 Electromagnetic brake installation for 1‑Phase model
①
②
③

-4-
2−4.Lubricant oil
1.The hoist is filled with lubricant oil
at initial delivery, hence it is not
necessary to add oil for the first run.
Make a small hole on (p/A505) Oil cap
as illustrated on the right, so that
the internal pressure of (p/A1) Gear
box does not increase during operation.
2.Check the oil level at periodic inspection.
Add oil in (p/A1) Gear box according to Fig. 5 Lubricant oil
Table 3 below if it is at the lower level.
Runout or short of oil causes abnormal noise
in the gear box and/or malfunction of the
mechanical brake. Table 3 provides recommended
oil type and quantity per model/capacity to
replace or replenish the oil. Table 3 Oil type & quantity
3.Lubrication on Load chain MH‑5・MHT‑5 MH‑5 MHT‑5
Make sure the load chain is MHC‑5 0.5〜1t 2〜5t 2〜5t
always lubricated. Diesel oil Diesel oil SHELL
Any machine oil or gear oil CD #30(API) CD #30(API) Tonna oil
is recommendable. 0.8 liters 1.5 liters 1.5 liters

-5-
3.Disassembly
3−1.Disassembly procedures
1. Unjoint (p/B32) Chain bucket pin 2. Take off (p/C12) Switch cover and disconnect the wirings of ①(p/C563)
and the hanging chain and remove Power source cable, ②(p/C564) Pendant control cable and ③(p/C635)
(p/B27) Chain bucket. Limit cable. Bundle each group of wires at this stage. It helps to
ease your job.
3. Open (p/B30‑2) Body cover B, and 4. Strip the electrical components. 5. Unscrew (p/A537) Oil extractor
disconnect the lead‑wires*. (Plug) located in the bottom of
*④:Wires from Switch holder section (p/A1) Gear box and drain the oil.
⑤:Black wires … Wires from the motor. To open (p/A505) Oil cap will make
Blue wires … Wires from the brake. it faster.
6. Pull out (p/B18) Top hook pin 7. Loosen (p/A559) Cap bolts w/ 8. Remove (p/A560) Gasket for A29.
and dismantle (p/D1) Top hook seal and take off (p/A29) Switch
assembly from the frame section. holder. Always replace (p/A559)
Cap bolts with seal with the new
ones.
9. Disassemble (p/C27) Limit switch 10.Disconnect (p/C32) Limit switch 11.Take off (p/C1) Motor cover.
cover. plate.
①
②
②③
④⑤

-6-
12.Dismantle (p/C59) Brake unit. 13.Loosen (p/C664) Through bolts 14.Take off (p/C49) Pipe for lead
and remove (p/C45) Shield. wire and (p/C3) Stator for motor.
15.Pull out (p/A2) Pinion shaft 16.Remove (p/A1) Gear box. 17.Disengage whole the mechanical
(w/ Rotor). brake set and the third pinion
set. Be careful of losing the
needles of (p/A508) Needle
bearing for 2‑5t capacities.
18.Unfasten (p/A556) Nut and 19.Pick up (p/B1‑4) Stay pipe A. 20.Remove (p/A510) Retaining ring
detach (p/A28) Brake supporting and disengage (p/A7) Load gear.
plate.
21.Pull out (p/B5) Collar for B4 22.Detach (p/B25) Chain limit stop, 23. Remove (p/B26) Load chain.
Load sheave. (p/D8) Bottom hook assembly and
(p/B536) Tail springs from
the load chain.

-7-
24. Unfasten (p/B538) Nut and 25. Release (p/B566) Retaining ring 26. Take off (p/B28) Hanging plate
(p/C525) Cap bolt, to separate and remove (p/B36) Limit lever. for (p/B27) chain bucket,
(p/C44) Motor flange and (p/B35) (p/B537) Springs for B6 then
Stay pipe B <0.5&1t> or (p/B1‑3) (p/B10) Handle.
Stay bolt B <2‑5t> from (p/B29)
Motor‑side plate and detach
(p/B1) Gear‑side plate.
27. Dismantle (p/B6) Load chain 28. Detach (p/B503) Oil seal for B4,
guide. (p/B28) Hanging plate for B27
then (p/B4) Load sheave.

-8-
3−2.Electromagnetic brake unit‑Inspections during disassembly
Fig.6‑a,6‑b shows disassembled (p/C59) Electromagnetic brake unit and the list of its
components.
Measure (p/C4) Brake wheel thickness "t" and replace with new one if it falls to or
below the limit dimension as given in Table 4 below.
①Brake base plate C59‑1
②Brake wheel C 4
③Armature C59‑4
④Brake coil C59‑5
⑤Detent plate C59‑6
⑥Hex. nylon nut
⑦Brake stay bolt
⑧Fixing screw for Detent plate
⑨Brake auxiliary spring C59‑8
⑩Brake spring C59‑7
Fig. 6‑a MH‑5 & MHT‑5
Fig. 6‑b MHC‑5
Table 4 Brake wheel dimension t (mm)
MH‑5 MHT‑5 MHC‑5
Std. 76
Limit 65
Remark: Never attempt to disassemble ①Brake base plate, ⑦Brake stay bolt
and its hex. nut apart. They are connected with locking agent.
①
②
③
④
⑤
⑥
⑦
⑧
⑨
⑩
④
⑤
③
②
⑧
⑨
①
⑥
⑩
⑦

-9-
4.Assembly
4−1.Frame section
Please replace the parts with new ones if they fall into the following conditions.
1.Gear‑/Motor‑side plates :Bearings (p/B507,508) rattle on the holes, or wear or
(p/B1,B29) deformation on the hole for (p/B18) Top hook pin is
found.
2.Load sheave (p/B4) :Either wear, deformation or flaws are found at any of
shank, spline or chain pocket section. Or, whenever
(p/B26) Load chain is to be replaced.
3.Oil seals (p/B502,B503):Wear or flaws are found whereat they touch with (p/B4)
Load sheave or (p/A2) Pinion shaft (w/ Rotor).
4.Load chain guide (p/B6) :Wear or deformation is found on its internal groove.
Or, whenever (p/B26) Load chain is to be replaced.
5.Handle (p/B10):Deformation or wear is found on its movable section
or on the crossed slit.
Assembly procedures
1. Set (p/B4) Load sheave with 2. Fit one of two (p/B28) Hanging 3. Build in (p/B6) Load chain guide.
(p/B503) Oil seal to (p/B1) Gear‑ plates for B27 on the stay bolt Be careful of its position in
side plate, then fit (p/B501) located on (p/B1) Gear‑side plate relation to the stay bolt.
Rubber seal in the position as as the above photo. (See white circle above.)
the sketch given below.
B501 Rubber seal
B4 Load sheave

-10-
4. Grease to the stay bolt beneath 5. Put 2 pcs. (p/B537) Springs for 6. Put also (p/B567) Supporting
(p/B6) Load chain guide and B6 in the position as above. spring with (p/B568) Cap bolt in
furnish (p/B10) Handle over it. case of a 2〜5t capacity unit.
7. Put the rest of (p/B28) 8. Fix (p/B29‑2) Body cover A on 9. Join (p/B1) Gear‑side plate and
Hanging plates for B27 to the (p/B29) Motor‑side plate with (p/B29) Motor‑side plate, then
stay bolt. Then grease to the (p/B572) Cap bolt. retain (p/B36) Limit lever with
fork plate of (p/B10) Handle and (p/B566) Retaining ring. In case
set (p/B36) Limit lever over it. of a 2〜5t capacity unit, put
(p/B1‑3) Stay bolt B into the
position of (p/B35) Stay pipe B
in the step 10 as given below.
10. Set (p/B35) Stay pipe B between 11. Tighten up (p/B538) Nuts.
※1
Insert pilot chain from the
the plates and insert (p/B574) (4 points) loose‑end side. Be sure the first
Bolt through the pipe in case of link to be inserted is a
a 0.5‑1t capacity unit.
※2
horizontal link for the single
chain‑fall unit while the first
link is a vertical link in case of
a double chain‑fall unit.
Feed the chain to the load‑side
turning (p/B4) Load sheave by the
fingers.
※1 Pilot chain ・・・A short preliminary link chains to be set through the load sheave in advance, in order to
guide the practical load chain at chaining. Prepare odd numbers of the links.
※2 Horizontal link ・・・The load chain links which lie in the load sheave pockets in horizontal aspect.
※3 Vertical link ・・・・The load chain links which set to the load sheave pockets in perpendicular aspect.
B567 Support spring
for 2〜5t capacity

-11-
4−2.Gear section
Replace the parts with new ones if they fall into the following conditions.
1.Any wear or flaw is found on the gear teeth.
2.Rattling or any damage is found the bearings (p/A507,A508,A509,A553,A554,B507).
Assembly procedures
1. Insert (p/B5) Collar for B4 to 2. Set (p/A7) Load gear to (p/B4) 3. Put (p/B1‑4) Stay pipes A over
the load sheave. Load sheave and clamp it with the Stay bolts, so that their
(p/A510) Retaining ring. chamfered end faces (p/B1) Gear‑
※1
Be careful of its aspect. side plate.
4. Fix (p/A28) Brake supporting 5. Build the third pinion assembly 6.
※3
Equip the mechanical brake
plate with 3 (p/A556) Nuts. in the position. Clamp the gear assembly and catch a ratchet
with (p/A513) Retaining ring. tooth with (p/A16) Pawl properly.
7. Furnish the third pinion and the 8. For MH‑5/MHT‑5 0.5‑1t and MHC‑5, 9. Put (p/A501) O‑Ring on (p/A1)
mechanical brake assemblies with clamp (p/A553) Ball bearing on Gear box with bond.
(p/A507,A553) Ball bearings the mechanical brake with
respectively. (p/A561) Ring for Bearing.

-12-
10. Align (p/A1) Gear box with
(p/B1) Gear‑side plate using
(p/A558) Spring pins, then fix
with (p/A519, A562) Cap bolts.
※2
A562 is to fix (p/B30‑1,B30‑2)
Body covers B and is different
from A519 in size.
※1 (p/A7) Load gear aspect:
0.5〜1t capacity ... The depressed side of the gear faces the (p/A28) Brake supporting plate.
2〜5t capacity ... Side of the thicker spline flange faces the (p/A28) Brake supporting plate.
※2 Size of (p/A562) Cap bolts to fix (p/B30‑1,B30‑2) Body covers B.
MH,MHT,MHC M6×18 2pc.
0.5〜1t
MH 2〜3t M8×18 2pc.
MHT 2〜2.5t
MH,MHT M8×18 1pc.
5t

-13-
※Mechanical brake assembly
1.Follow procedures through ① to ⑦ as the above photos.
・At procedure ⑦, screw up (p/A3) Pinion gear to the bottom first,
then insert (p/A15) Check washer. Be careful of its arm's position.
The arm of Check washer hits the projection of the pinion gear when
it gets loose, and it stops the rotation.
・Either face of (p/A15) Check washer can be used.
・Oil (p/A514) Friction discs in advance for assembly.
・Replace (p/A514) Friction discs with new ones when they wear at
thickness (t) over the limit dimension as given below.
(p/A514) Friction discs dimension
Thickness t (mm)
Std. 3
Limit 2.4
①②③
④⑤⑥
⑦

-14-
2.Adjust the clearance between Check washer arm and the projection of
Pinion gear to 1mm or less by meshing (p/A15) Check washer on the
different threads of (p/A4) Second pinion gear and/or by turning over
Check washer to the other face.

-15-
4−3.Motor section (incl. Electromagnetic brake)
Replace the parts with new ones if they fall into the following conditions.
1.Any wear is found on the helical gear or the spline portion of (p/A2) Pinion
shaft (w/ Rotor).
2.Rattling or any damage is found the bearings (p/B506,C669).
Assembly procedures
1. Set (p/B506) Ball bearing to 2. Insert (p/A2) Pinion shaft (w/ 3. Attach (p/C3) Stator for motor
(p/B29) Motor‑side plate. Also, Rotor) to (p/B29) Motor‑side while passing the motor lead wires
fit (p/C681) Bushing for motor plate. Be sure to set it to the through (p/C681) Bushing for motor
lead wire and (p/C560) Blind bottom. lead wire on the plate. Be careful
bushing in each position. not to pinch the wires between the
plate and the stator.
4. Align (p/C3) Stator for motor 5. Set (p/C49) Pipe for lead wire on 6. Lace the brake lead wires through
using (p/C664) Through bolt on (p/B29) Motor‑side plate. Furnish (p/C49) Pipe for lead wire and fix
its location. Be careful of the (p/C45) Shield with (p/C619) Wave
※
(p/C59) Brake unit to the motor
motor‑lead wires and take off washer [(p/C670) Rubber washer section with Hex. socket cap
the bolt when alignment is done. for MHC‑5] and (p/C669) Ball bolts.
bearing, then mount it over
(p/C3) Stator for motor. Align
(p/C45) Shield and fix it with
(p/C664) Through bolts.

-16-
7. Fix (p/C1) Motor cover with (p/C524)
Screws.
※Electromagnetic brake unit assembly
Please follow as illustrated below. Be sure to align both the center of (p/C4) Brake
wheel and (p/C59‑1) Brake base plate in assembly.
Refer to Section 2‑3. for the brake clearance inspection & adjustment.

-17-
4−4.Limit switch section
Assembly procedures
1. Set (p/C634) Limit switch at the 2. Fit (p/C32) Limit switch plate 3. Connect (p/C32) Limit switch plate
neutral position by turning the with (p/C634) Limit switch so to (p/B29) Motor‑side plate with
key shaft so that its arrowed that the labeled side of the (p/C630) Cap bolts, and pass
side meets the arrow on the switch faces up. Then fix with (p/C635) Limit cables through
plate. (p/C626) Screws to parallelize (p/C560) Blind bushing to the
the upper side of the switch body middle of the side plates.
and the side of the key shaft as
the above photo.
4. Attach (p/C27) Limit switch
cover.
※Test both the limits for up and down direction with (p/B10) Handle. If only one side of the
limits operates, make adjustment by changing the angle of the limit switch body over
the slits on its fin plate with (p/C626) screws. Make sure both sides of the limit functions
properly.
Parallel

-18-
4−5.Electrical parts & Wiring
Assembly procedures
1. Outfit (p/A2) Pinion shaft with 2. Outfit (p/A2) Pinion shaft with 3. Lay (p/A560) Gasket for A29 on
(p/A32) Bearing bush in case of (p/A509) Ball bearing. (p/A1) Gear box and coat with
MHT 0.5〜1t or MHC‑5 before water resistant adhesive around
procedure 2. in the right. (p/A30) Pipe.
4. Connect (p/A29) Switch holder 5. Pass (p/C635) Limit cables 6. Run the lead wires of the
with (p/A559) Cap bolts w/ seal. through (p/A30) Pipe to the side electrical components through
(Always use new bolts because of (p/A29) Switch holder. the open space above (p/B6) Load
A559 is coated with sealant.) Assemble the electrical unit on chain guide to the side of
(p/C50) Switch board and install (p/B30‑2) Body cover B.
it to (A29) Switch holder with Connect both of Body covers B,
(p/C687) Cap bolts. i.e. B30‑1 and B30‑2 with (p/C682)
Lace the wires of the electrical Terminal board, then connect the
components through (p/A30) Pipe wires on the terminal.
to the middle of (p/B1,B29) Gear‑
& Motor‑side plates.
Gear side Motor side
Other manuals for MH-5
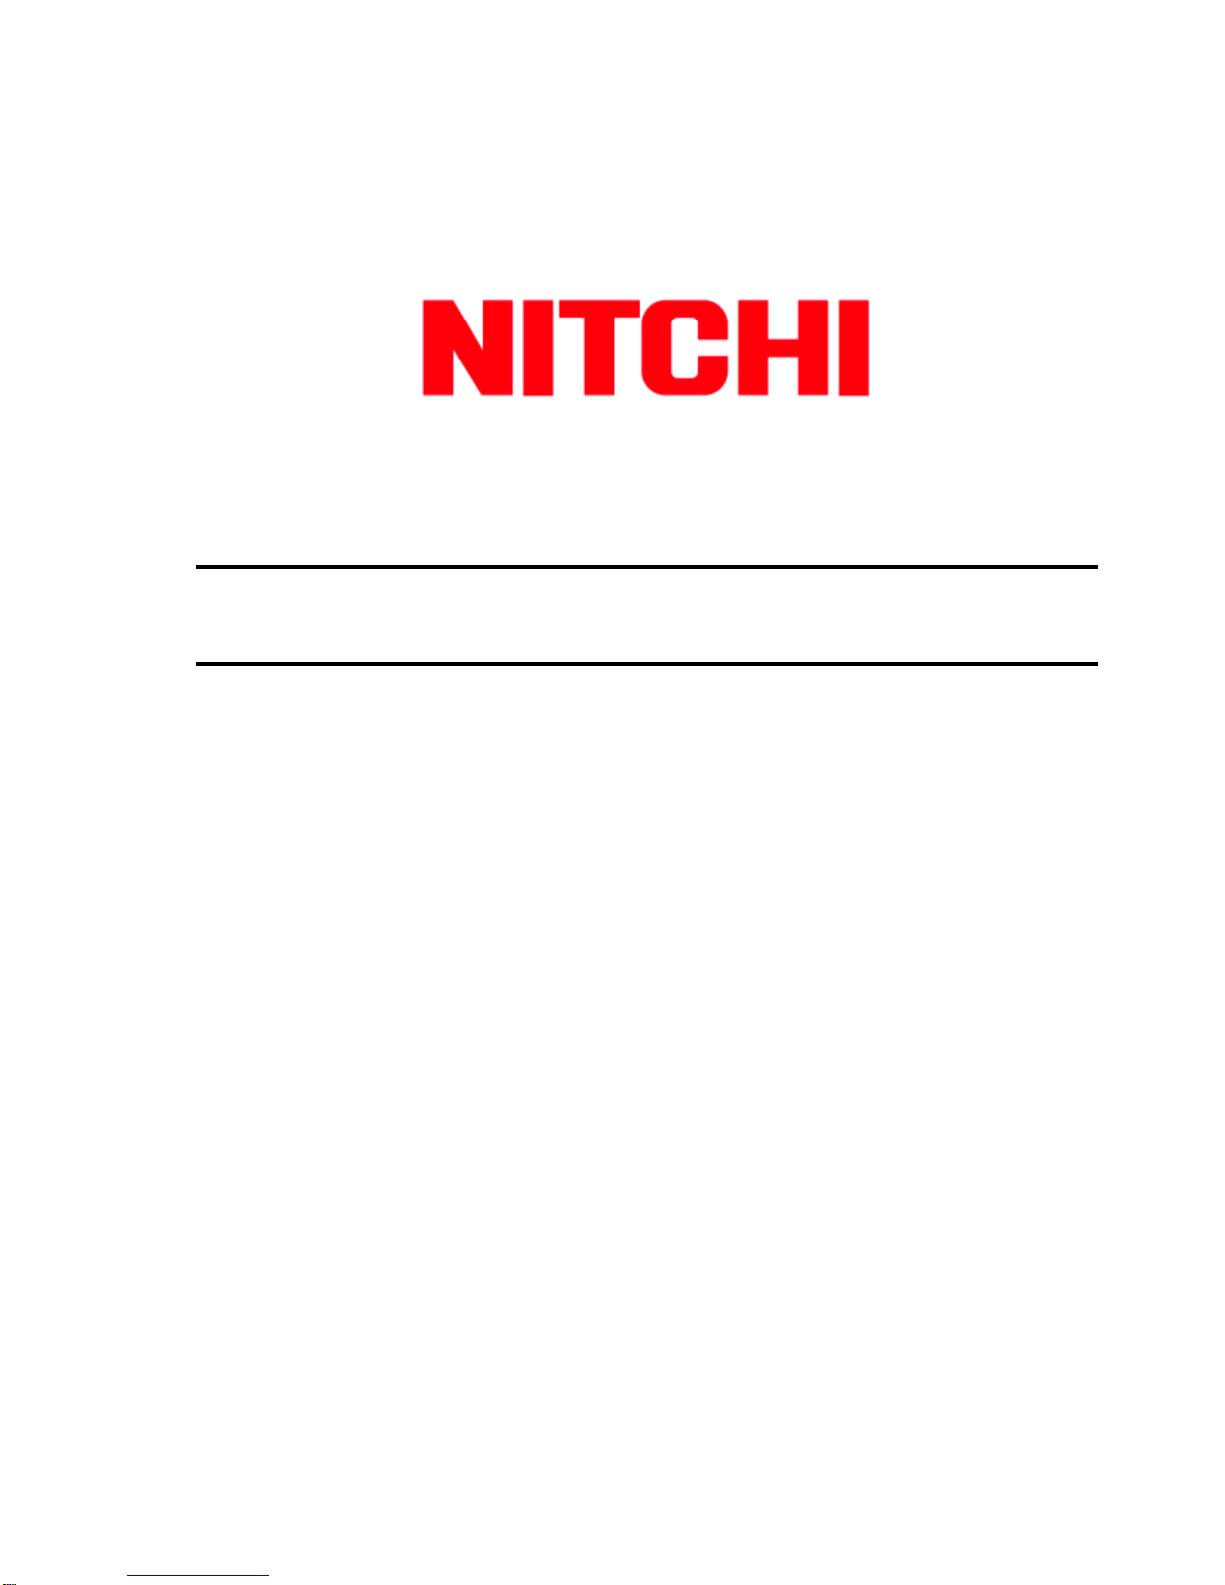
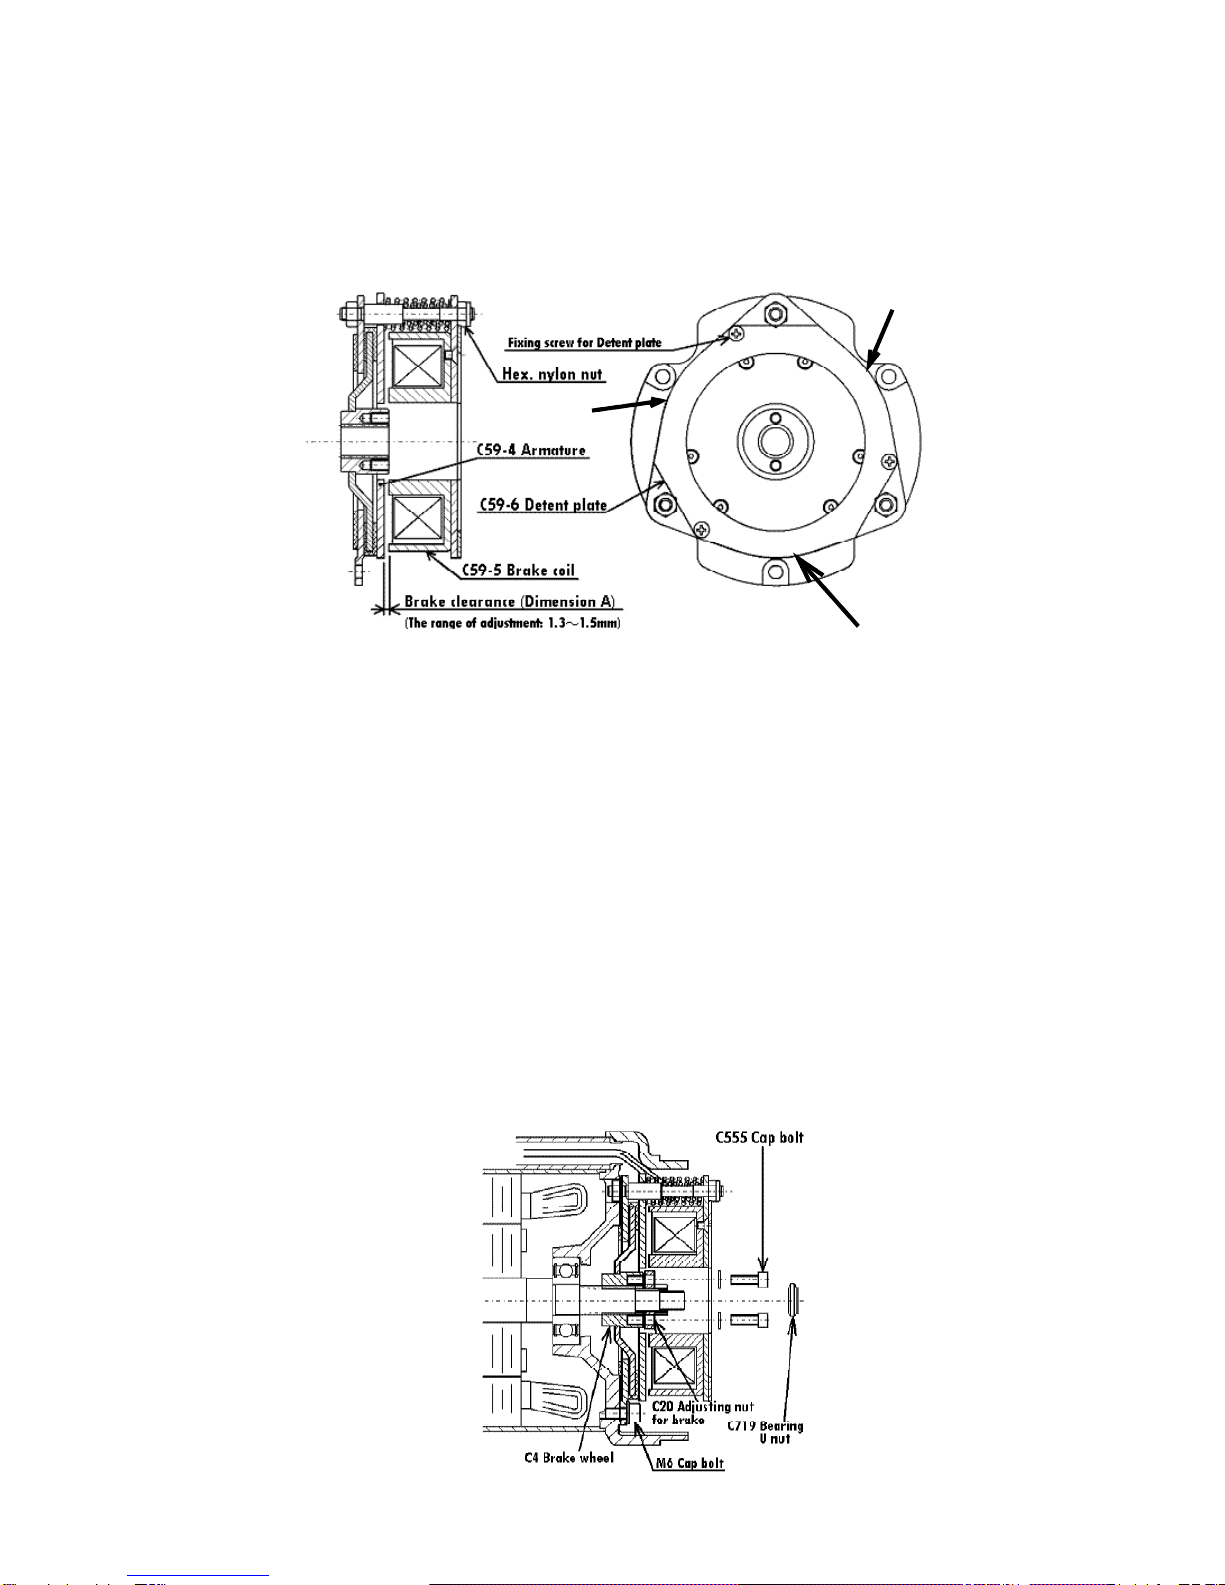
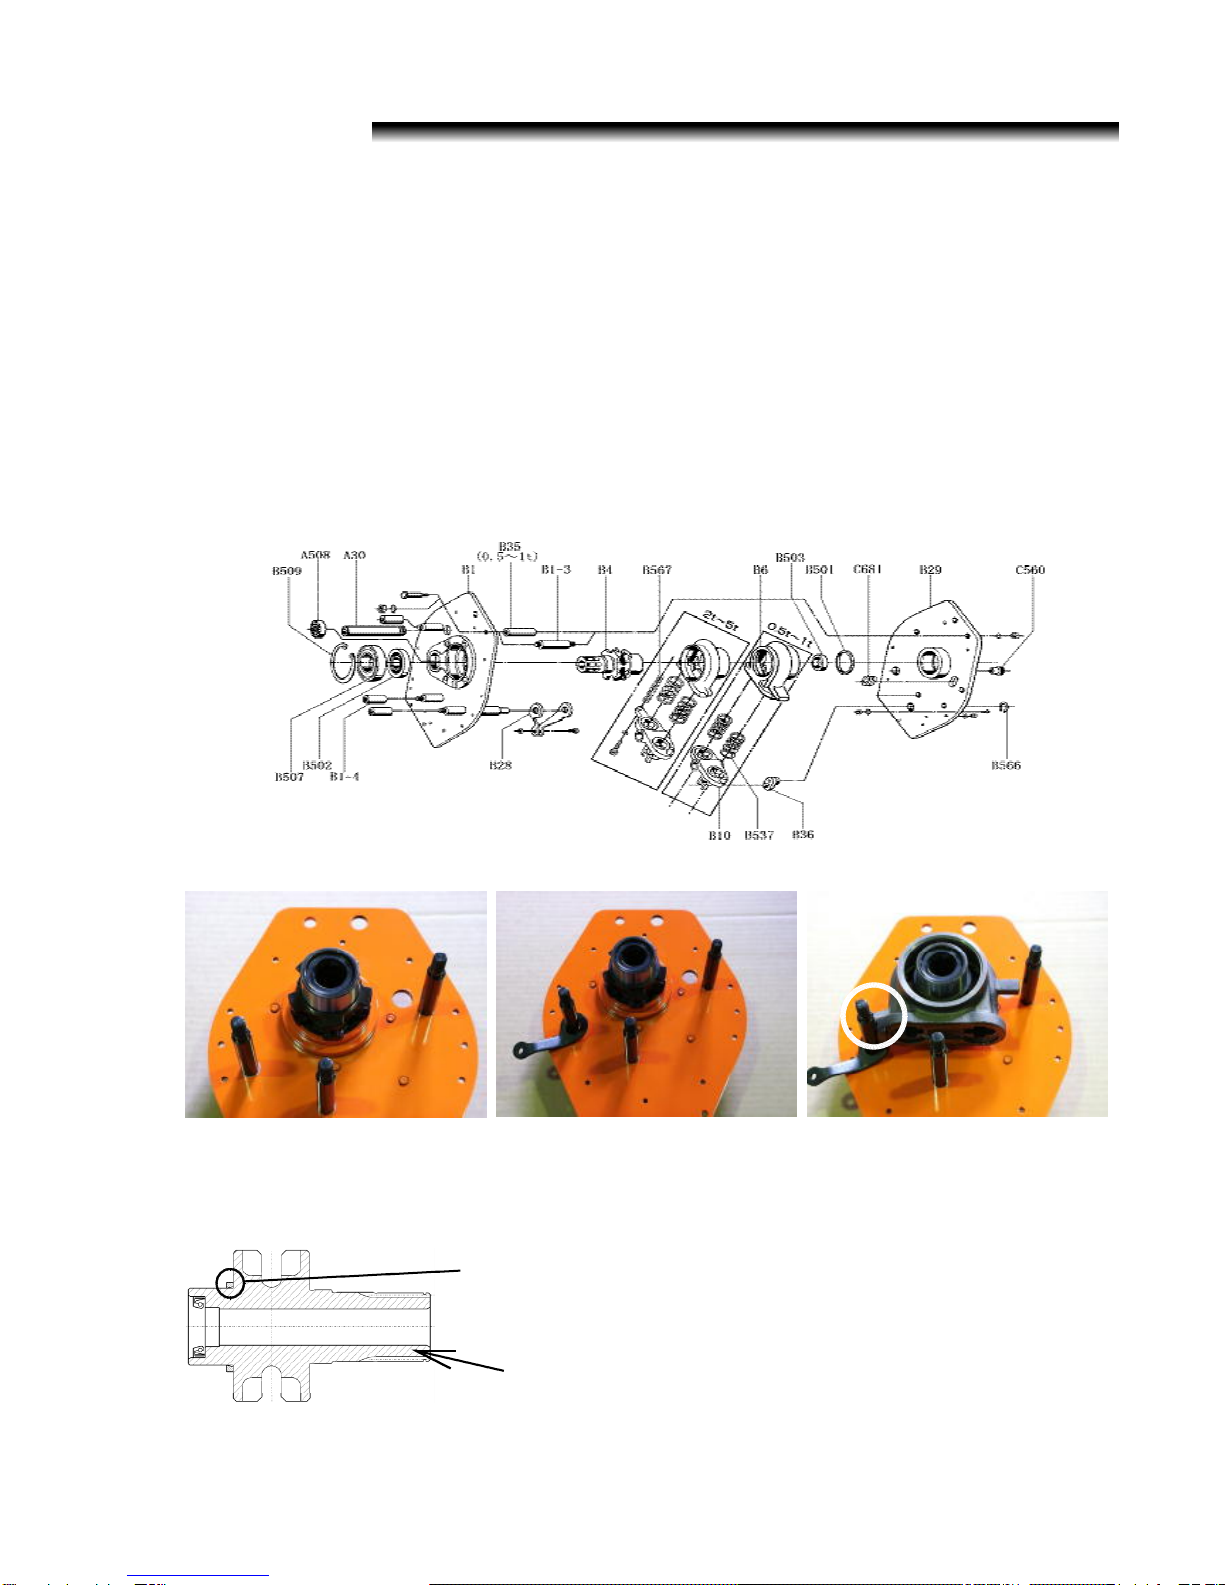
1
This manual suits for next models
2
Table of contents
Popular Industrial Electrical manuals by other brands

Daniamant
Daniamant ODEO Strobe Installation and maintenance instructions

Emerson
Emerson Liebert NXL Product specification/installation sheet

Endress+Hauser
Endress+Hauser Tankvision NXA820 operating instructions

ABB
ABB UZE Installation and commissioning guide

Murata
Murata GRM31M5C1H473JA01 Series Reference sheet

Woodward
Woodward 82384 Installation and operation manual