Nitto Kohki ATRA ACE ARA-100A User manual

Original Instruction
PORTABLE MAGNETIC DRILLING MACHINE
Read this manual carefully before operating your Nitto Kohki
Portable Magnetic Drilling Machine. Keep this manual with
your machine. All users of the Nitto Kohki Portable Magnetic
Drilling Machine must read this manual.
ATRA ACE Model ARA-100A
Professional Tool
Specifications
Model ARA-100A
Drill Motor
PowerSource(SinglePhase) 220-240 V AC 50/60 Hz
RatedPowerConsumption 1800 W
Rated Current 8.2A
No-load Speed 110-210/330-660 min-1
Magnet
PowerConsumption 80 W
Holdingpower 17000N
Dimensions 110 × 220mm
Weight 30kg
(Cord and Sub handle are not included.)
Short-Circuit Current Rating 5kA
Cutter Max. Plate Thickness Hole Diameter
JETBROACH One-touch Type 35mm 17.5 to 40mm dia.
50mm 17.5 to 50mm dia.
75mm 17.5 to 50mm dia.
JETBROACH 75mm 50 to 100mm dia.
HI-BROACH One-touch Type 50mm 18 to 35mm dia.
TWIST DRILL ーMax.32mm dia.
Be sure to install a circuit breaker with a 15Arating on the power supply outlet
before plugging this machine into the outlet.
Team lift when moving the machine.
The specifications and configurations contained in this document are subject to
change without prior notice due to improvements we are making day in, day out.
Manufactured by :
NITTO KOHKI Co., Ltd.
2-9-4, Nakaikegami, Ota-ku,
Tokyo, 146-8555, Japan
Tel : (81)-3-3755-1111
Fax : (81)-3-3753-8791
URL : www.nitto-kohki.co.jp
Keep the manual handy – so you can use it whenever necessary.
TQ14212-0

1
The following Safety notations are used throughout the manual to highlight safety precautions for the user and for
the machine.
DANGER: Indicates an imminently hazardous situation which, if not avoided by following the
instructions given, will result in death or serious injury.
WARNING: Indicates a potentially hazardous situation which, if not avoided by following the
instructions given, could result in death or serious injury.
CAUTION: Indicates a potentially hazardous situation which, if not avoided by following the
instructions given, could result in injury or material damage.
Caution: Important precautions for machine or tool setup, operation and maintenance.
Thank you for purchasing Nitto Kohki
product.
Before using this tool, please read this
manual carefully so ensure proper, ef-
ficient operation.
This manual should be kept close
at hand.
CONTENTS page
GENERAL SAFETY RULES ………………………………… 2
POWER TOOL SAFETY……………………………………… 3
ABOUT YOUR NITTO PORTABLE MAGNETIC
DRILLING MACHINE ………………………………………… 4
1. APPLICATION …………………………………………… 7
2. RECEIVING INSPECTION ……………………………… 7
3. PART NAMES …………………………………………… 7
4. FUNCTION OF ELECTRIC CONTROL ……………… 8
5. MACHINE SETUP ……………………………………… 8
6. MACHINE OPERATION ……………………………… 12
7. HOW TO USE TWIST DRILL ………………………… 15
8. TROUBLESHOOTING ……………………………… 15
9. MAINTENANCE /SERVICE ………………………… 16
10. OPTIONAL PARTS …………………………………… 17
11. ORDERING PARTS …………………………………… 19
PICTOGRAM
Warning: It might be dangerous to operate the
machine if the instructions supplied are not followed.
Do not allow the main body or the power source to get
wet as it will cause electric shock and leakage.
Using this tool improperly could result in serious injury.
Read the instruction manual before using.
Always wear suitable eye protection.
Always wear suitable hearing protection.
Always wear respiratory protective equipment.
・Sound Pressure Level : Maximum 92dB(A)
Operating Condition : No load (Drill speed volume
100%, Drill speed change HIGH)
Measuring Method : According to clause 1.7.4.2 of
Machinery Directive 2006/42/EC
・Sound Power Level : Maximum 103dB(A)
・Operating Temperature : 5˚C 〜40˚C
・Max. operation altitude : 1000m
・Operating Humidity : Maximum 90% at 25˚C
・Over-voltage Category : Category Ⅱ according to IEC664-1
・Pollution Degree : Degree 3 according to IEC664-1
・Wiring Diagram No. : TZW0147
・Disposal of this product : When disposing of this product,
please contact the distributor you
purchased the product from.
・English :Please ask your dealer or
distributor for instruction manual
in local language(s).
・German :Bitte fragen Sie lhren Händler
nach eine Betriebsanleitung in
Landessprache.
・French :S'il vous plait, veuillez demandez
á votre foumisseur de manuel
instruction en langue locale.
・Spanish :Por favor, cantacte con su
distribuidor para el manual de
instrucciones en español.
・Portuguese :Por favor pessa ao seo agente
ou distribuidor o manual de
instrucces ih linguagen local.
・Italian :Per Manuale Istruzioni in lingua
locale Vi preghiamo di rivolgervi
al rivenditore o distributore.
・Dutch :Vraag uw handelaar
om een nederladstalige
gebruiksaanwijzing.
・Swedish :Be er lokala Åtreförsäljare eller
distributör om manualer pá
svenska.
・Danish :Venligst henvend Dem til den
danske distributør for instructions
manualer.
・Polish :Prosze pytac swojego dealera
lub dystrybutora o instrukcje
obslugi w jezyku localnym.
・中文 :

2
WARNING
Some dust created by power sanding, sawing, grinding,
drilling, and other construction activities contains
chemicals known [to the State of California] to cause
cancer birth defects or other reproductive harm.
Some examples of these chemicals are:
●lead from lead-based paints,
●crystalline silica from bricks and cement and other
masonry products, and
●arsenic and chromium from chemically-treated
lumber.
Your risk from these exposures varies, depending on
how often you do this type of work. To reduce your
exposure to these chemicals: work in a well ventilated
area, and work with approved safety equipment, such
as those dust masks that are specially designed to
filter out microscopic particles.
GENERAL SAFETY RULES
WARNING
TO OPERATORS
Always Wear Proper Clothing
●Do not wear loose clothing. Loose clothing can
becomecaughtin the drilling machine.This could
cause severe injuries. Be careful that loose clothing
does not come into contact with the machine.
●Wear non-skid footwear. If you lose your footing,
you could contact moving portions of the machine.
This could cause severe injuries. Always wear non-
skid footwear and remain balanced when using the
drilling machine.
●Be careful of long hair. Wear a hat or a hair net to
contain long hair. Long hair can become caught in
the drilling machine. This will cause severe injuries.
Be careful that long hair does not come into contact
with the drilling machine.
Always Wear Suitable Eye Protection
●Always wear suitable eye protection. The operation
of your drilling machine will cause flying chips and
particles. These will cause severe eye injuries. You
must always wear suitable eye protection.
●Not all glasses are suitable eye protection. Wear
only suitable eye protection that comply with ANSI
standards. Not all of the lenses are shock resistant.
Glasses for vision correction are not for eye protection.
Select protective glasses suitable for the work.
Always Wear Suitable Hearing Protection
●Always wear suitable hearing protection.The
operation of your drilling machine will cause big
sound occurs. These will cause severe hearing loss
injuries. You must always wear suitable hearing
protection.
Always Wear respiratory protective equipment
●tnempiuqeevitcetorpyrotaripserraeWsyawlA
when working in an environment where dust
particles are generated in operation.
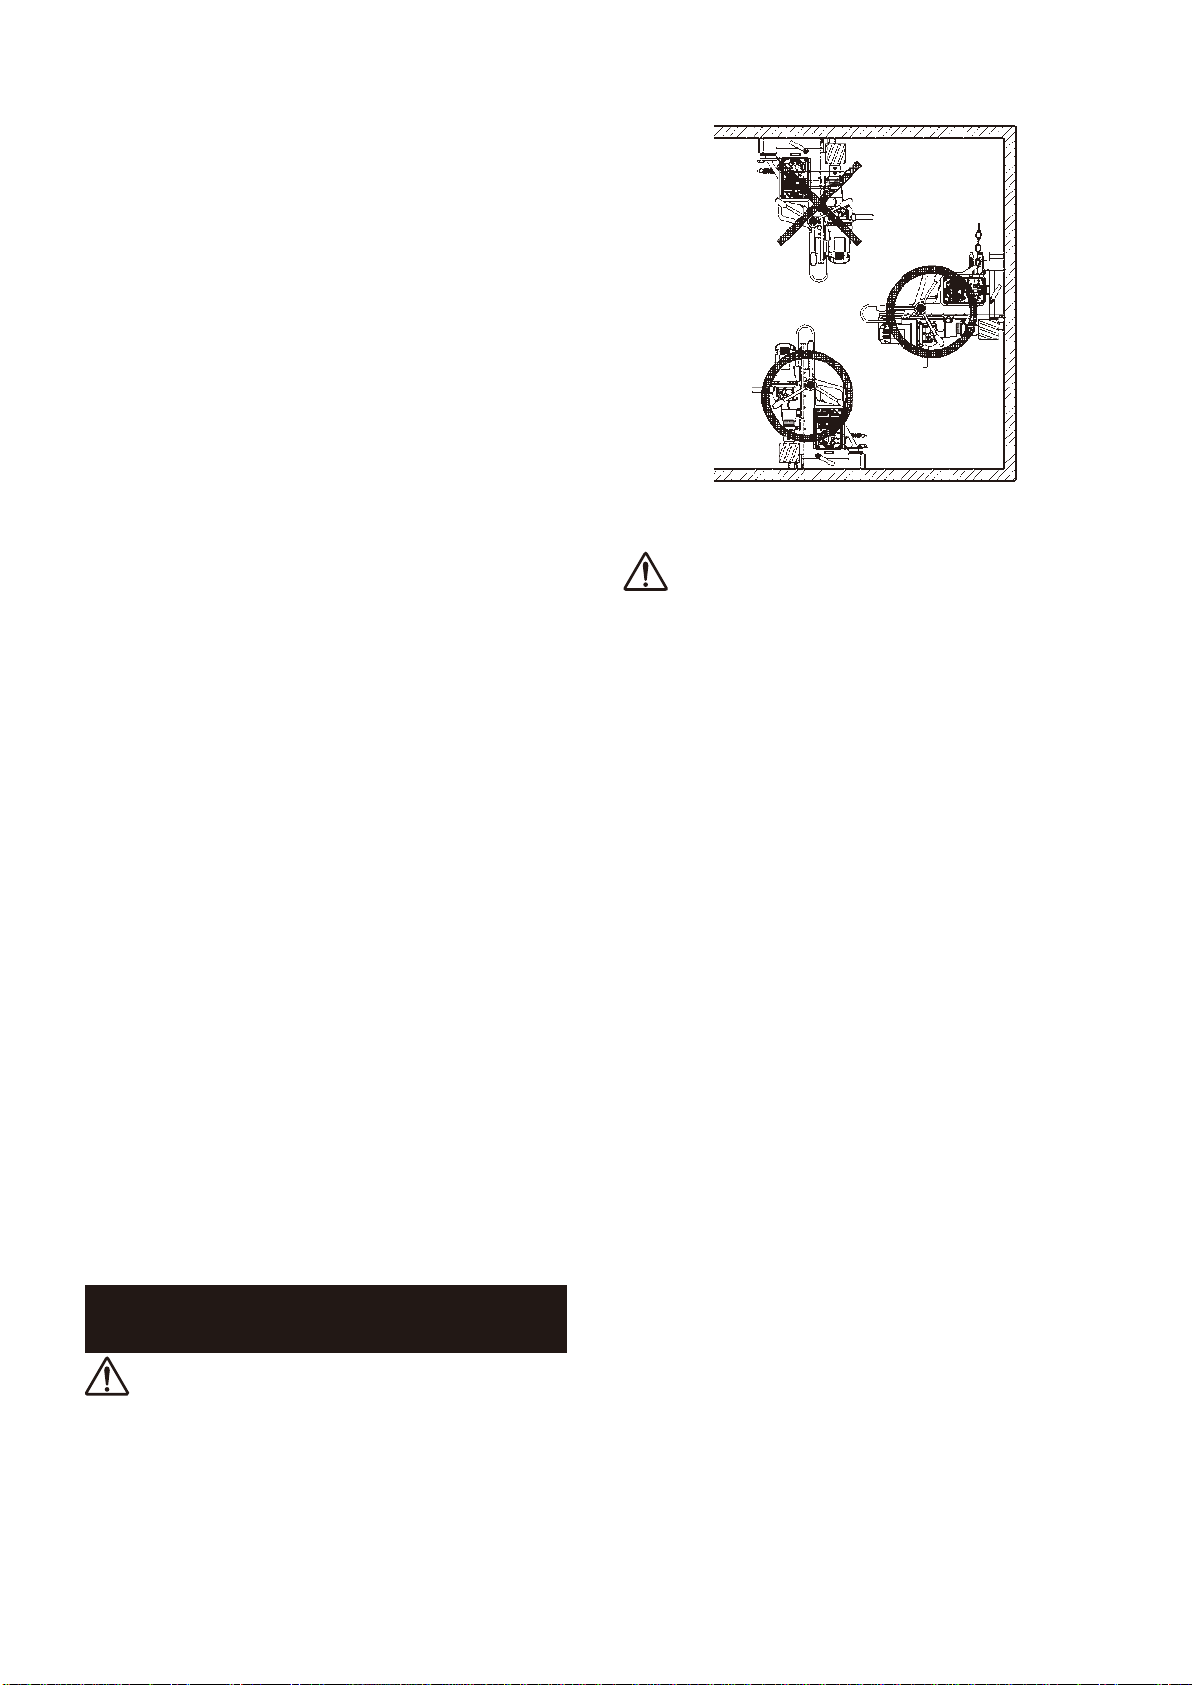
Maintain Good Posture
●Always wear non-skid footwear and maintain
good posture.Do not use the drilling machine
when you are tired. Fatigue or loss of balance could
cause you to lose control of the machine. This could
cause severe injuries. Always stay balanced. Always
keep good posture. Stop using the machine if you
are tired.
Never Touch the Cutting Tip
●Never touch the moving parts or cutting tip.
Contact with the moving tip will cause severe
injuries. Always keep all parts of your body away
from the cutting tip. Always keep your hand and
clothing away from the cutting tip.
ABOUT THE WORK AREA
Keep Work Area Clean
●Always keep your work area clean. Cluttered work
areas cause accidents. Always keep clear of other
objects.
●Never use the magnetic drilling machine when
it is wet.Always use the drilling machine in a dry
area. Do not use the drilling machine in the rain.
If you use the machine when it is wet you can get
electric shock. If you use the machine in the rain you
can get an electric shock.
●Always use the drilling machine in a well-lighted
area. Do not use the drilling machine in the dark.
●Avoid all flammable materials.Use of the drilling
machine may cause a spark that could ignite a fire
or an explosion.
Never use the machine near any flammable
material.
●Keep away from children. Always keep the drilling
machine away from children. Do not operate drilling
machine when children are present.
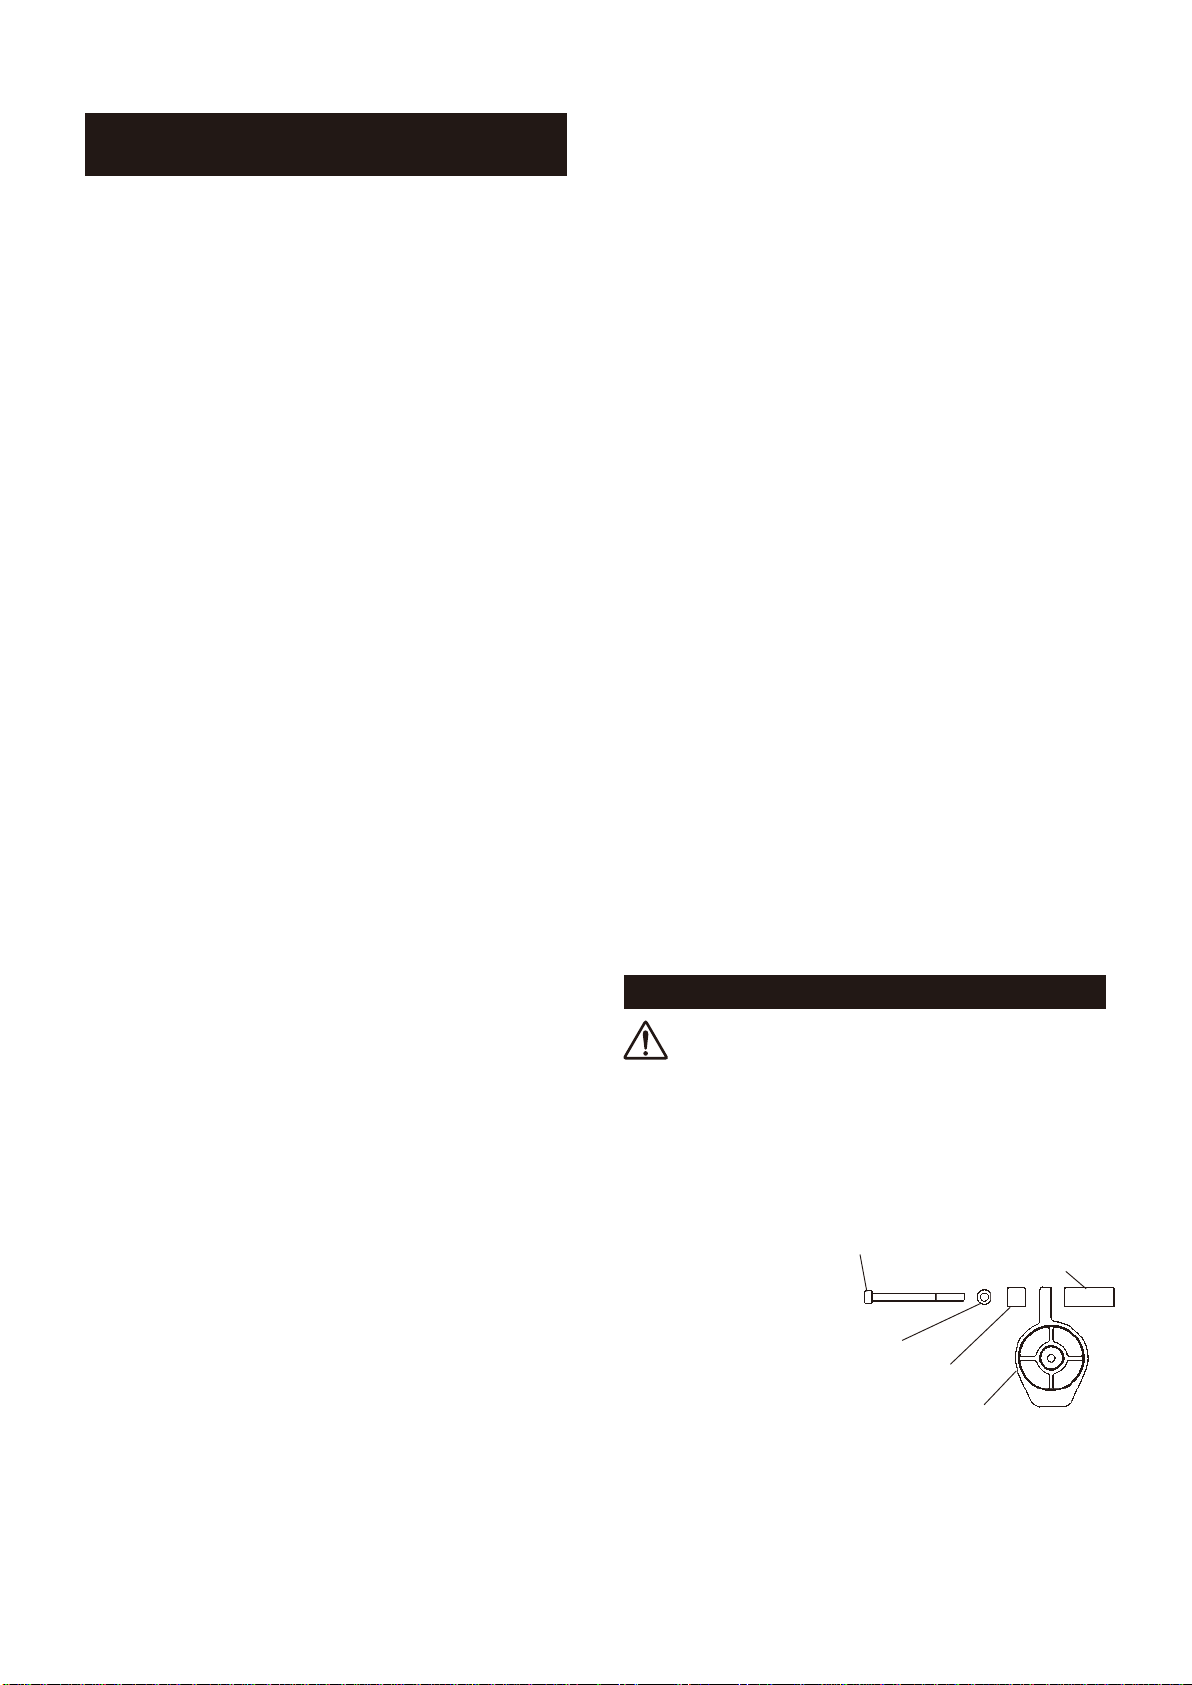
BEFORE OPERATION
Make sure that all parts are free from damage
●Make sure that the drilling machine is in good
operating condition.Operating a damaged
machine could result in severe injuries. If there
is any damage to the machine, do not use the
machine. If there is any damage to the machine,
take it to an authorized Nitto dealer for repair.
●Do not attempt service or repair of the drilling
machine. All service or repair should be done by an

3
authorized Nitto dealer.
Secure Your Work
●Always secure your work piece.Improperly
mounted work can become loose. This can cause
severe injuries. Always secure all work.
●Do not attempt to hold any work piece with your
hand.Attempting to hold a work piece with your
hand may cause severe injuries. Always use a vice
or clamp to hold the work piece.
●Always secure your drilling machine. Improperly
mounted drilling machine can come loose. This can
cause severe injuries. Always secure the drilling
machine.
Avoid Clutter
●Always stay clear of other objects. Cluttered work
areas cause accidents. Always keep a clean work
area and stay away from other objects.
Always Remove Spanner Wrenches and
Adjustment Tools
●Always remove spanner wrenches and
adjustment tools after adjustments have been
made to the drilling machine.
Always Use aCutter thatisAppropriate for Your Work
●Always use a Cutter that is appropriate for your
work.Avoid work that is the beyond the capacity
of your drilling machine. If the work exceeds the
capacity of your drilling machine, this can cause
accidents and severe injuries. Always use the
drilling machine in accordance with its performance
specifications.
SAFE HANDLING
●Never leave the magnetic drilling machine
unattended while it is running. When the machine
is unattended, disconnect the power source. Do not
leave the work area until the machine comes to a
complete stop.
HOW TO STORE YOUR MAGNETIC DRILLING
MACHINE
●Always store the machine off the cement floor
and on flat surface with the machine unplugged.
● Always store the machine off the cement floor,
flat surface and unplugged.
●Always store the machine in a dry area.
● Always keep the machine out of the reach of
children.
HOW TO CARRY YOUR MAGNETIC DRILLING
MACHINE
●Disconnect the power and turn off the machine
whenever you carry the machine.
MAINTENANCE
Do not take apart or modify your magnetic drilling
machine.
●Do not attempt to disassemble or modify your
magnetic drilling machine.
●Do not modify your magnetic drilling machine.
Modifications can cause accident and severe injuries.
●All service and repairs must be performed by an
authorized Nitto dealer. Any attempt to service or
repair the machine yourself may result in an accident
and severe injuries.
Check all Parts for Damage.
●Always inspect the magnetic drilling machine before
use.
●Always check that the pilot pin and cutter are in good
condition. Use of the machine with worn pilot pins or
worn cutter can cause accidents and severe injuries.
●Inspect all cutters before you put them on the
magnetic drilling machine.
●Do not operate the magnetic drilling machine with a
damaged or worn cutter. Do not operate the machine
with a damaged or worn pilot pin. Do not operate the
machine with any damaged accessory. Operating
the machine with any damaged part or accessory
can cause accidents and severe injuries. If there is
any damage to the magnetic drilling machine do not
operate the machine. Take it to an authorized Nitto
Dealer for repair.
●Always have the magnetic drilling machine repaired
at an authorized Nitto dealer. Always take the
magnetic drilling machine to an authorized Nitto
dealer for service, repair and replacement parts. If
you cannot locate an authorized Nitto dealer near
you, please contact your sales representative.
●Always use Nitto genuine parts. The use of improper
or non-Nitto parts can cause accidents and severe
injuries.
To obtain genuine Nitto parts, contact your sales
agent.
●Do not remove any nameplate from your magnetic
drilling machine. Do not remove any labels from
your magnetic drilling machine. If any label or
nameplate is damaged contact your sales agent for
a replacement.
POWER TOOL SAFETY
WARNING
●Always make sure that the machine is properly
grounded. If the machine is not properly grounded,
someone can get an electric shock.
●If you have any doubt about the grounding of

4
the magnetic drilling machine, contact a licensed
electrician.
●Never connect the grounding conductor to a gas
pipe. This will result in an explosion and severe
injuries or death.
●Always check the grounding conductor. If you have
any doubts about the grounding conductor contact a
licensed electrician.
●Wiring connections to a grounding rod require the
expertise of a licensed electrician. Do not attempt
the wire connections yourself. Always contact a
licensed electrician.
●Do not abuse the power cord. A damaged power
cord can cause an electrocution. A damaged power
cord can cause fires. Always inspect the cord. If the
cord is damaged, do not use the magnetic drilling
machine.
●Do not carry the machine by the cord. Do not pull
the cord to disconnect it from a socket.
●The cord can become damaged from heat, contact
with sharp objects or from being twisted. Always
inspect the cord. Do not use the machine if the cord
is damaged.
●Always use a ground fault circuit interrupter. The use
of a ground fault circuit interrupter may be required
by government regulations. The failure to use a
ground fault circuit interrupter may result in electric
shock.
●Avoid starting the magnetic drilling machine abruptly
or unintentionally.
●Always make sure that the switch is turned off before
connecting the power source.
●Always disconnect the power source and turn off
the switch before setting up for work operations.
Always disconnect the power and turn off the
switch when inspecting work. Always disconnect
the power and turn off the switch before attempting
any maintenance. Failure to disconnect the power
and turn off the switch during set up, inspection
or maintenance can cause accidents and severe
injuries.
ABOUT YOUR NITTO PORTABLE
MAGNETIC DRILLING MACHINE
DANGER
Do not use your portable drilling machine on the
ceiling.
● Use of the portable drilling machine on the ceiling
is dangerous. The machine could fall. The falling
machine could cause severe injuries or death. (Fig.1)
(Fig.1)
WARNING
Do not use the Magnet for more than five hours.
●More than five hours of uninterrupted operation
may cause a fire. Five hours of uninterrupted
operation generates extreme heat in the Magnet and
permanently damage the internal coils. Do not touch
the Magnet when the Magnet is hot. Touching it will
cause a severe burn injury. When you are not using
the Magnet, turn the switch to the OFF position and
unplug the machine.
Do not use the Drill Motor for over 30 minutes.
●Uninterrupted operation of the Drill Motor for over
30 minutes generates heat. This heat can cause a
fire. When you are not using the Drill Motor, turn the
switch to the OFF position and unplug the machine.
Use only on magnetic materials.
●Your portable drilling machine cannot be used
on non-magnetic materials, such as aluminum,
stainless steel, copper or alloys. The Magnet will
not adhere on non-magnetic materials. Attempting
to use the Magnet on non-magnetic materials could
cause an accident.
Use caution during wall operation.
●When using your portable magnetic drilling machine
on a magnetic wall, always use caution.
●Never stand under the machine.
* Never allow anyone to stand under the machine.
* Never put any part of your body under the machine.
* If the machine falls, it could result in severe injury or
death.
●Always remove Cutting Oil from the Tank before
using the machine on a wall. You must manually
apply Cutting Oil to the cutting tool.
Always use a work piece that is at least 13 mm
thick.
●The work piece must be at least 13 mm thick. If a

5
Use an iron back-up plate.
●If the work piece is less than 13mm thick, you must
use an iron back-up plate that is more than 10 mm in
thickness. The surface area of the iron back-up plate
must be greater than the surface area of the magnet.
An appropriate back-up plate is necessary to boost
the holding power of the Magnet.(Fig.3) Use of an
inappropriate back-up plate can result in an accident.
If the back-up plate is not thick enough or big enough,
the machine will come loose during operation. This
can result in an accident and severe injuries.
Lessthan13mm Place 10mm or greater thick piece
(Fig. 3)
Always keep surfaces clean.
●Always keep the Magnet surface clean. Always keep
the work piece surface clean. If there are any foreign
objects between the Magnet and the work piece
surfaces, this will reduce magnetic power. This could
cause the machine to move during operation. This
can result in an accident. Keep all surfaces clean of
rust, chips or other foreign material.
Do not place the machine over a hole.
●Do not attempt to position the Magnet over a hole.
Attempting to straddle a hole will reduce the power
of the Magnet. This will cause the work piece to
come loose during operation and can cause an
accident.
Always use a chain to secure the machine.
●If the machine falls, it can cause severe injuries.
There is always a possibility that magnetic power
can be lost or reduced because of a power failure.
Magnetic power can be lost on rough surfaces. You
must take precautions to prevent the machine from
falling.
●This machine comes with a chain. The chain is to be
used to fasten the machine to the work piece. If you
do not use the chain, it is possible that the machine
may fall. (Fig.4)
Chain
(Fig. 4)
●If use of the chain is not possible because of the
size of the work piece, you must use another method
of securing the machine. Use a Supporting Magnet
Ass’y to prevent the machine from falling.
●The use of a Supporting Magnet Ass’y is shown
below. (Fig.5)
Supporting Magnet Ass’y
(Fig. 5)
Always set the Magnet in the proper position.
●Always set the Magnet parallel to the longitudinal
direction of the material. Failure to set the Magnet in
the proper position may result in reduced magnetic
power. This can cause the machine to move in
operation. This can cause an accident resulting in
severe injuries.
●When using on H-section steel, as shown in the
figure below, set the Magnet in a direction parallel
to the longitudinal direction of the material. This will
ensure that the Magnet is in the best position for
magnetic attraction.(Fig.6)
(Fig. 6)
work piece is too thin, the magnetic power of your
machine will decrease. This will cause the machine
to move during operation. This could result in an
accident. (Fig.2)
Not less than13mm
(Fig. 2)

6
●Poor magnetic power may result in damage to the
cutter or damage to the work piece.
Be careful about chips.
●Keep your hands away from the cutting area at all
times. During drilling, there will be chips. The chips
are sharp. The chips are rotating with the cutter. Any
contact with the chips can cause severe injuries.
Do not touch the slug.
●Do not touch the slug. The slug is very hot and
sharp. It will cause severe burns. Make sure that
no one touches the slug. Make sure that there is
no one below the work area during operation. Hot
slugs will fall. Hot slugs can cause severe burns,
other severe injuries, or even death. Always wear
protective equipment, including protective headgear,
eye protection, hearing protection, and gloves. Do
not allow any person without protective equipment to
come near the machine.
Do not use your hands to remove chips.
●Chips have sharp edges. Use a screwdriver to
remove chips. If you use your hands to remove
chips, you can be injured, even if you are wearing
gloves. Do not use your hands to remove chips
under any circumstances.
The cutting edge is sharp.
●Always wear gloves when changing the cutter. The
cutting edge is sharp. If you do not wear gloves,
you will be cut. Attempting to change the cutter can
result in severe injuries.
Do not use Cutting Oil for other purposes.
●Cutting Oil should be used only for drilling. Please
refer to Section 5-7 of this manual for further
warnings and instructions about Cutting Oil.
●Stop the work and inspect the machine when
abnormal spark is observed with the carbon brushes
of the drilling machine.
CAUTION
Always use a compatible Pilot Pin.
●The Pilot Pin must be compatible with the cutter. An
improper Pilot Pin may result in an accident. See
Section 5-3 to identify compatible Pilot Pins and
cutters. The proper Pilot Pin to be used will vary,
depending on the type of cutter, the diameter of the
cutter, and the length of the cutter.
Do not use power that is generated by an engine-
driven welder.
●The use of an engine-driven welder as a power
source may cause your magnetic driven machine to
malfunction, Power from an engine-driven welder
can damage the electronic circuits in your portable
drilling machine.
●Do not use an extension cord that is too thin. Do
not use an extension cord that is too long. Do not
use an extension cord that is wound on a drum. Do
not share an extension cord with other motor-driven
tools. These uses can cause voltage to drop and
can reduce the holding power of the magnetic base,
causing the machine to move during operation. This
can decrease performance and may cause damage
to the machine. (Fig.7)
Use a Proper extension cord.
Extension Cord
Max length Size (nominal cross-section area of
the conductor)
10 m Min 2.0 mm2or more
20 m Min 3.5 mm2or more
(Fig. 7)
Don’t use this machine on the steel material being
electrically welded.
●When the electric welder is not properly grounded,
electricity will run through the Atra Ace machine via
its Magnet and Power cord, causing possible failure
or malfunctioning, which in turn may cause accident.
Don’t force to feed cutter when drilling manually.
●Because the Hi-Broach and Jetbroach have
rather thin cutting edges with less cutting pressure
resistance as compared to twist drill, do not force to
feed the cutter when drilling manually.
If you feed it with too much force, the cutter may
break or end up with shorter life.
Lower the drill when not using to store the drilling
machine.
●The main unit may turn over when the drill is kept in
lifted position.
The color of LED changes according to the load
of the drilling machine. Use the drilling machine
when LED is green.
●LED turns green when load of the drilling machine
is normal and turns red when excessive load is
applied.
Excessive load is applied to the drilling machine when
LED is turned red. Slow the feed speed to be able to
drill with load in which lights only the green LED.

7
The output of motor decreases and LED turns
red when excessive load is applied to the drilling
machine. When the same load is further applied
for approx. six seconds, the drilling machine will
automatically stop and the green LED will blink.
●The output of the drilling machine decreases for
protection when further load is applied in red LED.
The drilling machine returns to normal operation
when load is reduced before it completely stops
by excessive load. When the drilling machine has
stopped automatically, the drilling machine will only
operate after turning the motor switch OFF and then
turned back ON.
Team lift when moving the machine.
●The mass of the drilling machine is 30kg. Carry the
machine with two people by holding the grip of the
main unit and the side handle of the drilling machine.
1 APPLICATION
This is a portable drilling machine with a Magnet,
geared to drill mild steel (mild steel or equivalent)
using various cutters. The machine will be mounted on
the work piece to be drilled with the Magnet securely
fastening the machine to the work piece while drilling
takes place.
2 RECEIVING INSPECTION
Upon unpacking, check to see that the shipment is
complete without damage or oil leakage in transport.
Should you find any damage or short-shipment, please
contact sales agent through which you have
purchased your machine or an authorized dealer near
you for corrective actions.
Package Contents Q’ty Check
ATRA ACE 1set
Holder MT03075 Side lock 1set
Pilot Pin 12075 1
Rod Handle 3
Side Handle 1
Hex. Socket Screw Key 2.5 1
Hex. Socket Screw Key 5 1
Hex. Socket Screw Key 6 1
Hex. Socket Screw Key 8 1
Spanner 7X8 1
Drill Drift (see Fig.11) 1
Chain 1
Guard 1
Instruction Manual 1
3 PART NAMES
(Fig. 8)
Rod Handle
Window
Drill Speed Control Knob
Load Detector LED Lamp
Drill Motor
Hex. Socket Set Screw
With Flat Point M20x120
(Stabilizer)
Body
Set Screw
Power Plug
Clamp Lever
Magnet
Pole Plate
Stopper Plate
Stopper Bolt
Holder
Oil Dropper
Shift lever
Side Handle
Oil Tank
Oil Tank Bracket
Hex. Nut Type3 M20
Slow Start Switch
MotionSensor Delay Switch
MotorSwitch
Magnet Switch
Slide Board
Adjustment Screws
Slide Board

8
4 FUNCTIONS OF ELECTRONIC
CONTROL
4-1. Load detection function
Device to automatically operate functions described
below when excessive load is applied in drilling.
Do not use the drilling machine with an engine
generator as the power source or when the voltage
of the power source is too high or low since the load
detection function may not operate properly.
(1)Load indication function
The load condition of the drilling machine is
indicated by LED. LED turns green when load of
the drilling machine is normal and turns red when
excessive load is applied.
(2)Automatic stop function
When load is further applied to the drilling machine
with LED turned red, the output of motor drops and
LED starts blinking quickly. When load is further
applied for approx. six seconds in that condition, the
drilling machine will stop automatically to protect the
drilling machine and the green LED will blink.
To continue the work, turn the motor switch OFF, lift
the cutter slightly in the hole, and then turn it ON.
The drilling machine will operate.
(3)Automatic restart function
When load is reduced before complete stop of the
drilling machine by excessive load, LED switches
from blinking in red to continuous green and returns
to normal operation.
4-2. Drill speed control function
The speed of the drilling machine can be adjusted
from 100 to 50% by turning the drill speed control
knob to the right.
Use the control for fine adjustment of the drill speed
when using materials difficult to machine, to prevent
chattering of the cutter, to extend the service life of the
cutter or other purposes.
4-3. Motion detection function
When excessive vibration or lateral motion of the
magnet is observed during drilling, the drilling machine
will stop and the red LED will blink.
To continue the work, turn the magnet switch OFF and
ON again, lift the cutter slightly in the hole, and restart
the operation.
4-4. Motion detection switching function
Prior to starting drilling operations while the drill motor
is running, press the motion sensor delay switch to
temporarilycancel the lateral motion detection function
when adjusting the swivel base. The function will be
canceled for approx. eight seconds and the red and
green LED blinks alternately, this allows the machine
to drill properly after the base is adjusted.
4-5. Slow start function
The drilling machine operates in slow speed at the
start of cut to reduce chattering during drilling. It will
return to normal operation five seconds after load is
detected.
Turn the slow start switch ON when using a cutter of
φ80mm or more.
Turn the switch OFF when using a cutter of below
φ80mm.
4-6. Re-start Prevention
The re-start prevention function comes into play when
power is restored after an outage during operation.
The green LED will blink and the magnet will be
activated, however, the drilling machine will not
operate for safety.
Turn the motor switch to the OFF position and turn it
back ON to operate the drilling machine and continue
the work.
4-7. Magnet Interlock
When the Magnet fails, the drill motor will not start
and the red LED lamp will blink. To repair a defective
magnet, please contact the sales agent from whom
you purchased your unit or an authorized dealer near
you.
5 MACHINE SETUP
WARNING
●When setting up machine, turn off the Magnet
Switch and disconnect the power supply plug
from power source.
5-1. Mounting Parts
(1)Rod Handle (three pieces)
Mount the Rod
Handles on the
Handle Boss.
(2)Side Handle
Mount the Side
Handle on the
Drill Motor.
(3)Oil Tank Bracket (Fig.9)
Mount the Oil Tank Bracket on the Slide Board.
(4)Stabilizer
Screw in Hex. Socket Set Screw with Flat Point
M20x120 and Hex. Nut Type3 M20 to the rear part
of the body.
Hex. Socket Head Cap Screw 6×75
Washer M6
Spacer Oil Tank Bracket
Guard Tank Bracket
Oil Tank Bracket
(Fig. 9)

9
5-2. Using Cutter
CAUTION
●Use a holder appropriate for the cutter to use.
●Do not use worn or damaged cutter for better
workability and safety.
(1) Holder MT03075 Side lock Ass’y (Standard
accessory)
Holder exclusive for φ50 to φ100mm×75L
Jetbroach. Do not use for other cutters.
(2) Holder MT03075 One-touch Ass’y (Option)
Holder exclusive for Jetbroach one-touch and Hi-
Broach one-touch. Do not use for other cutters.
5-3. Combination of Cutter and Pilot Pin
CAUTION
●Do not use any other combinations than those
shown in the compatibility table.
Use a Pilot Pin appropriate for the cutter. (Fig.10)
A Pilot Pin to be used varies depending on the cutter
type, diameter, length (depth). A wrong combination
of cutter and Pilot Pin would not allow slug to be
ejected at the end of drilling and/or prevent Cutting
Oil from reaching the cutting point, resulting in
cutting tool damage.
(Fig. 10)
5-4. Attachment and detachment of holder
WARNING
●Turn the magnet switch OFF and unplug the
power plug when replacing the holder.
●Do not use a holder that is not of a genuine
product.
●Ensure the attachment of the holder. It may
cause damage when holder is not attached
properly.
CAUTION
●Make sure that the Holder will fit in the Spindle
of the Drill Motor.
●Keep the holder insertion area clean all the time.
When waste such as cut chip is entered in the
insertion area, remove it completely and then
attach the holder.
●Make sure to prevent adhesion of oil to the
holder insertion area and tapered shank when
attaching the holder. Wipe the oil cleanly if oil is
adhered.
●Pay attention not to drop the holder when
attaching it.
(1) How to attach holder (Fig.11)
Engage the lugs on the holder to the notches in the
spindle; rotate the oil ring to align the stopper bolt to
the stopper plate, then insert the holder forcefully.
Stopper Bolt
stopper plate notch
Holder
ドリルドリフト
窓
Tongue
(Fig. 11)
(2) Detachment of holder (Fig.12)
Turn the drill so that the tongue at the holder head
can be seen from the window of the drilling machine.
Insert the drill drift through the window and hit the
drill drift with a hammer to detach the holder.
ストッパボルト
ストッパプレート溝位置
ホルダ
Drill Drift
Window
タング
(Fig. 12)
5-5. Attachment and detachment of cutter
WARNING
●Turn the magnet switch OFF and unplug the
power plug when replacing the cutter.
●Do not use any combination of the pilot pin
and cutter not indicated in the combination
compatibility table.
●Wear gloves when replacing the cutter.

10
CAUTION
●Pay attention not to let cutting chips enter in the
cutter insertion area.
If cutting chips have entered the cutter insertion
area, remove the cutting chips completely before
attaching the cutter.
●Make sure to remove the tip coating when using
the Jetbroach.
When the Jetbroach is used without removing the tip
coating, the cutting oil will not flow properly and may
damage the cutter.
(1)Holder MT03075 Side lock Ass’y(Fig.13)
1 )
Turn the Rod Handle to
lift the drill to the upper
part of the main unit.
(Fig.14)
2 )
Insert the Jetbroach
to use in the pilot pin.
(Fig.15)
3 )
Insert by matching the
flat surface area of
the Jetbroach with the
holder screw. (Fig.16)
4 )
Securely tighten hexagon
socket head stopper
bolts with the supplied
hexagonal wrench. Pay
attention not to tighten
hexagon socket head
stopper bolts when they
are in a slanted condition
since hexagon socket
head stopper bolts
will bite into the holder
and will not be able to
remove them. (Fig.17)
(2)Holder MT03075 One-touch Ass’y (Fig.18)
1 )
Turn the Rod Handle to
lift the drill to the upper
part of the main unit.
(Fig.19)
2 )
Insert the pilot pin in the
cutter according to the
size of the cutter to use.
(Fig.20)
3 )
Align the ball dent area
of the cutter and white
line of the sleeve and
insert the cutter. (Fig.21)
4 )
When the cutter is
inserted properly, the
sleeve will rotate to the
right and lock with a
clicking sound.
5 )
When the cutter cannot
be inserted, rotate the
sleeve to the left and
then re-insert the cutter.
6 )
The cutter can be
detached by rotating the
sleeve to the left. (Fig.22)
5-6. Setting the shift lever
WARNING
●Make sure to turn the motor switch OFF and
wait until the drilling machine stops completely
before switching the setting.
●Do not turn the motor ON and rotate the drill
when switching the setting.
Switch the drill speed according the type and size of
the cutter. (Fig.23)
Lift the plunger pin of the shift lever and turn the shift
lever to switch the setting. (Fig.24)
If the shift lever gets caught at a certain point when
turning, rotate the holder manually to the point
where it does not get caught, and then turn the shift
lever to the end.
Insert the plunger pin in the hole to secure the shift
lever.
Refer to the table shown below for switching. Select
the drill speed appropriate for the actual drilling
since conditions differ depending on the material to
drill.(Fig.25)
Shift lever Plunger pin
Hole
(Fig. 23) (Fig. 24)
(Fig. 25)
Rod Handle Pilot pin
Down ward Up ward
Holder MT03075
One-touch Ass’y
Align
Cutter
Sleeve
Sleeve
Turn the Sleeve
to the left
White line
Depression
Rod Handle
Pilot pin
Down ward Up ward
Holder MT03075
One-touch Ass’y
Align
Cutter
Sleeve Sleeve
Turn the Sleeve
to the left
White line
Depression
Rod Handle
Pilot pin
Down ward Up ward
Holder MT03075
One-touch Ass’y
Align
Cutter
Sleeve
Sleeve
Turn the Sleeve
to the left
White line
Depression
(Fig. 18) (Fig. 19)
(Fig. 20) (Fig. 21)
(Fig. 22)
Rod Handle
Pilot pin
Jetbroach
Down ward Up ward
Holder MT03075
side lock Ass’y
Align
Rod Handle
Pilot pin
Jetbroach
Down ward Up ward
Holder MT03075
side lock Ass’y
Align
Rod Handle Pilot pin
Jetbroach
Down ward Up ward
Holder MT03075
side lock Ass’y
Align
(Fig. 15) (Fig. 16)
(Fig. 17)
(Fig. 13) (Fig. 14)

11
5-7. Preparation of Cutting Oil
Cutting Oil Safety Precautions
WARNING
(1) Use
●Use Cutting Oil for cutting purpose only. Don’t use it
for household purposes.
(2) Handling Precautions
●The Cutting Oil contains amine. Do not mix it up with
rust inhibitor, etc. containing nitrite.
●Wear safety glasses for eye protection when
handling Cutting Oil: eye injury may results if it gets
into your eyes.
●Wear protective gloves for hand protection when
handling Cutting Oil: skin injury may result if it
comes into contact with your skin.
●Wear respirator when exposure to respiratory
hazards with oil mist or vapor is anticipated.
Inhalation of oil mist or vapor may make you feel sick.
●When diluting Cutting Oil, follow the instructions per
the Operation Manual.
●Keep Cutting Oil out of reach of children.
● Don’t drink Cutting Oil.
(3) First Aid
●If Cutting Oil gets into your eyes, immediately open
your eyelids with your fingers and wash your eyes
with plenty of water for at least 15 minutes. If your
eyes feel irritated, consult with a medical doctor and
follow his/her instructions
● If Cutting Oil comes into contact with your skin,
immediately wash it away with plenty of water and
soap. Take off contaminated clothes. Clean the clothes
if you need to wear it again. If your skin feels irritated,
consult with a medical doctor for medical instructions.
●If someone inhales oil mist or vapor, immediately
take him/her to an area where fresh air is abundant
and wrap up his/her body with a blanket, etc. to keep
body temperature. Have him/her take a rest and
consult with a medical doctor for medical instructions.
●If someone drinks Cutting Oil, immediately make
him/her drink plenty of water and vomit it. Consult
with a medical doctor for medical instructions. When
unconscious, do not pour water into his/her mouth
nor induce him/her to vomit.
(4) Instructions in Case of Fire
● If fire breaks out in the vicinity, wear PPE (personal
protective equipment) and use foam, powder or
CO2fire extinguisher to put the fire out from the
windward.
(5) Storage
●When storing Cutting Oil after use, put into
a container with a tight sealing lid to prevent
contamination from dust or moisture.
●Avoid direct sunlight, rainwater or the like and store
Cutting Oil in a dim cool area.
(6) Disposal
●For disposal of concentrate solution and used fluid,
request a waste-disposal company to dispose them
as industrial waste in accordance with the local laws
and regulations.
●Treat flushing water through pH adjustment,
condensation/sedimentation, activated sludge
process, activated carbon adsorption, etc., and
discharge it in accordance with the regulations of
your local municipal bylaw.
●Residual dross will remain in an emptied container:
be careful when handling an empty container.
(7) Others
●When Cutting Oil is poured into another container
for use, post chemical and label information at the
site where it is kept. At the same time, keep the
Operation Manual handy so that it can be referred to
whenever necessary.
●For further details, contact us for product safety data
sheet.
●All the information and descriptions that have been
provided are based on the currently available
documents and information, which may be revised
upon our new recognition and/or discovery.
●The precautions provided apply to regular handling.
If special handling method is used, take safety
measures that are suitable for your applications and
usage.
●The information contained herein is for your
reference purpose only, to which we make no
warranty of any kind and for which we shall not be
held responsible.
Preparation of Cutting Oil
(1)Remove the oil tank from the oil tank bracket.
(2)Remove the cap of the oil tank and fill with cutting oil.
(3)Tighten the cap of the oil tank and turn the oil tank
up-side-down to insert in the oil tank bracket. (Fig.26)
Oil Tank
Oil Tank Bracket
(Fig. 26)

12
5-8. Connecting the Power Supply Plug to
Power Source
Turn the power switch OFF before plugging the power
plug.
Always use appropriate voltage for the power source.
Pay attention to voltage drop when using an extension
cord.
6 MACHINE OPERATION
WARNING
●Do not wear gloves. Wearing of gloves may cause
the hand to be caught in the rotating drill or
cutting chips.
●Always Wear Safety Glasses.
●Always Wear Hearing Protection.
●Wear respiratory protective equipment.
CAUTION
●Do not use hard material such as a screwdriver,
to operate the Motor Switch. This may damage
the panel and switch, which would lead to
machine failure.
6-1. Start and Stop
Motor switch will not operate and the drill will not
rotate unless the magnet switch is turned ON.
(1)Start (Fig.27)
・Magnet ON
When the magnet switch
is turned ON, the load
indication LED will turn
green and the magnet will
be activated.
・Drill Motor ON
Turn the motor switch
ON. The drill will start to
rotate.
(2)Stop (Fig.28)
・Drill Motor OFF
The drill will stop when the
motorswitchisturned OFF.
・Magnet OFF
When the magnet switch
is turned OFF, the load
indication LED will turn
off and the magnet will be
deactivated.
6-2. When drilling a large hole
CAUTION
●Drill slowly when drilling a large hole.
Turn the slow start switch
ON when using a cutter of
φ80mm or more. Turn the
switch OFF when using
cutters below φ80mm.
(Fig.29)
Operate in a slow speed at start of the drilling to
reduce the chattering and return to normal operation
five seconds after the load detection.
6-3. Adjustment of drill speed
CAUTION
●Reducing the speed of
the Drill Motor byusing
the Drill Speed Control
will also reduce the
cooling efficiency of
the Drill Motor, so do
not use continuously.
Continuous use may lead to early damage of the
Drill Motor.
●Drill a hole slowly since the drill speed control
will reduce the drill speed and power.
The drill speed of the drilling machine can be
adjusted from 100 to 50% by turning the drill speed
control knob to the right.
Adjust the drill speed according to the machining
material and condition of the cutter. (Fig.30)
6-4. Fine adjustment of drilling position(Fig.31)
WARNING
●Securely tighten the clamp lever.
The main unit can be minutely adjusted to right
& left and front & rear by turning the clamp lever
counterclockwise.
Precisely adjust the drilling position when it is not
properly aligned with a punch mark.
After the adjustment, turn the clamp lever clockwise
and securely tighten it.
※The clamp lever can be attached on either right or
left side.
Clamp Lever
loosen
fasten
(Fig. 31)
ON ON
Magnet
Load
Detector
Motor
(Fig. 27)
(Fig. 28)
Slow
Start
(Fig. 29)
(Fig. 30)
Drill
Speed
Fast Slow

13
6-5. Drilling Oblong Hole
CAUTION
●Always drill oblong hole slowly.
Drill oblong hole in the order of ①,②,③. For the
steps ②and ③, take care so that the cutter may not
be fed into the work piece with too much force.
Spacing between each step of drilling operations
should be so arranged that the Pilot Pin will always
hit the material yet to be machined. (Fig.32)
(Fig. 32)
6-6. Drill Stacked Plates
CAUTION
●When drilling stacked plates, fix the steel plates
so that the gap between the plates must be less
than or equal to 1mm.
●Use special one-touch Jetbroach Cutters
exclusively designed for stacked plates.
Drill slowly when drilling stacked plates.
Securely fix stacked plates together.
6-7. Drilling Procedure
CAUTION
(1)Punch Mark
A large punch mark should
always be stamped quite
vertical to the work piece.
Be careful to get the
precise position for the
punch mark since it serves
as the drilling center guide.
(Fig. 33)
(2)Aligning with Punch Mark.
Turn the Rod Handle to
slightly lower the cutter
and align the tip of Pilot
Pin to the punch mark.
(Fig.34)
(3)Magnet ON
WARNING
●There is a risk of the main unit to sway when an
abnormal object is caught between the attaching
surface of the magnet and the work piece.
The magnetic force will be weak when there is a gap
between the attaching surface of the magnet and
the work piece.
Make sure to keep it clean by preventing entry of
abnormal objects such as cutting chips and checking
that no uneven surface or rust is observed on the
surface.
●Check that the magnet is attached by the
magnetic force.
Turn on the Magnet Switch.
The Load Detector Lamp
turns green and the
magnet will be attached by
the magnetic force.(Fig.35)
(4)Adjustment of stabilizer
WARNING
●Set the stabilizer properly.
The stabilizer is used for the magnetic force to be
applied effectively. Turn the magnet ON and then
adjust the stabilizer to be closely attached to the
work piece. Pay attention that the magnet is not
lifted by excessively extending the stabilizer. (Fig.36)
Hex. Socket Set Screw
with Flat Point M20x120
(Stabilizer)
(Fig. 36)
(5)Mounting the Guard
Mounting the Guard as shown. (Fig.37)
Guard (TQ14213)
(Fig. 37)
Punch Mark
Punch Mark
る
げ
下
く
軽
(Fig. 33)
(Fig. 34)
(Fig. 35)

14
(6)Adjustment of cutting oil
CAUTION
●For feeding of the cutting oil, check the flow rate
with the oil dropper before start drilling.
●Securely insert the oil tank in the oil tank
bracket.
The pilot pin will be pushed up and the cutting oil
will start to flow by turning the P Valve, turning the
handle bar and lowering the drill. Adjust the flow rate
referring to the oil dropper.
Tighten the P Valve when the work is completed.
(Fig.38)
P Valve
Oil Tank Bracket
(Fig. 38)
(7)Drill Motor ON
WARNING
●Don’t touch any rotating
parts.
Press the Drill Motor ON
Switch to activate the Drill
Motor. (Fig.39)
(8)Drilling
(8-1) Drilling
Turn the Feed Handle downward to start drilling. For
the first 2 – 3 mm of the drilling, slowly feed the drill
motor.
(8-2) Final stage of drilling
CAUTION
When drilling a hole in an angle, channel or H-section
steel, etc., cutter may be damaged when it comes to
the slanted part of the work piece on the final cutting
stage. Feed slowly in its start and finish cutting.
(Fig.40)
(Fig. 40)
(9)Finish drilling the hole
WARNING
●Beware of ejecting slug when finish with the
hole. Never touch the slug with bare hands since
it is hot and sharp.
After complete drilling, turn the Feed Handle to
uplift the cutter and press the stop switch.
When the drill motor stops, immediately turn off the
power switch. Continuous current flow through the
magnet, while it is ON, could shorten the service life
of the magnet.
(10)Removing Slug
WARNING
Do not start the next drilling with a slug remaining on
the cutter.
The tool has automatic slug discharge system. But
when the slug would not come out by turning the feed
handle to lift up the cutter, do not try to turn the handle
forcefully. This will result in machine or cutter damage.
Upon drilling complete, slug will be ejected
automatically by the spring-operated pilot pin.
Should the slug left choked inside the cutter, turn the
handle to lift up the cutter to eject the slug forcefully.
When even turning the handle with the same force as
in the feed for cutting a hole, you cannot eject the slug,
do not turn the handle forcefully any more. Remove
the slug from inside the cutter by tapping the collar of
the slug with a needle stick or alike.
(Fig. 41)
Pilot pin
Slug
Slug
Collar
Needle
Cutter
(Fig. 41)
6-8. Position Change of Rod Handles
●The Rod Handle can be attached on either right
or left of the machine.
However, the Oil Tank Bracket must be attached on
the opposite side of the Rod Handle.
Oil TankRod Handle
(Fig. 42)
(Fig. 39)

15
7 HOW TO USE TWIST DRILL
7-1. Attachment of twist drill
WARNING
●When attaching the twist drill, turn the magnet
switch OFF and unplug the power plug.
●Do not use a worn twist drill.
●Do not use a twist drill that is not properly
reground.
●Wear gloves when replacing the twist drill.
CAUTION
●The shank of the drilling machine is using Morse
taper No.3. Use a sleeve according to the size
of the Morse taper when using a twist drill with
Morse taper other than Morse taper No.3.
●Securely set the twist drill.
●When using the straight drill of φ13mm or
less, use it by combining a chuck arbor of a
commercially available Morse taper No.3 and a
drill chuck.
7-2. How to drill a hole
WARNING
●Make sure to have a pilot hole when drilling a
hole of φ20mm or more.
●The pressing force tends to be stronger when
drilling with a twist drill than a circular cutter.
Pay attention not to have the magnet lifted by
pressing the work piece too hard.
CAUTION
●Oil tank cannot be used when using the twist
drill. Feed cutting oil using a jet oiler, etc. from
outside the twist drill.
・Refer to 6 MACHINE OPERATION for the drilling
method.
7-3. How to temporarily cancel the lateral motion
detection function
CAUTION
●Do not use this function when using a Jet-
Broach or Hi-Broach.
・
The lateral motion detection function may be activated
and stop the drilling machine when the drill is rotated
to loosen the clamp lever to align the center.
・To temporarily cancel the lateral motion detection
function, press the motion sensor delay switch when
the drilling machine is operating. The function will be
canceled for approx. eight seconds and the red and
green LED blinks alternately.
8 TROUBLESHOOTING
WARNING
●Never attempt to repair machine yourself: injury or damage to equipment may result.
●Please feel free to consult the sales agent through which you have purchase your machineor an authorized
dealer, when the following symptoms appear or when you have any questions about our products.
The machine has electronic control. Be sure to turn off all the switches, raise up the electric drill, and then check
the machine, when the operator come across to the following situations such as.
Problem Causes Solutions
Switch lamp does not come on when the
power switch is turned on. Power plug is not properly connected to
receptacle. Connect power plug properly to
receptacle.
The drill motor would not start and LED
lamp brinks in red when the motor switch
is turned on.
The magnet is not activated. Request for repair to check the continuity
to the magnet.
The drill does not rotate even when the
motor switch is turned ON. The drilling machine or control circuit is
damaged. Request for repair.
Carbon brush is worn out. Replace the carbon brush.
The drill motor stops during drilling. (The
magnet stops working and the power ON
lamp is off.)
Power failure or plug was pulled out of
power supply. Restore power or insert power plug back
in, then set the start switch on again.
The magnet is moved laterally, the drilling
machine completely stops by the function
of the lateral motion detection function
and the red LED is blinking quickly.
Work piece too thin. Use back-up plate: thickness 10 mm
or more.
Chips under Magnet base. Clean it up.
Worn cutting edge. Regrind or replace with new one.
Effective magnetic force too weak. Ask for repair.
No cutting oil or insufficient cutting oil flow. The valve is closed. Open the valve.
Coolant tank is empty. Refill cutting oil into the tank.

16
9 MAINTENANCE/SERVICE
WARNING
●Always turn off the switch and unplug the
machine before attempting any maintenance.
Failure to disconnect the power and turn off the
switch during set up, inspection or maintenance
can cause accidents and severe injuries.
●Check to see periodically that mounting screws
are tight. If you find them loose, retighten.
9-1. Keep the drill motor at the lifted up position
●Keep the drill motor at the lifted up position while
not in use, or for the purpose of safety, when
you do not use the machine even for a while if it
has a cutter mounted. The pilot pin and/or cutter
may have the chance to be damaged if you keep the
cutter at the low position while carrying around.
9-2. Periodic application of grease to sliding
surface
Apply grease periodically to the sliding surface of the
main unit and the slide board.
9-3. Adjustment of loose Slide Board
CAUTION
●When tightening the adjustment screw to adjust
the looseness of the slide board, check that the
slide board is at the position of the slide board
adjustment screw.
The drilling accuracy will deteriorate and the service
life of the cutter will be significantly short when
looseness exists at the main unit and the slide
board. When looseness is observed, adjust it by
evenly tightening six slide board adjustment screws
on the side of the main unit to a degree in which the
drilling machine does not go down by its weight.
9-4. Keep the Tip of Pilot Pin Sharp
When the tip of pilot pin gets dull, it sometimes fails to
seat properly in punched hole, and results inaccurate
hole position. See that the tip is sharp enough from
time to time. If you find otherwise, regrind with care
or replace as required. Grinding with too much force
makes the tip rather dull or soften the pin material to
such a degree that it is no longer usable.
(Fig. 43)
Pilot Pin
Grind the tip
Optimal angle 70˚
(Fig. 43)
9-5. Recovery Measures When Pilot Pin Gets
Jammed
To replace the cutter, dismount the cutter from drill and
remove the pilot pin from the old cutter and insert it
into the new replacement cutter. The pilot pin serves
as the guide for the cutter centering. However there
are cases the pin would not come off easily because
cutting chips in the clearance between the cutter and
pin, cause jamming. In such, tap the tip of the pilot pin
with a WOODEN hammer or alike to push it out.
9-6. Cutter Regrinding
When you need to regrind our cutters, please contact
sales agent through which you have purchased or an
authorized dealer near you.
9-7. Carbon Brushes Inspection and Replacement
CAUTION
●Unplug the machine.
●Replace two carbon brushes at the same time.
Periodically check the wear condition of the carbon
brush.
A cut-off brush is used for the carbon brush. The
electric current will automatically shut down when
the carbon brush is worn out.
Replace to new carbon brushes following the
procedure below when the electric current is
shutdown. Pay attention that the pig tail will not be
caught to the brush holder. (Fig. 44)
(1) Remove the tapping screw and remove the end
cap.
(2) Remove the spiral spring, take out the worn carbon
brushes, set new carbon brushes and attach the end
cap. Set the carbon brushes with the pig tail facing
upward.
(3) After the replacement, operate the drilling machine
for 10 minutes without any load to break in the
carbon brushes.
Brush Holder
Pan Head Tapping Screw
End Cap
Carbon Brush
Spiral Spring
Pig Tail
(Fig. 44)

17
10 OPTIONAL PARTS
10-1. Nitto-Brand Cutting Oil
CAUTION
Use Nitto-brand Cutting Oil for Atra-Ace.
Part No. Part Name
TB01507 Cutting Oil 2ℓ(Light Blue)
10-2. Supporting Magnet Ass’y (Fig.5)
Part No. Part Name
TB04374 Supporting Magnet Ass’y
10-3. Holder MT03075 One-touch Ass’y
Part No. Part Name
TB09727 Holder MT03075 One-touch Ass’y
10-4. Pilot Pin
Part No. Part Name Max.Plate
Thickness Applicable Cutter
TJ12696 Pilot Pin 08025 (A1) 25mm Hi-Broach One-Touch 18 to 35 mm dia.
TJ15859 Pilot Pin 08035 (A2) 35mm Jetbroach One-Touch 17.5 to 40 mm dia.
TJ16019 Pilot Pin 08050 (A3) 50mm Jetbroach One-Touch 17.5 to 50 mm dia.
Hi-Broach One-Touch 18 to 35 mm dia.
TJ17436 Pilot Pin 08075 (A4) 75mm Jetbroach One-Touch 17.5 to 50 mm dia.
TA9A207 Pilot Pin 12075 75mm Jetbroach 50 to 100 mm dia.
10-5. Chip Breaker Ass’y
Part No. Part Name
TB09276 Chip Breaker Ass’y
Preparation of Chip Breaker
CAUTION
When setting the chip breaker, see that the tip of blade may not come into contact with the cutting tool.
Chip Breaker shreds cutting chips generated in the drilling into small pieces and facilitates chips smooth
discharging.
(1) Mount cutter
Loosen the Hex. Socket Head Cap Screw, and pull the blade away in the direction as shown by the arrow until it
would no longer move. And then, mount a cutter. (Fig.45)
(2) Set the blade
Set the blade so that the cutter and the blade will have a clearance of 0.5 – 0.8mm and fasten it securely to the
blade stay with Hex. Socket Head Cap Screw 8×20. (Fig46)
Hex. Socket Head Cap
Screw 8×20
Hex. Socket Head Cap
Screw 6×14
Pole Plate
Magnet
Chip Breaker Block Blade
(Fig. 45) (Fig. 46)

18
10-6. Cutter
(1) Jetbroach One-touch Type 35mm Depth Pilot Pin 08035(A2)
Part No. Diameter r× Depth(mm) Part No. Diameter × Depth(mm) Part No. Diameter × Depth(mm)
TK00301 17.5 × 35 TK00313 23.5 × 35 TK00324 32 ×35
TK00302 18 × 35 TK00314 24 ×35 TK00325 33 ×35
TK00304 19 × 35 TK00315 24.5 ×35 TK00326 34 ×35
TK00305 19.5 × 35 TK00316 25 ×35 TK00328 35 ×35
TK00306 20 × 35 TK00317 26 ×35 TK00602 36 ×35
TK00307 20.5 × 35 TK00318 26.5 ×35 TK00603 37 ×35
TK00308 21 × 35 TK00319 27 ×35 TK00604 38 ×35
TK00309 21.5 × 35 TK00320 28 ×35 TK00605 39 ×35
TK00310 22 × 35 TK00321 29 ×35 TK00606 40 ×35
TK00311 22.5 × 35 TK00322 30 ×35
TK00312 23 × 35 TK00323 31 ×35
(2) Jetbroach One-touch Type 50mm Depth Pilot Pin 08050(A3)
PartNo. Diameter×Depth(mm) PartNo. Diameter×Depth(mm) PartNo. Diameter×Depth(mm)
TK00380 17.5 × 50 TK00394 25 × 50 TK00408 38 × 50
TK00381 18 × 50 TK00395 26 × 50 TK00409 39 × 50
TK00382 19 × 50 TK00396 26.5 × 50 TK00410 40 × 50
TK00383 19.5 × 50 TK00397 27 × 50 TK00411 41 × 50
TK00384 20 × 50 TK00398 28 × 50 TK00412 42 × 50
TK00385 20.5 × 50 TK00399 29 × 50 TK00413 43 × 50
TK00386 21 × 50 TK00400 30 × 50 TK00414 44 × 50
TK00387 21.5 × 50 TK00401 31 × 50 TK00415 45 × 50
TK00388 22 × 50 TK00402 32 × 50 TK00416 46 × 50
TK00389 22.5 × 50 TK00403 33 × 50 TK00417 47 × 50
TK00390 23 × 50 TK00404 34 × 50 TK00418 48 × 50
TK00391 23.5 × 50 TK00405 35 × 50 TK00419 49 × 50
TK00392 24 × 50 TK00406 36 × 50 TK00420 50 × 50
TK00393 24.5 × 50 TK00407 37 × 50
(3) Jetbroach One-touch Type 75mmDepth Pilot Pin 08075(A4)
Part No. Diameter × Depth(mm) Part No. Diameter × Depth(mm) Part No. Diameter × Depth(mm)
TK01036 17.5 × 75 TK01014 29 × 75 TK01026 41 × 75
TK01003 18 × 75 TK01015 30 × 75 TK01027 42 × 75
TK01004 19 × 75 TK01016 31 × 75 TK01028 43 × 75
TK01005 20 × 75 TK01017 32 × 75 TK01029 44 × 75
TK01006 21 × 75 TK01018 33 × 75 TK01030 45 × 75
TK01007 22 × 57 TK01019 34 × 75 TK01031 46 × 75
TK01008 23 × 75 TK01020 35 × 75 TK01032 47 × 75
TK01009 24 × 75 TK01021 36 × 75 TK01033 48 × 75
TK01010 25 × 75 TK01022 37 × 75 TK01034 49 × 75
TK01011 26 × 75 TK01023 38 × 75 TK01035 50 × 75
TK01012 27 × 75 TK01024 39 × 75
TK01013 28 × 75 TK01025 40 × 75

19
(4) Jetbroach Side lock Type 75mm Depth Pilot Pin 12075
Part No. Diameter × Depth(mm) Part No. Diameter × Depth(mm) Part No. Diameter × Depth(mm)
TJ17709 50 × 75 TJ16667 67 × 75 TJ16684 84 × 75
TJ16651 51 × 75 TJ16668 68 × 75 TJ16685 85 × 75
TJ16652 52 × 75 TJ16669 69 × 75 TJ16686 86 × 75
TJ16653 53 × 75 TJ16670 70 × 75 TJ16687 87 × 75
TJ16654 54 × 75 TJ16671 71 × 75 TJ16688 88 × 75
TJ16655 55 × 75 TJ16672 72 × 75 TJ16689 89 × 75
TJ16656 56 × 75 TJ16673 73 × 75 TJ16690 90 × 75
TJ16657 57 × 75 TJ16674 74 × 75 TJ16691 91 × 75
TJ16658 58 × 75 TJ16675 75 × 75 TJ16692 92 × 75
TJ16659 59 × 75 TJ16676 76 × 75 TJ16693 93 × 75
TJ16660 60 × 75 TJ16677 77 × 75 TJ16694 94 × 75
TJ16661 61 × 75 TJ16678 78 × 75 TJ16695 95 × 75
TJ16662 62 × 75 TJ16679 79 × 75 TJ16696 96 × 75
TJ16663 63 × 75 TJ16680 80 × 75 TJ16697 97 × 75
TJ16664 64 × 75 TJ16681 81 × 75 TJ16698 98 × 75
TJ16665 65 × 75 TJ16682 82 × 75 TJ16699 99 × 75
TJ16666 66 × 75 TJ16683 83 × 75 TJ16700 100 × 75
(5) For Piling board Jetbroach One-touch Type 50mm Depth Pilot Pin 08050(A3)
Part No. Diameter × Depth(mm) Part No. Diameter × Depth(mm) Part No. Diameter × Depth(mm)
TK01068 18 × 50 TK00624 25 × 50 TK00627 32 × 50
TK00622 22 × 50 TK00625 26 × 50 TK00628 35 × 50
TK00623 24 × 50 TK00632 26.5 × 50
TK00631 24.5 × 50 TK00626 28 × 50
(6) Hi-Broach One-touch Type 25mm Depth Pilot Pin 08025(A1)
Part No. Diameter × Depth(mm) Part No. Diameter × Depth(mm) Part No. Diameter × Depth(mm)
TK00336 18 × 25 TK00345 23.5 × 25 TK00354 30 × 25
TK00337 19 × 25 TK00346 24 × 25 TK00355 31 × 25
TK00338 19.5 × 25 TK00347 24.5 × 25 TK00356 32 × 25
TK00339 20 × 25 TK00348 25 × 25 TK00357 33 × 25
TK00340 21 × 25 TK00349 26 × 25 TK00358 33.5 × 25
TK00341 21.5 × 25 TK00350 26.5 × 25 TK00359 34 × 25
TK00342 22 × 25 TK00351 27 × 25 TK00360 34.5 × 25
TK00343 22.5 × 25 TK00352 28 × 25 TK00361 35 × 25
TK00344 23 × 25 TK00353 29 × 25
(7) Hi-Broach One-touch Type 50mm Depth Pilot Pin 08050(A3)
Part No. Diameter × Depth(mm) Part No. Diameter × Depth(mm) Part No. Diameter × Depth(mm)
TK00727 18 × 50 TK00733 24 × 50 TK00739 30 × 50
TK00728 19 × 50 TK00734 25 × 50 TK00740 31 × 50
TK00729 20 × 50 TK00735 26 × 50 TK00741 32 × 50
TK00730 21 × 50 TK00736 27 × 50 TK00742 33 × 50
TK00731 22 × 50 TK00737 28 × 50 TK00743 34 × 50
TK00732 23 × 50 TK00738 29 × 50 TK00744 35 × 50
11 ORDERING PARTS
When ordering parts from sales agent, please be sure to give them part number, part name and quantity.
Table of contents
Other Nitto Kohki Drill manuals