Nizo S 40 Operating instructions
/'
__
LI
(J
Nizo
~.
7 6
How
to
use
your
Nizo S
40
Contents
In
s
truction
s
at
a
glance
5
Motor
Driv
e
battery
6
Tes
ting
the
drive
battery
7
Met
er
battery
7
Tes
ting
the
meter
battery
8
In
ser
ting
the film
car
tridg
e 9
Filt
er
sel
ec
tor
10
Focusing
10
Fix Focus
11
Exposure
control
12
Adju
stable dia
phr
agm 13
Power
Zoom
13
Motor
Speeds
14
Ho
l
ding
camera and release
14
Using a
tripod
15
El
ec
tric
remote
re
lease 16
Close-up
lenses
17
Single
fr
ame shots
18
Tit
ling
19
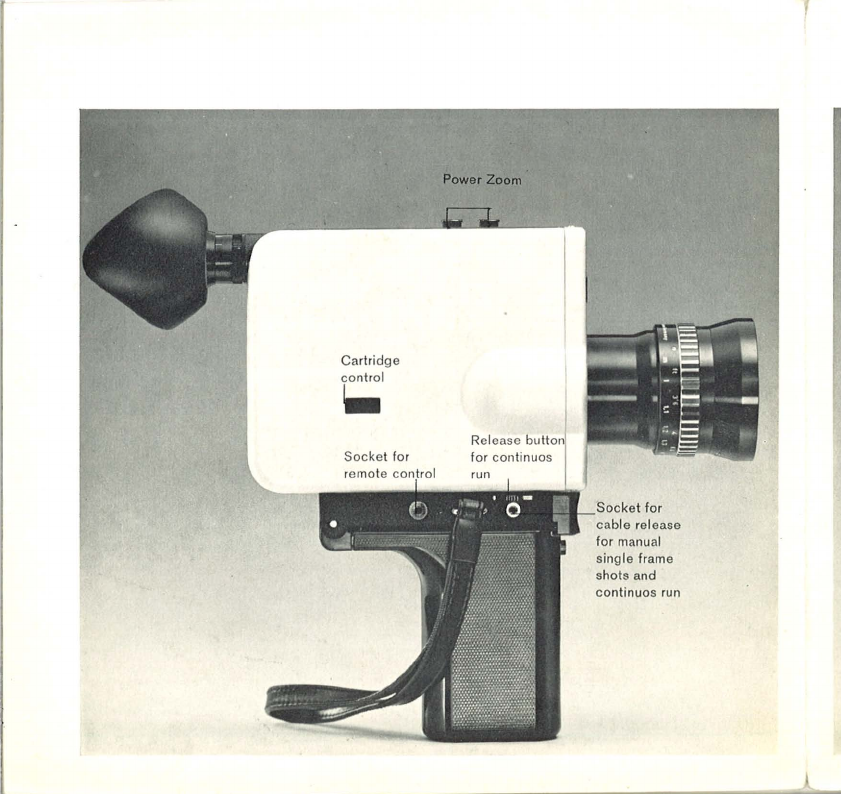
Cartr
idge
co
ntrol
..
Power Zoom
for
ma
nu
al
single frame
shots and
continuos
run

Window for
ape
r,
lur
e
scale
Camera
speed
sel
ector
Release
Pressb
utton
for
folding
handgrip
.. Tes
lbutt
on
for
meter
battery
Manual
Aperture
control
F
oo
tage
co
unter
Main switch
•

Instructions at a glance
For
problem
free
automatic shooting,
set
all
controls
to
the
red marks:
1.
Snap
pistol
grip
into position.
2.
Insert
cartridge.
3.
Turn
aperture
control
to
«automatic»
(red dot).
4.
Set
speed
to
18
f.p.s. (red dot).
5.
Outdoors:
Move
the
red
triangle
on
the
filter
selector
to
the
sun symbol,
indoors
to
the
lamp symbol.
6.
Set
main switch.
7.
Adjust
viewfinder
to
suit
your
eyes.
(Use
diopter
ring on eye
piece)
8.
Focus camera.
No
focusing
necessary
5 when
set
to
15
ft. and
15
mm
focal
length.
Both
figures
are marked
in
red.
At
f/4
this
combination
gives a
depth
of
field
from
5 ft.
to
infinity.
9.
Select
focal
length -and shoot.
10.
When
finished, turn main switch
to
«0».

Motor-Drive battery
The film
transport
and
the
power
zoom are
driven
by six
1.5
volt
batteries
located
in
the
grip
of
the
camera.
Press
the
button
below
the release and
lower
the
pistol
grip
. Pull
the
latch
in
the
upper
part
of
the
pistol
grip
and
the
battery
box will
slide
forward.
Tilt
camera
and
the
box wi!!
drop
into
your
hand.
Loosen screws on
the
bottom
of
the
box
until
the
lid
comes
off.
In
sert six
1.5
volt
batteries
as
marked. Replace
the
lid
and
tighten
screws.
Registration
pins
of
different
lengths insure
the
proper
posi-
tion
ofthe
lid.
In
sert box
into
battery
chamber and press
lightly
until
the
latch
snaps
over
the
edge
of
the
box.
Return
pistol
grip.
Camera
will
not
run unless
batteries
are
properly
inserted. Do
not
run
camera
unnecessarily
at slow
motion
speeds,
it
will waste batteries.
6

7
Testing the motor-drive
battery
To check the
ope
rat
in
g vo
lt
age, move the
ma
in
sw
it
ch to the black d
ot
and hold
it
in
that position.
The ape
rtur
e pointer in the viewfinder
. sho
ul
d move to the red 8 and beyon
d.
If
it
does not, exchange complete set of
ba
tt
e
ri
es.
In
the O-position, the ma
in
s
wit
ch dis-
co
nn
ects the
driv
e and meter ba
tt
e
ri
es and
pr
events any accide
nt
al start
of
the
ca
mera.
Wh
en the pis
tol
g
ri
p is folded
back, only the drive ba
tt
e
ri
es will be
disco
nn
ec
te
d.
Met
er battery
The a
ut
omatic exposure co
ntr
ol works on
two Mallory PX 13
1.
35 V ba
tt
e
ri
es.
It
ca
n be stored for
tw
o year
s.
With
te
mpera
tur
es below
32
° F, Ma
ll
ory
PX
625
batte
ri
es sho
ul
d be
pr
eferred.
Storeable one year.
The ba
tt
e
ry
chamber is
in
the bo
tt
om of
the
ca
mera and readily accessible when
the pistol grip is folded back. The
co
ver
can be
un
screwed with a coin.
In
sert fi rst ba
tt
ery with + mark fa
cing
bott
om of chamber
as
indi
ca
te
d.
The

second
battery
is
placed
on
top
of
the
first, + mark down
to
ensure
correct
wor-
king
of
battery
and
the
automatic
exposure
control.
Testing the meter battery
Turn main switch
to
red dot. Press
the
button
in
the
center
of
the
exposure
control.
The aperture
pointer
in
the
view-
finder
window
should turn
to
the red
B.
If
it
does not, be sure
to
exchange
the
meter
batteries
.
autom.
manual
Test-
butt
on
meter ba
tt
e
ry
B

9
Inserting the film cartridge
Open
the
cover
in the back
of
the camera
and
in
sert
the
cartridge
with the film
ope
ning
toward
the len
s.
Make s
ur
e
the
label on the
cartridge
point
s
to
the
right
,
otherwise
the
cover
will
not
close. Do
not
us
e
forc
e!
In
serting the film
cartridg
e a
utomatic
ally
adjusts
the
elec
tric
eye
to
the fi
lm
speed.
The
footage
co
unt
er always returns
to
ze
ro when
the
camera
is
opened, and
operates even
without
a car
tridge
in
the
ca
mer
a.
The label on
the
film
cartridge
is
vi
sible
through
a window on
th
e smooth side
of
the camer
a,
showing
th
at the camera is
lo
aded and which
typ
e
of
film is being
used.
Wh
en the film
transport
works
correctly
a red
light
will fl
as
h on and
off
above
the viewfinder
im
age.
At
the end
of
the
film the red
light
will
show
continuou
sly,
but
do
not
open until
you can read
«Ex
posed»
in
the
film
s
lot
of
the
cartridge.
Keep the film
gate
in
the
cartridge
chamber clean by using a long handled
brush
occasiona
lly
to
remove dust.

Filter
Selector
Currently
ava
il
able
Super
8
color
films are
of
the
indoor
type
A responding
to
the
low
color
temperature
of
movie
light
s.
Therefore,
a conversion
filter
is
built-in
(colour
red)
to
adju
st
the
film
for
outdoor
use. Turn the red
triangle
of
the
filter
sel
ector
to
the «sun» symbol when s
hoo
-
ting
outdoors,
and
to
the
«lamp» symbol
when using
mO
,vie
light
s
indoor
s.
Focusing
Wh
en
shooting
above
12
feet
and at stan-
dard and
wide
angle lens
positions
(below
25
mm),
distances
can be
estimated
and
set
accord
ingly
on
the
focusing
sca
l
e.
For more
exact
focusing,
particularly
in
tele
positions,
for
close-ups and
under
poor
light, the reflex
viewing
system
makes
it
easy to
focus
and
to
ensure
maximum sha,rpness.
It
is
important
to
adjust
the
eye
piece
of
your
Nizo S
40
to
match
your
eyesight.
Set
the
focusing
scale
to
infinity
and
point
camera against a neutral background.
Concentrate
on
the
cross ha
ir
in
the
finder
and turn
diopter
correction
ring until
the
cross
hair
appears sharp.
For
focusing
set
lens
to
maximum
tele
-
photo
range and turn
focusing
scale until
subject
and cross hair
appear
sharp
in
viewfinder.
Once
the
camera
is
focused
the
picture
will remain sharp regardless
of
the
focal
length used as long as
the
di
stance
does
not
alter. If
during
zooming
to
telephoto
the
subject
becomes unsharp
this
is
proof
of
incorrect
focusing
.
In
wide
angle shots
the
greater
depth
of
field
will
compensate
10
11
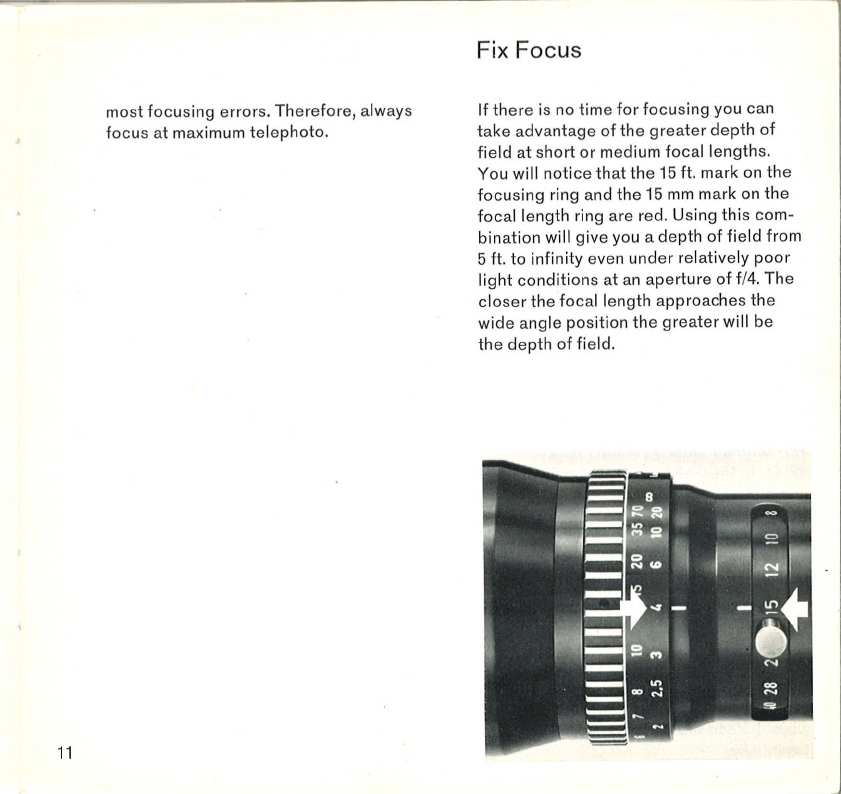
most
focusing
errors. Therefore, always
focus
at maximum
telephoto.
Fix Focus
If
there
is no
time
for
focusing
you can
take
advantage
ofthe
greater
depth
of
field
at sh
ort
or
medium
focal
lengths.
You
will
notice
that
the
15
ft.
mark on
the
focusing
ring and
the
15
mm
mark on
the
focal
length ring are red. Using
this
com-
bination
will give you a
depth
of
field
from
5 ft.
to
infinity
even
under
relatively
poor
light
conditions
at
an
aperture
of
f/4.
The
closer
the
focal
length approaches
the
wide angle
position
the
greater
will be
the
depth
of
field.
Exposure Control
The exposure
control
of
the Nizo S
40
automatically
selects
the
right
aperture
.
The
f-stops
are
visible
and may be checked
in
the
viewfinder. However, the readings
will
only
be
accurate
if
the
camera is
loaded s
in
ce the
cartridge
itself
adjusts
the
system
to
the
film speed.
Wh
en
there
is
not
enough
or
to
o much
li
ght
the
poi
nt
e'r
in
the
viewfinder
stops
in
the
red segments on
eit
her end
of
the
sca
l
e.
The
automatic
exposure control can be
shut
off
and any
f-stop
set manually. Turn
the
knob
from
«
automat
i
c»
to
«manual»
and
continue
turning
until
the
aperture
pointer
in
the
viewfinder
is
oppos
i
te
the
desired
f-stop
number.
This manual
contro
l -
or
override
-can
be used
to
correct
automatic
reading
s,
if
the
el
ectric
eye
of
the
exposure
meter
is
too
strongl
y
affected
by a background
which is much
brighter
or
darker
than the
main
subject.
In t
hi
s case
point
the
camer
a,
set
on
«a
utomatic»,
towards
the
subject
from a
short
distance
or
point
it
toward
s
a similarly
lighted,
more access
ible
subject.
Read
the
correct
f-stop
and
set
it
manually.
Here is
an
example: In beach
or
snow
scenes
the
automatic
exposure
control
will be
affec
ted by the
reflection
of
sand
or
snow, and a person
in
this
kind
of
su
rr
ounding
would be underexposed.
Ob-
viously the automatic reading needs
correction
through
manual override.
12

13
Adjustable Diaphragm
For
special
effects,
the
automatic
dia
-
phragm can be
set
to
manual
to
allow
for
fade-in and fade-outs.
For
fade
-ins read
off
the
aperture
in
the
viewfinder
, e.g.
8.
Then set
aperture
con-
trol
to
manual and
start
filming
at
f/22,
slowly
opening
up until you reach f/8.
Stop
and revert
to
automatic
operation.
For
fade-outs
start
in
the
manual
position
at f/
8,
then slowly move
aperture
control
to
f/
22
while
the
camera
is
operating.
Don't
forgetto
return
to
«automatic».
A
tripod
is recommended
for
optimum
results.
Power
Zoom
The
controls
for
the
power
zoom are on
top
of
the
Nizo S
40
camera. The black
button
(closer
to
the lens) moves
the
lens
towards
the
wide
angle,
the
green
button
(nearer the
viewfinder)
towards
the
telephoto
position.
Two zoom speeds are available:
if
you
press
the
control
button
lightly
the
zoom
speed
will be slow,
if
you push
it
down
firmly
it
will be fast.
The zoom
effect
can be
further
slowed
down by
the
use
of
one
of
the
two
slow
motion
speeds.
Any
focal
length can be set manually,
if
you want
to
change quickly
before
star-
ting
the
camera.

Motor
Speeds
The
Nizo
S
40
has 3 speeds, 18,24 and
54
frames
per
second
(f.p.s.).
Movies
taken
at
18
f.p.
s.
will show normal
timing
and
movements.
24
f.p.s.
should
be used when panning
or
shooting
from moving vehicles. When
projected
at
the
standard
speed
of
18
f.p.
s.
all
motions
will
appear
to
be
one-third
slower. .
54
f.p.s.
produces
true
slow motion.
When
projecting
at
the
standard speed
of
18
f.p.s.
everything
will
appear
to
be
thre
e
times
slower
than normal. Fast
action
can
therefore
be
closely
observed
during
projection.
Even
while
filming
it
is
possible
to
switch
from
18
or
24
f.p.s. Press
the
thumb on
to
the speed switch and turn
it
clockwise.
At
18
f.p.s. each
frame
is exposed '/
md
second, and at
54
f.p.
s.,
'/
129th
second.
The
electric
eye
automatically
adjusts
for
these change
s.
How
to
hold
camera
and
how
to
start
it
Nizo cameras may be used with
the
left
orthe
right
hand. Reach
through
leather
strap and
hold
camera
firmly
by
the
pistol
grip.
Your
index
finger
will easily reach
the
release
trigger.
Hold
viewfinder
to
your
eye. The eye
cup
keeps
it
in
the
right
viewing
distance.
The
free
han~
is used
for
focusing
and
zooming and
to
provide
extra
support
during
filming.
If
the
film
transport
works
correctly,
a red
light
will flash
regularly
above
the
viewfinder
image. The
closer
you
get
to
the
end
of
the
film
the
longer
14
15
the signal rhythm.
If
these signals s
to
p
at all during sh
oo
ting the film
tr
ansport is
out of order.
The
ca
mera may also be started by a cable
release (right so
ck
et on
ca
mera base), or
by el
ec
tri
ca
l re
mot
e control
(l
e
ft
socket).
More details on these features
in
the
respe
ctiv
e se
ction
s of this ma
nu
a
l.
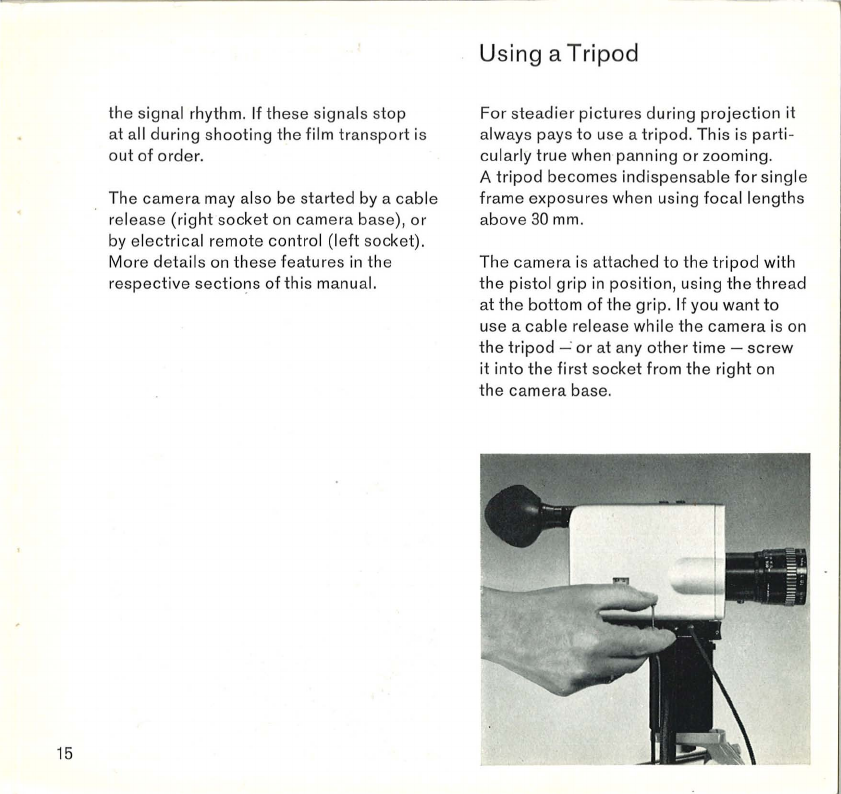
Using a Tripod
For st
ea
dier
pictur
es
dur
ing
pr
ojection
it
always pays to use a tripod. This is parti-
c
ul
arly true
wh
en pa
nn
ing or z
ooming
.
A
trip
od b
eco
mes indispensable
for
s
in
gle
fr
ame expos
ur
es
wh
en using
foc
al lengths
above
30
mm
.
The
ca
mera is a
tt
ached to the
tripod
with
the pistol grip
in
pos
ition
, us
in
g the
thr
ead
at the bo
ttom
of
the grip. If you wa
nt
to
use a
ca
ble
re
lease while the camera is on
the
tripod
"":
or
at any other time - s
cr
ew
it
into
the fi
rs
t socket
from
the
right
on
the
ca
mera base.
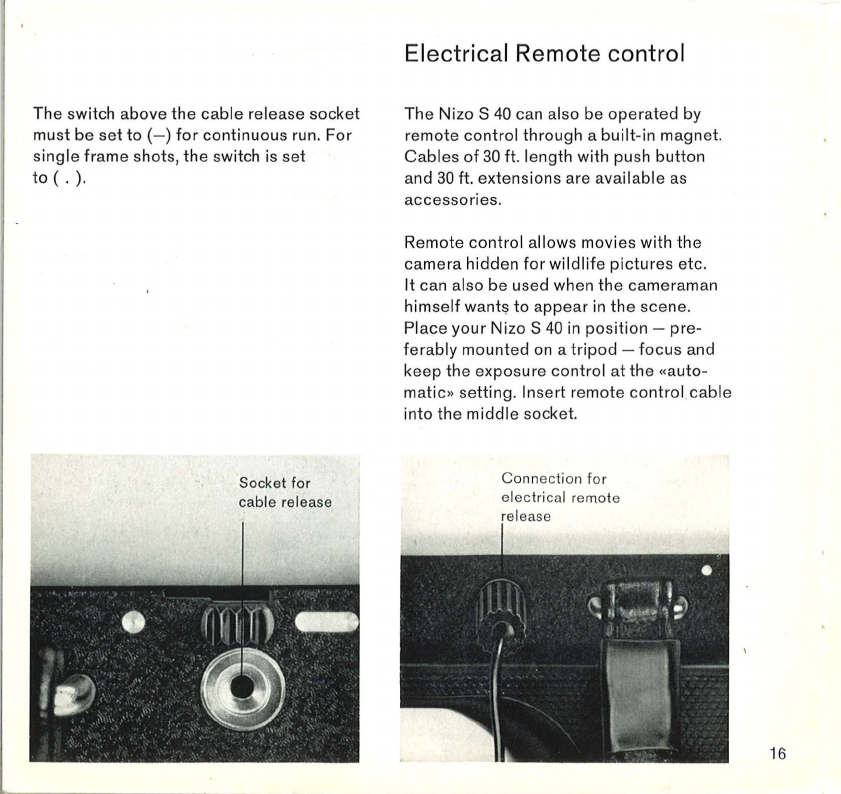
The switch above
the
cable release
socket
must
be
set
to
(-)
for
continuous run.
For
single
frame
shots,
the
switch is set
to
( . ).
Socket
for
cable
release
Electrical Remote control
The Nizo S
40
can also be
operated
by
remote
control
through
a
built-in
magnet.
Cables
of
30 ft. length with push
button
and 30 ft. extensions are available
as
accessories.
Remote
control
allows movies with
the
camera hidden
for
wildlife
pictures
etc.
It
can also be used when
the
cameraman
himself
want~
to
appear
in
the
scene.
Place
your
Nizo S
40
in
position
-
pre
-
ferably
mounted
on
a
tripod
-
focus
and
keep the exposure
control
at
the
«
auto-
matic
» setting. Insert remote
control
.
cab
le
into
the
middle
socket.
Connection
for
e
lectri
cal r
emo
te
16

17
Be careful
not
to
move
the
camera
from its
position,
or
upset
the
tripod
while you are
busy laying
out
the
remote
control
cable
.
The
connection
for
extension
cables
is
next
to
the
push button on
top
of
the spool.
Close-
up
Lenses
You have a choice
of
3 lenses
for
extrem
close
-ups.
When
using
the
longer
focal
lengths,
e.
g.
40
mm
very small areas are
filmed
and
reproduced
nearly
life
-size.
This opens up
the
fascinating
world
of
Macro
cinematography.
There is no need
to
go
into
further
optical
details
here. Much
depends
on
the
choice
of
the
focal
length
in
each case and
other
factors
which can only be shown
in
tables
.
Each Nizo
close-up
lens is
furnished
with
such
tables
giving
exact
information
on
field
of
view,
taking
distances,
depth
of
field,
etc.

Using Nizo
close-up
lenses usually re-
quires
no
f/stop
corrections,
but
exact
focusing,
and a
tripod
is recommended.
Close-up
lenses
for
the
Nizo S
40
NizoNL1
=
3"-17"
Nizo NL2 = 19" - 12"
Nizo NL3 = 12': -
9"
Single Frames
The single frame
device
of
the
S
40
can
be used
for
1. Time lapse filming
2.
Anima
tion
(Trick films)
This is
an
example
of
time
lapse
photo
-
graphy
:The
movement
of
slow moving
clouds can be made
visible
through
a
sequence
of
p,ictures taken
seconds
apart.
An exa
mple
of
a trick
film:
Dolls
wave
their
arms and legs when they moved
slightly
between shots.
Si
ng
le frame sw
it
ch
18

19
The camera is
triggered
with a cable
release
screwed
into the release socket
and
the
switch
set
to
( . ) when making
trick
film
s.
The cable
re
lease should be
in
serted
into
the
ca
mera base.
In
stead
of
the
cable
release, elec
tric
remote con
tr
ol can be
used
for
single exposures
or
the camera
trigger.
In
each
ca
'se
it
is
important
that
the
camera
stands absolutely still
to
avoid
spo
ilt
sequences.
Titling
The Nizo S
40
with its many
spec
ial
fea-
tures, makes
Titlers
sup
erf
luou
s.
The main
functi
on
of
Titlers
is
to
eliminate
par
allax.
The Ni
zo
S
40
is a reflex
camera
and
therefore
has no parallax.
Wh
at is
mor
e
import
ant,
it
h
as
a zoom lens with many
focal
length
s.
Therefore, the
distance
between the camera and
the
copy boa
rd
need n
ot
be changed,
yet
the
titl
es can
be
reproduced
in
any si
ze.
Place
the
camera on a
tripod,
or
on a table
or
any
other
steady s
upport.
Zoom
in on
the
copy
until
it
fills
the
frame. Be sure that
the
copy
board is well and evenly
illumina-
te
d and
that
the
titl
e sequence is
long
enough so that there is time enough
for
the
viewer
to
read the
titl
es on the screen.
For exact focus
in
g a ruler can be used.
Measure the
subject
distance from the
mark (
r:p
= film plane) above
the
filt
er
dial.

Table of contents
Other Nizo Film Camera manuals


