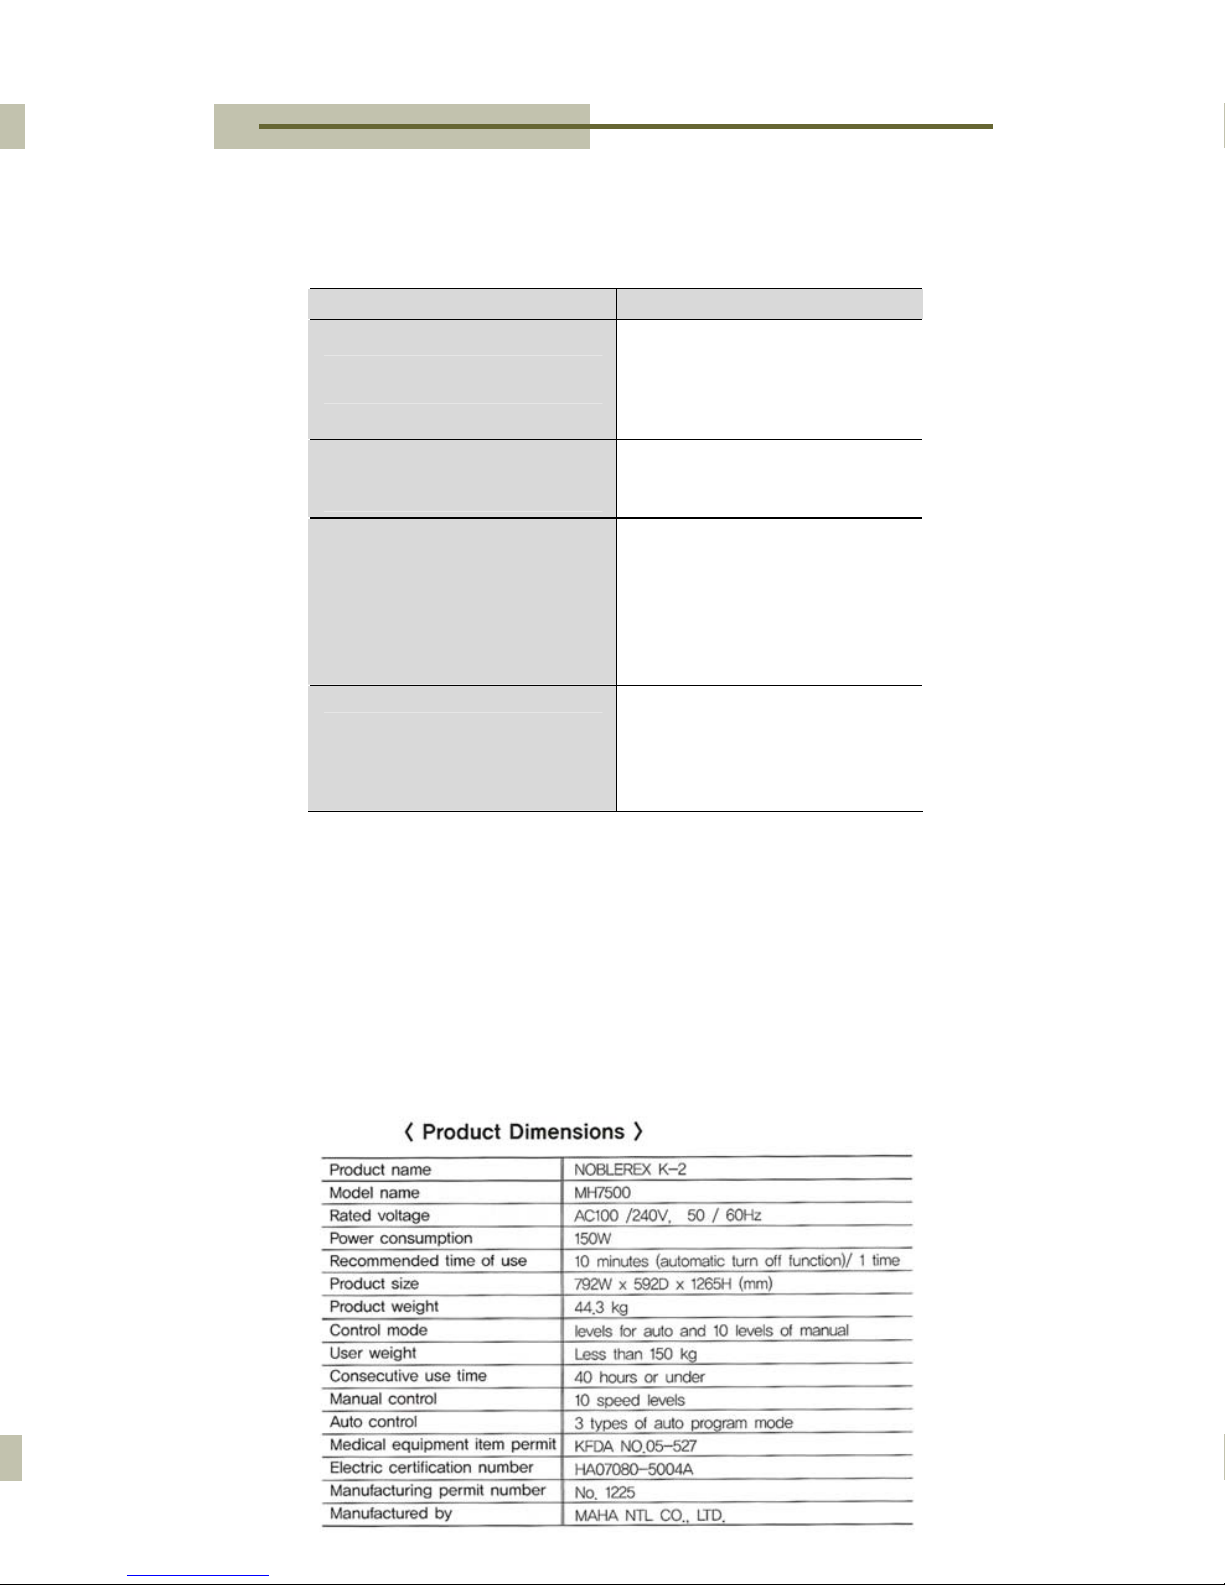
noblerex k2 mh-7500 Specification sheet
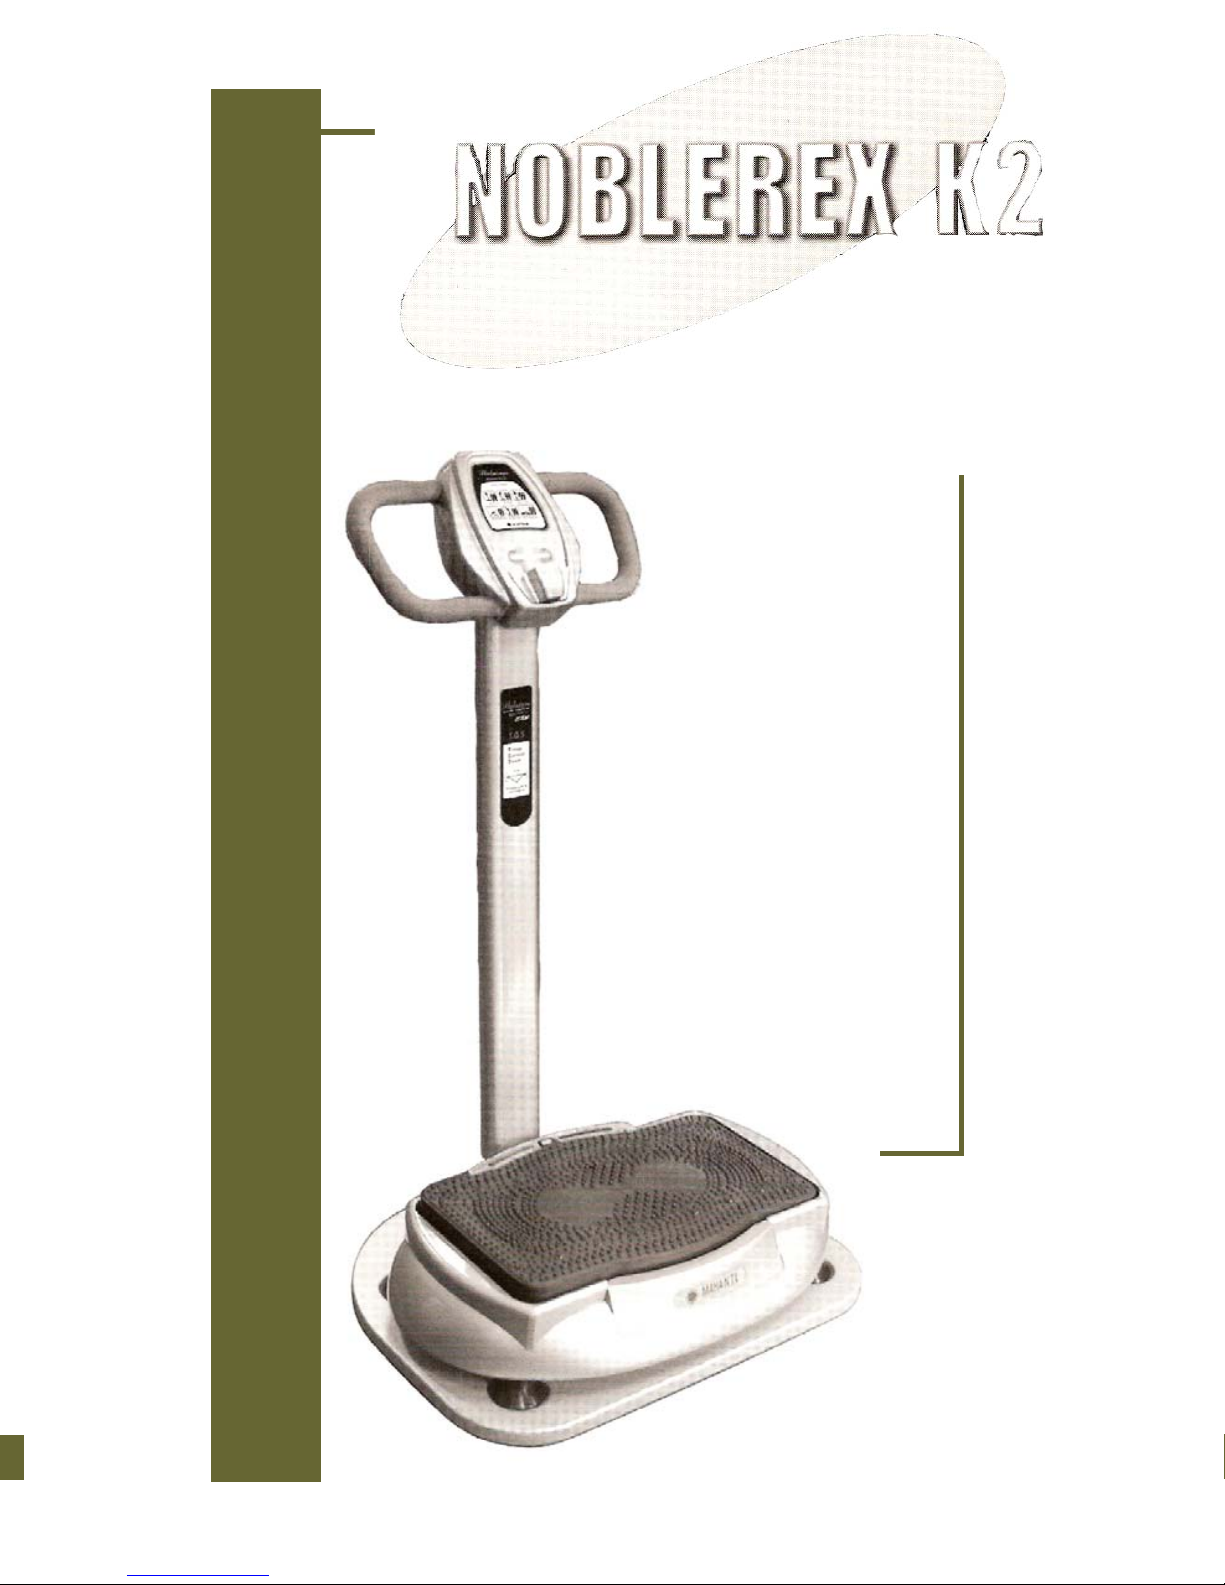
Model No: MH - 7500
PRODUCT INSTRUCTION MANUAL
For questions, comments, or ordering information
(602) 485-3621
Fax (602) 996-2743
www.aestheticmd.com
4809 E. Presidio Rd.
Scottsdale, AZ 85254
AestheticMD
Medical Clinic
8591 E. Bell Rd., Suite 102
Scottsdale, AZ 85262
AestheticMD
©2006 All rights reserved

Warnings and Safety 3
Installation and Assembly 4
Preparing for Operation 5
Preparing to Use the Noblerex K2 8
Operating the Noblerex K2 10
Exercise Programs 12
Troubleshooting/Warranty Information 15
TableofContents
Page2 NOBLEREXK2MANUAL
A
ESTHETICMD
Page15
Troubleshooting/WarrantyInformation
Problem Resolution
When Power is connected the
equipment does not operate.
Have you pressed the power
button on the operation board
or remote control? The K2 will
not operate until the power
button is engaged.
None of the LED lights are on
when the power cord is
plugged into an outlet.
The Noblerex K2 is
malfunctioning. Discontinue
use and contact AestheticMD.
There are two, three, or four
LED lights flickering and
making noise on both sides of
the operation board.
In the event of overheating,
The NobleRexK1 has a safety
mechanism that automatically
shuts the machine off to cool
down. Wait at least 30
minutes for before attempting
to use it again.
There is a severe vibration or
noise when the NobleRexK1
is operating.
Is the floorboard resting on a
flat, hard surface? Try placing
the machine in another area
without carpet or
incline/declines.
If none of the solutions above remedy the issue pertaining to your
NobleRexK1, please contact AestheticMD at (602) 485-3621.
Warranty Information
The NobleRexK1 has a warranty against manufacturer’s defects for 1
year from the date of purchase. The warranty does not cover
malfunctioning caused by neglect, unauthorized disassembly, natural
disaster, or negligence of warnings and precautions. If your
NobleRexK1 is malfunctioning after the warranty expiration date, please
contact AestheticMD for re
p
air information.
Page14 NOBLEREXK2MANUAL
A
ESTHETICMD
Page3
WarningsandSafety
For your protection, please read these safety instructions
completely before operating the NobleRexK1 and keep this
manual for future reference.
Carefully observe all warnings, precautions and
instructions on the K1 machine, or those described in the
instruction manual and adhere to them.
This product is exclusively for 110V outlets and has been rated for 8 or
more hours of use time.
To prevent fire or shock hazard, do not expose the NobleRexK1 unit to
rain or moisture.
If water happens to get into the unit, remove the power plug from outlet
and wait until unit is completely dry.
Do not extend the power line or twist it, doing so may result in electric
shock or fire.
To prevent electric shock, match wide blade of plug to wide slot, fully
insert.
Turn off all functions before pulling plug from outlet.
When the NobleRexK1 is not used for an extended period of time,
remove the power plug from outlet.
Do not insert or spill any foreign substance in or on the NobleRexK1,
doing so could cause product malfunction.
Make sure NobleRexK1 is placed on an even surface.
Do not allow children near the NobleRexK1 while the equipment is in
operation.
Do not exceed the NobleRexK1 maximum weight capacity of 353 lbs.,
doing so could damage the machine or cause a malfunction.
Do not allow children to place hands or feet in the gaps on the upper
board.
Seniors, pregnant women, people with physical difficulties, or anyone
using the product for rehabilitation treatment, please consult with a
physician, sports therapist or appropriate specialist before using the
NobleRexK1.
Exercise Position #7
Straighten both hands and place them on the vibration plate.
Spread both legs and lift the heels of the feet to take the push up
position.
Muscles stimulated: Strengthening of upper body muscle, including
arm, shoulder and neck area (relaxes pain in the shoulder, and
Exercise Position #8
Place upper body on the floor and set both feet on the vibration
plate. With both arms on the floor to support the body, lift the waist
from the floor and maintain the tension. This position is effective in
strengthening lower body muscles.
Muscles stimulated:
Lower body muscles and lower joints are strengthened. This
position also messages the soles of your feet.
Exercise Position #9
Stand on one edge of the exerciser, and spread the legs to
shoulder width with knees bent to about 30 degrees. Look toward
the front, and relax both arms. This is the full body exercise
posture which has the effect of jumping rope.
Muscles stimulated:
Upper and lower body, abdomen and other muscles are
strengthened. Knee joints and ankle joints are strengthened.
Exercise Position #10
Stand in a comfortable posture and fully straighten the knees and
waist. Spread both legs as much as possible, rest both hands
gently on the stand handle and look straight ahead. This posture is
great for strengthening the muscles in the lower body, and is
effective for those who walk a lot or need to massage their legs
frequently.
Muscles stimulated:
Lower body joints and abdomen are strengthened, Body fat
disintegrates, and blood circulation is promoted throughout the
thigh and hipbone.

Installation&Assembly
Page4 NOBLEREXK2MANUAL
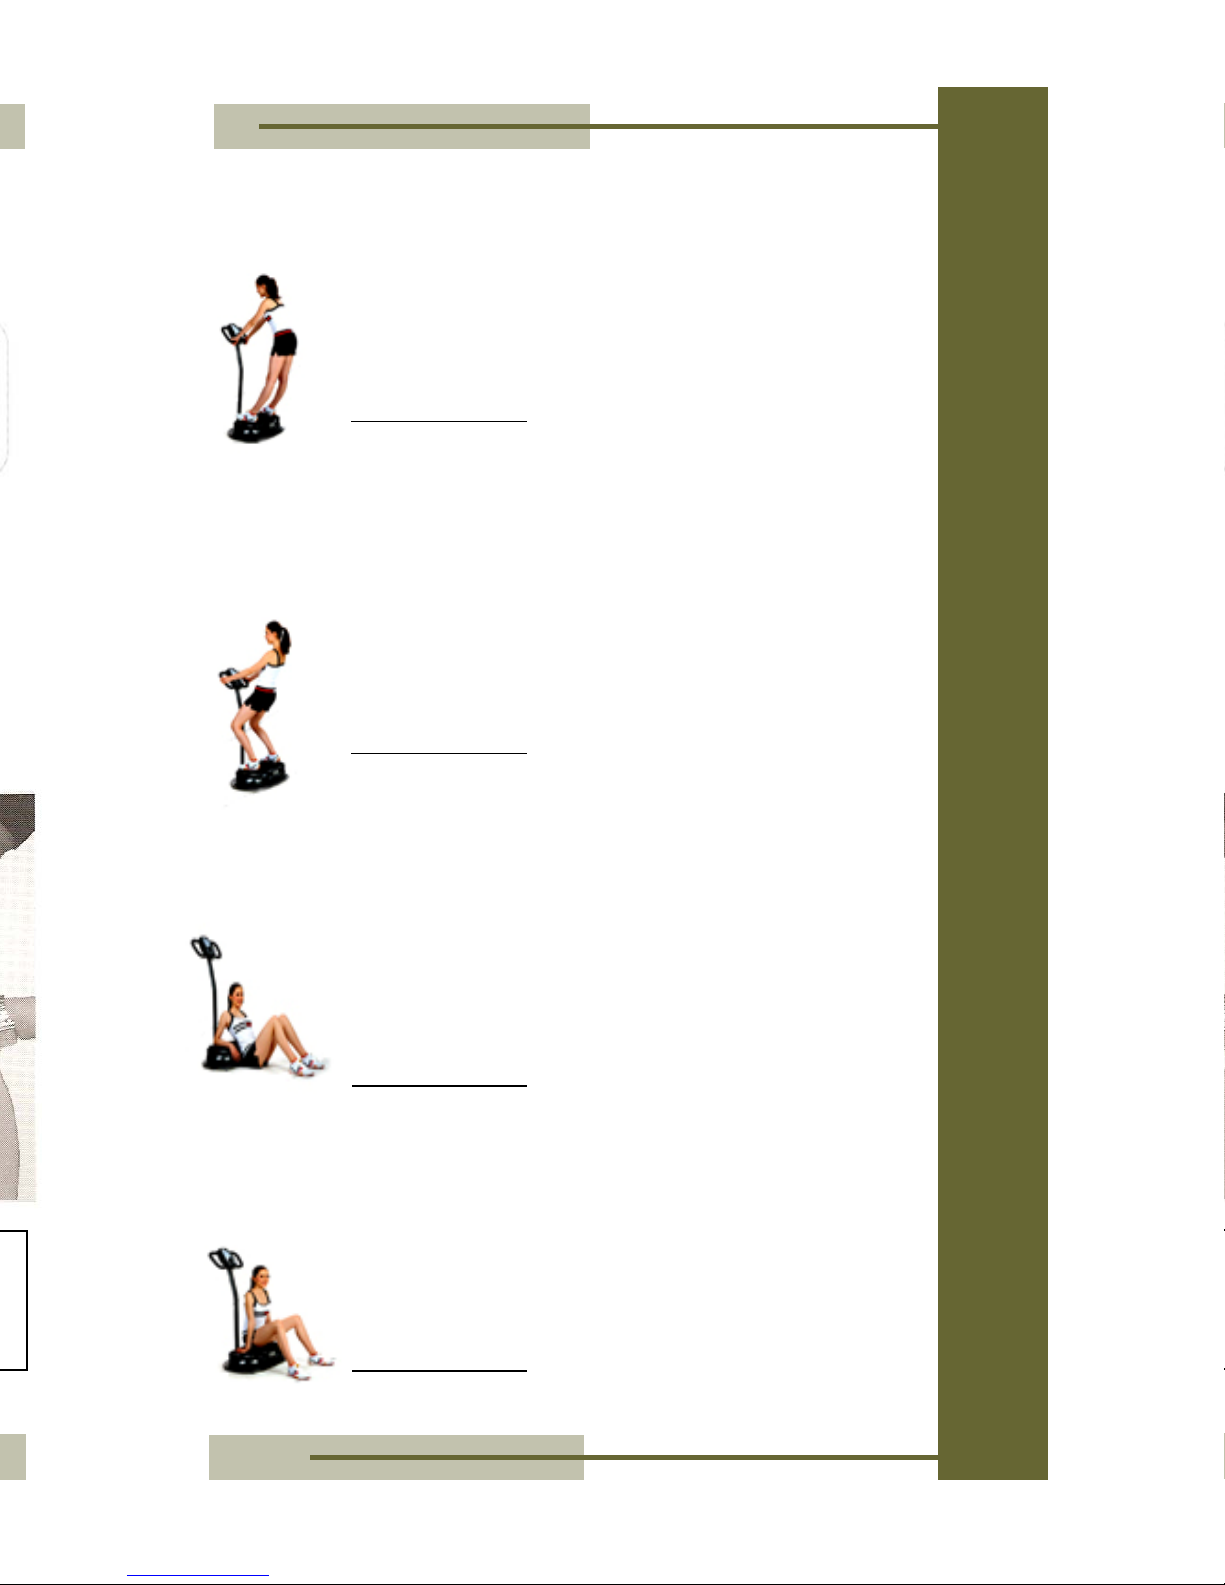
Exercise Position #3
Step on the vibration plate comfortably and use both hands
to hold the handle. Spread the legs as much as possible
and pull the hip backwards and bend the waist. At this time,
straighten both hands and look toward the front. It is
effective for lower leg muscles, and it prepares the leg
muscles for walking or running activities.
Muscles stimulated:
Waist muscles are strengthened, including the shoulders,
abdomen, thigh, and hipbone. Fat is disintegrated, the
metabolism is kicked into high gear, and intestinal movement
is encouraged.
Exercise Position #4
Step on the vibration plate and bend the knees about 30
degrees while straightening the back. Take the position of
wind surfing by Maintaining weight in the upper body and
holding the handle with both arms.
Muscles stimulated:
Knee joints, ankle joints, and upper/lower body muscles are
strengthened.
Exercise Position #5
Place the hips on floor in sitting position. Bend the elbows
and place them on the vibration plate. Straighten the waist
and the neck while looking to the front. Upper muscle,
especially the back muscles are effective in developing the
hard training for the upper body. This would help the triceps
and biceps of the shoulder area.
Muscles stimulated:
Upper arm, shoulder bones, triceps and biceps. Relaxes
arm and shoulder pain and develops back muscles.
Exercise Position #6
Facing the opposite direction of the NobleRexK1, sit on the
vibration plate. At this time, place both palms on the
vibration plate naturally. Keep the knees at 90 degrees with
sole of the foot flat on the ground.
Muscles stimulated:
Arms, shoulders, palms, and abdomen strengthened, as well
as metabolism assistance, and intestinal movement.
A
ESTHETICMD
Page13
The Noblerex K2 consists of a main body, floorboard, stand
handle, remote control, and part set (3 bolts and 1 hexagonal
wrench). Check contents before installation.
(1) Use the bolts and tool of
the part set to attach the
stand handle to the
floorboard. Make sure that
the bolts are tight.
(2) Place the main body on
the floorboard. Make sure
that the rubber cones
located beneath the main
body fit into the holes on
the floorboard.
(3) Connect the power once
assembly is completed
and continue through this
manual to understand the
K2 functions.
Place the floorboard on a flat even
surface. Damage or failure may occur
if the K2 is placed on a skewed or
inclined surface

Exercise Position #1
Stand on the vibration plate in a comfortable posture.
Bend the knees slightly as though on the back of a
horse, and relax both hands naturally toward the
hipbone. Straighten the waist and neck. This exercise
will focus on the thighs and is effective in strengthening
the lower limb muscles.
Muscles stimulated:
Arm muscle and lower body strengthening, knee joint,
ankle joint strengthening
Exercise Position #2
Stand on the vibration plate in a comfortable posture.
Bend the knees slightly as though on the back of a
horse, and with both hands holding the handle,
straighten the waist and neck to set the waist straight.
It is more effective if the heel of your foot is lifted and
released repeatedly.
Muscles stimulated:
Upper and lower body, abdomen and other muscles
strengthen, knee joints, and ankle joints strengthen.
ExercisePrograms
Page12 NOBLEREXK2MANUAL
A
ESTHETICMD
Page5
Preparingforoperation
Please use these exercise programs as a guide, however feel
free to experiment and consult with your doctor to help achieve
your desired results. You can sit, lie, or position a part of the
body upon the vibration platform and adjust the application
intensity to create a different effect. The combination of all ten
vibration exercise positions may produce the effects of up to 80
different exercises by making minor adjustments in posture and
body positioning. Just ten minutes gives you maximum results.
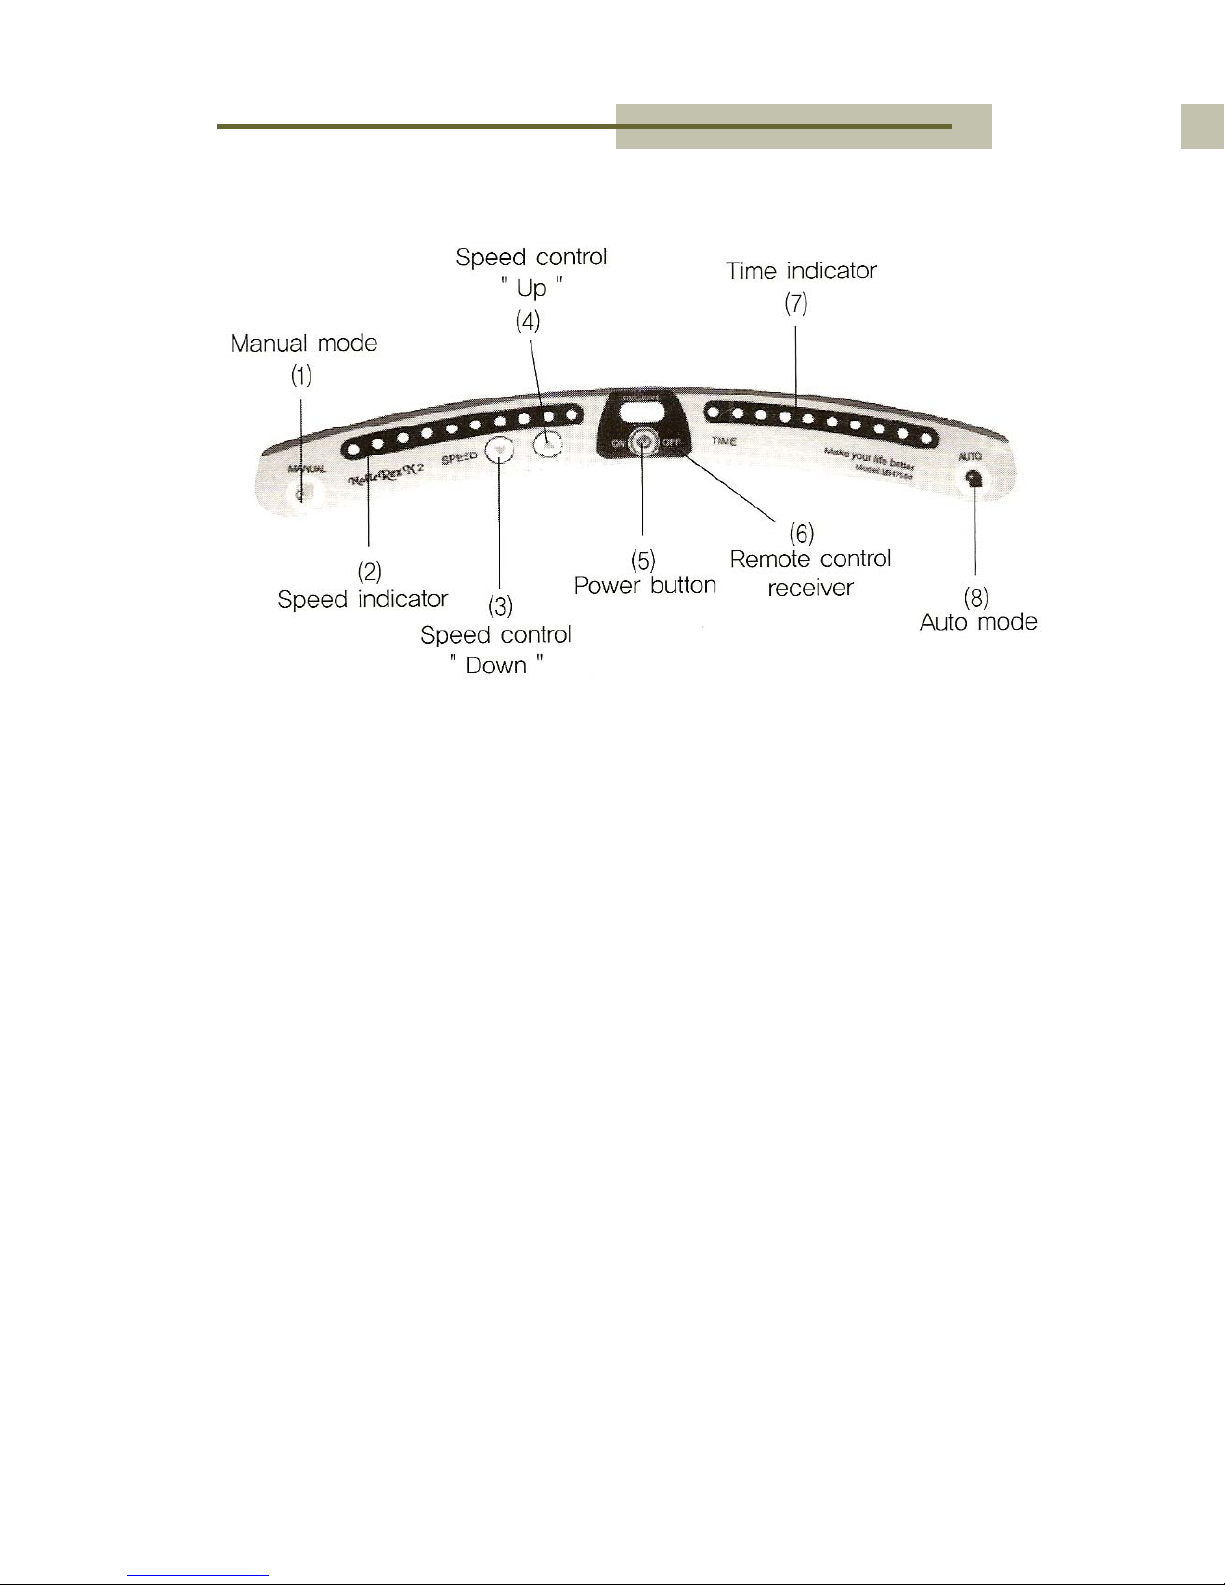
Part identification and functions
(1) Operation Board: The display located on the surface of the front
plate/vibration plate is connected to the operation board inside of the
Noblerex K2.
(2) Front Plate/Vibration Plate:The Noblerex K2 is designed to
aesthetically compliment most home interiors. The front plate is
covered in rubber material specially designed to provide comfort and
the effect of pressure acupuncture. Beneath the front plate is the
operation board.
(3) Body Cover: This highly durable poly cover protects the front
plate/vibration plate from external damage and also protects your
highly durable, but fragile feet from injury.
(4) Stand Handle: The handle extending from the floor board to the
hand grips. This may be used to support your balance while
operating the Noblerex K2. There is a diagram located between the
grips at the top of the handle which displays body positions for
exercises mentioned in chapter 5 of this manual.
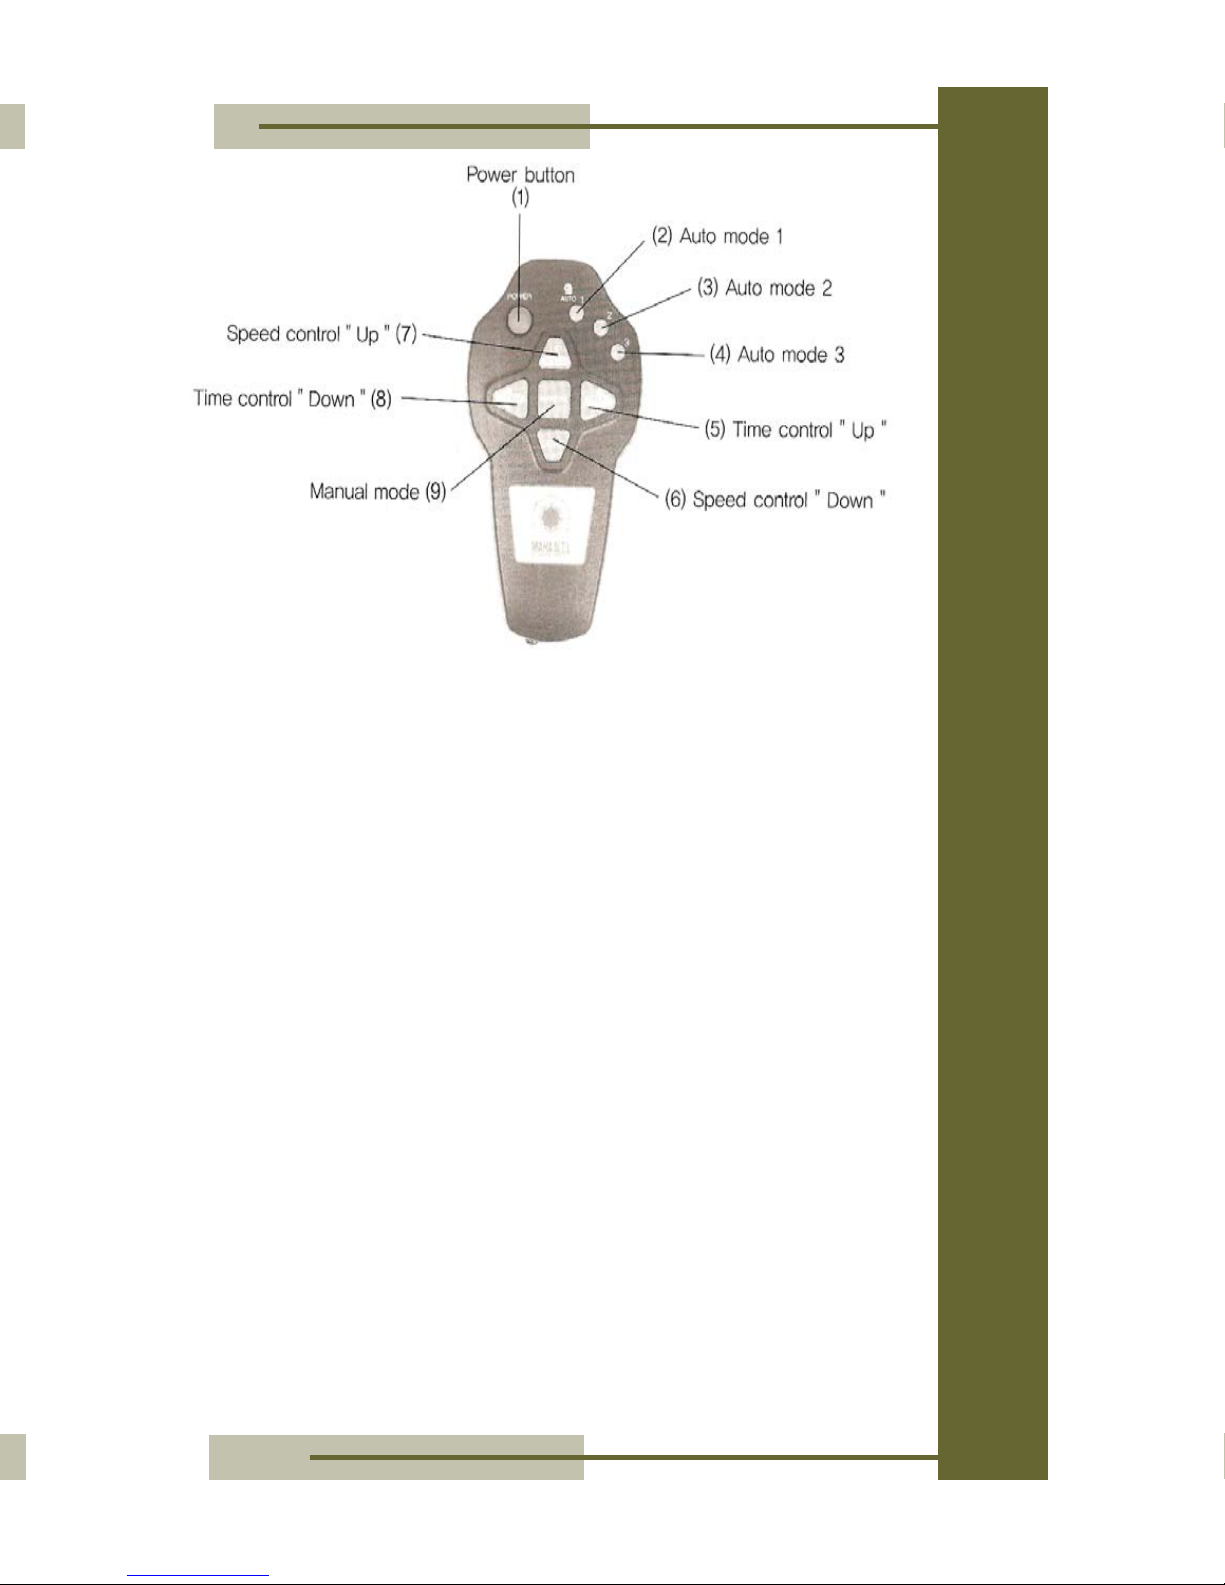
(5) Remote Control:The remote control consists of 3 mode buttons, 1
power button, 1 manual button, 2 buttons for speed increase or
decrease, and 2 buttons for time increase or decrease.
Page6 NOBLEREXK2MANUAL
A
ESTHETICMD
Page11
The default operation mode is auto mode-1 or beginner
mode, the NobleRexK1 ‘beeps’ once when this is
selected. If you choose to select a different mode you
may do so at this point. To select auto mode- 2 or auto
mode- 3, press the corresponding auto mode button on
the remote control or operation board display. Auto
mode- 2 or intermediate mode ‘beeps’ twice when it is
selected and Auto mode- 3 advanced mode ‘beeps’
three times when it is selected.
You may exit auto mode at any time by pushing the
manual button on the remote control or operation board.
If done correctly, you will hear a ‘beep’ and the
NobleRexK1 will continue to operate at an intensity level
(speed) of 1.
You may raise the speed level, and increase intensity by
pushing the ‘up’ button on the remote control or
operation board. Each time the button is pushed, the
NobleRexK1 will ‘beep’ and a green LED located on the
left side of the operation board will illuminate, displaying
the increase up to 10.
A ‘Beep’ will be heard when pressing the ‘time’ button on
the remote control or operation board and each LED
means one minute of time during an exercise program.
When the ‘time’ button on the right is pushed, the LED
increases by 1, each push, and the operation time is
extended by one minute, each push. Conversely, when
the ‘time’ button on the left is pushed, the LED
decreases by 1, each push, and the operation time is
decreased by one minute, each push.
(1) This switch converts the NobleRexK1 into ‘manual’ mode while the machine is
operating in ‘auto’ mode.
(2) The speed indicator green LED, displays the current speed and vibration intensity
of the program. Speed is measured from left to right on a scale of 1 to 10, 1 being
the slowest (least intense), 10 being the fastest (most intense).
(3,4) Two buttons control the speed and vibration intensity of the NobleRexK1. Each
time the button with the arrow pointing up is pressed, the speed will increase by
one. Concurrently, each time the arrow pointing down is pressed the speed will
decrease by one.
(5,6) The power button and remote control receiver are located here. The power can be
supplied with one press of this button, and shut off with another press. The remote
control receiver is located directly above the power button. The remote control
uses infrared technology so it is important not to cover or obstruct the receiver
area while using the NobleRexK1.
(7) The time indicator red LED, displays the operating time of the current program
selected. Time is measured from left to right with each LED light representing one
minute. The machine is designed to operate on 10 minute cycles however, time
can be manually modified by using the NobleRexK1 remote control. The LED
lights will turn off one by one as each minute passes during operation.
(8) This switch converts the NobleRexK1 into ‘auto’ mode while the machine is
operating in ‘manual’ mode.
OperatingtheNoblerexK2
Note: If the power light is off and there is no
sound, check to make sure the machine is
pluggedintoanoutlet.
Note: When LED illuminates on both sides of
theoperationboardsimultaneously,awarning
tone will sound and the NobleRexK1 will shut
down. This is a safety feature designed to
protect the machine and user from harm. If
this happens, please discontinue use of the
NobleRexK1 and allow some timeto cool down.
The NobleRexK1 will re-activate when it is
ready.Example:WhenthreeLED’sonbothsides
of the control board are turned on
simultaneously and a warning tone goes off
consecutively,orwhenfourLED’sonbothsides
ofthecontrolboardilluminate simultaneously
and a warning tone goes off, the machine will
shutdown.
Page10 NOBLEREXK2MANUAL
A
ESTHETICMD
Page7
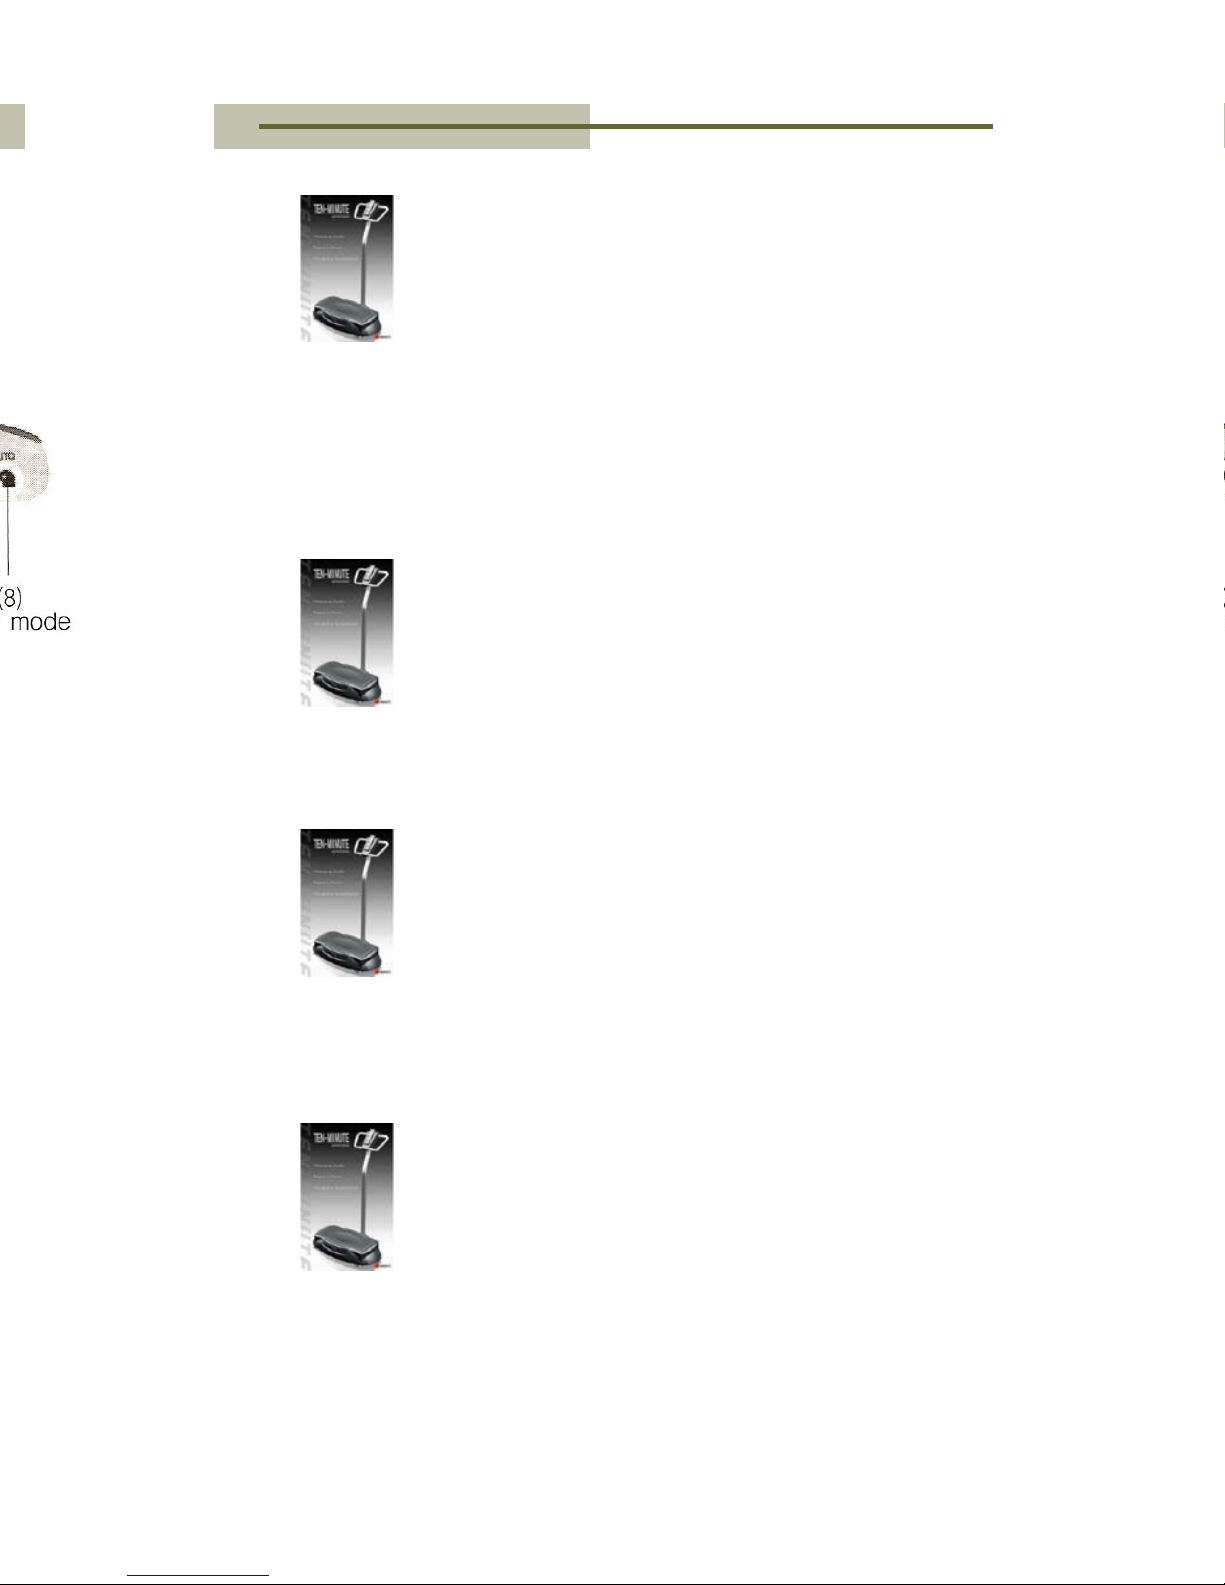
(1) The NobleRexK1 is powered by pressing this button once. The
power is shut off by pressing the button again.
(2) Auto mode 1 is the first button from left to right. This mode
provides a maximum speed or intensity that fluctuates between 1
and 5. Auto mode 1 is recommended for everyone to use and is
emphasized as the mode to use for beginners.
(3) Auto mode 2 is the middle button between the three auto mode
buttons. This mode provides a maximum speed or intensity that
fluctuates between 1 and 7. Auto mode 2 is recommended for
intermediate users.
(4) Auto mode 3 is the far right button between the three auto mode
buttons. This mode provides a maximum speed or intensity that
fluctuates between 1 and 10. This is the most intense auto
program available on the NobleRexK1. It is highly recommended
that only experts and users who are familiar with the NobleRexK1
try this program.
(5,8) Two buttons represent the time by minute that the NobleRexK1
operates. Each push of either button represents one minute.
(5) This button increases the time by minute that the K2 operates. The
program increases by one each time the button is pushed.
(8) This button decreases the time of a program by one each time the
button is pushed.
(9) Pushing this button switches the NobleRexK1 into manual mode.
Step onto the vibration plate and find a comfortable
position. Press the power switch on the remote control or
operation board to begin

Page8 NOBLEREXK2MANUAL
A
ESTHETICMD
Page9
PreparingtoUsetheNobleRexK2
The NobleRexK1 has two modes of control, AUTO and
MANUAL which can be adjusted at any time during operation.
Manual control: This mode lets the user choose a
combination between vibration intensity and operation time.
The vibration intensity (speed) is measured on a scale of 1 to
10, 10 being the highest and 1 the lowest. Time also works on
a scale of 1 to 10, each increment representing 1 minute.
Auto control: This mode provides the user with a choice
between 3 different exercise programs, each with a varying
degree of vibration intensity (speed) and time. Each mode
has a programmed pattern of speed and vibration intensity
that fluctuates throughout the programmed exercise time.
Below is a list and description of each mode:
Auto mode-1: Vibration intensity fluctuates between 1 and 5
for ten minutes
Auto mode-2: Vibration intensity fluctuates between 1 and 7
for ten minutes
Auto mode-3: Vibration intensity fluctuates between 1 and 10
for ten minutes
The recommended use of a NobleRexK1 is 1 to 3 times/day
for ten minutes each time beginning with auto mode-1. You
may gradually extend usage time and frequency, depending
on your personal physical condition and comfort. Please
consult a physician when you are ready to increase the time
or intensity of your exercise.
The time of use is set at ten minutes every time the power is
turned on or off. If you choose to exercise less then ten
minutes at a time, you must manually change the time.
The NobleRexK1 will automatically return to standby mode
after 10 minutes of use or any manually programmed time up
to 10 minutes.
The NobleRexK1 rated operation time is 10 minutes with a
standard weight of 150kg or 353lbs. It can be consecutively
used 8 hours or longer, however this is not recommended
without consulting a doctor prier to any extended period of
use.
When power is first connected to the NobleRexK1, the
machine will produce a beeping sound accompanied by the
LED lights indicating TIME and SPEED blinking left and right.
This indicates that the NobleRexK1 is in standby status.
Always step onto the vibration plate and find a comfortable

OperatingtheNoblerexK2
Note: If the power light is off and there is no
sound, check to make sure the machine is
pluggedintoanoutlet.
Note: When LED illuminates on both sides of
theoperationboardsimultaneously,awarning
tone will sound and the NobleRexK1 will shut
down. This is a safety feature designed to
protect the machine and user from harm. If
this happens, please discontinue use of the
NobleRexK1 and allow some timeto cool down.
The NobleRexK1 will re-activate when it is
ready.Example:WhenthreeLED’sonbothsides
of the control board are turned on
simultaneously and a warning tone goes off
consecutively,orwhenfourLED’sonbothsides
ofthecontrolboardilluminate simultaneously
and a warning tone goes off, the machine will
shutdown.
Page10 NOBLEREXK2MANUAL
A
ESTHETICMD
Page7
(1) The NobleRexK1 is powered by pressing this button once. The
power is shut off by pressing the button again.
(2) Auto mode 1 is the first button from left to right. This mode
provides a maximum speed or intensity that fluctuates between 1
and 5. Auto mode 1 is recommended for everyone to use and is
emphasized as the mode to use for beginners.
(3) Auto mode 2 is the middle button between the three auto mode
buttons. This mode provides a maximum speed or intensity that
fluctuates between 1 and 7. Auto mode 2 is recommended for
intermediate users.
(4) Auto mode 3 is the far right button between the three auto mode
buttons. This mode provides a maximum speed or intensity that
fluctuates between 1 and 10. This is the most intense auto
program available on the NobleRexK1. It is highly recommended
that only experts and users who are familiar with the NobleRexK1
try this program.
(5,8) Two buttons represent the time by minute that the NobleRexK1
operates. Each push of either button represents one minute.
(5) This button increases the time by minute that the K2 operates. The
program increases by one each time the button is pushed.
(8) This button decreases the time of a program by one each time the
button is pushed.
(9) Pushing this button switches the NobleRexK1 into manual mode.
Step onto the vibration plate and find a comfortable
position. Press the power switch on the remote control or
operation board to begin
Page6 NOBLEREXK2MANUAL
A
ESTHETICMD
Page11
The default operation mode is auto mode-1 or beginner
mode, the NobleRexK1 ‘beeps’ once when this is
selected. If you choose to select a different mode you
may do so at this point. To select auto mode- 2 or auto
mode- 3, press the corresponding auto mode button on
the remote control or operation board display. Auto
mode- 2 or intermediate mode ‘beeps’ twice when it is
selected and Auto mode- 3 advanced mode ‘beeps’
three times when it is selected.
You may exit auto mode at any time by pushing the
manual button on the remote control or operation board.
If done correctly, you will hear a ‘beep’ and the
NobleRexK1 will continue to operate at an intensity level
(speed) of 1.
You may raise the speed level, and increase intensity by
pushing the ‘up’ button on the remote control or
operation board. Each time the button is pushed, the
NobleRexK1 will ‘beep’ and a green LED located on the
left side of the operation board will illuminate, displaying
the increase up to 10.
A ‘Beep’ will be heard when pressing the ‘time’ button on
the remote control or operation board and each LED
means one minute of time during an exercise program.
When the ‘time’ button on the right is pushed, the LED
increases by 1, each push, and the operation time is
extended by one minute, each push. Conversely, when
the ‘time’ button on the left is pushed, the LED
decreases by 1, each push, and the operation time is
decreased by one minute, each push.
(1) This switch converts the NobleRexK1 into ‘manual’ mode while the machine is
operating in ‘auto’ mode.
(2) The speed indicator green LED, displays the current speed and vibration intensity
of the program. Speed is measured from left to right on a scale of 1 to 10, 1 being
the slowest (least intense), 10 being the fastest (most intense).
(3,4) Two buttons control the speed and vibration intensity of the NobleRexK1. Each
time the button with the arrow pointing up is pressed, the speed will increase by
one. Concurrently, each time the arrow pointing down is pressed the speed will
decrease by one.
(5,6) The power button and remote control receiver are located here. The power can be
supplied with one press of this button, and shut off with another press. The remote
control receiver is located directly above the power button. The remote control
uses infrared technology so it is important not to cover or obstruct the receiver
area while using the NobleRexK1.
(7) The time indicator red LED, displays the operating time of the current program
selected. Time is measured from left to right with each LED light representing one
minute. The machine is designed to operate on 10 minute cycles however, time
can be manually modified by using the NobleRexK1 remote control. The LED
lights will turn off one by one as each minute passes during operation.
(8) This switch converts the NobleRexK1 into ‘auto’ mode while the machine is
operating in ‘manual’ mode.

Exercise Position #1
Stand on the vibration plate in a comfortable posture.
Bend the knees slightly as though on the back of a
horse, and relax both hands naturally toward the
hipbone. Straighten the waist and neck. This exercise
will focus on the thighs and is effective in strengthening
the lower limb muscles.
Muscles stimulated:
Arm muscle and lower body strengthening, knee joint,
ankle joint strengthening
Exercise Position #2
Stand on the vibration plate in a comfortable posture.
Bend the knees slightly as though on the back of a
horse, and with both hands holding the handle,
straighten the waist and neck to set the waist straight.
It is more effective if the heel of your foot is lifted and
released repeatedly.
Muscles stimulated:
Upper and lower body, abdomen and other muscles
strengthen, knee joints, and ankle joints strengthen.
ExercisePrograms
Page12 NOBLEREXK2MANUAL
A
ESTHETICMD
Page5
Preparingforoperation
Please use these exercise programs as a guide, however feel
free to experiment and consult with your doctor to help achieve
your desired results. You can sit, lie, or position a part of the
body upon the vibration platform and adjust the application
intensity to create a different effect. The combination of all ten
vibration exercise positions may produce the effects of up to 80
different exercises by making minor adjustments in posture and
body positioning. Just ten minutes gives you maximum results.
Part identification and functions
(1) Operation Board: The display located on the surface of the front
plate/vibration plate is connected to the operation board inside of the
Noblerex K2.
(2) Front Plate/Vibration Plate:The Noblerex K2 is designed to
aesthetically compliment most home interiors. The front plate is
covered in rubber material specially designed to provide comfort and
the effect of pressure acupuncture. Beneath the front plate is the
operation board.
(3) Body Cover: This highly durable poly cover protects the front
plate/vibration plate from external damage and also protects your
highly durable, but fragile feet from injury.
(4) Stand Handle: The handle extending from the floor board to the
hand grips. This may be used to support your balance while
operating the Noblerex K2. There is a diagram located between the
grips at the top of the handle which displays body positions for
exercises mentioned in chapter 5 of this manual.
(5) Remote Control:The remote control consists of 3 mode buttons, 1
power button, 1 manual button, 2 buttons for speed increase or
decrease, and 2 buttons for time increase or decrease.
Installation&Assembly
Page4 NOBLEREXK2MANUAL
Exercise Position #3
Step on the vibration plate comfortably and use both hands
to hold the handle. Spread the legs as much as possible
and pull the hip backwards and bend the waist. At this time,
straighten both hands and look toward the front. It is
effective for lower leg muscles, and it prepares the leg
muscles for walking or running activities.
Muscles stimulated:
Waist muscles are strengthened, including the shoulders,
abdomen, thigh, and hipbone. Fat is disintegrated, the
metabolism is kicked into high gear, and intestinal movement
is encouraged.
Exercise Position #4
Step on the vibration plate and bend the knees about 30
degrees while straightening the back. Take the position of
wind surfing by Maintaining weight in the upper body and
holding the handle with both arms.
Muscles stimulated:
Knee joints, ankle joints, and upper/lower body muscles are
strengthened.
Exercise Position #5
Place the hips on floor in sitting position. Bend the elbows
and place them on the vibration plate. Straighten the waist
and the neck while looking to the front. Upper muscle,
especially the back muscles are effective in developing the
hard training for the upper body. This would help the triceps
and biceps of the shoulder area.
Muscles stimulated:
Upper arm, shoulder bones, triceps and biceps. Relaxes
arm and shoulder pain and develops back muscles.
Exercise Position #6
Facing the opposite direction of the NobleRexK1, sit on the
vibration plate. At this time, place both palms on the
vibration plate naturally. Keep the knees at 90 degrees with
sole of the foot flat on the ground.
Muscles stimulated:
Arms, shoulders, palms, and abdomen strengthened, as well
as metabolism assistance, and intestinal movement.
A
ESTHETICMD
Page13
The Noblerex K2 consists of a main body, floorboard, stand
handle, remote control, and part set (3 bolts and 1 hexagonal
wrench). Check contents before installation.
(1) Use the bolts and tool of
the part set to attach the
stand handle to the
floorboard. Make sure that
the bolts are tight.
(2) Place the main body on
the floorboard. Make sure
that the rubber cones
located beneath the main
body fit into the holes on
the floorboard.
(3) Connect the power once
assembly is completed
and continue through this
manual to understand the
K2 functions.
Place the floorboard on a flat even
surface. Damage or failure may occur
if the K2 is placed on a skewed or
inclined surface

Page14 NOBLEREXK2MANUAL
A
ESTHETICMD
Page3
WarningsandSafety
For your protection, please read these safety instructions
completely before operating the NobleRexK1 and keep this
manual for future reference.
Carefully observe all warnings, precautions and
instructions on the K1 machine, or those described in the
instruction manual and adhere to them.
This product is exclusively for 110V outlets and has been rated for 8 or
more hours of use time.
To prevent fire or shock hazard, do not expose the NobleRexK1 unit to
rain or moisture.
If water happens to get into the unit, remove the power plug from outlet
and wait until unit is completely dry.
Do not extend the power line or twist it, doing so may result in electric
shock or fire.
To prevent electric shock, match wide blade of plug to wide slot, fully
insert.
Turn off all functions before pulling plug from outlet.
When the NobleRexK1 is not used for an extended period of time,
remove the power plug from outlet.
Do not insert or spill any foreign substance in or on the NobleRexK1,
doing so could cause product malfunction.
Make sure NobleRexK1 is placed on an even surface.
Do not allow children near the NobleRexK1 while the equipment is in
operation.
Do not exceed the NobleRexK1 maximum weight capacity of 353 lbs.,
doing so could damage the machine or cause a malfunction.
Do not allow children to place hands or feet in the gaps on the upper
board.
Seniors, pregnant women, people with physical difficulties, or anyone
using the product for rehabilitation treatment, please consult with a
physician, sports therapist or appropriate specialist before using the
NobleRexK1.
Exercise Position #7
Straighten both hands and place them on the vibration plate.
Spread both legs and lift the heels of the feet to take the push up
position.
Muscles stimulated: Strengthening of upper body muscle, including
arm, shoulder and neck area (relaxes pain in the shoulder, and
Exercise Position #8
Place upper body on the floor and set both feet on the vibration
plate. With both arms on the floor to support the body, lift the waist
from the floor and maintain the tension. This position is effective in
strengthening lower body muscles.
Muscles stimulated:
Lower body muscles and lower joints are strengthened. This
position also messages the soles of your feet.
Exercise Position #9
Stand on one edge of the exerciser, and spread the legs to
shoulder width with knees bent to about 30 degrees. Look toward
the front, and relax both arms. This is the full body exercise
posture which has the effect of jumping rope.
Muscles stimulated:
Upper and lower body, abdomen and other muscles are
strengthened. Knee joints and ankle joints are strengthened.
Exercise Position #10
Stand in a comfortable posture and fully straighten the knees and
waist. Spread both legs as much as possible, rest both hands
gently on the stand handle and look straight ahead. This posture is
great for strengthening the muscles in the lower body, and is
effective for those who walk a lot or need to massage their legs
frequently.
Muscles stimulated:
Lower body joints and abdomen are strengthened, Body fat
disintegrates, and blood circulation is promoted throughout the
thigh and hipbone.
Warnings and Safety 3
Installation and Assembly 4
Preparing for Operation 5
Preparing to Use the Noblerex K2 8
Operating the Noblerex K2 10
Exercise Programs 12
Troubleshooting/Warranty Information 15
TableofContents
Page2 NOBLEREXK2MANUAL
A
ESTHETICMD
Page15
Troubleshooting/WarrantyInformation
Problem Resolution
When Power is connected the
equipment does not operate.
Have you pressed the power
button on the operation board
or remote control? The K2 will
not operate until the power
button is engaged.
None of the LED lights are on
when the power cord is
plugged into an outlet.
The Noblerex K2 is
malfunctioning. Discontinue
use and contact AestheticMD.
There are two, three, or four
LED lights flickering and
making noise on both sides of
the operation board.
In the event of overheating,
The NobleRexK1 has a safety
mechanism that automatically
shuts the machine off to cool
down. Wait at least 30
minutes for before attempting
to use it again.
There is a severe vibration or
noise when the NobleRexK1
is operating.
Is the floorboard resting on a
flat, hard surface? Try placing
the machine in another area
without carpet or
incline/declines.
If none of the solutions above remedy the issue pertaining to your
NobleRexK1, please contact AestheticMD at (602) 485-3621.
Warranty Information
The NobleRexK1 has a warranty against manufacturer’s defects for 1
year from the date of purchase. The warranty does not cover
malfunctioning caused by neglect, unauthorized disassembly, natural
disaster, or negligence of warnings and precautions. If your
NobleRexK1 is malfunctioning after the warranty expiration date, please
contact AestheticMD for re
p
air information.
Model No: MH - 7500
PRODUCT INSTRUCTION MANUAL
For questions, comments, or ordering information
(602) 485-3621
Fax (602) 996-2743
www.aestheticmd.com
4809 E. Presidio Rd.
Scottsdale, AZ 85254
AestheticMD
Medical Clinic
8591 E. Bell Rd., Suite 102
Scottsdale, AZ 85262
AestheticMD
©2006 All rights reserved
Table of contents


