Noise Lab CLANG User manual

CLANG - User manual
1

Getting Started
Installation
1. ⚠WARNING! Always make sure your eurorack system is turned off before
installing a new module. To be on the safe side, pull the plug before you start!
2. The 10-pin connector should already be connected to your module with the red
stripe on the power cable oriented towards the bottom, matching the white line
and -12V marking.
3. Connect the free end of the power cable to the 16-pin Eurorack header on your
power supply system. The red stripe on the cable should match the white line
(-12V marking) on the bus board.
4. Attach the module to the rails of your case using the included screws.
5. Power on your Eurorack system and get started!
3

Introduction
Clang is a unique combination of a four-quadrant multiplier (ring modulator) and wave
folder that can generate a wide range of interesting sounds from just a sine or triangle
waveform. From screeching drones, strange bells to plucky tones or deep fat basses.
Clang is a fully analogue module and its three inputs all accept both audio and control
voltages. The two outputs have slightly different functionality: the left provides the
processed sound, while the right routes the signal via a VCA, controlled by the Offset
Mod input and its level knob. Clang also has an integrated triangle oscillator normalled
to the Y input. If you want to read more about ring modulation and get some general
background, you can follow the links below:
https://en.wikipedia.org/wiki/Ring_modulation
https://learningmodular.com/glossary/four-quadrant-multiplier/
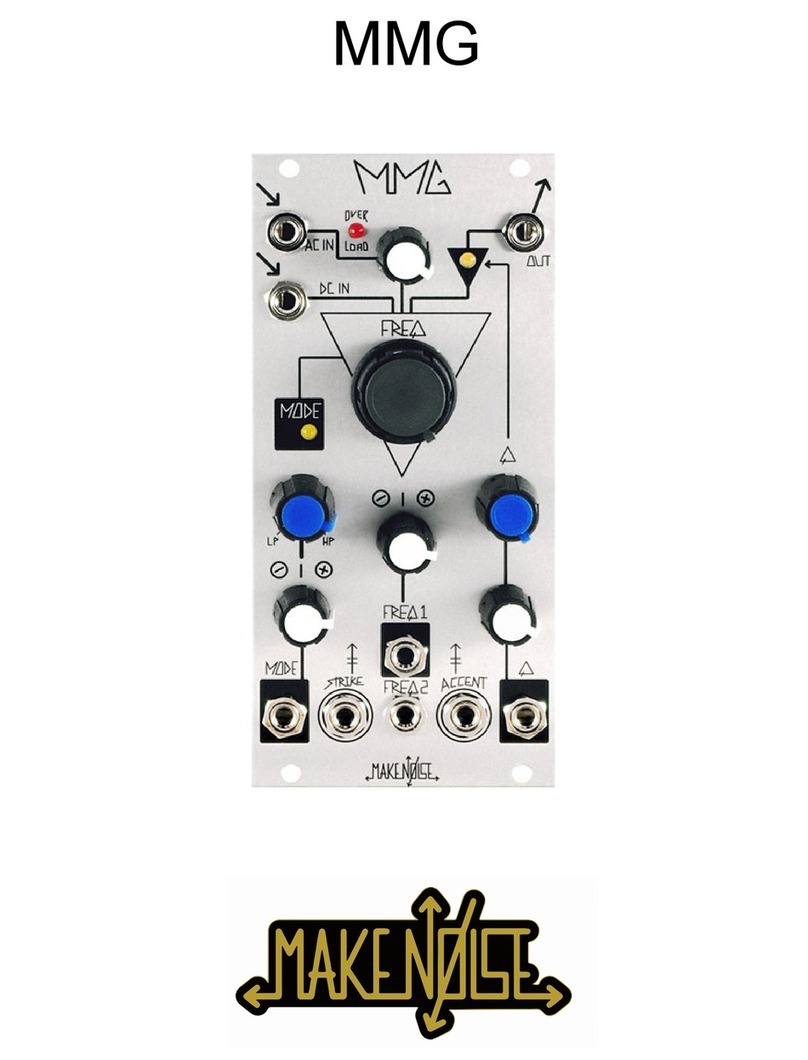
❶X and Y inputs
X Input is the basic input for the carrier signal ;the waveform you want to process.
Signal strength should typically be around 10Vpp but you can use weaker signals,
although it will cripple some of Clang’s waveshaping capabilities. A sine or triangle
waveform is usually best if you are looking for bell-like sounds but Clang will obviously
work with any type of waveform.
The Y Input is for the modulation signal. This input is normalled to a built-in triangle
oscillator which automatically is bypassed when you insert a patch cable. Typically you
use a sine or triangle wave here but you can also insert CV from your LFO or envelope
generator, thus making Clang act as VCA. However, it’s a better practice to use the
dedicated VCA output (described below).
❷X and Y level knobs
The Level knob controls the gain or signal strength of the X channel. When turning the
knob past 12 'O' clock noon (which is unity gain), the incoming signal will begin to
saturate and distort. For example, a sine wave will eventually morph into a square wave
when turning the knob to the max.
The Y Input level knob controls the strength of incoming modulation signal, and differs
in that it will not distort the wave form. This channel can be fed with audio as well as
control voltage.
4

❸Frequency
This knob controls the frequency (rate) of the built in triangle oscillator. Fully turned to
the left it oscillates slowly like an LFO, but as you turn the knob clockwise, you’ll quickly
get into audio range. The oscillator is primarily used at high frequencies to create
frequency sideband effects while modulating the carrier signal. If you want a slower
movement you can plug in an external LFO into the Y input.
Note! When there is a patch cable inserted in the Y Input, the frequency control knob is
bypassed. This knob has no other function than setting the speed of the oscillator.
❹RM Mode
RM Mode switch (Ring Modulator Modes)
1: Four-quadrant multiplier mode. Modulation of the carrier signal with offset control.
A good start if you want to make typical bell-like tones.
2: A single stage soft folding circuit that bends the waveform and thereby adds extra
harmonics to the carrier signal. Increase the level of X input to make the waveform fold
into itself. Offset Mod input can be used to animate the folded signal. For example,
use a slowly moving LFO and experiment with the level knob.
3: A hard folding circuit that generates a unique center aligned pwm-like waveform
which can be animated using the built-in oscillator or an external CV source, for
example an envelope generator. For example, insert a slowly moving LFO into the
Offset Mod input to try it out further.
❺Offset Modulation
Please note, an external CV signal or audio waveform is required here!
This input differs from the other two in that any signal used here will have different
effects on Clang's two outputs. The basic function is to offset the modulation signal
from the carrier in order to produce more complex sounds. The left output provides the
multiplied signal which in turn is routed via an VCA connected to the right output.
This means; any signal in this input will have effect on both the ring modulated sound
and the VCA.
A great way to learn how it works is therefore to connect an envelope generator
and observe how the signal is processed though both outputs. Turning the knob fully to
the left will attenuate the signal, leaving the modulating signal untouched, the right
output will behave like any linear VCA would do. Also try to use this input with audio
signals to achieve even more complex sounds. Try experimenting with different
waveforms at different frequencies.
5

❻Outputs
The left output provides your processed sound. The right output routes the sound via a
VCA which in turn is controlled by any signal used in the Offset Mod input.
Please keep in mind that if no signal is present in the Offset Mod, only the left output
will produce sound since the VCA is depending on an external CV source.
Patching examples
Here are some simple patches to get you started. Always experiment with different
waveforms and frequencies to see what you like and to learn how Clang works.
There are numerous sweet spots to discover!
Simple bell
X Input ⬅Sine or triangle wave, 1300 Hz, level 12 'O' clock
Y Input ⬅Sine or triangle wave, 800 Hz, level fully to the right
Offset Input ⬅ADSR (medium decay, medium release), Level knob fully to the left
RM Mode ⬅Ring or soft fold
VCA Output (right) ➡Your sound
Doomsday drone
X Input ⬅Sine or triangle wave, 55 Hz
Y Input ⬅Sine wave from internal oscillator at approx. 155 Hz
Offset Input ⬅LFO at low frequency (sine or triangle)
RM Mode ⬅Soft fold
Output (left) ➡Your sound
Doomsday drone II
X Input ⬅Sine or triangle wave, 55 Hz
Y Input ⬅Triangle wave from internal oscillator at approx. 600 Hz (3 'O' clock)
Offset Input ⬅LFO with sine or triangle at audio rate or another oscillator
6

RM Mode ⬅Soft fold
Output (left) ➡Your sound
Phazy Bass
X Input ⬅Sine or triangle wave, 55 Hz
Y Input ⬅Triangle wave from internal oscillator at zero
Offset Input ⬅Envelope generator
RM Mode ⬅Hard Fold
VCA Output (right) ➔ Your sound
Plucky
X Input ⬅Sine or triangle wave, approx 100 - 300Hz, Level 12 'O' clock
Y Input ⬅Sine or triangle wave, approx 100 - 300Hz, Level 3 'O' clock
Offset Input ⬅Level 12 'O' clock, ADSR w short envelope
RM Mode ⬅Soft Fold
VCA Output (right) ➔ Your sound
Specification
Size
Width: 8HP
Depth: 26 mm
Power
Eurorack system power supply
Consumption: 25 mA (+12 V) / 25 mA (-12 V)
Made in Sweden
7
Table of contents
Popular Music Equipment manuals by other brands

Fortin Amplification
Fortin Amplification ZUUL MINI instructions
EditorsKeys
EditorsKeys Portable Vocal Booth Pro Studio Series instruction sheet
Primova
Primova GKMX-41 user manual
Roland
Roland SoundCanvas SK-88Pro Service notes
Mutable Instruments
Mutable Instruments Plaits user manual

MicroVision
MicroVision MV-1104-001 user guide


