Noraxon Ninox 125 User manual
Ninox Camera Quick Start Guide
1
(Rev A)
Ninox Camera
Quick Start Guide
Quick Start GuideQuick Start Guide
Quick Start Guide

Ninox Camera Quick Start Guide
2
(Rev A)
Welcome from Noraxon
Congratulations on acquiring your new Ninox Camera System!
This guide will provide you with step by step instructions on how to install your new
hardware and software, adjust device settings, and record your first data set.
Let’s begin by walking through how to install your new hardware.
Note: This is not meant to be a complete manual, but a guide to help you get started with your system. or
more detailed instructions on operating the Ninox Camera System and its features please refer to the
complete Ninox User Manual, also included with your system.
1 System Unboxing
The Ninox camera system is packed within a reinforced padded box for storage and protection during
transport Upon arrival, carefully remove all contents and verify the following components are present
Contents will vary depending on the purchased package.
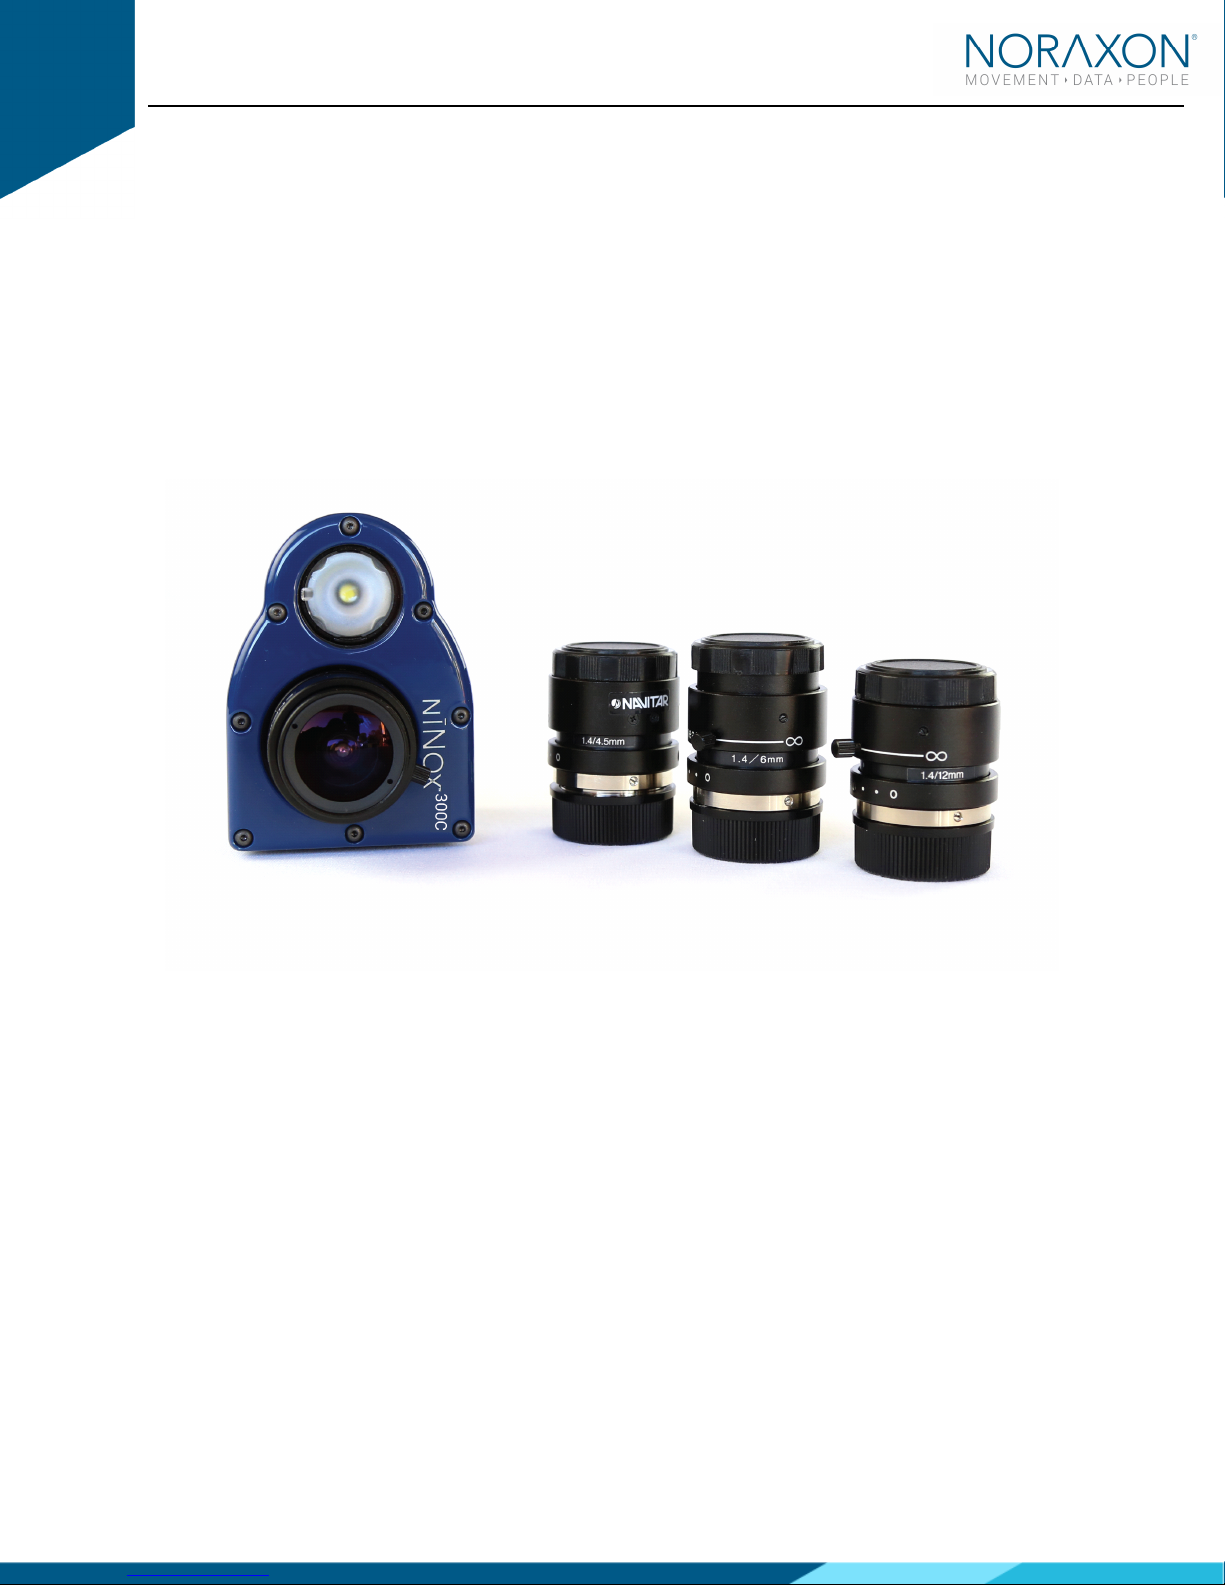
Figure 1 - Ninox camera
Ninox 1 5 (part #140)
Ninox 300C (part #143)
Figure - USB3.0 cable with sync (part #CBL31)
Figure 3 - MyoSync station (part # 6 )
Figure 4 - USB cable for MyoSync station (CBL )
Optional contents not illustrated:
Accessory lens (Ninox 300c only)
15m USB3 0 extension
Tripod

Ninox Camera Quick Start Guide
3
(Rev A)
2 Hardware Installation
2.1 Hardware Setup Instructions
Step 1
Insert CBL31 USB connector (USB3 0 micro b)
into the USB3 0 receptacle on the camera
Tighten BOTH thumb screws to the secure
CBL31 to the camera
Note: Failure to connect CBL31 to the camera
with BOTH thumb screws can result in
damage to the USB3 0 receptacle on the
camera
Step 2
Insert the stereo jack portion of CLB31 into
the receptacle on the camera
Step 3
Insert the USB Type A end of CBL31 into a
USB3 0 port on the host computer
Note: ONLY two cameras per USB controller
or USB hub are supported
Step 4
Insert the stereo jack portion of CBL31 into
any of the “Sync Out” ports of the MyoSync
station

Ninox Camera Quick Start Guide
4
(Rev A)
2.2 Select and attach our lens (300C onl )
Select a lens based upon the field of view that is needed for your specific use-case Refer
to the Section 11 3 of the hardware manual for details on selecting the appropriate lens
The following fixed-focal length lenses are available for use with this camera:
a Navitar 3 5 mm
b Navitar 4 5 mm
c Navitar 6 mm
d Navitar 12 mm
Once selected, carefully screw on the lens to the Ninox camera
2.2.1 Aperture and Focal Adjustment
The C-mount lens used with the Ninox 300C has a set aperture and an adjustable focus
By rotating the cylinder on the lens labeled ‘Near ---- ∞’, one can manually adjust the
focus of the lens for each use case
Note: For extreme cases of bright or dark conditions, the aperture can be manually adjusted See Section
11 5 of the User Manual for more information
3 Adjusting your omputer Settings
All changes to the computer settings must be made by a user with Administrator
AdministratorAdministrator
Administrator privileges
Power Options
Before using the Ninox camera, the host computer must have the correct power and performance options
set All computers may not have every Power Option
Power OptionPower Option
Power Option listed below, but you can follow the steps to make the
necessary changes to any option which is listed for your computer:
A note for laptop users: Be sure to change the settings for both On Battery
On BatteryOn Battery
On Battery and Plugged In
Plugged InPlugged In
Plugged In modes Be
aware that the settings are all “High Performance” and will reduce the battery run-time
Ninox Camera Quick Start Guide
5
(Rev A)
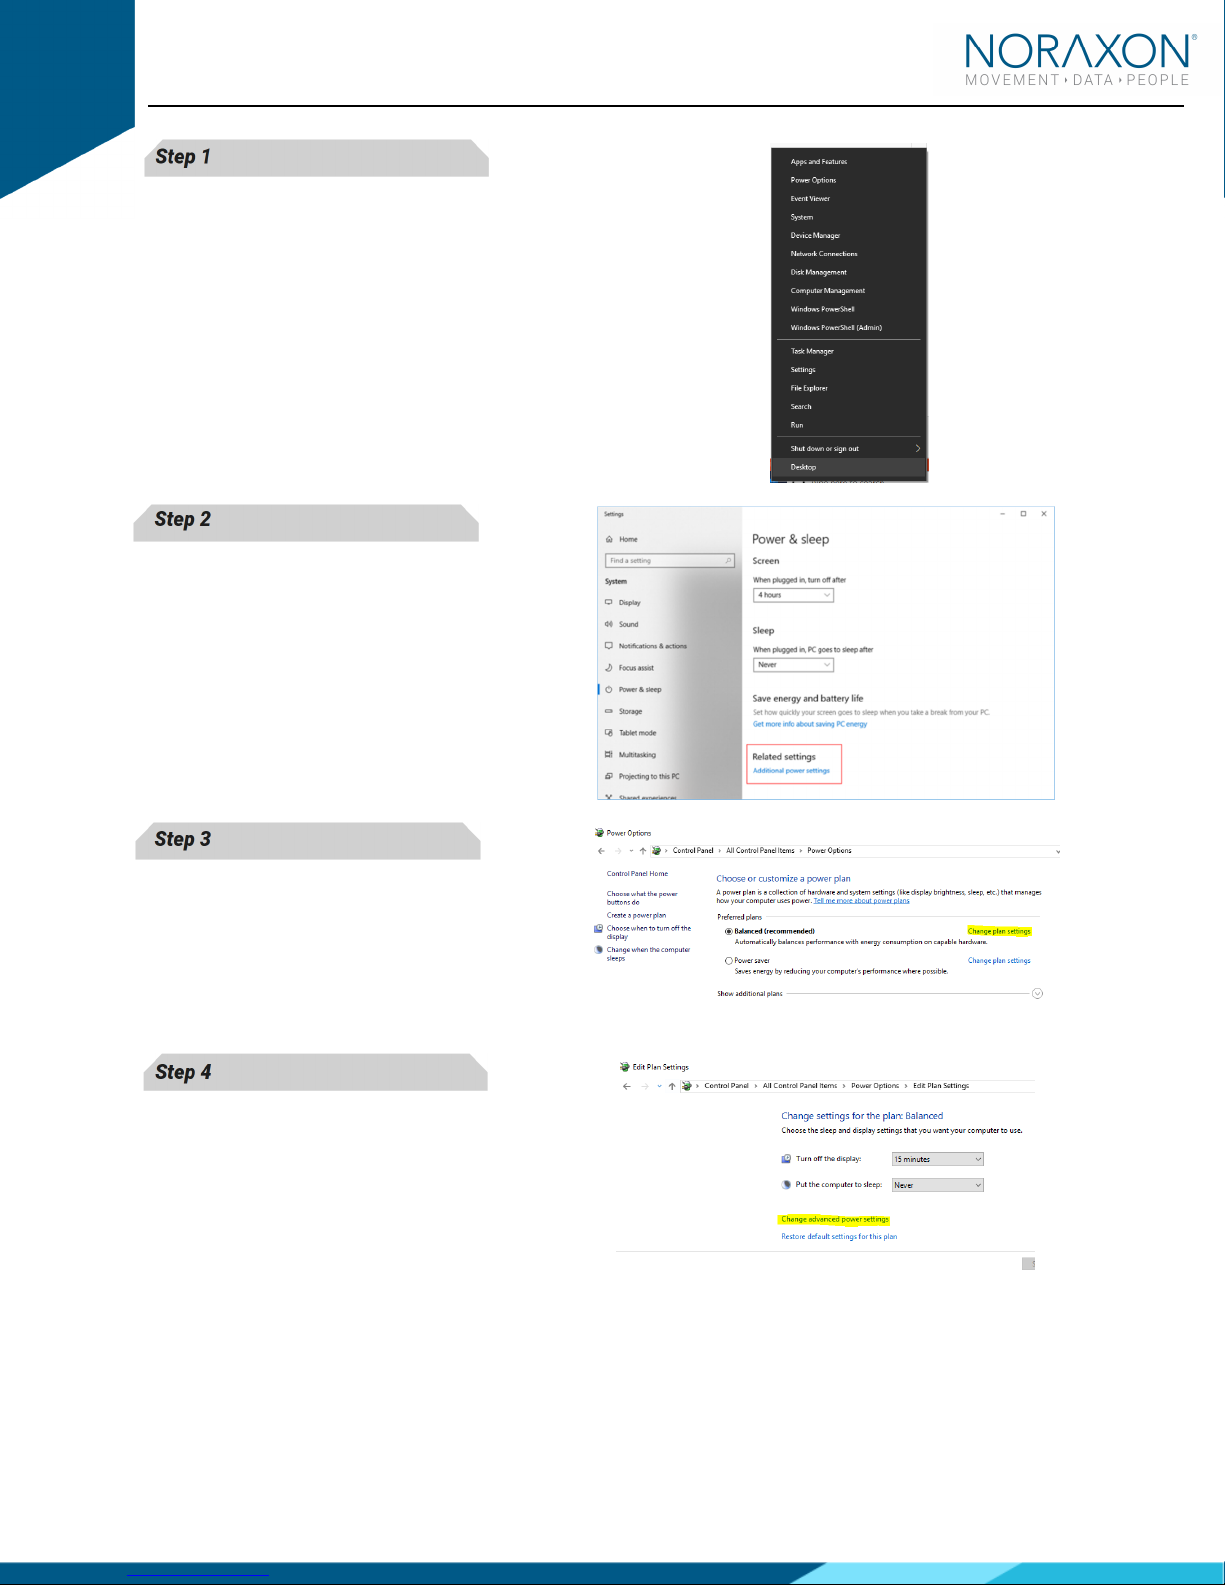
Step 1
Open the control panel by right clicking on the
Start menu and clicking on Power Options
Power OptionsPower Options
Power Options
Step 2
Navigate to the Additional power settings
Additional power settingsAdditional power settings
Additional power settings
Step 3
Click on Change Plan Settings
Change Plan SettingsChange Plan Settings
Change Plan Settings to make further
changes
Step 4
Click on Change Advanced
Change Advanced Change Advanced
Change Advanced Power Settings
Power SettingsPower Settings
Power Settings
Ninox Camera Quick Start Guide
6
(Rev A)
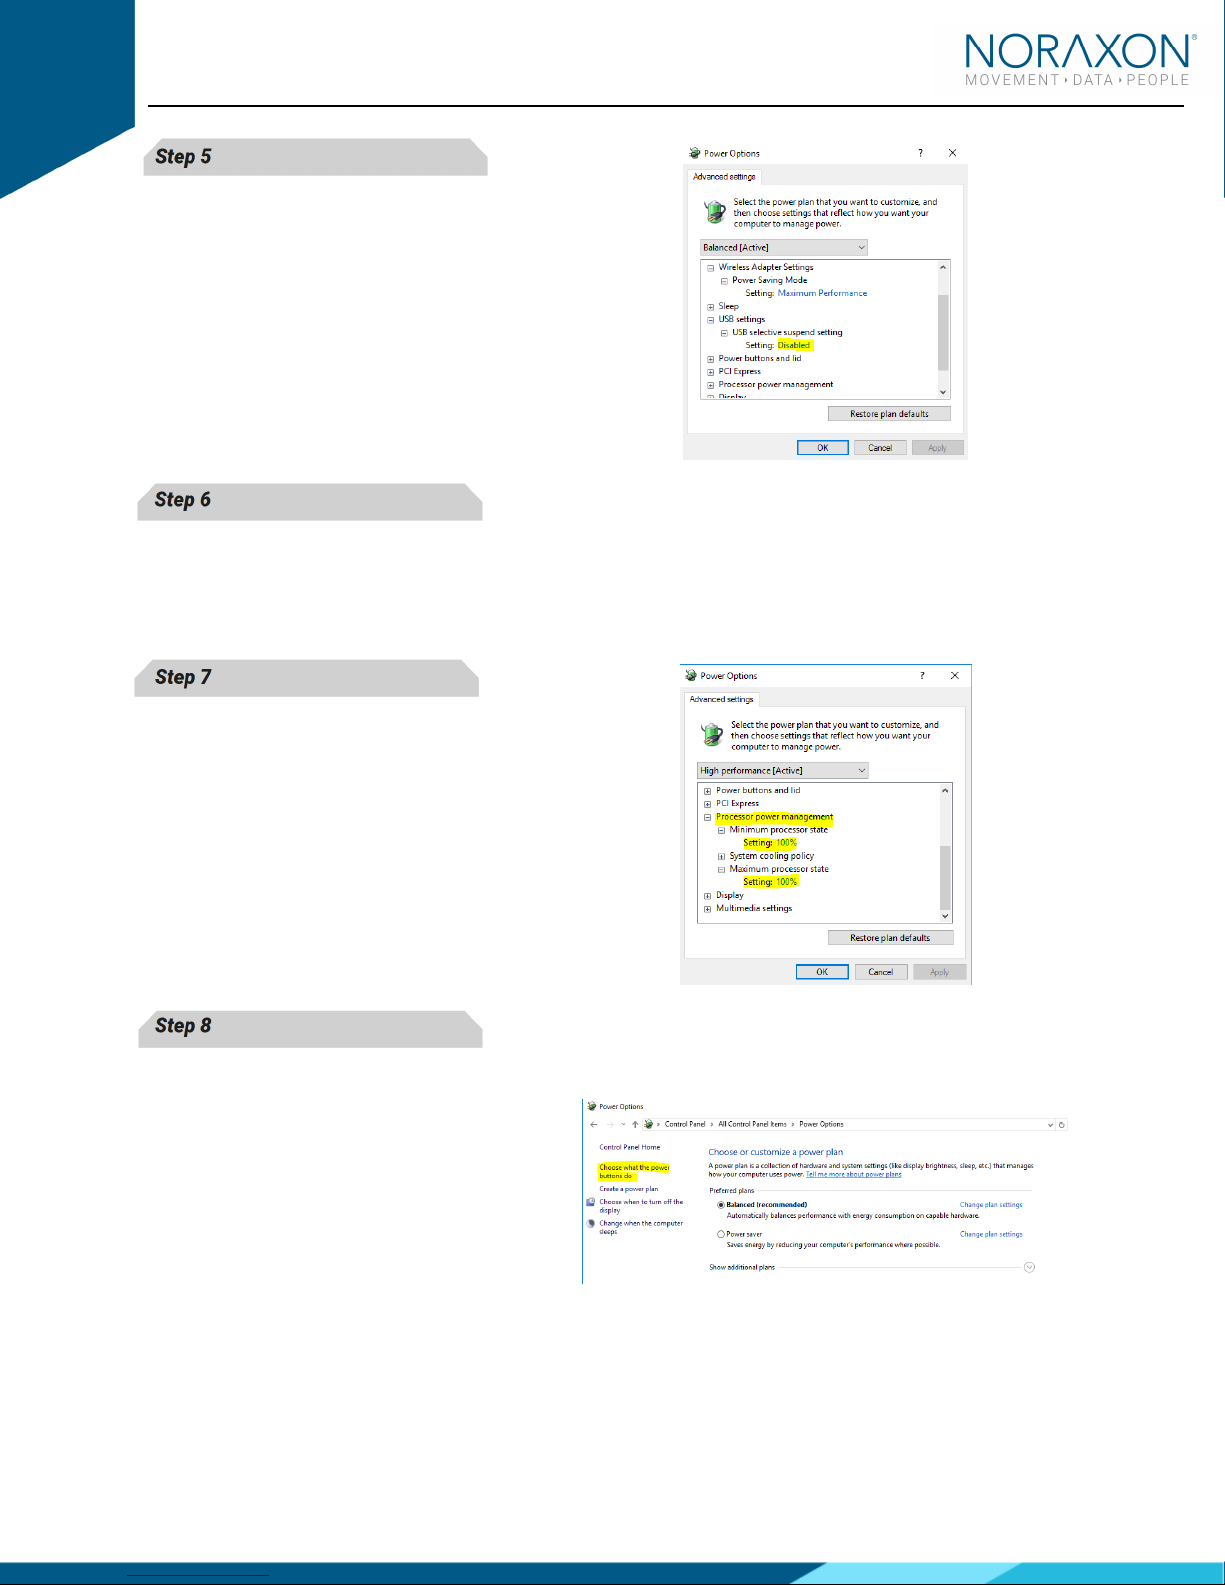
Step 5
Find the USB Settings
USB Settings USB Settings
USB Settings -
--
-> USB Selective
> USB Selective > USB Selective
> USB Selective
Suspend
SuspendSuspend
Suspend menu and select Disabled
Disabled Disabled
Disabled
Step 6
Find the Intel (R) Graphics Settings
Intel (R) Graphics SettingsIntel (R) Graphics Settings
Intel (R) Graphics Settings
Expand the Intel (R) Graphics Power Plan
Intel (R) Graphics Power PlanIntel (R) Graphics Power Plan
Intel (R) Graphics Power Plan and
change the setting to Maximum Performance
Maximum PerformanceMaximum Performance
Maximum Performance
Step 7
Find the Processor Power Management
Processor Power ManagementProcessor Power Management
Processor Power Management
Change both the Minimum
MinimumMinimum
Minimum and Maximum
Maximum Maximum
Maximum
Processor State
Processor StateProcessor State
Processor State to 100%
Step 8
Disable fast startup:
Open Control Panel\Power Options and click
Choose what the power buttons do
Choose what the power buttons doChoose what the power buttons do
Choose what the power buttons do on the left-
hand side
If there is a checkbox labeled Turn on fast
Turn on fast Turn on fast
Turn on fast
startup,
startup,startup,
startup, uncheck this box (If this option is
gray or disabled, click the text at the top
labeled “Change settings that are currently
unavailable ”)

Ninox Camera Quick Start Guide
7
(Rev A)
Graphics Card Driver
The latest graphics card drivers need to be installed on the host computer to ensure proper function with
the 3D graphics and video in MR3
Step 1
Open the Device Manager by right clicking the
start menu and select Device Manager
Device ManagerDevice Manager
Device Manager
Step 2
In the Device Manager expand the tab labeled
Display Adapters
Display AdaptersDisplay Adapters
Display Adapters
Force each display adapter (graphics card) that
is listed the driver should be updated to the
latest version available
Right click on the display adapter and select
Update Driver Software
Update Driver Software Update Driver Software
Update Driver Software
Step 3
Select the option to Search automatically for
Search automatically for Search automatically for
Search automatically for
updated driver software
updated driver software updated driver software
updated driver software
Step 4
If the latest drive is already installed, you will
receive the message “The best driver software
for your device is already installed”

Ninox Camera Quick Start Guide
8
(Rev A)
4 Installing the ompanion Software - myoResearch™ 3
To utilize the full functionality of the Ninox camera system, and ensure the system has updated drivers,
Noraxon’s myoResearch 3 (MR3) needs to be installed on the computer
Note: The Ninox camera system requires the IDS uEYE device driver which is pre-installed by the MR3
software installation It is also available in the Downloads Section of the Noraxon website
4.1 Software Installation
Within the package the Ninox camera system was shipped in, there is a USB flash drive containing the
latest myoResearch 3 software
1 Insert the MR3 USB flash drive into the PC
2 A menu will automatically pop up
3 Click on the Noraxon installation file and follow the Wizard’s instructions
4 After installation, an icon will be created on the desktop
4.2 Companion Software Activation
The installed companion software must be activated before unrestricted use is possible
1 Open MR3
2 A dialog box will indicate how many more times MR3
can be opened
3 Click on “Activate”
4 Enter the License ID provided on your USB flash drive
and press “OK”
- Continued on next page -
5 If you have an internet connection, click Activate by
Internet for immediate activation
6 Alternatively, email the provided activation ID to
activation@Noraxon com Noraxon Support will email
or respond by phone with the Activation Code Enter
the provided Activation Code to remove any restrictions on use

Ninox Camera Quick Start Guide
9
(Rev A)
5 onfiguring the Hardware
Step 1
Open MR3, typically listed under Noraxon ->
MR3
Click on the Hardware Setup
Hardware SetupHardware Setup
Hardware Setup button in the upper
right-hand corner
Step 2
Select the Ninox icon, within the ‘New Device
‘New Device‘New Device
‘New Device’
’’
’
column, and click on the Insert
InsertInsert
Insert button
Note: Make sure the Ninox camera is attached to
the USB port of the computer
Step 3
The Ninox Settings dialog will appear as shown
A preview of the image will also be shown here
Within the “
Settings” tab, select the desired
collection frame rate (FPS)
Select a Resolution for recording The
recommended resolution will show up based on
chosen FPS
You may change the shutter time, environment,
and settings such as gain and gamma here
Refer to the Ninox User Manual to learn more
about these settings
Note: If the camera image appears blurry
(especially with a Ninox 300C), the focus on the
lens may need to be adjusted To do this, turn the
lens in the camera until the image appears clear

Ninox Camera Quick Start Guide
10
(Rev A)
Step 4
Click on OK (in the bottom of the dialog box)
when done
6 Recording a Measurement
Step 1
Within the Home screen, click on the myoVIDEO
module icon
Create a New Subject
Select New Configuration
New ConfigurationNew Configuration
New Configuration
Step 2
Insert the devices to be used for the measurement
into the configuration by dragging a device in from
the list of A
AA
Available
vailable vailable
vailable D
DD
Devices
evicesevices
evices
You may configure lens correction, image quality,
resolution, video speed, and other settings here
Refer to the Ninox User Manual for information on
these settings
Continue to the next step by selecting Measure
Measure Measure
Measure
Step 3
After checking for normal video display, you are
ready to record a measurement Select Record
RecordRecord
Record at
the top left of the screen and begin your protocol
After completing your record, select Stop
StopStop
Stop and Save
SaveSave
Save
Save the record as the name of your configuration,
or type in a new name After this, save your record
or Discard & measure again
Discard & measure againDiscard & measure again
Discard & measure again

Ninox Camera Quick Start Guide
11
(Rev A)
7 Viewing a Record
To view a previously recorded record, select the Database
DatabaseDatabase
Database tab Records are organized by Project
ProjectProject
Project and
Subject
SubjectSubject
Subject name Double click on the record of interested to open the record in the Viewer
ViewerViewer
Viewer tab
8 Further Use Features of MR3
There are many additional features built within MR3 Such as:
2D video analysis
Slow motion playback
Customized reporting
Exporting (and importing) of data
To learn more about the features available to you through the system(s) you have purchased, refer to the
MyoResearch User Manual and the corresponding Hardware User Manual for this device If for any reason
you find our support content to be insufficient for your needs, please reach out to our support team directly
by submitting a support request on our website
This manual suits for next models
1
Table of contents


