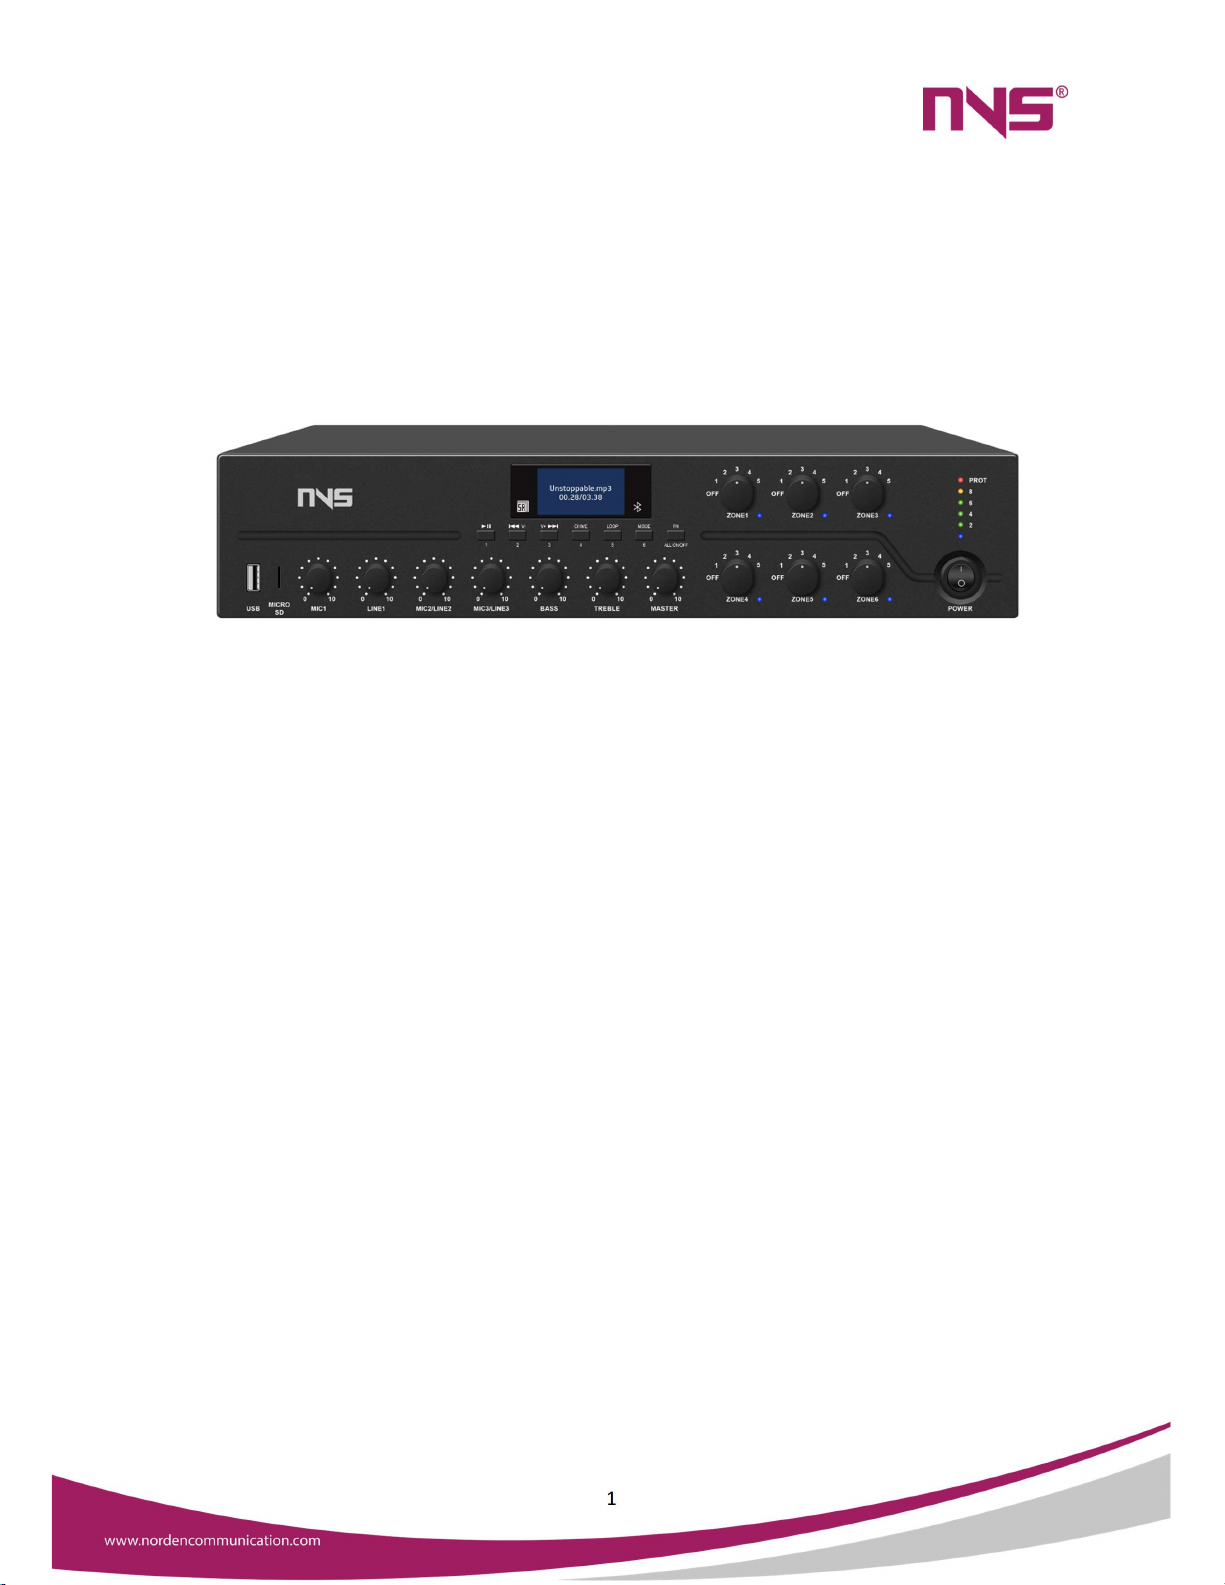
Norden NVS-PA0029006CP User manual

NVS-PA0029006CP/NVS-PA0030006CP
6 Zone Integrated PA Host with Amplifier
User Manual
1
.
Thank you for using our public address system. Please read this User Manual
carefully to make better use of this equipment

2
Contents
Profile of Product…………………………………………………..…………………………………………3
Description……………………………………………………………………………………………3
Features…..…………………………………………..………………………………………………. 3
Appearance.….…………………………………………..……………………………………………………..4
Front Panel………………………..……………………………..……………………………………4
Rear Panel……………………………………………….…………………………………………….7
Operating Instructions……………………………………………………………………………………..9
Remote Controller……………………………………………………………………………… 12
Specifications………………….……………………………………………………………………………..14

3
Profile of Product
Description
The NVS-PA0029006CP is a Digital Mixer Amplifier can be used in conjunction
with the NVS-PA0032006PM Remote Paging Station. It supports 2-channel RJ-45
remote paging microphone. The amplifier has a screen for intuitive display, with
input sources such as 4 MIC, 4 AUX, USB, FM, Bluetooth, and TF. It also provides
protection function when overload, clipping, short circuit, and abnormal working
temperature occur.
Features
LCD lattice screen with backlight to display more information, more user-
friendly
Five-segment level indicator
Built-in Bluetooth, FM, MP3 playback
Two-channel RJ-45 remote paging microphone interfaces with zone control
and strong cut function, DC+24V power supply, 6 paging stations cascaded per
channel, as far as 300m-600m transmission distance
With independent volume adjustment knob of six zones
With strong cut and one-touch to switch functions when broadcast certain
zones
AC and DC24V power supply can be turned off
4 microphone inputs, 1 emergency signal input, 4-line inputs and 1-line output.
70V/100V fixed voltage output and 4-16Ω fixed-resistance output
With priority function, the order is MUTE>EMC
IN=SIREN>MIC1>CHIME>RemotePaging>LINE1=MIC2/LINE2=MIC3/LINE3=
MIC4 /LINE4=MP3=BT=FM (no chime output when there is an alarm sound)
With total volume control; Zone, Siren, Chime, EMC IN, MIC, and AUX volume
control; treble and bass tone control.
SIRNE short-circuit trigger function, the device can be remotely controlled or
controlled by other equipment, with independent alarm sound output.
MUTE short-circuit triggered mute function, which can be controlled remotely
or by other devices.
1-channel EMC alarm signal input to input alarm signals from other devices.
Can be controlled by an infrared remote control.
With power-off memory function, it will display the last content when powers
on.
4
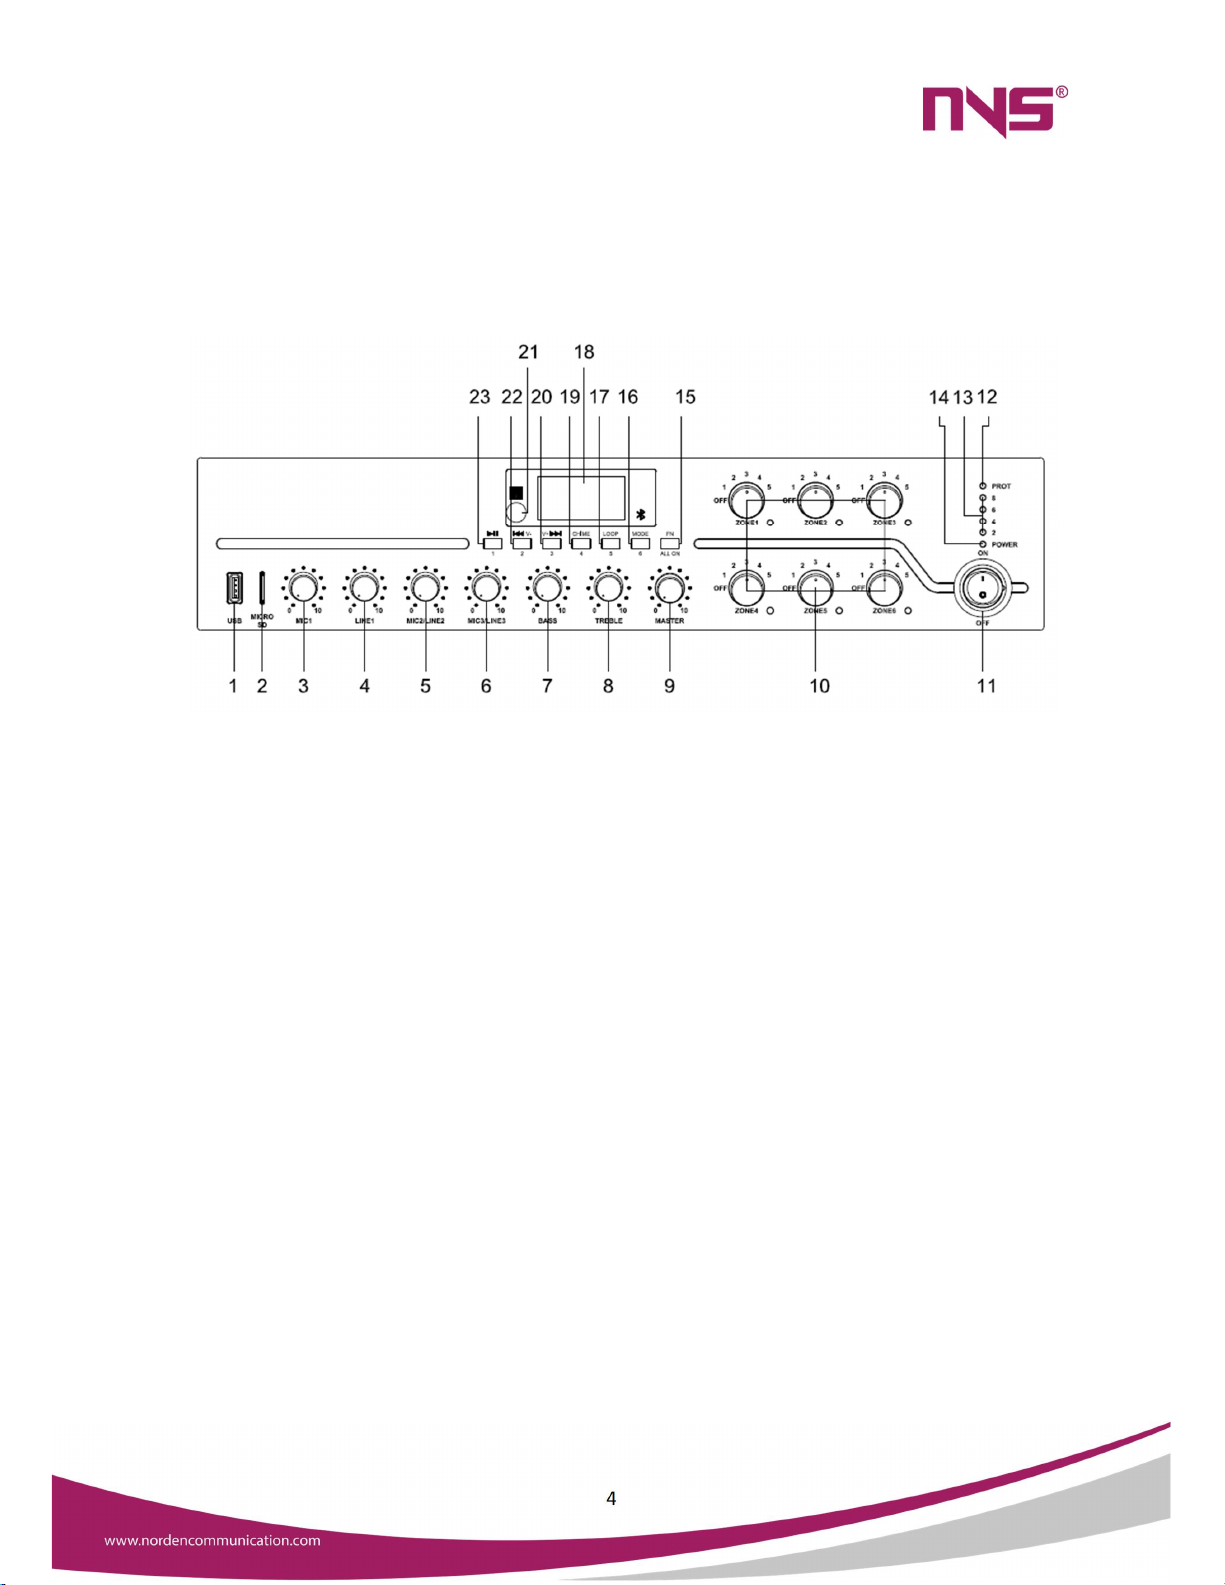
Appearance
Front Panel
1. USB
Insert a USB flash drive here to provide programs to the built-in MP3, whose
memory is 32GB
2. SD Card
3. MIC1 Volume Adjustment Knob
Adjust the volume of the MIC1, clockwise to volume up and counter clockwise
to volume down
4. LINE1 Volume Adjustment Knob
Adjust the volume of the LINE1, clockwise to volume up and counter clockwise
to volume down
5. MIC2/LINE2 Volume Adjustment Knob
Adjust the volume of the MIC2/LINE2, clockwise to volume up and counter
clockwise to volume down
6. MIC3/LINE3 Volume Adjustment Knob
Adjust the volume of the MIC3/LINE3, clockwise to volume up and counter
clockwise to volume down
7. Bass Volume Adjustment Knob
With the center position as the reference, clockwise to volume up and counter
clockwise to volume down

5
8. Treble Volume Adjustment Knob
With the center position as the reference, clockwise to volume up and counter
clockwise to volume down
9. Main Volume Adjustment Knob
Adjust the volume of all signals (except the emergency input signal on the rear
panel), clockwise to volume up and counter clockwise to volume down;
10. 6-Zone Volume Adjustment Knob & Indicator
Adjust the volume of 6 zones, clockwise to volume up and counter clockwise
to volume down
When the zone is open, the corresponding indicator is blue;
11. Power Switch
Press down button “ON” to turn on the power, and “OFF” to turn it off;
12. Protection Indicator (DC temperature, overcurrent, or short circuit
protection)
13. Level Indicator
Level display of audio output
14. Power Supply LED
15. FN Zone Switch
Short press to control zone 1-6 to be on or off, press it to turn on the zones, then
use the button “1”, “2”, “3”, “4”, “5”, “6” on the panel to turn on or off the
corresponding zone. If you press the FN button for more than 1s, all the zones
will be opened, and if you press the FN button for more than 1s again, the zones
will be restored to the state before they were all opened.
16. Mode
The modes that can be switched are USB mode, AUX line mode, Bluetooth play
mode and FM radio mode
17. LOOP Volume Adjustment Button
Adjustable volume of MIC4/LINE4, EMC, Chime, and SIREN, volume 0-32 (for
detailed operation, please refer to No.8 of the "Operating Instructions" item
below)
18. Display screen
19. Chime button
20. Next song / (FM mode for next program)
In USB and Bluetooth modes, press this button to the "next song"
In FM mode, press this button to the "next program"

6
In FM, AUX, USB, SD, and Bluetooth modes, long press this button to turn
down the volume of MP3 sources (including FM, SD, USB, and Bluetooth)
21. Infrared Remote Control Receiving
22. Previous Song / (FM mode for previous program)
In USB and Bluetooth modes, press this button to the "Previous song"
In FM mode, press this button to the "Previous program"
In FM, AUX, USB, SD, and Bluetooth modes, long press this button to turn up
the volume of MP3 sources (including FM, SD, USB, and Bluetooth)
23. Play/Pause
In USB and Bluetooth modes, press this button to Pause
In FM mode, press this button to the search
7
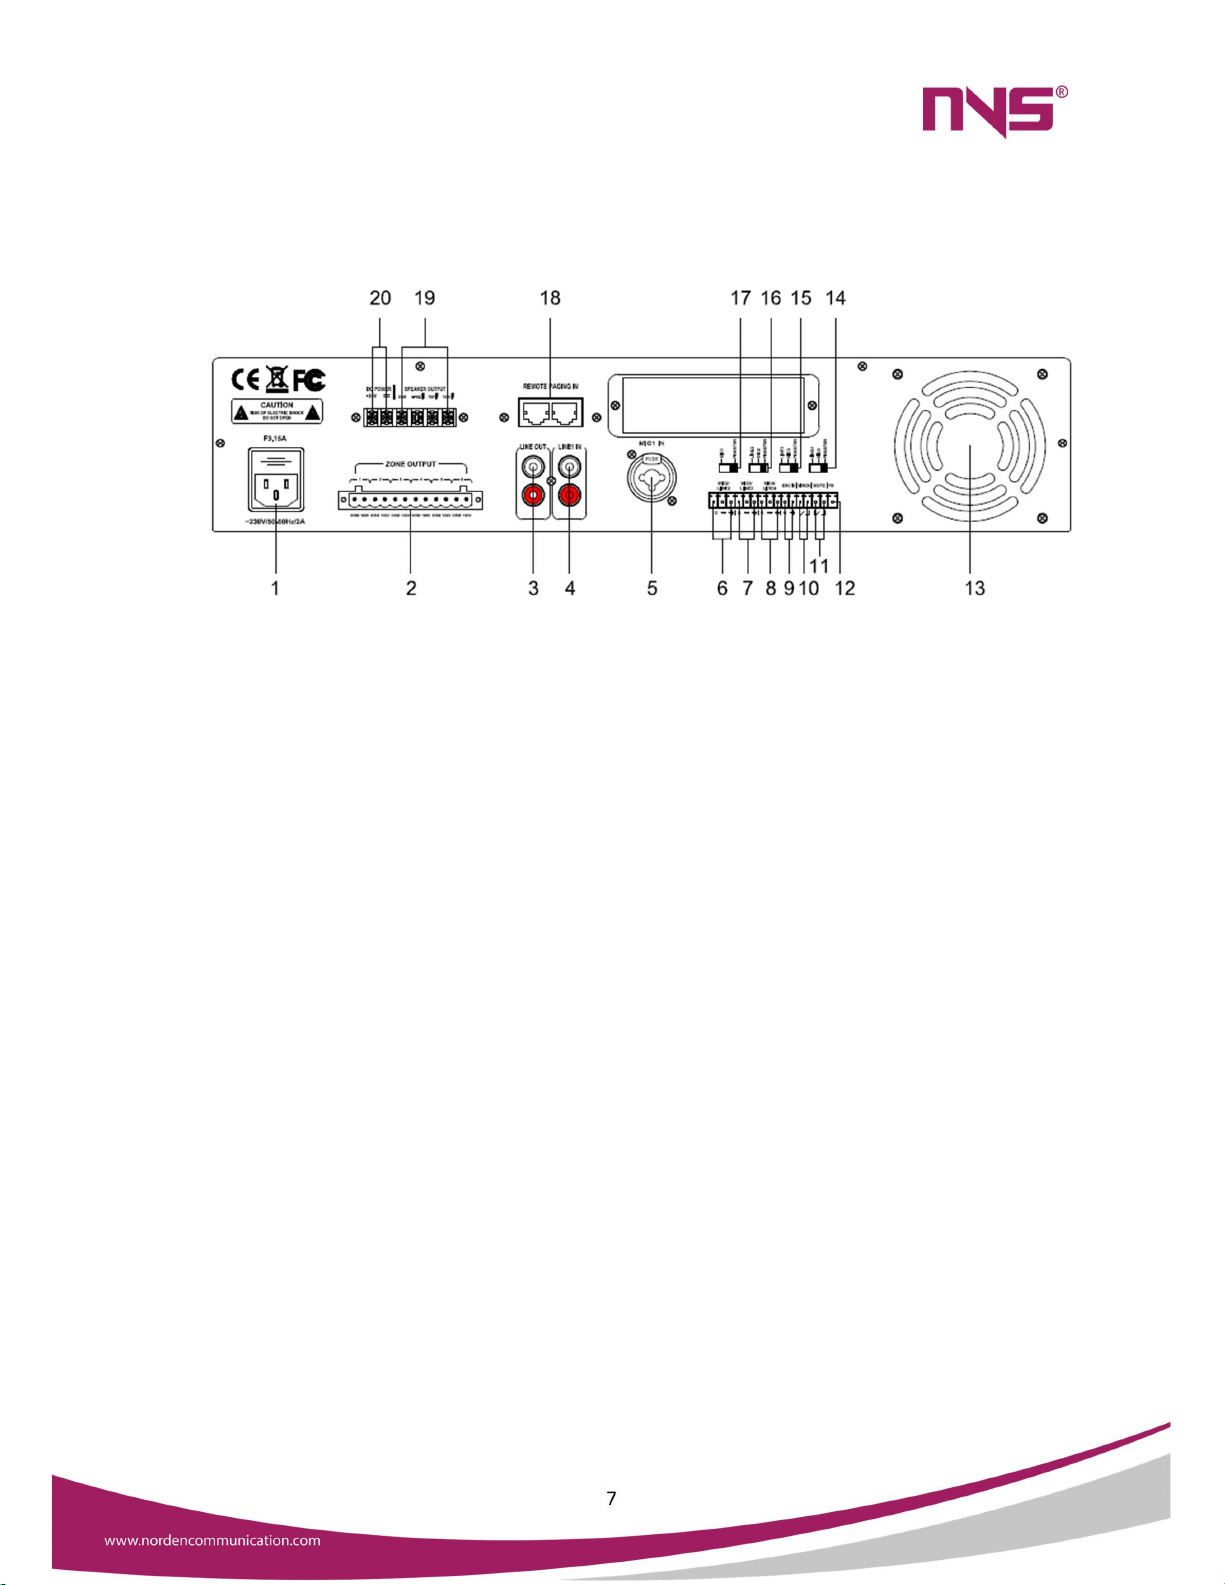
Rear Panel
1. Power Input Connector AC230V
Access the power plug to this connector. When connecting, please insert the
plug of this device first, and then connect to the grid.
2. 6-zone Output
3. LINE Output
4. LINE1 Input
5. MIC1 Balanced Input
6. MIC2, LINE2 Input
7. MIC3, LINE3 Input
8. MIC4, LINE4 Input
9. EMC Trigger Input
10. SIREN Short-circuit Trigger
11. Silent Short-circuit Trigger
12. FM Antenna
13. Fan Port
14. LINE4, MIC4 Phantom Voltage Switch
Toggling the switch to left and right (Note: When toggle this switch, you need
to turn down the volume of the device or turn off the power of the device
first)
15. LINE3/ MIC3 Phantom Voltage Switch
Toggling the switch to left and right (Note: When toggle this switch, you need
to turn down the volume of the device or turn off the power of the device
first)

8
16. LINE2/ MIC2 Phantom Voltage Switch
Toggling the switch to left and right (Note: When toggle this switch, you need
to turn down the volume of the device or turn off the power of the device
first)
17. MIC1 Phantom Voltage Switch
Toggling the switch to left and right (Note: When toggle this switch, you need
to turn down the volume of the device or turn off the power of the device
first)
18. NVS-PA0032006PM Remote Paging MIC Input
19. Fixed resistance and voltage output
Fixed resistance/voltage Speakers
20. DC+24V Power Input (emergency power input)

9
Operating Instructions
1. Initial Start-up
When starting up the stereo amplifier for the first time, do as follows:
Turn down the total volume.
Turn down the zone volume.
Connect the stereo amplifier to the power supply; Turn on the amplifier till
the power indicator is on.
Turn the total volume to the optimal level.
Adjust the zone volume until it reaches the desired volume output. If you
need to change the wiring or installation, make sure to disconnect the
power cord from the device first.
2. Mic Broadcast
Conduct MIC broadcast in any mode, the system detects the microphone's voice
and mute other audio sources; When the microphone has no signal, it
automatically backs to the original playback state.
3. Bluetooth Mode
Press the MODE button until the digital screen displays Bluetooth and
Bluetooth name, as shown below, then please open the cell phone or other
Bluetooth devices, find the device with Bluetooth name of "6 ZONES AMP BT”
for pairing. After that, music can be streamed from phone (when the device and
cell phone Bluetooth pairing successful, the digital display will stop flashing),
wireless transmission distance is about 10m.
4. USB Mode
When insert a USB, it will automatically come to USB mode (plug and play). As
shown below, the interface displays the current playing song name, playing
duration, playing mode, playing status and volume level. In USB mode, short
press LOOP button to switch the playback mode to random play, single loop,
directory loop.

10
Random Play Directory Loop Single Loop
5. Line Mode
Press the MODE button until the digital screen displays AUX to enter Line
Mode, as shown below.
6. FM Mode
For button description, please refer to the instructions in "Front Panel" above,
sections 20, 22 and 23. Press MODE button until the digital screen displays
FM to enter FM mode, as shown below; Then it will start to play radio
programs.
Searching radio stations: Before playing, search radio stations first, the FM
band radio frequency range is 87.00MHz - 108.00MHz.
Methods of searching for Radio Stations: Short press button on the panel
or remote control to search automatically from low to high frequency bands.
The searched stations will be stored in number starting with 1, so that the
stations can be recalled directly later.
Calling radio stations: search and store good radio channels with automatic
search method, and you can call and play them directly. Press button
“ ” on the panel to choose radio stations you want to play or press
number “0-9” to play.
11
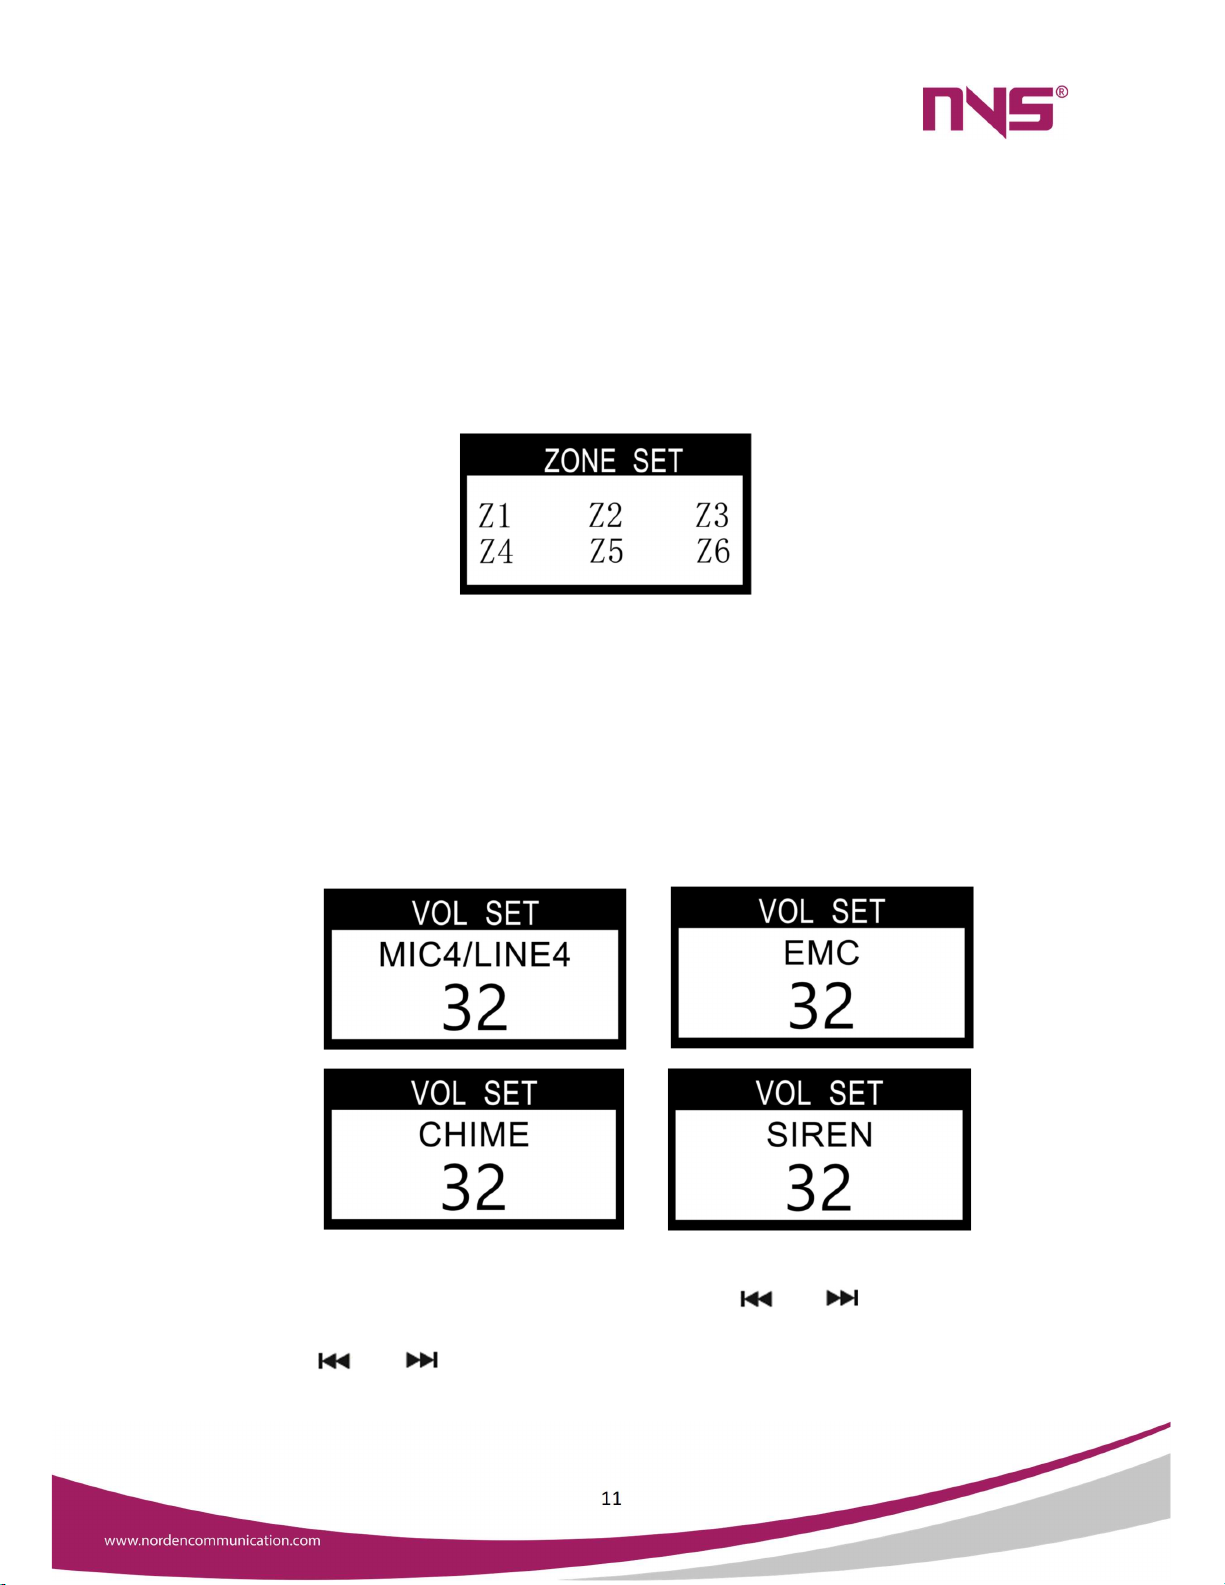
7. 6-zone Control Switch
Short Press the button FN to enter the zone setting interface, and the "1", "2",
"3", "4", "5" and "6" buttons on the panel can be used to turn on or off the
corresponding zones as shown in the figure below. Press and hold the FN
button for more than 1s to open all zones. At the same time, the indicator lights
at the 6-zone volume adjustment knobs on the device panel display bright blue,
and then press again to back to the state it was in before.
8. Adjust Volume of Audio Source
Volume of 6 zones/MIC1/MIC2/MIC3/LINE1/LINE2/LINE3 can be adjusted
directly through the corresponding volume knob on the panel.
Volume of MIC4/LINE4, EMC, Chime, SIREN: long press the LOOP volume
adjustment button to enter the volume setting interface, then short press the
LOOP button again and select MIC4/LINE4, EMC, Chime, SIREN alarm setting
interfaces, press button "V+/ V-" to adjust the volume of the corresponding
audio source through the panel (0-32).
MP3 audio source (FM/AUX/USB/SD/Bluetooth) volume: in the
FM/AUX/USB/SD/Bluetooth mode, long press “ ” or “ ”previous or next
song button to enter the MP3 volume settings interface, continue to long
press “ ” or “ ” the previous or next song button to adjust the MP3 audio
source volume level (0-32).
12
9. Phantom Power
Switch on the phantom power switch to provide phantom power (+ 48V) to all
green terminal microphone inputs. It is not recommended to switch on for
normal use but only used for MIC1, MIC2/LINE2, MIC3/LINE2, MIC4/LINE2.
Remote Controller
As shown in the following figure, remote controller keys are introduced in detail.
1. Standby Switch
2. Mode Selection: Click it to display modes in turn: FM, USB, AUX and BT.
3. MUTE button.
4. EQ Mode, with 4 optional sound effects.
5. Play Control Area. Play/Pause, Previous/Next, and Volume Control.
6. Loop Mode. Click it to display modes in turn: Single Loop, Random Play, and
Directory Loop.
7. Number Area. In FM mode, press the number directly to enter the FM frequency
that has been stored.
8. Alternative Button
13
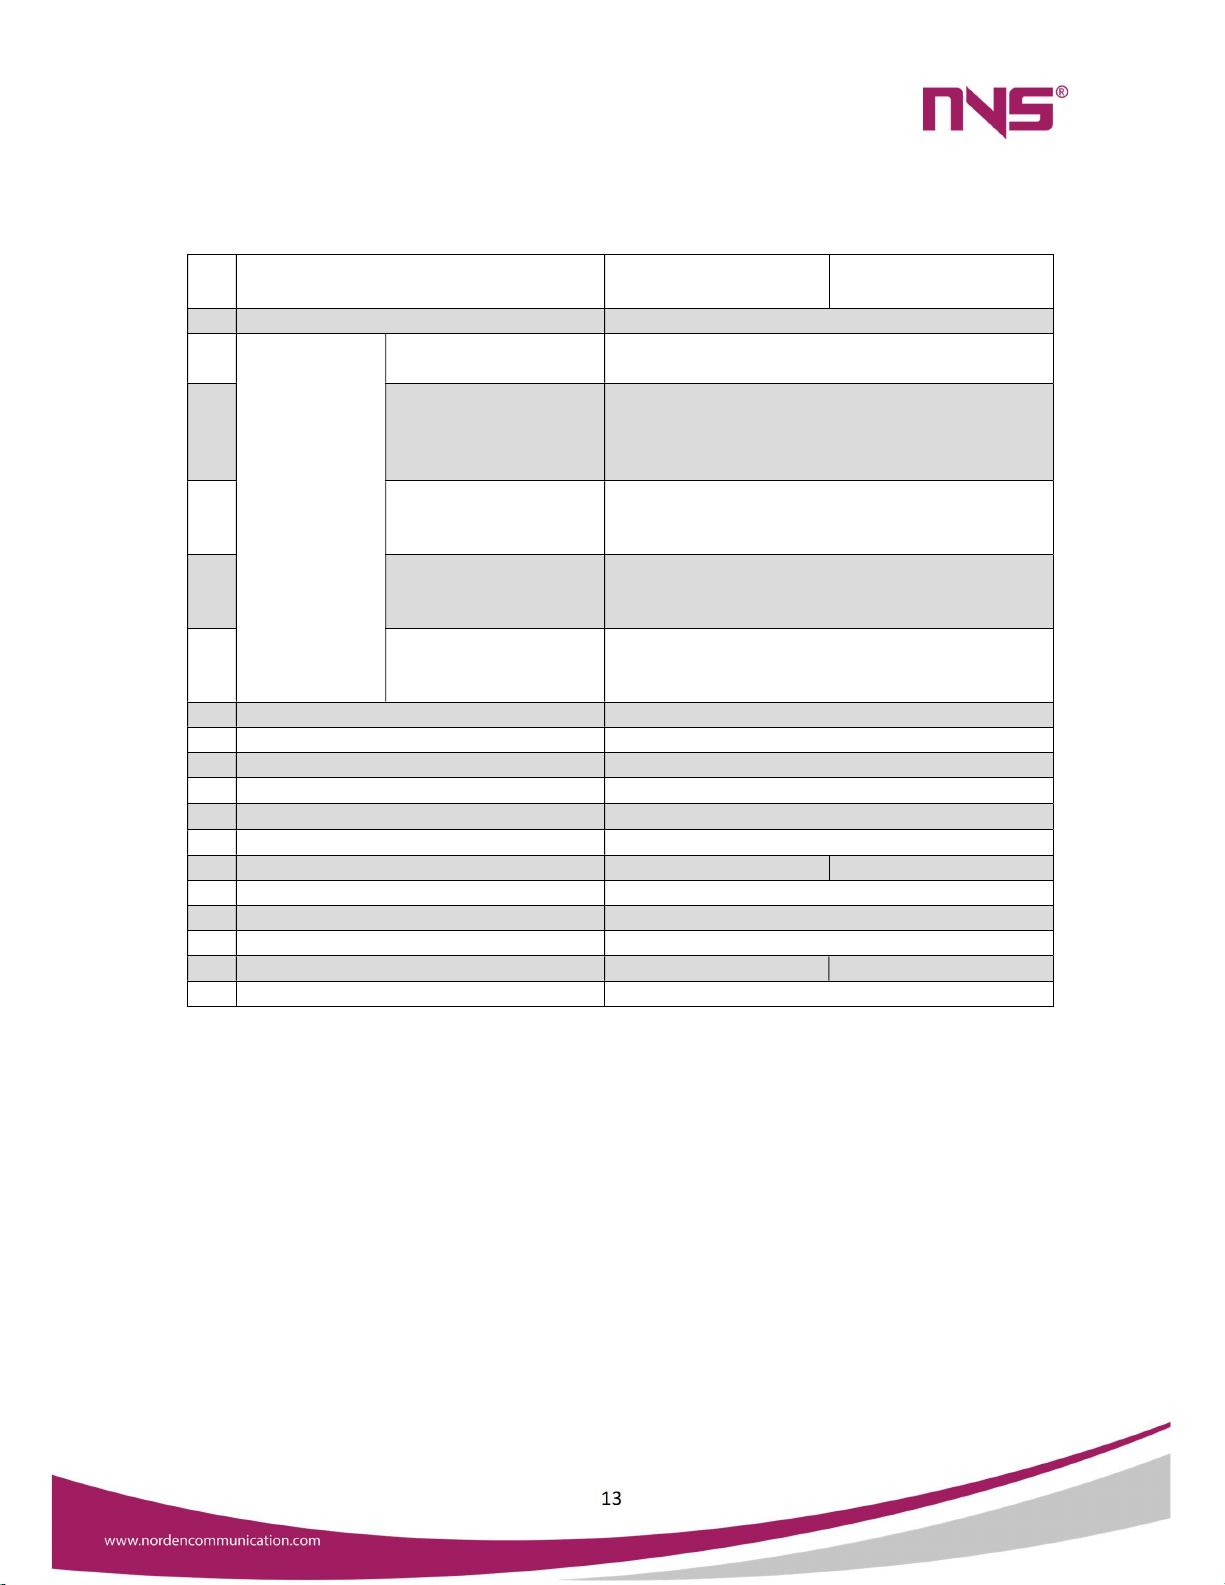
Specifications
Sl
No
Characteristics NVS-PA0029006CP NVS-PA0030006CP
1
Power Supply
AC230V 50/ 60Hz
2
Input
Sensitivity
MIC1 10mV ±1mv
(Balanced XLR Input)
MIC1 10mV ±1mv (Balanced XLR Input)
3 MIC2/MIC3/MIC4
10mV ±1mv
(Unbalanced Phoenix
Jacks)
MIC2/MIC3/MIC4 10mV ±1mv (Unbalanced
Phoenix Jacks)
4 AUX1 350mV±50mv
(Unbalanced RCA
Input)
AUX1 350mV±50mv (Unbalanced RCA Input)
5 AUX2 350mV ±50mv
(Unbalanced Phoenix
Jacks)
AUX2 350mV ±50mv (Unbalanced Phoenix
Jacks)
6 EMC 350mV ±50mv
(Unbalanced Phoenix
Jacks)
EMC 350mV ±50mv (Unbalanced Phoenix Jacks)
7 MIC Frequency Response 120Hz~12kHz (±3dB)
8 AUX Frequency Response 80Hz~15kHz (±3dB)
9 Total Harmonic Distortion <1%
10 Treble Adjustment Range 10dB (±2)
11 BASS Adjustment Range 10dB (±2)
12 Phantom Power +48V
13 Rated Output Power 350W 500W
14 Output Voltage of Port 4-16Ω,70V,100V (fixed voltage output)
15 Current 3A
16 Protection F6.3AL
1
7
Weight
9K
g
10.1Kg
18 Dimension(D×W×H) 430×390×88mm

This manual suits for next models
1
Table of contents
Other Norden Amplifier manuals


