Nordic Lab ULT U100 User manual
GB Instructions for use
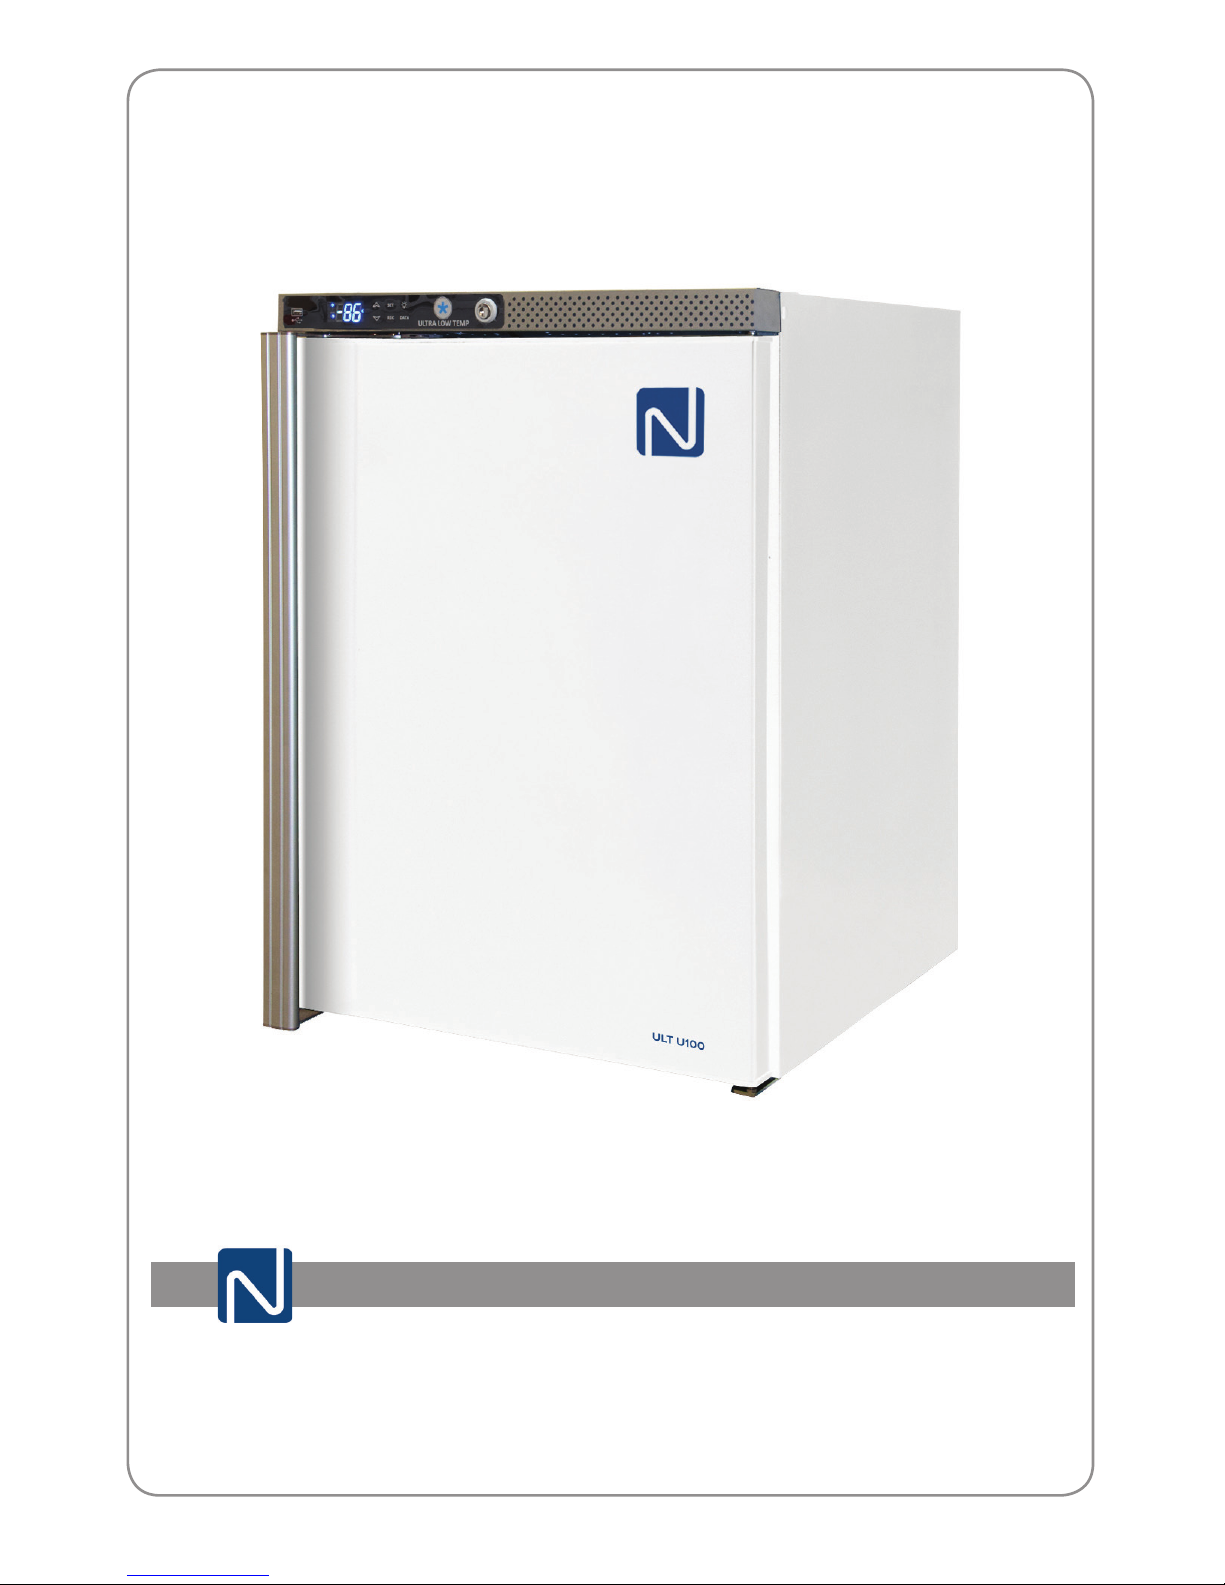
ULT U100

2
GB
As the appliance contains a
ammable refrigerant, it is es-
sential to ensure that the refrig-
erant pipes are not damaged.
The quantity and type of the
refrigerant used in your appli-
ance is indicated on the rating
plate.
Standard EN378 species that
the room in which you install
your appliance must have a
volume of 1m³ per 8 g of hydro-
carbon refrigerant used in the
appliances. This is to avoid the
formation of ammable gas/air
mixtures in the room where the
appliance is located in the event
of a leak in the refrigerant circuit.
WARNING:
Keep ventilation openings in
the appliance’s cabinet or in the
built-in structure clear of obstruc-
tion
WARNING:
Do not use other mechanical
devices or other means to ac-
celerate the defrosting process
than those recommended by the
manufacturer
WARNING:
Do not damage the refrigerant
system
WARNING:
Do not use electrical appli-
ances inside the refrigerated
storage compartment, unless
they are of a type recommended
by the manufacturer
WARNING:
Do not expose the appliance to
rain, and secure not splashing
water when cleaning the oor
WARNING:
This appliance is not intended
for use by persons (including
children) with reduced physical,
sensory or mental capabilities,
or lack experience and know-
ledge, unless they have been
given supervision or instructions
concerning use of the appliance
by a person responsible for their
safety. Children should be super-
vised to ensure that they do not
play with the appliance
Warning

3
GB
WARNING:
If a not compatible USB pen
drive is used it can cause a
reset of the controller
WARNING:
Do not store explosives, such
as aerosol cans with ammable
propellants in the unit.
WARNING:
Danger risk of re or explosion if
ammable refrigerant are used.
To be repaired only by trained
personnel.
WARNING:
Sharp edges on cabinet, com-
pressor compartment, evapo-
rator, ventilation cover and on
internal equipment can occur.
Please be aware to avoid injury.
WARNING:
The condenser on the back of
the appliance will in some cases
have a hot surface. Please be
aware to avoid injury.
●Always keep the keys in a sepa-
rate place and out of reach of
children
●Before servicing or cleaning the
appliance, unplug the appliance
from the mains or disconnect the
electrical power supply
●If the supply cord is damaged, it
must be replaced by the manu-
facturer, its service agent, or
similarly qualied persons in
order to avoid a hazard
●Relevant for Australia: Supply
cord tted with a plug complies
with AS/NZS 3112.
●Please note that changes to
the appliance construction will
cancel all warranty and product
liability
●This device is intended to be
used exclusively for medical
products.
●If the instructions is lost please
contact your supplier of the ap-
pliance to have a new instruction
for use.
●If service needed to this device,
please be aware of only using
service personnel with education
in handling medical devices.

4
GB
Contents
Warning ..................................................2
Get to know your freezer ........................4
Unpacking the appliance. .......................5
Before starting the appliance ..................6
Electrial connection. ...............................7
Battery backup system at start-up ..........8
Installation and start-up ..........................9
Maximum shelf load.............................10
Ventilation guards. ................................10
Interior tting. ........................................ 11
Port hole ...............................................14
Reversible door ....................................16
Controller. Operation and function ........ 24
Defrosting, cleaning and maintenance . 27
Fault nding ..........................................29
Warranty, sparepart and service.. .........30
Disposal. ...............................................31
5
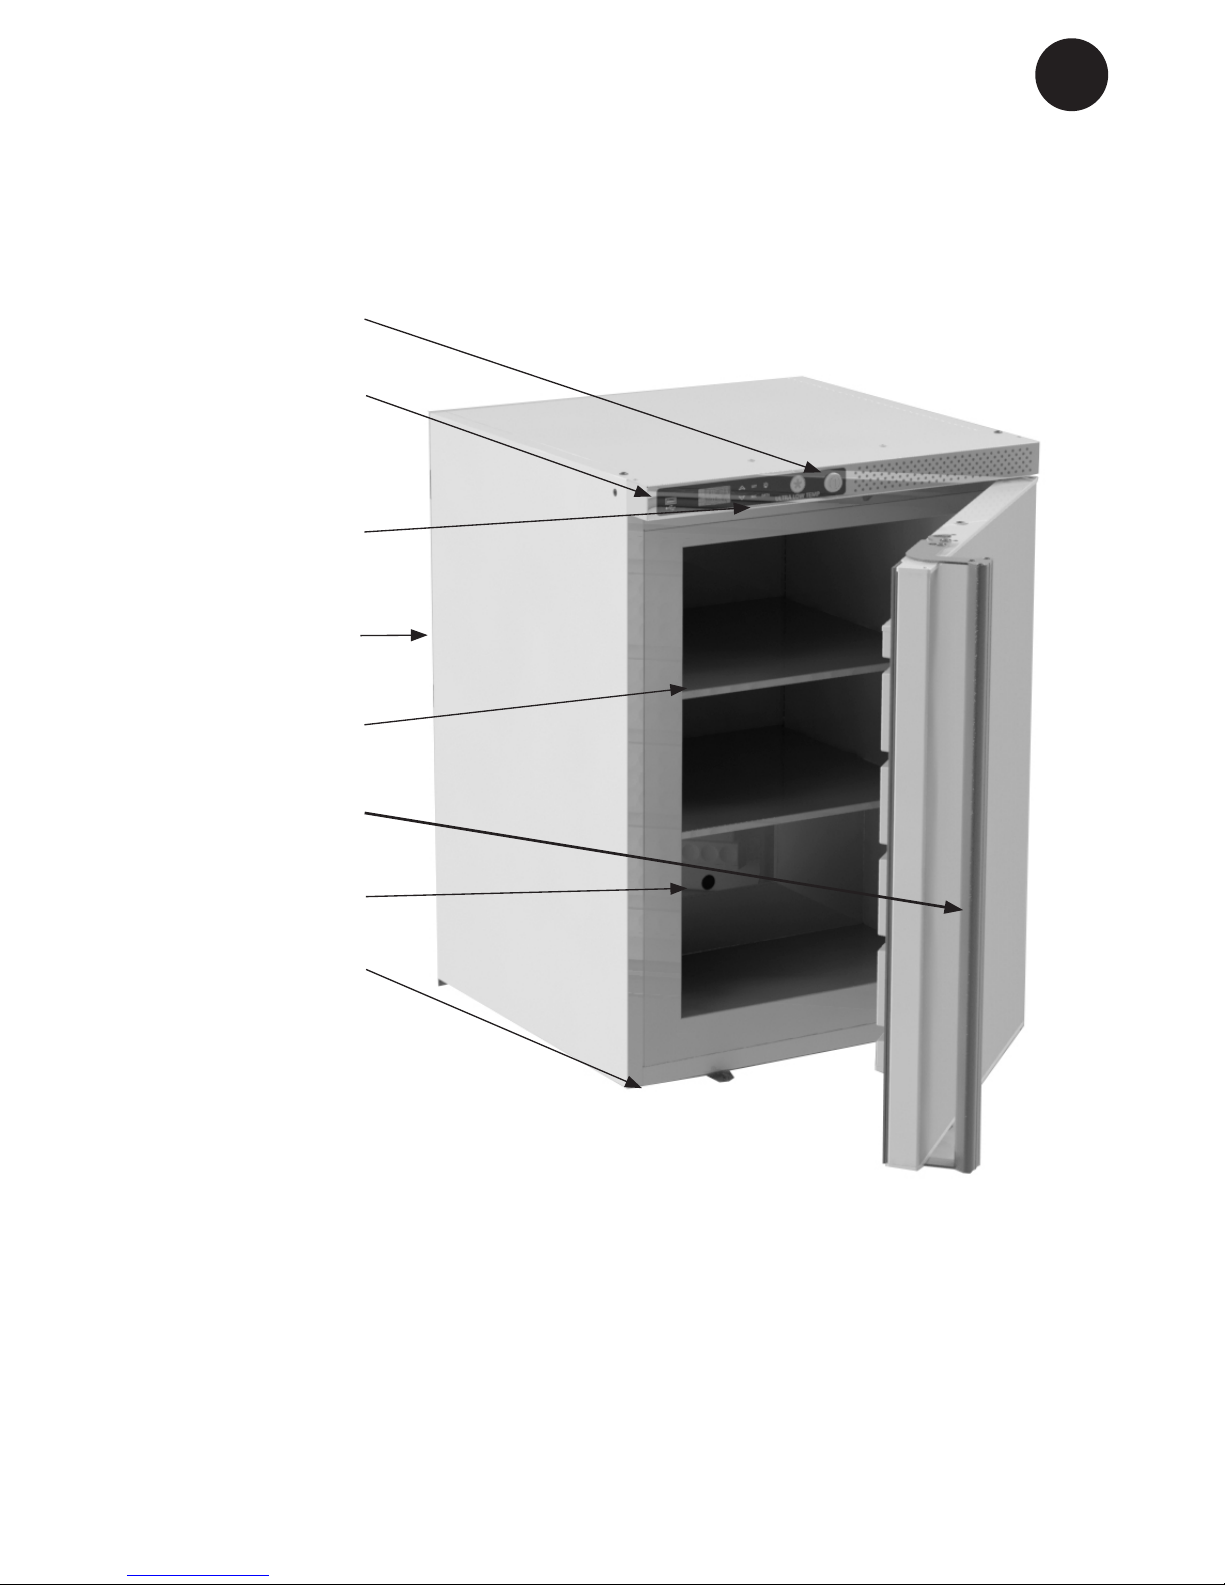
GB
Lock
Display/Keyboard
LED light
Rating plate
(on the back side)
Adjustable shelf
Door handle
Vacuum release
Adjustable feet
Get to know your freezer:
g. 1
6
GB
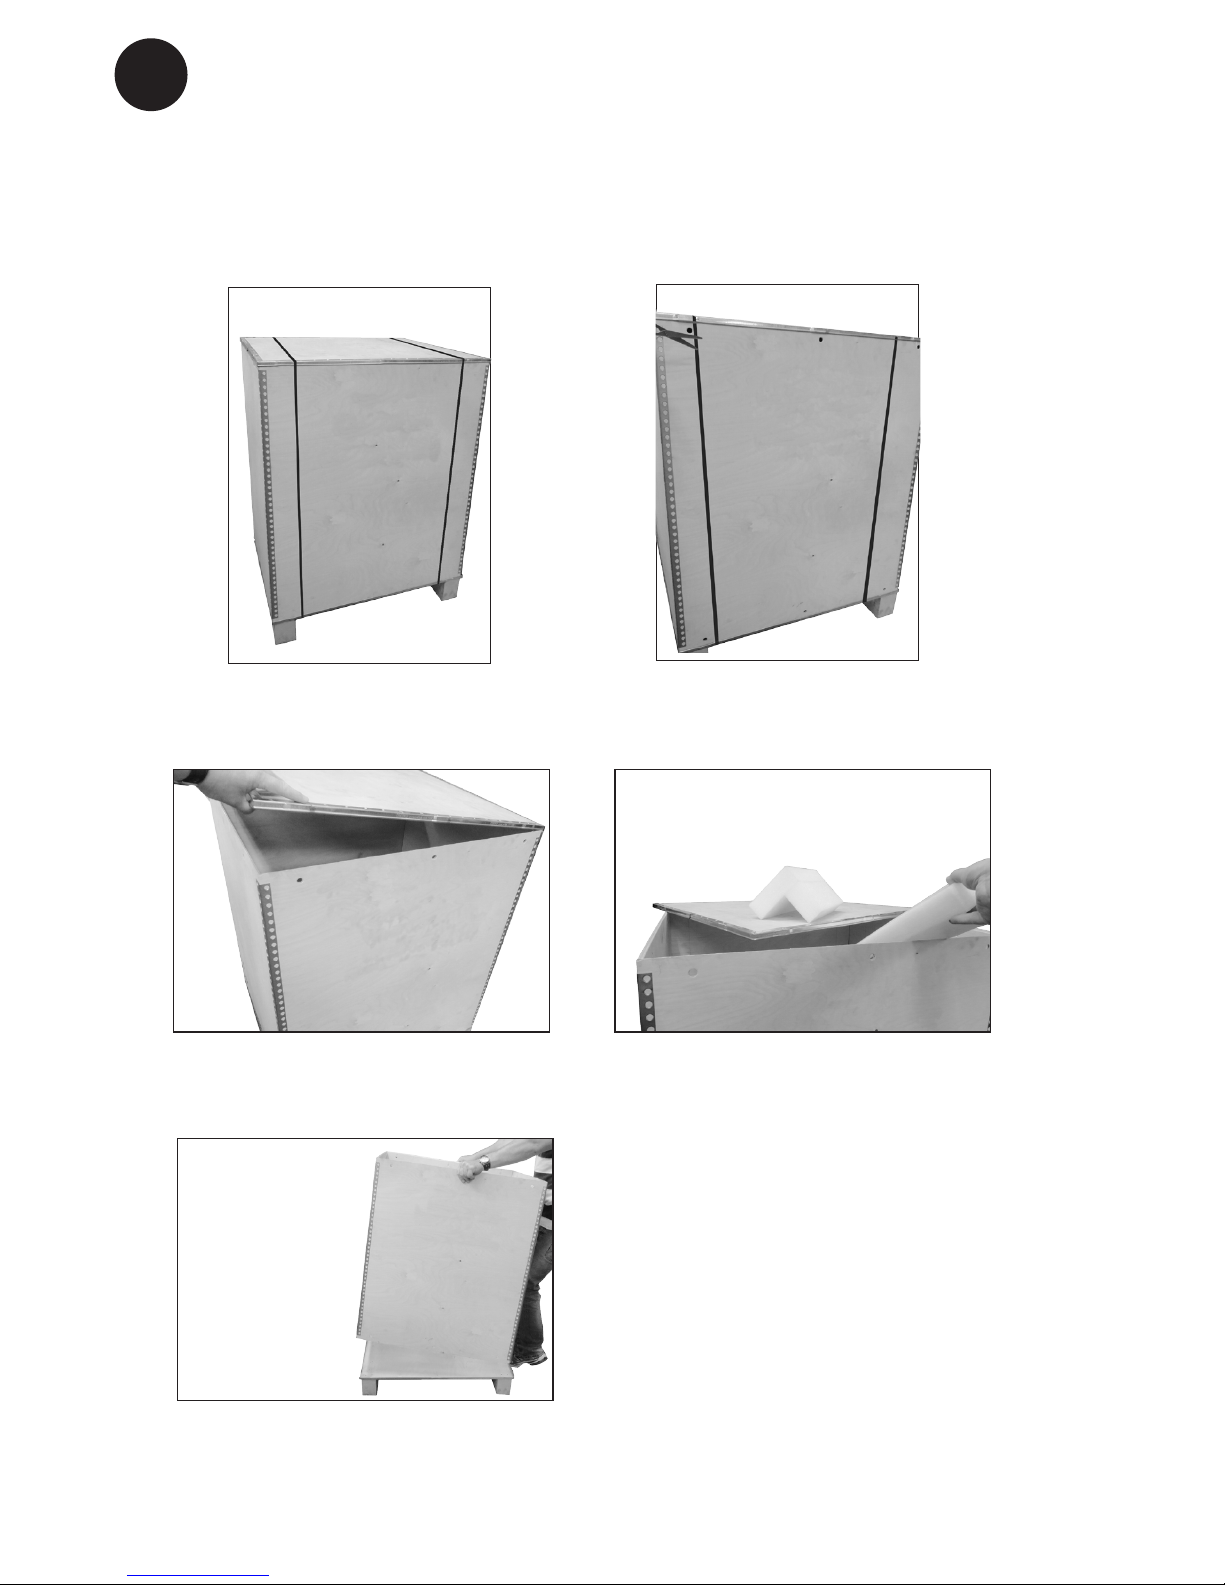
Unpacking the appliance
The appliance is delivered in a re-usable wooden box.
1. Reusable wooden package 2. Cut the strapex bands or see next
page if sealed with plast clips
3. Remove top 4. Remove top foam inlays
5. Remove box and lift down the
appliance

7
GB
Before operating your new appliance,
please read the following instructions care-
fully as they contain important information
on safety, installation, operation and main-
tenance. Keep the instructions for future
reference.
On receipt, check to ensure that the appli-
ance has not been damaged during trans-
port. Transport damage should be reported
to the local distributor before the appliance
is taken into use.
Clean the inside of the cabinet according to
the cleaning instructions.
If during transport the appliance has been
laid down, or if it has been stored in cold
surroundings (colder than +5°C), it must be
allowed to stabilise in an upright position for
at least an hour before being switched on.
Note: If the appliance is to be laid down,
the door must face upwards and the ap-
pliance must be enclosed in the original
packaging.
Before starting the appliance

8
GB
g. 3
Wiring and connections in power supply
systems must been all applicable (local and
national) electrical codes. Consult these
codes lengths and sizes prior to cabinet
installation.
This device complies with relevant EU
directives including Low Voltage Directive
2014/35/EU and Electromagnetic Compat-
ibility Directive 2014/30/EU
The socket should be freely accessible.
Connect the appliance only to 220/240 V
/ 50Hz alternating current via a correctly
installed earthed socket.
The socket must be fused with a 10A or 13A
fuse
If the appliance is to be operated in a non-
European country, check on the rating plate
whether the indicated voltage and current
type correspond to the values of your mains
supply.
Data regarding voltage and obsorbed
power / current are given on the rating
plate.
The power cord may be replaced by a
technician only.
The rating plate provides various techni-
cal information as well as type and serial
number.
Electrical connection
Room temperature
The climate class is stated on the name
plate. This species the optimum room
temperature.
The appliance operates best at room tem-
peratures: +16°C to +25°C

9
GB
Use a pen or screwdriver to push the button
through the above hole on the appliance
backside. This will switch on the battery
backup system.
Then please check the battery backup image
appears in the front display lower left corner.
This shows the battery backup is activated.
Battery backup system at start-up
This appliance is equipped with a battery back up system.
Please activate the battery backup before nal placement (see g. 2)
Battery backup function
The battery backup system supplies the controller and keyboard with power at power failure.
This makes it possible to supervise the temperatures in the unit during the power failure.
The battery backup system makes it possible to supervise the temperatures for 48 hours.
After a power failure and at the rst start up the battery needs to be recharged. To regain the
full capacity the battery will be reloading for 10 days
NOTE!
The battery backup system does not supply
the cooling system with power.
When starting up the appliance for the rst
time it is necessary to switch on the battery
backup system.
NOTE!
The battery for back up should be changed
every third year to secure 48 hours of back
up. Please put this change in the mainte-
nance schedule for every third year.
g. 2
10
GB
It is important that the appliance is abso-
lutely level. It can be levelled by screwing
the adjustable feet of the appliance up or
down.
Use a spirit level to check that the appliance
is absolutely level sideways.
If the appliance is placed on a soft sur-
face, e.g. oorboards or a carpet you must
recheck whether the appliance is still level
after a period of time as the underlying
surface may yield under the weight of the
appliance.
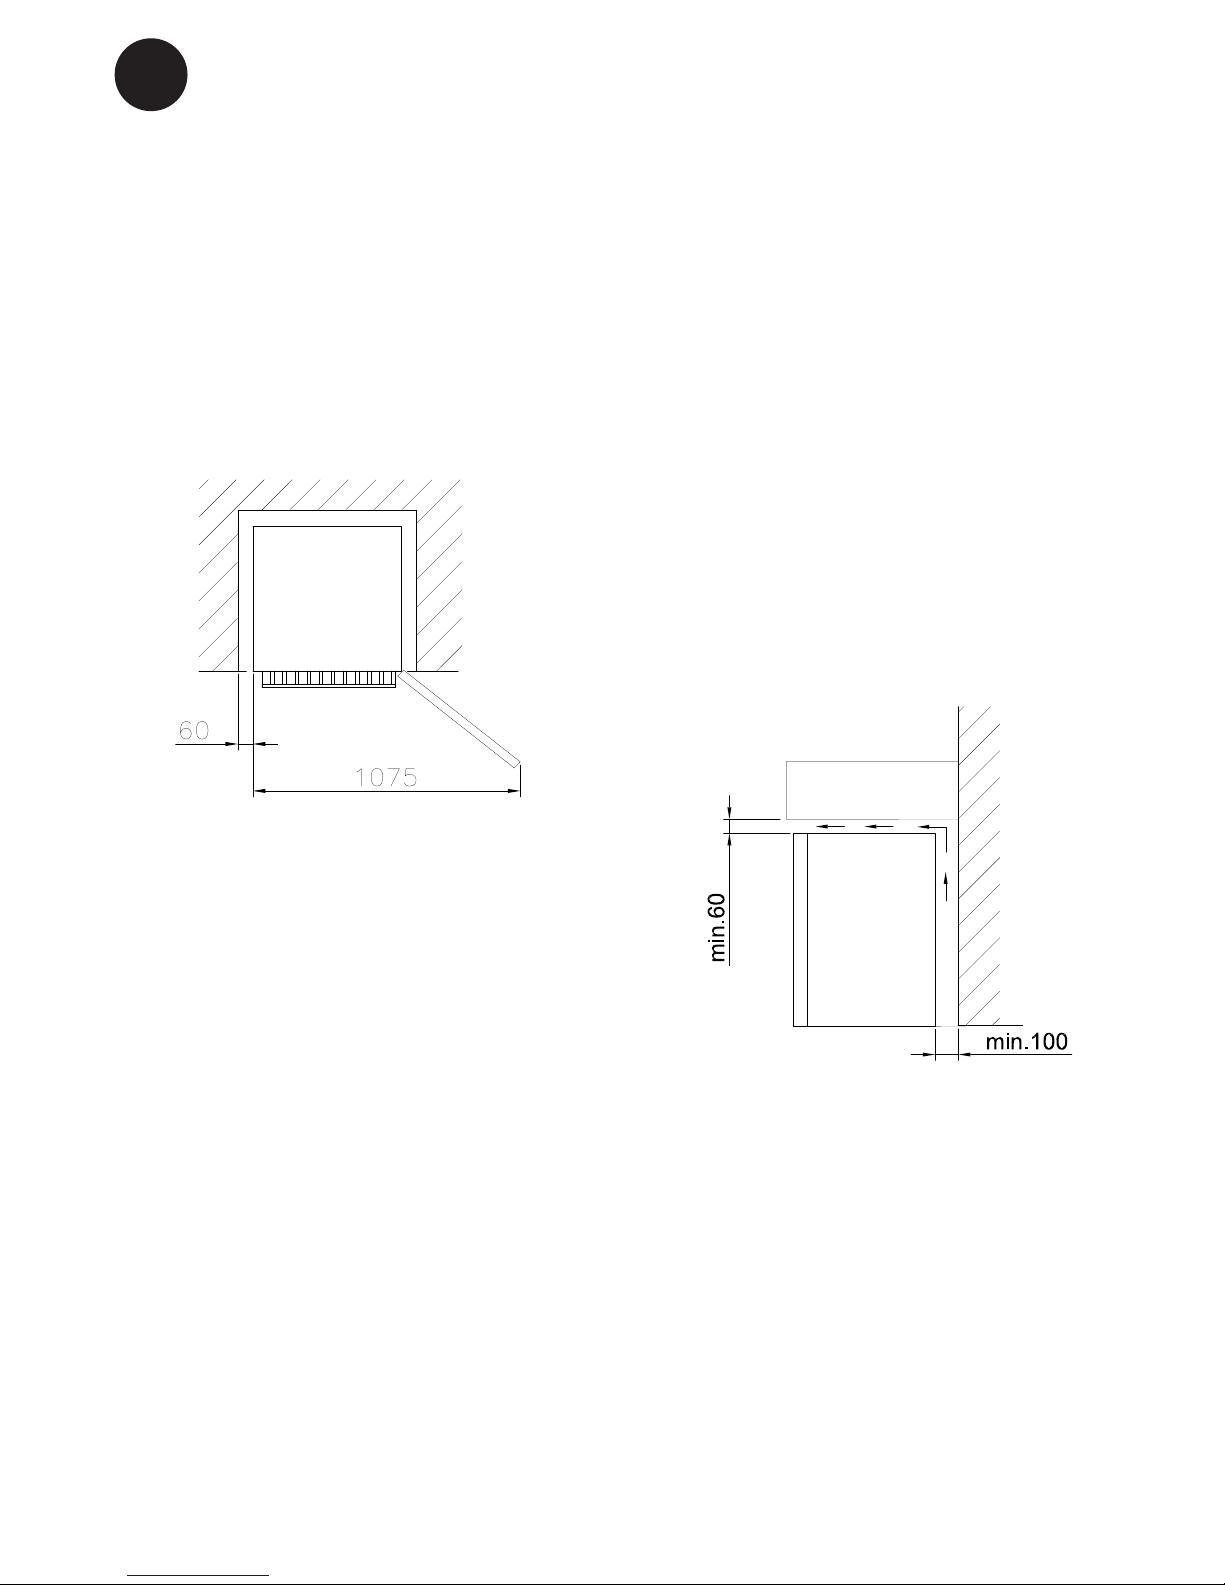
Setting up
g. 4
Ventilation
It is important that the appliance is well
ventilated and that air can circulate freely
above, below and around it.
The gurs (g. 4-6) illustrate how the neces-
sary air circulation around the appliance is
ensured.
The appliance viewed from
above
If the appliance is placed beside a wall,
there must be sucient room for its door to
be opened wide enough to allow the shelf to
be pulled out (g. 4)
Installation and start-up
g. 5

11
GB
Side by side
In side-by-side arrangements there must be
at least 60 mm between each unit on each
side of the cabinets, to ensure the doors
can be opened freely (See g. 6)
g. 6
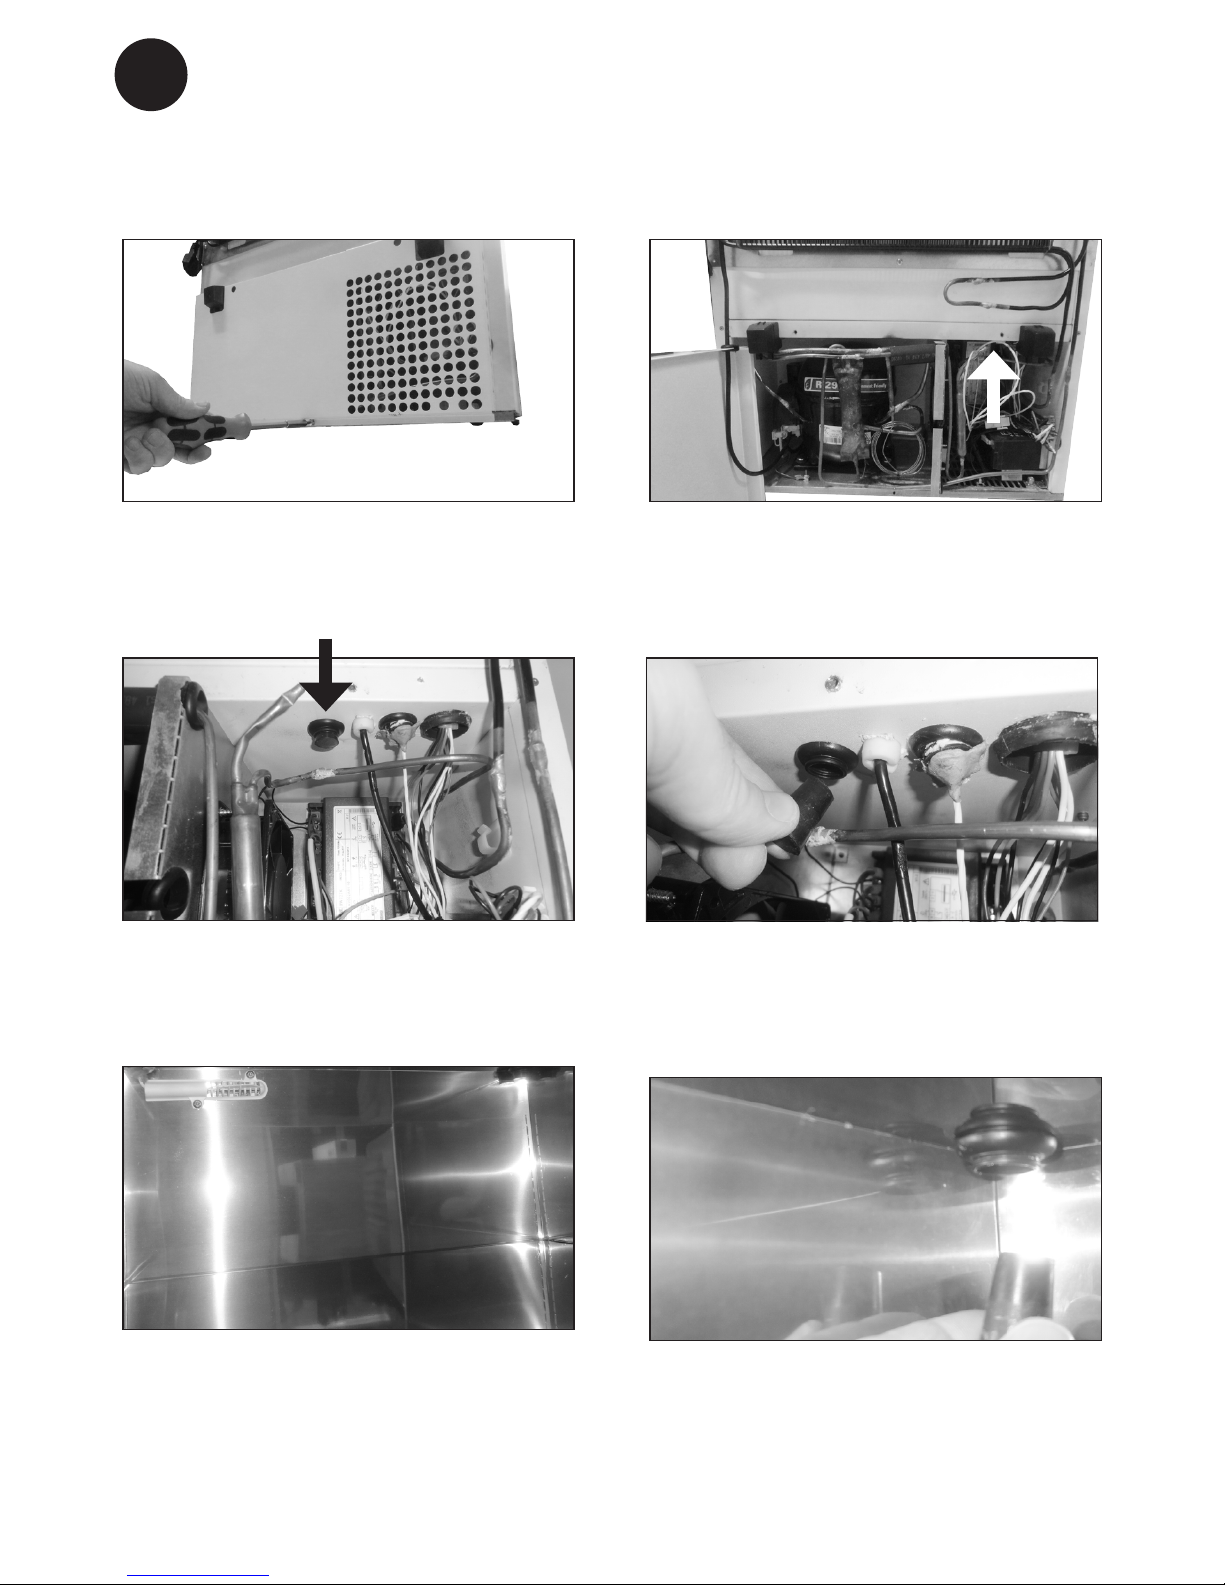
Ventilation guards
The two ventilation guards are mounted before moving the appliance to it’s nal placement.
The guards function is to secure an absolute minimum of ventilation, if the appliance is pus-
hed too close up against a wall.
Remember our guideline is minimum 100 mm free space behind the appliance to ensure suf-
cient airow.
1. Locate the left Ø15 mm hole in the engi-
ne cover on the appliance back. Push a
guard in the hole
2. Then locate the identical hole in the right
side of the engine cover and push the
last guard into this hole
12
GB
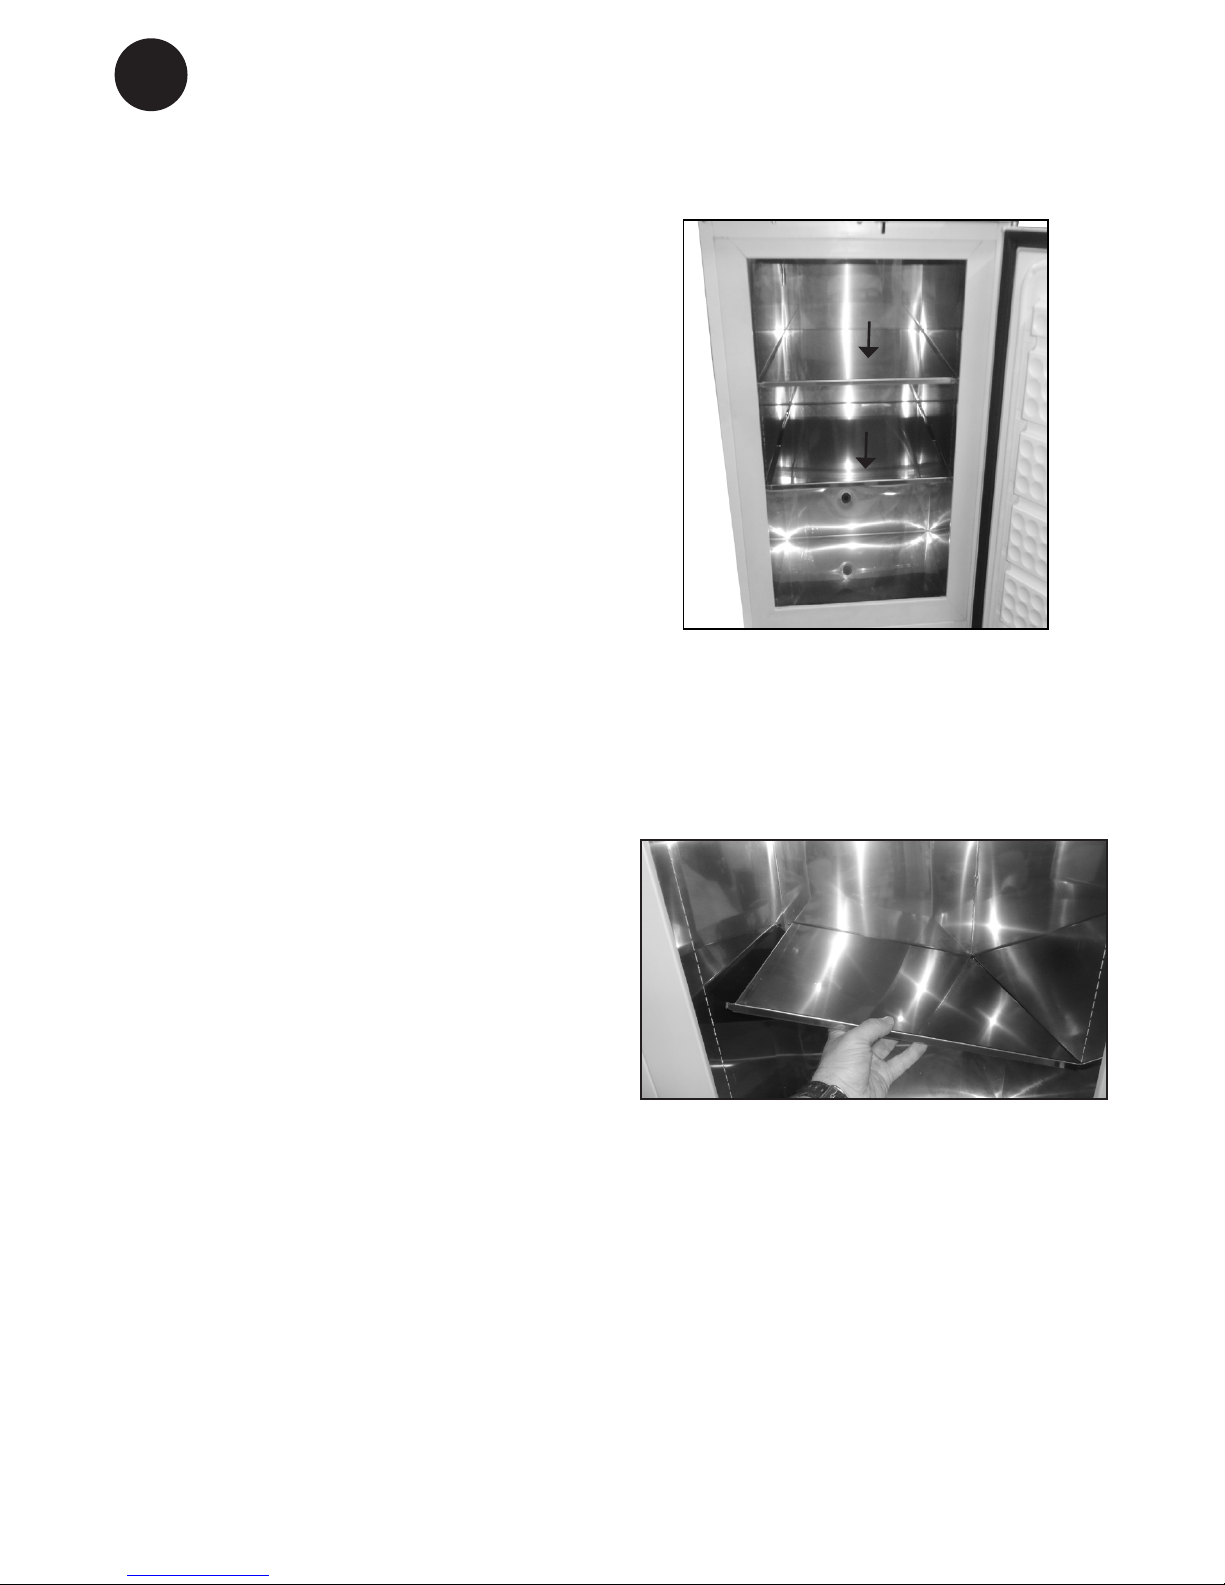
Interior tting
Stainless steel shelf
The shelfs are demountable and the
height position is adjustable.
Demounting
The shelf is demountable without use of tools:
Lift up to release all hooks and pull the shelf
to one side. Then tilt the shelf upwards in
the free side and lift it out
Maximum shelf load
The stainless steel shelfs are designed
to carry the weight of max. 15 kg each. 15 kg
15 kg
13
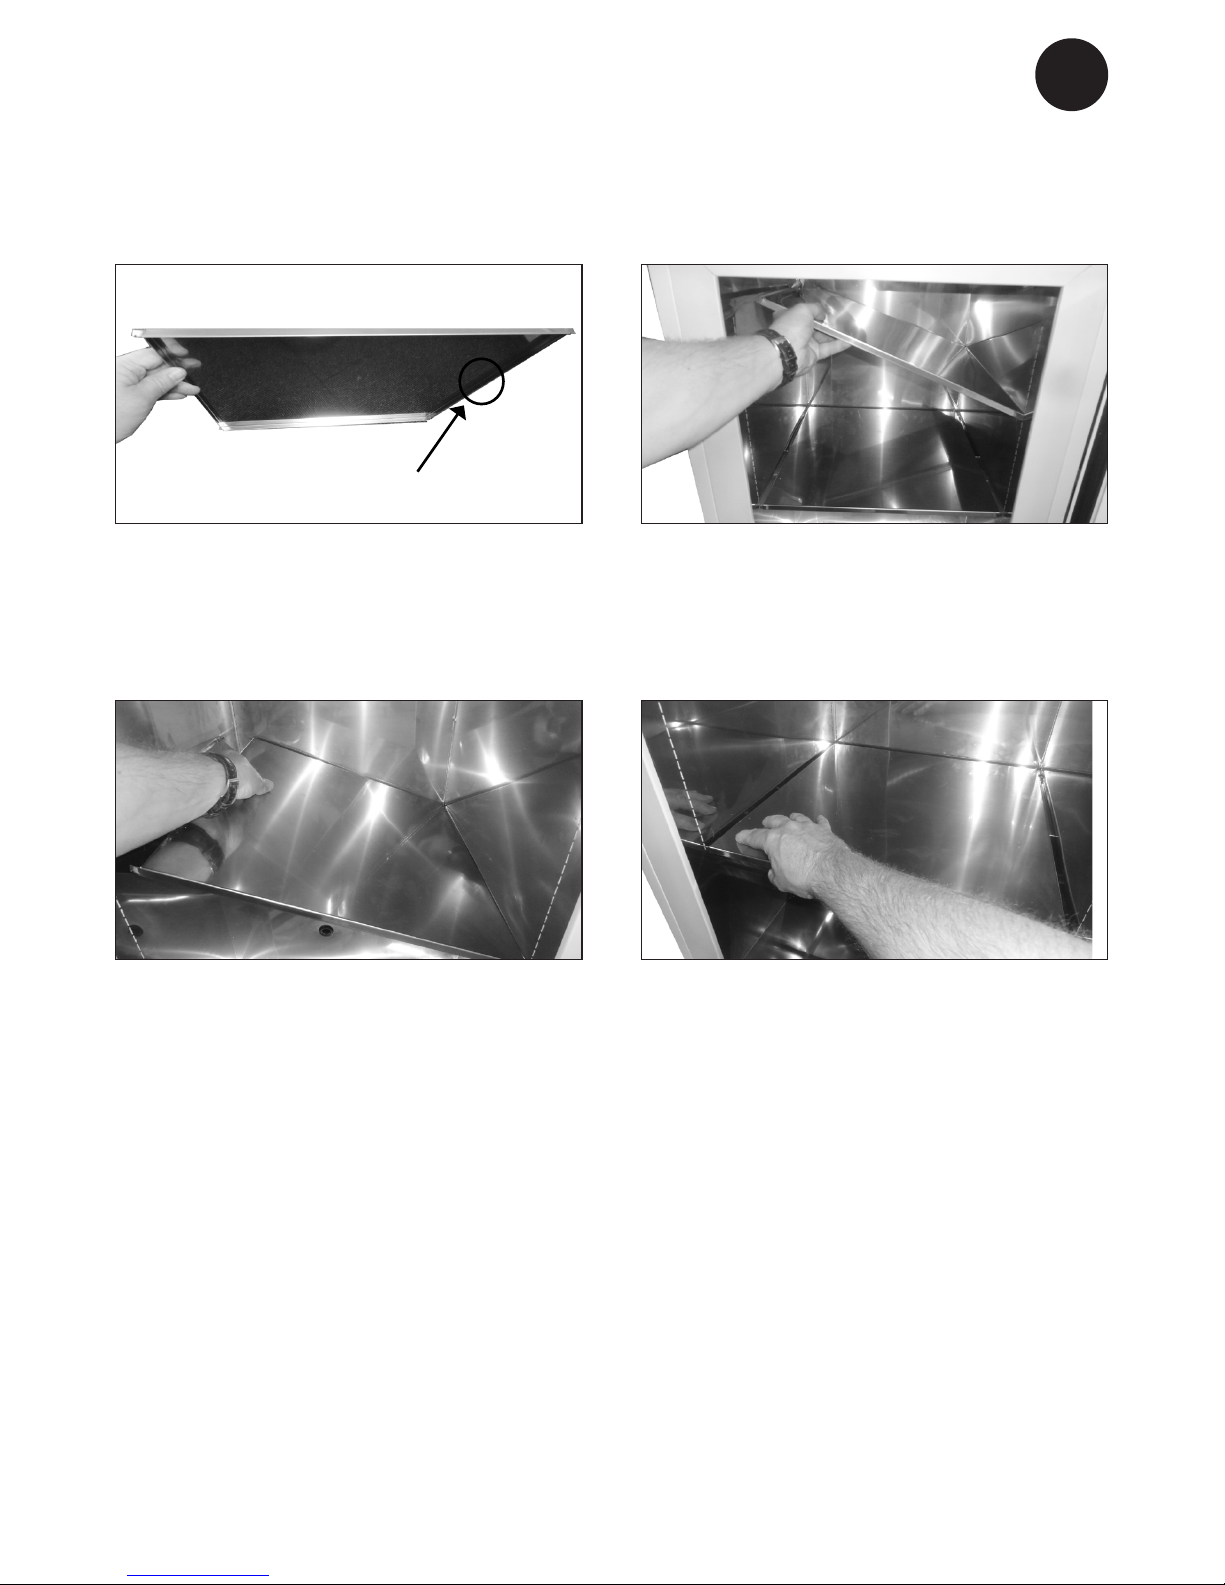
GB
Remounting in new height position
The shelf is remount by following a few simple steps:
1. The shelf hooks are smallest in the rear
edge.
Make sure the shelf direction is correct, by
ensuring the small punched “half moon” is
placed in the right side
2. Place one side of the shelf hooks in the
new height position
3. Gently press the hooks into the holes 4. Level the shelf and slide the hooks into
the opposite holeside. Press down to
ensure all hooks has fallen into place
14
GB
Port hole
The freezer is equipped with an extra port hole. Ex. for use of an external sensor.
1. Remove 3 screws in the cover for the
compressor compartment and remove
the cover.
2. Place the cover at the side of the
freezer. Still connected to the wire.
3. The port hole is placed at the right side.
4. Inside the port hole is located in the top
right side and is closed with a rubber
plug.
5. Remove the rubber plug.
6. Inside the port hole is located in right in
the top.
7. Remove the rubber plug.

15
GB
Port hole
The freezer is equipped with an extra port hole. Ex. for use of an external sensor.
8. Put in the sensor and push it all way
through the tube.
9. Closed the port hole by using putty
10. Close the inside hole by using putty 11. Fasten the cover with the 3 screws

16
GB
Reversible door
1. For a hingeside change turn o main
power and place the appliance on a
table. Protect top from scratches.
2. Loosen and remove visible top screws
(use 3 mm allan key + Torx 20 tool)
3. Open the door to gain access. 4. Remove three screws underneath the
toppanel (use 3 mm allan key)
5. Remove lock pin (use 4 mm allen key) 6. Carefully pull out the toppanel…

17
GB
7. …and place it upside down on the
cabinet top
8. Loosen 2*M8 screws approx. 5 mm
(use 5 mm allen key)
9. Loosen pivot nut (use 10 mm spanner) 10. Lift up the top bracket/pivot. Pull out
the door and lift it o the bottom pivot
11. Loosen door top pivot
(use 2,5 mm allen key if necessary)
12. Remount pivot in the new hinge side

18
GB
13. Tighten pivot (2,5 mm allen key) 14. Tighten pivot nut
15. Demount x nut and top handlelock pin 16. Remount the top handlelock pin in the
opposite side. Tighten the x nut again
17. Go to bottom and remove the door
pivot nylon washer
18. Remove the two front feet

19
GB
19. Remove bottom handlelock pin plate
by loosening two screws (use 4 mm
allen key)
20. Loosen bottom pivot nut
21. Loosen door bottom pivot 22. Remount door pivot for use in new
hinge side
23. Tighten pivot 24. Remount and tighten pivot nut
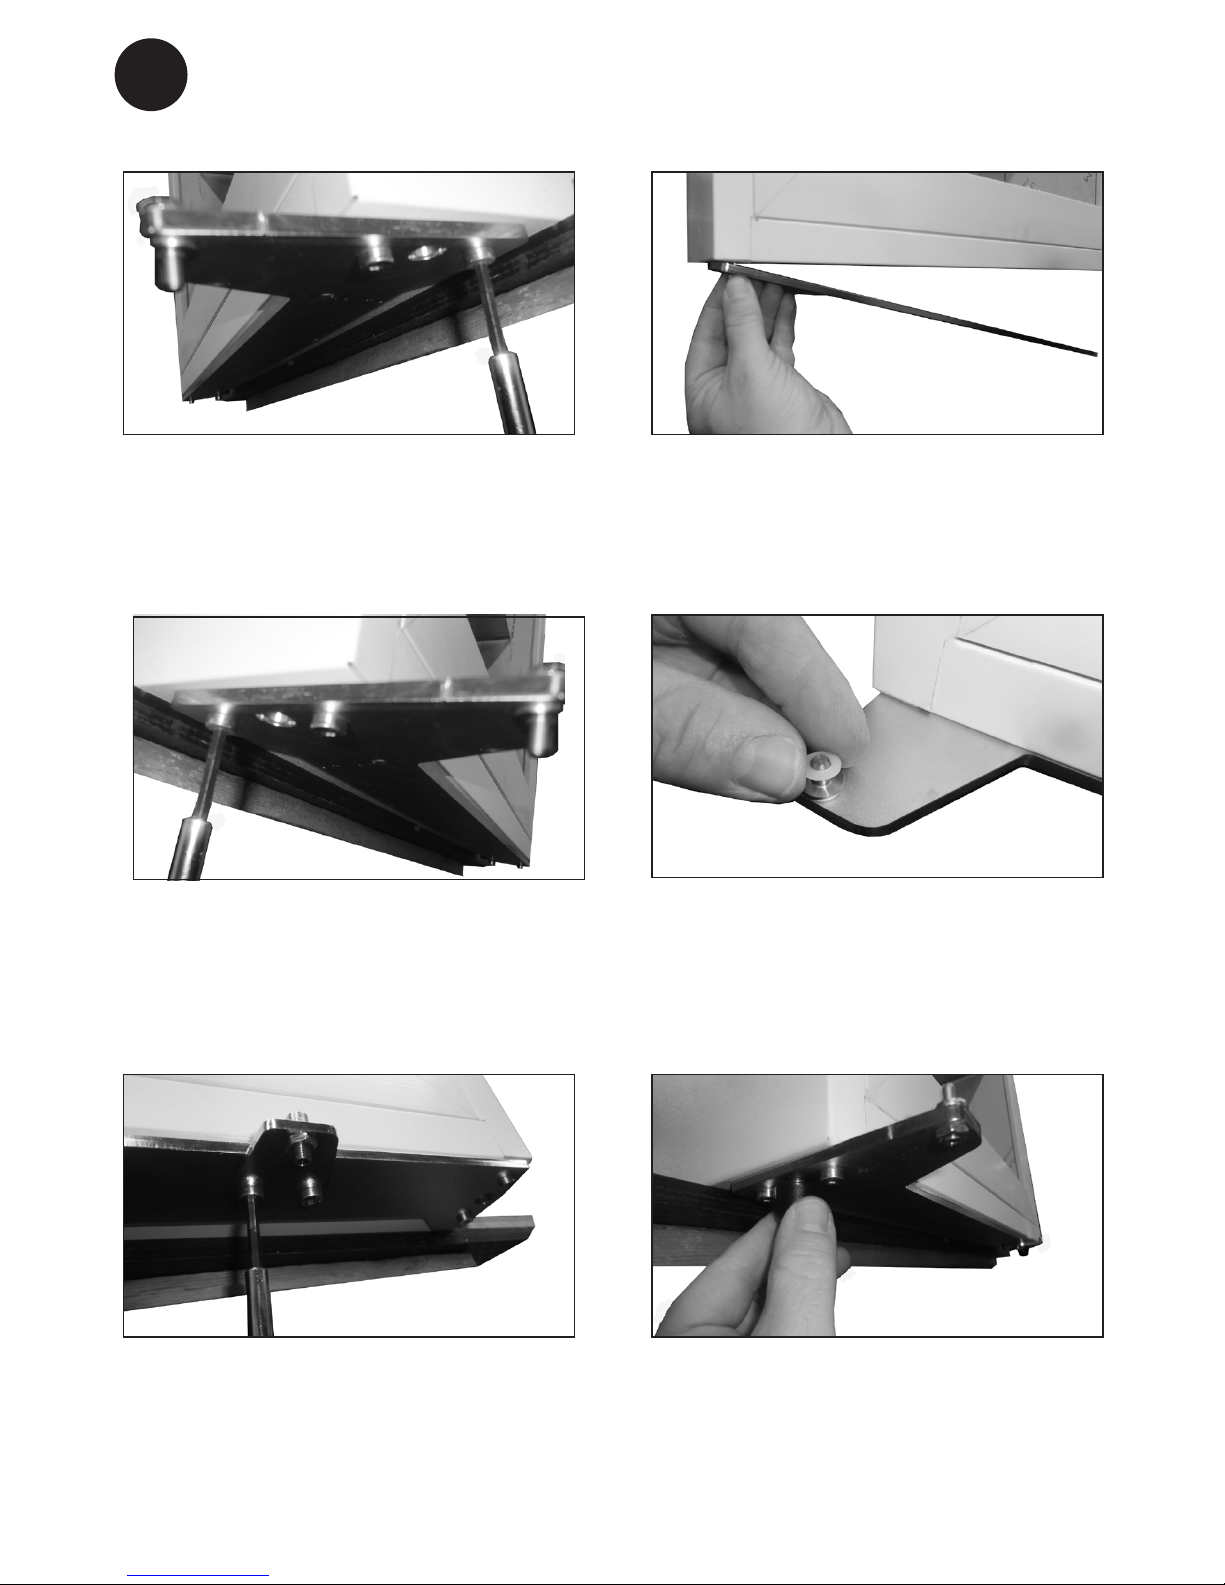
20
GB
25. Loosen the bottom door bracket screws
in one side (use 4 mm allen key)
26. Loosen the screws in the opposite side
and rotate the bottom door bracket
27. Then remount and tighten the screws
in both sides
28. Re-position the door pivot nylon washer
29. Remount bottom handle lockpin plate in
the opposite side by tightening the two
screws again (use 4 mm allen key)
30. Remount and tighten the two front feet
Table of contents


