Novation Launchpad Pro User manual

08
Fall$
Programmer’s Reference Guide
Document number: FFFA001331-01
Written by John Wilson and Lottie Thomas
© Focusrite Audio Engineering LTD

© Focusrite Audio Engineering LTD
2
Table of Contents
About this Guide 3!
Number Systems and MIDI conventions 3!
Bootloader 3!
Basic Features 4!
Basic Layouts 4!
Basic Communication 4!
Set-up Screen 5!
Colours 6!
Note Layout 6!
Drum Layout 8!
Fader Layout 10!
Programmer Layout 17!
Device Inquiry 18!
Advanced Features 20!
Lighting LEDs Using SysEx Messages 20!
Flashing 21!
Pulsing 22!
RGB Mode 22!
MIDI Clock 23!
Text scrolling 23!
System Exclusive Messages 25!
Other SysEx Messages 28!

© Focusrite Audio Engineering LTD
3
About this Guide
Launchpad Pro communicates using MIDI over USB and MIDI jack, operating in both directions.
This manual, describing the MIDI communication format, is all the information you need to be
able to write software that is customised for Launchpad Pro.
This is not an exhaustive document. Certain extra System Exclusive messages are used for
authentication, and for remote firmware upgrade. These are beyond the scope of this document,
however, it is worth knowing that they exist in case you encounter them while you are playing
with Launchpad Pro.
!
Number Systems and MIDI conventions
$
There are three ways of expressing MIDI data in this manual. The first, where appropriate, is a
plain English description of the message. When we describe a musical note, middle C is deemed
to be ‘C3’ or note 60. MIDI channel 1 is considered to be the lowest-numbered MIDI channel and
channels range from 1 - 16.
MIDI messages are also expressed in plain data, with decimal and hexadecimal equivalents. The
hexadecimal number will always be followed by an ‘h’ and the decimal equivalent given in
brackets. For example a Note On message on channel 1 is signified by the status byte 90h (144).
Bootloader
!
Launchpad Pro has a bootloader mode that allows the user to configure and save certain
settings. The bootloader is accessed by holding the Setup button whilst switching the device on.
The top two rows of square buttons can be used to set the device USB ID of Launchpad Pro. The
device ID ranges from 1 – 16 and the selected ID is represented by an orange button. This also
sets the USB identity, which ranges from 51h to 60h. The default ID from the factory is 1. If more
Figure$1:$Bootloader$display$

© Focusrite Audio Engineering LTD
4
than one Launchpad Pro is to be used on USB, then each device must have a different USB ID
selected.
The blue button refers to layout text, enabling the scrolling text messages when the layouts are
changed. By default the button is bright blue and the scrolling text within the main firmware is
enabled. Once the user is familiar with the use of the main firmware setup and layout selection,
turning the layout text off in the bootloader can give more rapid layout changes in the firmware.
The light green button displays the bootloader version number, and the dark green button
shows the firmware version number.
!
The main firmware can be started by pressing the Setup button again.
Basic Features
Basic Layouts
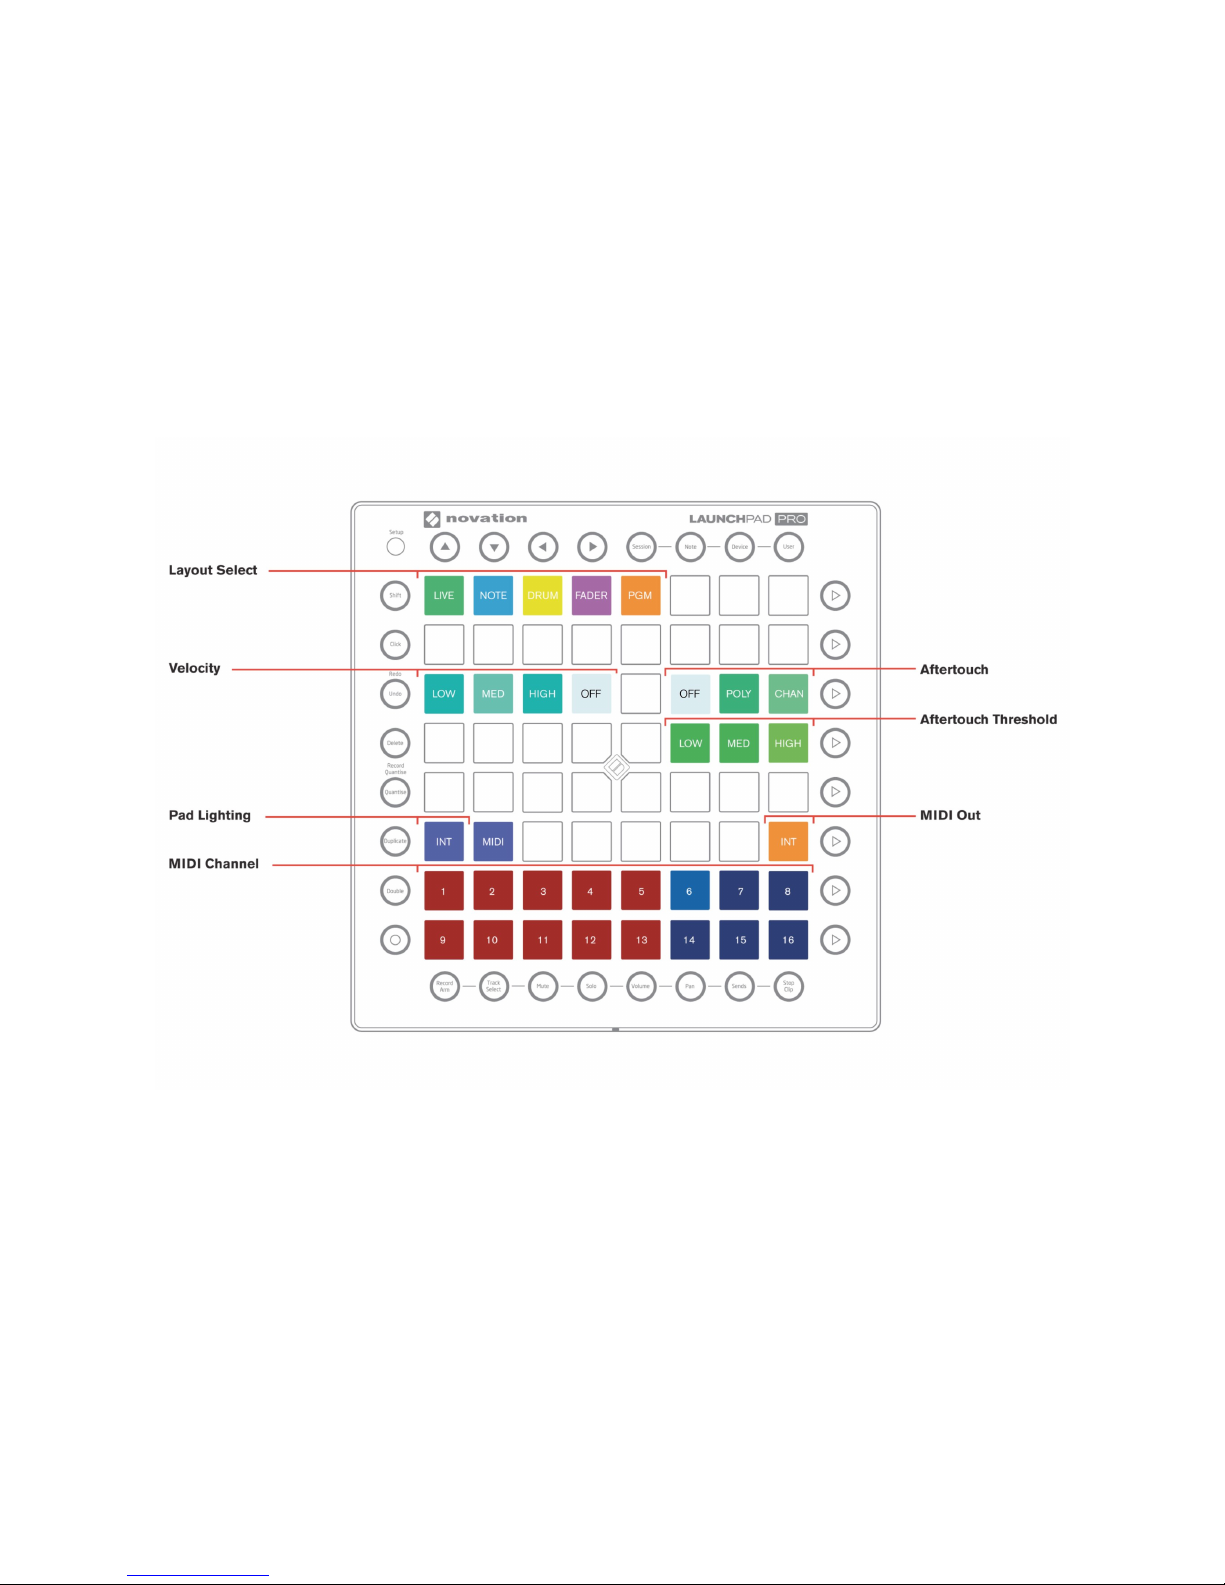
The User Guide gives a detailed description of the various layouts available in Launchpad Pro and
how to select them. The Live layout is automatically selected by Ableton Live, indicated by the
green side LED. There are four additional layouts available, allowing the Launchpad Pro to be
used as a ‘Standalone’ MIDI controller without Ableton. They are Note, Drum, Fader and
Programmer layout. Further detail on each layout can be found later in this document.
The different layouts may be manually selected on the Setup page, by pressing one of the five
coloured square pads on the top row. (See later.) The layouts may also be selected automatically
using the following message:
Host >> Launchpad Pro: F0h 00h 20h 29h 02h 10h 2Ch <Layout> F7h
(240, 0, 32, 41, 2, 16, 44, <Layout>, 247)
Where the <Layout> byte is: 00h – Note
01h – Drum
02h – Fader
03h – Programmer
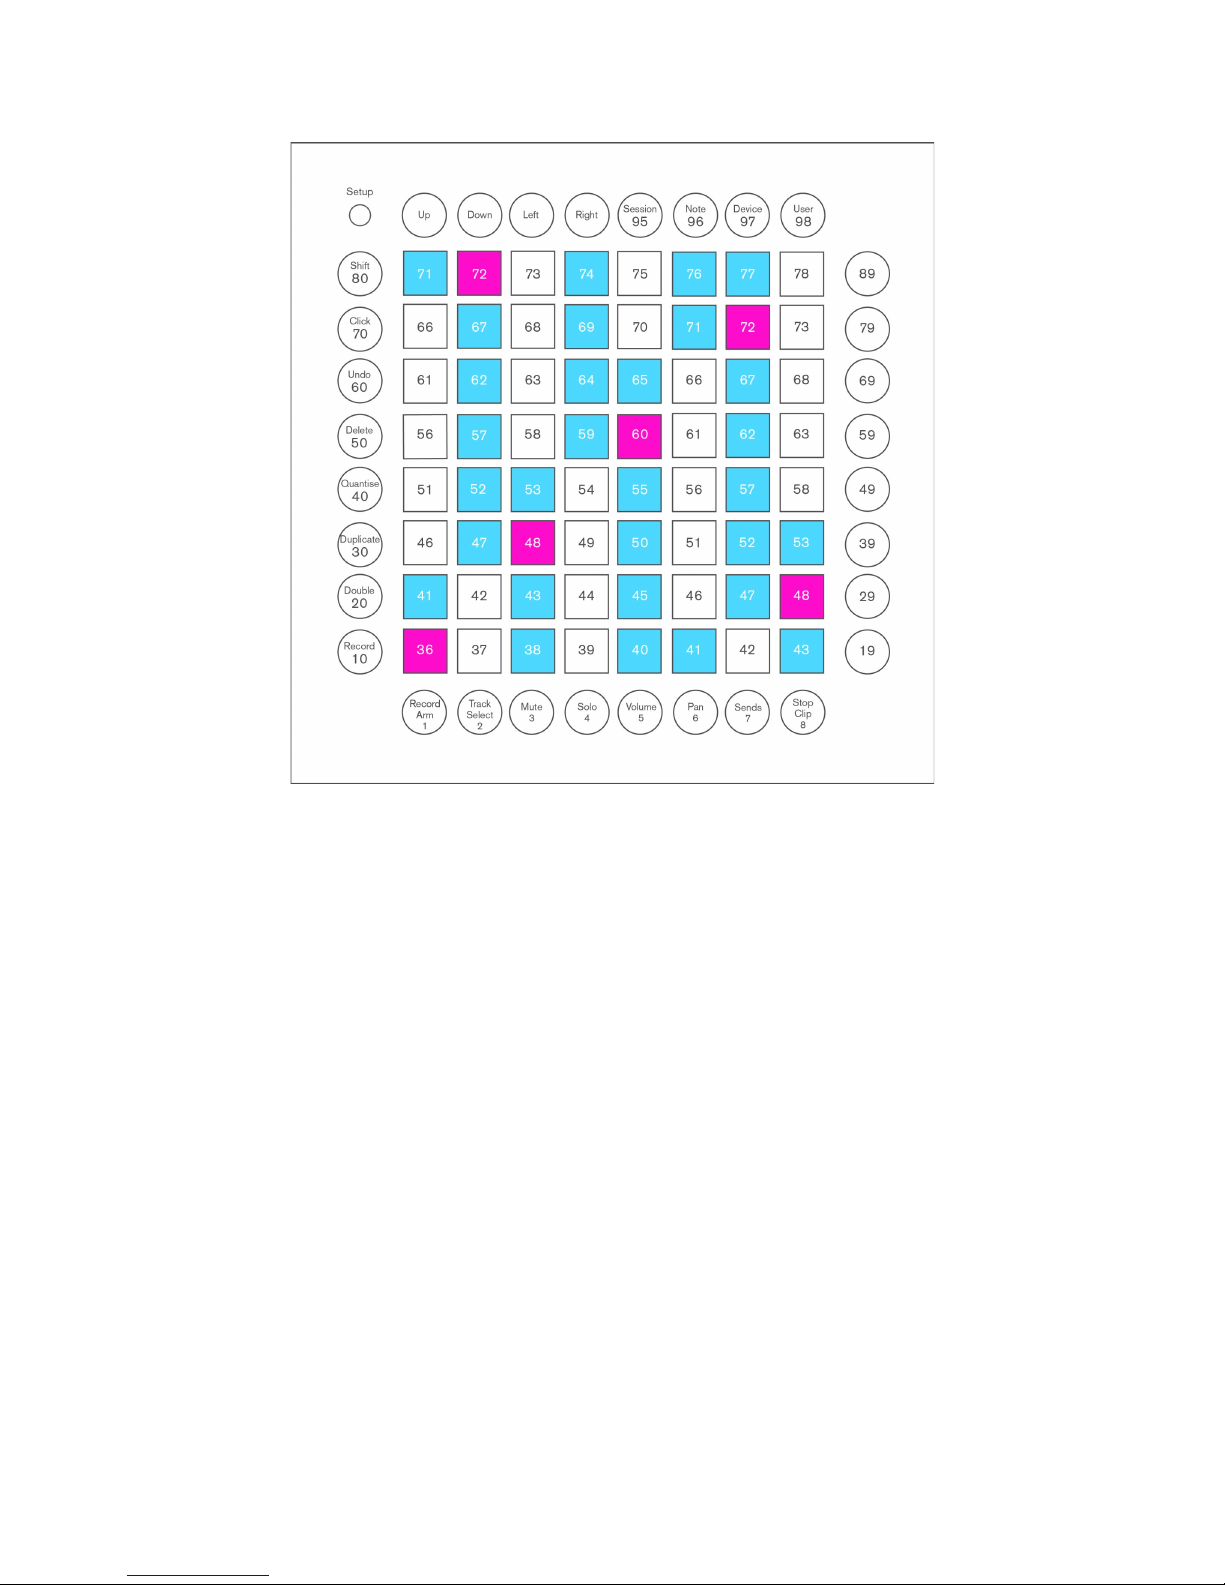
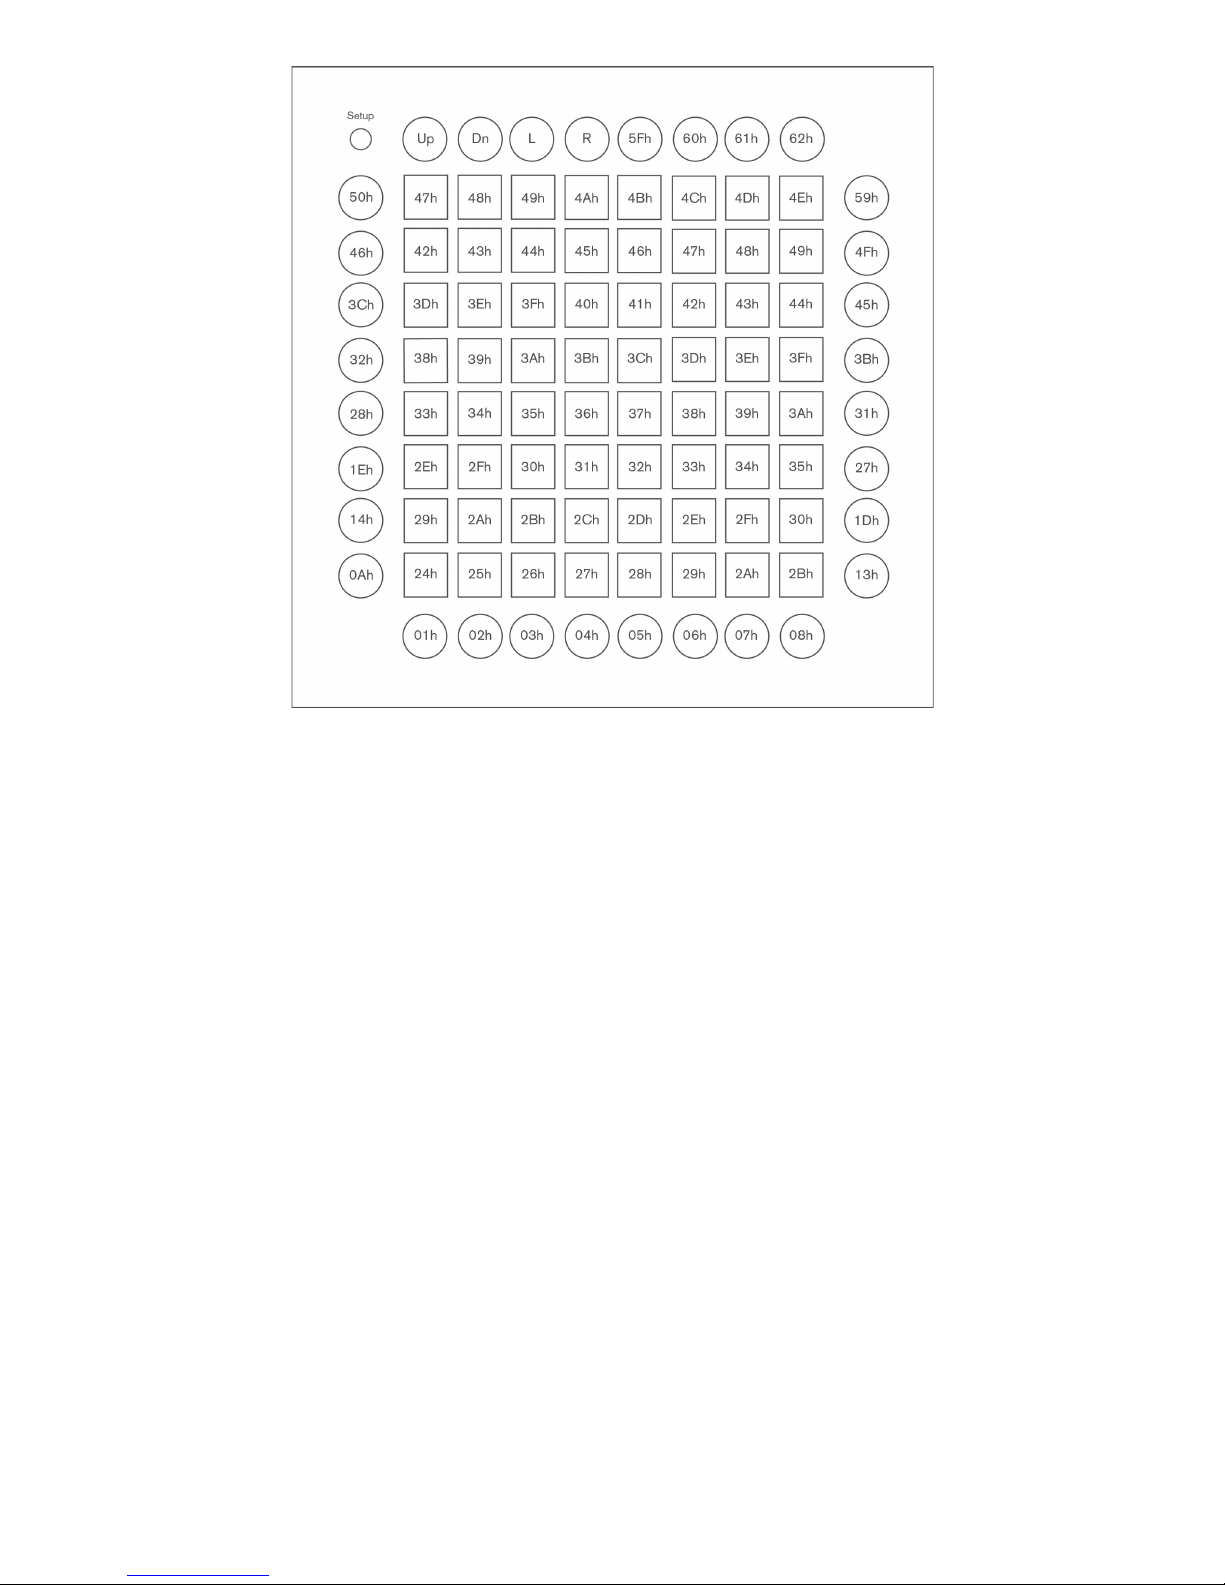
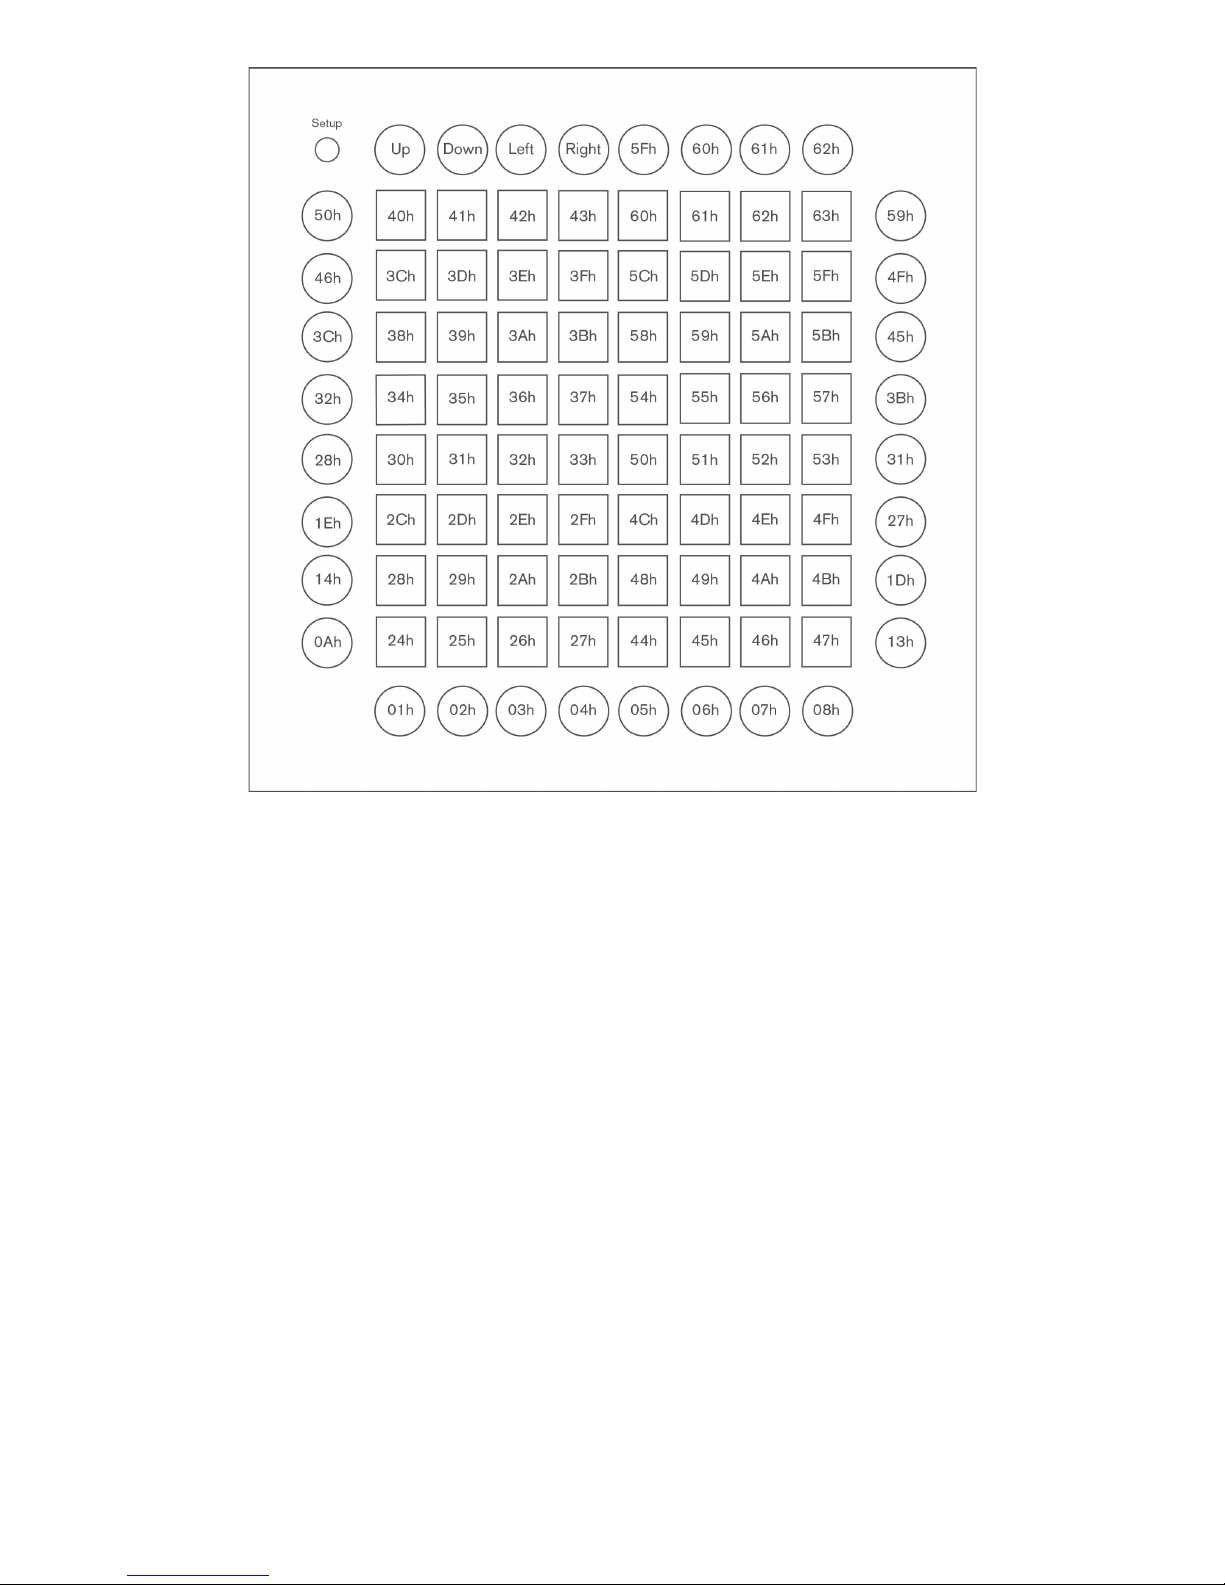
The layout determines the MIDI note numbers that the buttons send and receive. Layout 0 is best
for writing software that uses Launchpad Pro as an instrument. Layout 3 is best for
programming light shows, as the grid is a blank canvas and is easy to navigate by adding and
subtracting. Adding 1 moves to the right 1 button, adding 10 moves up one button.
Basic Communication
!
The communications behaviour of Launchpad Pro varies depending upon the layout. All of the
Standalone layouts can be used to detect button presses and control LED colour, but the actual
data values and results vary. Please refer to the following sections for specific details of each
layout.
Launchpad Pro is provided with a USB interface and MIDI input/output jacks. It is usual for
Launchpad Pro to connect to an Apple Mac or Windows PC using the USB lead. Once connected,
the class-compliant USB driver will automatically provide communication ports to Launchpad Pro
for sending and receiving note messages. These MIDI ports should be considered separately to
the conventional MIDI hardware (the MIDI input/output jacks.)

© Focusrite Audio Engineering LTD
5
There are 3 MIDI input ports and also 3 MIDI output ports. The first port pair (first input port and
first output port) is usually used for communication with Ableton. (These first ports will
communicate with the Live layout of Launchpad Pro.) The second port pair is used for Stand
Alone mode of Launchpad Pro. Note, Drum, Fader and Programmer layouts all share these ports.
The third port pair is used by the hardware MIDI interface. The output is routed from the USB,
through the Launchpad Pro and out to the MIDI output jack. Similarly, the MIDI input jack is
routed through the Launchpad Pro and into the third USB input port.
Set-up Screen
Each layout also has a set-up screen to give configuration options for that layout. Pressing and
holding the set-up button allows the set-up screen to be viewed on Launchpad Pro.Releasing
the set-up button returns the Launchpad Pro to the previous display.
Pressing one of the top coloured square pads manually changes to a different layout. These pads
can be used during play to rapidly switch layouts.
Pad velocity control, after-touch mode and threshold change the instrument playing style.
Pad lighting changes whether the pads are lit automatically by pressing them, or when receiving
MIDI notes.
MIDI out enables the sending of notes to the MIDI output jack.
MIDI channel selects which of the standard 16 MIDI channels is to be used for communications.
It is useful when using multiple Launchpad Pros, allowing notes to be routed to and from a
specific device. Each layout can have a different MIDI channel selection, allowing the different
Figure$2:$Typical$layout$setup$display$

© Focusrite Audio Engineering LTD
6
layouts to target specific synthesisers or settings. Any MIDI channels shown in red are not
available for use and cannot be selected. Ableton reserves a number of MIDI channels for Live
mode, but all MIDI channels are available in Stand Alone mode.
Currently selected options are shown in a brighter colour.
The configuration options are remembered for each layout, allowing different options to be
selected and each layout to be customised. When changed the selected options are stored away
and automatically recalled again when the Launchpad Pro powers up.
For more detail on the set-up screen please refer to the Launchpad Pro User Manual.
Colours
$
Launchpad Pro has a colour palette of 128 colours shown in figure 3.Colour 0 turns the LED off.
!
!
Note Layout
The Note layout shows a chromatic scale with the black notes unlit (shown white in the example
shown in figures 4 and 5) and the white notes lit blue. The C notes are highlighted in pink.
!
The central grid of 64 square buttons send Note On/Note Off messages to the host and the 32
round buttons send Control Change messages to the host. Pressing a square pad will send a Note
On message with a velocity in the range 1 to 7fh (127). The actual velocity will depend upon the
layout configuration and how hard the pad is pressed. Releasing the pad sends a Note Off
message, with velocity 0.
In this layout, when a MIDI Note On is received by Launchpad Pro the associated square pad
lights up green, returning back to the original colour when the Note Off message is received. As
there is an overlap of notes in this layout, it is possible that a single Note On can light up two
pads simultaneously. Pressing the pad also results in the pad lighting up green, then returning to
its original colour when released.
Pressing a round button gives a MIDI Control Change message with maximum value 7fh (127),
and a minimum value of 0 when released. In this layout, the round button will also light green.
However, the round button can light with a different colour when a CC message is received. (The
controller value determining the colour of the LED.)
The self-illumination of pads and buttons can be enabled or disabled on the set-up page.
Figure$3:$Launchpad$Pro$colour$table,$in$decimal$

© Focusrite Audio Engineering LTD
7
The Up, Down, Left, Right cursor buttons are special, and used for shifting the chromatic scale
display. These buttons cannot be controlled by a CC message.
Figure$4:$Note$layout$MIDI$values,$in$decimal$

© Focusrite Audio Engineering LTD
8
!Example: Trigger the top left grid light, in Note layout
$
Host >> Launchpad Pro: Channel 1: Note On B4/47h (71), velocity 2Dh (45)
90h 47h 2Dh (144, 71, 45)
!Example: Make the round Session button light pink, in Note layout
$
Host >> Launchpad Pro: Channel 1: set controller 5Fh (95) to 35h (53)
B0h 5Fh 35h (176, 95, 53)
Drum Layout
This layout is intended to provide a grid suitable for playing a drum rack within Ableton Live.
(See figures 6 and 7.)
Rather like the Note layout, the square pads send Note On and Note Off messages. The round
buttons send MIDI CCs. They self-illuminate when pressed, unless disabled in the set-up page.
When a MIDI Note On is received the associated pad lights up green, returning back to the
original colour when the Note Off message is received.
MIDI Note C1 = 36 (24h), which is the starting point for the Ableton drum rack.
Figure$5:$Note$layout$MIDI$values,$in$hexadecimal$

© Focusrite Audio Engineering LTD
9
Note the round buttons send MIDI CCs.
Figure$6:$Drum$layout$MIDI$values,$in$decimal$

© Focusrite Audio Engineering LTD
10
!Example: Trigger the bottom left grid light, in Drum layout
$
Host >> Launchpad Pro: Channel 1: Note On C1/24h (36), velocity 0Fh (15)
90h 24h 0Fh (144, 36, 15)
!Example: Make the round Sends button purple, in Drum layout
$
Host >> Launchpad Pro: Channel 1: set controller 07h (7) to 33h (51)
B0h 07h 33h (176, 7, 51)
Fader Layout
!Virtual Fader Controls
Each column outputs a MIDI CC with the number shown in the bottom row and the value as
shown in the grid. (See figures 8 and 9.) Essentially this creates 8 faders with static values that
can then be used in any way you might use a standard MIDI fader.
Note that the top 4 values of the fader table correspond to specific positions on Ableton Live's
volume faders.
Figure$7:$Drum$layout$MIDI$values,$in$hexadecimal$

© Focusrite Audio Engineering LTD
11
!
!
Figure$8:$Fader$layout$MIDI$values,$in$decimal$

© Focusrite Audio Engineering LTD
12
!
!
!
The Launchpad Pro lights up to indicate the current setting for each fader. If it receives a CC
message greater than or equal to the values in the table, it will show additional lights to indicate
the new virtual fader's position. Similarly, receiving a CC message below the current fader
position will lower the fader, turning lights off. When the bottom row of pads are pressed, they
will send a value of zero, turning all the fader lights off. If a value of 1 or greater is received, then
the bottom pad will light up.
When hitting a pad to turn a 'fader' up or down, the device sends out interim values to smooth
the transitions. The faders therefore move over time. These times depend on how hard you hit
the pad. Incoming CC values are ignored during a transition.
The transition time between values is proportional to how fast (the velocity) the pads are struck.
Therefore if you were to hit the top row of pads with a velocity of 127 for example all the 'faders'
would move to send 127 in value and arrive at the same time regardless of starting position and
sending interim values during the transition period.
When the device receives a velocity of 1, the transition time will be 2 seconds. When a velocity of
127 is received, the transition time is 20ms and in that time 10 values will be sent. Fewer values
than this will be sent if the difference between the current value and the target value is less than
10.
Figure$9:$Fader$layout$MIDI$values,$in$hexadecimal$

© Focusrite Audio Engineering LTD
13
Pressing a pad that corresponds to the current (i.e. last transmitted) value of a fader will cause
that same value to be sent again, and any currently-in-progress transition will be aborted.
The message to select Faders layout has to set them to colour 0 (off) to maintain compatibility
with Ableton Live. (Colours can subsequently be set with a Fader Setup sysex message.)
When a layout change request is received while a fader is still moving, the Launchpad stops the
fader movement and selects the new layout.!
In the case of the round buttons, the Fader layout is like the Note layout, sending MIDI CC
messages. The round buttons also self-illuminate when pressed, unless disabled in the set-up
page.
!Virtual Pan Controls
A virtual pan control is similar to the virtual fader control. A pan lights both the fourth and fifth
pads (counting from the bottom) i.e. the two middle pads when a value of 63 or 64 is received.
Their operation will be similar to that of the faders, however pads will light outwards from the
centre, e.g. if the value is 0, then the bottom four pads will be lit. If the value is 127 then the top
four pads will be lit. If the pan control is in the centred position then both middle pads will be lit.
(See figures 10 and 11.)
!
Figure$10:$Pan$layout$MIDI$values,$in$decimal$

© Focusrite Audio Engineering LTD
14
!
!
!
!Initialise a fader or pan control
$
Host >> Launchpad Pro: F0h 00h 20h 29h 02h 10h 2Bh <Number> <Type> <Colour> <Value> F7h
(240,0,32,41,2,16,43,<Number>, <Type>, <Colour>, <Value>, 247)
<Number> <Type> <Colour> <Value> sets may be repeated up to 8 times in a message.
<Number> - Index of the fader, numbered left to right, 00h – 07h (0 – 7)
<Type>- Fader (00h) or Pan (01h).
<Colour> - 00h – 7Fh (0 – 127)
<Value> - Initial value for the fader 00h – 7Fh (0 – 127)
!Example: Set-up 4 fader controls, in Fader layout
$
Host >> Launchpad Pro: F0h 00h 20h 29h 02h 10h 2Bh 02h 00h 05h 7fh 03h 00h 15h 46h 04h 00h 2dh 22h 05h ..
.. 00h 35h 00h F7h
(240, 0, 32, 41, 2, 16, 43, 2, 0, 5, 127, 3, 0, 21, 70, 4, 0, 45, 34, 5, 0, 53, 0, 247)
This message looks complicated but can be broken down into the following sections:
Figure$11:$Pan$layout$MIDI$values,$in$hexadecimal$

© Focusrite Audio Engineering LTD
15
F0h 00h 20h 29h 02h 10h 2Bh - SysEx header for fader set-up message
(240, 0, 32, 41, 2, 16, 43)
02h 00h 05h 7fh - 3rd fader along, in red, at +6dB (value 127)
(2, 0, 5, 127)
03h 00h 15h 46h - 4th fader along, in green, at -12dB (value 70)
(3, 0, 21, 70)
04h 00h 2dh 22h - 5th fader along, in blue, even lower (value 34)
(4, 0, 45, 34)
05h 00h 35h 00h - 6th fader along, in pink, at off (value 0)
(5, 0, 53, 0)
F7h - end of SysEx message
(247)
This example will then look like the following figure 12:
Note that the pink fader is not visible, as it is off.
Figure$12:$Fader$layout$example$

© Focusrite Audio Engineering LTD
16
!Example: Set-up 5 pan controls, in Fader layout
$
Host >> Launchpad Pro: F0h 00h 20h 29h 02h 10h 2Bh 00h 01h 05h 7fh 01h 01h 15h 40h 02h 01h 2dh 00h ..
.. 03h 01h 35h 49h 04h 01h 35h 15h F7h
(240, 0, 32, 41, 2, 16, 43, 0, 1, 5, 127, 1, 1, 21, 64, 2, 1, 55, 0, 3, 1, 53, 73, 4, 1, 53, 21, 247)
This message looks complicated but can be broken down into the following sections:
F0h 00h 20h 29h 02h 10h 2Bh - SysEx header for fader set-up message
(240, 0, 32, 41, 2, 16, 43)
00h 01h 05h 7fh - 1st fader is a pan control in red, at 50R (value 127)
(0, 1, 5, 127)
01h 01h 15h 40h - 2nd fader is a pan control in green, at C (value 64)
(1, 1, 21, 64)
02h 01h 2dh 00h - 3rd fader is a pan control in blue, at 50L (value 0)
(2, 1, 55, 0)
03h 01h 35h 49h - 4th fader is a pan control in pink, just above C (value 73)
(3, 1, 53, 73)
04h 01h 35h 15h - 5th fader is a pan control in pink, at 33L (value 21)
(4, 1, 53, 21)
F7h - end of SysEx message
(247)
This example will then look like the following figure 13:
Figure$13:$Pan$layout$example$

© Focusrite Audio Engineering LTD
17
Programmer Layout
In the Programmer layout, the Launchpad Pro is essentially a blank canvas, with the controls and
LEDs all available for use. It is the best layout to use for light displays.
Square pads send Note On and Note Off messages. The round buttons send MIDI CCs.
Note On messages can also be used to light the LED behind each button. The velocity of the Note
On message determines the colour of the LED. A Note On message with velocity 0, or a Note Off
message of any velocity will turn the LED off.
Pressing a round button gives a CC message with maximum value 7fh (127), and a minimum
value 0 when released. Similarly, the round button will light when a MIDI CC message is received,
with the controller value determining the colour of the LED.
The Programmer layout does not use the enable/disable self-illumination options on the set-up
page. It will only illuminate when a message is sent to the LED.
In this layout, the Up, Down, Left, Right arrow buttons also generate MIDI CC messages, and are
available for programmer use. See figures 14 and 15.
!
Figure$14:$Programmer$layout$MIDI$values,$in$decimal$

© Focusrite Audio Engineering LTD
18
!
!
!Example: light top left grid LED blue, in Programmer layout
Host >> Launchpad Pro: Channel 1: Note On A5/51h (81), velocity 2Dh (45)
90h 51h 2Dh (144, 81, 45)
!Example: light the cursor left LED pink, in Programmer layout on MIDI channel 8
Host >> Launchpad Pro: Channel 8: set controller 5Dh (93) to 35h (53)
B7h 5Dh 35h (183, 93, 53)
Device Inquiry
$
Launchpad Pro responds to the MIDI specification’s Device Inquiry message.
!Device Inquiry
$
Host >> Launchpad Pro: F0h 7Eh 7Fh 06h 01h F7h
(240,126,127,6,1,247)
Figure$15:$Programmer$layout$MIDI$values,$in$hexadecimal$

© Focusrite Audio Engineering LTD
19
Launchpad Pro will respond:
! !
Launchpad Pro >> Host:
F0h 7Eh <device ID> 06h 02h 00h 20h 29h 51h 00h 00h 00h <firmware revision 4 Bytes> F7h
(240,126, <device ID>, 6, 2, 0, 32, 41, 81, 0, 0, 0, <firmware revision 4 Bytes>, 247)
The firmware revision number is represented by four bytes, where revision 138 would be given as
00h, 01h, 03h, 08h.
!

© Focusrite Audio Engineering LTD
20
Advanced Features
$
Lighting LEDs Using SysEx Messages
$
It is possible to control Launchpad Pro’s LEDs using SysEx messages. This allows a number of LEDs
to be updated quickly in a single message. In this SysEx message, the index of the LED is taken to
be the same as Programmer layout, regardless of the currently selected layout. This is also
applicable to the round buttons, with the LED index using the same value defined in the
Programmer layout. Please refer to figures 14 and 15.
Note that the SysEx LED message will override the colour of the specific pad LED, regardless of
the previous colour (including the special round cursor buttons.)However, if those buttons are
subsequently pressed and released, the LEDs will return to the official colour of that button. (i.e.
The SysEx message LED colour will be overridden by the default colour for that specific button on
that layout.)
!
!Light LED using SysEx
The side LED can also be updated by this message. It has an LED index of 99 (63h).
$
Host >> Launchpad Pro: F0h 00h 20h 29h 02h 10h 0Ah <LED> <Colour> F7h
(240,0,32,41,2,16,10,<LED>,<Colour>,247)
<LED> <Colour> pairs may be repeated up to 97 times in the message.
!
!Light a column of LEDs using SysEx
$
Columns are numbered left to right, 0 – 9, with 0 and 9 referring to the round buttons. The
sequence of LED colours starts at the lowest LED, with the next colour referring to the next
higher LED in the same column. However, the LEDs that are missing from the corners (in the
columns of round buttons) still occupy a position in the message. They just cannot be seen. Also,
the side LED cannot be updated by this message.
$
Host >> Launchpad Pro: F0h 00h 20h 29h 02h 10h 0Ch <Column> <Colour> F7h
(240,0,32,41,2,16,12, <Column>, <Colour>, 247)
The <Colour> parameter may be repeated within the message up to 10 times.
!Light a row of LEDs using SysEx
$
Rows are numbered bottom to top, 0 - 9, with 0 and 9 referring to the round buttons. The
sequence of LED colours starts at the most left LED, with the next colour referring to the next LED
to the right in the same row. However, the LEDs that are missing from the corners (in the rows of
round buttons) still occupy a position in the message. They just cannot be seen. Also, the side
LED cannot be updated by this message.
$
Host >> Launchpad Pro: F0h 00h 20h 29h 02h 10h 0Dh <Row> <Colour> F7h
(240,0,32,41,2,16,13,<Row>,<Colour>,247)
The <Colour> parameter may be repeated within the message up to 10 times.
Other manuals for Launchpad Pro
2
Table of contents
Other Novation Musical Instrument manuals