Novexx Solutions U-RX User manual

06/09 Rev. 5.02-01 OPERATING INSTRUCTIONS
U-RX
Setting up, Operation
Mounting the U-RX .......................................2
Lifting ......................................................... 2
Mounting ................................................... 2
Checking the contents ...............................3
Product description ....................................... 4
Operating parts ......................................... 4
Connections .............................................. 5
Warning labels on the U-RX ...................... 6
Operating buttons ...................................... 7
Basic operation ............................................. 8
Plugging in and powering up ..................... 8
Setting up the print-stop function .............. 9
Rewinding settings ...................................10
Settings for unwinding .............................11
Assembling a rewinding mandrel with a
different diameter .....................................12
Changing fuses ........................................13
Inserting the material ...................................14
U-RX as rewinder ....................................14
U-RX as unwinder ....................................15
Cleaning the unit .........................................16
Cleaning agents .......................................16
Cleaning ...................................................16
06/09 Rev. 5.02-01 OPERATING INSTRUCTIONS Setting up, operation
U-RX
2
Mounting the U-RX
Lifting
«Grip under the base plate to lift the unit.
Mounting
The U-RX is designed for rewinding and unwinding rolls of label material.
Device orientation: Standing on the base plate[1].
WARNING!
The U-RX may weight up to 38kg. Lifting it improperly can cause back
injury.
«Two persons are required to lift it.
«Try to lift the unit in a safe way, for example by
– carrying it close to your body, by
– bending your knees, and by keeping your back straight.
CAUTION! To avoid damaging the unit:
«Do not use the deflection rollers and dancer arms as handles when lifting.
WARNING!
When choosing a base, observe the following guidelines to avoid
dangerous operating conditions:
«The base needs to be at least the same size as the unit itself.
«The surface needs to be level, solid and dry.
«The environmental conditions specified (temperature, air humidity, etc.)
need to be complied with.
«The power cable should not be more than 3meters long.
The device can only be disconnected completely by pulling off the power
supply cable. For this reason:
«Make sure that the power supply socket for the device is readily accessible!
«In case of emergency, switch off the device and disconnect the power
supply cable!
06/09 Rev. 5.02-01 OPERATING INSTRUCTIONS Setting up, operation
U-RX
3
[1] Operating position of the U-RX
Checking the contents
Before using the U-RX for the first time, take a few minutes to check that the
following is in order:
«Check that the unit has not been damaged in transit. If the packaging has
been dented or torn, check the contents particularly carefully for shipping
damage.
«Are the articles listed below included in the box [2]?
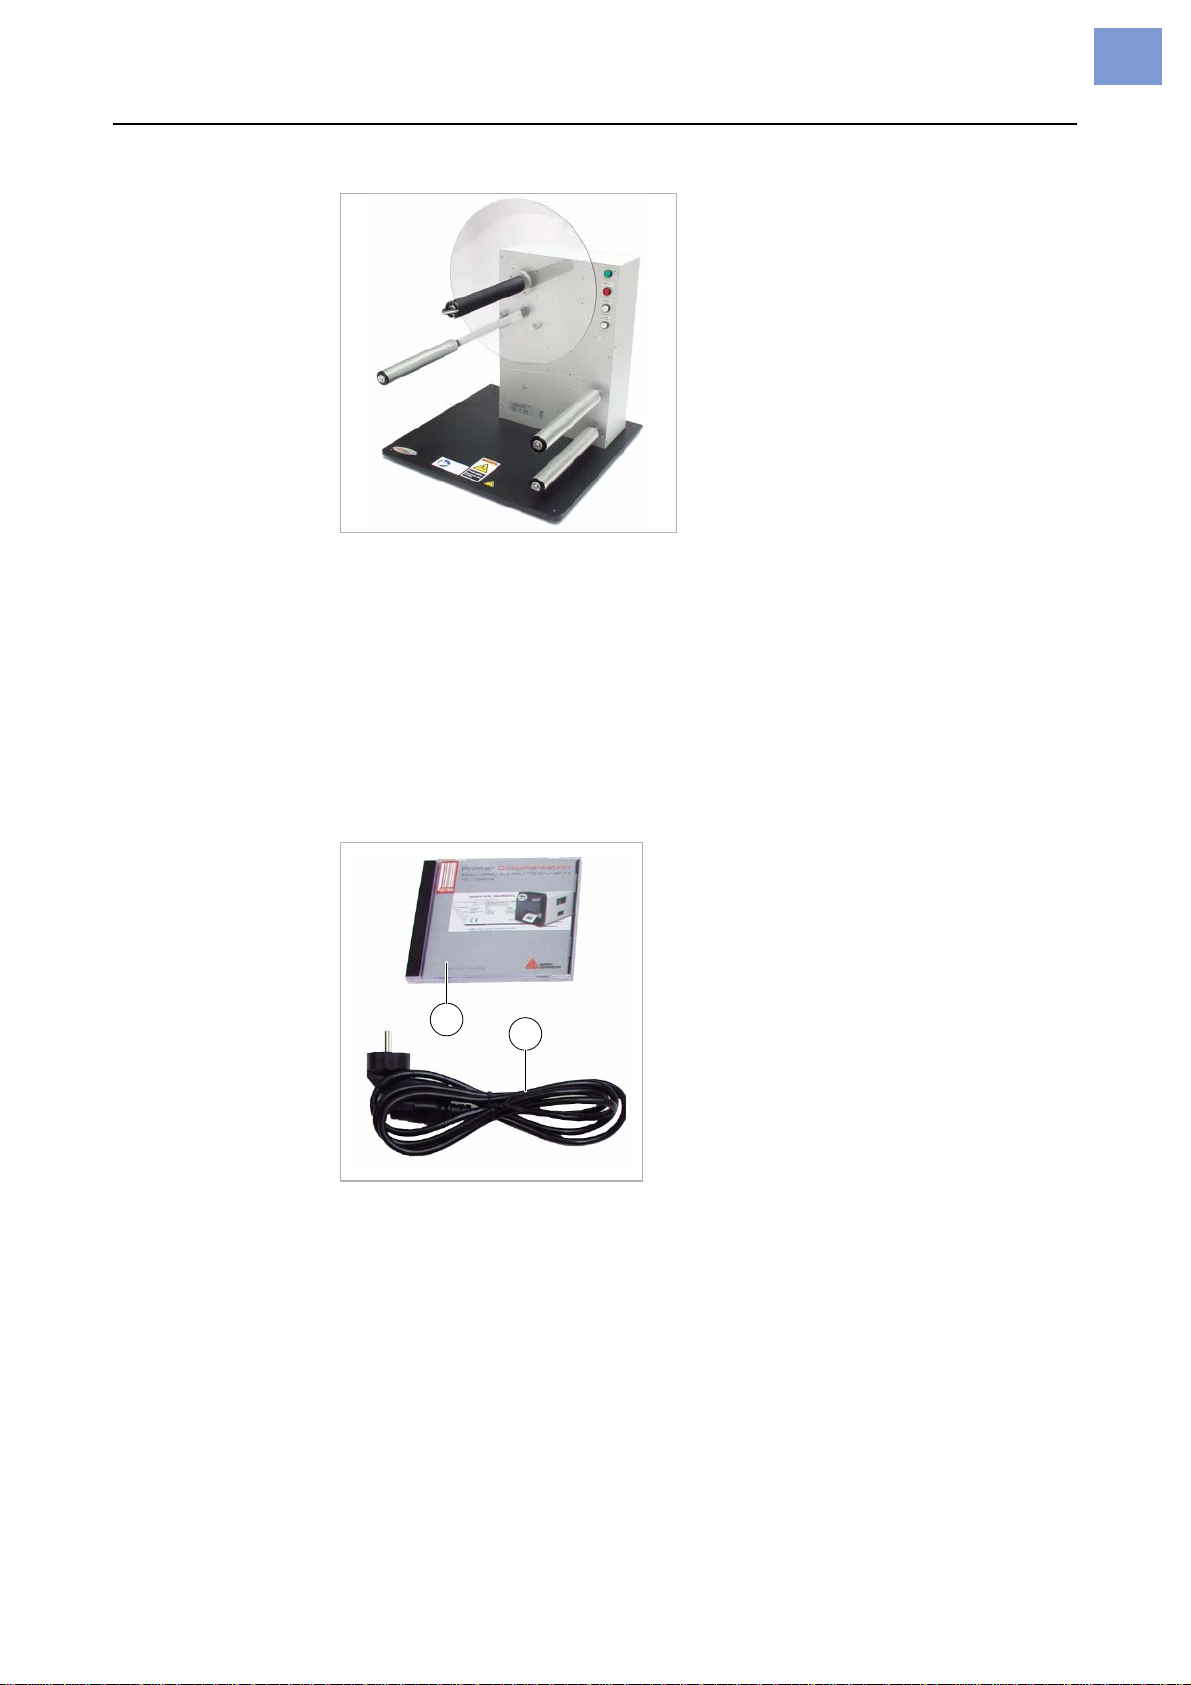
[2] Items supplied with the U-RX
•U-RX
•Documentation CD [2A]
Contains the complete operating instructions and service manual for the U-
RX in German and English.
•Power cable[2B]
The plug for the power supply may vary depending on the country of delivery.
B
A
06/09 Rev. 5.02-01 OPERATING INSTRUCTIONS Setting up, operation
U-RX
4
Product description
Operating parts
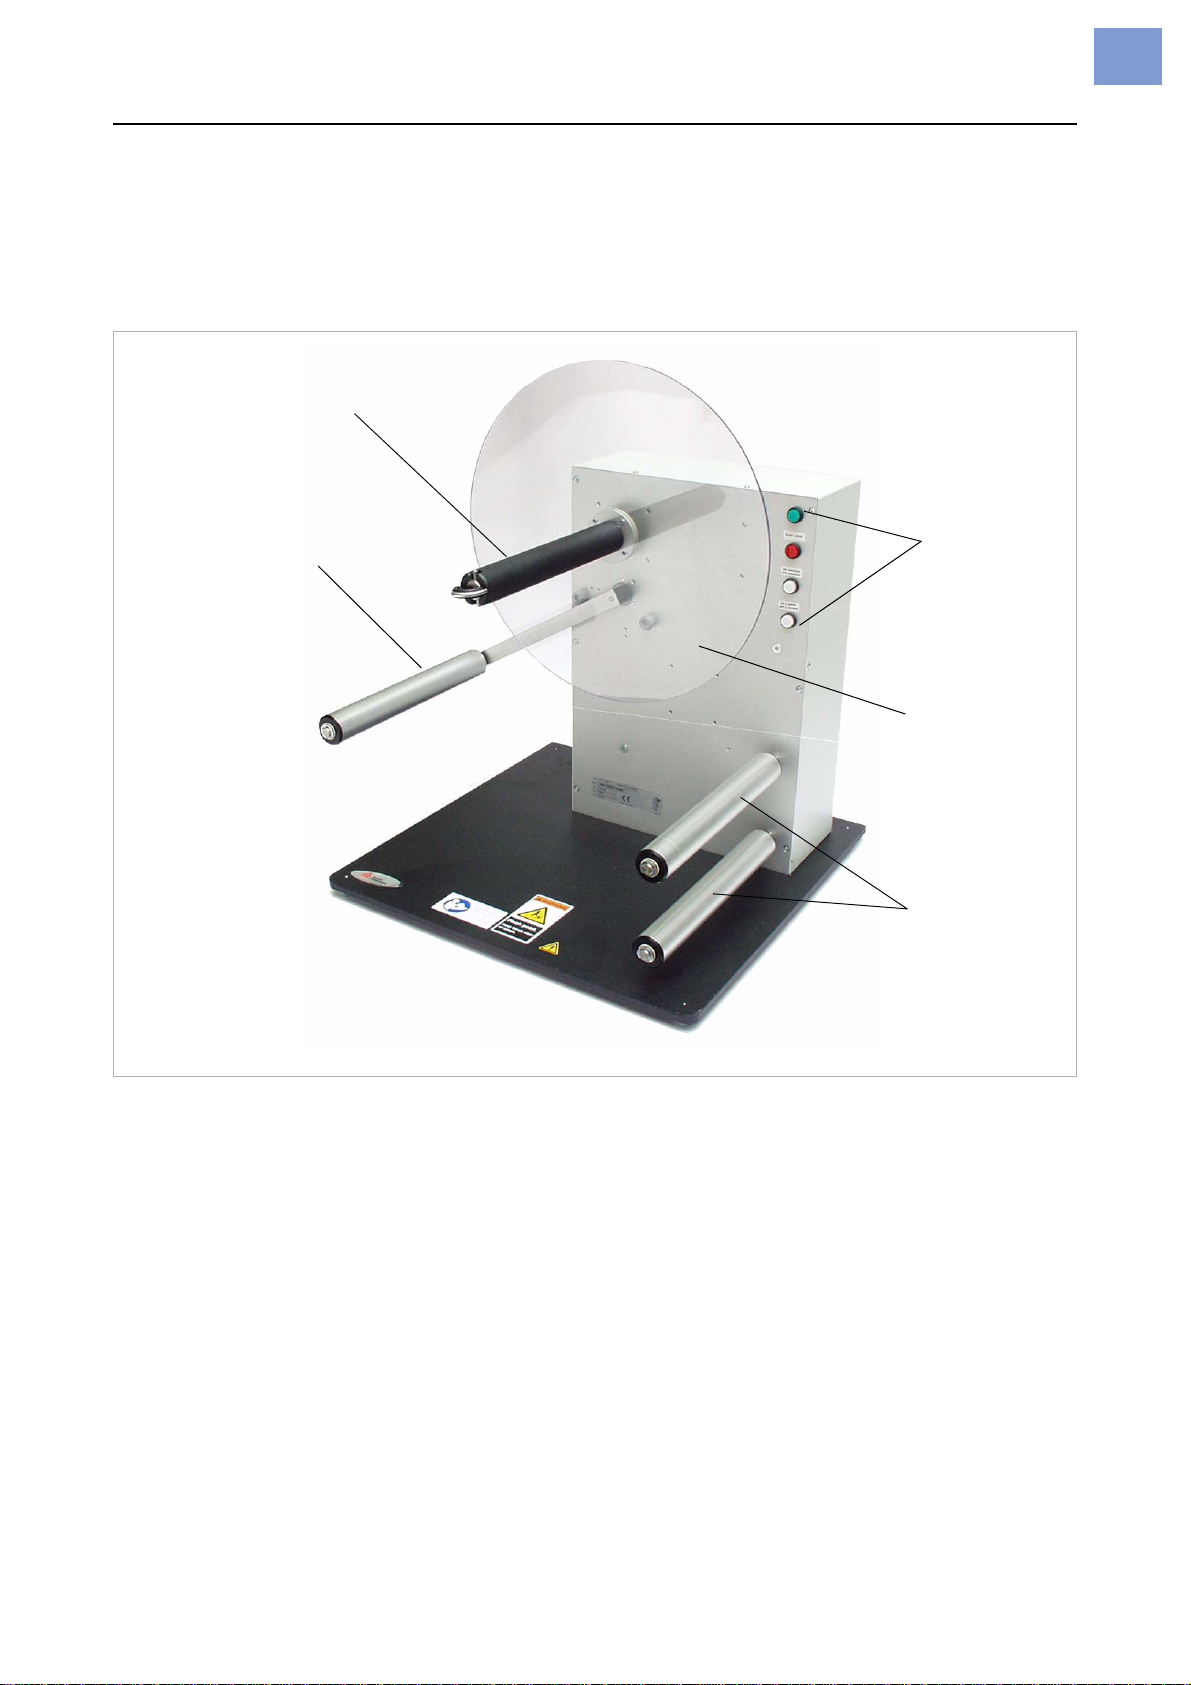
[3] Front view of the U-RX
Dancer arm
Evens out fluctuating
speed of the material
being fed.
Operating
buttons
Sets the unit
functions;
Displays the
rotating direction;
Deflection rollers
Ensure a wide
winding angle onto
the dancer arm,
thereby regulating
therewindingspeed.
Rewinding mandrel
Holds the material roll; has
to fit the internal diameter of
the material roll.
Inside guide plate
Ensuresthematerial
roll is rewound
straight.
06/09 Rev. 5.02-01 OPERATING INSTRUCTIONS Setting up, operation
U-RX
5
Connections
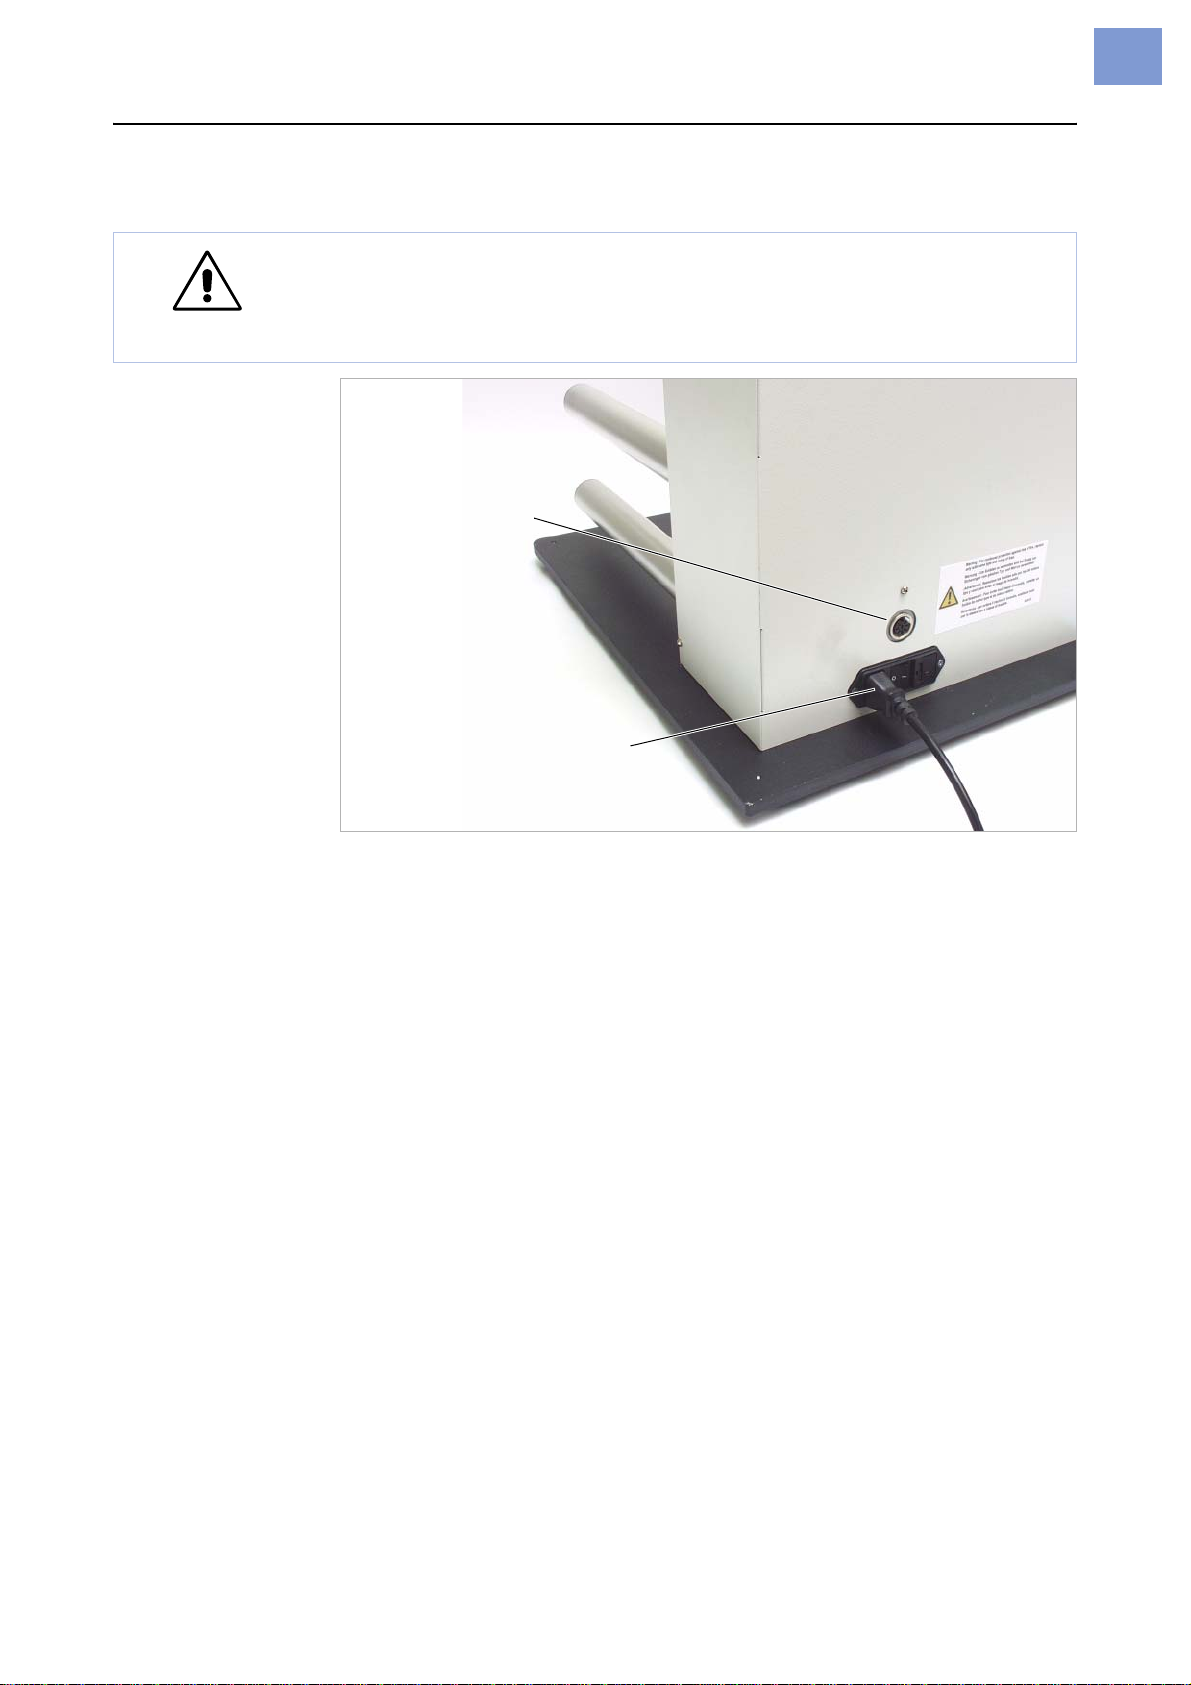
[4] Rear view of the U-RX
CAUTION! Add-on devices of an inferior quality may damage the unit!
«Connect the printer only to devices that fulfil SELV (safety extra-low
voltage) circuit requirements acc. to EN60950.
«Only connect OEM devices.
Power supply
Connectionto the power
supply using the power
cable provided.
Printer-stop interface
Error signal interface to
the printer. If connected
with the appropriate
cable,the printing stops,
if an error occurs at the
U-RX.This avoidspaper
jam.
06/09 Rev. 5.02-01 OPERATING INSTRUCTIONS Setting up, operation
U-RX
6
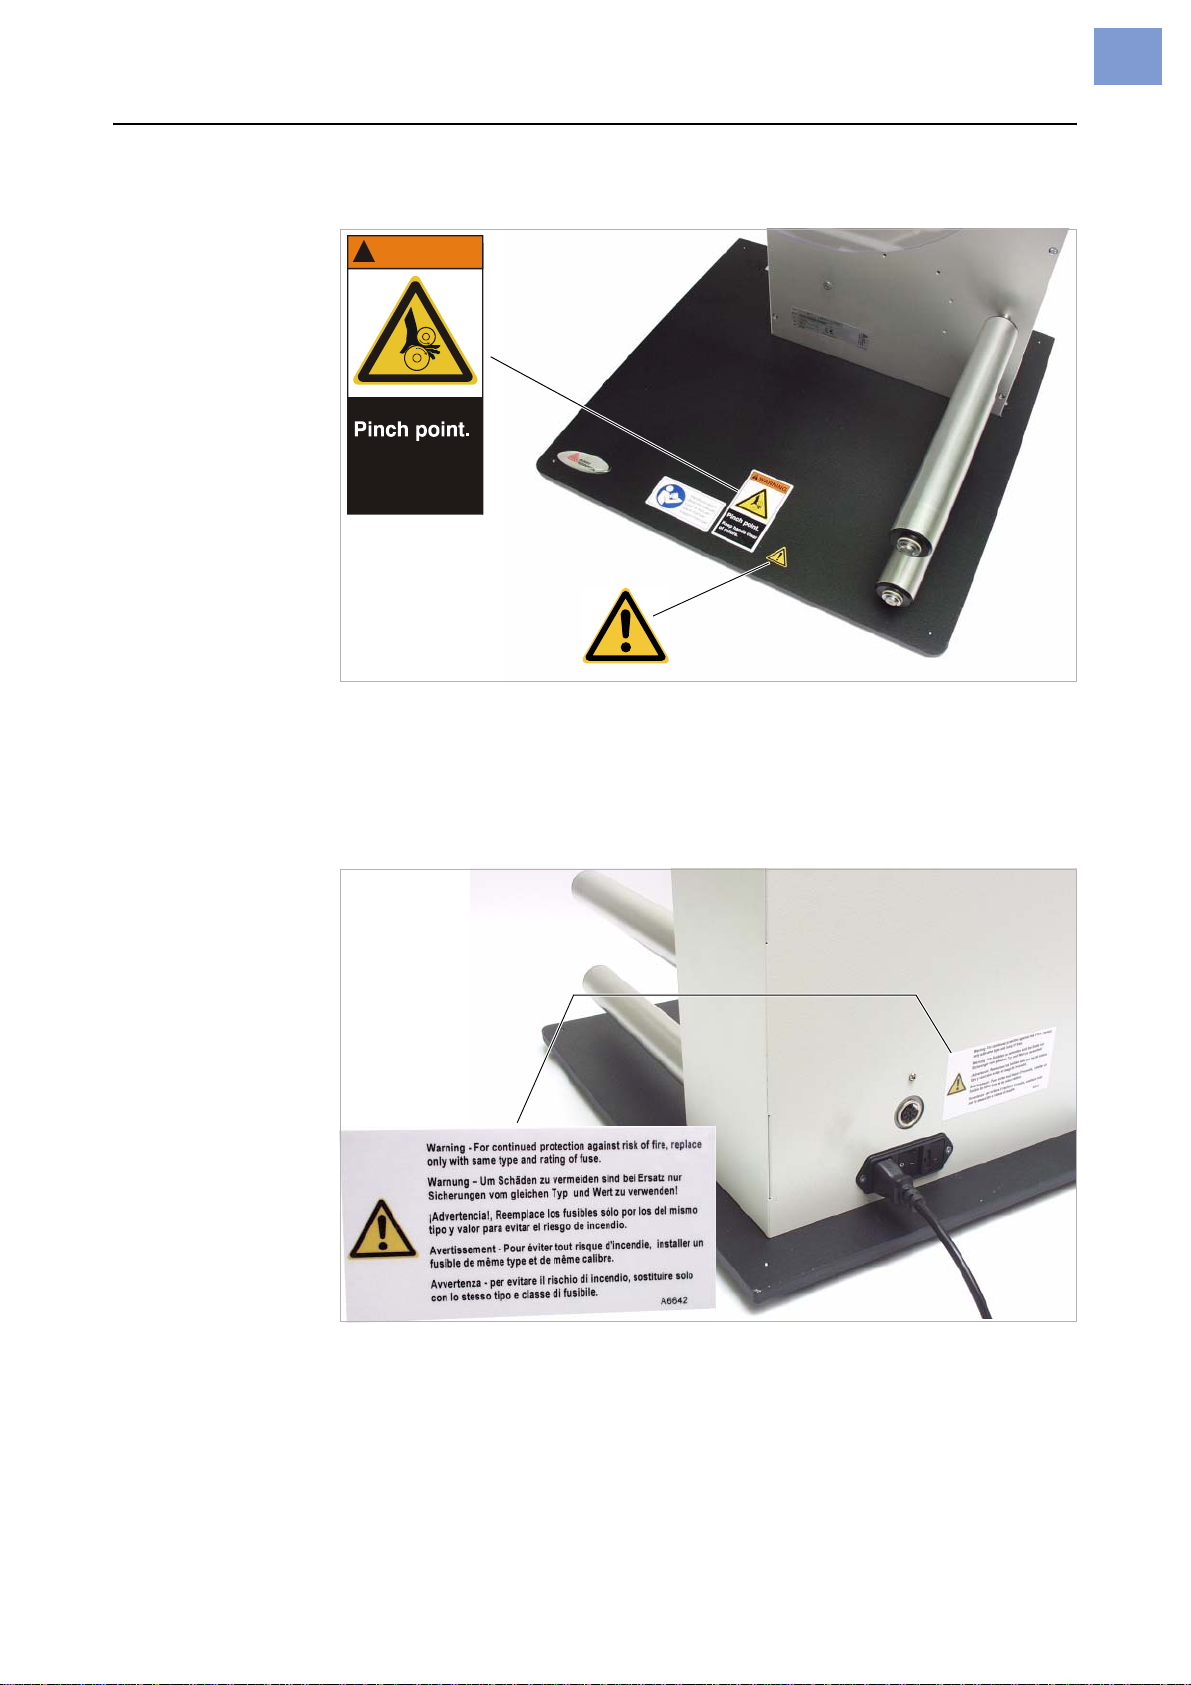
Warning labels on the U-RX
[5] Warning stickers on the base plate of the U-RX
•The label shown [5] above is a warning about getting caught in the printer’s
moving parts (part no. A5346).
•The label shown [5] below is a general alert about possible operational
hazards.
[6] Warning stickers on the back of the U-RX
•The sticker shown here [6] warns you not to replace the fuses for the power
supply with other types of fuses (part no. A6642).
«If one of these warning stickers is missing or illegible, it should be replaced
immediately.
WARNING
!
Keep hands clear
of rollers.
A
53
4
6
06/09 Rev. 5.02-01 OPERATING INSTRUCTIONS Setting up, operation
U-RX
7
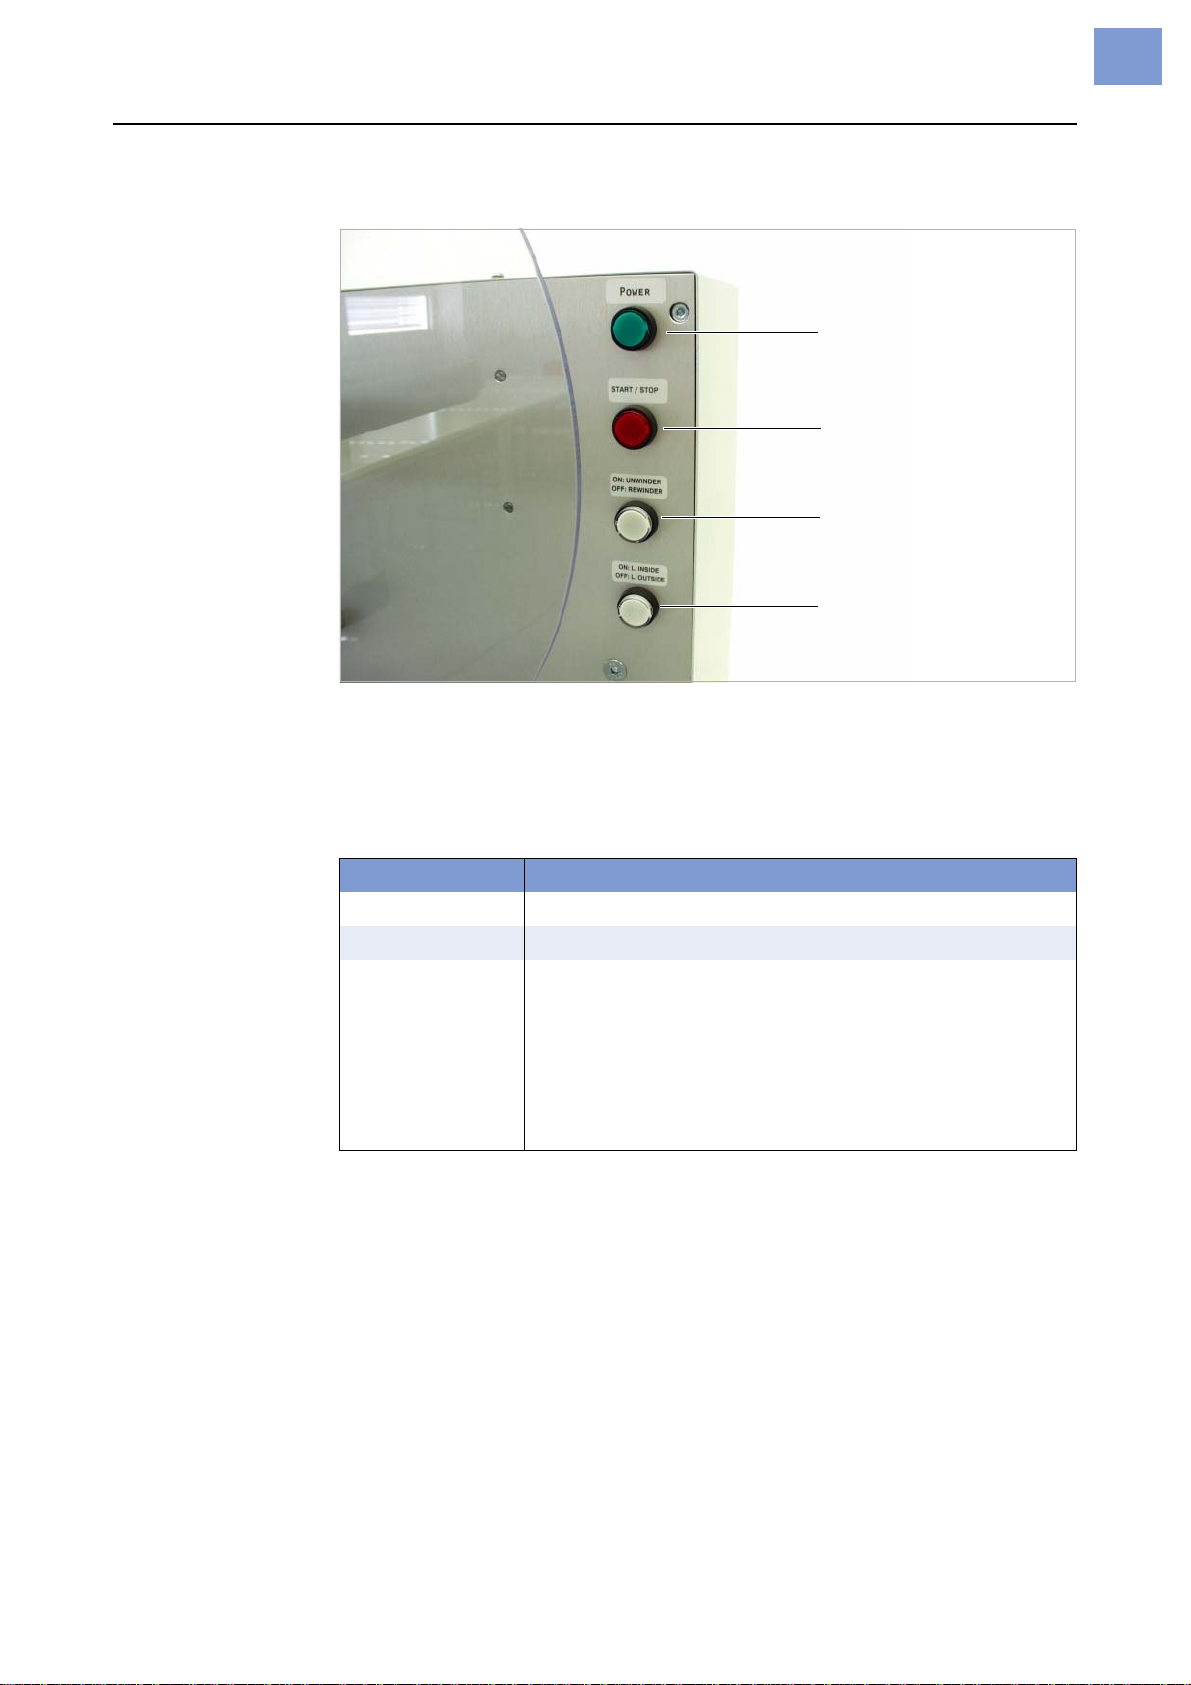
Operating buttons
[7] U-RX operating buttons
Power indicator
lamp Lights up when the unit is ready for use, in other words when the power cord
is plugged in and the on/off switch is at “0”.
Start/stop
button The start/stop light indicates the operational status:
The start/stop button does the following:
•Rewinder: Starts/stops the rewinding process.
•Unwinder: Starts/stops the unwinding process.
Unwinder/
rewinder Toggle between unwinding and rewinding mode.
•Light on: Unwinder
•Light off: Rewinder
Inside/outside
winding Toggle between inside and outside winding.
•Light on: Inside winding (label on the inside).
Light off: Outside winding (label on the outside).
Power indicator
Start/stop button/
light
Unwinder/rewinder
button/light
Inside/outside
windingbutton/light
Start/stop light: Message
On “Stopped” mode: Unit is ready for use, but stopped.
Off “Ready” mode: Unit is ready for use.
Flashing As Rewinder: Unit is currently rewinding material and
moving the dancer arm to the start position (material
initialisation).
As Unwinder: Unit is currently unwinding material and
moving the dancer arm to the rest position (material
initialisation).
Error message: Internal error (e.g., overheating).
[1] What the red light indicates
06/09 Rev. 5.02-01 OPERATING INSTRUCTIONS Setting up, operation
U-RX
8
Basic operation
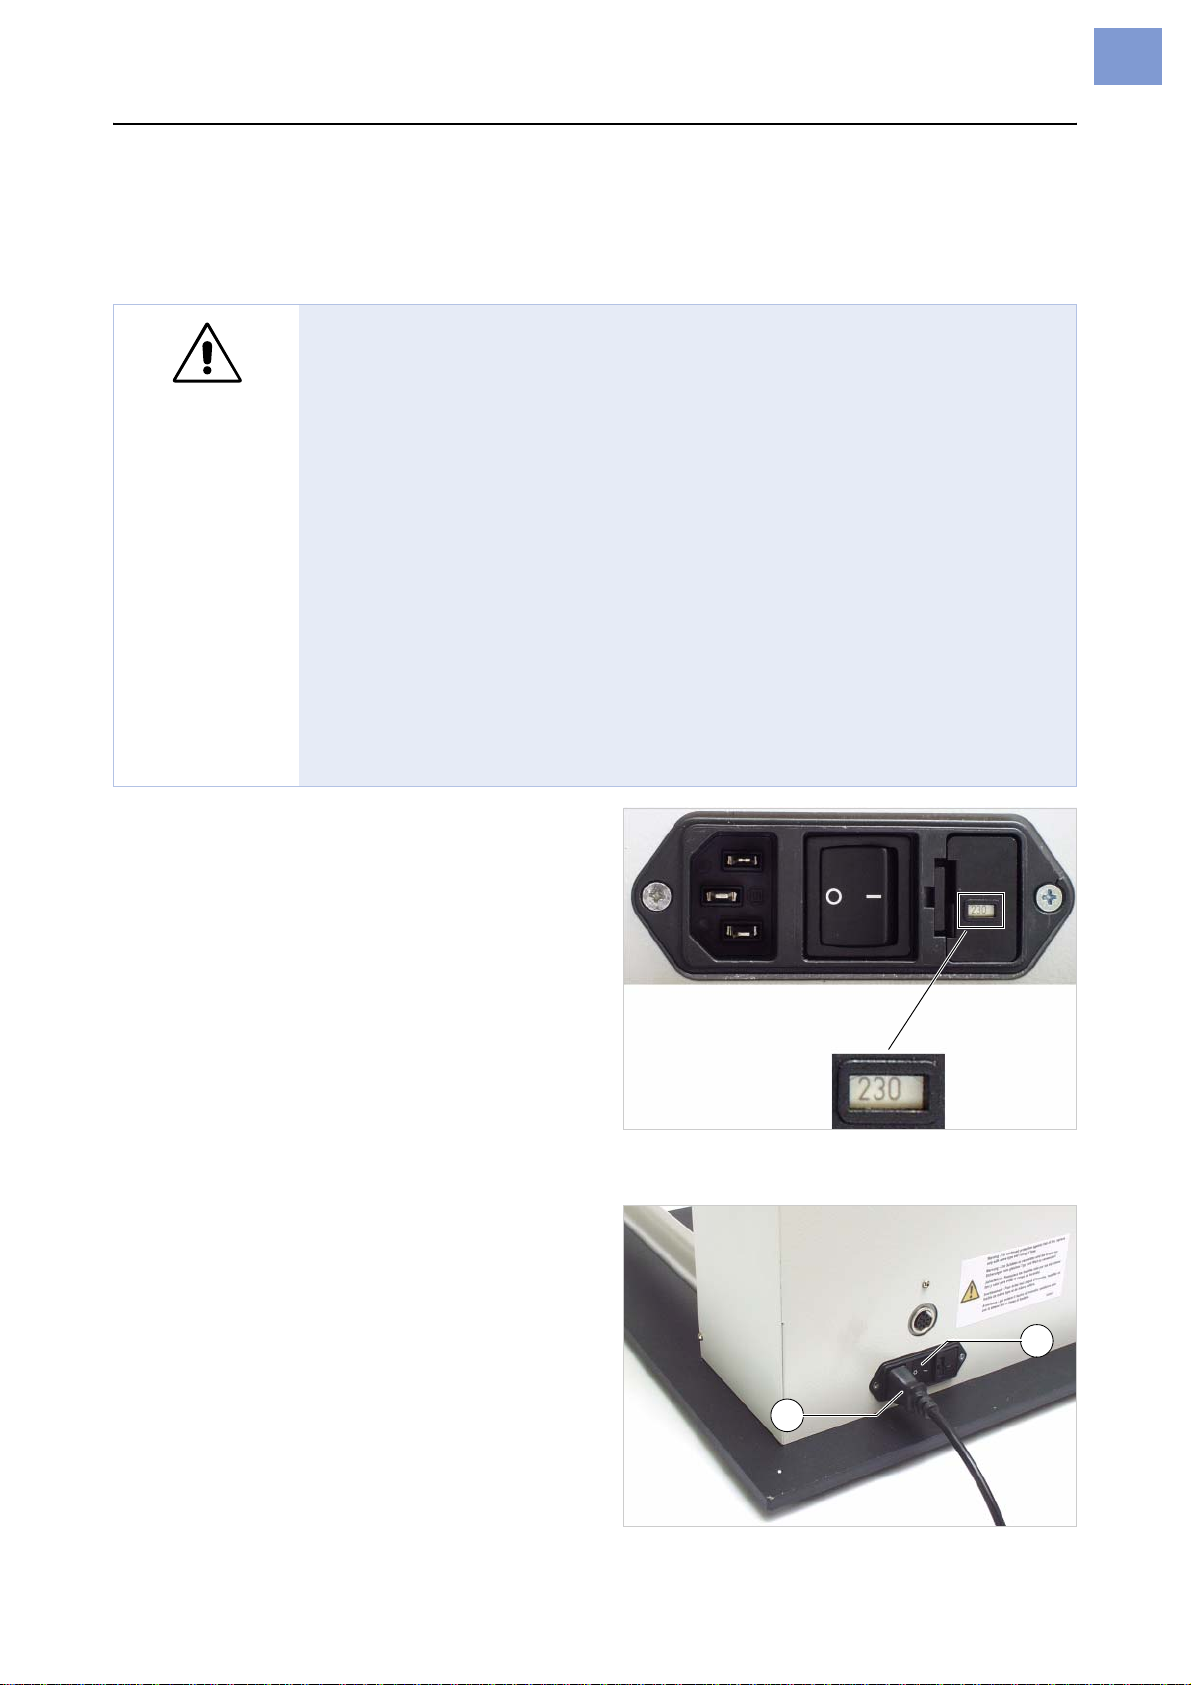
Plugging in and powering up
1. Ensure that the mains voltage set for the
unit is the same voltage as the local
electricity supply. To do this, look for the
number in the small window next to the
power switch [1]. This number indicates
the required voltage.
¯If the voltage set is not the same as the
local voltage, please call a qualified
technician to change the setting.
PFor further information, refer to the service
manual.
2. Ensure that power switch [2B] on the U-RX
is set to “0” (off).
3. Using the power cord [2A] supplied, plug
the U-RX into a socket connected to the
local electricity supply.
4. Turn on the unit (switch set to “I”).
WARNING!
The unit operates using mains voltage! Touching electrically live parts may
expose you to hazardous electrical currents and may lead to burns.
«Make sure that the unit is switched off before connecting the power cable.
«Only operate the unit with mains voltage set in the fuse insert[1].
«Ensure that the unit is set to the mains voltage supplied by your electricity
provider.
«Only connect the unit to a grounded power socket fitted to authorised
standards.
«The power cable should not be more than 3meters long.
The device can only be disconnected completely by pulling off the power
supply cable. For this reason:
«Make sure, that the power supply socket for the device is readily
accessible!
«In case of emergency, switch off the device and disconnect the power
supply cable!
[1] Check the mains voltage set for the U-RX on the power
socket of the unit (shown here as 230V).
[2] U-RX power supply
A
B

06/09 Rev. 5.02-01 OPERATING INSTRUCTIONS Setting up, operation
U-RX
9
Setting up the print-stop
function
The print-stop function prevents paper
jams between the printer and the U-RX in
case the rewinder stops. If this happens,
printing stops.
¯The printer must be equipped with an
USI signal interface (regardless, if 5V or
24V version).
1. Turn off the printer and the U-RX.
2. Connect the printer to the U-RX with the
A7264 cable.
3. Turn both units back on.
4. Set the following parameters for the
printer:
•SYSTEM PARAMETERS > Start source = “USI”
•DP INTERFACE > Start Print Mode =
“Level low active”
CAUTION!
Paper jam between printer and
U-RX can cause dangerous si-
tuations.
«Always apply the print-stop
function.
06/09 Rev. 5.02-01 OPERATING INSTRUCTIONS Setting up, operation
U-RX
10
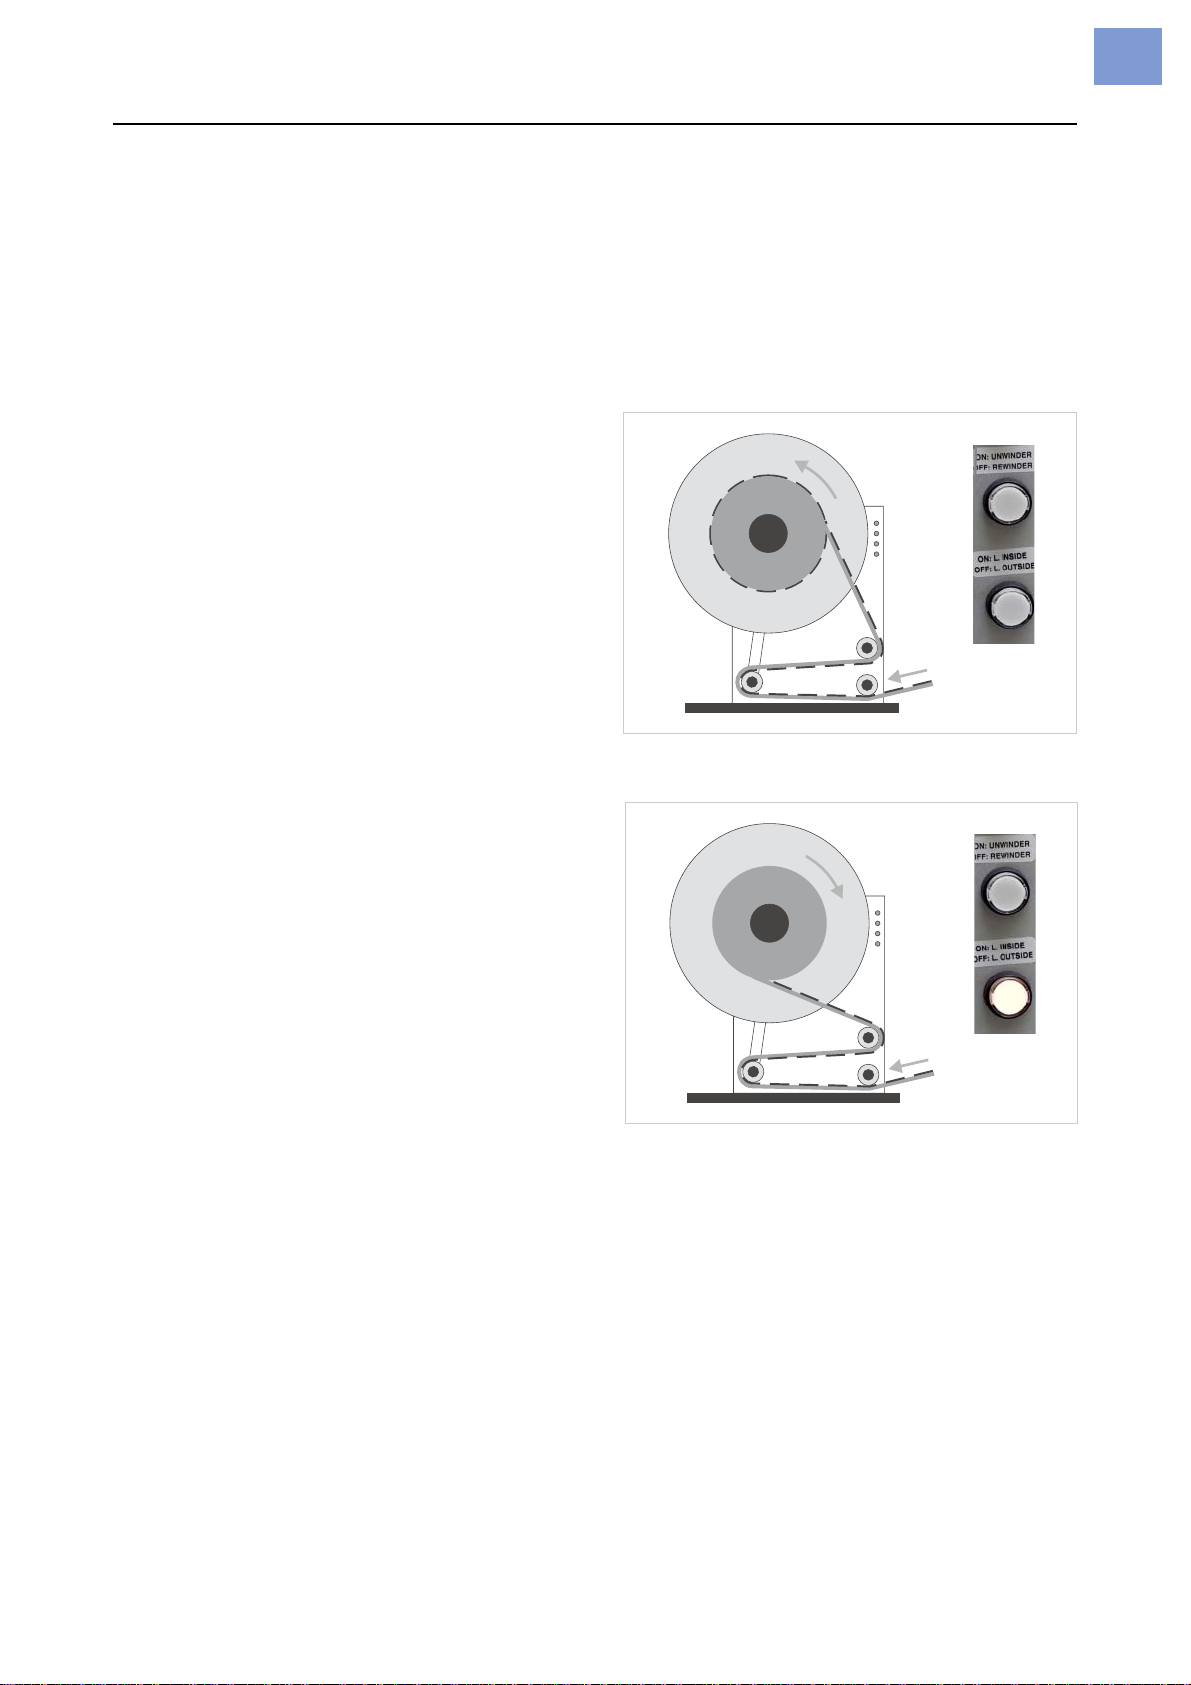
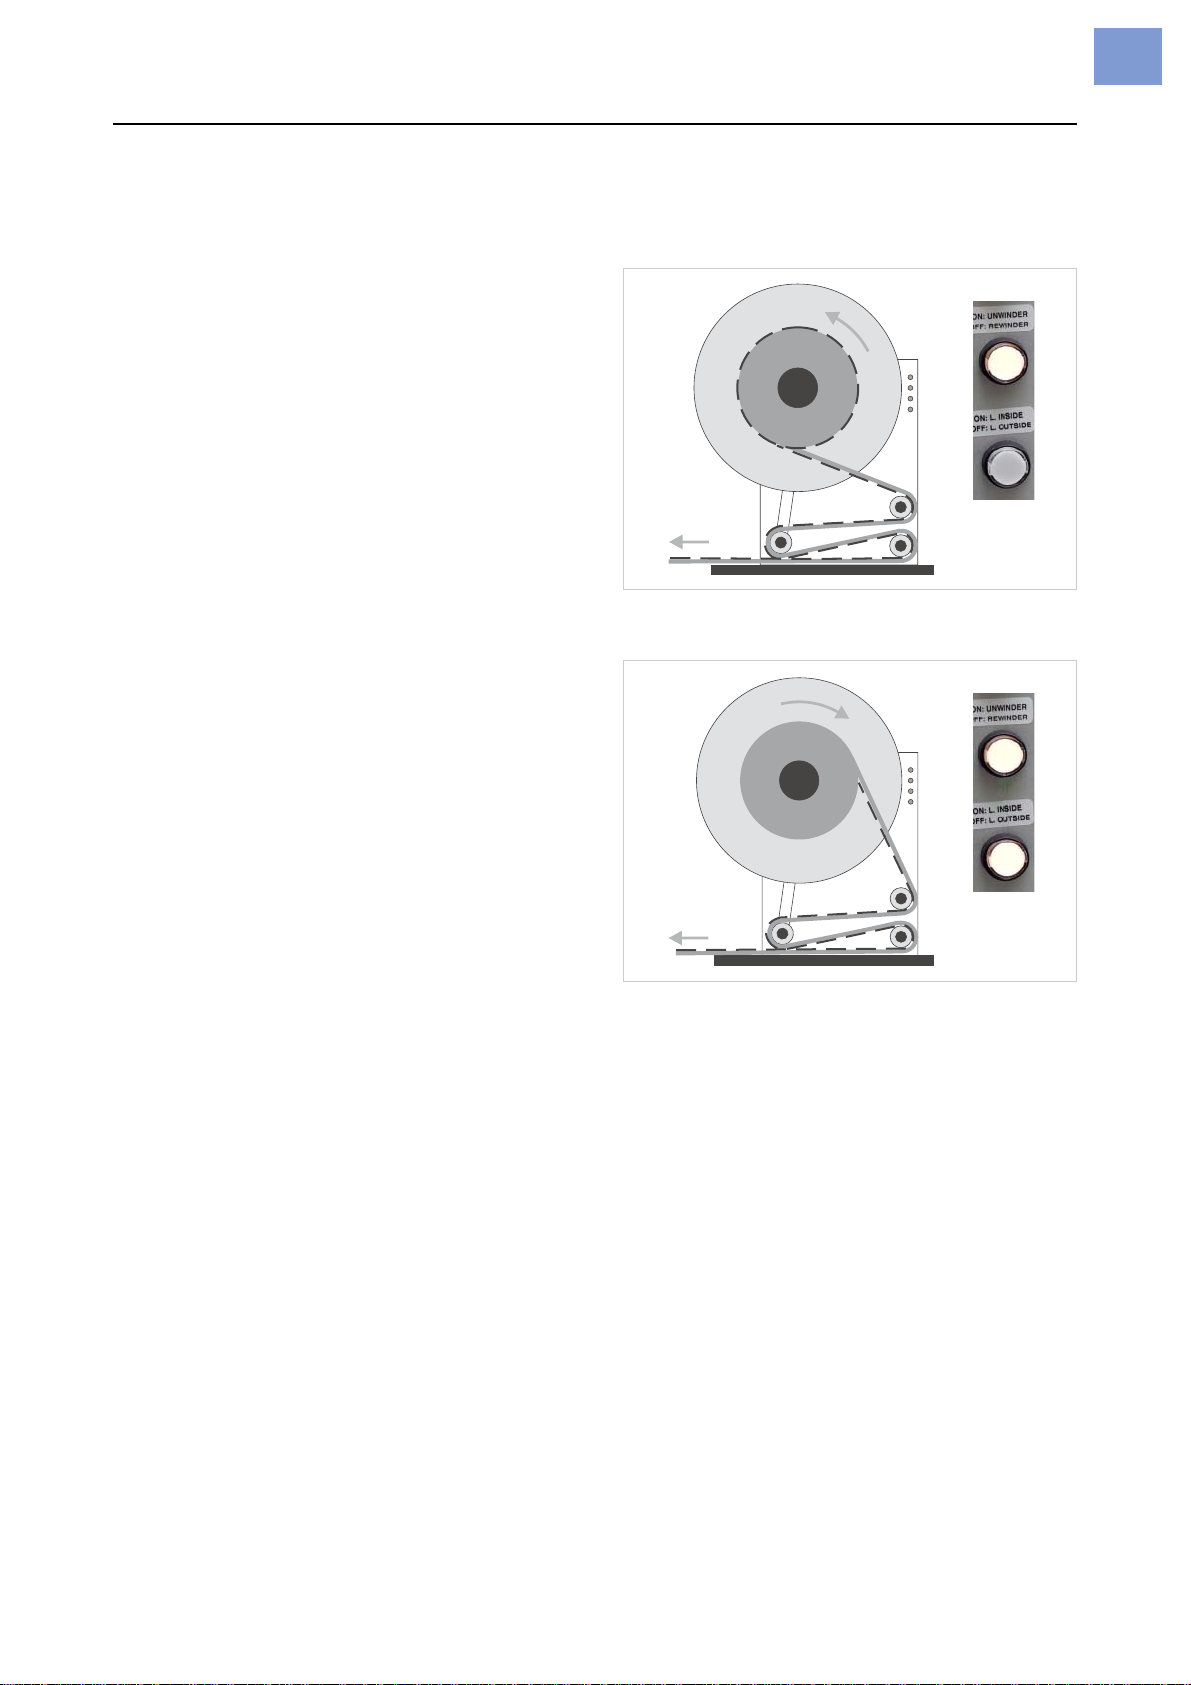
Rewinding settings
«Press the button to turn the indicator light
on or off.
¯Changes to the white buttons only
become effective once the operational
mode has been switched from “stopped” to
“ready”.
•Rewinding direction “label on the outside”:
neither of the two white buttons may be lit
[3].
•Rewinding direction “label on the inside”:
the lower white button is lit, but the one
above is not [4].
[3] Winding diagram and setting for rewinding with the label on
the outside
[4] Winding diagram and setting for rewinding with the label on
the inside.
06/09 Rev. 5.02-01 OPERATING INSTRUCTIONS Setting up, operation
U-RX
11
Settings for unwinding
«Press the button to turn the light on or off.
•Unwinding direction “label on the outside”:
the upper white button is lit, but the one
below is not [5].
•Unwinding direction “label on the inside”:
both white buttons are lit [6].
[5] Windingdiagramand settingforunwindingwiththelabelon
the outside.
[6] Windingdiagramand settingforunwindingwiththelabelon
the inside.
06/09 Rev. 5.02-01 OPERATING INSTRUCTIONS Setting up, operation
U-RX
12
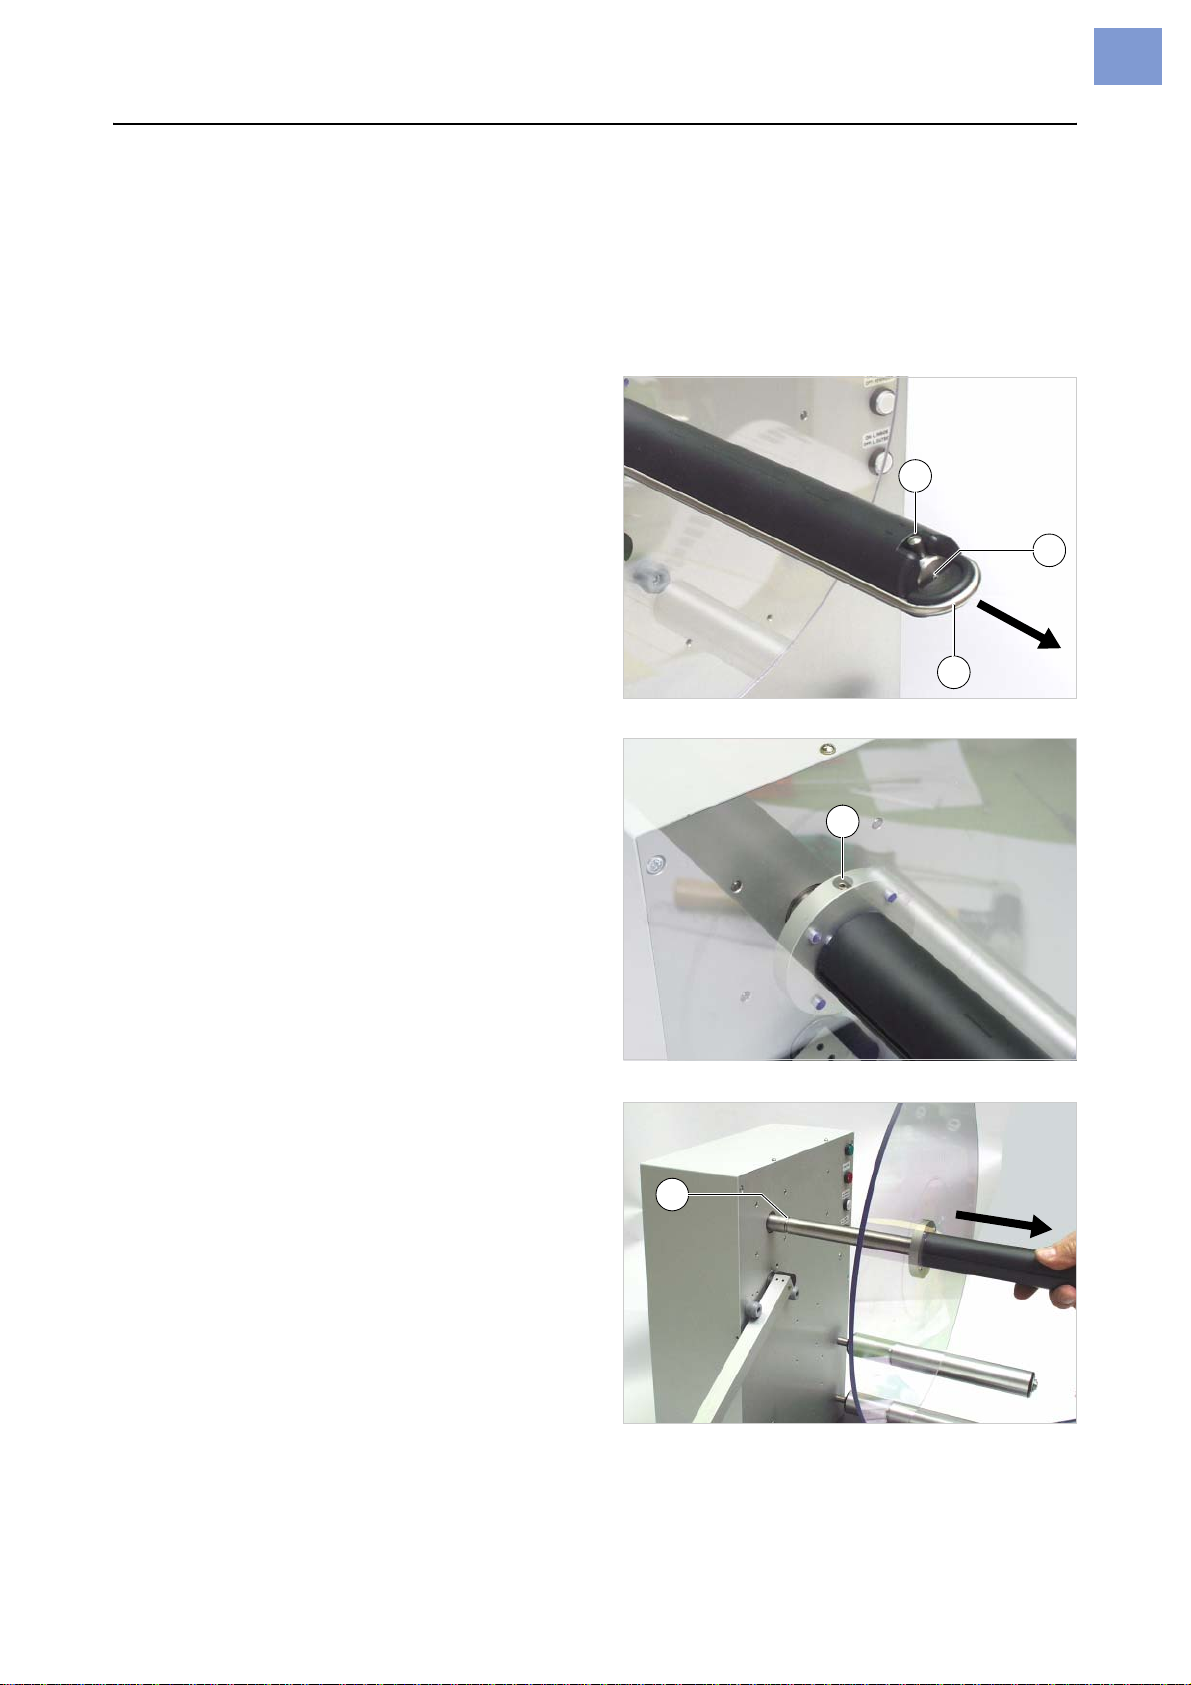
Assembling a rewinding
mandrel with a different
diameter
Tools
2mm Allen screwdriver
Dismantling
1. Pull out the lock clamp [7C].
2. Loosen the set screw [7B], unscrew [8A]
completely.
3. Push out parallel pin [7A] laterally.
4. Pull the rewinder mandrel off the axle [9].
Assembly
Assemble the rewinder mandrel in reverse
order to dismantling it. Doing so, ensure
that:
¯The set screw [8A] catches in the
groove [9A] of the axle.
[7] Outer rewinding mandrel fastener
[8] Inner rewinding mandrel fastener
C
B
A
A
[9] Pulling out the rewinder mandrel
A
06/09 Rev. 5.02-01 OPERATING INSTRUCTIONS Setting up, operation
U-RX
13
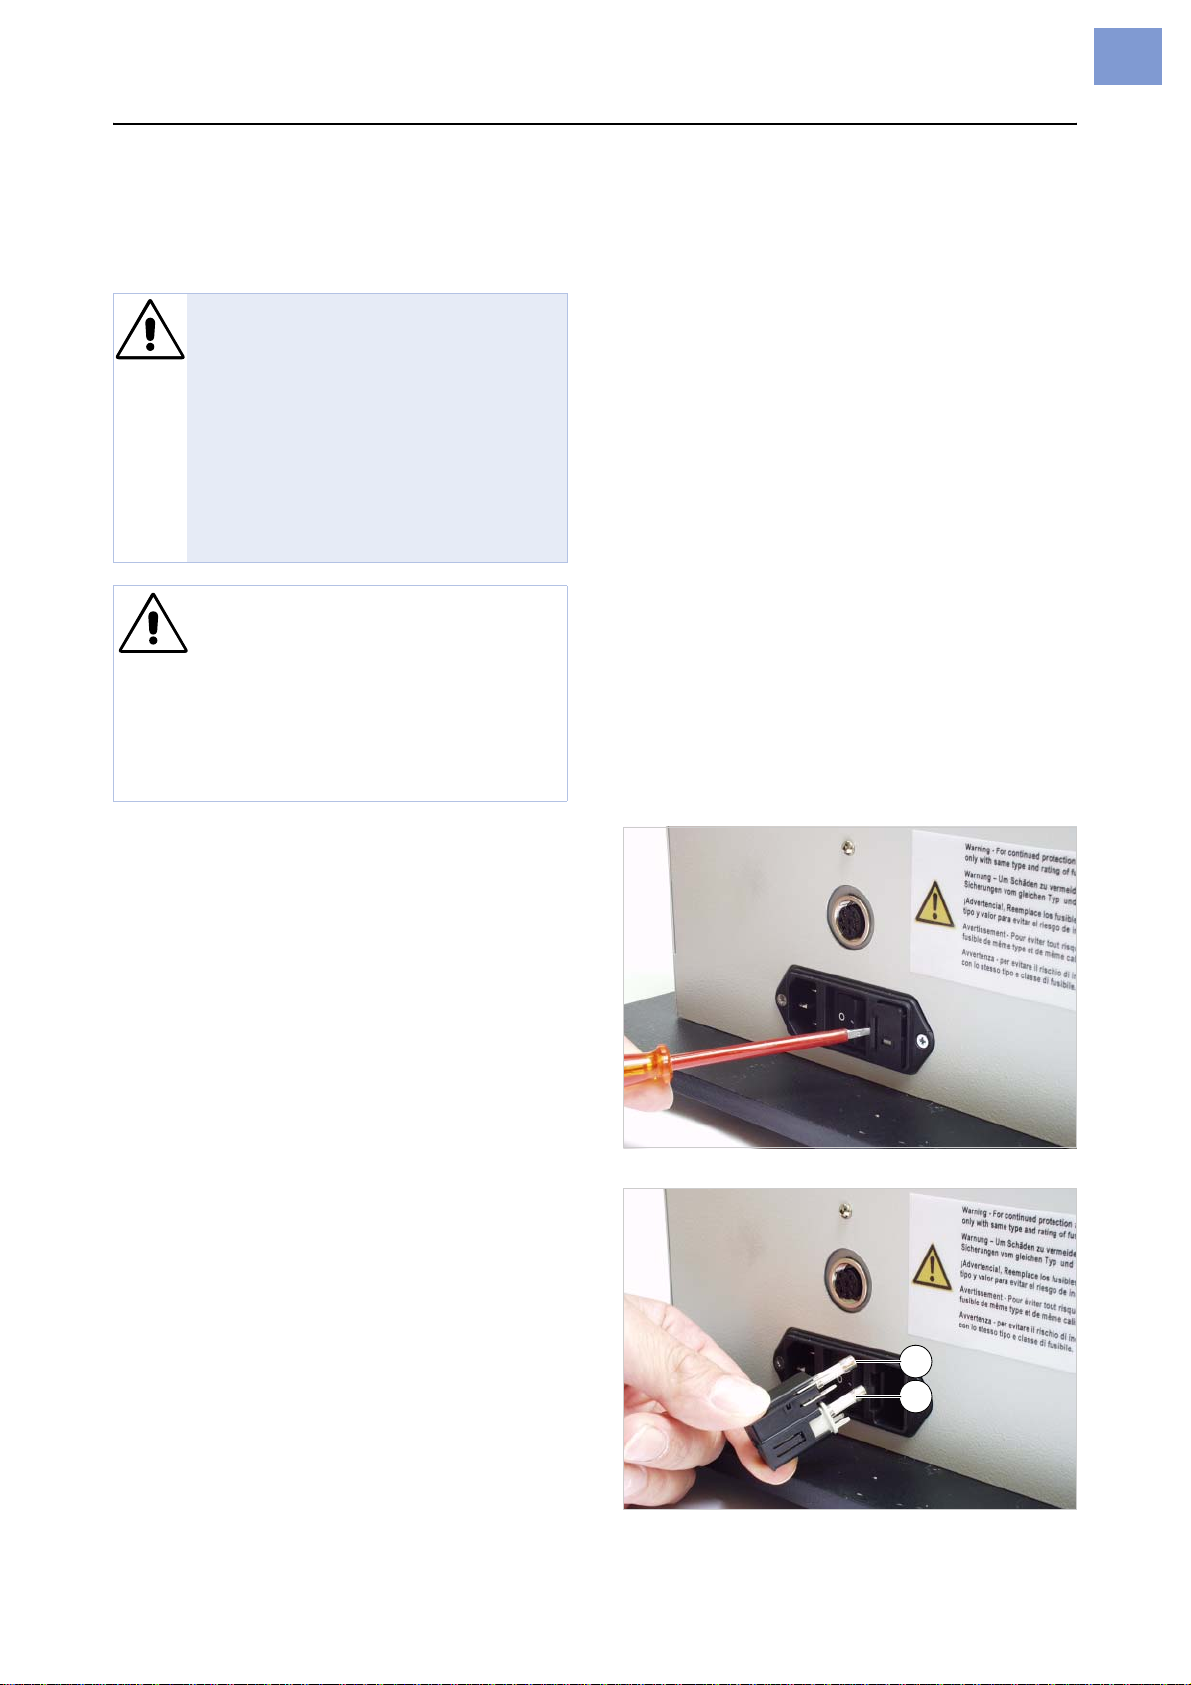
Changing fuses
Required fuse type: T2AH/250V
(Part number: A8676)
Tools
Small screwdriver
1. Turn unit off. Remove power plug.
2. Remove the fuse insert to the right of the
power switch. To do this, press the latch to
the side [10] and pull out the insert [11].
3. Exchange the fuses[11A].
WARNING!
The unit operates using mains
voltage! Touching electrically live
partsmayexposeyoutohazardous
electrical currents and may lead to
burns.
«Switch off the device and unplug
the power cable before removing
the fuse insert.
CAUTION! - Risk of fire, if a wrong
fuse type is inserted.
«Only replce fuses with the type and
rating specified in this manual.
«If you are not sure about the correct
fuse type, contact qualified service
personnel.
[10] Open the fuse insert latch with a screwdriver.
[11] Removing the fuse insert
A
A

06/09 Rev. 5.02-01 OPERATING INSTRUCTIONS Setting up, operation
U-RX
14
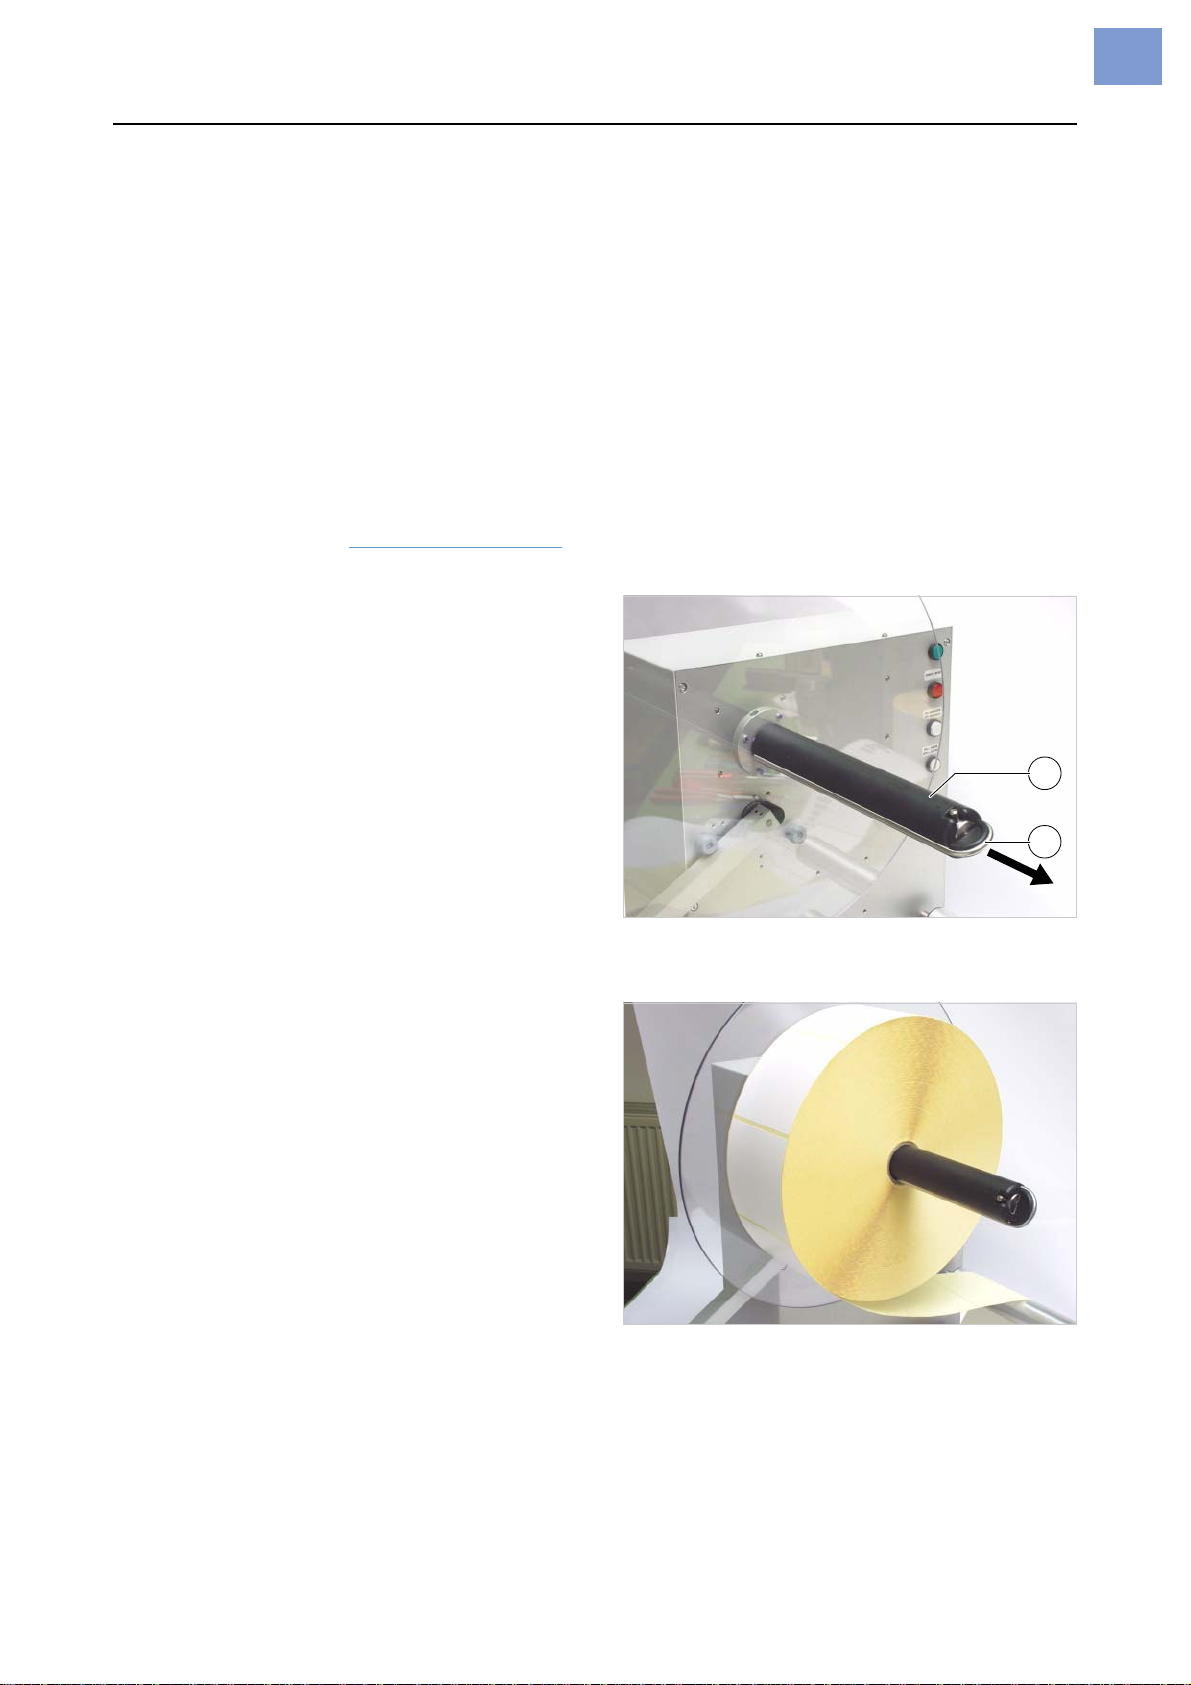
Inserting the material
U-RX as rewinder
•U-RX is turned on and ready for operation
(red start/stop button is lit).
•Operational mode and winding direction
are already set for the unit.
PHow? – See section Rewinding settings on
page 10.
1. Pull out lock clamp [1B] from the rewinding
mandrel [1B].
2. Thread the material according to the
winding diagram. Slide the lock clamp over
the end of the material[2].
Optional: Rewinding onto a cardboard
core. Slide the lock clamp under the
cardboard core. Fasten the end of the
material to the cardboard core (adhesive
tape).
3. Press the start/stop button.
The U-RX will now rewind the material until
the dancer arm comes to the middle
position. The start/stop button light flashes
during the rewinding process. When the
desired position is reached, the light is
turned off.
WARNING!
•Rotating parts can trap items and draw them in!
«When working on the U-RX, donot wear loose jewellery, long sleeves, long
hair, and similar.
«The unit should only be operated by trained users.
•The U-RX can process material rolls up to about 28kg. Using an improper
lifting technique when changing the rolls can lead to back injury. Rolls that
are dropped can lead to foot injury.
«Try to lift the unit in a safe way, for example by
– carrying it close to your body, by
– bending your knees, and by keeping your back straight.
«Wear safety shoes.
[1] The U-RX’s rewinding mandrel
ARewinding mandrel
BLock clamp
B
A
[2] Securing the end of the material under the lock clamp
06/09 Rev. 5.02-01 OPERATING INSTRUCTIONS Setting up, operation
U-RX
15
¯During this time, the printer may not
send any material to the U-RX.
¯If the red light does not turn off, there
has been an error. In this case, repeat
step 3.
U-RX as unwinder
•U-RX is turned on and ready for operation
(red start/stop button is lit)
•Operational mode and winding direction
are already set for the unit.
PHow? – See section Settings for unwinding
on page 11.
1. Pull out lock clamp [1B] from the rewinding
mandrel [1B].
2. Insert the material roll according to the
winding diagram and fasten it with the lock
clamp.
¯To do this, slide the lock clamp under
the cardboard core.
3. Press the start/stop button.
TheU-RXwillnowunwindthematerialuntil
the dancer arm comes to the resting
position (left stop). The start/stop button
light flashes during the unwinding process.
When the desired position is reached, the
light is turned off.
¯During this time, the U-RX may not
send out any material.
¯If the red light does not turn off, there
has been an error. In this case, repeat
step 3.
[3] The U-RX’s rewinding mandrel.
CRewinding mandrel
DLock clamp
B
A
[4] Material is inserted and fastened with the lock clamp.
06/09 Rev. 5.02-01 OPERATING INSTRUCTIONS Setting up, operation
U-RX
16
Cleaning the unit
Cleaning agents
•Housing, base plate: Commercially available neutral cleaning liquid
•Rollers, rewinding mandrel: Cleaning solvent, label remover solvent (part no.
90073)
Cleaning
«Wet a cloth with the cleaning solvent and wipe down the part that is dirty.
WARNING!
Maintenance and cleaning may result in hazardous situations. Accidents
can occur by mechanical or electrical means if safety instructions are not
observed!
«Turn off the unit and remove from the power supply prior to cleaning or
maintenance work!
«On no account should liquid be allowed to enter the unit!
«Do not use any of kind of spray directly on the unit! Moisten a cloth with a
cleaning agent to clean the unit!
«Repairs to the unit may only be carried out by a trained service technician!
CAUTION! - Observe the following instructions in order not to damage the
unit:
«Do not use anycleaning agents that could damageor destroy the finish, the
labels, the display, the nameplates, the electrical components, etc.
«Do not use any cleaning agents that are abrasive or damaging to plastics.
Avoid acid or alkaline solutions.
WARNING!
Cleaning solvent is highly flammable and can lead to fires.
«Follow safety guidelines for working with flammable liquids.
«Do not smoke.
Other manuals for U-RX
2
Table of contents
Other Novexx Solutions Printer Accessories manuals


