Novolink Lightscape LS-101B-WLVCTL Quick start guide

Controller
Motion Sensor
& Spotlight
Installation and Use
LS-101B-WLVCTL
LS-201-WMSR-SPL

Contents
The Novolink Lightscape™ System
What’s Included
Download the App
Tools You’ll Need
Controller Installation
Motion Sensor Installation
Spotlight Installation
Online Resources & Help
2
4
6
9
11
25
31
41

32
Novolink Lightscape™ Landscape Lighting System gives you simple,
convenient, and wireless control of your hard-wired, low-voltage
landscape lighting environment.
Our Controller’s unique connector is the key. Attach it directly to
your existing low-voltage system, and gain command over the
electrical current powering your lights. It grants you Bluetooth®
wireless access to operate your landscape lighting.
Important: Set your transformer to MANUAL ON, or powered
ON continuously. Turn timers and photo cells OFF. This allows the
Novolink Lightscape™ system optimal uninterrupted operation.
The Novolink
Lightscape™ System
With the Controller in place, use our handy Novolink Lightscape™
App to schedule when lights will turn on and when they’ll turn off,
whether at a specific time, or at dusk and dawn.
Add the Motion Sensor and Spotlight, and you can set your lights
to turn on whenever the sensor detects motion. Our spotlights are
battery-powered and wireless, and can be placed almost anywhere.
Install multiple Controllers, Motion Sensors and Spotlights to create
and control Zones around your home.
Side Yard
On :
O :
5:30 pm
1:00 am
Zone 1
Zone 2
!
54
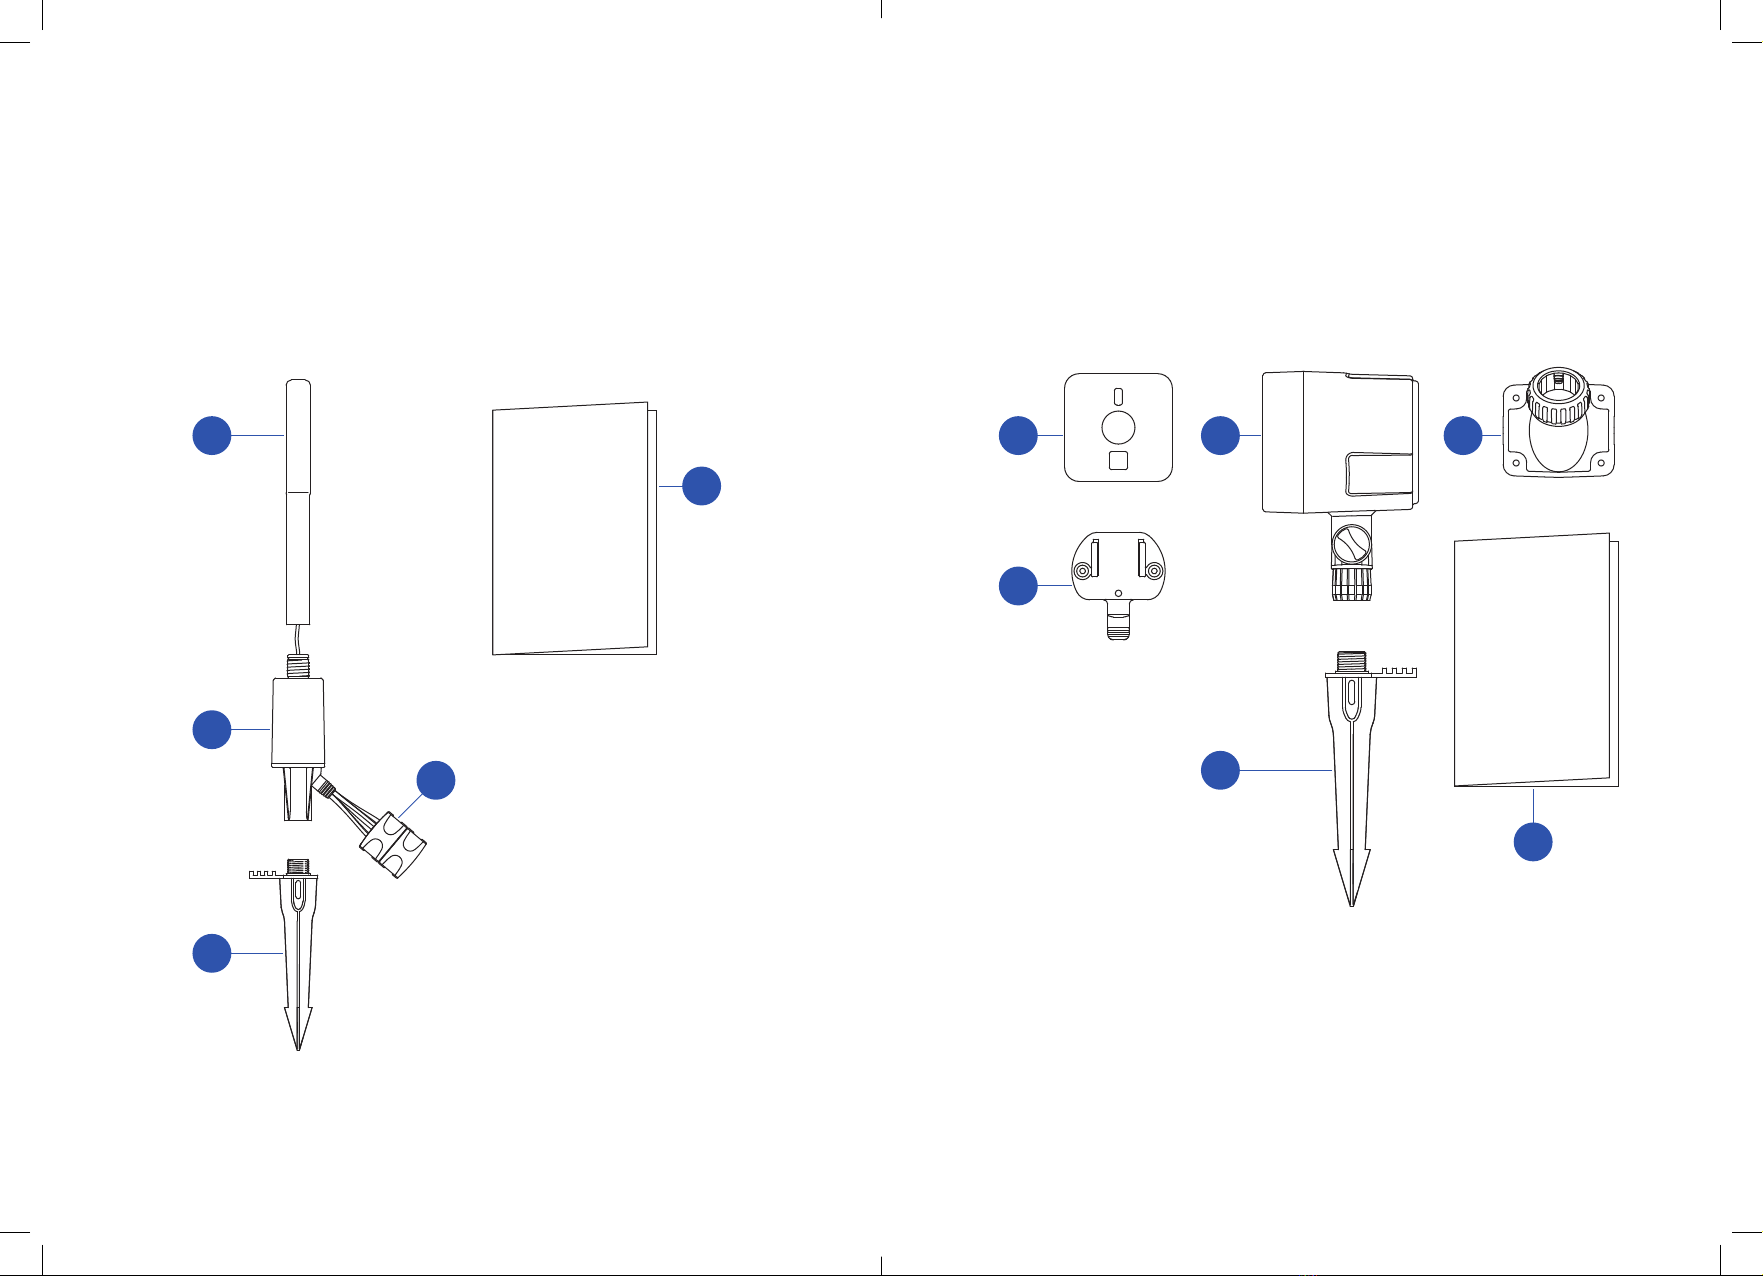
What’s Included
Motion Sensor & SpotlightNovolink Lightscape™ Controller
Quick
Start
Guide
Quick
Start
Guide
1motion sensor
2sensor wall mount
3spotlight
4stake
5spotlight wall mount
6quick start guide
1antenna
2main body
3connector
4stake
5quick start guide
1 1 3
4
5
2
6
2
3
5
4
76
Download the
Novolink Lightscape™
App
Use the app to:
- schedule when lights turn on or off
- set motion sensor preferences
- create separate zones for each Controller
(like Front Yard, Backyard, Pool, etc.)
- connect more equipment to your system
- test your lights
1. Before you install any Novolink
Lightscape™ components, download the
app from Google Play (Android) or from
the App Store (iOS).
The app requires a device with
Bluetooth®wireless capability.
2. Make sure your device’s Bluetooth® is ON. You may find
this in your device settings.
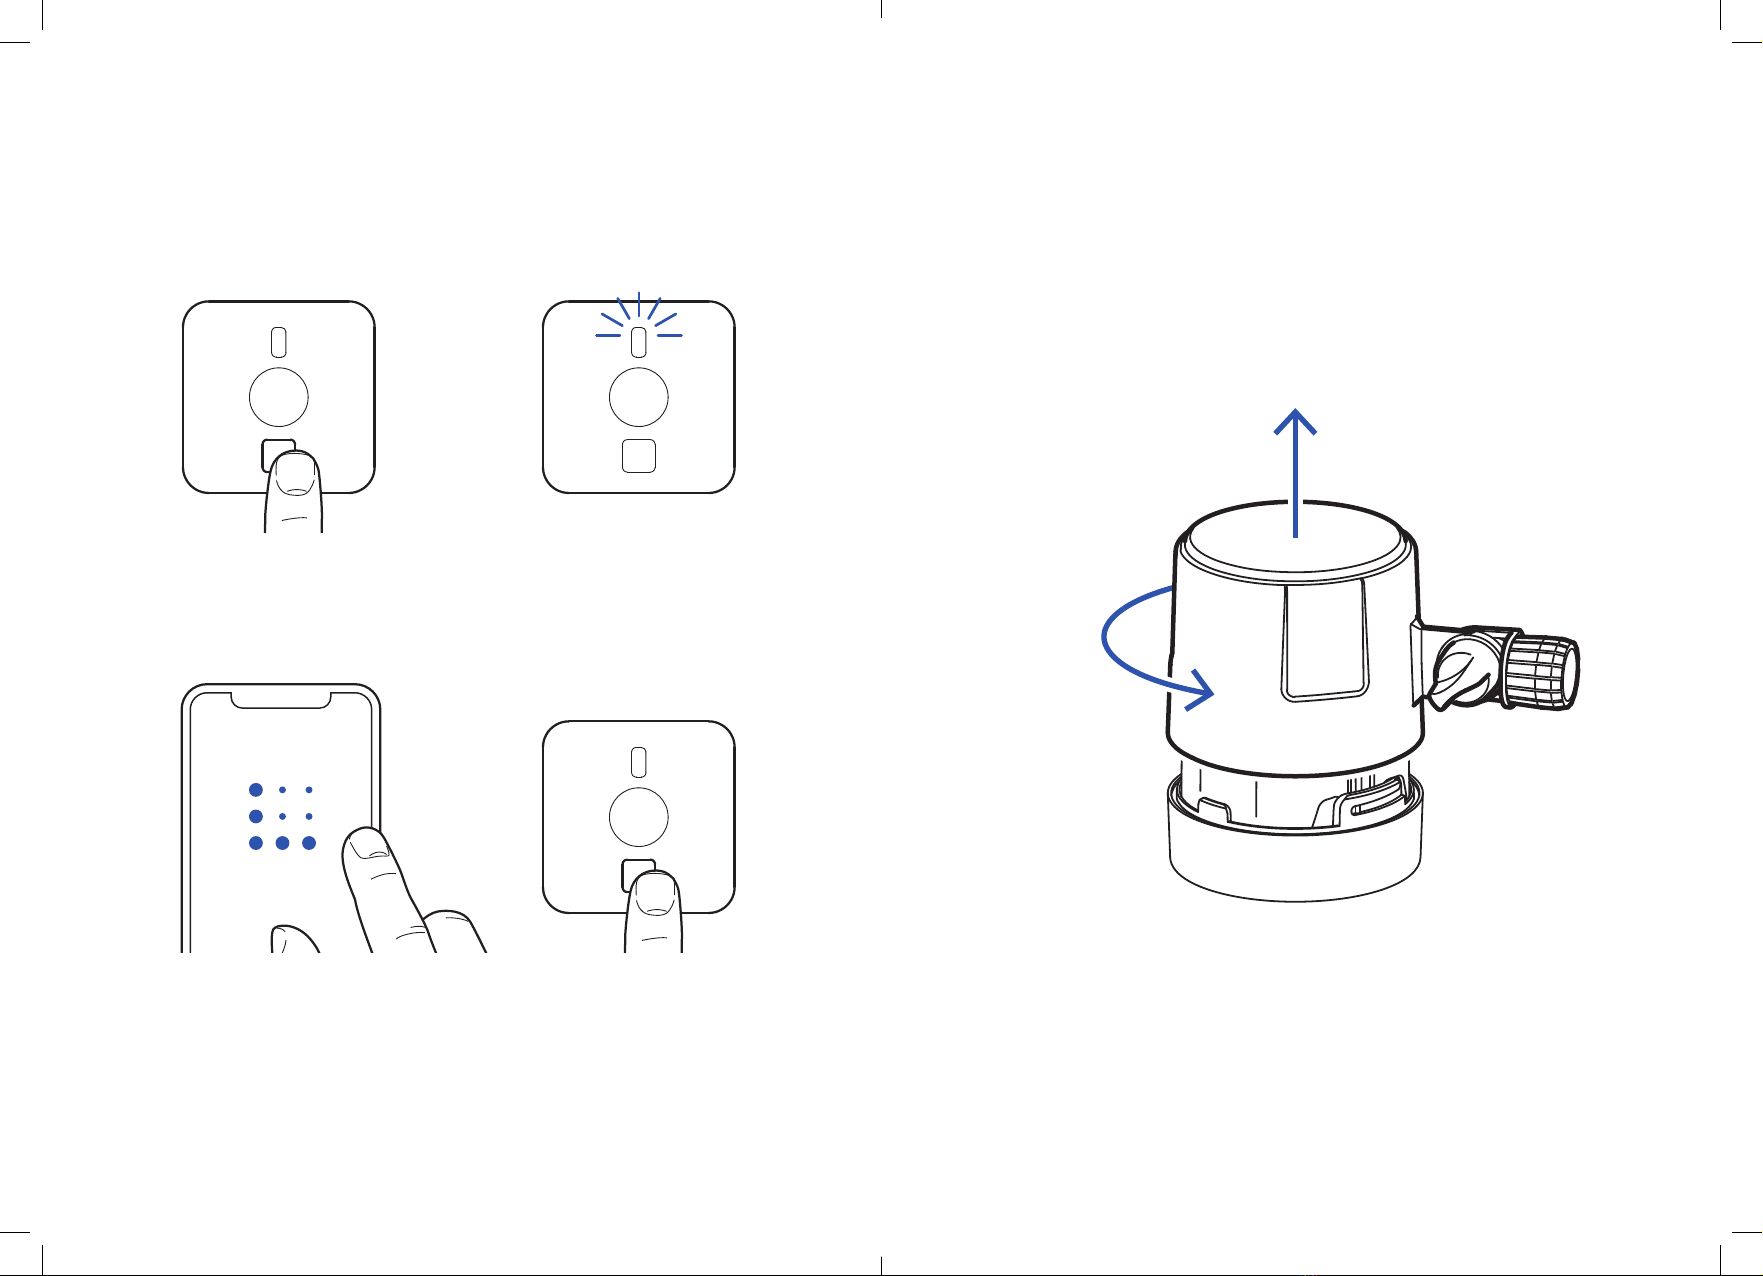
3. Open the app, and follow the prompts to activate a component
(like the Controller).
Note: you can activate more than one component at one time.
Visit novolinkinc.com/lightscape for up-to-date instructions on
how to use the app, and our FAQ, based on real customer input.
SCAN THIS CODE TO
DOWNLOAD THE APP
9
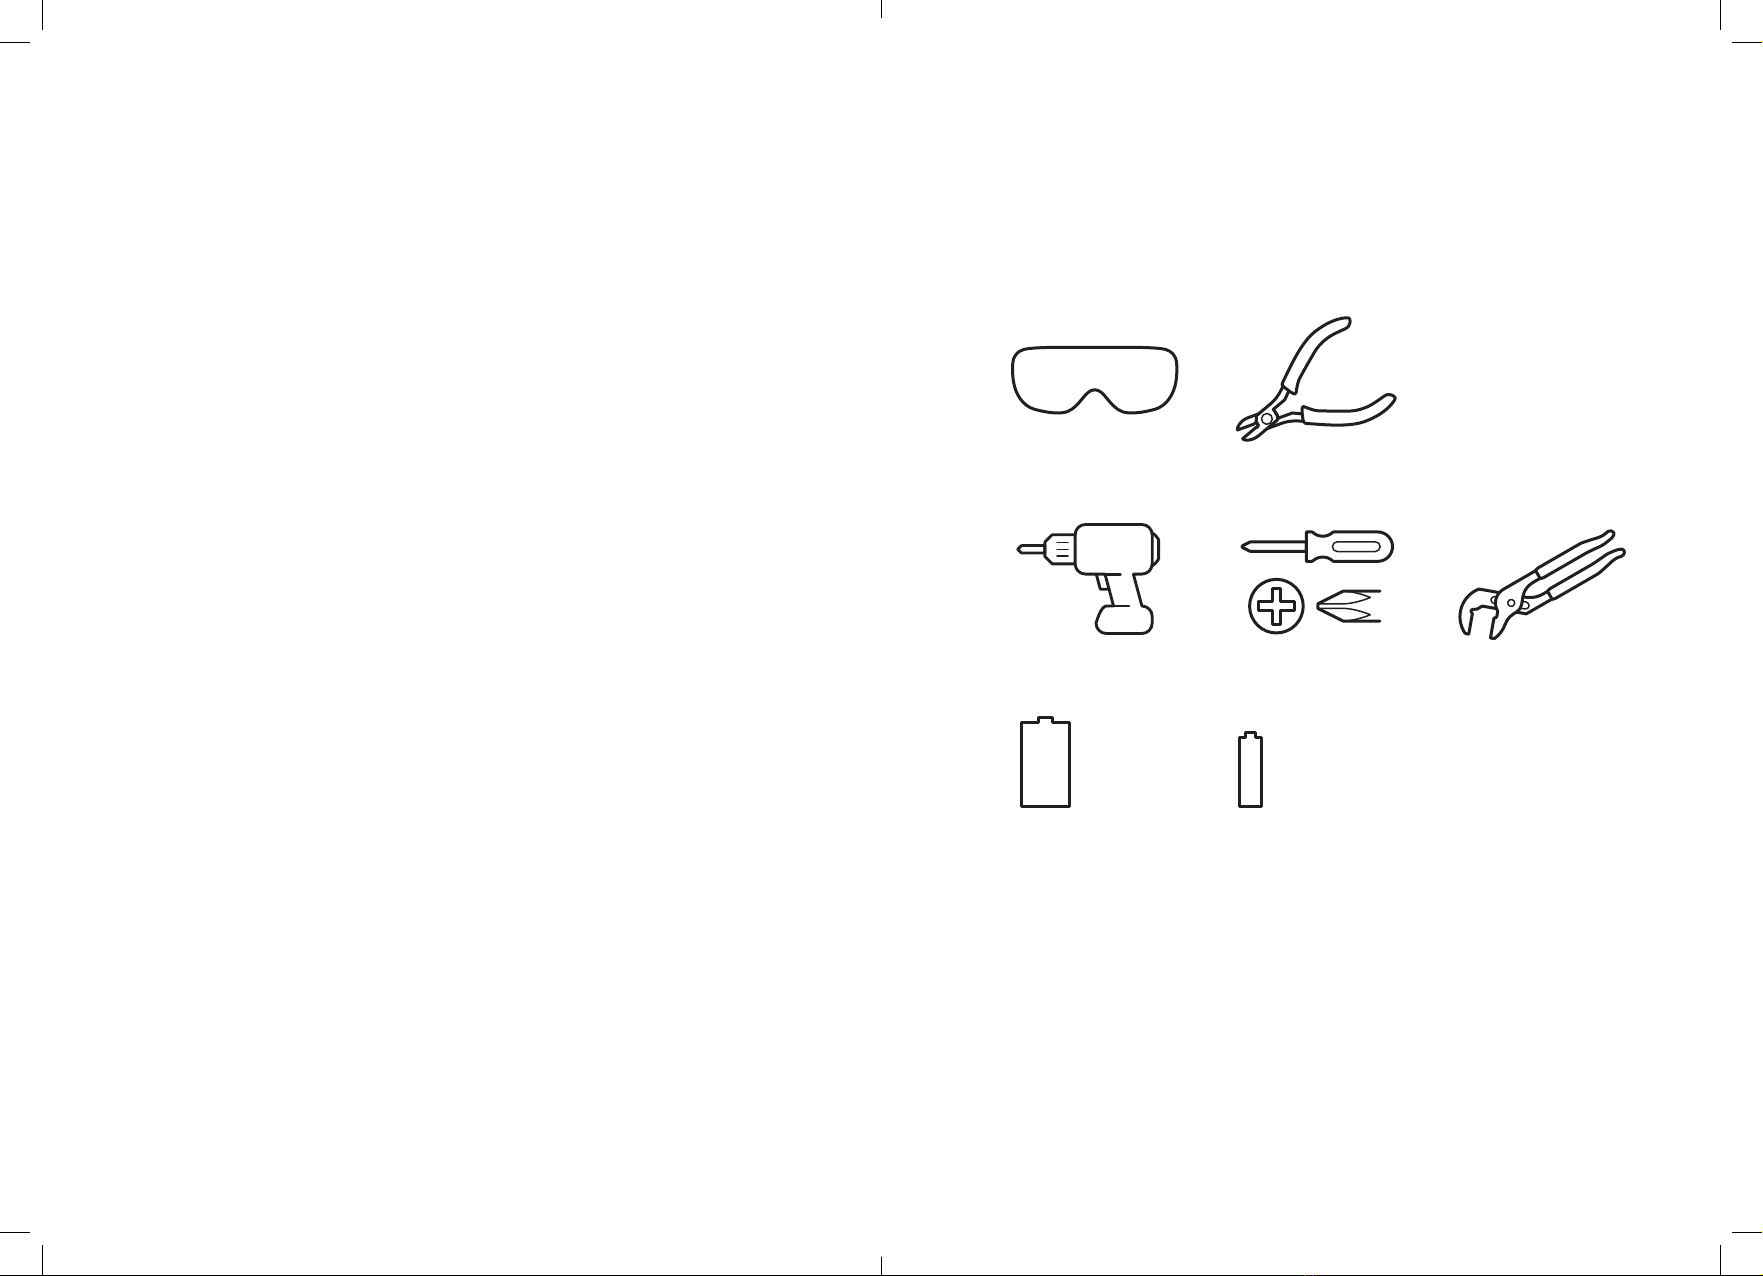
Tools You’ll Need
1protective eyewear 2wire stripper / cutter (18 to 12 gauge wire)
3drill 4philips screwdriver 5pump pliers (optional)
6for spotlight: (4) D alkaline batteries
7for motion sensor: (3) AA alkaline batteries
AA
D4× 3×
1
6
2
4 5
7
3

11
Controller
Installation
1312
Electrical Warning:
When working with electrical wires of any voltage, exercise
caution in moving, cutting, splicing, or connecting the wires. It’s
best to disconnect any transformer or source of electricity before
commencing installation.
low-voltage
transformer
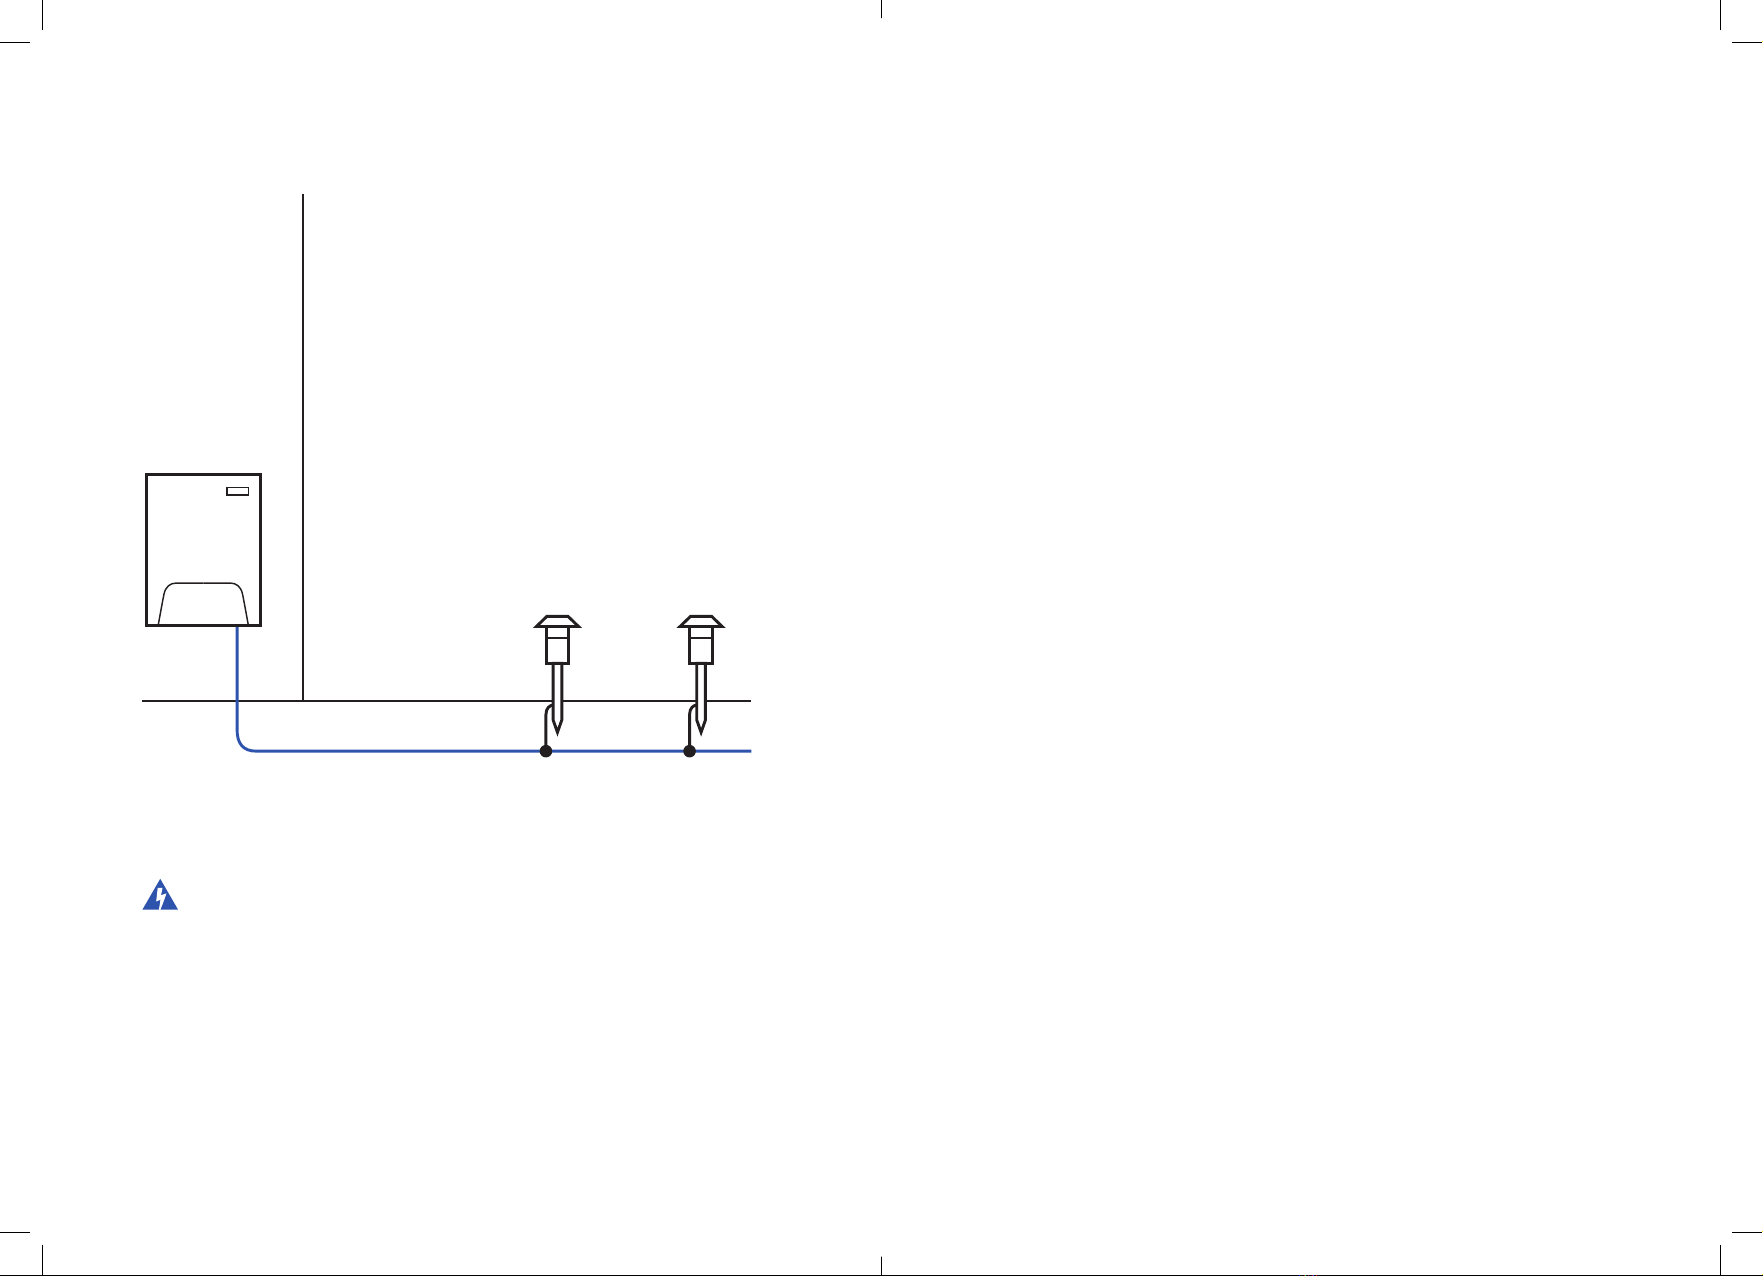
Before You Start
To install the Controller, you’ll need access to the low-voltage
wire that runs between the Low-Voltage Transformer and the first
of your landscape lights. This may require exposing the wire(s) if
they’re buried.
Ensure your low-voltage transformer will work optimally with the
Novolink Lightscape™ system on our website:
novolinkinc.com/compatibility
15
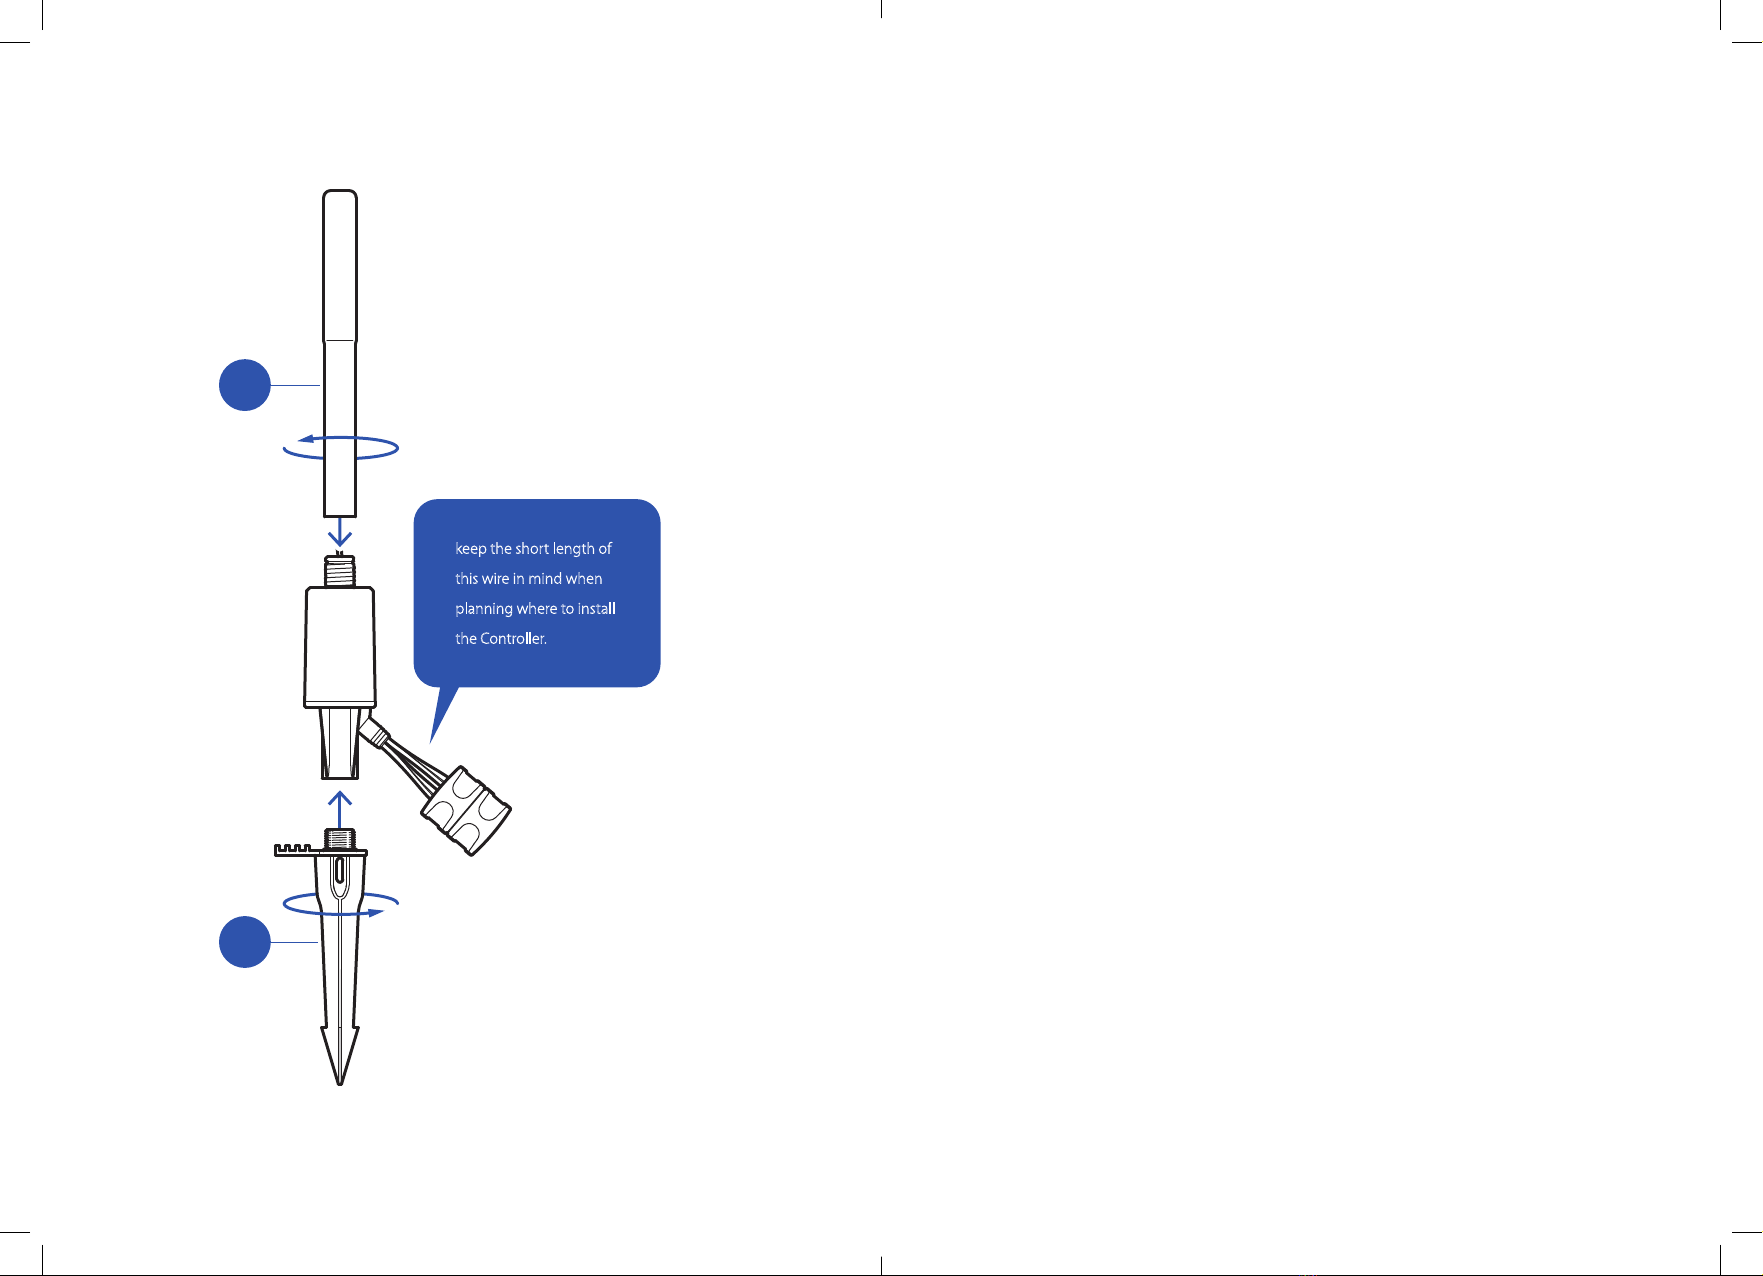
keep the short length of
this wire in mind when
planning where to install
the Controller.
2
3
Assembly
1. Make sure you have all parts of the Controller. Check the
mechanisms and wiring for damage. Set the parts on a clean,
sturdy work-surface.
2. Attach the antenna top to the main Controller body.
3. Then attach the stake to the main Controller body. Twist until it’s
firmly in place.

1716
Install the Connector
2. Locate the low-voltage wire that runs between your transformer
and the first of the landscape lights. Choose a place along the
wire in the lawn or landscaping, where the Controller’s stake can
be inserted into the ground. Here, the Connector will attach to
the low-voltage wire.
1. Unplug / disconnect your Low-Voltage Transformer. It’s best to
turn power OFF at the circuit breaker or fuse, and test that the
power is OFF before proceeding.
4. Remove the 2 caps from the top of the Controller’s Connector.
Pull up on the tabs to release the caps.
Note: the caps are designed to fit one-way on the Connector,
and won’t fit if their direction are reversed.
3. Unearth this portion of the low-voltage wire. Make sure there’s
enough slack to easily cut and manipulate the wire. Then use
wire-cutters to cut the wire here.

1918
5. Locate the end of the wire leading from the Transformer. Place it
into the lower portion of the Connector, in the channel marked
“From Transformer”. Lead the wire completely through the
Connector. Leave the wire’s cut end bare or apply an endcap.
Ensure the wire is straight and aligned with the channel, and
rests on the brass teeth.
6. Replace the cap over this end of the wire, and press until the cap
clips into position.
Ensure the cap is turned the right direction. The caps are not
reversible. Thicker wires may be difficult to secure, and a clamp
or wrench may help squeeze or press it into place. Do not use a
hammer, as it may damage the cap.

2120
7. Locate the end of the wire leading to the first landscape light
fixture in the series. Place it into the channel in the top half of
the Connector, marked “To Lights”.
8. Align the second cap and press it into position until it snaps in
place and is secured to the Connector.

2322
Complete the Installation
1. With the Connector attached to the low-voltage wires, position
the Controller’s stake where it will be installed. Loosely guide
the top of the Controller with the palm of your hand. Use your
foot to push down the spike and drive it into the ground.
Note: Do NOT pull on the Controller while pushing the spike
down, as this may damage the unit.
2. Once the Controller is in place, the Connector can be settled
above or below ground.
Reconnect the Transformer
2. If necessary, turn OFF any photo-sensors or timers that would
interfere with the Wireless Controller.
3. When the Controller has power, it can be added to your system
on the app and can be set as a zone.
1. Turn the power ON at the circuit breaker or fuse, and / or plug
your transformer in, and turn it ON.
Note: It’s important the transformer remains ON continuously
and does NOT automatically shut off. Ensure your transformer is
set to MANUAL ON or continuous ON.
25
Motion-Sensor
Installation
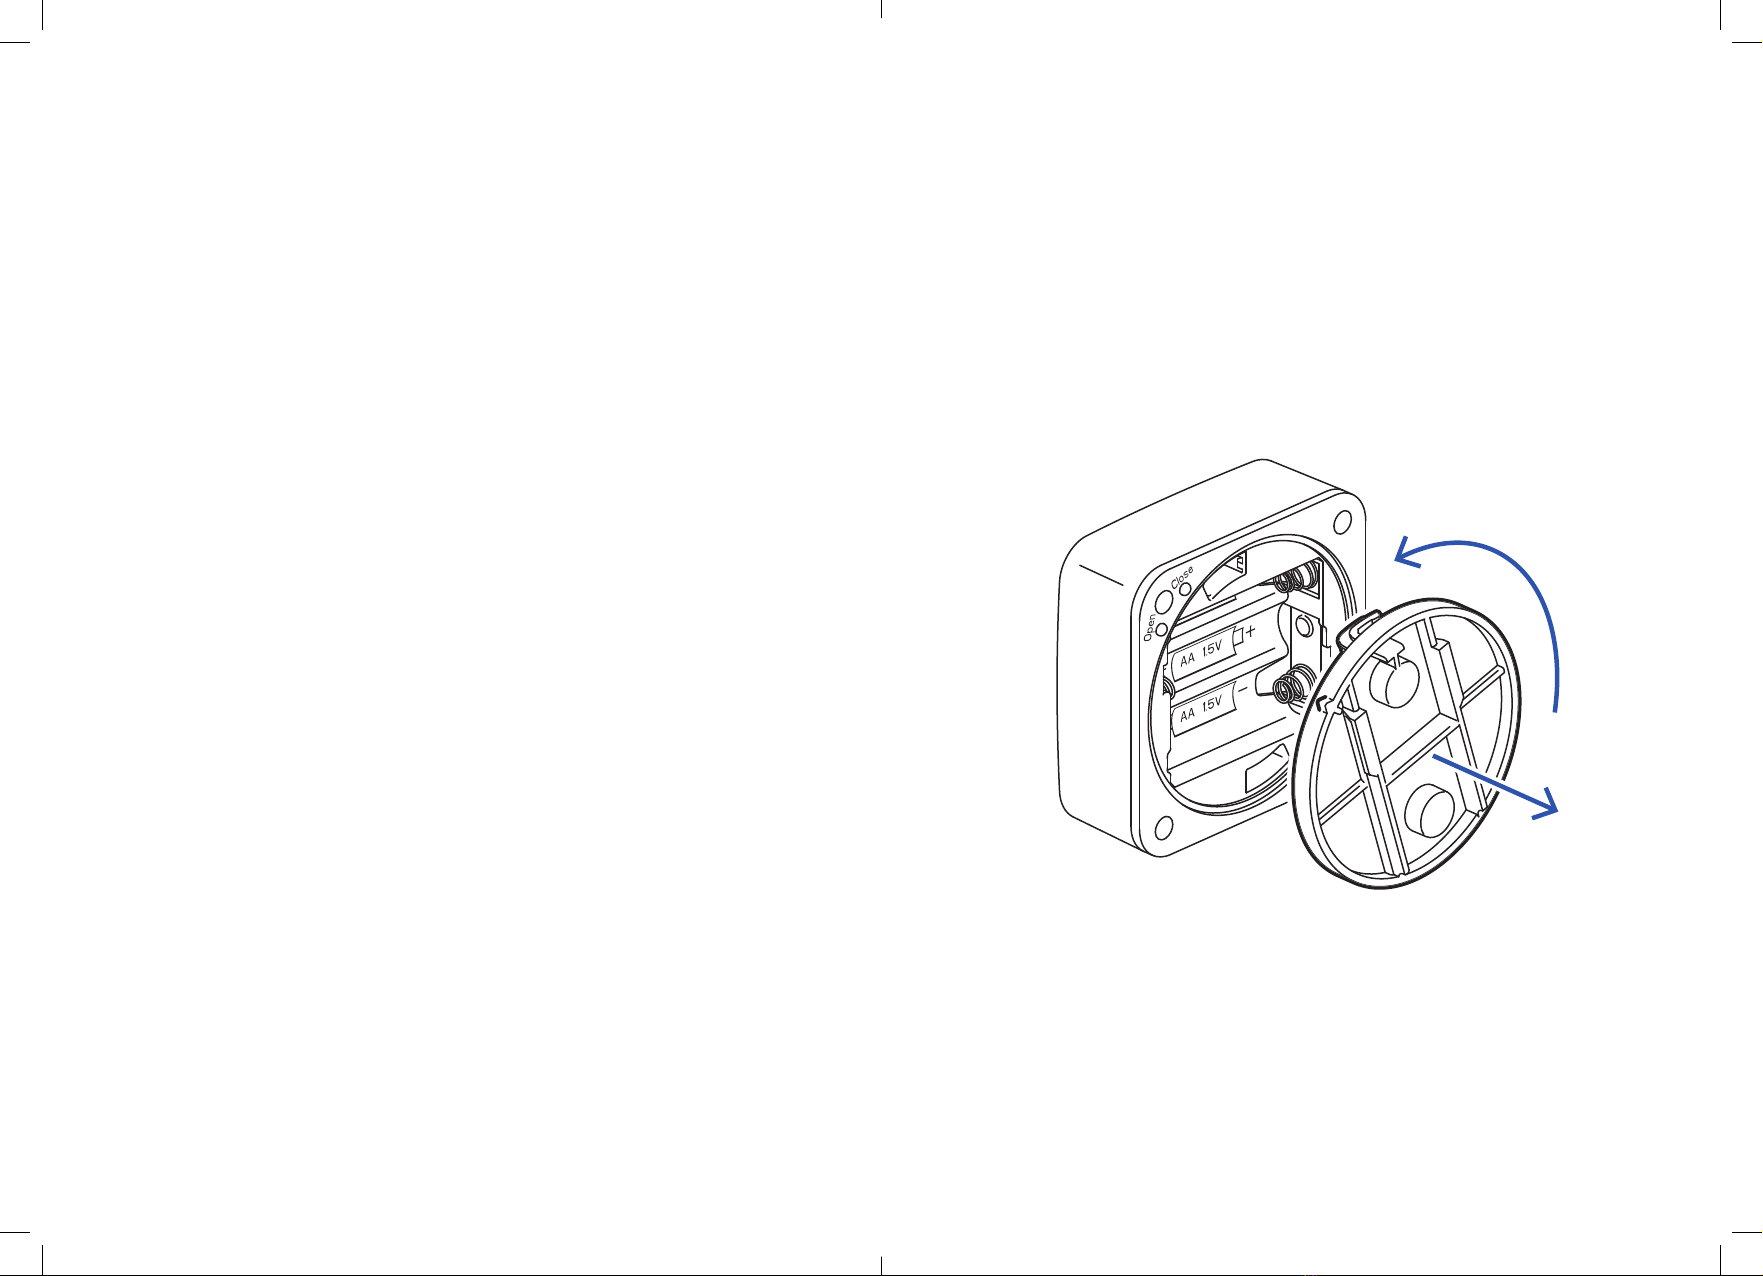
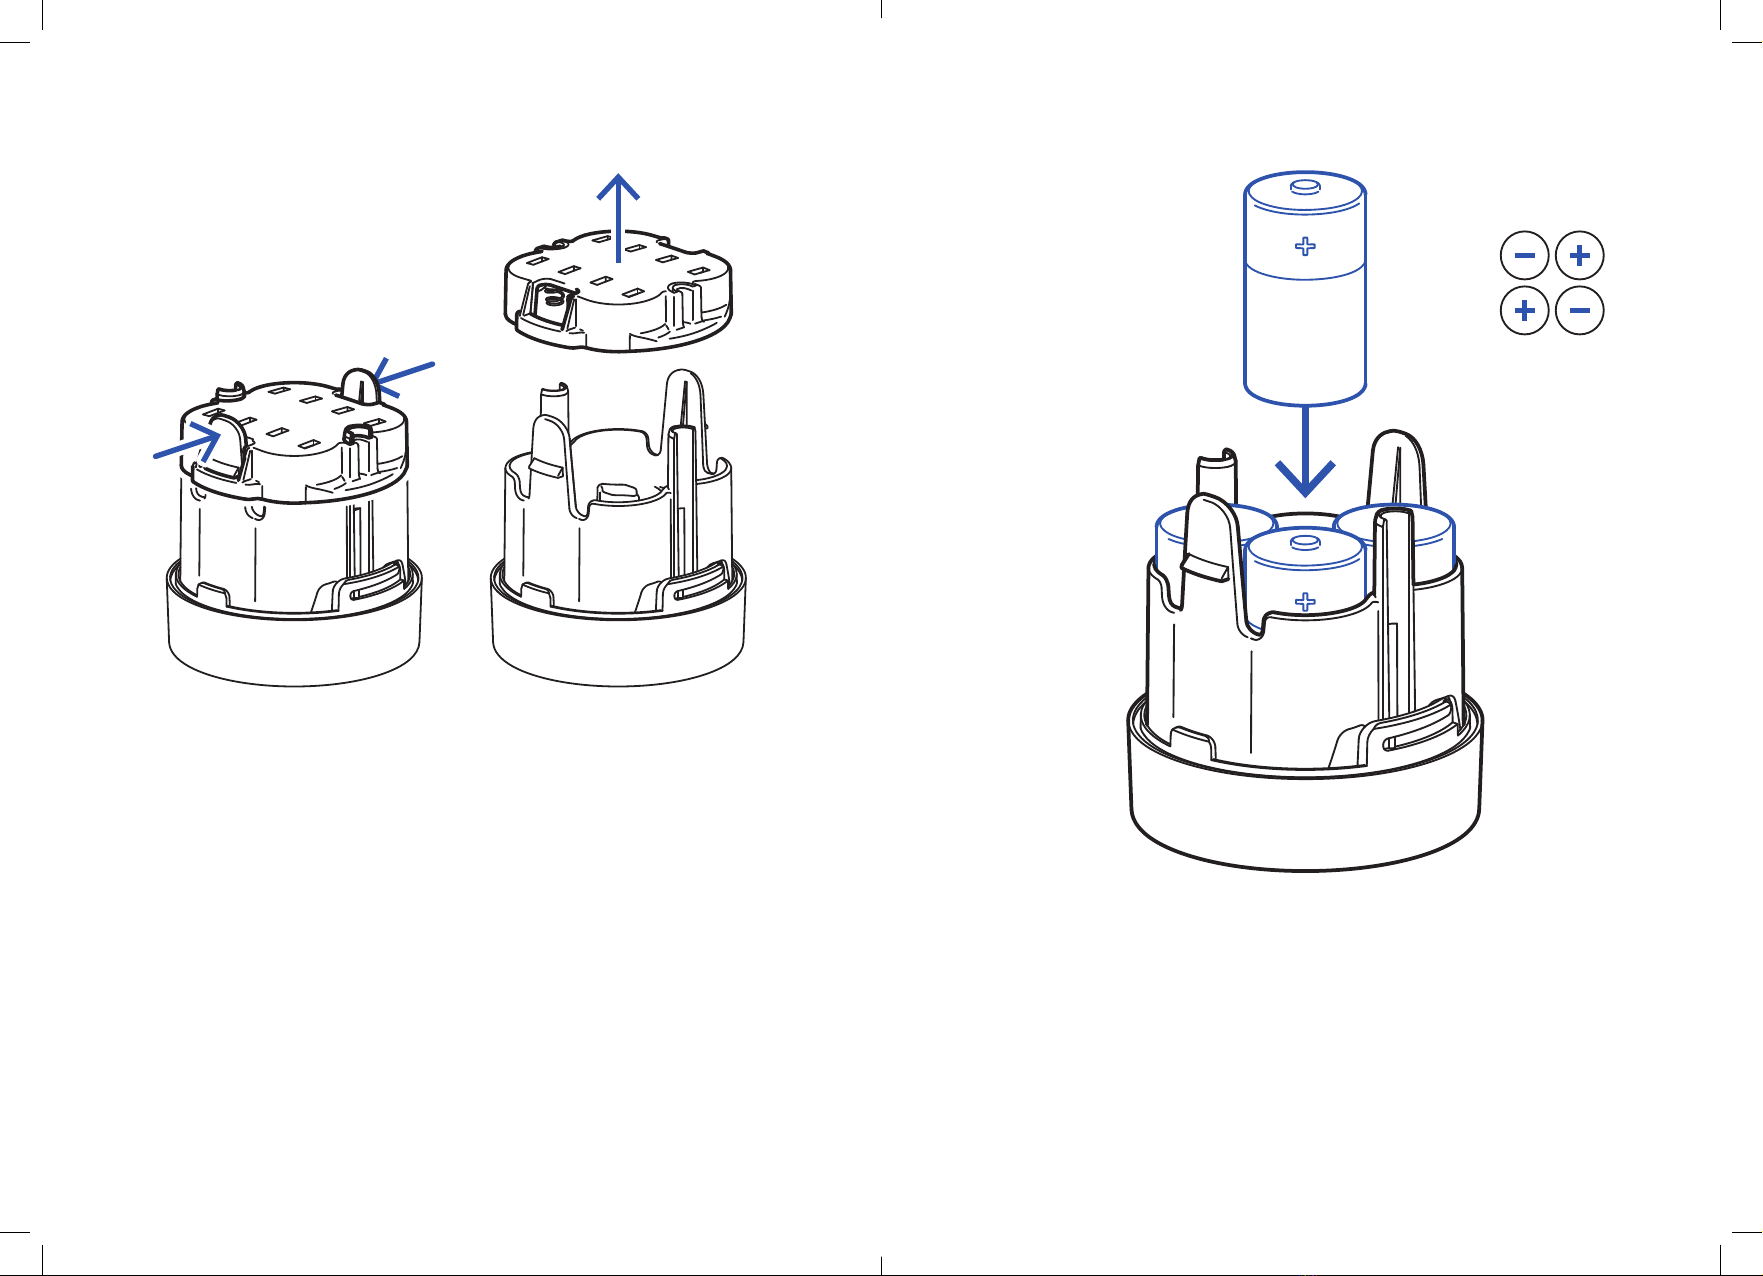
Insert Batteries
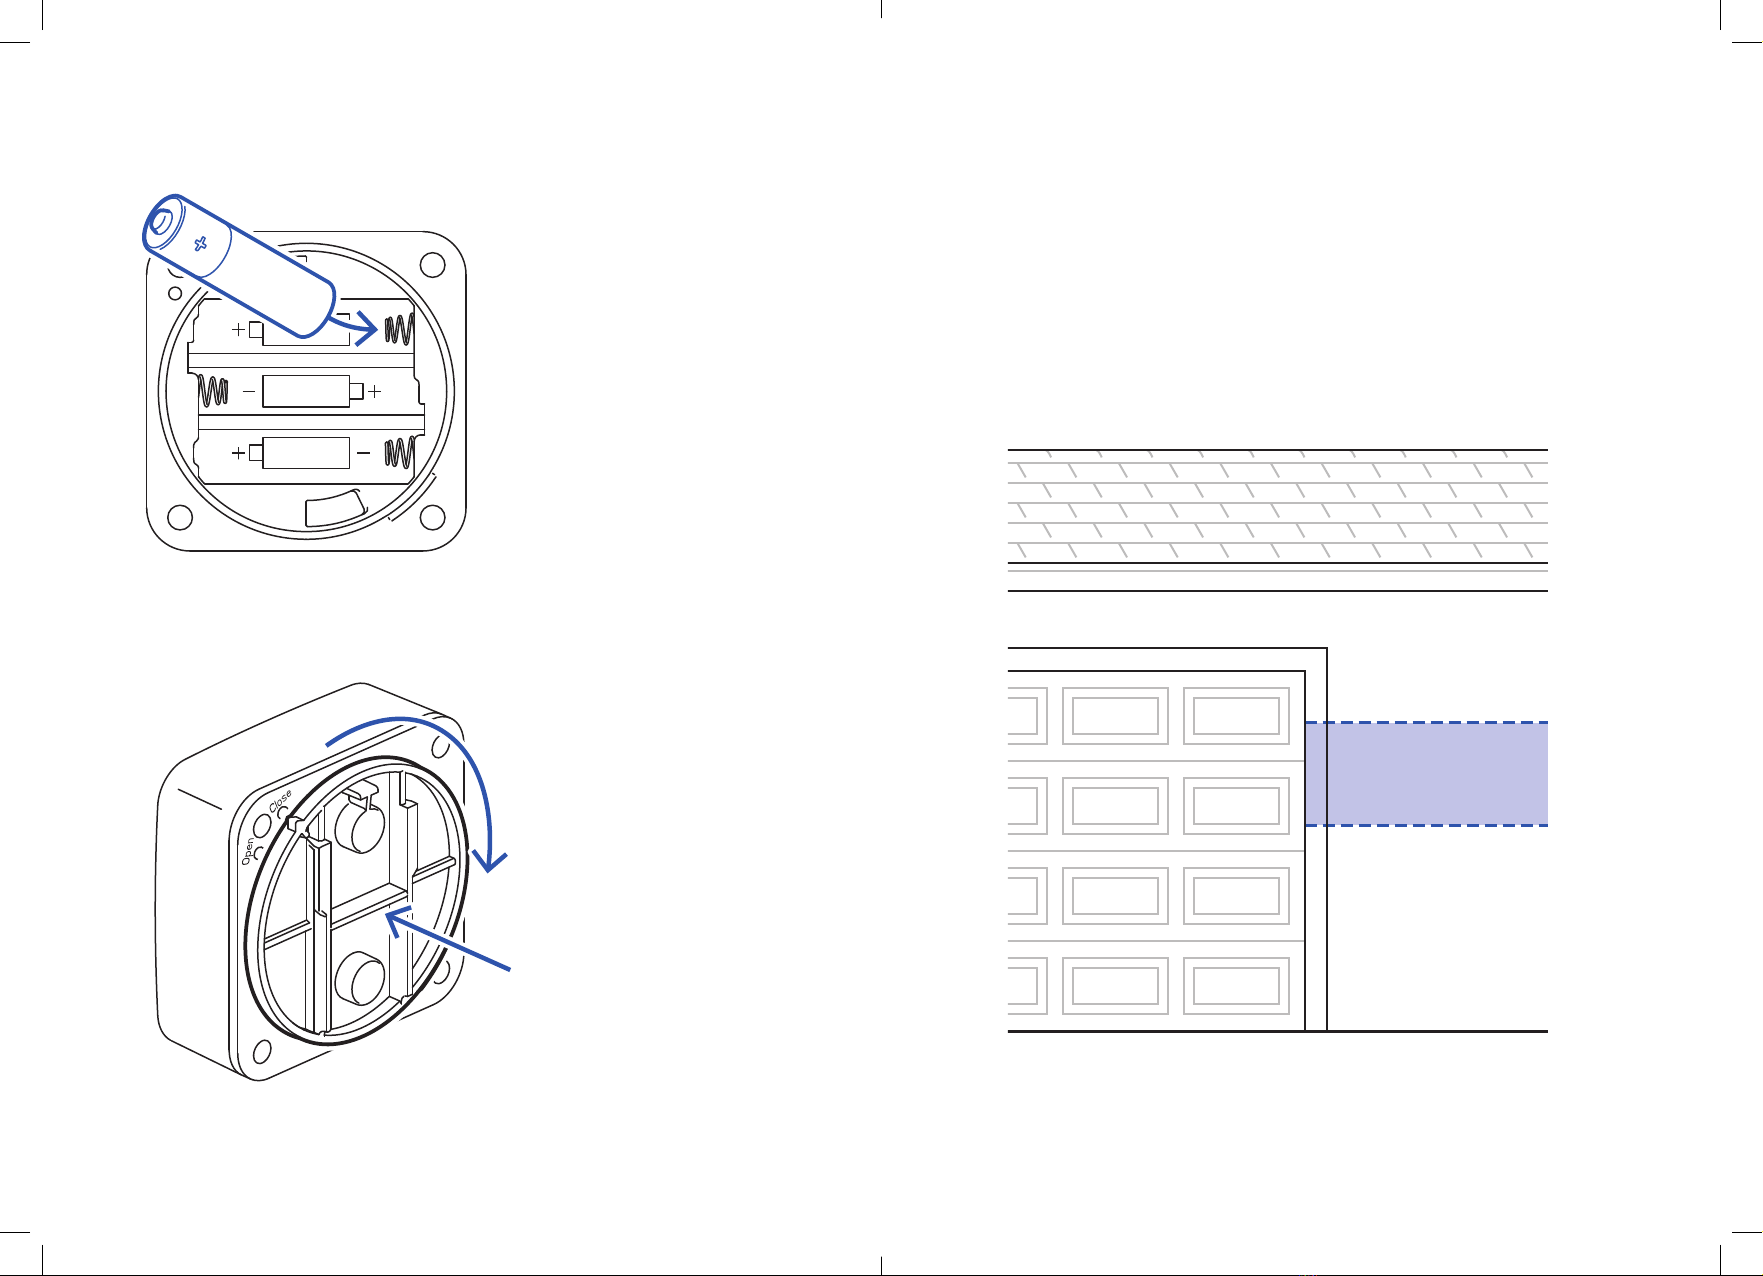
1. Press your palm against the rear plate and twist counter-
clockwise (about 5°) to open and access the battery
compartment.
AA 1.5V
AA 1.5V
AA 1.5V
Open
2726
3. Replace the rear plate.
Twist until it locks back
into place.
2. Insert (3) AA batteries.
Match the direction of the
polarity markings (+) (−).
CAUTION: Do NOT open, short
circuit, or mutilate batteries as
injury may occur. Do NOT mix
old and new batteries. Do NOT
mix alkaline, standard (zinc-
carbon), or rechargeable (Ni-Cd,
Ni-MH) batteries.
IMPORTANT: Dispose of
batteries in accordance
with local, state, and federal
regulations.
AA 1.5V
AA 1.5V
AA 1.5V
Open
Mount the Sensor
The Motion Sensor can be mounted onto a wall, or staked to the
ground. (Cradle, stake, and pole sold separately.)
Mounting to the Wall
1. Choose a suitable location 4 to 6 ft. above the ground, where
you’d like the sensor to detect motion and activate the light.
4 ft.
6 ft.
2928
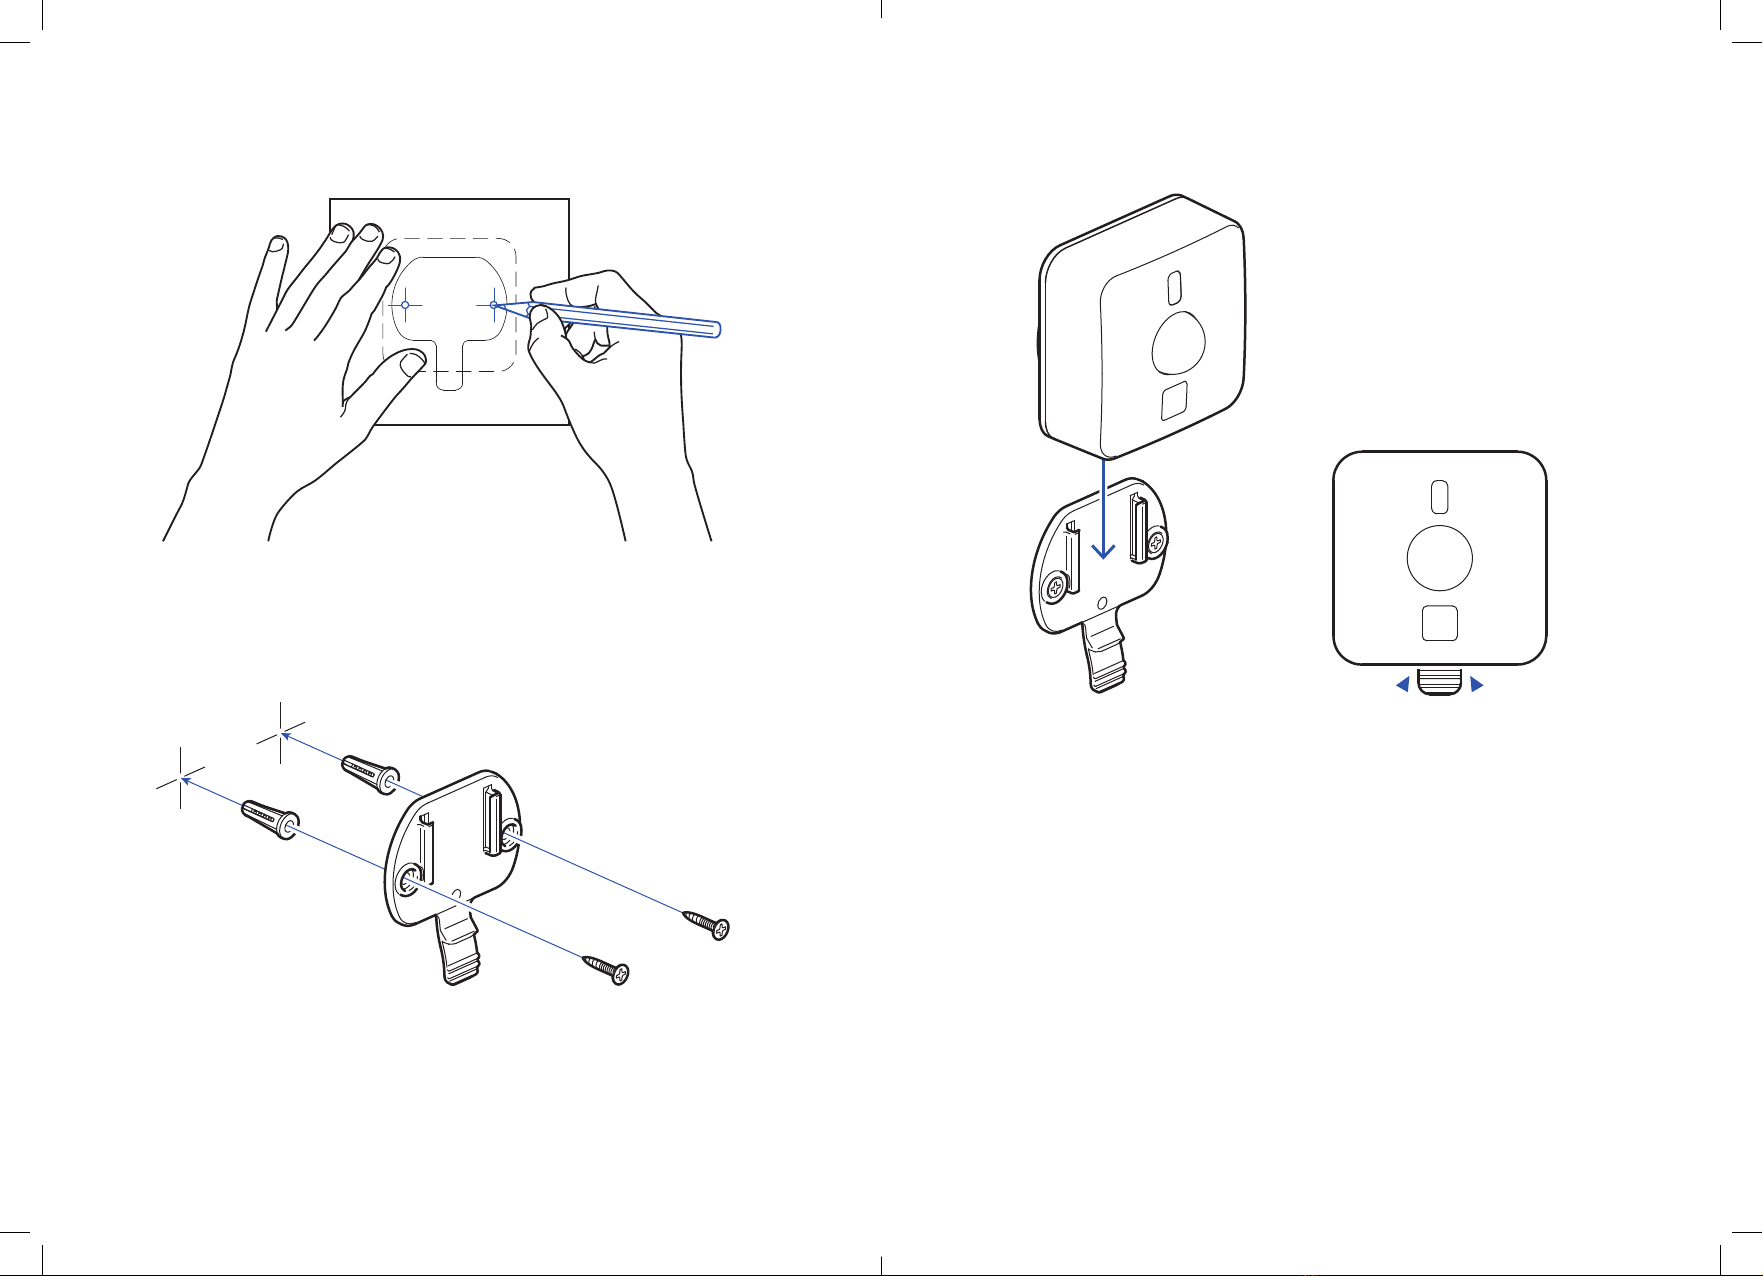
2. Use the enclosed template to mark the location where the
sensor will be installed.
3. Fix the mount to the wall with screws. Use anchors if needed.
4. Slide the Motion Sensor onto the wall mount until it clicks in
place.
3130
Pair with App
3. In the Novolink Lightscape™
App, Search Devices. Follow
the prompts to add the
sensor and set it in a zone.
4. The Motion Sensor is ready.
When motion is detected, it
will alert the Spotlights and
Controllers in its zone.
1. Press the button on the
front of the sensor unit.
2. The LED light will flash
continuously, indicating that
it is ready for pairing.
Spotlight Installation
Insert Batteries
1. Turn the back of the Spotlight counter-clockwise (about a 1/4
turn) and open, to reveal the battery compartment.
3332
2. Press and squeeze the top and bottom tabs of the compartment
cover to open it.
3. Place (4) D batteries into the
compartment. Match the
polarity markings (+) (−).
CAUTION: Do NOT open, short circuit,
or mutilate batteries as injury may occur.
Do NOT mix old and new batteries,
and do NOT mix alkaline, classic (zinc-
carbon), or rechargeable (Ni-Cd, Ni-MH)
batteries.
IMPORTANT: Dispose of batteries
in accordance with local, state, and
federal regulations.

3534
4. Replace the battery compartment cover. Press until it snaps into
place.
5. Replace the back of the Spotlight and turn clockwise until it
locks shut.
6. When the Spotlight has power, it can be added to your system
on the app. Assign it the same zone as a sensor to connect them.
3736
Mount the Spotlight
Mounting to the Wall
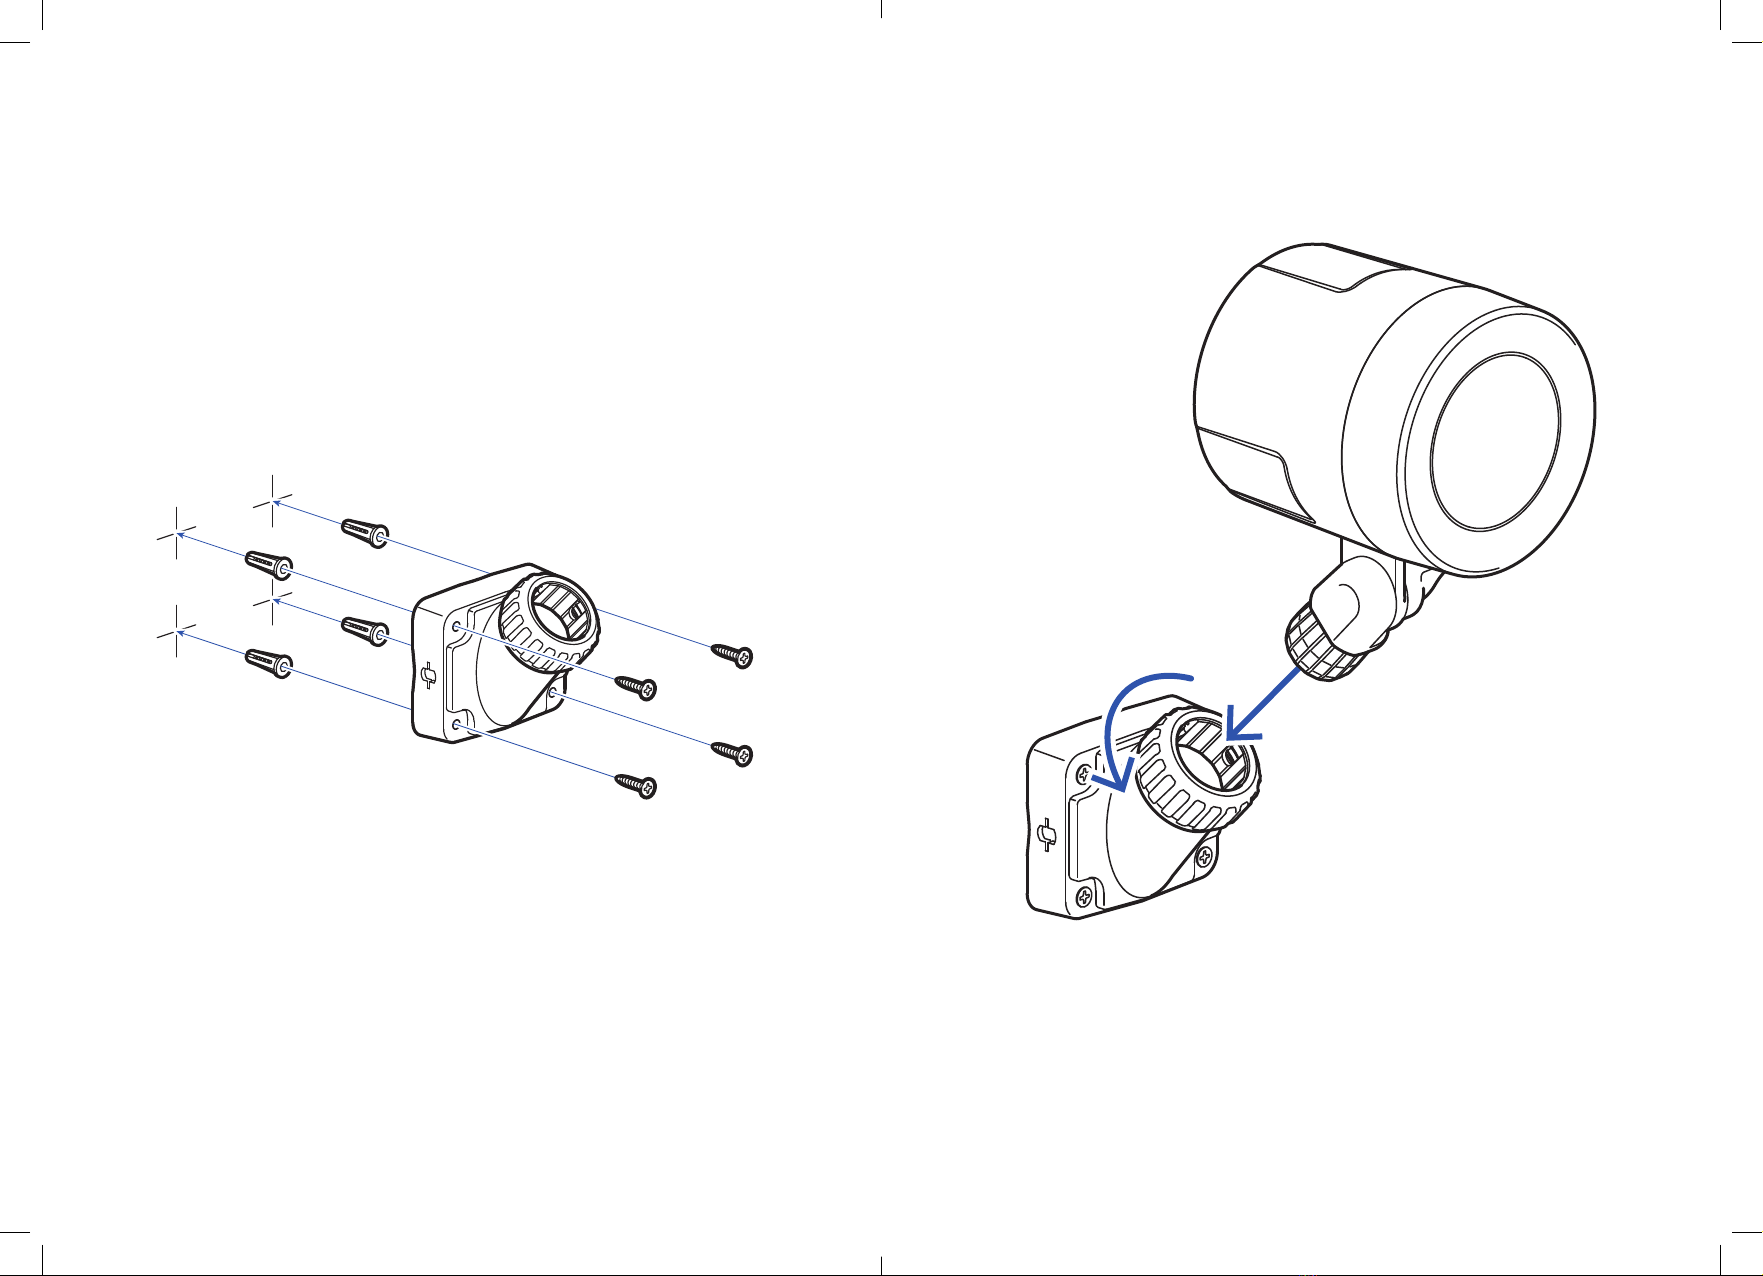
1. Choose a location on the wall 6 to 8 ft. above the ground to
mount the Spotlight. Fasten the mount to the wall. Use anchors
if needed.
2. Twist the locking-ring on the wall mount to loosen it, and insert
the base of the Spotlight.
This manual suits for next models
1
Table of contents
Popular Landscape Lighting manuals by other brands


Cooper Lighting
Cooper Lighting Talon Architectural Area Luminaire Brochure & specs

Saxby Lighting
Saxby Lighting PYRAMID instruction manual

Malibu Boats
Malibu Boats NA501 instructions

Malibu Boats
Malibu Boats LZ1W instructions

Global Light & Power LCC
Global Light & Power LCC WW440206 Installation instruction

Paradise Datacom
Paradise Datacom GL28106 instructions


