Nowa Szkola Orbitrek SG 0003 User manual
Orbitrek
Uwaga: Nie pozostawiaæ dziec-
ka bez opieki podczas korzysta-
nia ze stepera.
Zachowaj instrukcjê do dalsze-
go u¿ytkowania.
Produkt do monta¿u wy³¹cznie
przez osobê doros³a.
Przeczytaj uwa¿nie wszystkie
strony instrukcji.
Ogólne informacje
Urz¹dzenie zalecane dla dzie-
ci w wieku od 4 do 8 lat.
Maksymalna waga do 68 kg.
Przed u¿ytkowaniem wymaga-
na jest konsultacja z pediatr¹.
Nigdy nie zostawiaj dziecka
bez opieki podczas korzysta-
nia z urz¹dzenia.
Trzymaj ma³e nieskrêcone czêo-
eci i plastikowe torby poza za
Orbitrek
Warning: Never leave child
unattended while using this pro-
duct.
Save these instructions for future
reference.
Adult assembly required.
Read all instructions prior to use.
General caution
Recommended ages 4–8 years
old.
Not intended for use by child
over 150 Lb.
Please consult with your child's
doctor before using any exercise
equipment.
Never leave child unattended
while he/she is using this product
Orbitrek
SG 0003
SI IN SG 0003 12/21
nowa szko³a
ul. POW 25, 90-248 £ódŸ,
www.nowaszkola.com
tel. (42) 630 17 28,
(42) 630 04 88, fax: (42) 632 73 28
OSTRZE¿ENIA!
1. Zabawka przeznaczona jest dla dzieci powy¿ej
3 lat - ryzyko utraty równowagi.
2. Do u¿ytku pod bezpoœrednim nadzorem osoby
doros³ej
3. Nale¿y zachowaæ opakowanie lub/i instrukcjê.
Zawieraj¹ one wa¿ne informacje mog¹ce byæ
przydatne w przysz³oœci.
4. U¿ytkowanie niezgodne z zaleceniami zwalnia producenta od odpo-
wiedzialnoœci za ewentualne szkody.
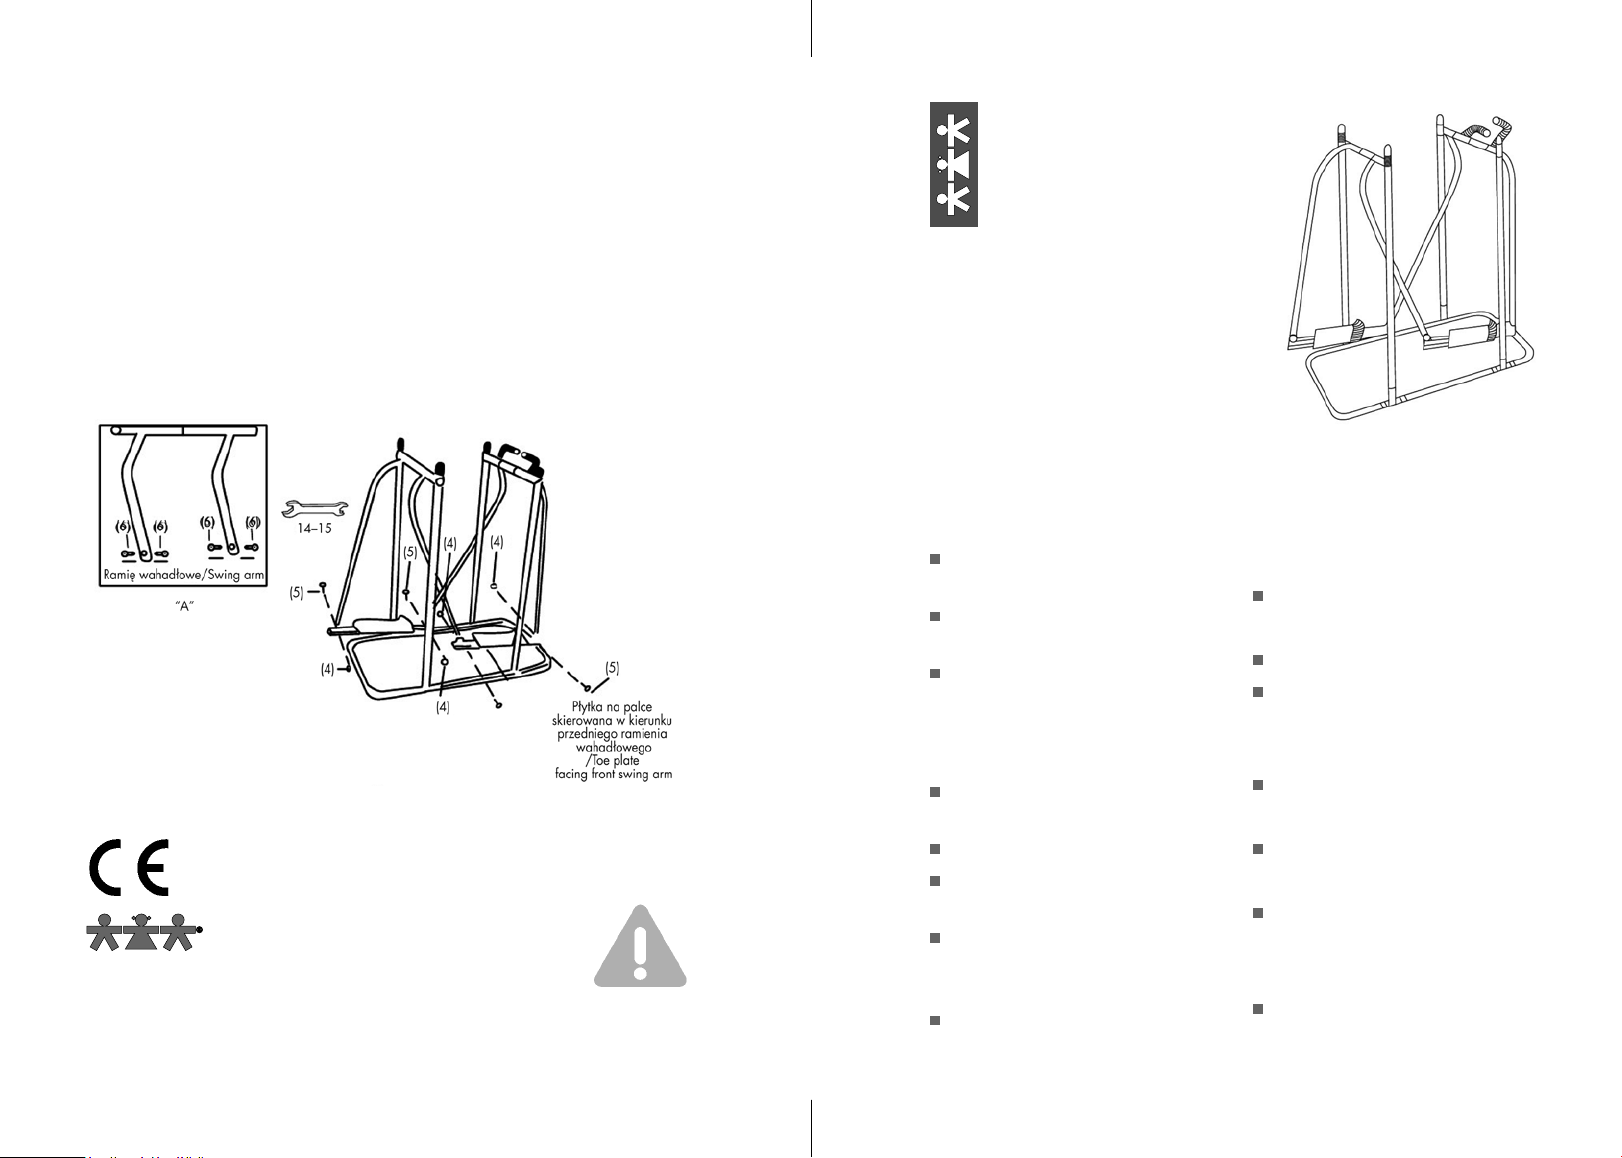
Krok 6.
Monta¿ podstawy pod stopy
Przymocowaæ plastikowe p³ytki
pod stopy na platformie za po-
moc¹ oerubek oraz zabezpie-
czaj¹cych wkrêtów. Nastêpnie
zamontowaæ podstawy pod sto-
py do ramion wahad³owych za
pomoc¹ wkrêtów (5) (6) oraz
nakrêtek (4), jak pokazano na
schemacie.
Step 6.
Foot platform assembly
Assemble the plastic foot plates
onto the foot platform by inserting
screws through holes on the plat-
form and securing with bolts.
Now assemble the entire foot
platform assembly into the swing
arms with bolts (5),(6),and nut (4)
as shown.
2 7
siêgiem dziecka. Pozb¹dŸ siê
foliowych opakowañ pamiêtaj ¹c
o ochronie oerodowiska.
Dzieci nie powinny mieæ do czy-
nienia z czêoeciami urządzenia,
m. in. z bateriami oraz nie powin-
ny go montowaæ.
Nie korzystaj z urz¹dzenia w
pobli¿u schodów, pochy³ooeci,
dróg, basenów czy innych zbior-
ników wodnych.
Korzystanie z urz¹dzenia tylko
pojedynczo.
Dzieci korzystaj¹ce ze stopera
powinny zawsze mieæ odpowi
nie obuwie.
Jeśli nast¹pi uszkodzenie jakiego-
kolwiek elementu nale¿y natych-
miast przerwaæ u¿ytkowanie.
PRZED U¯YTKOWANIEM
URZ¥DZENIA NALE¯Y
SKONSULTOWAÆ SIÊ Z
LEKARZEM
Keep small unassembled parts
and plastic bags out of child-
rens.
Reach dispose of the plastic
bags properly.
Care should be taken in unpac-
king and assembly of the pro-
duct.
Children should not handle
parts, including batteries, or
help in assembly of the product.
Never use the product near
steps, steep inclines, roadways,
swimming pools or water.
Never allow more than one (1)
user at a time.
Children should always wear
shoes while using this product.
If any part of this product is
broken, stop using immediately.

Lista częoeci / Part List
1.Tuba podstawy/Base tube
2.Stojak do podstawy/Base stud
3.£¹cznik kolankowy/Elbow connector
4.Tuba podtrzymuj¹ca/Support tube
5.Plastikowa tulejka/ Plastik bushing
6.Lewe ramiê wahad³owe/Left swing arm
7.Prawe ramiê wahad³owe/Right swing arm
8.Tylne ramiê wahad³owe/Rear swing arm
9.Profil/Axle tube
10.Podstawa pod stopê/Foot platform
11.OErubka/Screw
12.Wkrêt 8x40 mm/8*40mm Bolt
13.Podk³adka 8 mm/8mm Washer
14.Nakrêtka 8 mm/8mm Nut
15. Wkrêt 6 mm/6mm Bolt
16. Wkrêt 6 mm/6mm Bolt
17. Plastikowa tulejka (oerednica 12 mm)/Plastic Bushing (OD–l2mm)
18. Klucz imbusowy/m6
19. Klucz szczêkowy dwustronny/Key jaw-sided 14–15
Krok 4.
Monta¿ przedniego ramienia
wahad³owego do podstawy
Wzi¹æ zmontowan¹ w Kroku 1
podstawê oraz przednie ramiê
wahad³owe z Kroku 2. Wsun¹æ
tuby wspieraj¹ce do rurek po
stawy, jak pokazano na schema-
cie poni¿ej.
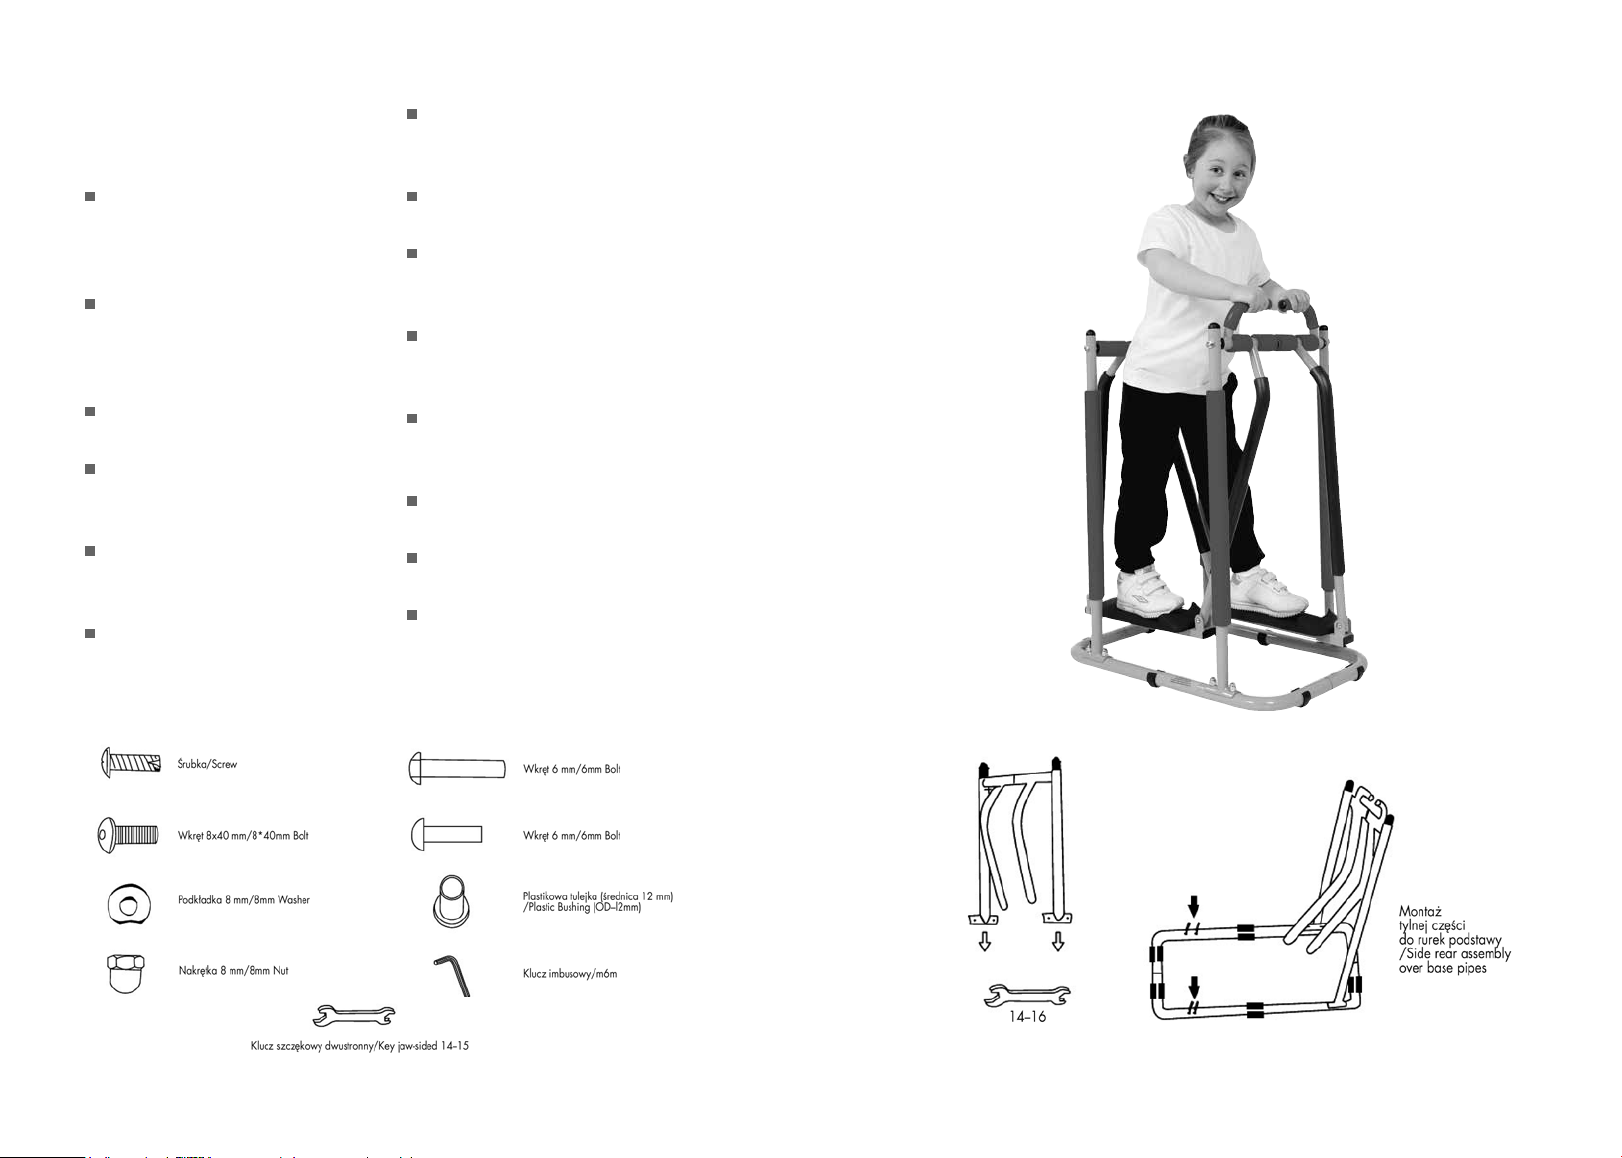
Krok 5.
Monta¿ tylnego ramienia
wahad³owego do podstawy
Przymocowaæ zmontowane tylne
ramiê do dwóch rurek podstawy.
Step 4.
Front swing arm assembly to
base
Take the base tube assembly that
was previously assembled in Step
1 and the front swing arm asse
bly from step 2 and slide the sup-
port tubes onto the base pipes as
shown below.
Step 5.
Rear swing arm assembly to
base
Take the rear swing arm assembly
and slide completely onto the re-
maining two base pipes of the
base assembly.
6 3
sztuk / pcs
1
1
1
1
1
1
1
1
1
2
4
4
8
4
4
8
2
1

Krok 1.
Monta¿ podstawy
Po³¹czyæ wszystkie tuby podsta-
wy jak pokazano to na schema-
cie poni¿ej. Wyregulowaæ
wszystkie czêoeci i zamontowaæ
oerubki. Nie skrêcaæ nadmiernie
oerubek, aby umo¿liwiæ póŸ-
niejsz¹ regulacjê.
Krok 2.
Monta¿ przedniego ramienia
wahad³owego
Wzi¹æ jedn¹ tubê wspieraj¹c¹
i jeden profil. Po³¹czyæ profil z
tub¹ wspieraj¹c¹ oraz dokrêciæ
śoerubki. Zabezpieczyæ oerubk¹
(2).Wsun¹æ przednie lewe ramiê
wahad ³owe. Wsun¹æ prawe ra-
miê wahad³owe, nastêpnie
wsun¹æ tubê wspieraj¹c¹.
Dopasowaæ otwory na oerubki i
przykrêciæ.
Krok 3 .
Monta¿ ramienia
wahad³owego
Po³¹czyæ oerubk¹ (2) jedn¹ tubê
wspieraj¹c¹ i jeden profil.
Wsun¹æ tylne ramiê wahad³owe,
nastêpnie kolejne ramiê. Wsun¹æ
ostatni¹ tubê wspieraj¹c¹ oraz
przykrêciæ śrubkê.
UWAGA: Podczas monta¿u
przedniego i tylnego ramienia
wahad³owego nale¿y u¿yæ si³y,
poniewa¿ elementy oecioele do
siebie przylegaj¹.
Step 1.
Assembly
Assemble base tube pieces by
sliding them together as shown
below. Align pieces and insert
screw. DO NOT tighten screws at
this time to allow for adjustment.
Step 2.
Front swing arm assembly
Take one support tube and one
axle tube. Install axle tube into
support tube and align screw ho-
les. Secure with screw (2) Slide
on left front swing arm. Slide on
right swing arm and then slide on
a support tube. Align screw holes
and insert screw.
Step 3.
Rear swing arm assembly
Take one support tube and one
axle tube and secure with screw
(2) Slide on rear swing arm and
then the other rear swing arm
Now slide on the last support tube
and insert screw.
NOTE: When assembling front
and rear swing arm ,you may ne-
ed to exert additional force due
to the tight tolerance we used to
build this equipment
4 5
Other Nowa Szkola Exercise Bike manuals

Popular Exercise Bike manuals by other brands

Body Sculpture
Body Sculpture BE-6115 manual

INSPIRE Q
INSPIRE Q Virgil Classic Assembly instruction

Bells Of Steel
Bells Of Steel BTZBK User Manual and Assembly Guide

BH
BH S3Ri owner's manual

Spirit Commercial
Spirit Commercial CU800ENT owner's manual

Stamina
Stamina CPS 9200 Indoor Cycle 15-9200 owner's manual


