Bells Of Steel BTZBK User manual


1
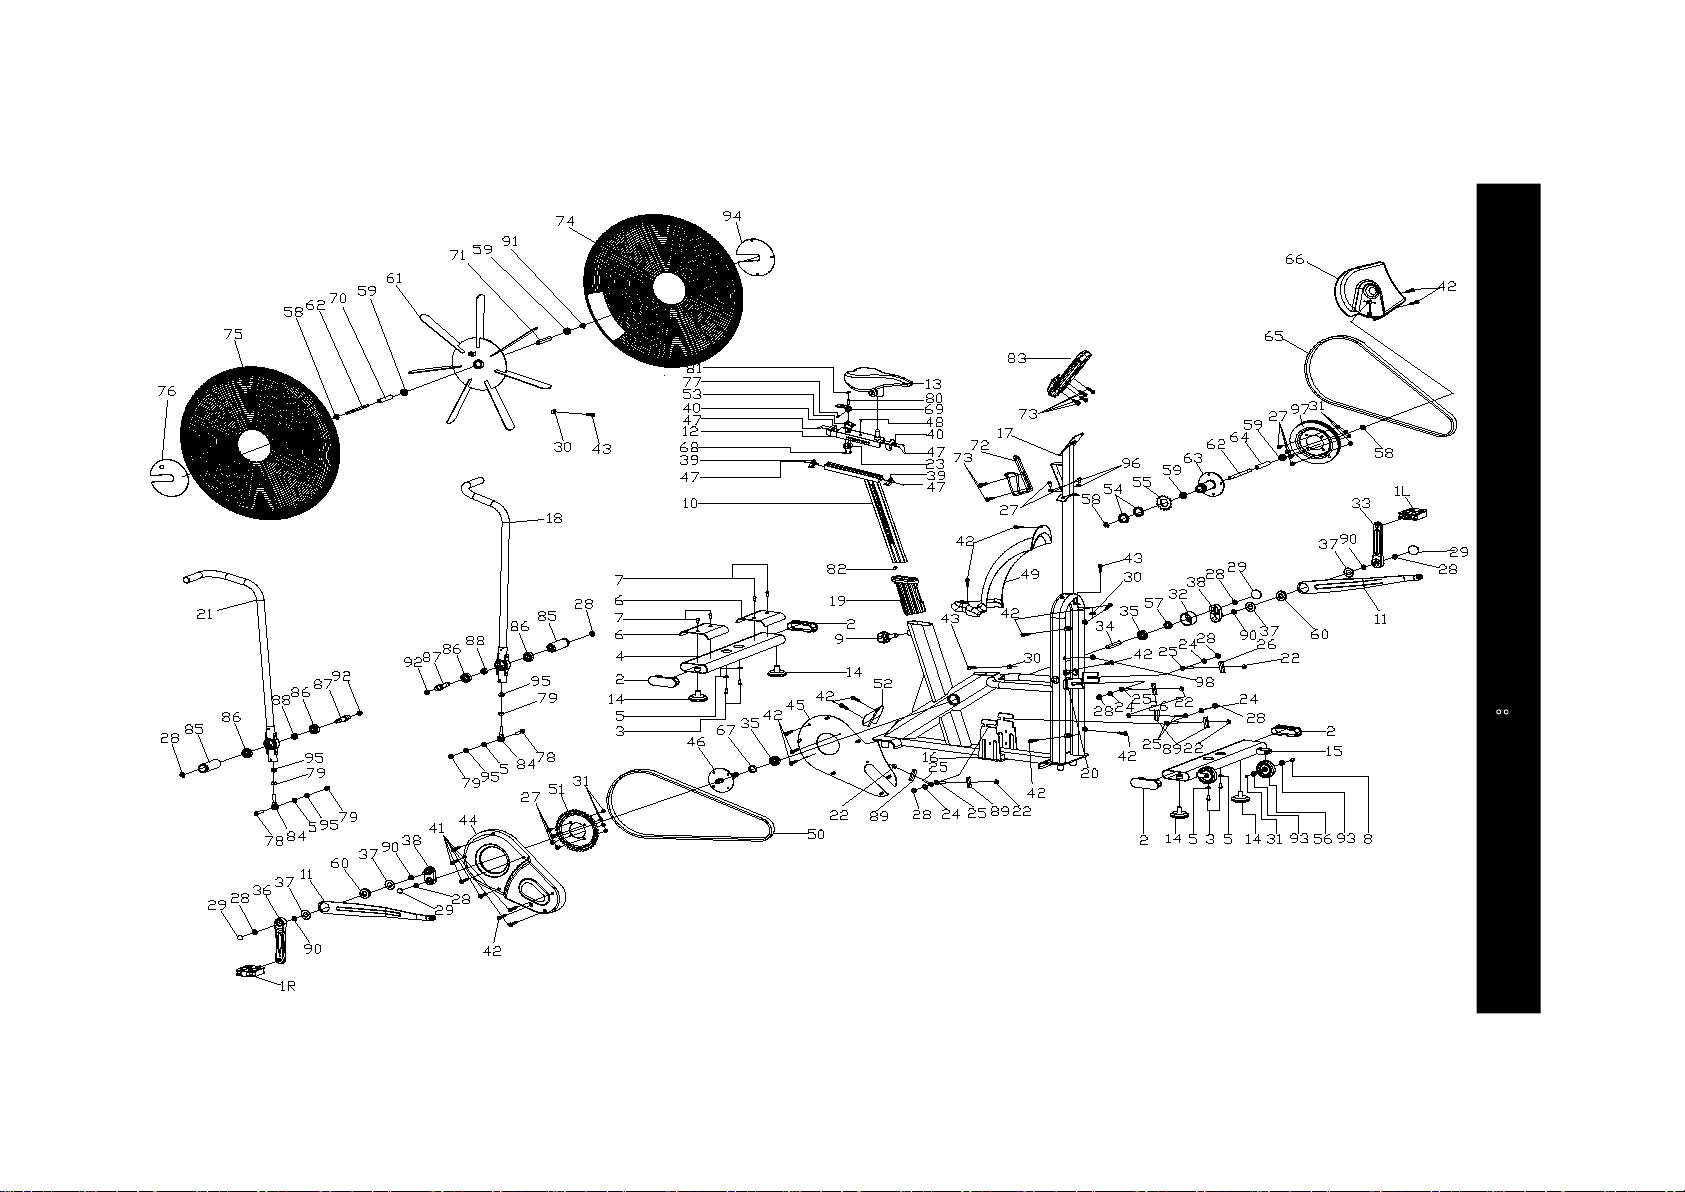
EXPLODED-VIEW & PARTS LIST:
2

3

4
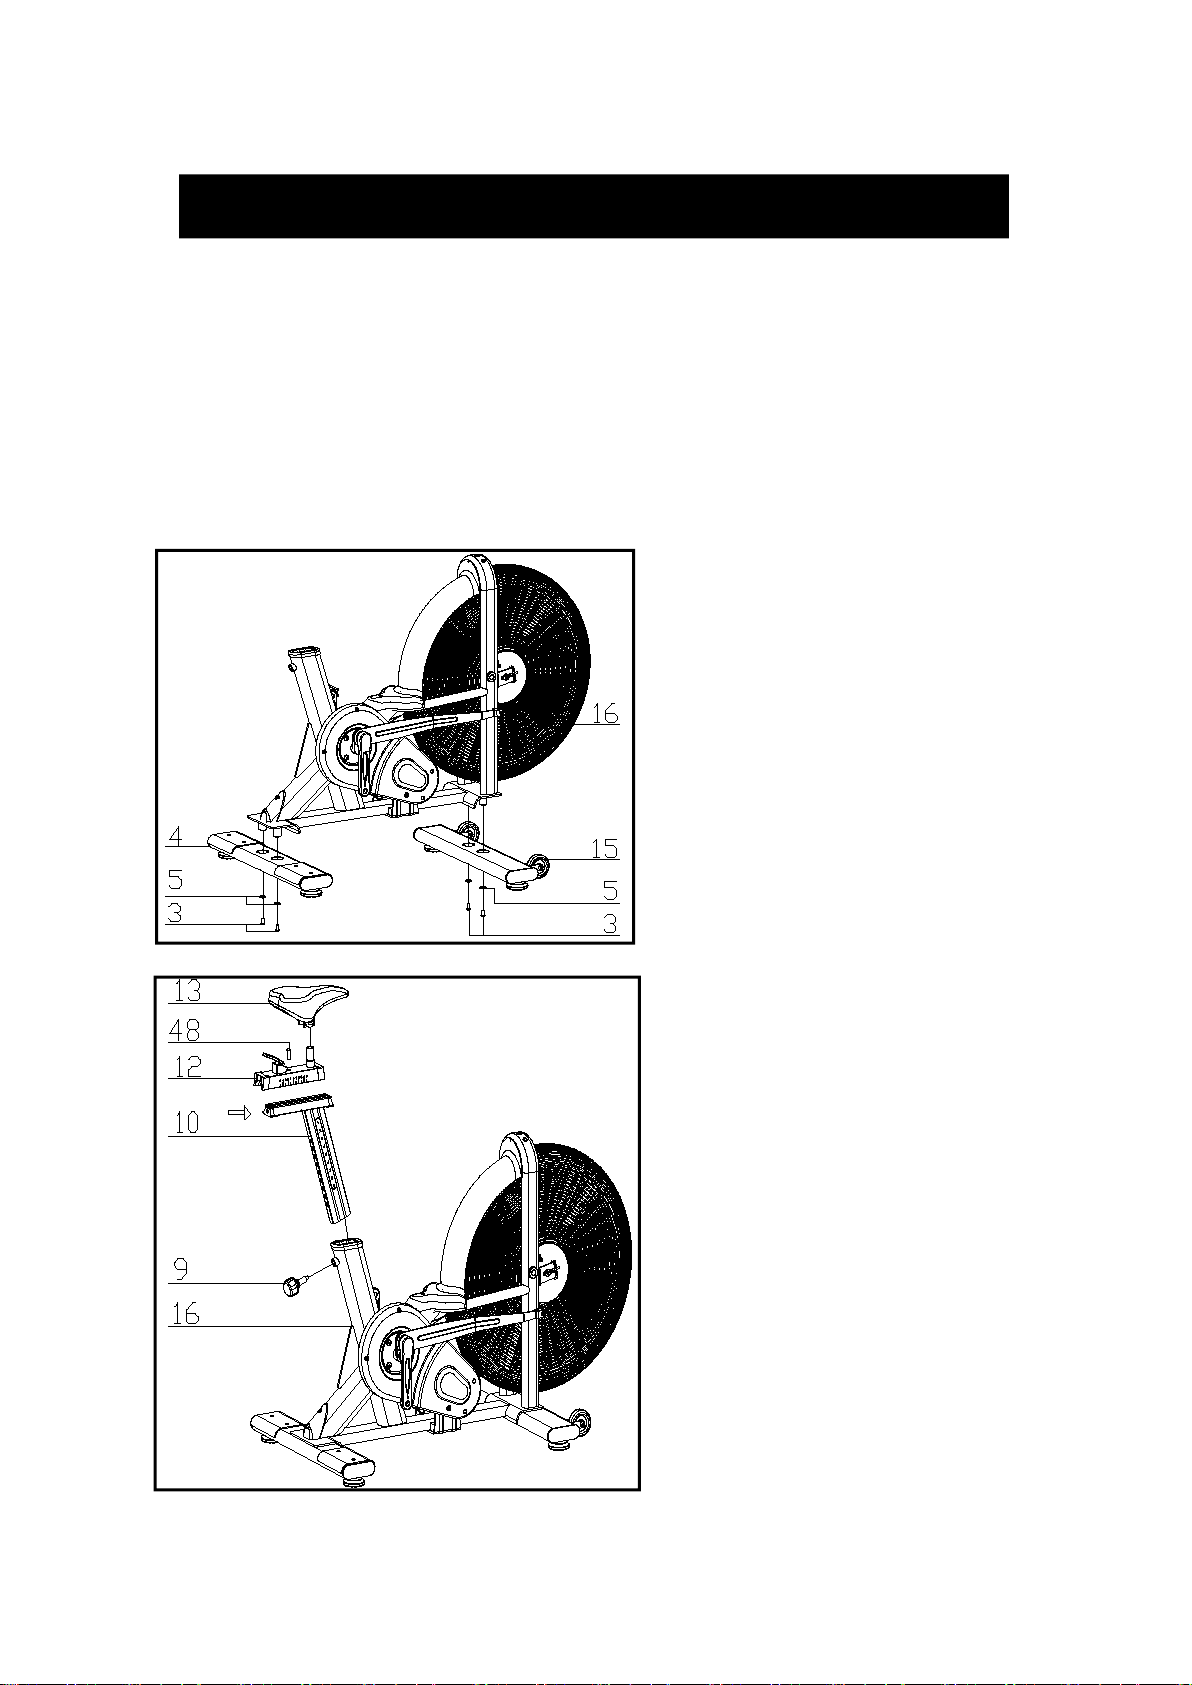
FIG.1
ASSEMBLY INSTRUCTION:
1.PREPARATION:
A. Before assembling make sure that you will have enough space around the item.
B. Use the present tooling for assembling.
C. Before assembling please check whether all needed parts are available (at the above
of this instruction sheet you will find an explosion drawing with all single parts (marked
with numbers) which this item consists of.
2.ASSEMBLY INSTRUCTION:
:
FIG.2
FI G.2:
Slide the Vertical Seat Post (pt.10) into
the seat post housing on the main frame
(pt.16). And put the knob up, then release
the round nut(pt.48) , Then slide the
Seat Post (pt.12) into the Vertical Seat
Post (pt.10),Then fixing the bolt8 (pt.48),
You will have to slacken the knurled
section of the Adjustment Knob (pt.9) and
pull the knob back and then select the
desired height. Release the knob and
retighten the knurled portion.
Now fix the Seat (pt.13) to the Seat Post
(pt.12) as shown, and tighten the bolts
around the screws under the seat.
FIG.1:
Attach the Front Stabilizer (pt.15) to the
Main Frame (pt.16) using two sets of
Ø10 Flat Washers (pt.5) and bolt 1 (3).
Attach the Rear Stabilizer (pt.4) to the
Main Frame (pt.16) using two sets of
Ø10 Flat Washers (pt.5) and bolt 1 (3)
5

FIG.3
FIG.4
FIG.3:
The left hand assembly (18), the right
wrench assembly (21) and the outer
tooth type gasket (92) are fixed to the
main frame assembly (16) in accordance
with the graphic method,the inner six
angle flat head screws (78), flat washer
(5), Spring washer(95),the lock nut (79)
drive assembly connected then, locking;
electronic connection assembly (17) with
six angle flat head screws (27) fixed to
the main frame assembly (16), the cross
slot screw (73) will Aluminum Alloy kettle
(72) fixed to the main frame assembly
(16) on,
ATTENTION: YOU SHOULD FIX THE
HANDLEBAR TIGHTLY
The electronic meter assembly (83)
with cross slot screw (84) fixed to the
electronic connection assembly (17),
connect the plug (A1&A2),
FIG.4:
The Pedals (pt.1 L & pt.1 R) are
marked "L" and "R" - Left and Right.
Connect them to their appropriate
crank arms. The right crank arm is on
the right- hand side of the cycle as you
sit on it.
Note that the Right pedal should be
threaded on clockwise and the Left
pedal anticlockwise.
6

ADJUSTMENT
*To adjust the seat height, slacken the spring knob on the vertical post
stem on the main frame and pull back the knob. Position the vertical
seat post for the desired height so that holes are aligned, then release
the knob and retighten it.
*To move the seat forward in the direction of the handlebar or
backwards away from it, loosen the adjusting knob and washer and
pull the knob back. Slide horizontal seat post into desired position.
Align holes and then retighten the adjusting knob.
*To adjust the handlebar height, slacken the spring knob and secondary
knob and pull both knobs back. Slide the handlebar post along the
housing on the main frame to the desired height and, with the holes
aligned correctly, tighten the spring adjusting knob and then the
secondary knob.
7
DISPLAY FUNCTIONS
Monitor Instruction Manual
TIME DESCRIPTION
RPM ·Display the rotation per minute with range from 0~ 199.
SPEED ·Display current training speed. Maximum speed is 99.9 KM/H or ML/H.
TIME ·Count up - No preset target, Time will count up from 00:00 to maximum
1:59:59 with each increment is 1 minute.
·Count down – The console will countdown from preset time to 00:00:00 and
each preset increment or decrement will be 1 minute between 00:01:00 to 1:59:00.
DISTANCE ·Accumulates total distance from 0.0 up to 999.9 KM or ML or count down from
preset value. User may preset target distance value with UP/DOWN key. Each
increment is 1.0KM or ML.
CALORIES
·Accumulates calories consumption or count down during training from 0 to
maximum 999 calories.User may preset target Calories with UP/DOWN key.
WATT ·Display the power consumption during training.
·Display Range: 0~1999.
PULSE ·User may set up target pulse value from 0~30 to 230 and the console buzzer will
beep when the actual heart rate is over the target value during workout.
BUTTON FUNCTION
TIME DESCRIPTION
START ·To start workout quickly or resume workout in Stop mode.
STOP
·To stop/pause workout.
·To clear up all settings.
·Hold on this key for 2 seconds to reboot the console
DOWN ·To adjust Distance, Calories, Heart-rate, Time, Age value down.
UP
Target Distance
Target Calories
Target Heart-rate
Target Time
Interval
ENTER
·To adjust Distance, Calories, Heart-rate, Time, Age value up.
·Fast access to Target Distance training mode.
·Fast access to Target Calories training mode.
·Fast access to Target Heart Rate training mode.
·Fast access to Target Time training mode.
·There are 3 programs: INTERVAL 10/20,INTERVAL 20/10, Custom.
·To confirm settings or enter program.
OPERATION INSTRUCTION
1. When POWER ON, LCD will full display 2s (Figure 1) with long beep sound, then display wheel
diameter 1s in DIST area (Figure 2). Then enter into AGE setting mode , the AGE flashing to be set (Figure
3). Press the UP/DOWN to set age and press ENTER to confirm then go to Standby mode.
Figure 2 Figure 3
Figure 1
8

2. The window of 、 、 、 、 、 、 、 、INTERVAL10/20 INTERVAL10/20 NTERVAL CUSTOM READY WORK REST TIME DISTANCE
CALORIES WATTS SPEEED RPM、、、 and will flash by sequence in every 1s (Figure 4~Figure 16).
If no input of key operation or RPM signal or pulse input for 60s, computer will go to Sleeping mode.
Figure 4 Figure 5 Figure 6 Figure 7 Figure 8
Figure 9 Figure 10 Figure 11 Figure 12 Figure 13
Figure 14 Figure 15 Figure 16 Figure 17 Figure 18
Figure 19 Figure 20 Figure 21 Figure 22 Figure 23
9
3. Select Manual, Interval, Target Distance, Target Calories, Target HR, Target Time program:
3.1 Manual mode:
①In Standby mode, press START to start workout quickly, the buzzer sound 1 second. TOTAL TIME/ TIME/ DISTANCE/
CALORIES/ WATTS/ SPEED/ RPM start to count up (Figure 17).
②Whenever there is Pulse signal input, will light up and symbol will flash and display pulsevalue (Figure 18). Without pulse
input, it will display “P” (Figure 17).
③No signal input for 30s, buzzer sounds 1 short beep and enter to Wake-up mode. Press any to wake up the console.
④Press START key once to pause training, Buzzer will sound for 0.5s in every 30s. All values are displaying on LCD and flashing in
every 4s. If continue to stop training for 5 minutes, buzzer sounds 2s and enter to Wake-up mode. Press START to resume workout.
⑤Press STOP key, TIME will display total workout time; DISTANCE will display total workout distance; CALORIES will display
total consumption during workout; WATT, SPEED and RPM will switch to display AVG. & MAX.PULSE window will switch to
display 65%, 85% MAX (Figure 21~23) each 5s.
⑥With pulse signal input, PULSE window will display user actual pulse. Pulse window displays nothing if no pulse signal input
(Figure 19~20).
⑦Press any PROGRAM key then perform the program accordingly.
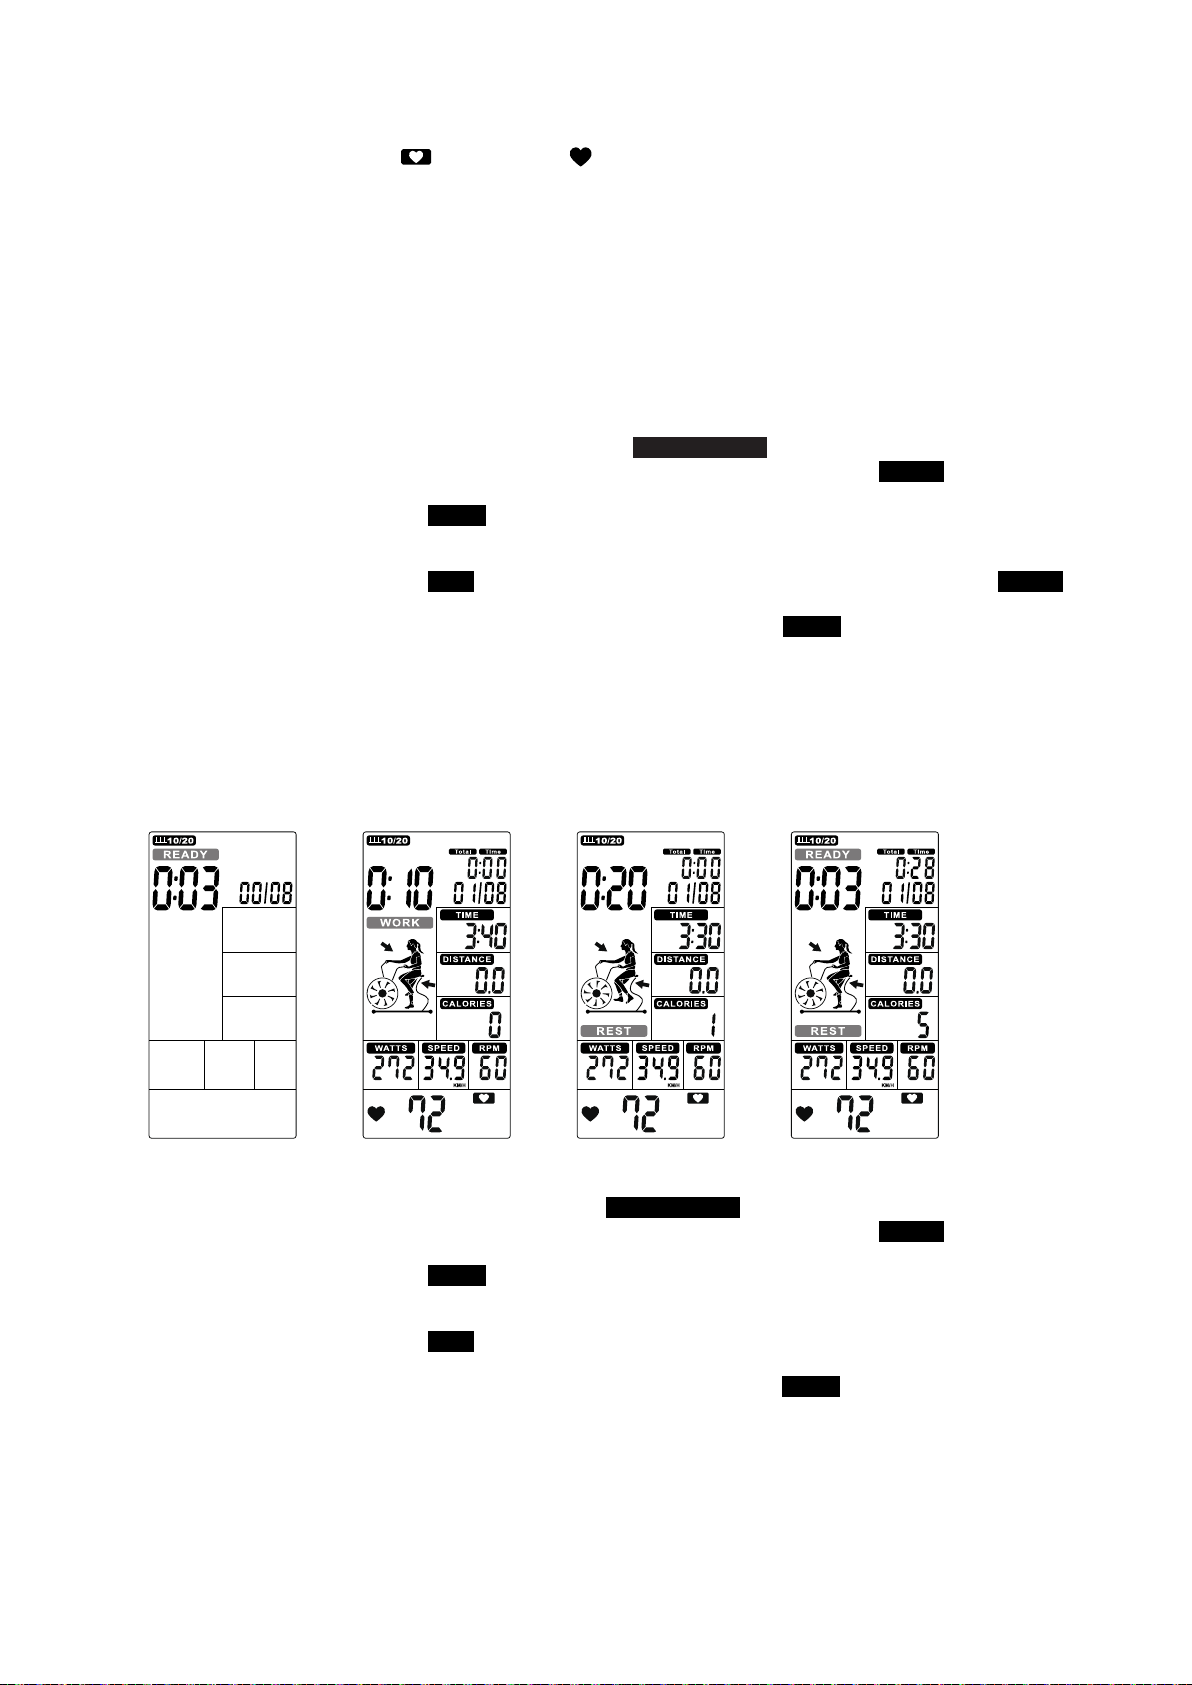
3.2 Interval 20/10 mode:
①Press INIERVAL key to select INTERVAL20/10, press ENTER then will light up, alongwith a long sound for 1s.INTERVAL20/10
②Cycle time counts down from 3 to 0 then console start, meanwhile buzzer beeps once per second and flashes once per READY
second, counting displays ‘00/08’(Figure 24).
③Cycle time counts down from 20 to 0 and flashes once per second . Meantime windows displays rotation animation and WORK
count down from 4 minutes. Then TOTAL TIME, DISTANCE, CALORIES, WATTS, SPEED & RPM start calculating, counting
displays ‘01/08’(Figure 25).
④Cycle time counts down from 10 to 0 and flashes once per second along with 10 beeps(Figure 26), meanwhile willREST READY
flash in last 3s (Figure 27).
⑤The above ③&④ continuie cycle counting and add 1 per each cycle,until displays 08/08 , then go to End page.WORK
�⑥Press START button once enter into PAUSE mode, Buzzer will sound for 0.5s in every 30s. All values are displaying on LCD and
flashing in every 4s. If continue to stop training for 5 minutes, buzzer sounds 2s and enter to Wake-up mode. Press START to resume
workout.
⑦Press STOP or end up training, buzzer beeps 1s then displays TOTAL TIME, DISTANCE,CALORIES for 30s, and WATT, SPEED
& RPM will switch to display AVG. & MAX. PULSE window will switch to display 65%, 85% MAX (Figure 21~23) each 5s.
⑧With pulse signal input, PULSE window will display user actual pulse and 65%, 85% MAX (Figure 21~23). Pulse window displays
nothing if no pulse signal input (Figure 19~20).
⑨Press any PROGRAM key then perform the program accordingly.
3.3 Interval 10-20 mode:
①Press INTERVAL to select INTERVAL10/20, press ENTER then will light up along with buzzer beeps 1s.INTERVAL10/20
②Cycle time counts down from 3 to 0 then console start, meanwhile buzzer beeps once per second and flashes once per READY
second, counting displays ‘00/08’(Figure 28).
③Cycle time counts down from 10 to 0 and flashes once per second . Meantime REMAINING will light up and count down WORK
from 4 minutes. Then TOTAL TIME, DISTANCE, CALORIES, WATTS, SPEED & RPM start calculating, counting displays
‘01/08’(Figure 29).
④Cycle time counts down from 20 to 0 and flashes once per second along with beeps (Figure 30), meanwhile READY will flash REST
in last 3s(Figure 31).
⑤The above ③&④ continue cycle counting and add 1 per each cycle, until displays 08/08 , then go to End page.WORK
⑥Press START button once enter into PAUSE mode, Buzzer will sound for 0.5s in every 30s. All values are
displaying on LCD and flashing in every 4s. If continue to stop training for 5 minutes, buzzer sounds 2s
and enter to Wake-up mode. Press START to resume workout.
⑦Press STOP or end up training, buzzer beeps 1s then displays TOTAL TIME, DISTANCE,CALORIES for
30s, and WATT, SPEED & RPM will switch to display AVG. & MAX. .PULSE window will switch to
display 65%, 85% MAX (Figure 21~23) each 5s.
⑧With pulse signal input, PULSE window will display user actual pulse. Pulse window displays nothing if no pulse signal input
(Figure 19~20).
⑨Press any PROGRAM key then perform the program accordingly.
Figure 24 Figure 25 Figure 26 Figure 27
10

3.4 Interval CUSTOM:
①Press INTERVAL to select INTERVAL CUSTOM, press ENTER to enter into this mode then 00/XX flashes INTERVAL CUSTOM
to be set along with buzzer beeps 1s. Press UP/DOWN to set 00/XX within 1~99 Circularly. Press ENTER to confirm along with
buzzer beeps 1s then enter into next setting.(Figure 32)
②The TIME continues lighting up, and 0:01 will flash, press UP/DOWN to set training time within 0:00~9:59 circularly WORK
(Figure 33). Press ENTER to confirm along with buzzer beeps 1s and continues lighting up.INTERVAL CUSTOM
③The TIME continues lighting up, will flash, press UP/DOWN to set rest time 0:01~9:59 circularly (Figure 34). Press ENTER REST
to confirm along with buzzer beeps 1s and continues lighting up.INTERVAL CUSTOM
④Cycle time counts down from 3 to 0 then console start, meanwhile buzzer beeps once per second and flashes once per READY
second, counting displays ‘00/XX’(Figure 35).
⑤Cycle time counts down from the preset total time and flashes once per second . Then TOTAL TIME, DISTANCE,WORK
CALORIES, WATTS, SPEED & RPM start calculating, counting displays ‘01/XX’(Figure 36).
⑥Cycle time counts down from and flashes once per second along with buzzer beeps(Figure 37), meanwhile will flash REST READY
in last 3s(Figure 38).
⑦The above ③&④continue cycle counting and add 1 per each cycle, until the WORK setting value finished then go to End page.
⑧In mode, buzzer beeps 1s then enter into wake up mode if no any signal inputs within 30s.WORK
⑨Press START button once enter into PAUSE mode, Buzzer will sound for 0.5s in every 30s. All values are displaying on LCD and
flashing in every 4s. If continue to stop training for 5 minutes, buzzer sounds 2s and enter to Wake-up mode. Press START to resume
workout.
⑩Press STOP or end up training, buzzer beeps 1s then displays TOTAL TIME, DISTANCE, CALORIES for 30s, and WATT, SPEED
& RPM will switch to display AVG. & MAX. each 5s. PULSE window will switch to display 65%, 85% MAX (Figure 21~23)
⑪With pulse signal input, PULSE window will display user actual pulse. Pulse window displays
nothing if no pulse signal input (Figure 19~20).
⑫Press any PROGRAM key then perform the program accordingly.
Figure 28 Figure 29 Figure 30 Figure 31
Figure 32 Figure 33 Figure 34 Figure 35
11

12

13

14
Table of contents


