Nualight N18497 User manual

Before installing, please read the installation instructions!
RoHS
COMPLIANT
8
&
ISO9001-2000 ISO14001-2004
8
&
Manual for NUALIGHT LED Street Light
UK Branch
Tilgate Business Park, 1 Forest Gate, Brington Road,
Crawley, West Sussex, RH 11 9PT
T: +44 129 322 4120 Company Reg No: BR 016632
Nualight Sales Ltd-Headquarters
Cork Business & Technology Park, Model Farm Road,
Cork, T12 PW 29, Ireland
T:+353 21 4867 636 Company Reg No: 386239

Characteristic
3
3
3
3
3
3
3
3
3
3
3
3
2OMNZOTMKLLKIZINGXZ
*OYZXOH[ZOUTI[X\K
6NUZUKRKIZXOI6GXGSKZKXY
*OSKTYOUT
)NGXGIZKXOYZOI
4UZKYULZNK/TYZGRRGZOUT[YOTM
/TYZGRRGZOUT3GT[GRȻ
/TYZGRRGZOUT3GT[GRȺ
:XGTYVUXZ9ZUXGMKXKW[OXKSKTZY
6XKIG[ZOUTY
9KI[XOZ_IG[ZOUT
)UTZGIZ[Y
Manual for NUALIGHT LED Street Light
ʒLED Source: selection of original CREE/PHILIPS/ORSAM high power LED, which fully guarantees the light color stability and lumen maintenance.
ʓDriver: adoption of international famous brand of high-power special driver for LED streerlight with a variety of certification, which makes the reliability
and stabilityof the lamps greatly improved.
ʔDesign of optical light distribution: The secondary light distribution design with independent intellectual property rights, so that the lamp spacing ratio
reached 1:4y as increased in the lamp efficiency at the same time; optical lens with high light transmittance, high lighting efficiency
ʕRadiation: new modular heat dissipation design, making use of lamps and lanterns better airflow from all directions, ensure the lamp temperature rise
ʖStructure: Unique design with ultra-thin lighting weight, increase the use of safety; High strength toughened glass mask makes the fixture more easier
to clean and the optical devices more durable.
Horizontal and vertical installation with -5°to 15°adjustable angles for 70W above led street models with tool free installation and maintenance design
module design standard, makes the more flexibility and convenience for installation and useness. More saftety for the useness if starting the automatic
power off function of the electric chamber cover.
ʗProtection 1: Independent waterproof structure for both power and led chip body, not only make the lamp module replacement convenient, also make
the level of protection of the lamp to reach IP66.
ʘProtection 2Suitable for the use during the wide voltage from 120-277VAC; Surge protective device(10KV/10KA) provides more safety.
ʙIntelligent control function:A variety of control methods and induction devices available, lamps more intelligent, more convenient to use
ʚOthers: Dust free self cleaning system design,prodiving more lasting efficient cooling for lamps.
Manual for NUALIGHT LED Street Light

Photoelectric parameters
! !
! !
: :
,3 ,3
&((1(& &((1(&
!+UV !+UV
MODEL
,138792/7$*(
32:(5EFFICIENCY
32:(5FACTOR
6<6POWER
/80(1
LIGHTDISTRIBUTIONTYPE
/UMENEFFICIENCY
&CT
&5,
,3RATE
&(57,),CATE
/,)(63$1
1:
3$&.$*(SIZE
52224576
Model DIMENSION˖
/:+ ᧤81,7
MM
52224576
Dimension
N18497
.* .*
9 9
!/P !/P
/0: /0:
.. ..
! !
POLARIZATION
ELLIPSE
N18498
N18497 N18498
POLARIZATION
ELLIPSE
Manual for NUALIGHT LED Street Light Manual for NUALIGHT LED Street Light

Distributioncurve
Lightingeffectchart
LIGHTING EFFECT DIAGRAMII
LIGHTING EFFECT DIAGRAMI
0
30
60
90
120
150
180
150
120
90
60
30
ݹ ᕪ
cd
C01801490
C90270568
ᒣ ൷ ݹ ᶏ 䀂
501029
ᓖ
0
700
1400
2100
2800
3500
InstallationManual(ൕ
1. Open the packaging to check whether the product is in line with the requirements; the surface of the product is intact; The function of the
product is in line with the requirements.
2. Installation of lamp
21The grid line penetrates into the lamp post, the electric cable (2) and the lamp power line (1) connected (see Figure 2)
22 The grid line connected into a lamp post, lamp arm (3) penetrates the lamp arm mounting hole (4), (see Figure 3)
2.3 With six angle wrench locking parts (5) (see Figure 3)
Installation requirements of the lamp arm& Light controller installation
The two lamp arm of the street lamp is suitable
for different size᧤Φ50ᇬΦ42᧥see offside᧥
Picture 1
Picture 2
Picture 3
%URZQ
Manual for NUALIGHT LED Street Light Manual for NUALIGHT LED Street Light

InstallationManual(ൖ
1. Open the packaging to check whether the product is in line with the requirements; the surface of the product is intact; The function of the product is in line
with the requirements.
2. Detailed installation Manual:
3. If nertical installation, pls adjust the lamp arm as below picture shows:
Requirement for lamp arm: This led street light is suitable for different lamp arm sizes(Φ42~Φ60)
Notes of the Installation & using
LED is widely used outdoor with poor working conditions, which keeps the strict requirements for its reliability. According to the failure analysis,
except for the factors from the lamp, good electricity ambient and correct installation have a great effect on the stability of the drive. Below are
the precautions for the installation and using:
1 Installation Instructions
1.1 There are 3 lines for AC input, which are L,N,G and please wire and power the lamp according to the product specifications.
1.2 Voltage fluctuations from the state grid should be within the voltage range of the lamp. There will be highlights on the Item NO.2 in “Power Systems”
below.
1.3 Please make sure that the lamp has a good connection with the ground line while installation.
1.4 Surge protective device is provided when buying the products from us, but lightning protection device is also needed while installation in case of the
damage caused by lightning.
1.5 The power cord of the LED street light is must be the special line, with no other mixed cords, especially the cords of the HPS or other high voltage
shock lamps.
1.6 Please don't expose the driver out of the lamp to reduce the damage caused by poor condition bad environment.
Manual for NUALIGHT LED Street Light Manual for NUALIGHT LED Street Light

2 Power Systems
There are 3 lines for led street light, namely L line, N line, and GND. The power system of the LED lamps can be single-phase & three-phase power
supply. Wiring is showed as the one in picture 1 and single-phase two-wire system is prohibited. When using three-phase power supply, TN-S system
is required, namely three-phase five-wire system. The wiring is showed below in picture 2 and three-phase four-wire system is prohibited. These two
power system needs to ensure that the GND is connected with the ground of the main power supply system.
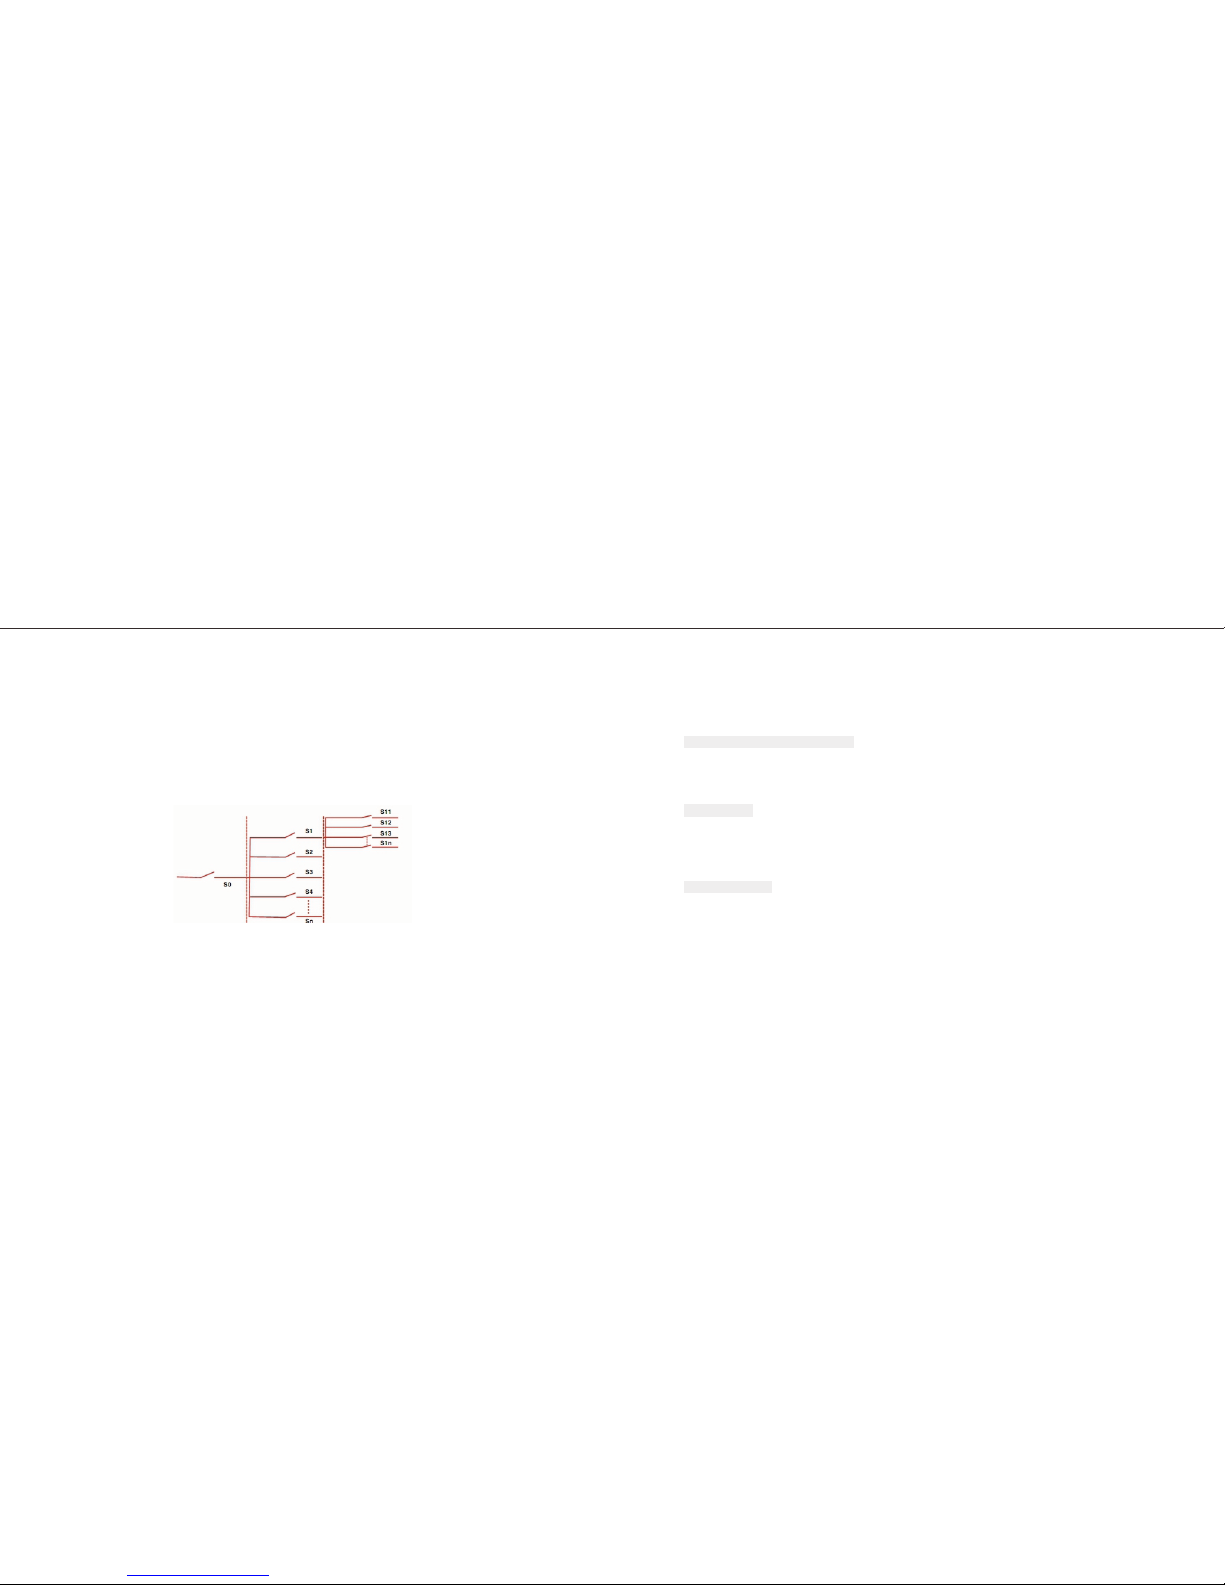
Three-phase five-wire system is widely applied in most of the cases, and the electrician needs to take care of the three-phase load balancing. And if there
is no balance for the three-phase load,1) there will be huge surge current at the input terminal of the load when turn on/off the switch,(And this high
current is caused by high voltage in a short time at the grid, like a wave. When large-capacity electrical equipment turns on/off, there will be surge voltage
caused by the inductance in the grid, which will cause the surge current to damage the LED driver of theLEDs ). The phase that is caused by low voltage
may prevent the control circuit of the led lamp from being normal working state, thus affect the energy saving or the light-efficiency of the LED.
Picture 1 Wire of Single-phase three-wire system
(notice the balance of the three phases)
Picture 2 Wire of three-phase five-wire system (notice the balance of the three phases)
3 (Power lines)
LED Street Light uses three-phase output current and stable voltage, therefore the following points needs to be taken care in case that the driver & LED
is damaged by them.
ƹMake sure that the AC line from the low-voltage distribution is provided by the specific transformer, the input AC voltage is not exceeding the working
voltage range of the LED lamp. Public transformer is prohibited because of the low power quality and huge voltage fluctuation. Current harmonics,
caused by the current variation and the driver resistance, will change into voltage harmonics and come to the power distribution cabinet. This sometimes
leads to the unbalanced current, overload and poor electromegnatic power ambience
ƹPower lines shared with HPS, metal halide and other high-intensity discharge lamps is not allowed because of the unstable arc discharge in the tube
at the initial phase, which can leads to surge voltage as high as 2-6KV.
ƹSpecific power line can not power the large electrical equipment or factories temporarily or for a long time. Like: electric welder, mixer, impact drill,
packing machine, large-scale heavy equipment, cement factory,steel plant .etc. Because these machines and working conditions makes the instability
of the state grid.
4 Requirements of the installation for the driver
4.1 Reliable grounding
- The Led lamp and the pole needs to be reliable grounded in case of thunder shock. In order to make sure
the safety of the electricity, connecting the ground line with the N-line is not allowed, and unconnected
ground line of the LED lamp is also prohibited.
4.2 Connection of the power cord
- When connect the LED lamp and the AC input, please make sure that the cord needs to be inserted into
the pole and then connect the AC input of the driver. Let the connector upward and then wrap with insulation tape or waterproof junction box to
prevent the connecting part from the moisture or the rain.
Otherwise, there will be security risks on the one hand, and on the other hand, huge voltage fluctuation will ruin the LED and the driver. Please
refer to the connection line of the picture 3 below.
4.3 Diameter requirements of the N-line
- In many cord(three-phase power supply),the diameter of the N line is small, which has a great impact on 3 pieces led street light with
single-phase power supply. Because the led street light is powered by three-phase five-wire system, which requires the same diameter
of A,B,C three phase line to adapt to the Schematic diagram of use waterproof junction box
connect the output of
the waterproof wiring
box wit h the LE D
power supply
waterproof
wiring box
Flood
Use insulation tape schematic bandage 3 Recommended connection method
%URZQ
Manual for NUALIGHT LED Street Light Manual for NUALIGHT LED Street Light

Picture 4 Switch configuration ( Switch on or off step by step)
5 Control load capacity & turn on/off the switch in reason
5.1 Control the load capacity on each street line
To ensure the LED street light work properly, from low-voltage power distribution cabinet to LED street light power distribution cabinet, if the lead
wire is long ,then there will be huge lead inductance. And this is the same case for turning on/off the LED street light. This will make the sudden
change of the inductance current ,which can threaten the safety of the LED street light. So when installing the LED street light, the quantity for
each street light line needs to be reasonably planed in case of too much load.
Any accessory that may caused the over load or close to full load of the LED street light is prohibited.
5.2 Turn on/off the switch step by step
Sub-switch is needed under the main switch in the distribution system, like the one showed in picture 4. And single main switch to control all
the lines is prohibited. The quantity of the sub-switch depends on the quantity of the branches and the load capacity.
Make sure that all the branches are off before turn on the main switch.
Turn on the branch switch step by step after turning on the main switch, and at the same time, make sure that the interval is more than 5 seconds
between each two switches.
Please never turn off the main switch when all the sub-switches are turned on, because in this case, the impact shock caused by over load and the
leakage inductance from the transformer will lead to huge energy,thus low frequent , high frequent current and voltage surge will damage the
driver, LED or other accessories.
Primary Switch
( Main Switch)
Secondary Switch Sn
Third Level Switch
( Set the switch step
by step according to
the real demands)
Procedures of turning on the lamp:
Step 1:Turn on S0->S1->S11->S12->S13->S1n, and until all the last stage switches are turned on;
Step 2: Turn on S2->S21->S22->S23->S2n, and until all the last stage switches are turned on;
Step n: Turn on Sn->Sn1->Sn2->Sn3->Snn, and until all the last stage switches are turned on.
Procedures of turning off the lamp:
Step 1: Turn off S0->S1->S11->S12->S13->S1n, and until all the last stage switches are turned off;
Step 2: Turn off S2->S21->S22->S23->S2n, and until all the last stage switches are turned off;
Step n: Turn off Sn->Sn1->Sn2->Sn3->Snn, and until all the last stage switches are turned off.
Security Caution
The warranty does not cover the damage caused by the following reasons:
Input voltage of the LED street light is not the same in the product specifications.
No good ground while the LED street light is working.
External force or throw the lamp into the water or the fire.
Artificial or external irresistible factors (say earthquake,flood, fire,lightning)
Products that is repaired or try to repair by people that is not authorized by our company.
Please read the manual carefully before using in case of accidents and damage.
The products don't need to repair in most of the cases, but if maintenance is a needed, please contact us.
Please check the product carefully before using it, and please contact us if there is anomalies.
There will be temperature rise during working, and this is a normal phenomenon.
Our LED street light is packaged with hard paper carton box, and severe mechanical shock, exposure to rain,
inversion, rolling and heavy load are all not prohibited. The LED street light should be stored in cool, dry and clean
ambience and the temperature is -20ć40ć
Transport & Storage requirements
Precautions
Manual for NUALIGHT LED Street Light Manual for NUALIGHT LED Street Light

UK DESIGN
NUALIGHT STYLE
2017
Manual for NUALIGHT LED Street Light Manual for NUALIGHT LED Street Light
This manual suits for next models
1
Other Nualight Outdoor Light manuals
Popular Outdoor Light manuals by other brands

PUK
PUK Hydrotech Medium Square LED 401006 Assembly and operating instructions

cocoweb
cocoweb Canberra Nautical installation instructions

LIGMAN
LIGMAN MC-20002-LC installation manual

Pro-Elec
Pro-Elec PELL0265 instructions

LIGMAN
LIGMAN MARYS 6 installation manual

Vaxcel
Vaxcel T0040 Assembly and installation instructions

LightPro
LightPro Nomia 207U user manual

ABBA
ABBA CD75 installation guide

Acuity Brands Lighting
Acuity Brands Lighting Holophane High Mast System 2 Operation & maintenance manual

Thorn
Thorn DYANA LED MLE Series installation instructions

LIGMAN
LIGMAN PRA-10001 installation manual

Hubbardton Forge
Hubbardton Forge Elton 303050 installation instructions