Nubert nuXinema User manual

1
nuXinema AV Receiver
INITIAL OPERATION
INSTRUCTIONS FOR USE
Many thanks for your confidence in our product. To obtain fast information briefly, please read the
quick start guide first.
The following instruction guide elucidates all functions, operating and connections explicitly, so
that you could enjoy your new Nubert product in its entirety. You will be able to set up your system
without any problems if you read these operating instructions carefully.
We will explain the operation, connection and installation so that you can achieve the optimum
sound quality and fully enjoy your new nuXinema AV-Receiver!
Nubert electronic GmbH hereby declares that this product complies with the currently EU directives,
provided that it is installed and used in accordance with the manufacturer’s instructions. The full
text of the EU Declaration of Conformity is available at the following Internet address:
https://www.nubert.de/konformitaetserklaerungen/716/
• Do not change the serial number on the speaker. It is part of the operating approval.
• If the loudspeaker is repaired or modified by workshops or other third parties not authorized by
Nubert, it loses its operating license.
• Only accessories and devices may be connected which in turn comply with all legal requirements
and are approved.
• This device may only be used for the applications specified in the „Intended Use“ section.
Coldness, Sound and Dependability .
When loudspeakers and other electric devices are brought from a cold into a warm
environment, it is possible that there will arise water condensation inside. In conse-
quence of that, there exists danger of any defects or an electric shock. Furthermore,
deep temperatures will have an impact on the flexibility of movable parts inside of the
loudspeaker.

2
Therefore, wait at least 4 hours before turning on the device until it has taken room
temperature. Your new Nubert loudspeaker will thank you with the superior sound qual-
ity you’re expecting from Nubert rightly.
Intended Use .
This electric device is designed exclusively for sound reproduction in dry rooms. Use
the receiver only as described in this manual. Any other use (particularly safety-rele-
vant or medical use, installation in open environment like IP-certified products) is con-
sidered improper and may result in property damage or even personal injury. Nubert
electronic GmbH does not assume any liability for damages caused by improper use.
Positioning and Antenna .
The nuXinema must be
placed on a flat and stable
place. Be careful that there
will be a sufficient air circu-
lation for cooling the device
during operation.
On the back side, the
nuXinema has two threaded
bushes for antennas. Install
the antennas (included in
the standard delivery) and
align them towards the top.
Connections and Application Examples
The nuXinema must be wired completely before switching on – please look at the
separately installation guide for more details.
With the included remote control or our Nubert X-Remote Smartphone App you can
choose between the sources you want to listen to (see the following section).
Bluetooth input
The Bluetooth input also belongs to connecting options for playing music wireless
from another device like a laptop, smartphone, or something like this.

3
AUX input
For sources with analogue line-out output, like
▪ CD player
▪ some network adapters
▪ Smartphones, PCs and MP3-Players with 3,5 mm male trs jack
USB port
The USB port provides an electricity supply with 5 V / 1,5 A for replacing the power
supply unit of another additional device (for e.g., a remote receiver or smartphone).
Simultaneously, it works as an additional audio input. Some devices which are de-
signed exactly for those function – like the remote receiver Nubert nuConnect trXS –
can broadcast audio signals by means of this port.
HDMI eARC connection
Hereby it can be connected a TV with ARC or eARC audio output.
Please note: In some cases, it can be necessary that you should activate the CEC and
ARC plus PCM or Dolby Digital sound output functions manually in the menu of your
TV.
SPDIF inputs
1x coaxial for connecting sources with electric digital output;
1x optical for connecting sources with optical digital output, for e.g.,
▪ CD players
▪ network adapters
▪ satellite receivers

4
HDMI inputs
3x HDMI connecting plugs for sources with an equivalent output, for e.g.,
▪ Blu-ray players
▪ Gaming consoles
Analog outputs
8x analog cinch connecting plugs for coupling power amplifiers or active speakers.
There can be connected the following channels:
▪ Front left and right
▪ Centre and Subwoofer
▪ Surround left and right
▪ Height left and right
Remote Control
The remote control allows directly access to the functions needed
permanently.
on/off
With the on/off button, the nuXinema preAV can be turned on and
off. Furthermore, it can be turned into the stand-by mode.
⚠ Notice:
▪ If the nuXinema preAV will be turned into the stand-by mode by
using the remote control, the automatically switch-on function will
be deactivated.
volume and mute
These buttons allow regulation of the volume level. With the button you can mute
the sound or activate it again.
tone
With the remote control there also can be adjusted the sound characteristic.
The tone button will call the appropriate menu. Furthermore, this button allows chang-
ing between the submenu of bass, mid/high and loudness. By using the arrow keys
there can be set some options in the submenu like rising or lowering down the bass
level and mid/high tone up to ±10 dB. Additionally, the loudness effect can be activated
or deactivated. For more details, see page 12.

5
mode
When pressing the mode button twice, there can be chosen the sound/surround mode
you desire. There are available some different modes like Stereo, Dolby Surround,
Voice+ and Night. For more details about this, please turn to page 16.
hdmi, coax, bluetooth, aux, opto, port
These six buttons allow to choose the source. These buttons are double used partially.
By pressing these buttons for several times there can be switched between the
sources.
p1, p2, p3
These buttons are for pre-sets so that you can recall three options which can be saved
in the setup menu. Alternatively, there can be saved a pre-set by pressing and holding
the respective button (see page 10).
menu, directional pad
Some buttons of the remote control are double used to allow controlling the display
menu (OSD).
If you press the menu/hdmi button for 4 seconds, there will be shown the display menu
(OSD) of the nuXinema on the TV or video projector which is installed at the HDMI
eARC port. In this OSD menu you can navigate by these arrow keys and the central
selection key.
Nubert X-Remote App
The Nubert X-Remote App is another option to control the device. It’s an alternative to
the remote control. This app can be downloaded to your smart devices by the app
stores (Google Play and Apple).
With the X-Remote App you can control all options and settings from your listening
position very comfortable. The app includes all menu points which are also available

6
by the display at the front of the nuXinema. Additionally, there are some more functions
available as follows:
Setting password
If necessary, you may request to set a password when the app will be loaded firstly. By
the factory setting, the password is set at the value 0000.
In the menu
>Settings >advanced >password
it is possible to set another password to protect your device from unauthorized access.
If the device will be reset to factory defaults, the password will also reset to the value
0000.
X-Room Calibration
Bad room acoustics can have a negative effect of the final sound, for e.g., such as
droning noise or losses at low frequencies. Specifically targeting the sound means that
unwanted room reflections can be avoided.
X-Room Calibration allows an optimization of lower frequencies so that the bass
sound will have a punchy sound and better pulse accuracy. To benefit from these au-
tomatically room calibration, it is necessary to connect with every compatible loud-
speaker separately and pass this calibration process from your listening position.
The loudspeaker will activate a test noise which will be recorded by your smartphone
microphone. The app will use this data to calculate a correction curve which will be
send back to the speaker, so that you could enjoy the best sound at your listening po-
sition. In addition, the nuXinema preAV can optimize the lower frequencies of the front
speaker connected by cinch by means of its integrated signal processor.
⚠ Notice:
▪ When using an Android mobile phone, there is necessary the separately USB meas-
uring microphone “Nubert XRC Android Interface” to use the X-Room Calibration func-
tion.
Device Display
The device display will show the following information during operation:
Symbol
This symbol will be displayed when the nuXinema preAV is in Wireless mode and a
wireless connection by X-Connect Surround exists.
Symbol
This symbol will be displayed when the nuXinema preAV is in Mute mode. All speakers
will be muted.

7
Currently chosen input Currently volume level
Displaying of signal type and sound mode
As a temporarily display (if necessary, as a ticker) there will be shown the currently
sound or surround mode (here: Voice+) and the input signal (here: PCM2.0) at the start
of the sound reproduction.
Selection of permanent operation display
The behaviour of the permanent display can be selected in the menu. In the submenu
>light there can be selected automatic dimming, or the display can be deactivated. In
the submenu >content there is an option to display the preAV logo permanently.

8
Menu navigation and settings
Return button __________| select rotary control
By pressing the return key By turning the select
you will come back to the knob the various menu
main menu. With this button points can be called
you always change to the up or settings can be
higher menu level. changed.
By pressing the rotary
control you can skip
into a submenu or con-
firm a selection you
have been made.
Main menu and submenu
After turning on the nuXinema preAV there will be
shown the preAV logo on the display screen. After 8
seconds it changes to the volume level menu auto-
matically.
The volume menu shows the currently selected input
(here: coax) and the volume level. This can be adjust-
ed by the select rotary knob.
Maximum volume: 0 dB | Minimum volume: -100 dB
Choose with the select rotary control your source
between HDMI eARC, HDMI, aux (analogue input),
Bluetooth, coax (digital electric input), optical (digi-
tal optical input) or port (digital input).
By the select rotary knob there can be achieved an
increase or lowering of the mid/high frequency range
of the front speakers (maximally 10 dB, see page 13).
By the select rotary knob there can be achieved an
increase or lowering of the bass frequency range of
the front speakers (maximally 10 dB).

9
You can choose between on and off with the rotary
control knob.
There can be chosen between various tone and sur-
round modes with the rotary control.
The select knob can be used to set an additional de-
lay of the sound output, so that you can achieve a
synchronous playback of sound and picture (step
size 10 ms, max. 400 ms).
Under this menu point there can be set the loudspeak-
er configuration. Furthermore, there will be defined
the operation mode. If there is set none or pre-output
at all channels, so the preAV works in standard mode
(default condition, stand-by power under 1 W). If there
is connected a speaker wireless, the preAV works in
Wireless mode (stand-by power under 2 W).
With the select rotary control the channel to be con-
figured can be selected.
Afterwards, there will be skipped to the right display
side by pressing the knob.
none channel is not in use
pre output channel will be given out at the ana-
logue cinch output
new pairing Starts a pairing process to connect any
wireless speaker or receiver
If a speaker or receiver is assigned to this channel,
its name and ID code will appear here. If you will made
an alternative assignment, there can be chosen an-
other speaker. Every speaker is registered here. Con-
firm your selection by pressing the knob.

10
___ 🔻 ___ gain 0 dB
Input sensitivity for analogue AUX input can be set in 2
steps between 0 dB and +6 dB.
___ 🔻 ___ preset 1 Press rotarx control to call presets 1, 2
or 3
|
Save as –––– 🔻 –––- save as p1
A preset can be saved by choosing save as. By
Using the select knob there can be chosen
between 3 storage spaces. By pressing the 🔻
button the settings in the sub-menus mid-hi, bass,
loudness, surround mode, lip sync, analog gain and
X-Room Calibration will be saved.
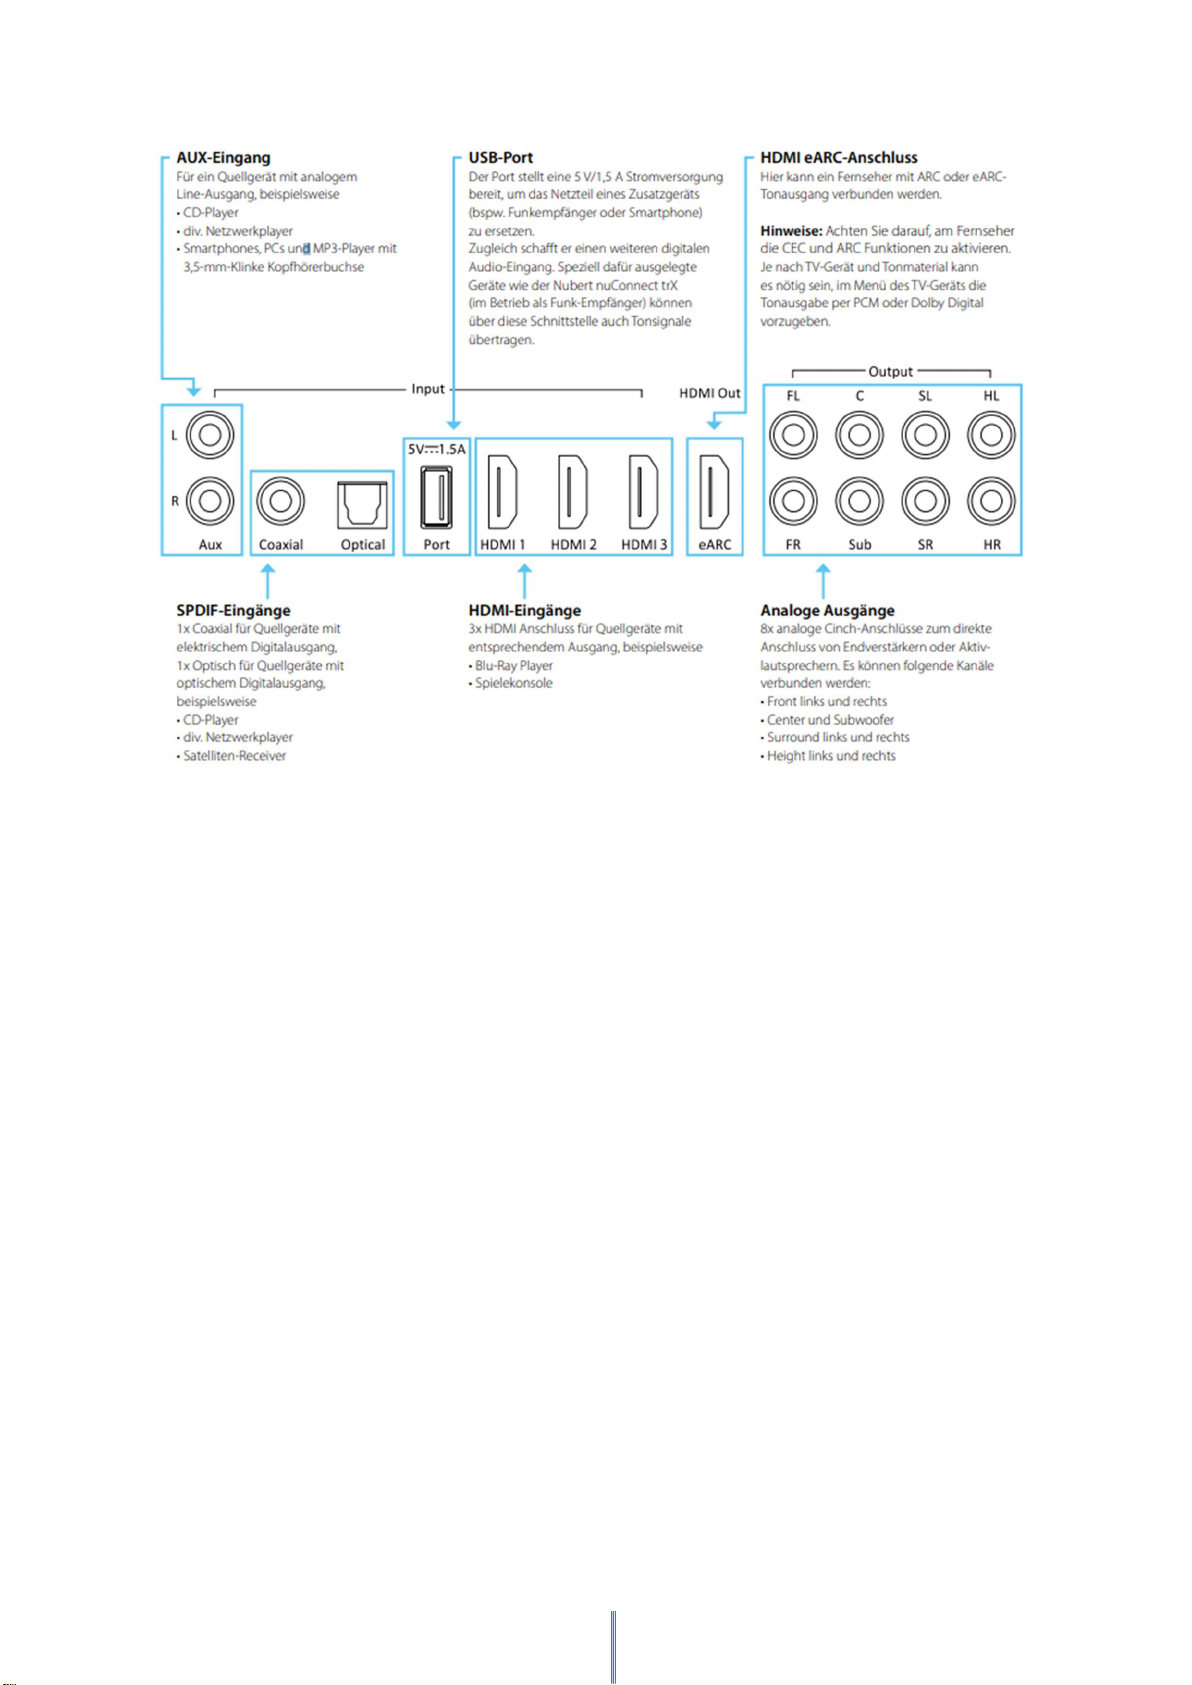
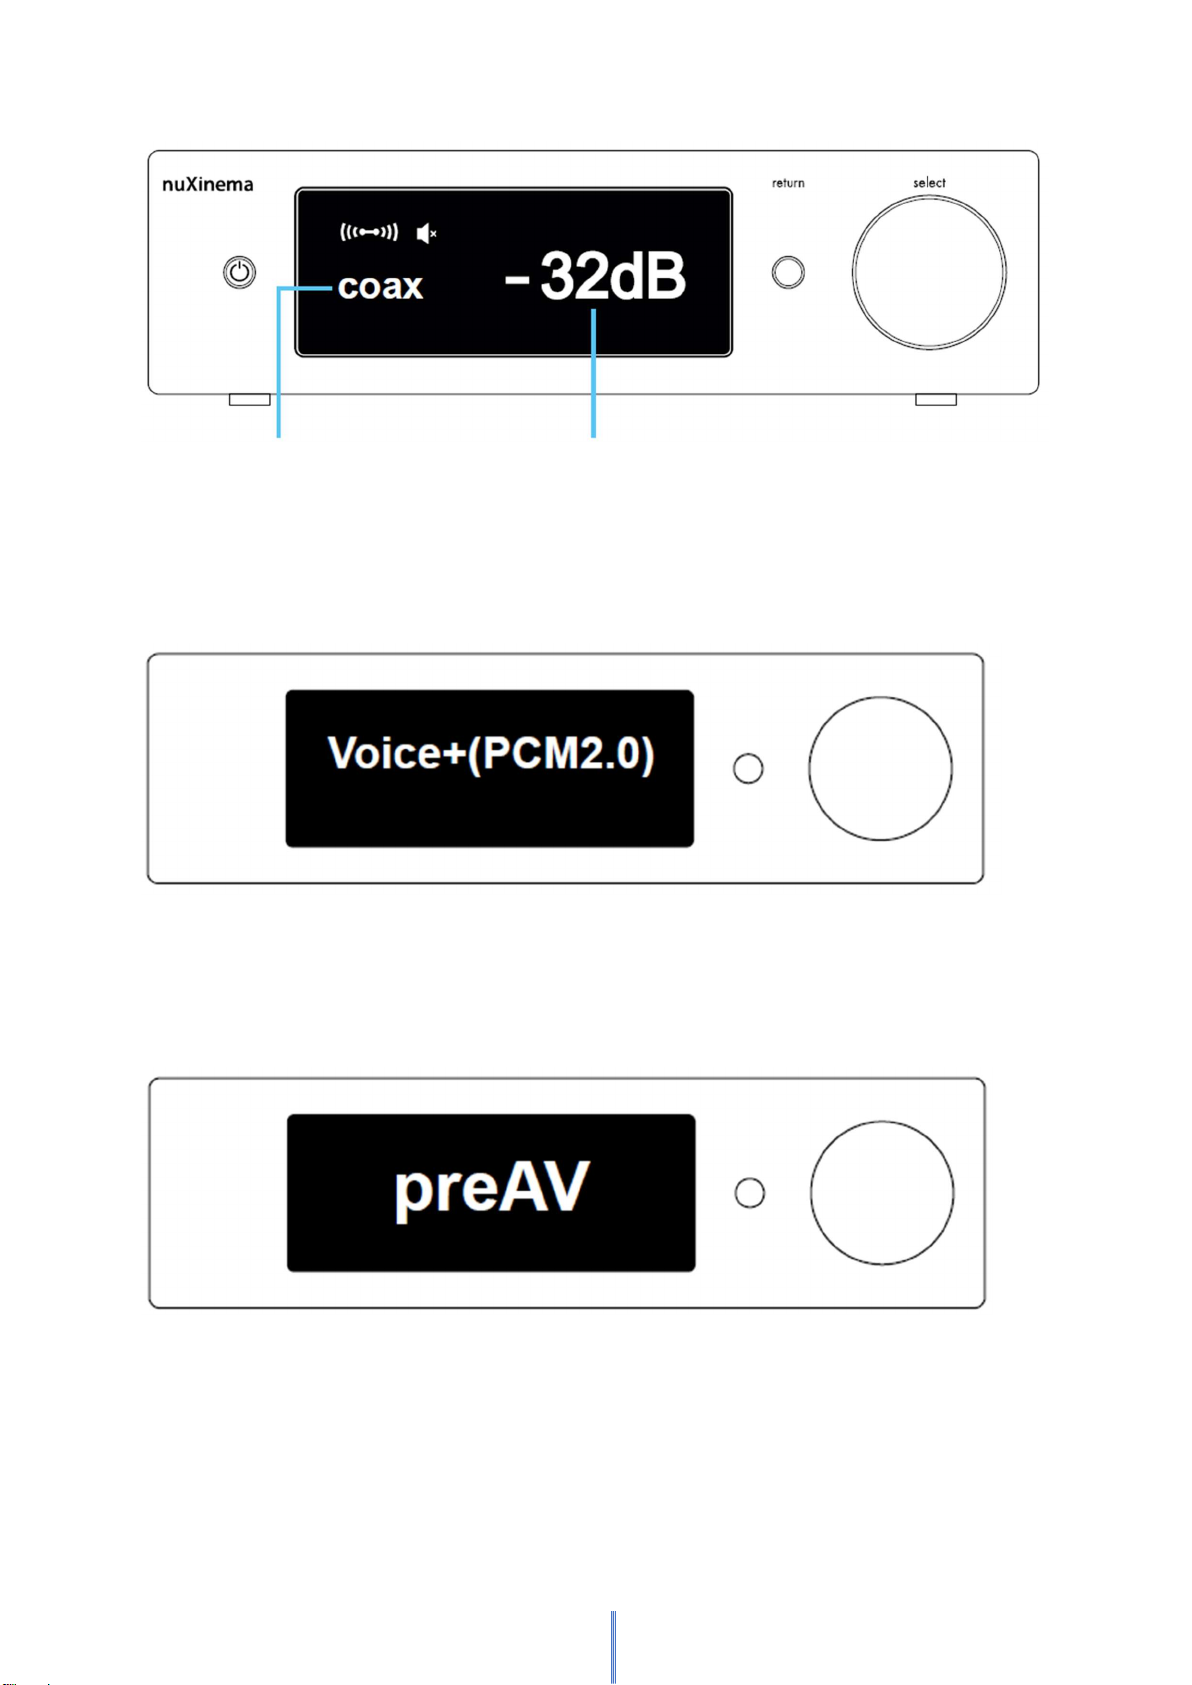
___ 🔻 ___ content ______ 🔻 _____ volume
Display at the set- …at the volume menu
ting content will fix or at the preAV
the standard display logo.
permanently...
|
___ light ______ 🔻 _____ normal
Display light will normal: full brightness
set the brightness permanently
of the display illu- autodim: Brightness
mination like…: will be dimmed after
10 seconds
auto off: off after 10 sec.
___ 🔻 ___ auto power ON
The electronics of the preAV is equipped with a
stand-by automatic which automatically switches
the device into a power-saving mode when it is not
needed – and also turns it on again automatically.
Please note: More details about the stand-by mode
you will find on page 13.
___ 🔻 ___ default to factory setting?
This menu item is used to restore the factory set-
tings. To confirm the reset operation, press the
select rotary knob 🔻. During loading the settings,
there will be shown loading in the display.
Please note: After settings have been made, the display automatically changes to the
permanent operating display after 10 seconds and will show the volume or the preAV
logo then. During this change, the storage of all settings made takes place. However,
if the power connection is disconnected before the automatic saving takes place, it
will load the last saved settings when restarting.

11
Display menu / OSD menu and status information
If there is connected a TV or projector to the HDMI eARC output of the preAV, some
status information or an OSD menu will be shown on the connected device.
Status information
During operation, the volume, selected source, played signal
and selected sound processing mode are displayed. In the
case of audio-only sources, the display is permanent; in the
case of sources with picture and sound the display is hidden
again 5 seconds after an operating procedure.
On Screen Display
The OSD menu will be shown when you press the menu / hdmi
button on the remote control for at least 4 seconds. Use the
arrow keys and the central selection key to navigate.
The main menu contains the following menu points:
▪ Audio Source
▪ Sound processing
▪ Channel Configuration
▪ Output Adjustment
▪ Advanced System Setup
▪ Crossover Setup
▪ Distance Setup
In the sub menu audio source, there can be set the following
adjustments:
Analog Gain
Allows to select the sensitivity of the analogue AUX input
between 0 dB and +6 dB.
Lip Sync
An additional delay of the sound output can be set here to
achieve synchronous playback of sound and synchronous
playback of sound and picture. (Step size 10 ms, maximum
400 ms)
Bluetooth Setup
Allows the configuration of the Bluetooth input. Selecting
the pair entry starts the pairing process and pairing with a
corresponding smartphone, tablet or computer can be per-
formed for one minute. Selecting reset will clear the
memory of the paired devices.

12
In the sub menu Sound Processing there can be set the fol-
lowing sound adjustments:
▪ Mid-Hi allows rising or lowering the mid/high range of the
front speakers by up to 10 dB. See also page 13, section tone
balance.
▪ Bass allows boosting or cutting the bass range of the front
speakers by up to 10 dB.
▪ With the Loudness function, there can be (de-)activated the
automatic aurally correct low frequency boost of the front
speakers.
▪ Room Calibration Enable offers the possibility to (de-)acti-
vate the room calibration of the front speakers.
▪ Sound Mode allows choosing of different sound modes
(see page 14).
▪ Preset: Choose one of the previously saved presets 1, 2 or
3 by pressing the selection key.
▪ Save as Preset: A preset is saved by selecting from the 3
memory locations and activating the save process with the
selection button.
In the Channel Configuration sub menu, the output type can
be selected for the channels to be output (max. 7.1.4).
can be selected. The following entries are available for each
channel:
• none
• pre output (if the output is available by Cinch jack)
• new pairing
Furthermore, it is possible to assign the speakers connected
wirelessly via X-Connect Surround to the respective channels
connected via X-Connect Surround. For this purpose, all con-
nected speakers are also listed in each channel menu.
Tip: To find the speakers easily, we recommend naming them
respectively to their position, for e.g.,
SL Surround Left
RSL Rear Surround Left
HL1 Height Left 1, and so on.
In the sub menu Output Adjustment can be raised or lowered
the output sound volume of each channel for 10 dB at maxi-
mum.
Please note: The active loudspeakers connected via X-Con-
nect Surround are recognised and their volume levels auto-
matically adjusted to each other in volume level. (Setting 0
dB)

13
In the Advanced System Setup sub menu, the following settings
can be made:
Display Content allows the selection of the permanent operation
display. The volume setting enables the permanent display of the
volume menu; alternatively, the preAV logo can be displayed.
Under Display Light the illumination level of the display is defined:
normal: permanently full brightness
auto dim: dims brightness automatically after 10 seconds
auto off: turns off the display automatically after 10 seconds.
In the Crossover Setup submenu, high-pass filters or, in the case
of the subwoofer channel, a low-pass filter can be activated for
each of the specified channels and the appropriate crossover fre-
quency can be set.
Full Band High or low pass is not activated.
50 Hz … 140 Hz High or low pass is activated by steps of 10 Hz
In the sub menu Distance Setup, there can be set the distance to
your listening place for each channel. The preAV sets the signal
propagation time of the channels appropriately according to this
information.

14
Construction and technology
Sound balance
The mid/high frequency adjustment of the nuXinema preAV has the characteristic of
a commonly called "sound balance". While conventional treble controls "bend" the fre-
quency response and thus create sonic overemphasis, the frequency response with
this controller rises or falls continuously in a linear manner. Thus, the basic tonal char-
acter of the loudspeakers as well as the harmony of the sound image are perfectly
preserved. The Mid/Hi tone control allows the frequency response to be increased or
decreased with a maximum of 10 dB at 20 kHz.
Analog gain
The input sensitivity for the analogue AUX input can be set in 2 steps (0 dB to +6 db).
Sound format
The nuXinema preAV handles various audio formats in de digital input like
• PCM (up to 192 kHz / 24bit)
• Dolby Audio
• Dolby Atmos
• DTS
• DTS X
If the nuXinema preAV is connected by HDMI eARC, the compatibility will be often
identified automatically so that the TV outputs the appropriate signal (the CEC function
in the TV must be activated). In some cases, it may be possible to adjust players such
as TVs or game consoles to the right settings manually. For the highest possible com-
patibility, it can also be useful to specify PCM as the sound output format. Please also
refer to the manual of your player.
Operating mode: X-Connect activated
For connecting some speakers or devices by wireless network X-Connect Surround,
choose the option > ch config in the main menu. Navigate to your desired channel and
choose the option > new pairing. The wireless network is activated automatically.
The standby power consumption in this mode is <2.0 watts.
Operating mode: X-Connect deactivated
To deactivate the wireless network (X-Connect Surround), set all the entries in the
menu section > ch config to > none or > pre out. The wireless network is deactivated
automatically. The standby power consumption in this mode is <1.0 watt.
This is also the factory default.
Signal turnaround time
The nuXinema preAV's signal turnaround time is a minimum of 30.5 ms. The sound
signal is always reproduced synchronously from all speakers connected via analogue
output or speakers connected via X-Connect Surround. To adapt the sound reproduc-
tion to the picture reproduction of your TV set, the signal can be additionally delayed
up to 400 ms. delay. Please refer to the lip sync section on page 11.

15
Automatic switch-off
The nuXinema preAV is equipped with an automatically switch-off function which can
be deactivated in the menu. If there is selected one of the inputs AUX or Bluetooth, the
loudspeaker will turn into stand-by mode automatically after 20 minutes without sig-
nal. For all digital inputs it also reacts directly to the absence of a digital data stream
or a switch-off command at the HMDI ports. Thus, a faster switch-off is possible if the
playback devices at the SPDIF inputs deactivate the data stream accordingly.
Automatic switch on
The nuXinema preAV also has an auto power on feature that can automatically wake
it up from stand-by mode. This function is only active if the loudspeaker has been set
to stand-by mode by the automatic switch-off. The signal must be applied to the input
that was selected during the automatic switch-off process. (This function is not avail-
able for Bluetooth devices). If the standby mode was activated manually by pressing
the on/off button on the remote control or the app, the automatic switch-on function
is deactivated.
Loudness
With this function, a volume-dependent frequency response correction can be made,
which is based on the character of the human auditory system. The human ear per-
ceives bass at low volumes perceived less strongly at low volumes. To achieve a full
sound image even at low volumes, low frequencies can be automatically boosted by
up to 10 dB by activating the loudness function.
Frequency response correction of the loudness circuit
Extension of a Surround Setup via X-Connect Surround
The nuXinema offers two options for connecting some loudspeakers:
In standard mode, 8 channels can be connected analog via RCA cable, so that a maxi-
mum of a 5.1.2 setup can be set up.
In wireless mode, additional 8 channels can be connected wirelessly via X-Connect
Surround. A maximum 7.1.4 setup can be set up with a combination of wired and wire-
less speakers. The configuration of such a setup can be done via menu on the device,
in the on-screen menu or via the app. Please refer to the corresponding sections in
these operating instructions and also the commissioning instructions.

16
Please note about the channels connected via X-Connect Surround:
The preAV reacts flexibly to the currently available speakers and automatically adjusts
the corresponding output channels. If, for example, the speakers used for the rear
channels are switched off (e.g., at the power switch on the back of the device or via an
app), the preAV detects this and modifies the upmixing in such a way that the sound
components to be output there are then redirected proportionally to other speakers
that are still present.
Sound and Surround modes
The nuXinema preAV features several different sound and surround modes. These can
be selected via the mode button on the remote control. The incoming sound signal is
processed by the internal signal processor – partly according to Dolby or DTS specifi-
cations, partly according to Nubert's own algorithms. The sound output is as follows:
stereo
The sound output only is via the two front channels. Stereo content is played back
directly, multi-channel content is mixed to the two front channels. No sound pro-
cessing takes place.
movie, music, voice+ and night
Any source material will always be played back through all available loudspeakers in-
cluding height speakers. Native Dolby Atmos or DTS X material is reproduced true to
its channel.
If upmixing takes place, it is automatically adjusted to the currently used speaker
setup. Depending on the input signal algorithms from Dolby or DTS are used.
movie For full movie enjoyment through all available speakers
music For full music enjoyment through all available speakers
voice+ Complements Nubert's own optimization voice+ for best speech intelli-
gibility
night For full sound enjoyment at night
auto Automatic detection of the input signal and up mixing or direct playback
on the appropriate existing channels.
_______________________________________________________________________
Technical changes and misprints reserved. You will find the newest instructions for use and more
information about this product here:
https://www.nubert.de/downloads
Our General Terms and Conditions (GTC/AGB) can be found on our website:
www.nubert.de/agb.htm
Nubertstraße 1 Hotline: +49(0)7171 8712-0
73529 Schwäbisch Gmünd https://www.nubert.de/en/
Germany © Nubert 05/2023
Table of contents