Nutzen NSO-10P User manual

Manual 說明書
GERMAN
performance
Manual 說明書
GERMAN
performance
KITCHEN REVOLUTION, TECHNOLOGY INNOVATION
NSO-10G
NSO-10P
微蒸迷你焗爐
Steam Toaster Oven

安全注意事項
1. 使用蒸氣多士焗爐前請仔細閱讀相關說明︐並妥善保存此說明書︒
2. 請單獨使用13A以上的插頭︐切勿使用萬能插蘇或與其他電器同時使用︐以免出現電流過大︐引起火災︒
3. 插座應有可靠接地線︒
4. 切勿使用外接定時器或獨立的遙控系統來操作本產品︒
5. 包裝塑料袋請及時處置︐避免兒童玩耍其造成窒息︒廢棄時︐請把其剪碎︒
6. 請勿將蒸氣多士焗爐擺放在附近有潮濕的地方中使用︒
7. 請勿將蒸氣多士焗爐放置在地毯︑抬布︑報紙︑薄紙或任何其他低耐熱物品上使用︒
8. 請勿將易燃︑易爆物品直接或間接加熱︐以免燃燒或爆炸︐引起危險︒
9. 使用蒸氣多士焗爐時︐請勿長時間離開︒
10. 使用蒸氣多士焗爐時︐請避免電源線︑塑膠製品︑紙張或易燃物等靠近蒸氣多士焗爐︒
11. 如果蒸氣多士焗爐在工作中被一些易燃物所覆蓋︐如窗簾︑織物等類似的東西︐會易引起火災︒
12. 切勿向加水口以外的地方加水︒烤焗過程中切勿加水︒
13. 烤焗過程中︐如食物冒煙或起火︐應馬上拔掉插頭︒切勿打開爐門或向焗爐潑水︐打開爐門可能助
長火勢︐潑水可能造成觸電或玻璃爆裂︒
14. 蒸氣多士焗爐使用中或使用後︐爐門或可接觸表面溫度可能較高︐請勿觸摸︒
15. 切勿將蒸氣多士焗爐放於兒童能觸及的地方︒
16. 應該對兒童進行監督︐以確保他們不玩弄本產品︒
17. 若電源線出現破損或故障時︐切勿自行拆開更換︐以免引起觸電危險︐
應將產品送到本公司維修部修理︒
18. 如果本產品出現任何故障或某些配件已經損壞︐為避免危險︐應立即停止使用︐
並將產品送到本公司維修部檢查及維修︒
19. 請勿自行打開︑檢查︑改裝︑修理蒸氣多士焗爐或更換不符合安全規格的配件︒
20. 當不使用產品時︑清潔或檢查前︐必須拔下插頭︐以免發生意外︒
21. 清潔蒸氣多士焗爐時應用乾布抹擦︐不要用任何腐蝕性的洗滌劑或溶劑清潔︐嚴禁用水沖洗︒
2
使用前應先檢查
1. 先確定電源電壓是否與本產品額定電壓相符︓電源插座是否能承受本產品的
正常負荷︔電源插座是否有可靠的接地裝置︒
2. 在平整牢固的可承面上放置本產品︐並盡可能靠近電器插座︒
3. 遠離火源︑發熱的家用電器和易燃物品︒
4. 放置在小孩不能觸摸及拉扯電源線的地方︐以免燙傷或觸電︒
5. 本產品不適合身體︑感官或精神能力下降︐缺乏經驗和知識的人(包括兒童)使用︐
除非他們已經對負責其安全的人員使用本產品進行監督或指導︒
6. 清潔前︐請先將插頭拔掉︒

煤氣
1. 請確認本地的電壓與產品所標示的電源電壓相符︒
請不要在同一插座同時插入多個插頭︐以免因同時工作導致火災︒
3. 拔插插頭時︐請用手抓住插頭拔︐不要拉扯電源線︒
不要過度彎曲或擠壓電源線︒
4. 爐門或可接觸表面在使用中或者使用後溫度極高︐注意不要碰觸︒
兒童在旁時必須密切監視︐以免燙傷︒
5. 禁止在蒸氣多士焗爐周圍放置易燃易爆物品︒
6. 請依右圖所示距離保證蒸氣多士焗爐周圍的空間︐
也不要放置任何物體在蒸氣多士焗爐底部以免引起火災︒
7. 請不要在使用本機時放置任何物體在爐頂︐
高溫可能使物品變形或引起火災︒
8. 爐身處於高溫狀態時不要潑或濺水到門玻璃上︐
容易導致玻璃爆裂︒
9. 下列物品不應放入蒸氣多士焗爐中加熱或烤焗︐
以免發生火災或危險︓瓶子︑ 罐裝食品︑紙張︑
塑膠物品︑布料︑易燃物料等︒
2. 請勿用濕手接觸電源線或插頭︐以免觸電︒
用完本產品後︐請務必將插頭拔掉︒
電源線須遠離兒童可接觸的地方!
3
重要安全指導 產品介紹
額定電壓
額定功率
額定頻率
型號
容量
產品尺寸
NSO-10P / NSO-10G
220V-240V
50Hz/60Hz
1300W
10公升
353(長)x 318(深)x 213(高)毫米
量杯
箱體
焗爐門
時間顯示燈
功能旋鈕
時間旋鈕
門把手
蒸氣水槽蓋 烤盤碎屑盤
碎屑盤安裝槽
烤架
產品規格
圖片僅供參考︐以實物為準
4
蒸氣水槽蓋
蒸氣水槽
提示︓加水口在量杯下方

5 6
操作說明操作說明
首次使用前
1. 從蒸氣多士焗爐中取出所有包裝物及配件︒
2. 用濕布和少許中性清潔劑清潔爐身︑內腔及其配件︒清潔後︐請保持表面徹底乾燥︒
3. 將蒸氣多士焗爐加熱到200°C︑15分鐘︒
4. 待蒸氣多士焗爐完全冷卻後再次執行步驟2︒
注意
- 清潔前︐請確保蒸氣多士焗爐已完全冷卻並斷開電源︒
- 蒸氣多士焗爐在初次使用時可能會散發出些氣味或煙霧︒這很正常︒
請把蒸氣多士焗爐放在通風良好的地方使用︒
操作方法
1. 插上電源後︐時間指示燈會全部亮起一秒︐伴隨提示聲音一響︒
2. 打開焗爐門︐放入食物︐然後關上焗爐門︒食物盡量放在烤架/烤盤的正中間︐烘烤的效果會更好︒
放入焗爐的食物的總高度不宜超過5.5cm︐否則容易烤燶︒
3. 旋動功能旋鈕選擇所需的功能︓
4. 如果選擇了有蒸汽功能的模式︐請使用量杯於加水口加水︒
如果選擇了沒有蒸汽功能的模式︐請勿加水︒
注意︓
- 如果選擇了有蒸汽功能模式而不加水︐可能造成蒸發器乾燒而發黃︒
- 如果選擇了沒有蒸汽功能模式而加了水︐會導致蒸發器中的水無法蒸發︐請待焗爐冷卻後把水擦乾︒
- 過短的烤焗時間可能導致水無法完全蒸發︐請相應減少水量︒
- 不能加入超過兩杯水︒不能使用其他杯子作為量杯︒
5. 旋動時間旋鈕選擇所需的烤焗時間︐時間指示燈會隨時間旋鈕變化︐指示燈的每一顆燈代表一分鐘︒
提示︓
- 過長的烤焗時間可能導致食物烤燶︒
- 糖份較高或水份較小的食物容易烤燶︐應相應縮減烤焗時間︒
- 如果需要對食物進行二次烤焗︐請通過玻璃門密切留意食物的顏色變化︐以免烤燶甚至著火︒
6. 如連續3秒鐘內無任何操作︐蒸氣多士焗爐會自動按照當前設定啟動烤焗工作︒
時間指示燈會從右到左逐一熄滅︐能視為烤焗倒時計︒
注意︓
- 發熱管可能時亮時暗︐這是因為蒸氣多士焗爐的智能芯片在控制焗爐溫度︐並非故障︒
- 蒸汽功能模式下︐門玻璃可能會有霧氣︐這是由水蒸汽所造成︐屬正常現象︒
- 連續多次烤焗時︐由於爐身溫度較高︐可能看不到明顯霧氣︐不代表蒸汽功能異常︒
7. 烤焗的過程中您可以隨時調節時間旋妞增加或減少烤焗時間︒如想中途停止烤焗︐
可向左旋轉時間旋鈕至所有時間指示燈熄滅︐蒸氣多士焗爐會停止工作︐烤焗結束︒
您也可旋動功能旋鈕使烤焗時間重置為零︐結束烤焗工作︒
8. 隨着最後一顆指示燈熄滅並連續發出五聲響聲︐蒸氣多士焗爐會停止烤焗︐代表烤焗完成︒
如果不需要繼續烤焗其他食物︐請拔掉插頭︒
9. 此時蒸氣多士焗爐溫度極高︐請手握門把手︐慢慢打開爐門︐等代食物降溫再取出︒
請使用夾子︑烤焗手套等工具取出食食物︐避免直接接觸多士焗爐和食物︐以免燙傷︒
10. 待蒸氣多士焗爐完全冷卻以後︐請及時清潔︐以免殘渣堆積導致故障或着火危險︒
麵包模式
(有蒸氣功能) 恆溫模式
(沒有蒸氣功能)
多士
芝士多士
法式麵包
牛角包

1. 拔掉插頭︐待爐身冷卻後再進行清潔︒
2. 清潔內腔︑外殼及其它配件時︐請用柔軟的毛巾或海棉浸
中性洗滌液清洗︒清潔後︐請保持表面乾淨乾燥︒
3. 不能用堅硬的刷子或者其他硬物擦洗︐以免刮花爐身或烤盤︒
4. 烤架及碎屑盤請用中性洗滌劑及軟抹布擦洗︐
再用清水洗淨︐待乾透後放回焗爐內︒
5. 5cc水杯每次使用完後請妥善保管好︒
警告︓請勿用水直接沖洗蒸氣多士焗爐︒
7 8
產品清潔
2. 一手扶著爐門︐另一隻手將烤架向耳扣的缺口下壓︒
3. 從缺口拉出烤架︒
4. 此時烤架前端與爐門分離︒
5. 烤架後端有兩鈎子扣著烤架軸︒
6. 將烤架向後推出烤架軸即可以將整個烤架拿出箱體︒
1. 將烤架後端鈎子放上烤架袖︐用力將烤架向前拉直到不動為止︔
2. 一隻手扶起爐門︐另一隻手將烤架兩前端扣位放回入爐門掛鈎內︒
警告︓請確保蒸氣多士焗爐完全切斷電源及冷卻後才拆除及安裝烤架︐否則有可能觸電或燙傷︒
烤架拆除及安裝步驟
烤架拆除方法
烤架安裝方法
產品規格或外形如有更改︐恕不另行通知︒中英版本如有出入一概以中文版為準︒
1. 焗爐門前端有耳扣扣著支架︒

GAS
1. Please make sure that the voltage indicated on the oven corresponds
to the local power voltage. Do not plug into a socket where several other appliances
are already plugged in to avoid excessive current which will cause fire.
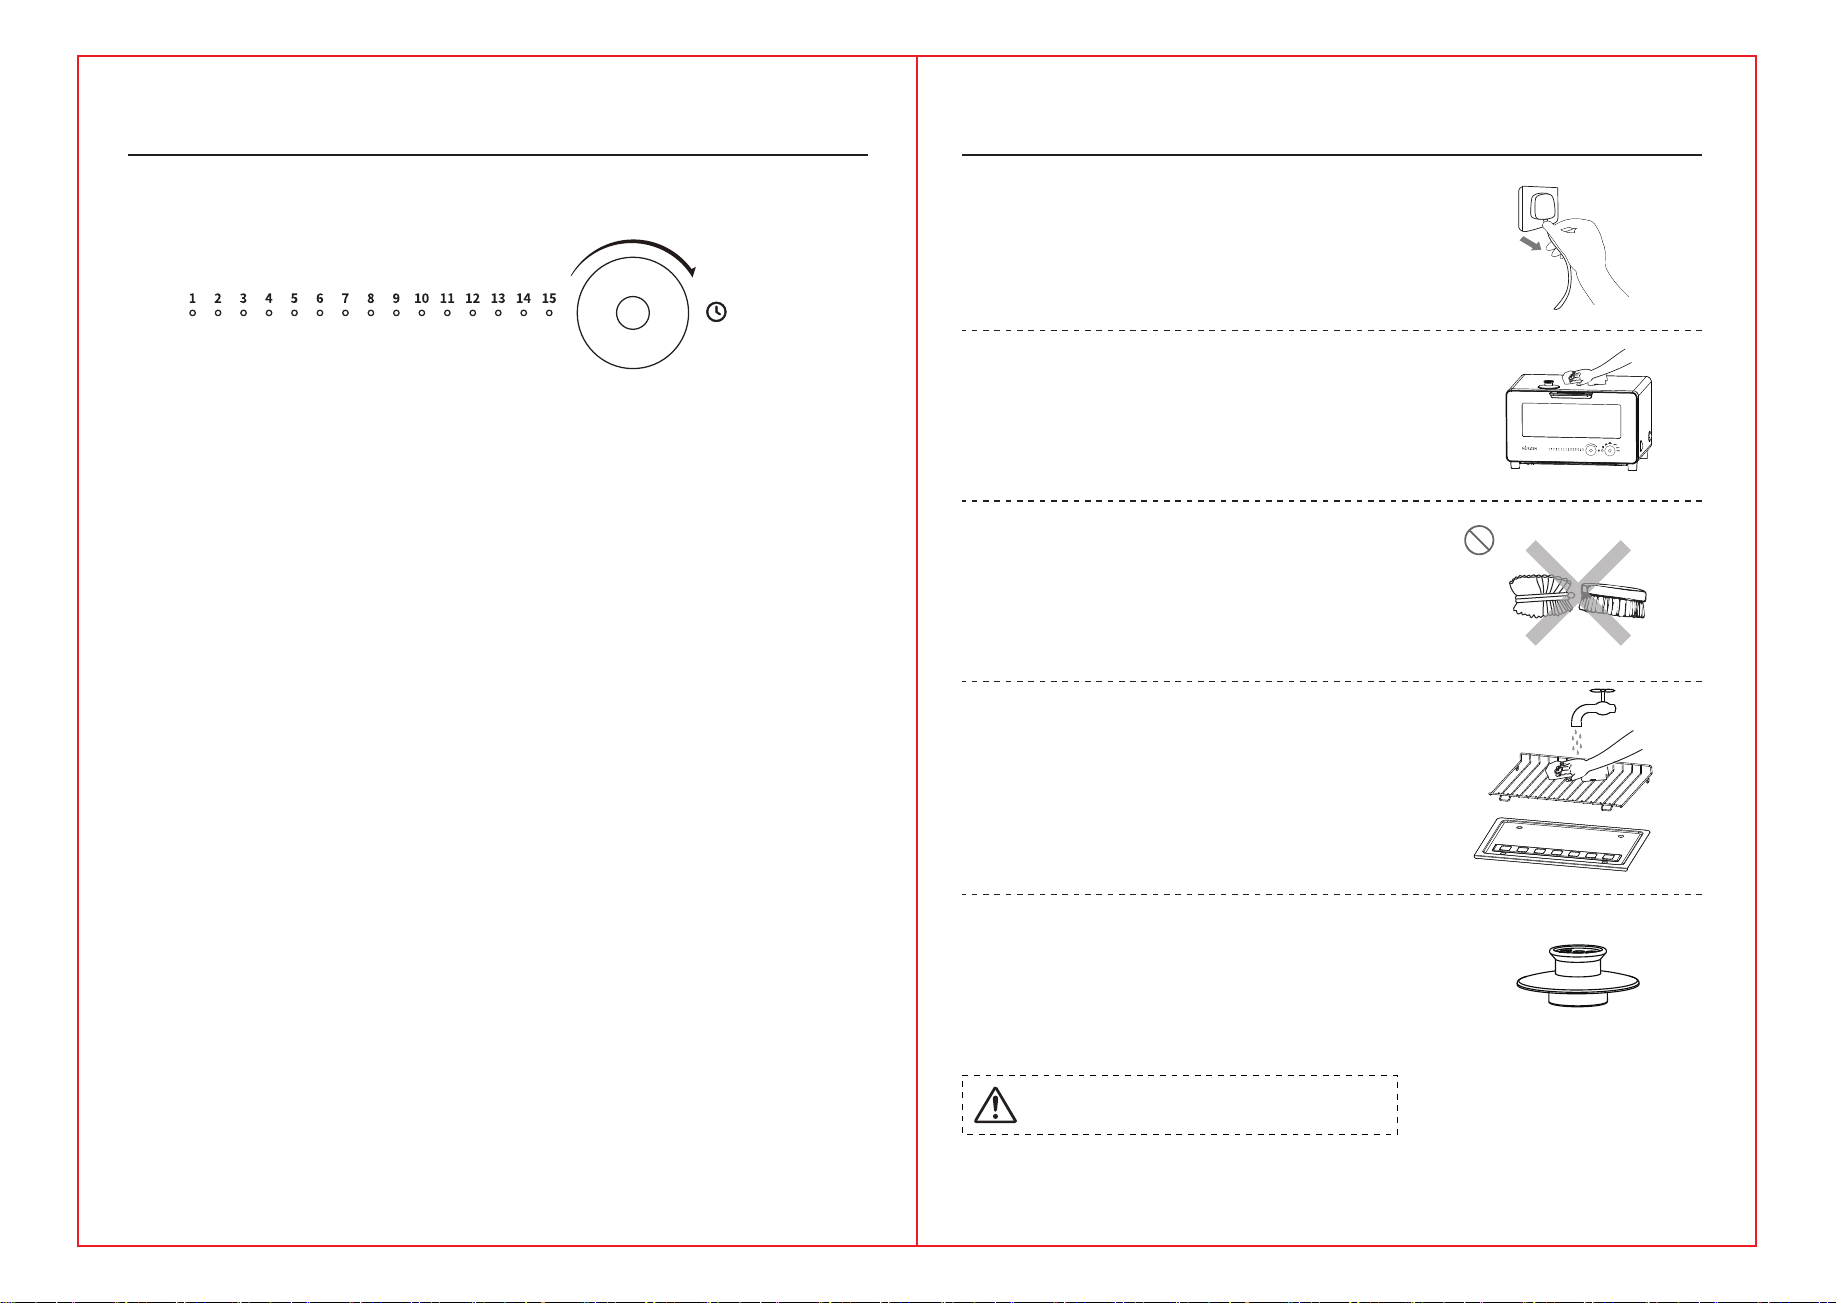
3. When unplugging or inserting the plug, make sure to grasp the plug.
Do not pull the power cord. Do not bend or pinch the power cord excessively.
4. The temperature of the oven door or accessible surfaces is extremely high during
or after use. Be careful not to touch!
Children must be closely monitored when they are present to avoid burns.
5. Do not put flammable and explosive items around the oven.
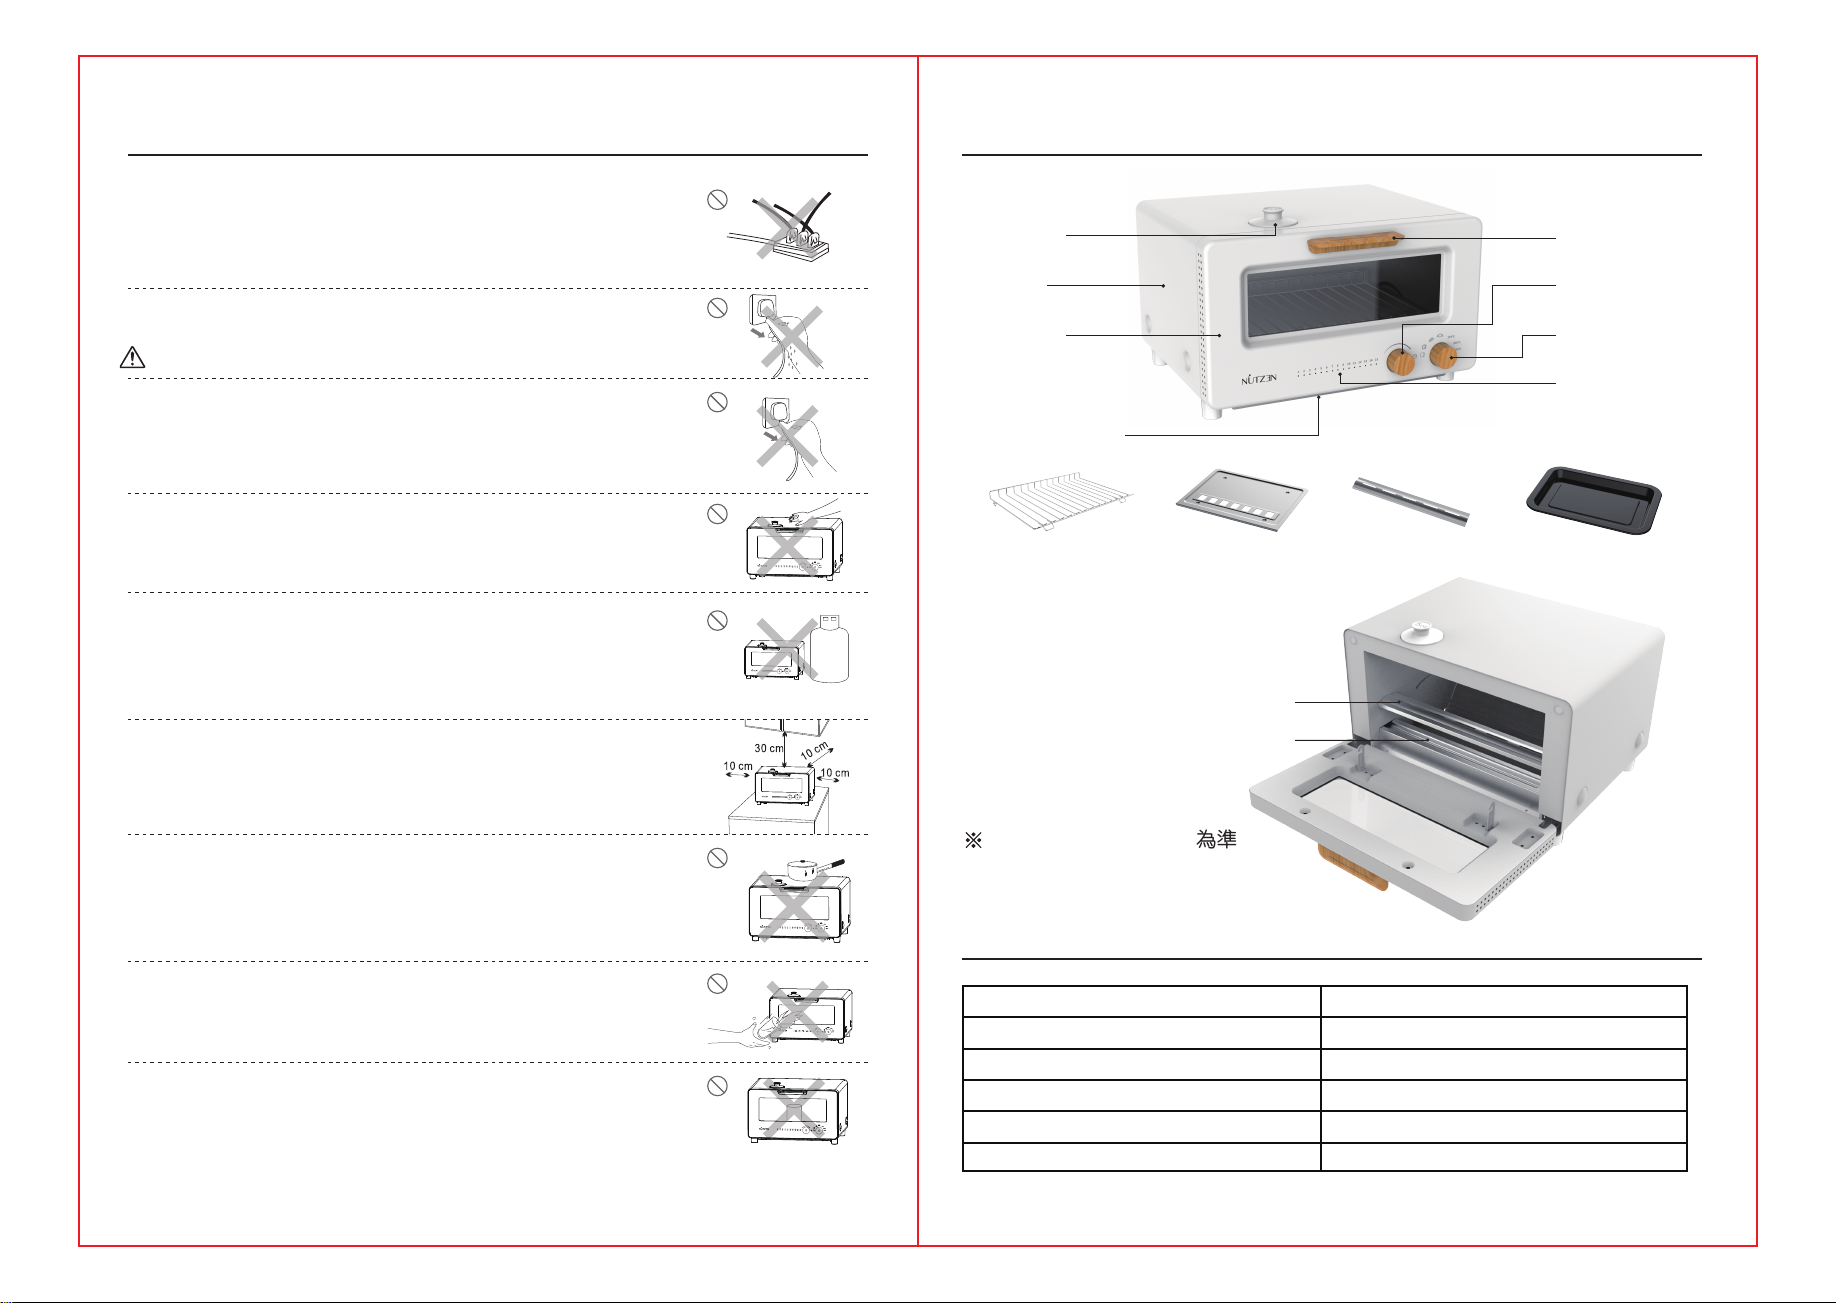
6. Please ensure the space around the oven according to the distances shown on the
right and do not place anything on the bottom to avoid fire.
7. Do not place any things on the top of the oven. High temperature may deform
the items or cause fire.
8. Do not splash water on the door glass when the oven is hot. It is easy to break the glass.
9. Do not heat these items in the oven to avoid fire or danger: bottles, canned food,
paper, plastic items, fabrics, flammable materials, etc.
2. Do not touch the power cord or plug with wet hands to avoid electric shock.
Always unplug the oven after use.
Keep the power cord out of the reach of children!
910
IMPORTANT SAFETY INSTRUCTIONS
1. Before inserting the main plug into the socket, check whether voltage and current rating of the supply line
are in compliance with the rated electric parameter shown on the label. Don’t overload electrical outlets,
never plug too many appliances into the same outlet and make sure you are using the proper fuses.
2. Please operate the appliance on a firm and level desk or floor.
3. Keep the appliance away from flammable and explosive items; never use the appliance in an environment
with of flammable gas and/or powder. Keep it away from any sources of heat like fire.
4. Keep the appliance out of the reach of children to reduce the risk of fire and avoid accidents such as
electric shock and injury.
5. The appliance is not intended to be used by persons (including children) with reduced physical, sensory or
mental capabilities, or lack of experience and knowledge, unless given the supervision or instruction
concerning the use of the appliance by a person held responsible for their safety.
6. Unplug the appliance before cleaning.
SAFETY PRECAUTIONS
1. Please read the instruction manual carefully before using the oven and keep this manual for future use.
2. Please use qualified power socket which is no less than 13 A. Do not use adaptor and do not plug into a socket
where several other appliances are already plugged in to avoid excessive current which will cause fire.
3. The oven’s dedicated power outlet must be reliably grounded.
4. Do not use an external timer or remote-control system to operate the oven.
5. Please dispose the plastic bags immediately after unpacking to prevent children from suffocating when playing
with them. When disposing, shred them.
6. Do not place the oven near wet places.
7. Do not place the oven on carpet, tablecloth, newspaper, thin paper, or any other low heat-resistant materials.
8. Do not heat anything which is inflammable and explosive to avoid burning or exploding, causing danger.
9. Never let the appliance run unattended.
10. Please avoid the power cord, plastic products, paper or flammable materials near the oven during use.
11. It may cause fire if the oven is covered with some flammable materials such as curtains, fabrics and the like during use.
12. Do not add water outside the water inlet, and do not add water during the baking process.
13. During the baking process, if the food smokes or catches fire, unplug the oven immediately. Do not open the oven door
or pour water into the oven. Opening the oven door may encourage fire and splashing water may cause electric shock
or glass burst.
14. During or after use, the temperature of the oven door or accessible surfaces may be high. Do not touch with hands.
15. Make sure the oven is not reachable by children.
16. Children should be supervised to ensure that they do not play with the oven.
17. If there is a damage on the power cord, do not repair it on your own to avoid the risk of electric shock.
Please take it to our maintenance centre for repair.
18. With any indication of damage or malfunction, please stop using the oven immediately to avoid hazards.
Take it to our maintenance center for check and repair.
19. Do not attempt to repair, modify or change any parts of the oven on your own.
20. Unplug the oven when not in use or before cleaning or maintenance.
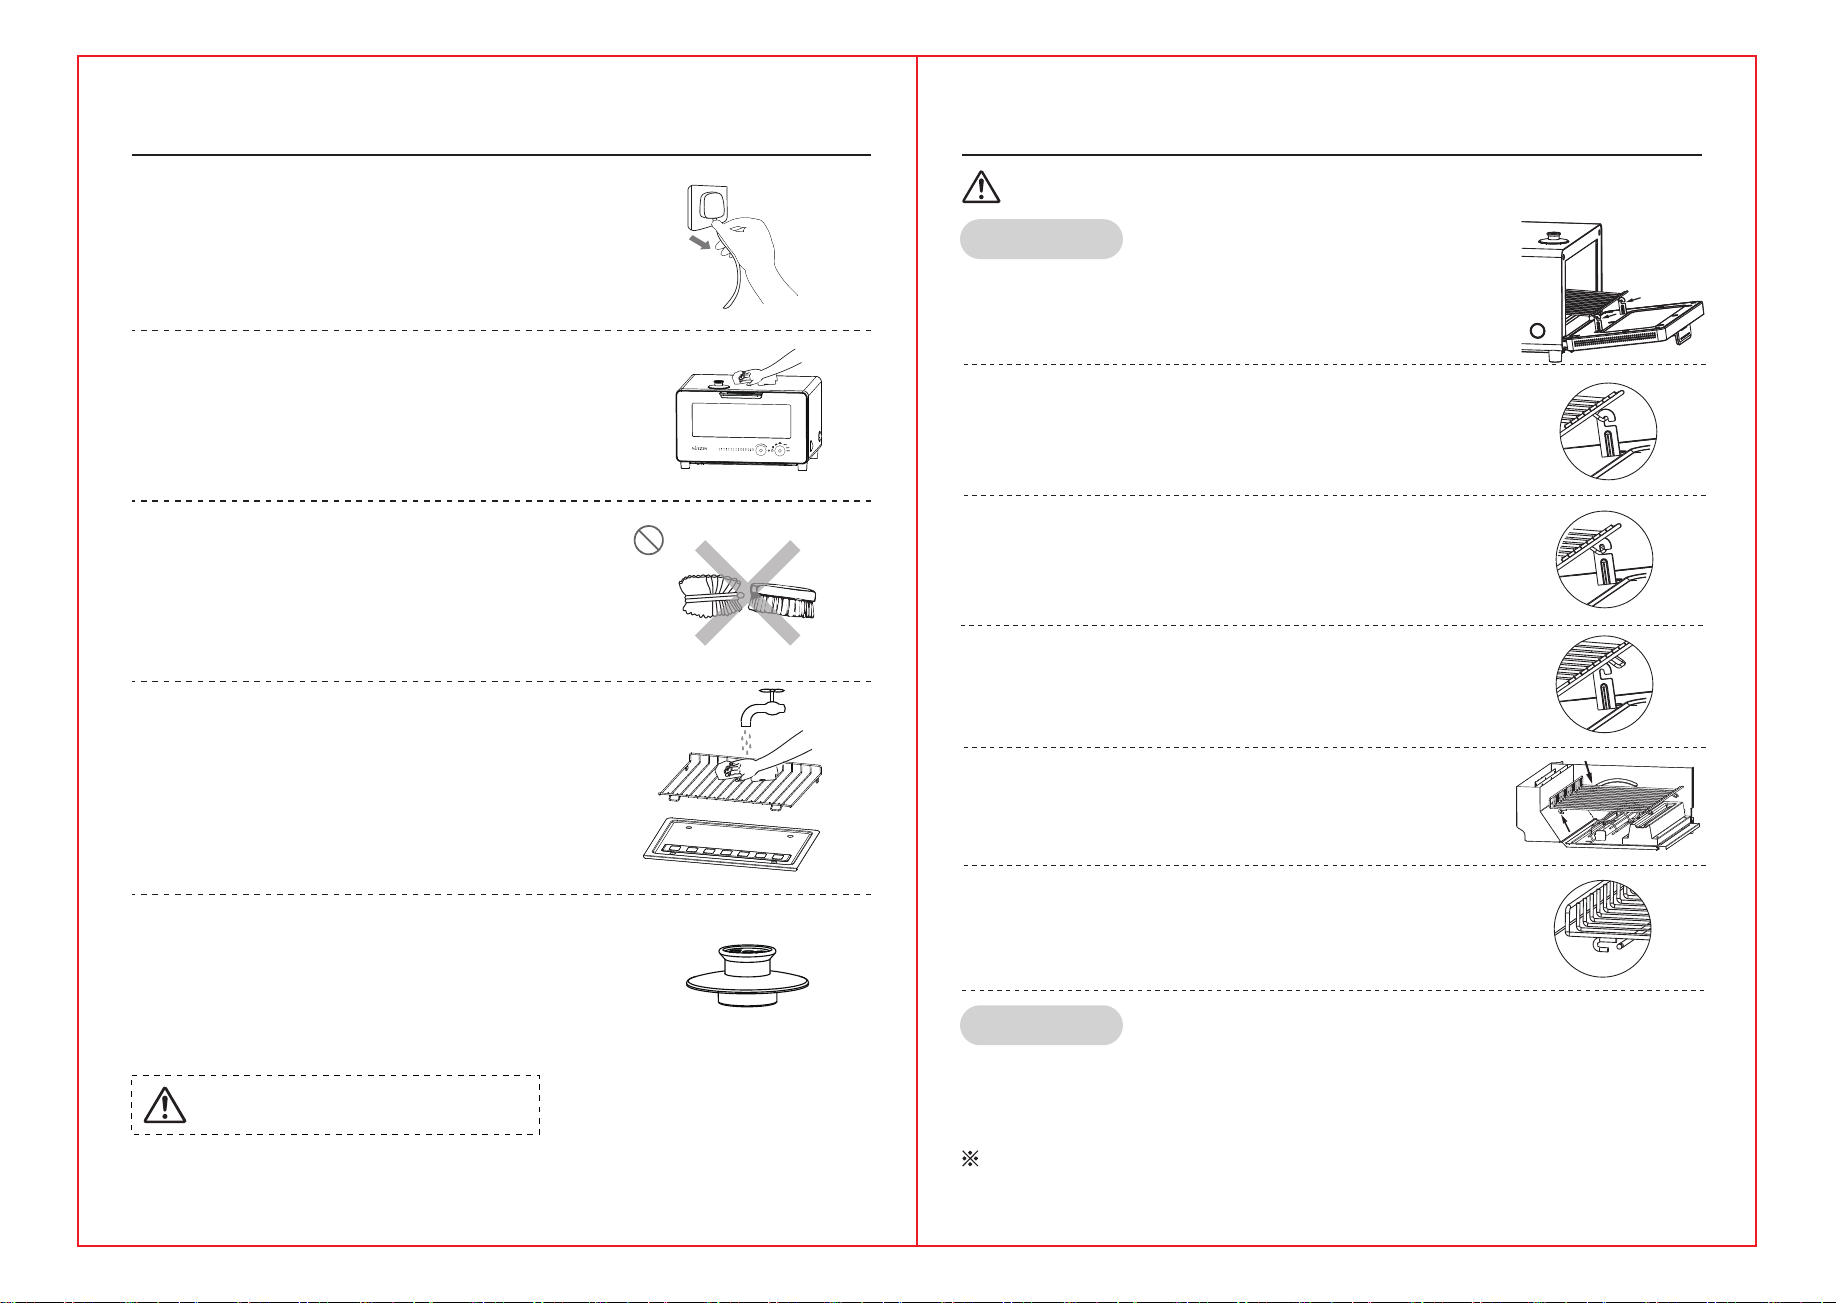
21. To clean the oven, please use a dry cloth to wipe it. Do not use any corrosive detergent or solvent to clean it.
Do not rinse with water.

11 12
PRODUCT DESCRIPTION OPERATION INSTRUCTIONS
(Photos shown are for illustration purpose only,
may vary with actual product.)
Cabinet
Oven door
Crumb tray
insertion slot
Baking rack Crumb tray Boiler cover Bake tray
Measuring cup Door handle
Timer knob
Function knob
Time indicator lights
Rated voltage
Rated power
Rated frequency
Model
Capacity
Product dimensions
NSO-10P / NSO-10G
220V-240V
50Hz/60Hz
1300W
10L
353(L)x 318(D)x 213(H) mm
PRODUCT SPECIFICATIONS
Boiler cover
Boiler
Note︓The water inlet is below the measuring cup
Before first use
1. Remove packaging and accessories from the oven.
2. Clean the oven and its accessories with a damp cloth and mild detergent.
After cleaning, please keep the surfaces dry thoroughly.
3. Heat the oven to 200˚C for 15 minutes.
4. Allow the oven to cool down completely then do step 2 again.
Note
- Before cleaning, make sure the oven is completely cooled down and disconnected from the power.
- The oven may spread some smell and smoke at first use. This is normal.
Please place the oven in a well-ventilated area.
Operating instructions
1. After plugging in the power, the time indicator lights will all light up for one second,
accompanied by a prompt sound.
2. Open the oven door, put in the ingredients, and then close the oven door. The ingredients are
suggested to be placed in the middle of the rack or bake tray to get a better baking result. The total
height of the ingredients should not exceed 5.5cm, otherwise it is easy to get burnt.
3. Turn the function knob to select the desired function:
4. If you select the baking mode with steam function, please use the measuring cup to add
water to the water inlet. If you select a mode without steam function, do not add water。
Note:
- If you select a mode with steam function but without adding water, it may cause the evaporator
to dry and yellow.
- If you select a mode without steam function but add water, the water in the boiler will not evaporate.
Please wait for the oven to cool down and wipe the water dry.
- If the baking time is too short, the water in the boiler may not be completely evaporated.
Please reduce the amount of water accordingly.
- Do not add more than two cups of water. Cannot use other cups as measuring cup.
Bread modes
(without steam function) Traditional modes
(without steam function)
Croissant
French Bread
Cheese Toast
Toast

13 14
OPERATION INSTRUCTIONS PRODUCT CLEANING
5. Turn the timer knob to select the desired baking time. The time indicators will change with the
timer knob, and each light of the indicator lights represents one minute.
Tips:
- Too long baking time may cause the food to be burnt.
- Foods with high sugar or low water content are easy to be burnt, and the baking time should
be reduced accordingly.
- If you need to bake the food twice, please pay close attention to the color change of the food
through the door glass to avoid burnt or even catching fire.
6. If there is no operation for 3 consecutive seconds, the oven will automatically start baking according
to the current settings. The time indicator lights will turn off one by one from right to left, and it can
be regarded as the timer.
Note:
- The heating tube may be bright and dark. This is because the oven is controlling the temperature,
not a malfunction.
- Under the steam function modes, there may be mist on the door glass, which is caused by water
vapor and is normal.
- When baking several times in a row, due to the high temperature of the door glass, no obvious
mist may be seen, which does not mean that the steam function is abnormal.
7. During the baking process, you can adjust the baking time at any time by turning the timer knob.
If you want to stop the baking halfway, you can turn the timer knob to the left until all the time indicators
go out, the oven will stop working and the baking process ends. You can also turn the function knob
which will reset the baking time to zero and end the baking process.
8. With the last time indicator light off and five beep sounds heard, the oven stops baking,
which means the baking process is complete. If you do not need to continue baking
other foods, please unplug.
9. At this time, the temperature of the oven is extremely high. Please hold the door handle and slowly
open the door. Wait for the food to cool down then take it out. Please use clips, baking gloves and
other tools to take out the food to avoid direct contact so as to avoid burns.
10. After the oven is completely cooled, please clean it in time to avoid the accumulation of residues
which may cause malfunction or fire hazard.
1. Before cleaning, make sure the oven is completely cooled down
and disconnected from the power.
2. When cleaning the inner cavity, outer shell and other accessories,
please use a soft cloth or sponge soaked in mild detergent to clean.
After cleaning, please keep the surfaces dry thoroughly.
3. Do not scrub with hard brush or other hard objects to avoid
scratching the oven body or bake tray.
5. Please keep the 5cc water cup properly after use each time.
Warning: Do not rinse the oven directly with water
4. The baking rack and crumb tray should be scrubbed with a soft wipe cloth
with mild detergent, and then washed with water. After drying,
put it back to the oven.

15 16
BAKING RACK REMOVAL AND INSTALLATION
2. Hold the oven door with one hand, and press the baking rack towards the gaps
of the buckles with the other hand.
3. Pull the baking rack out of the gaps.
4. The baking rack is now separated from the oven door.
5. There are two hooks on the back end of the baking rack to
buckle the frame shaft.
The product appearance and specifications are subject to change without prior notice.
If there is any inconsistency or ambiguity between the English version and the Chinese version
of the user manual. Chinese version shall prevail.
Baking rack removal method
Baking rack installation method
1. There are buckles on the oven door to buckle the baking rack.
Warning: Make sure the power is disconnected and the oven is completely cooled down before
removing and installing the baking rack, otherwise there may be electric shock or burns.
6. Push the baking rack backwards out of the frame shaft then take it
out from the oven.
The installation method is just opposite to the dismantling steps.
1. Put the rear hooks on the frame shaft. Pull the baking rack forward until it does not move.
2. One hand holds the oven door. Another hand puts the front end of the baking rack back to the buckles
on the oven door.
This manual suits for next models
1
Table of contents
Other Nutzen Oven manuals
Popular Oven manuals by other brands

Jenn-Air
Jenn-Air W2410 use and care manual

Bosch
Bosch HBG655B 1M Series User manual and installation instructions

NuWave
NuWave 20902 user manual

Amica
Amica 10133.3ETsKDpHbQX instruction manual

Hotpoint Ariston
Hotpoint Ariston FZ 51.2/HA operating instructions

Moffat
Moffat WALDORF RN8810G Technical data sheet

Whirlpool
Whirlpool AKZM 760 User and maintenance manual

Electrolux
Electrolux EOB 2620 operating instructions

Bakers Pride
Bakers Pride Y-800 parts list

Cooke & Lewis
Cooke & Lewis CLELDO105 manual

Thermo Scientific
Thermo Scientific Lindberg/Blue M VO Series Installation and operating manual

Blodgett
Blodgett BC-20E Installation operation & maintenance