NX NX-LEDS5M User manual

NX-LEDS5M
5 Metre Smart RGBW LED Light Strip
USER MANUAL
ENGINEERED FOR THE NEXT GENERATION™


1
CONTENTS
1.0 WARNINGS....................................................................................... 2
2.0 INTRODUCTION .............................................................................. 2
2.1 Pre-Installation...................................................................................3
3.0 NX SMART APP SETUP.................................................................. 4
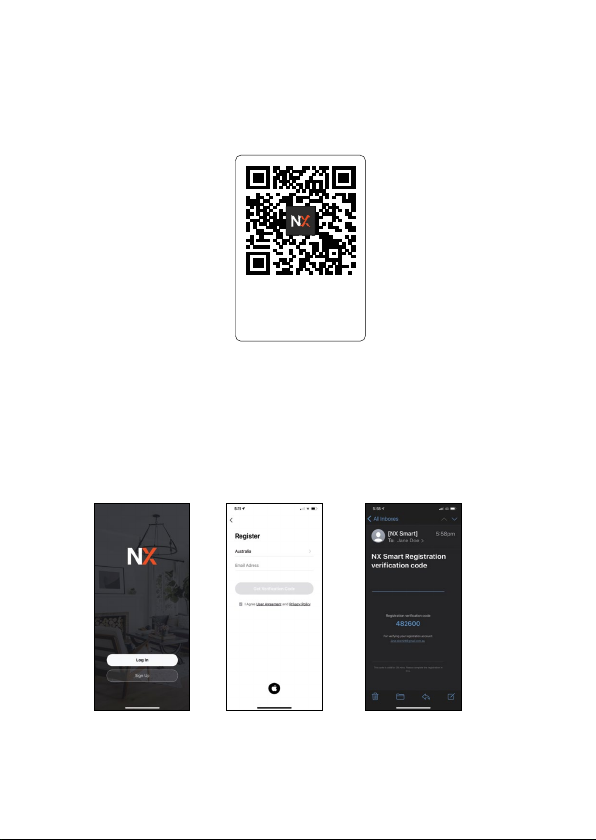
3.1 App Download...................................................................................4
3.2 App Registration ...............................................................................4
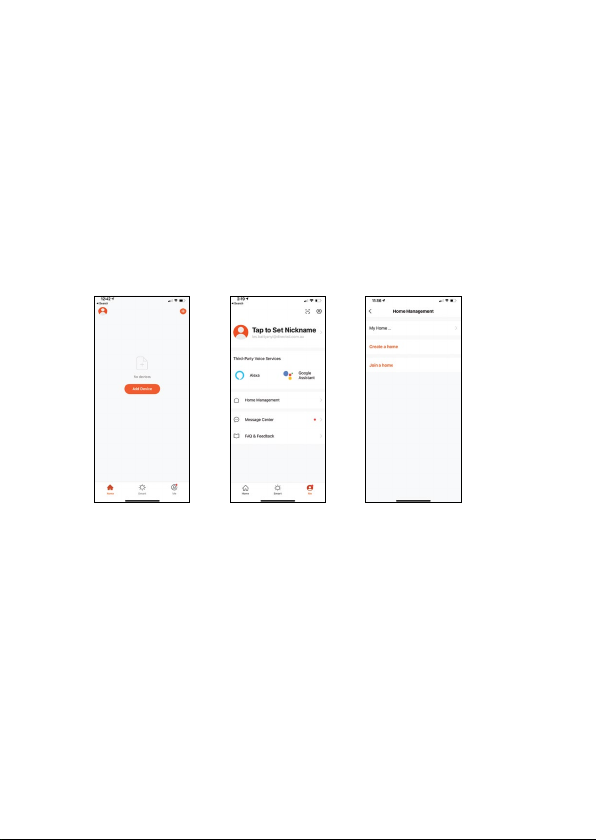
3.3 Home Management ........................................................................ 5
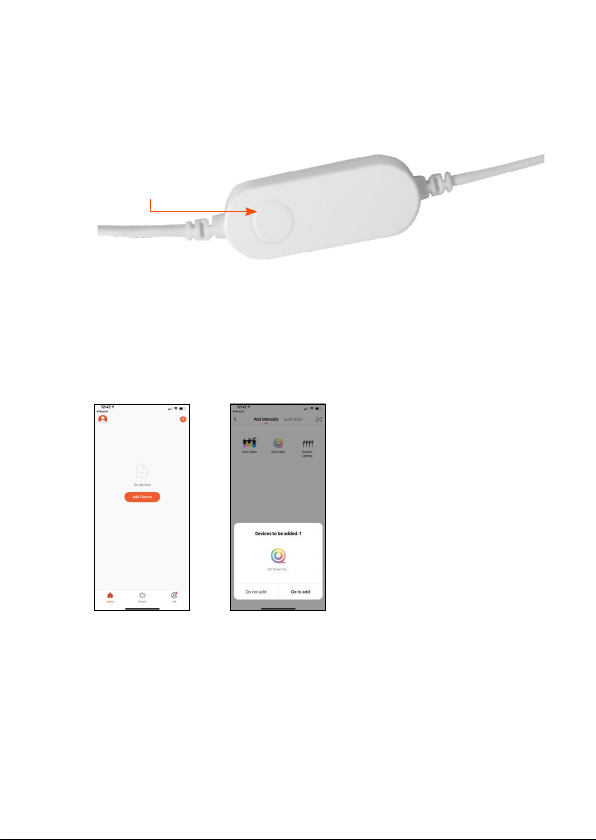
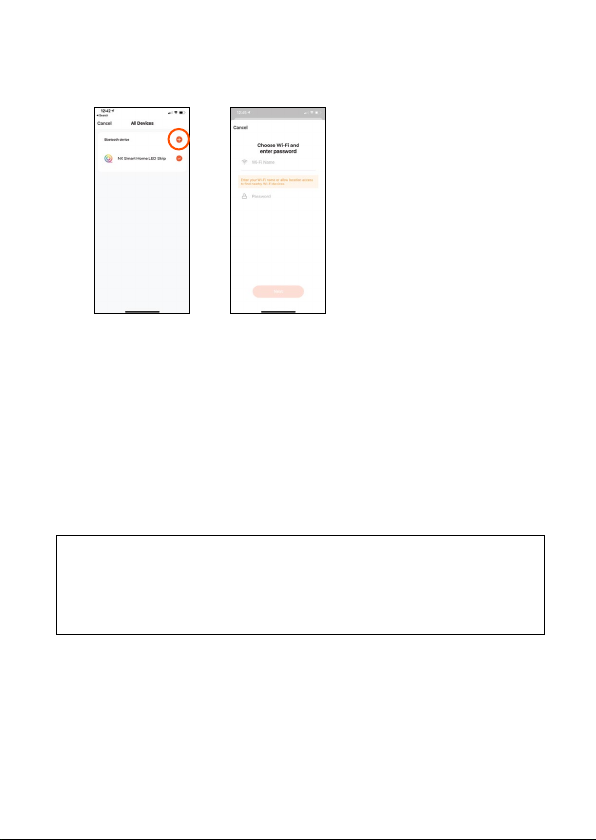
3.4 Add your NX LED Light Strip to the App ................................... 6
4.0 OPERATION ..................................................................................... 9
4.1 Light Colour Options......................................................................10
4.2 Smart controller................................................................................ 11
4.3 Google Home Integration.............................................................. 11
4.4 Amazon Alexa Integration ............................................................ 13
4.5 Automation .......................................................................................15
4.6 Additional App Functions ............................................................. 17
5.0 SPECIFICATIONS............................................................................17
6.0 WARRANTY TERMS & CONDITIONS...........................................18
8.0 NOTES.............................................................................................22

2
1.0 WARNINGS
• Consult a licensed electrician if you are unsure of the
AC connection or do not have a power point within
connection range.
• Do not disassemble the adaptor, smart controller or
NX-LEDS5M Smart RGBW Light Strip.
• There are no user serviceable parts within this kit.
• Do not stare directly at the NX-LEDS5M Light Strip.
2.0 INTRODUCTION
Thank you for purchasing the NX-LEDS5M Smart RGBW LED
Light Strip (NX LED Light Strip). These lights can be controlled
directly by the smart controller, via our free smartphone app and
by voice using Amazon Alexa or Google Assistant.

3
2.1 PRE-INSTALLATION
1. This system works with 2.4GHz WiFi networks only.
Depending on your router model, you may need to disable
5GHz networks while connecting the NX LED Light Strip to
your WiFi network.
2. Connect the NX LED Light Strip to the smart controller by
aligning the arrows on the connectors, circled below:
Connect the other end of the smart controller to the
240V adaptor.
3. Please ensure the installation location is within range of your
WiFi router. One way to test this is to pair the NX LED Light
Strip with the NX Smart App at a location close to the WiFi
router. Then once paired, you can test dierent installation
locations for WiFi range.
NOTE:
• it may take 1-2 minutes for the lights to re-connect with the
WiFi network once you have relocated them.
4. To mount the NX LED Light Strip, first clean the mounting
surface, then remove the backing and press down to adhere.

4
3.0 NX SMART APP SETUP
3.1 APP DOWNLOAD
Download the NX Smart app from the Apple or Google Play
stores by searching 'NX Smart' or scan the QR code below.
3.2 APP REGISTRATION
Select ‘Sign Up.’ Read and agree to the privacy policy then enter
your email address. Select ‘Get Registration Code’ and you will
receive an email containing your registration code. Please enter
it into the NX Smart App and set your password.
Quick Scan QR Code
for NX Smart App.

5
You will be asked to authorise access to several services
including Bluetooth, Notifications and Location Services.
These functions enhance the operation of the app. For Music
Mode, you will also be asked for access to your smartphone’s
microphone.
3.3 HOME MANAGEMENT
To enable extra NX LED Light Strip control options, like adding
other users and organising your NX LED Light strip into dierent
areas, follow the steps below (you can also set up Home
Management later).

6
CONFIGURATION STEPS:
1. Select ‘Me’ menu at the bottom of the screen.
2. Select ‘Home Management’. Then select ‘My Home’ to
configure your default home setting.
3. Add a home name and set the location (this is optional). After
this step, you can add and name additional areas (the app
refers to this as a room). For example ‘Living Room.’ Always
select ‘save’ when you’ve finished making changes.
3.4 ADD YOUR NX LED LIGHT STRIP TO THE APP
1. Ensure your smartphone is connected to your 2.4GHz WiFi
network (this is a specific home network, if you are unsure of
the dierence please read the quick explainer below).
QUICK EXPLAINER:
• Modern home routers typically provide two WiFi networks
(5GHz and 2.4GHz). These separate networks won’t always
be named clearly, especially if you have re-named your
home WiFi network.
• For your NX LED Light Strip to work, you will need to pair it
to the 2.4GHz WiFi network, which has a greater range and
a stronger and more reliable signal. If you are unsure which
of your WiFi networks is 2.4GHz, please clarify with your
network provider.

7
2. Power up the NX LED Light Strip. Within 3 seconds, it should
start flashing red. If it does not flash, press and hold the button
on the smart controller for 5 seconds until they start flashing.
3. The NX LED Light Strip is equipped with the latest pairing
technology to ensure quick and easy setup. To pair the lights,
please ensure that Bluetooth is enabled on your smartphone.
4. Select ‘Add Device.’
A screen popup will indicate the NX LED Light Strip is about to
be added.
Select ‘Go to add’ to confirm the selection.
Reset/Control
Button

8
5. On the next screen, select the ‘+’ icon, circled in the image
below to confirm the selection.
6. Your WiFi network name will be displayed.
If your 2.4HGz WiFi network name is not displayed, please
leave the app, connect your Smartphone to the 2.4GHz
network then return to the app and enter the WiFi password
and select confirm. You can also enter the network name
manually if it is not displayed.
Please refer to our explainer on page 6 if this is not clear.
If you still cannot find your 2.4GHz WiFi, please contact your
network provider.
NOTE:
• Bluetooth is only used to enable easy connection to
the lights. After they are connected to WiFi, Bluetooth is
not required.
7. The pairing process will then begin. When completed, a
confirmation screen will be displayed. At this stage you can
rename the NX LED Light Strip on the NX Smart App if you
choose to by selecting the pen icon (circled). This name will
trigger Amazon Alexa and Google Assistant if you use them.

9
You can then allocate the lights to a specified living area if
you have set up Home Management to easily control multiple
devices and/or create smart automations.
4.0 OPERATION
There are four operation modes available for the NX LED
Light Strip. The on/o switch for the lights is situated at the
bottom centre of the operation mode screen.

10
4.1 LIGHT COLOUR OPTIONS
1. White: The NX LED Light Strip are supplied with discreet cool
white LED’s to provide natural white light. As the LED’s are
cool white only, the White menu only allows you to adjust the
brightness of the LED’s.
2. Colour: Slide your finger around the colour wheel to select
your desired colour.
Brightness is adjusted by the slider. There is also a contrast
slider, that when adjusted to 50% and lower, allows you to
select pastel colours.
3. Scene: There are four fixed ambient light scenes and four
flash scenes available for selection. The four ambient scene
settings (Warm, Cool, Sunset and Ocean) need to be set by
the user first using the circled edit control.
The four flash scenes: Relax, Party, RGBFlash and Chill are
pre-programmed, but can also be adjusted using the edit
control.
4. Music Mode: Uses your smartphone microphone to trigger
the NX LED Light Strip. The app needs to be left open and the
smartphone unlocked for this function to work.

11
4.2 SMART CONTROLLER
If a smartphone is unavailable, you can use the button on the
NX LED Light Strip’s smart controller to operate the lights. With
each button press, the lights will turn on, then cycle through all 8
scenes and the last press will turn the lights o.
4.3 GOOGLE HOME INTEGRATION
1. The NX Smart app features Verification Code linking for quick
and easy integration with Google Assistant. Simply select ‘Me’
from the NX Smart Home screen, select ‘Google Assistant’,
select ‘Get’ to load your Verification Code, then select ‘Copy’.
2. Open the Google Home app, select ‘+,’ then select ‘Set up
device’ on the next menu, then ‘Works with Google’ on the
following menu. Then tap the search icon at the top right
corner of the screen and search for ‘NX Smart’ and select it.
Reset/Control
Button

12
3. Finally, paste the Verification Code then select ‘Authorise’ on
the next screen
Google Assistant will find your device(s) then select the ones
you want to link. Confirm the home location for the device(s) and
select the room where the device(s) are located.
Now you can control the Garden Lights with Google Assistant.
Some example commands follow - or try your own variations!
Remember whatever you named the NX LED Light Strip as in the
NX Smart App will also be their Google Assistant name.

13
• Ok Google, turn on LED Lights!
• Ok Google, turn o LED Lights!
• Ok Google, set LED Light Strip brightness to 20%.
• Ok Google, set LED Lights to blue.
4.4 AMAZON ALEXA INTEGRATION
1. The NX Smart app features Verification Code linking for quick
and easy integration with Amazon Alexa. Simply select ‘Me’
from the NX Smart Home screen, select ‘Alexa’, select ‘Get’ to
load your Verification Code, then select ‘Copy’.
2. Open your Amazon Alexa app and from the home menu,
select ‘More.’ Then select ‘Skills & Games’ then using the
search tool at the top right corner of the screen, enter 'NX
Smart' to search for the NX Smart App.

14
After you select 'NX Smart', select ‘Enable to Use’ on the next
screen.
3. Paste the Verification Code then select ‘Authorise’ on the next
screen. Once your NX Smart account is linked to Alexa, select
‘CLOSE’ on the following page then ‘DISCOVER DEVICES.’
Some example commands follow - or try your own variations!
Remember what you named NX LED Light Strip in the NX App,
will be their Alexa name.

15
• Alexa, turn on LED Lights!
• Alexa, turn o LED Lights!
• Alexa, make the LED Light’s brightness 20%.
• Alexa, make the LED Light’s blue.
4.5 AUTOMATION
There are various ways you can enhance your smart product
experience. Automation lets you control your smart products
based on other conditions such as time, temperature or based
on the operation of another smart device.
To activate Automation, follow the steps below:
From the home screen, perform the following actions:
1. Select ‘Smart.’
2. To add an Automation routine, select ‘+’ (circled at the top of
the screen).
3. Select an Automation action (in this example we will select
‘When weather changes’).
4. You can select a specific weather condition, so we will select
‘Temperature.’

16
5. Select the trigger temperature then ‘Next.’
6. Select the action to be performed, we will select
‘run the device.’
7. Select the device you want to control
8. Select the device operation. In this example we will select
‘Switch’ then ‘ON’ to turn on the lights.
9. Select ‘Save’ and select ‘Next.’
You are finally presented with a summary screen of the
Automation.
To finish, select ‘Save’.

17
4.6 ADDITIONAL APP FUNCTIONS
Additional app functions are described in the ‘FAQ & Feedback’
section in the ‘Me’ menu in the app.
5.0 SPECIFICATIONS
Model: NX-LEDS5M
WiFi: 2.4GHz Only, IEEE802.11b/g/n
Waterproof: IP44
App Requirements: IOS 10.0 or Android 5 and above.
Operating Voltage: 12VDC 2A
Google Play and the Google Play logo are trademarks of Google Inc. Industries.
Amazon, Alexa and all related logos are trademarks of Amazon.com, Inc. or its aliates
.

18
6.0 WARRANTY TERMS & CONDITIONS
Our goods come with guarantees that cannot be excluded under
the Australian Consumer Law. You are entitled to a replacement
or refund for a major failure and for compensation for any other
reasonably foreseeable loss or damage. You are also entitled
to have the goods repaired or replaced if the goods fail to be of
acceptable quality and the failure does not amount to a major
failure.
This warranty is provided in addition to your rights under the
Australian Consumer Law. Directed Electronics Australia Pty
Ltd (Directed Electronics) warrants that this product is free from
defects in material and workmanship for a period of 12 months
from the date of purchase or for the period stated on the
packaging. This warranty is only valid where you have used the
product in accordance with any recommendations or instructions
provided by Directed Electronics.
This warranty excludes defects resulting from alterations of the
product, accident, misuse, abuse or neglect. In order to claim the
warranty, you must return the product to the retailer from which
it was purchased or if that retailer is part of a National network, a
store within that chain, along with satisfactory proof of purchase.
The retailer will then return the goods to Directed Electronics.
Directed Electronics will repair, replace or refurbish the product
at its discretion. The retailer will contact you when the product is
ready for collection. All costs involved in claiming this warranty,
including the cost of the retailer sending the product to Directed
Electronics, will be borne by you.
Email: [email protected]
Table of contents
Popular Home Lighting Accessories manuals by other brands

Anslut
Anslut 012204 operating instructions

Fraser Hill Farm
Fraser Hill Farm FCRY060-SNM1-WT manual

Home Accents Holiday
Home Accents Holiday TY173-1711 Assembly instructions

Home Accents Holiday
Home Accents Holiday 22RT1772214 manual

INNOLIVING
INNOLIVING INN-053 user manual

Atlantis
Atlantis BXLEDTV02 user manual

Velleman
Velleman HQ Power HQPE10004 user manual

MELINERA
MELINERA 283766 Assembly, operating and safety instructions

Anslut
Anslut 004848 operating instructions

Anslut
Anslut 012373 operating instructions

IKEA
IKEA KOLDKNAPP J1954 quick start guide

Home Accents Holiday
Home Accents Holiday TY401-2017 Assembly instructions