O'Fresh MFS-26L User manual

www.ofresh.fr
MISTING FAN INSTRUCTION MANUAL

Please carefully read this manual before attempting to install or use this misting fan.
1.Don't place fingers or foreign objects through guards into blade,and don't let children close the
fan when the fan is running.
2.Bare-body children, weakling and elder should not stay in front of the running fan for a long
time.
3.Don't place the running fan near being opened window or flower or tree or the curtain, portiere
curtain places, also don't place the fan in some unplaned place.
4.Close power supply before removing the fan.
5.Don't allow the fan become wet or corrosive, forbid to use in bathroom.
6.Don't pull the wire forcibly to avoid breaking it.
7.To ensure your safety, pls don't replace the wire yourself, if do need replacing, send the fan to
maintenance station or our factory.
8.Besides our stating maintenances, non-professional is forbidden to disassemble the fan.
9.This appliance is not intended for use by persons (including children) with reduced physical,
sensory or mental capabilities, or lack of experience and knowledge, unless they have been given
supervision or instruction concerning use of the appliance by a person responsible for their safety.
10.Children should be supervised to ensure that they do not play with the appliance.
11.Type Y attachment - Damaged supply cords to be replaced by the manufacturer, service agent
or similarly qualified person to avoid hazard.
12.Unplug the appliance during filling and cleanign.
PARAMETER
220-240V~ 50Hz
5
MFS-26L
Speed 3
220 68 2401400
Speed 2Speed 1
Item
Proformance
174 60 22012501100 143 55 210
Model
Air
m /min
Noise
dB
Power
W
Speed
rpm volume
3 3
volume
Speed
rpm
Noise
dB
Power
W
m /min
Air Power
W
Noise
dB
Speed
rpm volume
3
m /min
Mist
volume
(Max)
L/H
Note:No further notice if above indices change.
MAINTENANCE
1 .Clean the fan periodically to keep it tidy and durable.
2. Cut off the power and make sure the blade stay still before cleaning, open the grill clips and
loose the screws, remove the front grill and blade, use a soft cloth and a mild soap to clean the
fan's exterior. Do not use gasoline or any other corrosive liquid which can damage the misting fan.
Thoroughly dry all of the fan's parts with a soft cloth after cleaning and install the fan by contrary
steps.(Remark: Do not knock down the misting system).
3. Keep the motor and electrical components away from water when cleaning.Do not knock
against the blade or change its angle.
4. Clean the water tank and water collection plate to keep water clean.
5. If the misting fan will not be in use for an extended period of time, cover the unit and keep it
stored in a clean, dry place.

CAUTION
1. Follow the diagram to take out the fan body when open the packing carton of fan.
2. Do not insert objects or let fingers to enter to the fan guard.
3. Adjust the pitch angle of the fan within a predetermined range.
4. Do not place the fan to unsteady floor or near curtains, drapes, or any other materials easily to be involved in
the misting fan's grills.
5. Children, elders and weak people cannot stand in front of the machine for a long time.
6. If the power cord is damaged, in order to avoid a hazard, it must be replaced by the manufacturers and their
maintenance departments or similar sector professionals.
7. Immediately cut off the power supply in the presence of abnormal noise, smoke, blade does not turn, and send
it back to the factory or professionals with relevant qualifications to check and maintain.
8. In addition to this specification of maintenance allows, non-professionals can not disassemble, repair and
reconstruct the misting fan..
9. Take away moisture-proof things when starting mist function to avoid moisture.
WIRING DIAGRAM
Brown
N
N
L
N
220-240V~
50Hz
N
L
Thermal protector
Black
Misting
motor
Blue
Fan motor
Blue
Pump
Ground wire (yellow/green)
capacitor
High speed (yellow)
Middle Speed (blue)
Low Speed (white)
Kim (black)
N
Brown
1.5uF/450V
capacitor
3.15A/250V
Fuse
capacitor
Blue
Brown
Ground wire (yellow/green)
Primary phase
yellow
blue
white
orange
purple
Black
Black
Brown
red
REMOTE CONTROL PANEL

MIST
MIST
LOW
MED
HI
4H
2H
1H
0.5H
OFF TIMER
ON/SPEED
OFF
Timer setting
Misting ON/OFF
ON/SPEED
Timer Indicator Speed Indicator
Misting Indicator
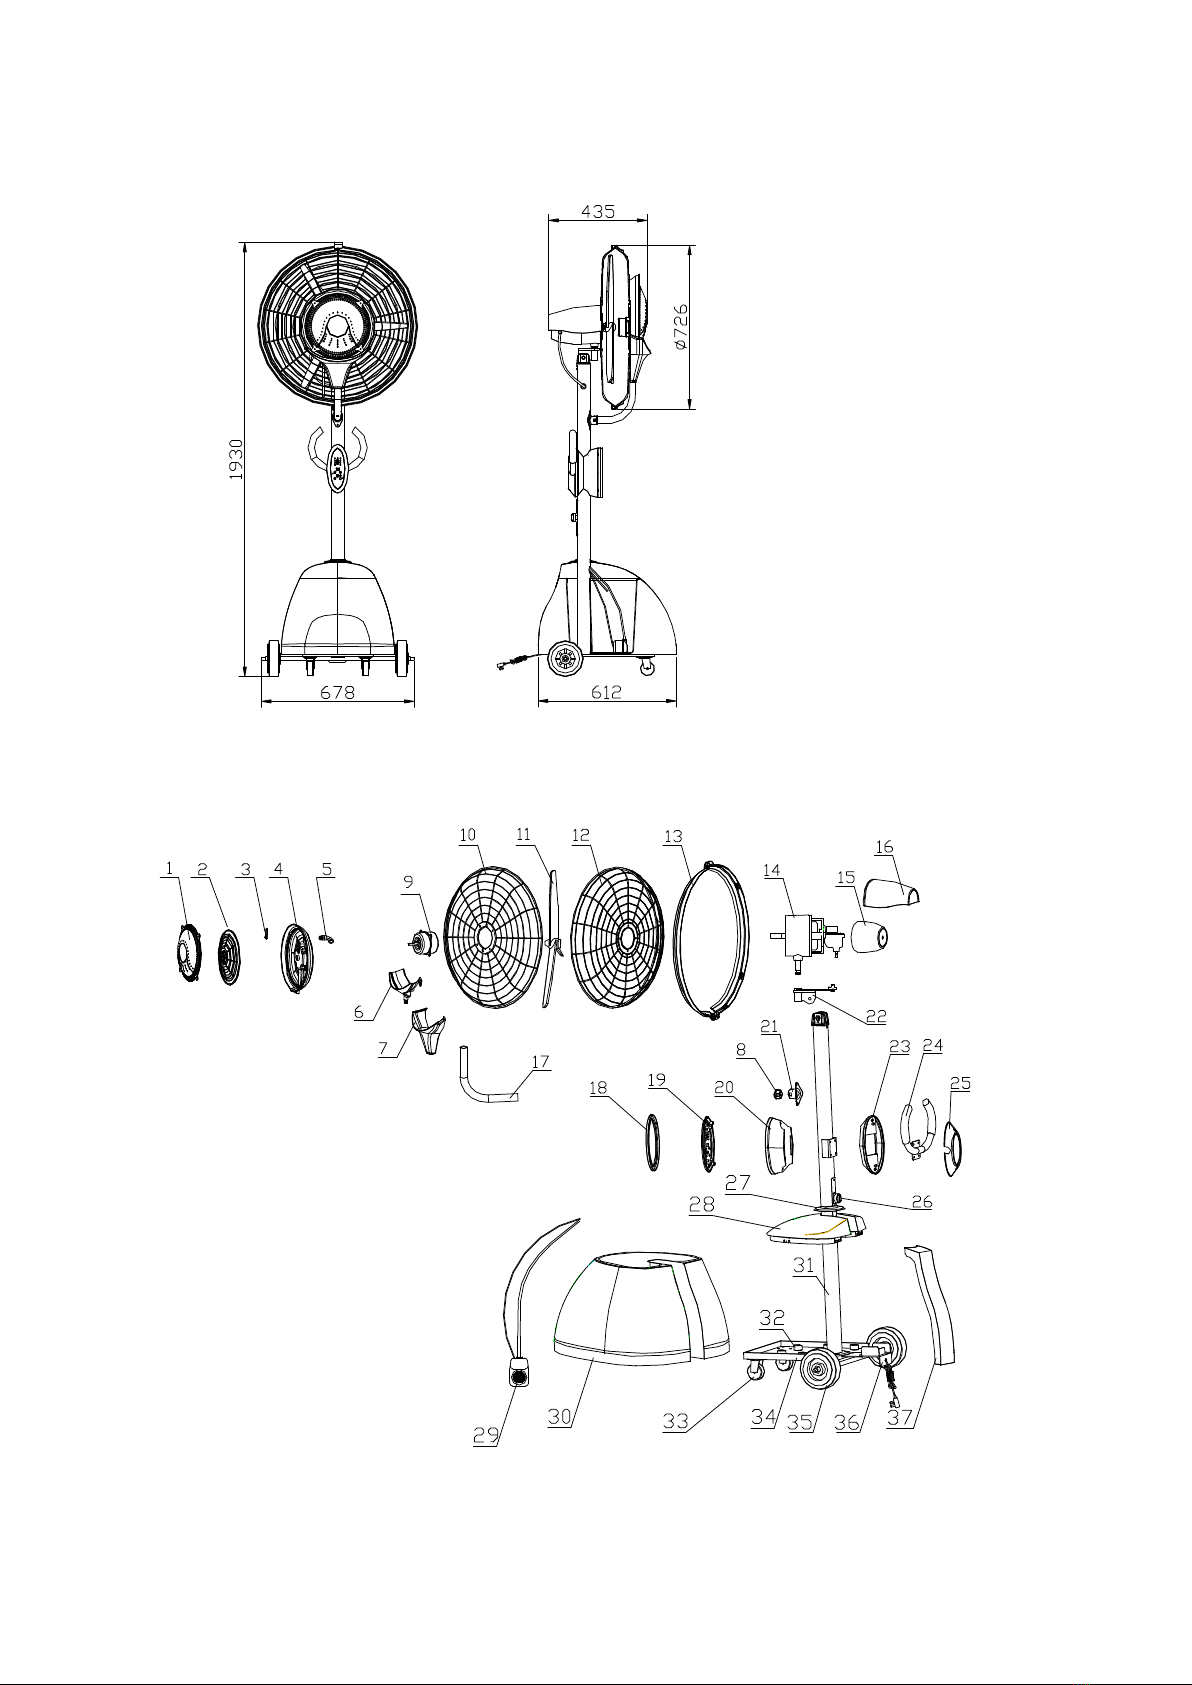
FEATURES AND APPLICATIONS
1. Use CAD optimized design with artistic looking.
2. The fan misting system adoptsthe centrifugal atomization optimized design, without nozzle and water
filtration, reasonable structure, easy maintenance.
3. Fan surface is epoxy resin coated,anti-rust and durable.The fan has water proof electrical design, safety, with
tank cart, easy to move.
4. Misting and air supply driven by different motors, motors use high quality rolling bearings, with stable
performance, low temperature rise, long life, low noise, strong overload.
5.Misting volume adjustable, pumps take full insulation enclosed protective structure for safe operation.
6. The fan with the function of oscillation and adjustable angle. easy to use, suitable for factories, residential
areas, shopping malls, sports grounds cooling, dedusting, odor removal, and also can be used in livestock farms,
greenhouses, mushroom farms and special places.
7.With a long-range smart remote control function, third speed, oscillating, timing, easy to use.
OPERATING INSTRUCTIONS
1.Use the fan under the voltage and frequency shown on the rating label, do not use in corrosive enviroment.
2.Do not use the fan above an altitude of 1000 meters and temprature above 40ºC.
3.If the fan use socket to get power supply, it should meet the IEC335-1 standard. use direct power supply by
power cord, should be installed contact separation not less than 3mm all-pole switch in the fixed wiring.
4. The fan oscillating angle adjustment: Loosen the injection oscillating screws to move to desired location
(screw more out, the greater oscillating angle), tightened injection oscillating screws. The fan pitch angle
adjustment: Loosen the fastening nut, adjust the motor to desired angle, fasten the nut.
5. Speed adjustment: press bottoms on remote control or electrical box to control the speeds.
6. Remote control operating
(1) The machine is in standby mode when power on, the buzzer beeps once.
(2) Press ON/SPEED to start, the fan start by mid-speed firstly in three seconds then switch
to work by low-speed. Press the key again is the mid-speed, the third press is high-speed, cycle
by low-speed, mid-speed and high-speed.
(3) Press the OFF key to turn off the fan.
(4) Timing setting: Press TIMER to open a total of four time profiles, 0.5H, 1H, 2H, 3H, 4H,
indicator synchronization instructions.
(5) Press MIST key to open misting, press it again to turn off, indicator synchronization
instructions.
(6) Remote distance is less than 8M, buzzer beeps twice, shut down a long ring one second,
other operations beeps once..

7. Misting adjustment between "OFF" and "ON" when the fan running in misting.
8. The tank must be full filled with water before the fan running in misting. The tank is filled with water at the
maximum misting state can be run continuously for 4 hours, when the tank is not enough water should be
coupled with the water to obtain the effect of misting. Open the drain valve behind water tank to release water
when the tank needs to be cleaned.
9. Press the front-wheel brake when the tank cartstopped. The tank cart should not be parked at the slopes, to
prevent it forwards freely sliding. Do not force to push the tank cart before open the brake, so as to avoid
damage.
10. Clean the water tank each time when use it.
Assembly Instructions
DO NOT plug in the fan before assembly. This misting fan comes in 3 separate boxes. Carefully remove all
packing materials and retain for future storage/use. Make sure there is no residual foam left in any of the
components. Check all the components to avoid any parts missing, scratching, or damage during transportation.
A screwdriver and wrench will be required to assemble this misting fan.
Step 1: Install the stand pole
Take off the water tank, connect and tighten the power cord by connecting the male splice piece from stand pole
and the female splice piece from the tank cart. Make the electric box panel face to front, install the stand pole
onto the tank cart and tighten with four M8X25 bolts, flat washers, spring washers and nuts.
Plug connector
Electric box panel
Diagram 1
Step 2: Install the fan
Install the fan onto the stand pole. Connect the four-pin male splice piece in front of the fan and the four-core
famale splice piece in front of the stand pole. Connect the two water tubes and make sure the two ends should be
the same color. And then connect the six-pin male splice piece at the side of the fan and the six-core famale
splice piece at the side of the stand pole. Finally, install the side panel and the tube connector.

Side panel
Diagram 2
Male and famale
splice pieces
Male and famale
splice pieces
Fan motor
Tube connector
Step 3: Connect water pump power cord and water pump tube
Connect the two-pin male splice piece on end of the water pump power cord and the two-core famale splice
piece from the stand pole, and then stuff inside the stand pole. Pass the two water tubes through the front cover,
and insert the blue tube into the water pump connector. Finally, install the front cover onto the stand pole.
Blue tube
Front cover
Male and famale
splice pieces
Front
cover
Notice:Power
cord should be
set above the
water tube
Blue tube
Black tube
Water pump
connector
Diagram 3
Step 4: Water Tank Assembly
a. Refer to diagram 4. Position the tank on tank cart; use the two hems to fix the tank.
b. Put the pump into U-groove inside water tank.
c. Insert the two positioning buckle into the bayonet on the tank back.
d. Insert the positioning groove into water tank fixing board, gently pat till the water tank back cover in right
place.
e. Lid tank cover, ensure pump tube, water cycling tube and pump power cord get through the U-groove of water
tank.
f. Install the handle on stand pole.
g.Install the rear cover of electric box by screws.

Diagram 4
U-groove
Handle
water tank
fixing board
Positioning
groove
Bayonet
Positioning
buckle
Rear cover of
electric box
Hem
Step 5: Misting Testing
a. Full fill the water tank with clean water, and cover the tank lid.
b. Keep the ball valve from "on " to "off ", and make power on. Run the fan with remote control or press button
by hand, and check if the motor and blade operate normally.
c. Press misting button, run misting motor and water pump, and check if the misting motor, misting plate and
water pump operate smoothly.
d. Turn ball valve from " on" to "off", and observe the misting function.
e. Adjust the plastic screw, and check if the oscillation function work smoothly.
Ball valve
Plastic screw
Remote control
Diagram 5

OVERALL DIMENSION
Structure Diagram

1. safety cover 2.misting plate 3. water outlet 4. water collecting plate 5. whorl bent connector
6. water receiving plate 7.water receiving plate cover 8. plug 9. misting motor 10. front grill
11. blade 12. rear grill 13. grill ring 14. fan motor 15. motor cover 16. motor protective cover
17. flexible tube 18. protective cover of electric box 19. front cover of electric box
20. front base of electric box 21. tube connector for stand pole 22. oscillating structure
23. rear base of electric box 24. handle 25. rear cover of electric box 26. ball valve
27. decorative cover 28. water tank cover 29. water pump 30. water tank 31. stand pole
32. cart-shelf rubber fitting 33. small wheel 34. tank cart 35. big wheel
36. water tank fixing board 37. water tank back board
Table of contents
Other O'Fresh Fan manuals
Popular Fan manuals by other brands

Matrix
Matrix FE-70D3fOL(E) owner's manual

Craftmade
Craftmade RGD52 installation guide

Orbegozo
Orbegozo CF 101132 instruction manual

AirArtDeco
AirArtDeco AADQ-401 instruction manual

Trisa electronics
Trisa electronics 9346.43 Instructions for use

Hubbell
Hubbell Progress Lighting P250018 installation manual

Unold
Unold 86880 Instructions for use

Broan
Broan HRV150FL user manual

Monte Carlo Fan Company
Monte Carlo Fan Company 4ICR52XXD Series Owner's guide and installation manual

Lunos
Lunos eGO installation manual

Jata electro
Jata electro VS3010 Instructions for use

Harbor Breeze
Harbor Breeze E-TM52BNK5LED installation guide