Oasis 330R With QC2 User manual

Assembly and Operating Manual
1
20
Oasis Rolling Base 330R
Oasis Rolling Base 330R with
Quick Clamp Accessory QC-2

This manual enables the safe and ecient handling of the sunshade stand. The manual
is an integral part of the sunshade stand and must be stored at all times in the immediate
vicinity of the sunshade so that it is available to persons who use the sunshade. Before be-
ginning any activities, persons must rst carefully read and understand this manual, as well
as all safety information and markings. A basic requirement for safe handling is compliance
with all safety information and instructions provided in this manual. In addition, the local
accident prevention regulations and general safety regulations for the intended use and
place of use of the sunshade stand apply.
Illustrations in this manual show the sunshade stand Oasis Rolling Base 130R as an ex-
ample. They are intended for general understanding and can dier from the actual model.
The smaller models may dier in appearance from the depicted sunshade stand; however,
the assembly steps and all information in this manual apply equally for all models, unless
explicitly stated otherwise. Claims against NerTes GmbH (hereinafter „Manufacturer“) on
the basis of the illustrations are not enforceable.
Limitation of liability
All information and notices in this manual were compiled taking into account the applicable
standards and regulations, the state of the art and our many years of experience and
knowledge. The manufacturer will assume no liability for damages due to:
Failure to comply with the manual
Non-intended use
Use by unauthorized persons
Unauthorized alterations or technical modications
Use of non-authorized parts
Copyright
This manual is protected by copyright and is intended for internal use only. Dissemination
to third parties, reproductions of any type or manner – also excerpts – and exploitation
and/or communication of the content are not allowed without the written permission of the
manufacturer, except for internal purposes. Infringements will result in liability for damages.
All rights reserved.
Distributor for United States
© NerTes GmbH Oasis Rolling Bases
Carl-Zeiss-Str. 2-4 11748 MonteVista Rd.
47475 Kamp-Lintfort Clermont, FL 34711
Germany United States
Tel.: +49 (0) 2842 9498053 Phone: 725-696-2747
Internet: www.nertes.de
10 Technical data
iThe exact model designation of your sunshade stand can be found on the base.
Lift the casing on the assembled sunshade stand so you can see the designation.
Permissible pole diameters
Model Permissible pole diameters
330R 45 to 68 mm (1.77 in to 2.68 in)
330R With QC2 50 mm (1.97in), 55 mm (2.17in),
Dimensions and weight
Model Diameter with
casing
Weight of the single
weight segments
Total base
weight
260R 35,83 in
with plastic casing
approx. 44 lb approx. 265 lb
330R 35,83 in
with plastic casing
approx. 55 lb approx. 330,7 lb
10 Technical Data
19
2

1 Introduction 4
2 For your safety 4
2.1 Intended use 4
2.2 Symbols in the manual 5
2.3 Safety notices 5
3 Scope of delivery 8
3.1 Unpacking the sunshade stand 9
4 Assembly of the sunshade stand 10
4.1 Assembly pictures 10
4.2 Assembly 13
5 Using the sunshade stand 15
5.1 Inserting the sunshade 15
5.2 Moving the sunshade stand 16
6 Disassembly at end of season 17
7 Care 18
8 Disposal 18
9 In case of problems 18
10 Technical data 19
7 Care
Scratching of the casing and mounting tube due to incorrect care!
Do not use aggressive or abrasive cleaners (such as steel wool), which can dama-
ge the surface of the sunshade stand.
Do not use highpressure or steam cleaners.
Incorrect materials for cleaning and care can damage the surface of the sunshade
stand.
Clean the casing with mild soapy water and a soft cloth.
Use a stainless steel cleaner for care of the mounting tube
i For rough cleaning of the casing, you can also spray it o with a garden hose.
However, do not spray water inside the mounting tube and the base.
8 Disposa
Danger to the environment due to incorrect disposal! !
Dispose of all parts in accordance with waste disposal regulations. If in doubt,
contact the responsible authority for information on correct disposal
Incorrect disposal can result in damage to the environment and nes
The following materials are used:
The casing is made of plastic or natural bers (rattan), depending on the model
The base including the mounting tube and the clamp are made of various metals
and plastics
The weight segments are made of special concrete.
9 In case of problems
Danger of injury due to damaged parts!
Never use a defective sunshade stand.
If the sunshade stand is damaged, there is an increased danger that it could over-
turn or roll away, resulting in severe injuries
If you have questions concerning the product or the purchase of replacement parts,
contact the dealer where you purchased the sunshade stand or our technical sup-
port department (see page 2 for address).
iFor questions about sunshades that can be used with the stand, contact the sun-
shade manufacturer
Table of contens7 Care 8 Disposal
9 In case of problems
18
3

1 Introduction
With your choice of the Oasis sunshade stand you have purchased a high-quality product
featuring a patented and unique design that allows you to move the sunshade while in use
to any spot on your terrace, while maintaining an upright posture. Finally you can put up
the sunshade where it is really needed.
Read the information in this manual carefully so you will be able to use your sunshade
stand safely and eectively.
We hope you enjoy your product.
2 For your safety
2.1 Intended use
The sunshade stand is intended only for use as a holding device for sunshades on a level
and solid surface. Use only sunshades that, according to the manufacturer‘s specications,
are suitable for the weight class of the sunshade stand, to ensure maximum stability.
The dierent models of the LiRo sunshade stand may be used only for poles with the dia-
meters specied in the Technical Data
Model LiRo Specied pole diameters
330R 1.77 in to 2.68 in
330R with Quick Clamp
Accessory QC2
1.97 in and 2.17 in
The sunshade stand - in moving position - can be moved together with the sunshade on a
level surface
Foreseeable misuse
Misuse can result in dangerous situations. Therefore, never use the sunshade stand
as a stand for objects for which the static requirements are not known
with sunshades that are not suitable for the stand due to the pole diameter or
size
for transporting persons
6 Disassembly at end of season
At the end of the season the sunshade stand should be stored as follows:
1. Remove the sunshade from the mounting tube of the sunshade stand by
– loosening the knurled screws (model: 330R).
– opening the clamping lever (model: 330R with Quick Clamp Accessory).
Storage
2. Store the sunshade stand, if possible, at a location that fullls the following criteria.
The storage location should be:
– dry
– protected against frost
– level
iAlternatively, you can cover the sunshade stand with an optional protective
cover.
To prevent the protective cover from becoming loose, pull the cover completely
down to the ground and then draw the rubber straps tight until they are caught
under the protective cove
1 Introduction 2 For your safety
2.1 Intended use
6 Disassembly at the end of season
4
17

2.2 Symbols in the manual
Important safety notices in this manual are marked with warning symbols and signal words
that describe the extent of the danger.
Always observe all warnings and carry out all activities carefully to prevent accidents, injury
and property damage.
Indicates a possibly dangerous situation that can result in
severe injuries if not avoided.
Indicates a possibly dangerous situation that can result in
slight or minor injuries if not avoided.
Indicates a possibly dangerous situation that can result in
damage to property and the environment if not avoided.
iThis symbol indicates useful tips and suggestions.
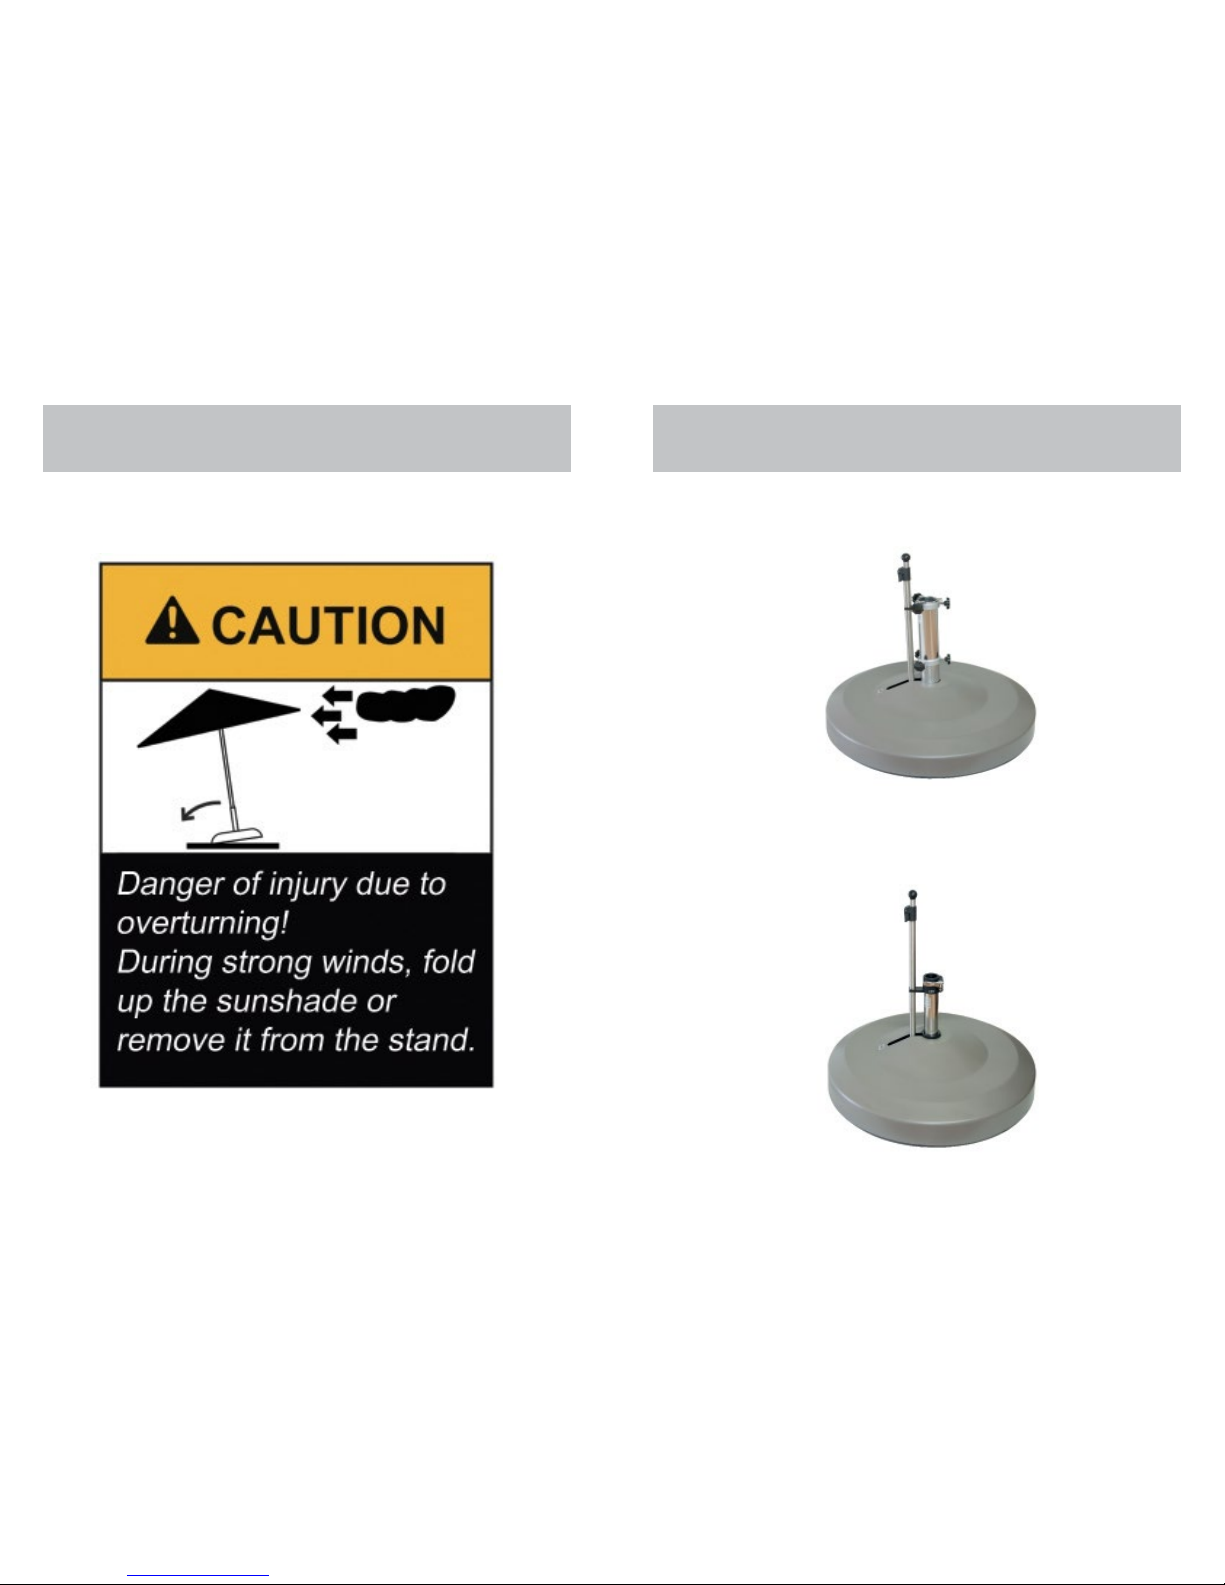
2.3 Safety notices
Accidental rolling
Danger of injury and danger of property damage due to rolling!
• Move the sunshade stand only on a level surface without inclines, never on ramps or
other sloping terrain.
• After moving the sunshade, always set the stand to standing position and secure the
telescoping rod on the retaining clip provided.
• Never use the sunshade stand on ice or snow.
If the sunshade stand remains in moving position or is moved on unsuitable terrain,
it can roll away accidentally, resulting in severe injuries and property damage.
Telescoping rod
Danger of pinching on the telescoping rod!
After moving the sunshade, always guide the telescoping rod slowly by hand to the
mounting tube and fasten it on the retaining clip.
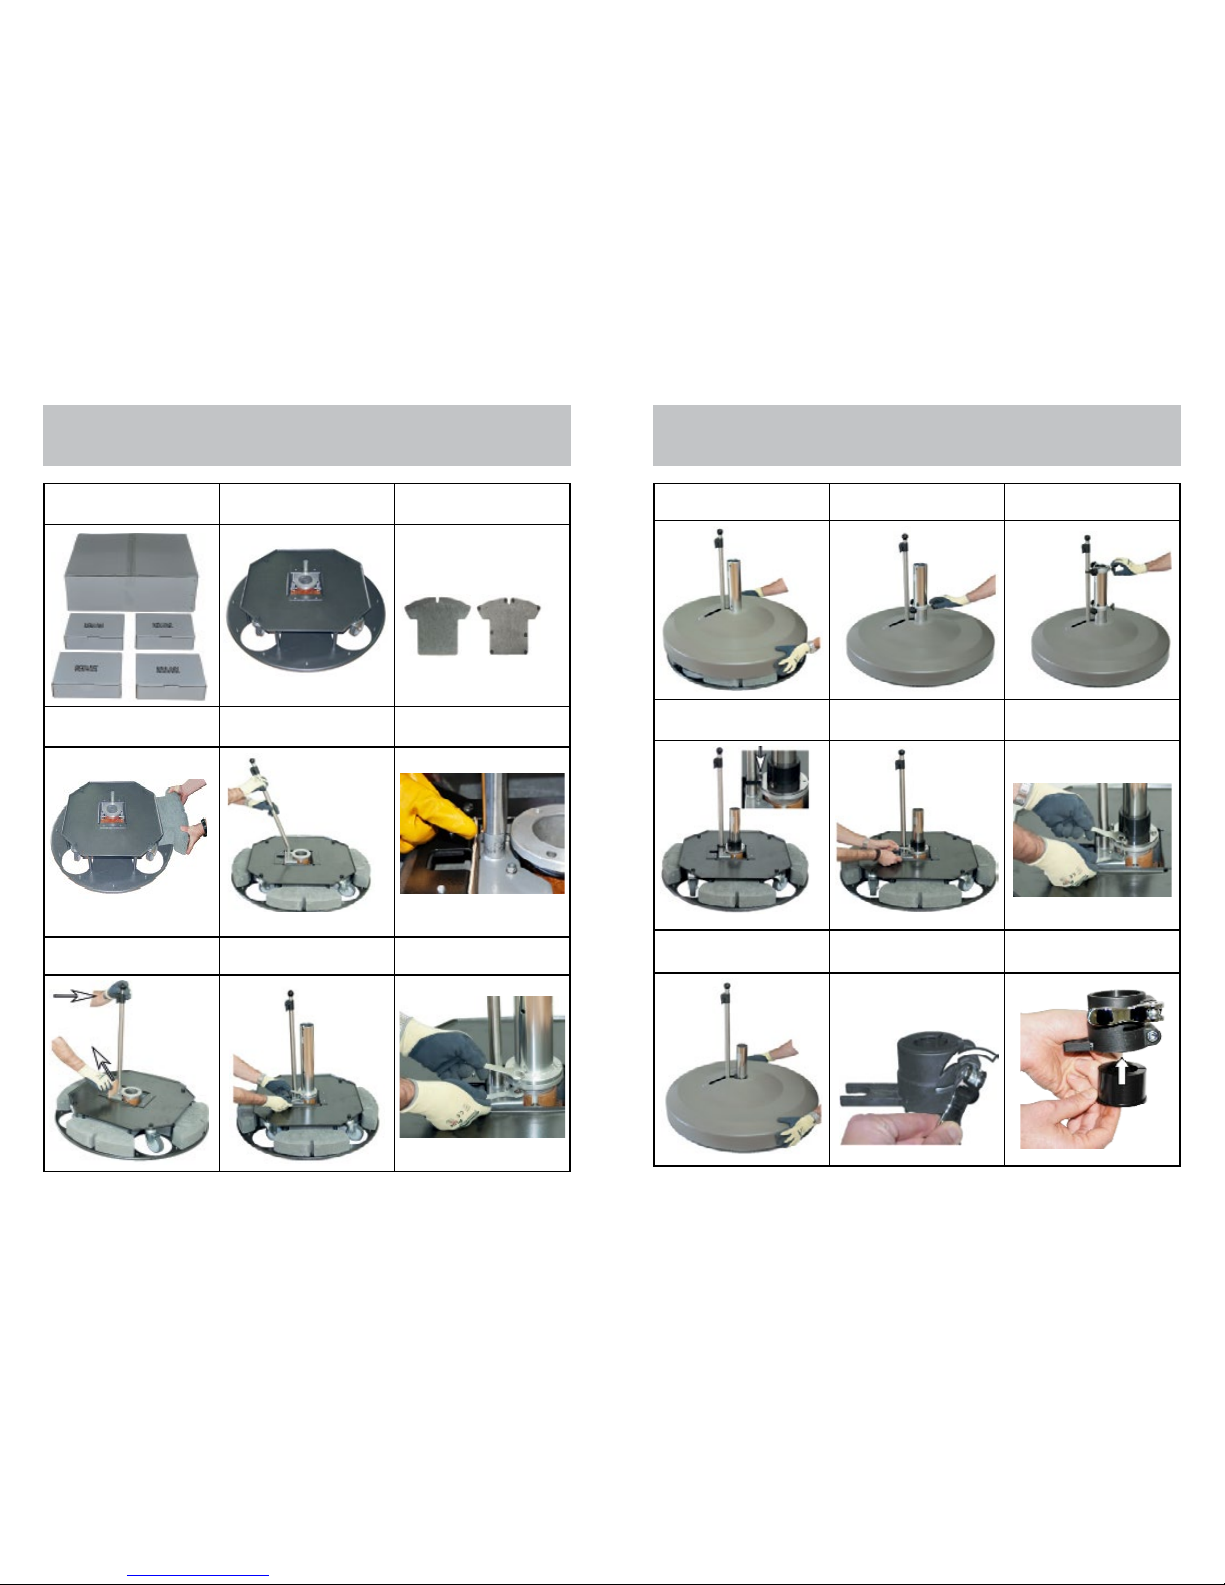
2. Open the quick-release clamp by pulling the clamping lever away from the moun-
ting tube (Fig. 21).
3. Turn the clamping lever counter-clockwise until the pole ts into the mounting tube.
4. Push the pole of the sunshade into the mounting tube as far as it will go.
5. Turn the clamping lever clockwise until you feel slight resistance.
6. Danger of overturning.
Press the clamping lever completely onto the mounting tube until it locks into place
iThe clamping lever must be able to be pressed with some eort. If there is
too much ease of movement, you have either confused opening with closing
the clamping lever or you have to turn the clamping lever further until it is
tight. In both cases, repeat all steps and make sure that the clamping lever is
actually opened when turning it and not already closed.
5.2 Moving the sunshade stand
Damage to telescoping rod due to incorrect handling!
Do not use the telescoping rod as a lever to raise the sunshade stand on one side,
for example to overcome uneven areas on the underlying surface. Instead, go
around uneven areas.
If the sunshade stand is not moved as intended, the telescoping rod can be dama-
ged.
The sunshade stand - in moving position - can be moved to another spot together
with the open sunshade as follows:
1. Put the sunshade stand into moving position by pulling the telescoping rod side-
ways away from the mounting tube until it locks into place (Fig. 22).
2. If necessary, open the catch on the telescoping rod (Fig. 23/1) and pull the knob
(Fig. 23/2) out to adjust the length of the telescoping rod to your body height.
3. Then lock the telescoping rod again by pressing down on the catch.
4. Pull the sunshade stand by means of the telescoping rod slowly to the spot where
you want to put up the sunshade.
5. Danger of injury.
Put the sunshade stand back into standing position (Fig. 22) by slowly returning the
telescoping rod to the mounting tube and securing it in the retainer clip. Do not let
the telescoping rod snap back release it slowly.
6. If necessary, open the catch on the telescoping rod and press the knob back in to
retract the telescoping rod.
7. Then lock the telescoping rod again by pressing down on the catch.
2.2 Symboles in the manual
2.3 Safety notices
16
5
5 Using the sunshade stand
5.1 Inserting the sunshade 5.2 Moving the sunshade stand

Heavy weight
Danger of injury due to heavy weight of the parts! 2 men handling
• Handle all packing units and parts carefully with both hands, especially the weight
segments, and set them down carefully. If possible, use transport aids for transport of
the stand.
• Do not stack packing units and parts.
• Wear sturdy shoes during transport and assembly of the stand
During transport and assembly you will have to handle heavy parts. Parts can fall or over-
turn, resulting in severe injuries due to their heavy weight.
Unexpected overturning
Danger of injury and danger of property damage due to overturning!
• Never use the sunshade stand without rst having inserted all weight segments. Use
only original weights.
• Use the sunshade stand only with sunshades that are suitable for the weight class of
the sunshade stand. Observe the specications of the sunshade manufacturer.
• Do not use the sunshade in case of strong wind. During strong winds, fold up the sun-
shade or remove it from the stand.
• Do not leave the sunshade stand unattended when the sunshade is open.
If the sunshade stand is not handled as intended it can overturn together with the sunsha-
de, resulting in injuries and property damage.
Weight segments
Danger of pinching and danger of cuts/scrapes from the weight segments!
• Handle the weight segments carefully and wear work gloves
When inserting the weight segments, there is a danger of being cut or scraped by the
weight segments and pinching of ngers between the weight segment and the base.
mounting tube to the sunshade pole diameter.
If an unsuitable reducing sleeve for the pole diameter is used (if the sleeve is too
large) the sunshade can overturn, resulting in injuries and property damage.
The clamp must be attached as follows:
2. Open the quick-release clamp by turning the clamping lever counter-clockwise a
few turns (Fig. 15).
3. Insert the correct reducing sleeve for the sunshade into the clamp from below (Fig.
16) and push it up as far as it will go.
4. Unscrew the lower allen screw (Fig. 17/1) until the clamp opens.
5. Place the clamp on the mounting tube so that the retainer clip (Fig. 18/1) is in
position of the telescoping lever (Fig. 18/2) and press the telescoping rod into the
retainer clip.
6. Tighten the lower Allen screw (Fig.19)..
5 Using the sunshade stand
5.1 Inserting the sunshade
Danger of injury and danger of property damage due to overturning!
Use the sunshade stand only with sunshades that are suitable for the weight class
of the sunshade stand. Observe the specications of the sunshade manufacturer.
Do not open the sunshade to put it into the stand.
Do not use the sunshade in case of strong wind. During strong winds, fold up the
sunshade or remove it from the stand.
If the sunshade stand is not used as intended it can overturn together with the
sunshade, resulting in injuries and property damage.
Modell: 330R
For model 330R, insert the sunshade as follows:
1. Make sure that the sunshade stand is in standing position, i.e. the telescoping rod
is parallel to the mounting tube and secured on the retaining clip (Fig. 20).
2. Unscrew the three knurled screws of the clamp (Fig. 20) until the pole ts into the
mounting tube.
3. Push the pole of the sunshade into the mounting tube as far as it will go.
4. Turn the three knurled screws alternately until the pole is held tightly in the center.
Modell: 330R with quick clamp accessory QC2
For model 330R with quick clamp accessory QC2, insert the sunshade as follows:
1. Make sure that the sunshade stand is in standing position, i.e. the telescoping rod
is parallel to the mounting tube and secured on the retaining clip (Fig. 21).
2.3 Safety notices 5 Using the sunshade stand
5.1 Inserting the sunshade
6
15

Certain persons
Danger of injury to certain persons!
• The sunshade stand is not intended for use by children and persons with limited
physical, sensory or mental capacities or insucient experience and/or insucient
knowledge, unless they are supervised by a person who is responsible for their safety
or have been instructed by that person on how to use the sunshade stand.
• Persons who are not allowed to lift heavy weights must never handle the packing units
and parts.
• Children should be supervised to ensure that they do not play with the sunshade
stand.
• Store the stand in a place that is inaccessible to children.
• Keep children away from the packaging material. There is a danger of suocation.
If persons use the sunshade stand who cannot assess the dangers, there is a possibility of
injuries.
Unexpected change of direction
Property damage due to unexpected change of direction of tilting sunshades!
• Do not use the sunshade in case of strong wind. During strong winds, fold up the sun-
shade or remove it from the stand.
• Set up the sunshade stand with a sucient safety clearance to building façades (espe-
cially window panes), other sunshades and structures of all types.
• Do not leave the sunshade stand unattended when the sunshade is open.
Tilted sunshades can unexpectedly turn as a result of the wind, resulting in property dama-
ge.
5. Fastening telescoping rod (Fig. 5)
Guide the telescoping rod above the small tube stick, so that the opening for the
ball catch points outward.
Danger of pinching.
Press the ball catch on the telescoping lever (Fig. 6) in with your nger and careful-
ly push the telescoping rod until the ball catch locks the telescoping rod. If neces-
sary, turn the telescoping rod back and forth a little.
6. Remove the transportation lock.
Press the telescoping rod to the base center and remove the transportation lock
(wooden plate Fig. 7).
Fastening the mounting tube and the clamp on 330R models
1. Fastening the mounting tube
Insert the mounting tube on the ange of the base and screw into place it with the
enclosed screw connections (bolts, washers, and nuts). Tighten the bolts with the
two wrenches (Fig 8 and 8.1).
2. Place the casing on the base so that the telescoping lever is guided through the
slot (Fig. 9)
3. Fastening the clamp Scratching of the mounting tube.
Unscrew the knurled screws of the lower clamp until the screws no longer protrude
on the inside.
4. Push the lower clamp over the mounting tube so that the knurled screws are at the
position of the lower holes in the mounting tube (Fig 10).
5. Screw the knurled screws in until the clamp is fastened on the mounting tube.
6. Push the upper clamp over the mounting tube so that the knurled screws are at the
position of the upper holes in the mounting tube.and the retainer clip (Fig. 11) is
above the telescoping lever.
Fastening the mounting tube and the clamp on 330R with quick clamp accesso-
ry QC2 models
1. Insert the mounting tube on the ange of the base so that the retainer clip are at
the positionof the telescoping rod (Fig.12) and screw into place it with the enclosed
screw connections (bolts, washers, and nuts). Tighten the bolts with the two wren-
ches Fig 13 and 13.1).
2 Place the casing on the base so that the telescoping lever is guided through the
slot (Fig. 14)
Danger of injury and danger of property damage due to over-turning!
Use the correct reducing sleeves for the sunshade you are using to adapt the
2.3 Safety notices
4 Assembly of the sunshade stand
4.2 Assembly
14
7

3 Scope of delivery
Casing Base (pre-assembled) Weight segments
330R
Mounting tube Upper exible clamp Lower exible clamp
330R with quick clamp accessory QC2
Mounting tube Quick-release clamp Reducing sleeves
Telescoping rod Adhesive pads allen key
Screwing open end wrench
Equipment
Danger of injury. To protect yourself against injury, you must wear the following clothing
during assembly of the sunshade stand:
Sturdy shoes
Work gloves
In addition, you will need the following materials and tools
Allen key (included)
Soft blanket, etc. to place beneath parts during assembly
iBesides the tools included with the stand you will need no other tools for
assembly
Check conditions for assembly
Make sure that the assembly location fullls the following conditions. The assembly
location must be:
level,
suciently rm for bearing loads,
large enough for assembly of the stand
insensitive to scratches and impacts
Assembly
The sunshade stand must be assembled as follows:
1. Place the blanket, etc. on the ground to prevent damage to the
underlying surface a and the parts during assembly.
2. Fig. 2: 2-men handling
Setting down the weight segments and the base
Set down the weight segments and the base (with the rollers facing downward) on
the ground
3. Stick eight adhesive pads to the bottom (at side) of each weight segment as
shown in the gure (Fig. 3).
4.
Danger of pinching and danger of cuts/scrapes. Wear gloves and place the weight
segments carefully and one at a time on the bottom support plate (Fig. 4) of the
base. Push the weight segments all the way back so that they are held rmly in
position by the holding pins.
4 Assembly of the sunshade stand
4.2 Assembly
8
13

The sunshade stand is delivered in ve parts (Fig 1):
1 sunshade stand
4 weight segments
i Before unpacking, check all packing units for obvious damage from trans-
port. In case of obvious damage from transport, contact the dealer where you
purchased the sunshade stand.
Unpacking
Heavy weight, 2-men handling
1. Transport all packing units to the assembly location.
2. Carefully remove all parts and place them next to each other on the ground.
3. Check the scope of delivery according to the following table to make sure it is
complete. In case parts are missing, contact the dealer where you purchased the
sunshade stand.
4. Dispose of unneeded packaging material in an eco-friendly manner (Chapter 8
“Disposal”).
Figure 17 Figure18 Figure 19
Figure 20 Figure 21
Bild/Picture 22 Bild/Picture 23
4. Assembly of the sunshade stand
4.1 Figures to the assembly instructions
3 Scope of delivery
3.1 Unpacking the sunshade stand
12
9

Figure 1 Scope of delivery
5 cartons
Figure 2 Figure 3
top site bottom site
Figure 4 Figure 5 Figure 6
Figure 7 Figure 8
330R
Figure 8.1
330R
4. Assembly of the sunshade stand
4.1 Figures to the assembly instructions
Figure 9
330R
Figure 10
330R
Figure 11
330R
Figure 12
330R QC2 version
Figure 13
330R QC2 version
Figure 13.1
330R QC2 version
Figure 14
330R QC2 version
Figure 15
330R QC2 version
Figure 16
330R QC2 version
4. Assembly of the sunshade stand
4.1 Figures to the assembly instructions
10
11
This manual suits for next models
1
Table of contents
Other Oasis Patio Furniture manuals