Oce OP1016 User manual

1.1.1.
Océ OP1016/1020/1025
Network Fax
Operations Guide
Education Services
Océ
Operations Guide
Englishversion

i
About this On-Line Manual
This On-Line Manual explains the setting procedures required in order to use the Network FAX functions when the Scanner
Kit and Fax Kit are installed in your machine. It is recommended that you also read the corresponding Operation Guide as
well.
This manual is prepared as a PDF (Portable Document Format) file, so Adobe Acrobat Reader version 5.01 or later must be
installed on your computer if you want to read the manual without the provided CD-ROM. If you do not already have the
appropriate Adobe Acrobat Reader software, it is recommended that you install it from the CD-ROM.
IMPORTANT!
The use of Adobe Acrobat Reader implies agreement to the terms of use as stipulated by Adobe Systems Incorporated.
Trademark Information
• Microsoft, Windows, Windows NT and Internet Explorer are registered trademarks of Microsoft Corporation of the United
States and other countries.
• Windows Me, Windows Server and Windows XP are trademarks of Microsoft Corporation.
• Ethernet is a registered trademark of Xerox Corporation.
• IBM and IBM PC-AT are trademarks of International Business Machines Corporation.
• Adobe and Acrobat are registered trademarks of Adobe Systems Incorporated.
All other company and product names contained in this On-Line Manual are trademarks or registered trademarks of their
respective companies. The designations ™ and ® will not be used in this manual.
Operating Environment
The Network FAX functions are compatible for use under the following operating environments:
• Hardware ... IBM PC-AT compatible computer
• Interface ... 10BASE-T or 100BASE-TX
• Operating system ... Windows NT 4.0 (Server, Workstation) + SP5 or later,
Windows 2000 (Professional, Server, Advanced Server),
Windows 98 (Second Edition), Windows 95 (OSR2 or later),
Windows Me and Windows XP
The screen shots used in this On-Line Manual are compiled from Windows XP. The actual displays on your computer may
differ depending upon your particular operating system.

ii
Included Utilities
The following utilities are contained on the provided CD-ROM. In order to use the related Network FAX functions, it is
necessary to follow the appropriate procedure and install the corresponding utility on your computer.
Network FAX Driver
This software allows you to send documents created on your computer to the Scanner Kit in this machine, which converts
them to the appropriate format, transfers them to Fax Kit which then transmits them to the other fax machine. The Network
FAX Driver must be installed on the computer from which you want to send the documents.
Address Book for Network FAX
This utility is the address book that needs to be installed on the computer from which you want to send documents. The
Address Book for Network FAX allows you to create and use your own personal fax destination list for sending documents
directly from your computer. It is also possible to import CSV-formatted address data that has been created with other
applications.
Scanner File Utility
Documents sent from the other fax machine can be received by the Fax Kit in this machine and, once the Scanner Kit is
installed, the received documents will be converted to an image file and can be sent to and saved in a folder that is
designated in the Scanner File Utility. Because the Scanner File Utility must be running in order to receive the incoming
data, it is recommended that you install it on a computer that is generally up and running on the network (referred to as the
“Server Computer” in this manual).
You can select the type of installation to be performed based upon whether you are using Windows 2000, Windows Server
2003 or Windows XP, as well as whether you are using the Scanner File Utility on an individual basis or it is being shared.
(See page 1-7.)
Address Editor for FAX
This utility is an editor that uses your computer to register and change the self-station and dialing information which is stored
in the fax machine itself. The Address Editor for FAX allows you to easily and conveniently register the information that will
be used by the fax machine directly from your computer.
The Address Editor for FAX utility is compatible with the KM-1650, KM-2050, KM-3035, KM-4035 and KM-5035.

iii
Outline of the Network FAX Functions
The Network FAX functions allow you to send and receive fax documents between computers on your LAN network and the
other fax machines. In addition, if you use the Address Book, you can register individual destinations, or multiple destinations
as an individual group, in advance.
●Transmission function
1. Documents are sent as image data from a network computer over the LAN network to this fax machine.
2. Those documents are sent over the telephone line as a
fax transmission from this fax machine to the other fax
machine.
●Reception function
1. Documents are sent over the telephone line as a fax transmission from the other fax machine to this fax machine where
they are converted into PDF or TIFF file data.
2. That data is sent from this fax machine over the LAN network to the Server Computer.
3. The file is saved on the Server Computer.

iv
●Address Book
1. Information for individual destinations (or a group of destinations) is registered in the Address Book software on the
computer from which you want to send documents.
2. The destination for sending documents using the Network FAX function is selected from this Address Book.
3. The documents are then sent as image data from a network computer over the LAN network to this fax machine.
4. Those documents are sent over the telephone line as a fax transmission from this fax machine to the other fax machine
based on the selected destination information. If multiple destinations are registered as a group, the documents will be
broadcast to all of those destinations.
Outline of the Network FAX Functions

v
●Address Editor for FAX
1. Use your computer to read and edit the self-station and/or dialing information of the fax machine itself, and then register
the revised data back into the fax machine.
2. Import CSV-formatted address data or FDT-formatted address books that have been created with another application
and register it in the fax machine.
3. Save registered dialing information as FED-formatted data (the data format for Address Editor for FAX).
Outline of the Network FAX Functions

vi
About this On-Line Manual ................................................................................... i
Trademark Information ......................................................................................... i
Operating Environment ........................................................................................ i
Included Utilities .................................................................................................. ii
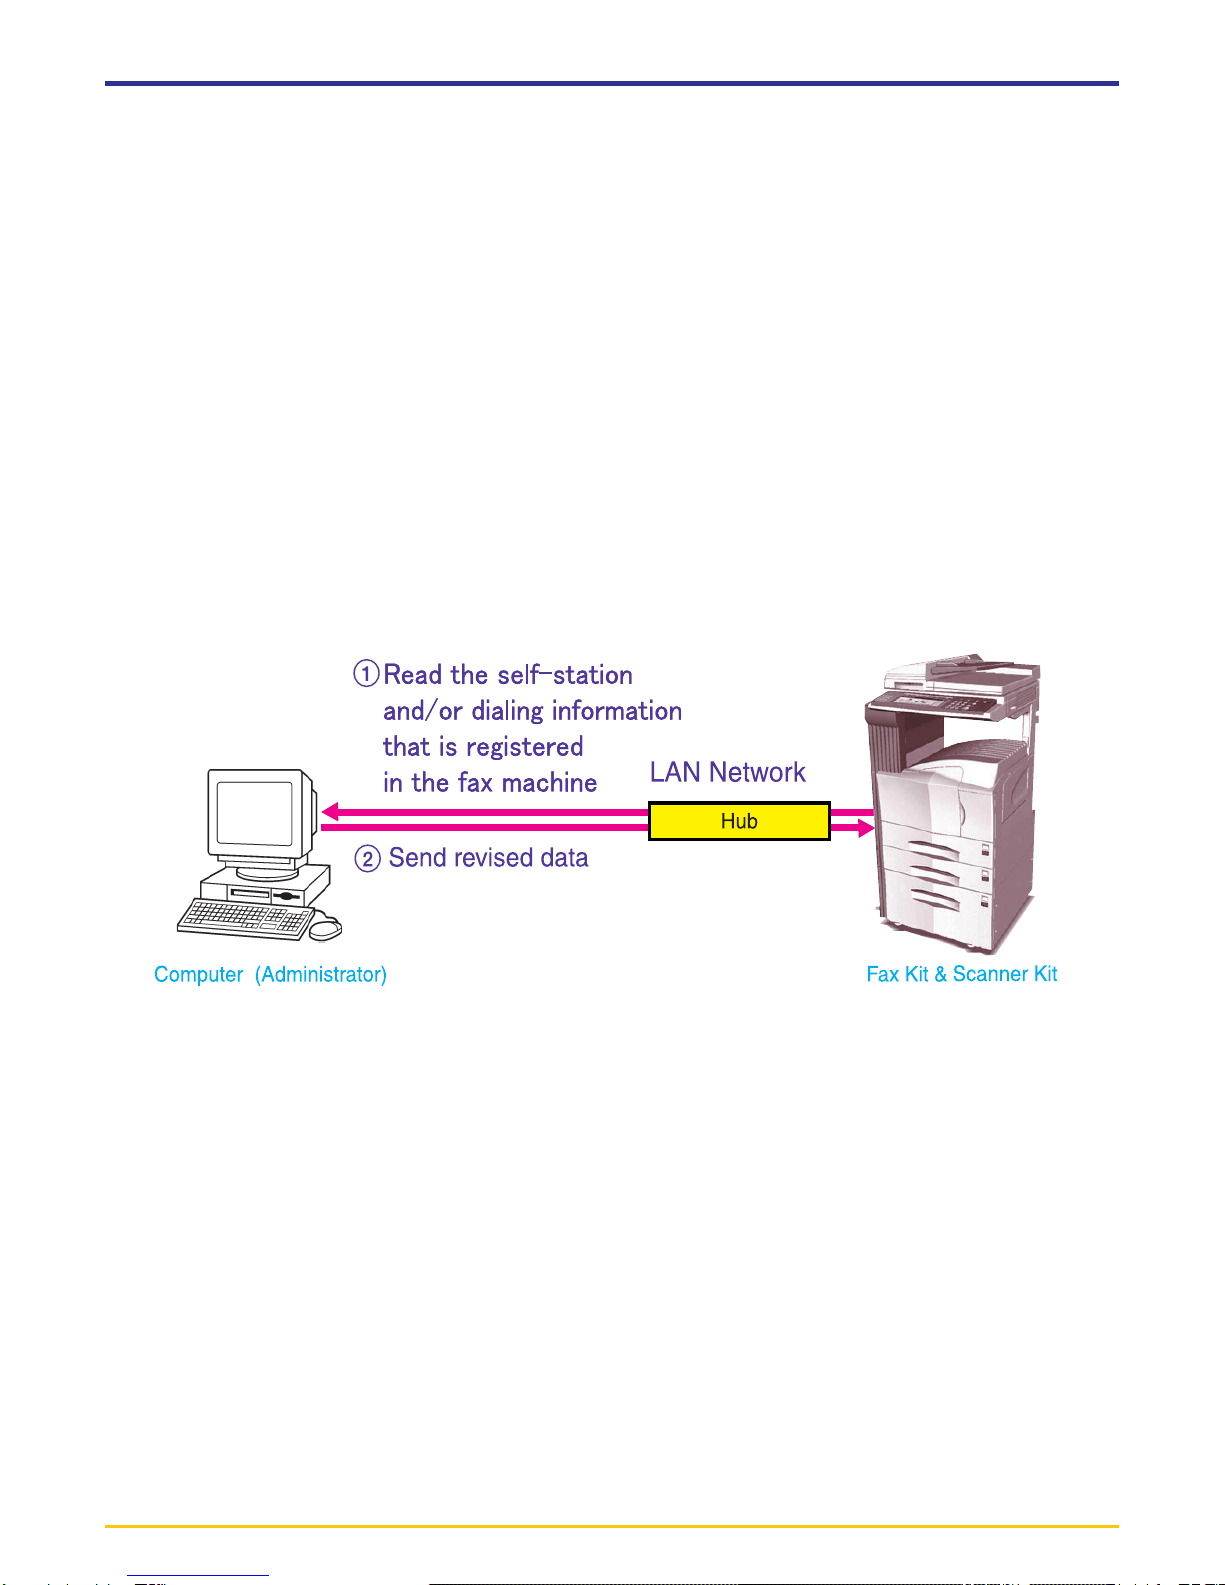
Outline of the Network FAX Functions ............................................................... iii
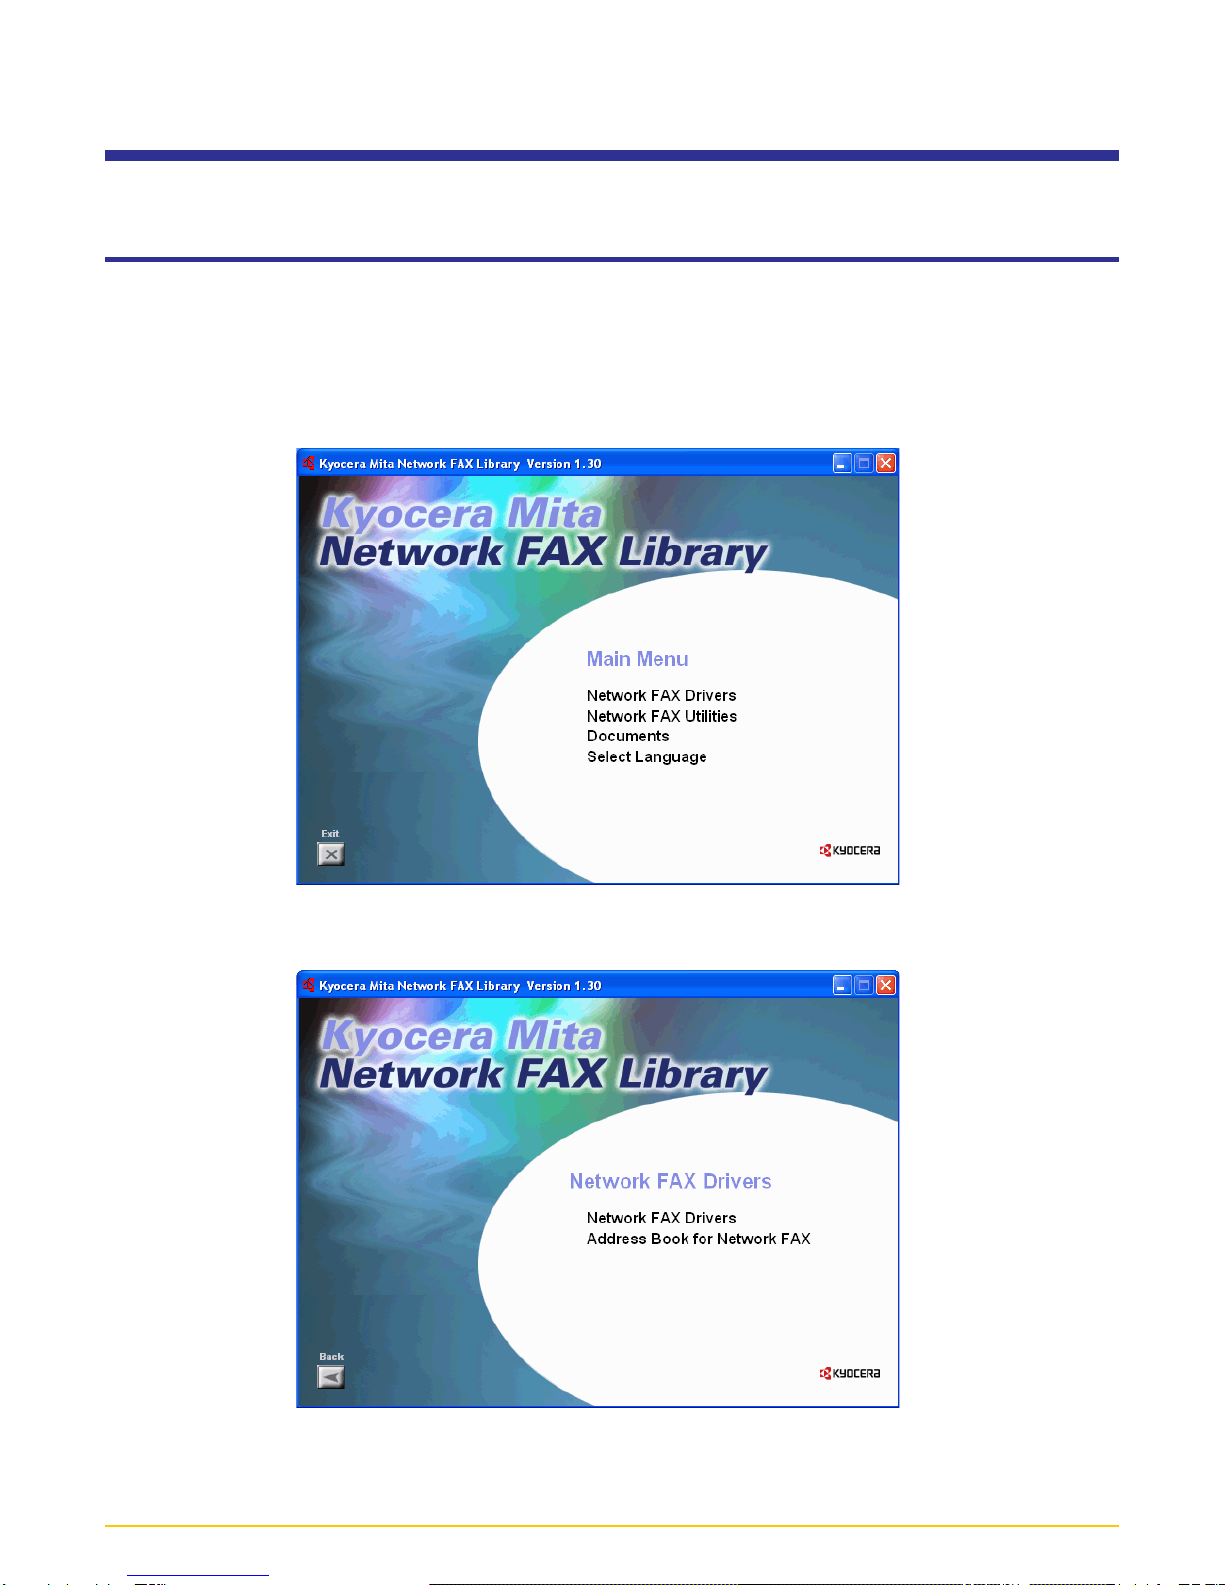
Section 1 Installing the Corresponding Software .. Page 1-1
1-1 Installing the Network FAX Driver ................................................... Page 1-1
●Registering the Machine’s IP address ................................................................................... 1-2
●Uninstalling the Network FAX Driver ..................................................................................... 1-4
1-2 Installing the Address Book for Network FAX.................................. Page 1-5
1-3 Installing the Scanner File Utility ..................................................... Page 1-6
1-4 Installing the Address Editor for FAX............................................... Page 1-8
Section 2 Sending a Fax ........................................... Page 2-1
2-1 Main Transmission Functions.......................................................... Page 2-1
(1) Delayed Transmission ......................................................................................................... 2-1
(2) F-Code Based Communication ........................................................................................... 2-2
(3) Concurrent Print .................................................................................................................. 2-2
(4) Save Transmitted Original ................................................................................................... 2-2
(5) Attaching a Cover Page ....................................................................................................... 2-3
(6) Restricted Access ................................................................................................................ 2-3
2-2 Basic Transmission ......................................................................... Page 2-4
2-3 FAX Setting Tab .............................................................................. Page 2-6
2-4 Default Setting Dialogue Box .......................................................... Page 2-7
(1) Sending Options Tab ........................................................................................................... 2-7
(2) Sender Information Tab ....................................................................................................... 2-9
(3) Machine Setting Tab .......................................................................................................... 2-10
(4) Restricted access Tab ....................................................................................................... 2-11
2-5 Various Settings in the TX Setting Dialogue Box .......................... Page 2-12
(1) Selecting a Destination from the Address Book ................................................................ 2-12
(2) F-Code Based Communication ......................................................................................... 2-15
(3) Registering the Destination Information to be Added to the Cover Page .......................... 2-16
(4) Optional Settings ............................................................................................................... 2-18
(5) Transmitting Terminal Information Data ............................................................................. 2-19
(6) Machine Settings ............................................................................................................... 2-20
2-6 Transmission Control .................................................................... Page 2-21
Contents

vii
Section 3 Receiving a Fax ........................................ Page 3-1
3-1 Summary of Delivery Settings......................................................... Page 3-2
3-2 Starting the Scanner File Utility....................................................... Page 3-4
3-3 Setup Dialogue Box ........................................................................ Page 3-5
3-4 Folder Setting Dialogue Box ........................................................... Page 3-6
3-5 Delivery Setting List Dialogue Box .................................................. Page 3-7
3-6 Delivery Setting Dialogue Box....................................................... Page 3-10
3-7 Determining the Destination Folder .............................................. Page 3-13
3-8 When a notice of fax reception is sent .......................................... Page 3-13
3-9 Checking a Reception Notification Error ....................................... Page 3-14
3-10 Opening Received Faxes............................................................ Page 3-15
3-11 Deleting Received Faxes ............................................................ Page 3-16
Section 4 The Address Book .................................... Page 4-1
4-1 Registering Destination Information ................................................ Page 4-2
4-2 Registering Multiple Destinations as a Group ................................. Page 4-4
4-3 Address/Group Copy ....................................................................... Page 4-6
4-4 Editing Individual and Group Destination Information ..................... Page 4-7
(1) Editing Information for an Individual or Group Destination .................................................. 4-7
(2) Editing Information for More than One Individual or Group Destinations ............................ 4-8
(3) Search/Replace the Contents of a Particular Entry Item .................................................... 4-9
4-5 Deleting Individual and Group Destination Information................. Page 4-10
4-6 Importing Address Data................................................................. Page 4-10
(1) Importing FDT Files ........................................................................................................... 4-10
(2) Importing CSV Files ........................................................................................................... 4-11
4-7 Exporting Address Data ................................................................ Page 4-13
Contents

viii
Contents
Section 5 Address Editor for FAX ............................ Page 5-1
5-1 Registering Self-Station Information ............................................... Page 5-2
5-2 Setting the Network FAX functions.................................................. Page 5-8
5-3 Registering Dialing Information ....................................................... Page 5-9
(1) Registering one-touch dial information ................................................................................ 5-9
(2) Registering chain dial information ..................................................................................... 5-12
(3) Registering group dial information .................................................................................... 5-14
(4) Registering program dial information ................................................................................ 5-18
(5) Editing registered dialing information ............................................................................... 5-22
(6) Deleting dialing information .............................................................................................. 5-28
(7) Registering abbreviated dialing information ..................................................................... 5-29
5-4 Registering Box Information.......................................................... Page 5-30
(1) F-Code Based Confidential box......................................................................................... 5-30
(2) Encryption box ................................................................................................................... 5-31
(3) F-Code Based Relay box ................................................................................................. 5-33
(4) Deleting registered boxes ................................................................................................. 5-36
5-5 Importing Data............................................................................... Page 5-37
5-6 Saving Data as an FED-formatted File ......................................... Page 5-41
Section 6 Specifications ........................................... Page 6-1

Page 1-1
Section 1
Installing the Corresponding Software
1-1 Installing the Network FAX Driver
1. Insert the provided CD-ROM into the CD-ROM drive of the computer in which you want to install the Network FAX Driver.
The set-up screen will appear automatically.
* If the set-up screen does not appear, start the appropriate software manually from the CD-ROM.
2. Read the conditions of use and then click the Pbutton.
3. Click on Network FAX Drivers in the main menu.
4. Click once again on Network FAX Drivers.
5. Follow the instructions in the installation wizard to continue the installation procedure.

Page 1-2
2. Right-click on the name of the machine that you want to use as the Network FAX and select Printing Preferences... from
the resulting dropdown menu. The Printing Preferences dialogue box will appear.
* To open the Properties dialogue box under Windows 98 and so on, click on Start in the Windows Task Bar and then
select Settings and Printers. Right-click on the name of machine that you want to use as the Network FAX and select
Properties from the dropdown menu. Click on the FAX Setting tab in order to display its contents.
1-1 Installing the Network FAX Driver
●Registering the Machine’s IP address
Once you have installed the Network FAX Driver, perform the following procedure to register the IP address of the
machine that you want to use as the Network FAX.
* The following procedure is explained as though it is being carried out in Windows XP. If you are using another
operating System, use this procedure simply as reference.
1. Click on Start in the Task Bar and then select Control Panel, Printer and other Hardware and then Printers and
Faxes in that order from the successive menus in order to access the Printers and Faxes dialogue box.
(This screen-shot is for when the KM-5035 is installed.)

Page 1-3
3. Click on the FAX TX Setting... button in order to access the Default Setting dialogue box.
4. Click on the Machine Setting tab in order to display its contents.
5. In the Network FAX Address area, enter the IP address, or host name, of the machine that you want to use as the
Network FAX.
NOTE: The IP address/host name that you enter here must be the same as that registered in the scanner default settings
of the machine itself. (Refer to "2. Set-up" in the Operation Guide for your Network Scanner.)
1-1 Installing the Network FAX Driver
6. Click on the OK button.
Sample screen-shot of the
scanner default setting window

Page 1-4
1-1 Installing the Network FAX Driver
●Uninstalling the Network FAX Driver
Perform the following procedure when you want to delete the Network FAX Driver from your computer.
1. Click on Start in the Task Bar and then select Control Panel, Printers and Other Hardware and then Printers and
Faxes in that order from the successive menus in order to access the Printers and Faxes dialogue box.
2. Right-click on the name for this printer (normally: Kyocera Mita KM-XXXX NW-FAX), and then select Delete in the
resulting menu.
3. Click on Yes when the confirmation dialogue box appears and the driver will be deleted.

Page 1-5
1-2 Installing the Address Book for Network FAX
1. Insert the provided CD-ROM into the CD-ROM drive of the computer in which you want to install the Address Book for
Network FAX. The set-up screen will appear automatically.
* If the set-up screen does not appear, start the appropriate software manually from the CD-ROM.
2. Accept the conditions of use and then click the Pbutton.
3. Click on Network FAX Drivers in the main menu.
4. Click on Address Book for Network FAX.
5. Follow the instructions in the installation wizard to continue the installation procedure.

Page 1-6
1-3 Installing the Scanner File Utility
1. Insert the provided CD-ROM into the CD-ROM drive of the computer in which you want to install the Scanner File Utility.
The set-up screen will appear automatically.
* If the set-up screen does not appear, start the appropriate software manually from the CD-ROM.
2. Accept the conditions of use and then click the Pbutton.
3. Click on Network FAX Utilities in the main menu.
4. Click on Scanner File Utility.

Page 1-7
5. Follow the instructions in the installation wizard to continue the installation procedure.
* If you are using Windows 2000, Windows Server 2003 or Windows XP operating systems, the Setup Type selection window will be
displayed. Select one of the following setup types and then proceed to the next step.
Install a service mode ....... Select this type of setup in order to share the Scanner File Utility on a File Server, etc. (In this case, the
Scanner File Utility will be usable even when you are logged off of your computer.) (Refer to page 3-4.)
Install a desktop mode ...... Select this type of setup in order to use the Scanner File Utility independently from others. (In this case,
the Scanner File Utility will be usable once you are logged on to your computer.)
* Once the Scanner File Utility has been installed, you can change the type of setup from the desktop mode to the service mode by
selecting “Repair”in the Windows “Add/Remove Programs”control panel.
* If the Select Components screen appears, click on the box next to KM-Network FAX Receive Handler in order to put a check mark
in that box. The content of the other checkboxes is as follows:
•PDF Keyword Embedder ... The KM-DB Assist option (Adds file information as keywords to scanned image data files)
•DataBase Link Handler (Sample) ... The Database Assist option (Creates a csv file that includes the registered file information to go
with the scanned image data file)
1-3 Installing the Scanner File Utility

Page 1-8
1-4 Installing the Address Editor for FAX
1. Insert the provided CD-ROM into the CD-ROM drive of the computer in which you want to install the Address Editor for
FAX. The set-up screen will appear automatically.
* If the set-up screen does not appear, start the appropriate software manually from the CD-ROM.
2. Accept the conditions of use and then click the Pbutton.
3. Click on Network FAX Utilities in the main menu.
4. Click on Address Editor for FAX.
5. Follow the instructions in the installation wizard to continue the installation procedure.

Page 2-1
Section 2 Sending a Fax
This section contains explanations on how to use the Network FAX Driver to send documents created on a network computer
directly from that computer to the other fax machine.
IMPORTANT!
The Network FAX Driver must be installed on the computer from which you want to send the documents. Refer to “1-1
Installing the Network FAX Driver”on page 1-1 for the procedure to install that software.
2-1 Main Transmission Functions
(1) Delayed Transmission <see page 2-7 for setting procedures>
This function enables you to have documents transmitted at a designated time. Delayed transmission can be carried out at
any time within 24 hours from the time that is actually set in the fax itself.

Page 2-2
Memory
of the other Fax Machine
(2) F-Code Based Communication <see page 2-15 for setting procedures>
(3) Concurrent print <see page 2-7 for setting procedures>
This function enables you to send documents to an F-Code Box that is registered in a destination fax machine. Because
F-Code Boxes include a sub-address and password, highly confidential communication is ensured. It will be necessary
for you to enter the corresponding sub-address and password of the destination F-Code Box (if they have been
designated for that box) whenever you perform an F-Code Based Transmission procedure.
* For more information on F-Code based
communication, refer to the Operation
Guide for the Fax Kit.
This function enables you to print out the documents at the same time as you send them by fax.
(4) Save Transmitted Original <see page 2-7 for setting procedures>
This function enables you to save transmitted documents in the folder that corresponds to the folder number which was
registered under the “Network FAX Registration”settings in the fax machine . Those documents will be saved as a PDF or
TIFF file according to the default “File Type Setting”in the fax
machine itself.
* For more information on registering folder numbers
and on file formats, refer to the Operation Guide
for the Fax Kit.
2-1 Main Transmission Functions

Page 2-3
(5) Attaching a Cover Page <see page 2-7 for setting procedures>
This function enables you to add a cover page to your transmission that includes such TTI (Transmitting Terminal Information)
data as your company name, department name, your own name, your telephone or fax number, in addition to whatever
comment you’d like to send. The type of cover page you use can be selected from among several different templates.
(6) Restricted Access <see page 2-11 for setting procedures>
When Restricted Access is turned ON
in the copy (or fax) machine itself, this
function enables you to control Network
FAX Transmissions under Restricted
Access as well, only allowing
transmission when a viable access
code that is registered in the copy (or
fax) machine is entered.
* For more information on Restricted
Access, refer to the Operation Guide
for the Fax Kit.
2-1 Main Transmission Functions
Other manuals for OP1016
1
This manual suits for next models
2
Table of contents
Other Oce Fax Machine manuals