Odys 68006 User manual

ODYS Slim TV 68006
1
EN
Table of contents
1Safety instructions.................................................................................. 2
2Product properties.................................................................................. 6
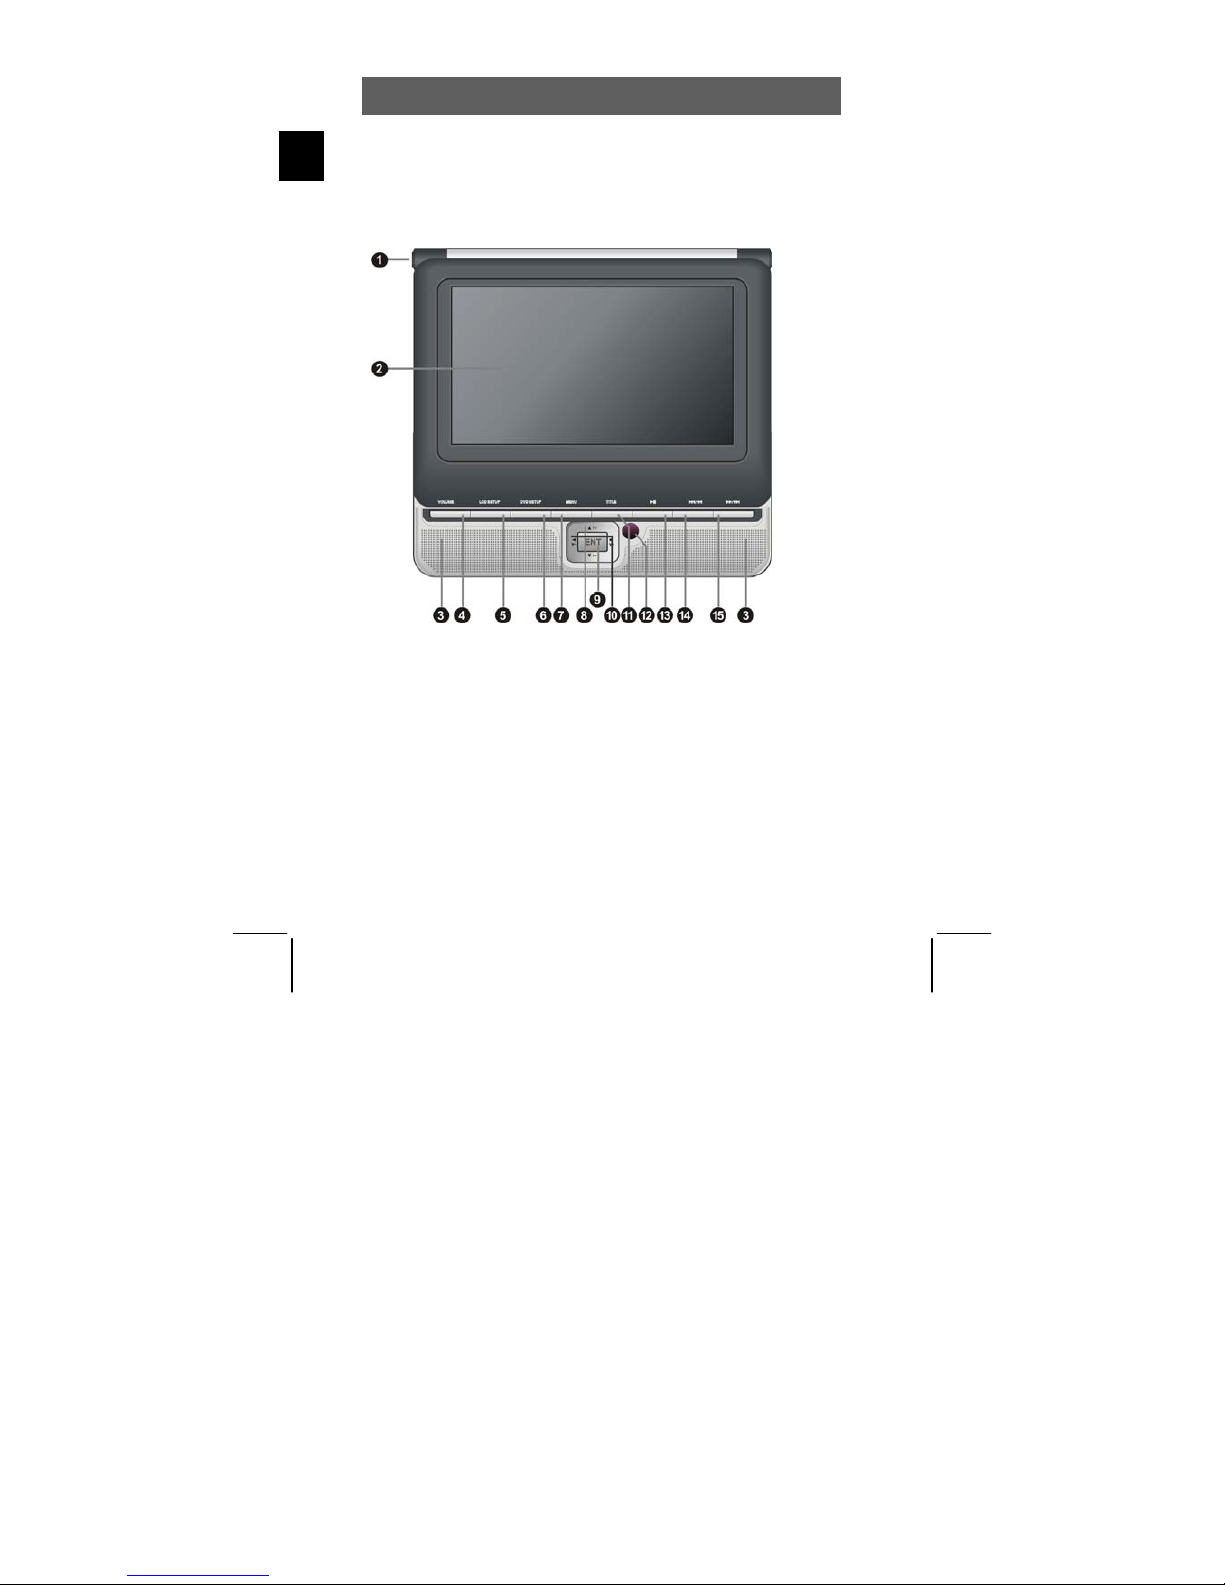
3Controls.................................................................................................. 8
3.1 SlimTV .....................................................................................................8
3.2 Using USB memory and SD cards ............................................................12
3.3 Buttons of the Remote Control ...............................................................13
4Connecting ........................................................................................... 17
4.1 Connecting to a television set.................................................................17
4.2 Connecting to an amplifier......................................................................17
4.3 Connecting headphones.........................................................................18
4.4 Connecting to an external A/V source .................................................... 18
4.5 Connecting to DVB-T Antenna ............................................................... 19
4.6 Power supply unit ................................................................................... 19
4.7 Car adapter ............................................................................................20
5Rechargeable battery pack .................................................................. 21
5.1 Notes on using rechargeable batteries ...................................................21
5.2 Connecting the rechargeable battery pack .............................................22
5.3 Charging the battery pack ......................................................................22
5.4 Removing the rechargeable battery pack ............................................... 23
5.5 Connecting the DVB-T module...............................................................23
5.6 Removing the DVB-T module.................................................................24
6Disc information ................................................................................... 25
6.1 Compatible disc formats.........................................................................25
6.2 Using discs.............................................................................................26
7Playback operation............................................................................... 27
7.1 Getting started........................................................................................ 27
7.2 DVD playback ........................................................................................29
7.3 CD playback (Audio, MP3, VCD, SVCD) ................................................ 31
7.4 Picture CD playback (JPEG) ..................................................................33
7.5 DivX playback ........................................................................................36
8System settings DVD/DVB-T................................................................. 39
8.1 General Setup ........................................................................................40
8.2 Speaker Setup (Audio) ...........................................................................42
8.3 Digital Setup...........................................................................................43
8.4 Preference Setup ...................................................................................44
8.5 Password Setup ..................................................................................... 47
8.6 DVB-T Setup ..........................................................................................48
9System settings LCD/TV ...................................................................... 53
10 Glossary............................................................................................... 55
11 Troubleshooting ................................................................................... 56
12 Specifications ....................................................................................... 58
Warranty condition ......................................................................................59

ODYS Slim TV 68006
2
EN
1 Safety instructions
Thank you for choosing our product. Please read this manual carefully and
observe all safety and operating instructions. Store the manual in a safe
place for later reference.
The flash symbol displayed in a triangle warns the user of
dangerous electrical voltages inside the device that could lead to
electrical shocks with harmful effects to health if the device is used
incorrectly.
or
The exclamation point displayed in a triangle in the
documentation indicates dangers when using and
maintaining the device.
The information symbol in the documentation indicates useful
information and tips for using and maintaining the device.
Caution
IMPORTANT FOR LASER PRODUCTS
1. NOTE: The device is a class 1 laser product. The
corresponding label is located on the rear side of the
device.
2. DANGER: Visible laser radiation when open and
interlock failed or defeated. Avoid direct exposure to
beam.
3. CAUTION: Do not open the top cover. There are no
user serviceable parts inside the unit. Leave all servicing
to qualified service personnel.
CAUTION: USE OF ANY CONTROLS, ADJUSTMENTS, OR PROCEDURES OTHER
THAN THOSE SPECIFIED HEREIN MAY RESULT IN HAZARDOUS RADIATION
EXPOSURE.

ODYS Slim TV 68006
3
EN
Caution
This product contains a low-power laser device. In order to guarantee
the safety of the laser device, do not remove any covers, and do not
attempt to repair the unit yourself. Contact your dealer or a service
shop, if repair work is required.
In order to prevent electric shock, do not remove any covers or housing
parts. There are no internal customer-serviceable parts. Only allow qualified
service personnel to perform work on the device. Unplug the product
from the wall outlet before servicing or when it is unused for a long
period of time.
The manufacturer is not liable for damages that were caused by
replacing and changing components without the consent of the
manufacturer or an authorised service representative..
Danger of battery explosion if incorrectly inserted. Only use an
equivalent battery type.
Power supply
Connect the power supply cable to the DC 9.5V IN jack on the
right side of the device. Connect the power plug to an earthed
socket AC 100-240 V. If you have problems when plugging the
mains plug into the socket, rotate the plug by 180° and plug it in
again.
Environment protection notes
At the end of its service life, this product must not be
disposed of in normal household waste, but must be
brought to a collection point that recycles electrical and
electronic devices. The symbol on the product, in the
instruction manual or on the packaging indicates this.
Please consult your sales person or local authority about
the relevant disposal facility.
Warning
The apparatus shall not be exposed to dripping or splashing and
that no objects filled with liquids, such as vases, shall be placed
on the apparatus.
Do not touch the color TFT LCD screen by hand directly.

ODYS Slim TV 68006
4
EN
Safety instructions
1. Read these instructions.
2. Keep these instructions.
3. Heed all warnings.
4. Follow all instructions.
5. Do not use this apparatus near water.
6. Clean only with dry cloth.
7. Do not block any ventilation openings. Maintain well ventilated
conditions around the product. Do not put product on bed, sofa or
anything that blocks ventilation. Install according to the manufacturer’s
instructions.
8. Do not install near any heat sources such as radiators, heat registers,
stoves, or other apparatus (including amplifiers) that produce heat.
9. Read, heed and follow all instructions to ensure correct and safe
installation and interconnection of the apparatus.
10. The apparatus shall not be exposed to dripping or splashing and that no
objects filled with liquids, such as vases, shall be placed on the
apparatus.
11. The mains socket-outlet shall be installed near the apparatus and the
mains plug shall remain readily operable.
12. Protect the power cord from being walked on or pinched particularly at
plugs, convenience receptacles, and the point where they exit from the
apparatus.
13. Only use attachments/accessories specified by the manufacturer.
14. Use only with the cart, stand, tripod, bracket, or table specified by the
manufacturer, or sold with the apparatus. When a cart is used, use
caution when moving the cart/apparatus combination to avoid injury
from tip-over.
15. Unplug the apparatus during lightning storms or when unused for long
periods of time.
16. Refer all servicing to qualified service personnel. Servicing is required
when the apparatus has been damaged in any way, such as power-
supply cord or plug is damaged, liquid has been spilled or objects have
fallen into the apparatus, the apparatus has been exposed to rain or
moisture, does not operate normally, or has been dropped.
17. The apparatus shall be connected to a mains socket outlet with a
protective earthing connection.

ODYS Slim TV 68006
5
EN
Note
DVD players and discs are coded by region. Your DVD player will
only play back discs whose region code matches that of the player.
The region code of your DVD player is 2.
Note on copyrights
This device is equipped with technology for the protection of
copyrights that is protected by patents in the United States of
America and by other laws regarding the protection of intellectual
property. Use of this copyright protection technology must be
approved by Macrovision. This approval is granted exclusively for
personal use and other limited visual presentations, unless
Macrovision has expressly permitted a more extensive use. Reverse
engineering and disassembly are forbidden.

ODYS Slim TV 68006
6
EN
2 Product properties
•Excellent sound quality:
Dolby Digital technology ensures outstanding sound.
•High resolution:
More than 500 lines of horizontal resolution with MPEG-2
•AV In: Input for external audio and video signals. Can be connected
to a variety of external AV sources.
AV Out: Analogue audio/video output
•Playable formats: DVD, VCD, SVCD, MVCD, Audio-CD, MP3, WMA,
JPEG, Kodak Picture CD and DivX
•High resolution 7" LCD colour screen
•Switchable power supply unit:
Automatic adjustment to different voltages in different countries.
•On-screen menu in English, French, Spanish, German etc.
Special playback functions:
•Various playback speeds (fast forward, fast reverse, slow play,
Search By Time), supports several playback languages and repeat
functions. Multiple display formats and camera perspectives, zoom
in/zoom out, multilingual subtitles
•Remember the last playback position and resume playback when
turned on without opening the disc cover (Resume).
•Parental control: Blocking of certain scenes or entire discs.
Support
URL: http://www.odys.de
See our website for the latest information on this DVD player, on other
products by our company and on our company itself. If you have questions
or problems, please read the FAQs on our website or contact our customer

ODYS Slim TV 68006
7
EN
Contents of package
1 x SlimTV + carrying
bag
1 x rechargeable battery
pack 1 x DVB-T module
1 x remote control
1 x battery for remote
control 1 x USB cable
1 x operating manual 1 x power supply unit 1 x headphones
1 x audio/video cable 1 x car adapter 1 x DVB-T antenna
Note
Accessories and their corresponding part numbers are subject to
change without notice due to technological progress.

ODYS Slim TV 68006
8
EN
3 Controls
3.1 SlimTV
Front view and right view
1. POWER button (Press to switch on or off the device.)
2. TFT LCD screen (Presents high resolution picture.)
3. Loudspeaker
Two speakers output high quality stereo sound.
4. Volume button
Changes to volume setting, adjust by pressing V+/-.
5. LCD SETUP button
Accesses the system settings for the LCD display
6. DVD SETUP button
Accesses the setting for the DVD and DVB-T mode

ODYS Slim TV 68006
9
EN
7. MENU button
To display the disc menu
8. /, P+/P−button
/: To select menu objects.
P+/P−: Selects the channel, both forwards and backwards (DVB-T).
9. ENT button
For confirming selected menu items.
10. /, V+/−button
/: Press to select different elements or to increase or decrease the level
of brightness, contrast and colour.
V+/−: Press to set the volume.
11. TITLE button
To display the title menu of the disc (if present on the disc).
12. Sensor for remote control
Sensor that receives the signal from the remote control
13. PLAY/PAUSE button
Starts playback, activates the pause function or resume playback
14. /button
: press once: jump to the beginning of the current track or chapter of the
disc; press twice: jump to the beginning of the previous track or chapter of
the disc.
: Press and hold for several seconds to quickly seek backwards in DVD
mode.
15. /button
: Press and hold for several seconds to quickly seek forwards in DVD
mode.
: Press to go to next list/track/chapter in DVD mode.

ODYS Slim TV 68006
10
EN
16. Video In/Out jack
For connecting to an external monitor or video source (output/input).
17. Jack for audio input/output
For connecting an external amplifier / audio source (Output/Input).
18. Headphone jack
Headphones connection. When the headphones are inserted, the
loudspeakers are switched off.
19. Mini-USB jack
USB connection to USB mass storage/Sticks
20. SD/MMC/MS card slot
Used to insert the SD/MMC or MS card.
21. Power supply jack (9.5 V DC)
Power supply unit or car adapter connection
22. DVB-T module
23. DVB-T antenna jack
DVB-T antenna connection
24. Handle
Pull out the handle to carry the device or to use as a device support.
25. Rechargeable battery pack

ODYS Slim TV 68006
11
EN
Bottom view
1. Mounting terminal for DVB-T module
2. Connection for rechargeable battery
For connecting the rechargeable battery

ODYS Slim TV 68006
12
EN
3.2 Using USB memory and SD cards
1. Connect the device to the power supply.
2. Switch the device on.
3. Insert the USB memory stick into the USB port or insert the SD/MMC/MS card
into the SD card slot (see the images below).
4. Drücken Sie die SOURCE-Taste, um auf die gewünschte Wiedergabe-
Betriebsart (USB, SD) zuzugreifen.
•Prior to connecting the device, make sure that the USB memory stick or the
SD/MMC/MS card contains JPEG, MP3 or DivX files.
•Press the SOURCE button and select the USB or SD option using in the
menu. Then press, to access either USB or SD playback mode.
•Press the , to switch to the JPEG, MP3 or DivX playback option and
confirm using the ENT/OK button (see chap. 7.3 and 7.4).
•Press the buttons to select the folder and confirm your selection using the
ENT button.
•Press the buttons to select the desired file and start playback using
ENT/OK.
•Press to the STOP button to stop playback. Playback can now be continued
again from the beginning of the current file. Press the button to return to the
folder menu.
The USB jack cannot be used for connecting digital cameras or
other USB devices.

ODYS Slim TV 68006
13
EN
3.3 Buttons of the Remote Control
1. POWER
For switching the device on and off
2. INFO
Displays detailed information in DVD or DVB mode
3. MUTE
Press to turn on or off the audio output.
4. SOURCE
Calls the menu for selecting playback mode, Switches between the DVD,
USB, SD, AV and DVB-T functions.
5. AUDIO
Selects a different playback language of a DVD (if available on disc),
Switches between MONO L, MONO R, STEREO in DVB-T mode.
6. Numerical buttons (0 - 10)
To select the corresponding number for title, chapter, time etc.

ODYS Slim TV 68006
14
EN
7. SUBT
DVD mode: To select a language for subtitles (if available on disc) or turn off
the subtitles
DVB mode: Accesses various subtitles, if supported
8. A-B / PR-LIST
DVD mode: Enables you to repeat playback of the section between points A
and B. Press this button once to set point A. Press the button a second time
to set point B. Press this button during looped playback to exit the loop mode.
DVB mode: Switches to the program list, select by using the buttons
and confirm using OK
9. REP / LANG
DVD mode: To repeat a chapter, title or the entire disc
DVB mode: Switches the language
10. GOTO / SEARCH
DVD mode: Press to select the desired disc starting time, title or chapter
DVB mode: Activate Automatic channel search
- Switches to the search menu, then and ENT starts the search.
Select the "OK" button or cancel the process by pressing and ENT.
- Cancelling channel search: Press the SEARCH button again and select
"OK" using and ENT or continue channel search using and ENT
11. LCD SETUP (Accesses the LCD setup menu)
12. MENU / RETURN
DVD mode: Calls the menu of the DVD currently inserted
DVB mode: Access the channel viewed last
13. OK (For confirming your selection)
14. Direction buttons , CH+/CH−, +/−
: Selects the menu entries
CH+/CH−: Selects channel, both forwards and backwards (DVB)
+/−: Press to set the volume.
15. DVD SETUP (Accesses the DVD setup menu)
16. Volume (Lautstärke)
Changes to volume setting, adjust by pressing V+/-.
17. PLAY/PAUSE, TV/R
DVD mode: Starts playback or activates Pause
DVB mode: Switch function between TV and radio
18. STOP / EPG
DVD mode: Press once: Stops playback (press PLAY to continue playback
at this point); press twice: stops playback completely
DVB mode: Calls the menu of the EPG (Electronic Program Guide)

ODYS Slim TV 68006
15
EN
- Select channel or program option using the buttons
a) Channel: Selection of the channel whose EPG information you wish to
display; Select option using and confirm by pressing OK
b) Programm: Listing of the upcoming programmes of the current channel
and adding them to a reservation list
- Select reserve program using ; four small fields appear on the bottom
of the screen in red, green, yellow and blue;
- Display program information using ; exit menu by pressing the OK button;
- Display items from the previous day using and select option using ;
call a field by pressing the OK button. Select "OK" using and reserve
program by pressing the OK button or select "Cancel" using and cancel
process by pressing the OK button
- Display items from the next day using and select option using ; call a
field by pressing the OK button. Select "OK" using and reserve program by
pressing the OK button or select "Cancel" using and cancel process by
pressing the OK button
- Display detailed information using and exit menu by pressing the OK
button. Note: Call EPG again for each new reserved programme.
19. TITLE / FAV
DVD mode: Press to go to title menu if the disc contains.
DVB mode: Press to select the favorite channel.
20. SLOW / TTX
DVD mode: Activate slow playback
DVB mode: Displays the teletext. Use or the number keys to select the
desired page.
21. DVD mode: Activate fast reverse playback
22. DVD mode: Activate fast forward playback
23. Skips the track or chapter forward in DVD mode
24. press once: jump to the beginning of the current track/chapter of the disc
press twice: jump to the beginning of the previous track/chapter of the disc
25. PP
Calls the PP mode: Selection of personal basic settings for picture and sound
(Bright, Personal, Soft and Standard)
26. 16:9 / 4:3
Selects the screen format (switches between 16:9 and 4:3)
27. ZOOM
DVD mode: Access the zoom function
28. ANGLE / GUIDE
DVD mode: Access different camera angles in DVD mode (if available on disc)
DVB mode: Calls the channel list menu, select by using the buttons and
confirm using OK

ODYS Slim TV 68006
16
EN
Preparation of the Remote Control
Place the remote control on an even surface and insert the supplied button
cell into the remote control as follows.
1Refer to the drawing and remove the empty
battery receptacle.
2Insert the battery into the receptacle. Make
sure the polarity matches the marks inside the
component.
3Insert the receptacle into the remote control.
Using Of Remote Control
•Point the remote control towards the main unit when operating. The
remote control works best at a distance less than 5 m and at an angle of
up to 60° to the front of the unit. No obstacles may stand in the way
between remote control and infrared sensor and do not place the remote
control in direct sunlight.
•Under normal use the battery will last for six months.
•If the remote control unit fails to work even when it is operated near the
player, replace the battery.
Notes on batteries
If the remote control is not used for a long period of time, please
remove the battery from the compartment.
Do not heat batteries or dispose of them in fires.
Do not dismantle, deform or modify batteries.

ODYS Slim TV 68006
17
EN
4 Connecting
•The DVD player, the television set and any other electric devices to be
connected to the DVD player must be switched off and disconnected from
the mains.
•Observe the colour coding when connecting audio and video cables.
4.1 Connecting to a television set
Audio/video connectors
Using the audio/video cables,
connect the DVD player to the
A/V inputs of the television set as
shown in the illustration.
4.2 Connecting to an amplifier
Prior to connecting the
DVD player to an
external audio device,
read the operating
instructions for the
respective device.
Connect the DVD
player to the A/V
amplifier as shown in
the illustration.

ODYS Slim TV 68006
18
EN
4.3 Connecting headphones
Connect the headphones to the
headphone jack on the right
side of the device. The loud-
speakers are automatically
deactivated.
Caution
Excessively high volume can damage your hearing. Turn the volume
down before connecting the headphones and then turn the volume
up to a moderate level.
4.4 Connecting to an external A/V source
Using the audio/video cables,
connect the DVD player to
the A/V signal source (for
example, DVD or video
recorder) as shown in the
illustration. Press the
SOURCE button and select
the AV option using in
the menu. Then press to
access AV playback mode.
Note
When external audio signals are received during DVD playback,
this can lead to disturbing noise in the loudspeakers. If this is the
case, disconnect the audio cable.

ODYS Slim TV 68006
19
EN
4.5 Connecting to DVB-T Antenna
Plug the DVB-T antenna
into the DVB-T jack on the
DVB-T module to receive
TV signal.
4.6 Power supply unit
The DVD player is delivered with a power supply unit. It provides power to
the device and charges the battery.
Connect the power supply cable to the DC 9.5V IN jack on the right side of
the device as shown below. Connect the power plug to an earthed socket.
Note
Turn off the DVD player before you unplug the mains cable from
the socket.
When the DVD player operates on mains power, the LCD screen
lights up brighter than when it operates on battery power.
The screen is blue if there is no available video signal.

ODYS Slim TV 68006
20
EN
4.7 Car adapter
Use the supplied car adapter to operate the DVD player in a vehicle. It
provides power to the device and charges the battery.
Connect the adapter cable as shown below to the mains terminal DC 9.5V IN
of the DVD player and the cigarette lighter of the vehicle.
Caution
The driver must not operate the device or look at the screen while
driving.
Position the device in a way that ensures an uninhibited view.
Remove the rechargeable battery pack, if you want to provide
power to the device only by the power supply unit or by the car
adapter.
If possible, disconnect the car adapter cable while starting the
vehicle.
to the cigarette
lighter socket
Table of contents
Other Odys TV manuals