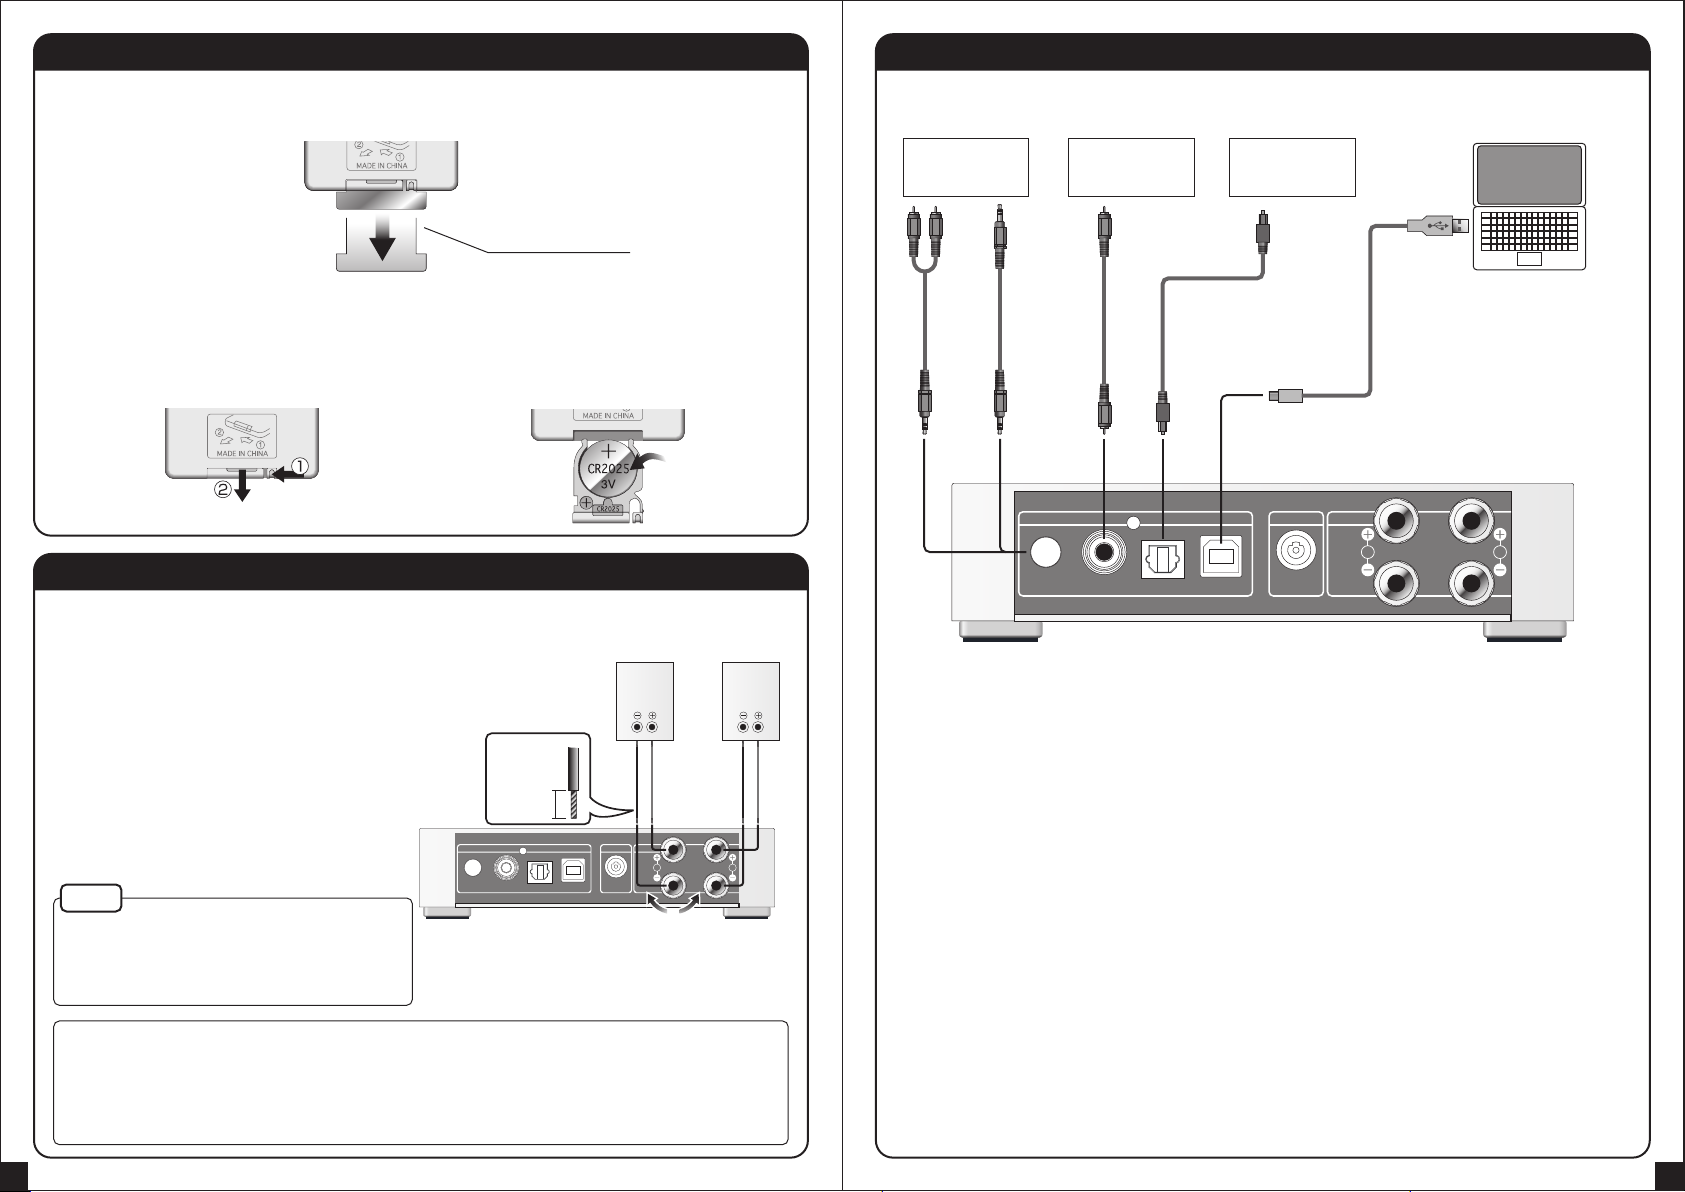
Olasonic NANO-UA1 User manual

USB DAC Integrated Amplifier
Thank you for purchasing Olasonic products. For your safety,
please read the instruction manual carefully and then be sure
to keep it a place where you can read it anytime.
NANO-UA1 Instruction Manual
070-0010-00

Please check the accessories described below.
Checking the accessories
□AC adapter (TW-AC3)
□Remote Control (TW-RM1)
□USB cable
□Instruction Manual (this manual)
FCC Notice – Declaration of Conformity Information
On cleaning
If the surface of the main unit gets dirty, please wipe it using a soft cloth with mild detergent.
2 3
Warnings and Cautions
1. Should you notice an abnormality or malfunction of the appliance, immediately
stop using it and contact the store from which you purchased the product or Olasonic
Support Center.
2. Only use the supplied AC adapter.
3. Do not touch the AC adapter with wet hands. It may cause an electric shock.
4. If the appliance is not used for an extended period of time, please disconnect
the AC adapter from the AC outlet.
5. Do not disassemble the appliance.
6. Do not place the appliance in the following locations.
(a)
(b)
(c)
(d)
(e)
7. Make sure the plug is firmly connected to the appliance.
8. Do not pull the cable when disconnecting the cable from the appliance.
9. Do not place the appliance on a unstable place.
10. Do not wipe the exterior with products containing benzine or thinner.
11. Do not use speakers when the impedance is under 4Ω.
12. Please be careful about battery handling.
(a)
(b)
(c)
(d)
(e)
(f)
(g)
(h)
(i)
This equipment has been tested and found to comply with the limits for a Class B digital
device, pursuant to Part 15 of the FCC Rules. These limits are designed to provide
reasonable protection against harmful interference in a residential installation. This equipment
generates, uses and can radiate radio frequency energy and, if not installed and used in
accordance with the instructions, may cause harmful interference to radio communications.
However there is no guarantee that interference will not occur in a particular installation.
If this equipment does cause harmful interference to radio or television reception, which can
be determined by turning the equipment off and on, the user is encouraged to try to correct
the interference by one or more of the following measures:
- Reorient or relocate the receiving antenna
- Increase the separation between the equipment and the receiver
- Connect the equipment into an outlet on a circuit different from that to which the receiver
is connected
- Consult the dealer or an experienced radio/TV technician for help
Changes or modifications made to this equipment, not expressly approved
by Towa Electronics Co., Ltd. for compliance could void the user’s authority to operate
the equipment. This device complies with Part 15 of the FCC Rules.
Operation is subject to the following two conditions:
(1) This device may not cause harmful interference, and
(2) this device must accept any interference received, including interference that may cause
undesired operation.
Very humid rooms such as a bathroom
Places subject to rain or mist
Places subject to the direct sunlight such as by the window
Places subject to high temperature such as heating appliances
Very dusty areas
Should battery leakage occur, do not touch it by hand.
Do not use the battery other than specified type.
Do not disassemble the battery.
Do not heat up the battery or put it into fire or water.
Do not insert the polarity of battery in reverse.
Do not connect a positive and negative polarization of the battery together.
Do not take along or store a battery and metal piece together.
Do not place a battery within baby’s reach. They may swallow it.
Should a baby swallow the battery, consult a medical doctor immediately.

Before using a remote control Connecting the input devices
Button type lithium battery (CR2025) has already been inserted into the remote control.
Before using, pull out the insulation sheet as follows.
Replacing the battery of the remote control
Please replace the lithium battery (CR2025) as shown below.
Connecting the speakers
Connect speakers to the speaker terminals of the main unit.
1.Peel the protective covering of the speaker cables
approximately 0.4 inch for both left and right speakers,
and twist the cable cores firmly.
2.Insert the cable core through the connection hole
of each speaker terminal and tighten the knob.
RL
COAX OPT USBLINE
INPUT DC IN
SPEAKER
RL
COAX OPT USBLINE
INPUT DC IN
SPEAKER
Insulationsheet
Speaker(R) Speaker(L)
Speaker code
(not supplied)
LoosenTighten
USB cable (supplied)
Optical cable (not supplied)
Stereo mini cable (not supplied)
RCA audio cable (not supplied)
RCA coaxial cable (not supplied)
Optical digital output
(OPTICAL)
Coaxial digital output
(COAXIAL)
Analog audio output
(LINE OUT)
Digital audio output devicesDigital audio output devices
CD player/
Portable audio devices Computer
4 5
The speaker terminals support the use of banana plugs.
If the cable is difficult to connect because of,for example,
too thick, please use the banana plug (not supplied) that
is compatible with the cable.
Tips
Keep pressing in the direction of ①,
and pull out in the direction of ②.
Insert the battery with the Indication of +
facing upward.
Approx.
0.4 inch
Notes
・Connect speakers with impedances of 4Ωand over. Protection circuit may work,
if connecting speakers with impedances of less than 4Ω.
・Connect speakers so that the neighboring cable cores do not touch each other.
USB input terminal (USB)
Connect a USB port of the Computer and the USB terminal of the main unit with the
supplied USB cable.
Optical digital audio input terminal (OPT)
Input the digital audio through a device with the optical digital audio output terminal
(toslink square type).
Coaxial digital audio input terminal (COAX)
Input the digital audio through a device with the coaxial digital audio output terminal.
Analog audio input terminal (LINE)
Input the analog audio through a device with the line output terminal using a mini stereo
audio cable. When the line output terminal of an analog audio output device is the RCA
analog audio terminal, connect with a cable of stereo mini male to 2 RCA stereo male jack.

Connecting the AC power code
Listening to better sounds
Name of parts and functions (Main unit)
For better sound, match the polarity of power cord with the
polarity of the wall outlet.
A B C D F G H
E
RL
COAX OPT USBLINE
INPUT DC IN
SPEAKER
AC power cable
(supplied)
AC outlet
Spectacle-shaped plug
AC power plug
AC power adapter (supplied) ①
③
②
6 7
底面
①Connect the spectacle-shaped plug of the supplied AC power cord to
the supplied AC power adapter.
②Insert the DC output plug of AC power adapter into the DC IN terminal of the
main unit.
③After all connections are finished, insert the AC power plug into a wall outlet.
- Insert the spectacle-shaped plug of the AC power cable with the printing side
down into the AC power adapter with the top side up(the label side down).
AC power
adapter
Facing the top side up
The bottom side
has convex parts.
Plug with the printing
side down
GND side
Wall outlet
A. Power button ( )
Turns the main unit on and off.
When the power is off, the standby indicator lights up.
B. Input selector
Input switches each time the button is pressed.
C. Headphone terminal
It enables you to enjoy music with your headphones. When connecting
the headphones, the sound does not output from speakers.
D. MUTE indicator
When pressing the MUTE button on the remote control, the indicator lights
up in red and the sound is muted.
E. Receiving section of a remote control signal
Receives the signal from the supplied remote control.
F. BASS BOOST indicator
When pressing the BASS BOOST button on the remote control, the indicator
lights up in red and the bass sound can be reinforced. When pressing again,
the indicator turns off and the sound returns to the normal playback
G. RM indicator
When adjusting the volume using remote control, the RM indicator lights up.
H. VOLUME knob
Adjusts the volume.

Name of parts and functions (Remote control) Using the amplifier
A
C
D
E
Not in use
for NANO-UA1
B
USB→OPT→COAX→LINE
Get lower
Low volume
Get higher
8 9
Hybrid Volume Control
・If the volume is greater than the rated power, it turns down automatically and the RM indicator lights up.
・When any audio signal is not output from a device selected by Input selector (except for "USB" )
and also any operation for the main unit is not done for approximately 30 minutes, the power of the unit automatically
turns off. As for "USB " input, when the playback on a computer is in stop mode and any operation for the main unit is
not done for approximately 30 minutes, the power of the unit automatically turns off.
Tips
A. Power button
Turns the main unit on and off.
B. MUTE button
When pressing the MUTE button on the remote control,
the indicator lights up in red and the sound is muted.
C. BASS BOOST button
The bass sound of the music can be reinforced.
D. INPUT button
When pressing each button of INPUT, input is switched to the selected input.
E. VOL(▲/▼) button
It adjusts the speaker volume.
When adjusting the volume with the remote control, the volume turns up or down from the volume position on the
main unit and [RM] indicator on the main unit lights up.
When operating the VOLUME knob on the main unit, the volume returns to the slit position of VOLUME knob and
the RM indicator turns off.
1.Set the volume level to the minimum.
2. Press to turn on the main unit.
3. Press Input selector to select an input device.
4.Start playback of the input device.
5. Adjust the volume.

Setting up a computerPlaying music on a Computer
①Connect a computer and the main unit with a USB cable.
②Turn on the computer.
③Press to turn on the main unit.
④Press the input select button( )
to select “USB”.
⑤Set up the computer according to the page of [Setting up
a computer].
⑥Start playback of music files on the computer.
RL
COAX OPT USBLINE
INPUT DC IN
SPEAKER
10 11
USB cable (supplied)
Computer
For Windows 8
2. Press [Windows] key and [X] key
simultaneously.
3. Click [Control Panel]>[Hardware and Sound]>
[Sound]. Click [Playback] tab and choose
“Olasonic USB DAC(96kHz)”.
1. Click [Desktop]
from the Start screen.
4. Click [Set Default] and then [OK].
For Windows Vista/7
1. Click [Control Panel]>[Hardware and Sound]>
[Sound]. Click [Playback] tab and choose
“Olasonic USB DAC(96kHz)”.
2. Click [Set Default] and then [OK].
“INPUT” on the remote

For Mac OS
The protection circuit has been
activated because the sound
volume is too high.
Re-install the driver.
*Perform the operation of
[Right click]-[Delete], and reconnect
the device. If not recognized after
all, restart the PC with connecting
the USB cable.
Troubleshooting
Ifyouexperienceaproblemwiththisunit,pleasecheckthefollowingitems
beforerequestingservice.Ifitstilldoesn'toperatecorrectly,contactthe
retaileryoupurchasedtheunit,orsendane-mailtoOlasonicsupportcenter
(seethewarrantyinformationinthismanual).
Symptoms Causes Countermeasures
The power adapter or power cable
is not connected correctly.
Connect them correctly.
The input selection is wrong.
The cable of input device is not
connected correctly.
The speaker cables have not been
connected correctly.
Connect them correctly.
Muting function has been activated.
The volume is too low.
The digital output setting of an
input device is not set to “PCM”.
Neighboring speaker cables short
out and protection circuit has
kicked in.
Disconnect the power cord from
the wall outlet, and check the
connection of speaker cables.
The power does
not turn on.
No sound
is output.
The sound outputs
from only one speaker.
The sound volume
gets low automatically.
The sound is not
outputting and the
power is turned off.
Cancel the muting function.
Turn the volume up moderately.
Set the digital output setting of the
device to “PCM”.
Select the correct input by input
selection button.
Connect it correctly.
C
o
m
m
o
n
U
S
B
The volume level on the volume
control setting on a PC is low.
The driver is not installed correctly
on a PC.
*In case it is not recognized on
[Device Manager],
“?” or “
!
” will appear.
The volume muting on a PC is on.
Click the volume icon on the taskbar
and turn the volume moderately.
Click the volume icon on the taskbar
and cancel the volume muting.
Connect the speaker cable correctly.
One of the speaker cables is not
connected correctly.
Decrease the volume.
Setting up a computer
12 13
1. Click the Apple logo in the menu bar and select [System Preferences].
2. Click [Sound]> [Output] and select [Olasonic USB DAC(96kHz)] from devices
of “Choose a device for sound output”.

Trademark
14 15
Audio input
Audio format
USB compatibility
Speaker output
Headphone output
Amplifier method
Frequency characteristic
Power
Power consumption
External dimensions
Total weight
Accessories
Specification
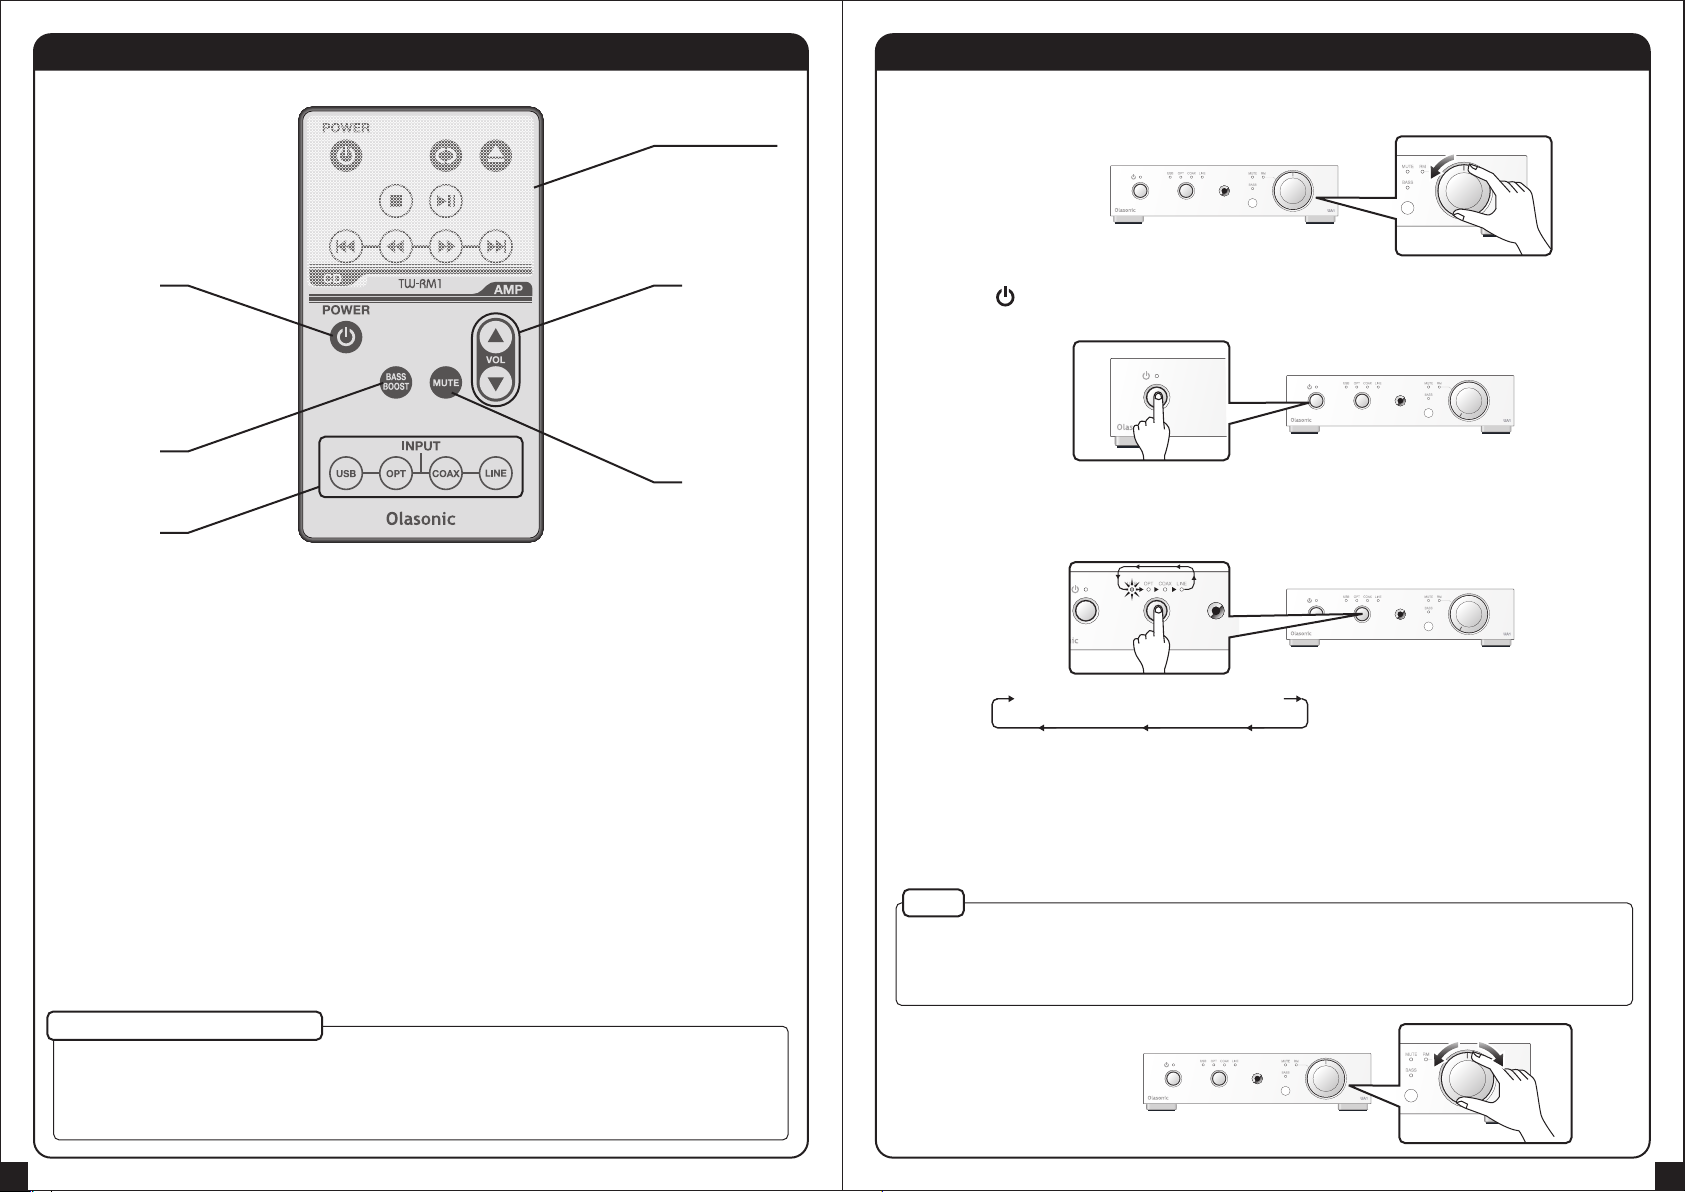
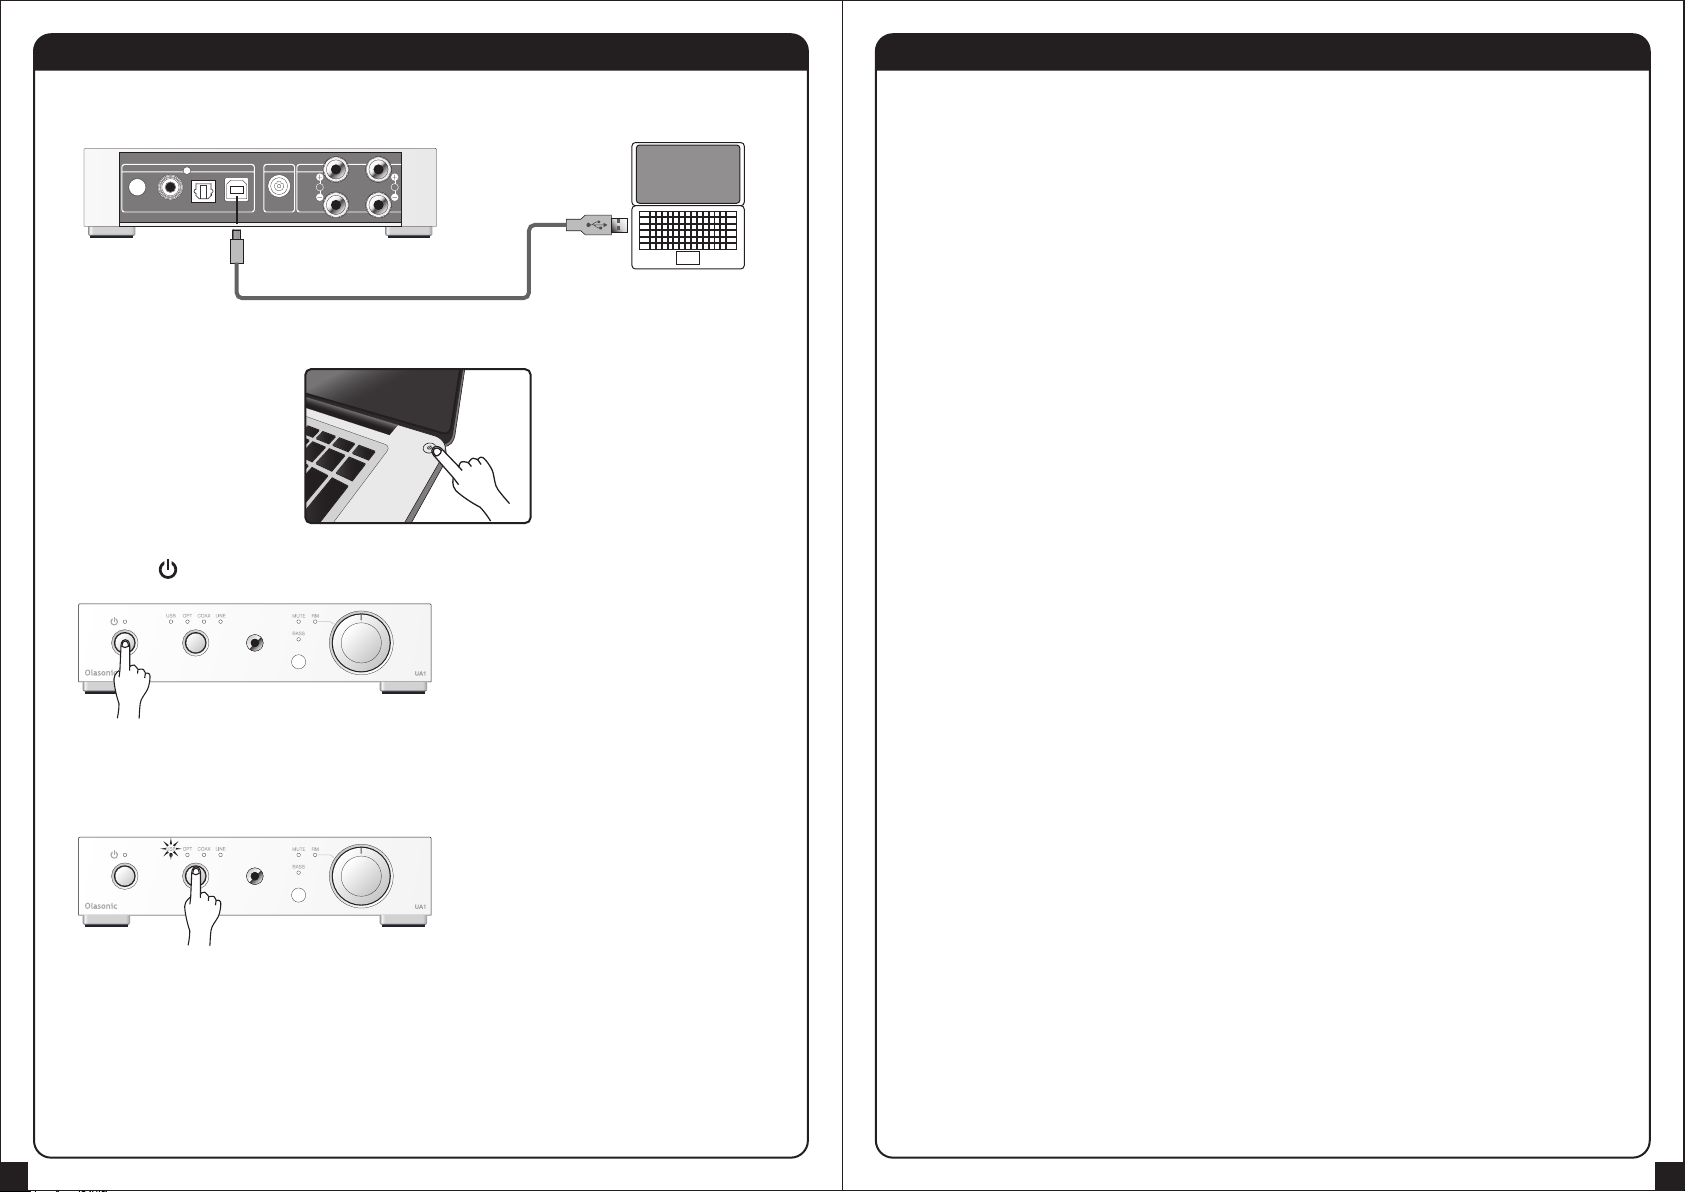
USB(B-Type),OPT(Optical digital),COAX(Coaxial digital),
LINE(analog/3.5mm mini stereo)
USB/OPTICAL: up to 96kHz/24bit(Linear PCM))
COAXIAL: up to 192kHz/24bit(Linear PCM)
Mac OS9.1 / OS10.1 and after
Windows Vista / 7 / 8
26W+26W(4Ω)(Dynamic power)
13W+13W(8Ω)(Dynamic power)
54mW+54mW(300Ω),φ3.5mmmini stereo jack
SCDS(Super Charged Drive System)method
5Hz-80,000Hz(at 1W output)
AC100V-240V(using AC power adapter)
Silent mode: approx.5W,Max output mode: approx. 20W
149mm(W)×33mm(H)×149mm(D)(not including protrusion)
149mm(W)×39mm(H)×175mm(D)
890g(main body only)
Remote control, AC adapter, USB cable
・MAC OS is the trademark of Apple Inc. registered in U.S. and the other countries.
・Microsoft and Windows,Windows Vista, Windows7, Windows8 are the trademarks
of Microsoft corporation in U.S. and the other countries.
・Microsoft and the logo, Windows, Windows logo are the trademarks of Microsoft
Corporation in U.S. and the other countries.
The Olasonic warranty protects the original owner and all subsequent owners,
provided that the product was purchased from a dealer who was authorized by Olasonic
to sell such products at the time of the original purchase. A copy of the original dated bill
of sale must be presented whenever warranty service is required.
Except as specified below, the Olasonic warranty covers all defects in material and workmanship for
one year from the date of the first consumer purchase. The followings are not covered; damage
caused by accident, misuse, abuse, product modification or neglect; damage occurring during
shipment; damage from failure to follow instructions contained in the instruction manual; damage
resulting from the performance of repairs by someone not authorized by Olasonic; damage caused
by installation of parts that does not conform to Olasonic specifications; units not used for their
intended purpose; any claims based on misrepresentations by the seller; products sold on an
“as is “ or final sale basis; or the cost of installing, removing or reinstalling the unit. Olasonic liability
is limited to the repair or replacement, at our option, of any defective product and shall not include
incidental or consequential damages. Olasonic reserves the right to replace a discontinued model
with a comparable model. Any replacement units or parts may be new or rebuilt.
NOTE: Repair of our product must be done by an authorized dealer, distributor or service center.
Unauthorized repair will void the warranty and is done at the risk of the consumer.
Warranty service is only available in the country of original purchase. If you require warranty service,
please contact your dealer or distributor for assistance. If it is not possible, please send an e-mail to
This warranty gives you specific legal rights. You may also have other rights, which vary country to
country, or state to state. Some countries or states do not allow the exclusion or limitation of incidental
or consequential damages or limitations on how long an implied warranty lasts, so, the above may
not apply to you.
WARRANTY INFORMATION
WHAT IS COVERED BY THIS WARRANTY
TO OBTAIN WARRANTY SERVICE
*The product specifications and the design are subject to change without notice.
The description of this manual is as of April,2014.
WHO IS PROTECTED BY THIS WARRANTY
Table of contents