manuals.online logo
Brands
  1. Home
  2. •
  3. Brands
  4. •
  5. OLG
  6. •
  7. Desktop
  8. •
  9. OLG Axis Height Adjustable Workstation HA-90 User manual

OLG Axis Height Adjustable Workstation HA-90 User manual

Other OLG Desktop manuals

OLG EkoSystem 90 User manual

OLG

OLG EkoSystem 90 User manual

OLG EkoSystem 90 User manual

OLG

OLG EkoSystem 90 User manual

Popular Desktop manuals by other brands

StarTech.com ARMSTSL manual

StarTech.com

StarTech.com ARMSTSL manual

Dell Inspiron 5720 quick start guide

Dell

Dell Inspiron 5720 quick start guide

GÜDE WERKBANK GW 6/2 XL Translation of the original instructions

GÜDE

GÜDE WERKBANK GW 6/2 XL Translation of the original instructions

Lenovo ThinkCentre M62z Vodič za uporabnika

Lenovo

Lenovo ThinkCentre M62z Vodič za uporabnika

Lenovo ThinkCentre M71z user guide

Lenovo

Lenovo ThinkCentre M71z user guide

Fujitsu ESPRIMO C7xx operating manual

Fujitsu

Fujitsu ESPRIMO C7xx operating manual

Bosch DCU 130 operating instructions

Bosch

Bosch DCU 130 operating instructions

Zotac VR GO quick start guide

Zotac

Zotac VR GO quick start guide

HP 260 G2 DM Product End-of-Life Disassembly Instructions

HP

HP 260 G2 DM Product End-of-Life Disassembly Instructions

Sony VAIO VGC-LS21 Specifications

Sony

Sony VAIO VGC-LS21 Specifications

HP ProOne 400 G1 specification

HP

HP ProOne 400 G1 specification

IBM PS/2 60 Hardware maintenance service

IBM

IBM PS/2 60 Hardware maintenance service

Acer Aspire SA60 Service guide

Acer

Acer Aspire SA60 Service guide

Lenovo ThinkCentre M71z Uživatelská příručka

Lenovo

Lenovo ThinkCentre M71z Uživatelská příručka

IBM Aptiva 2198 reference guide

IBM

IBM Aptiva 2198 reference guide

Sony PCV-LX810 - Vaio Slimtop Computer System reference manual

Sony

Sony PCV-LX810 - Vaio Slimtop Computer System reference manual

Dell Precision U3525 Quick reference guide

Dell

Dell Precision U3525 Quick reference guide

MicroTouch IC-215P-AW2 user guide

MicroTouch

MicroTouch IC-215P-AW2 user guide

manuals.online logo
manuals.online logoBrands
  • About & Mission
  • Contact us
  • Privacy Policy
  • Terms and Conditions

Copyright 2025 Manuals.Online. All Rights Reserved.

TOOLS REQUIRED: Powered screwdriver
Installation Guide
myolgoffice.com
Axis Height Adjustable Workstation
Recommended
2-person Step
* To prevent possible scratches or damage,
assemble the desk upside down on a soft surface
such as a blanket, carpet or packaging.
* Attach Leg to the Top assembly by using Bolts,
spring washer, flat washer. Tighten using the
Allen Wrench provided.
AXIS HEIGHT ADJUSTABLE WORKSTATION
Installation Guide
Any top supplied for this unit will be a universal top and will require the installer to correctly position & pre-drill before fixing it to the frame.
A B C
x 1
x 1
x 1x 1 x 2
x 2
x 2
x 4
x 5
x 2
x 4
x 2
x 4
x 1
x 1
D
E
F
G
H
I
J
K
L N
M
C1
PARTS:
STEP 2: Attach crossbeam Fto leg Ausing bolt J.STEP 1: Fit adjustable feet to all legs.
AXIS HEIGHT ADJUSTABLE WORKSTATION
Installation Guide
H
H
H
B
A
C
A
F
F
M
J
L
A
STEP 3b: Short end of gear bar Emust be fitted into the drive socket in the
corner leg C.
STEP 3a: Cont.
STEP 3a: Attached corner leg Cto crossbeam F.STEP 3: Insert long hex end of gear bar Eto leg A.
AXIS HEIGHT ADJUSTABLE WORKSTATION
Installation Guide
E
A
F
A
C
F
C
M
JL
C
E
STEP 5: Insert short end of gear bar Eto leg B.STEP 4: Attached crossbeam Fto leg Busing bolt J.
AXIS HEIGHT ADJUSTABLE WORKSTATION
Installation Guide
F
F
JL
M
B
B
E
E
B
B
STEP 6: Attach the two top rails Dto plate C1 using bolt K.
STEP 5b: Long end of gear bar E must be fitted into the drive socket in the
corner leg C.
STEP 5a: Attach corner leg Cto crossbeam F.
AXIS HEIGHT ADJUSTABLE WORKSTATION
Installation Guide
F
C
C
F
M
J
L
E
C
D D
K
C1
STEP 8: Insert caps Ginto crossbeam F.STEP 7: Attach top rails Dto legs Aand Busing bolts I.
AXIS HEIGHT ADJUSTABLE WORKSTATION
Installation Guide
DD
D
B
A
A
N
IG
G
F
F
B
A
A
STEP 9: Fit top. Ensure that the top bars are parallel to the desk top. COMPLETED
AXIS HEIGHT ADJUSTABLE WORKSTATION
Installation Guide
a
a
a=a
b=b
b
b
STEP 2: Fold handle away parallel to desk top.STEP 1: Pull handle lever. Tilt handle lever upward and klick into crank handle.
HOW TO OPERATE HANDLE
1
2
3
CHANGING CRANK HANDLE FROM LEFT TO RIGHT OPERATION
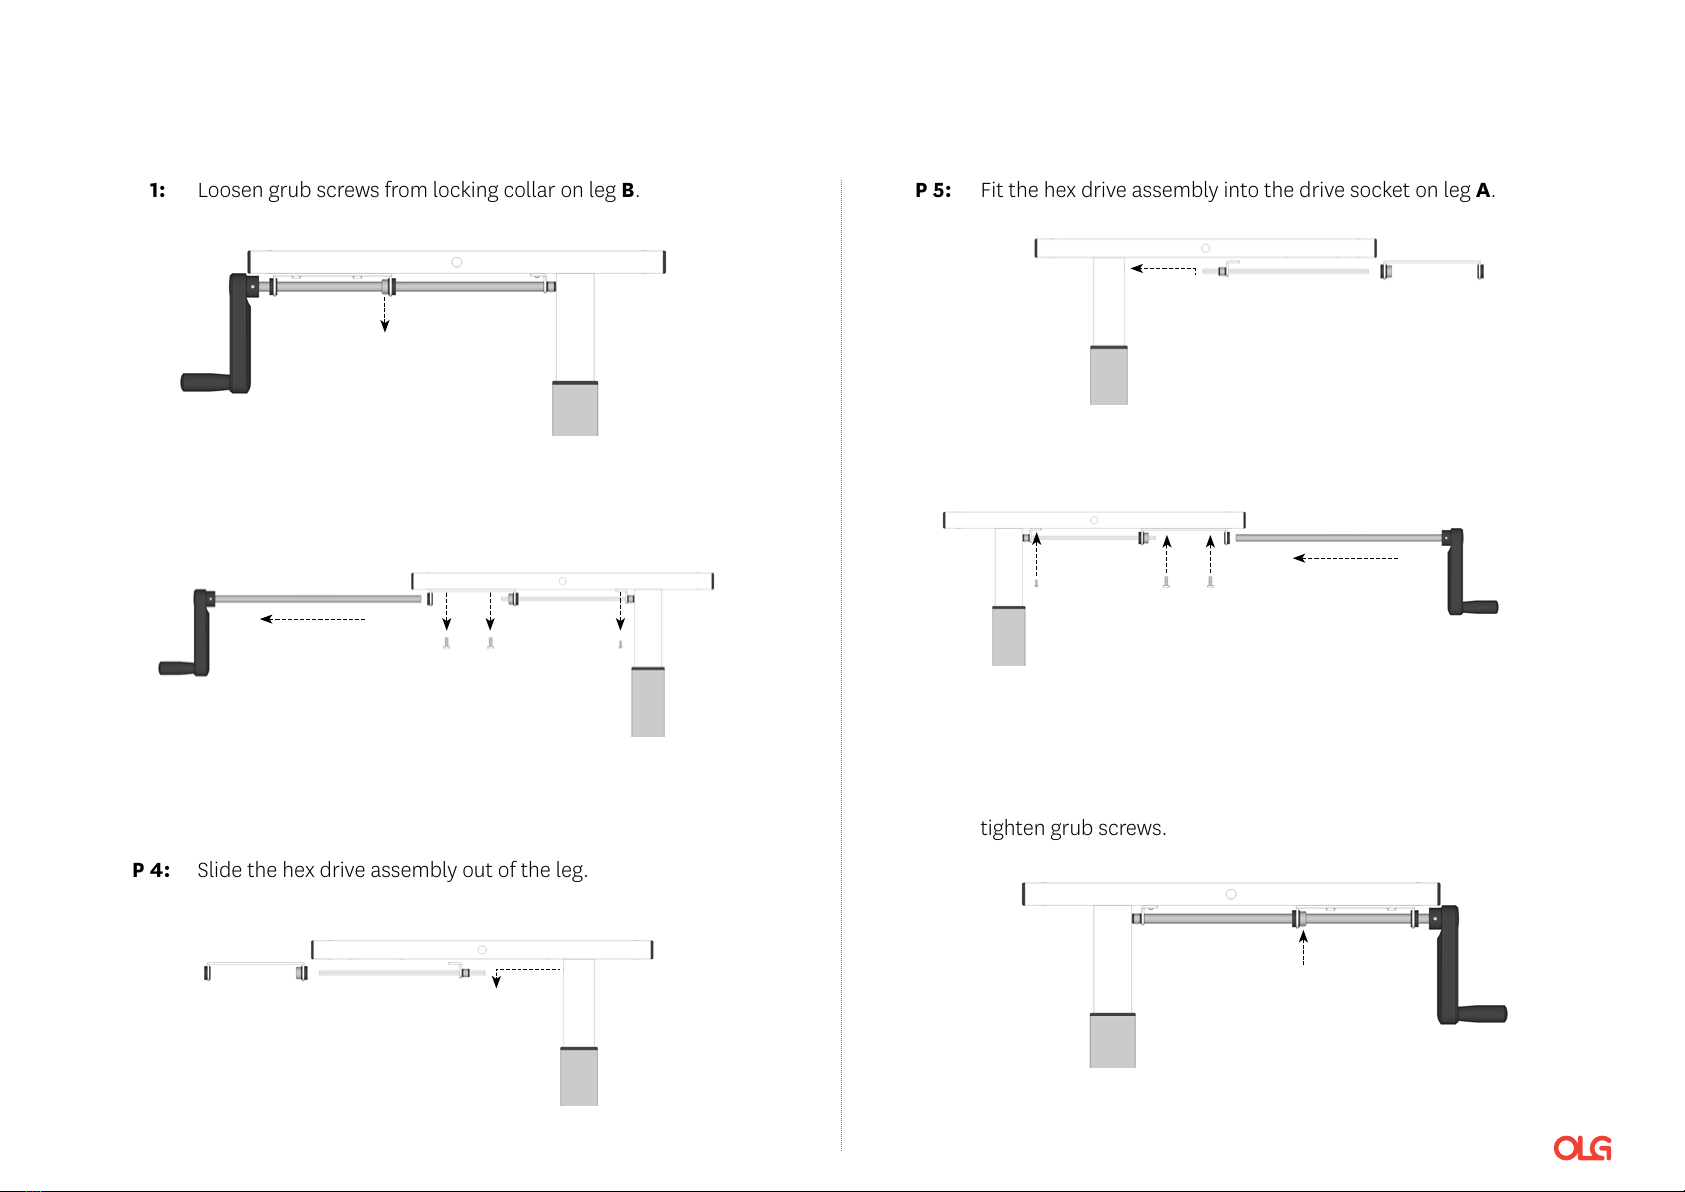
STEP 1: Loosen grub screws from locking collar on leg B.STEP 5: Fit the hex drive assembly into the drive socket on leg A.
STEP 2: Slide out crank handle and shaft.
STEP 6: Fit hanger bracket screws and tighten.
STEP 3: Remove hanger bracket screws to release the assembly.
STEP 7: Slide in crank handle assembly.
STEP 4: Slide the hex drive assembly out of the leg.
STEP 8: With crank handle fully retracted, push the locking collar
hard against the furthest bearing on the hanger bracket and
tighten grub screws.
STEP 9: Test operation.
BA
A
A
B
B