Oliver 501 Operation instructions

0502S20000
Grand Rapids, Michigan, U.S.A. 49504-5298
USER’S OPERATING AND INSTRUCTION MANUAL
MODELS 501, 501-N, 502, & 502-N
PANINI GRILLS

501_502
0502S20001 0-1
INDEX
Section Description Document No. Page No.
SAFETY INSTRUCTIONS --------------------------------------0502S20002 --------------------------- 1-1
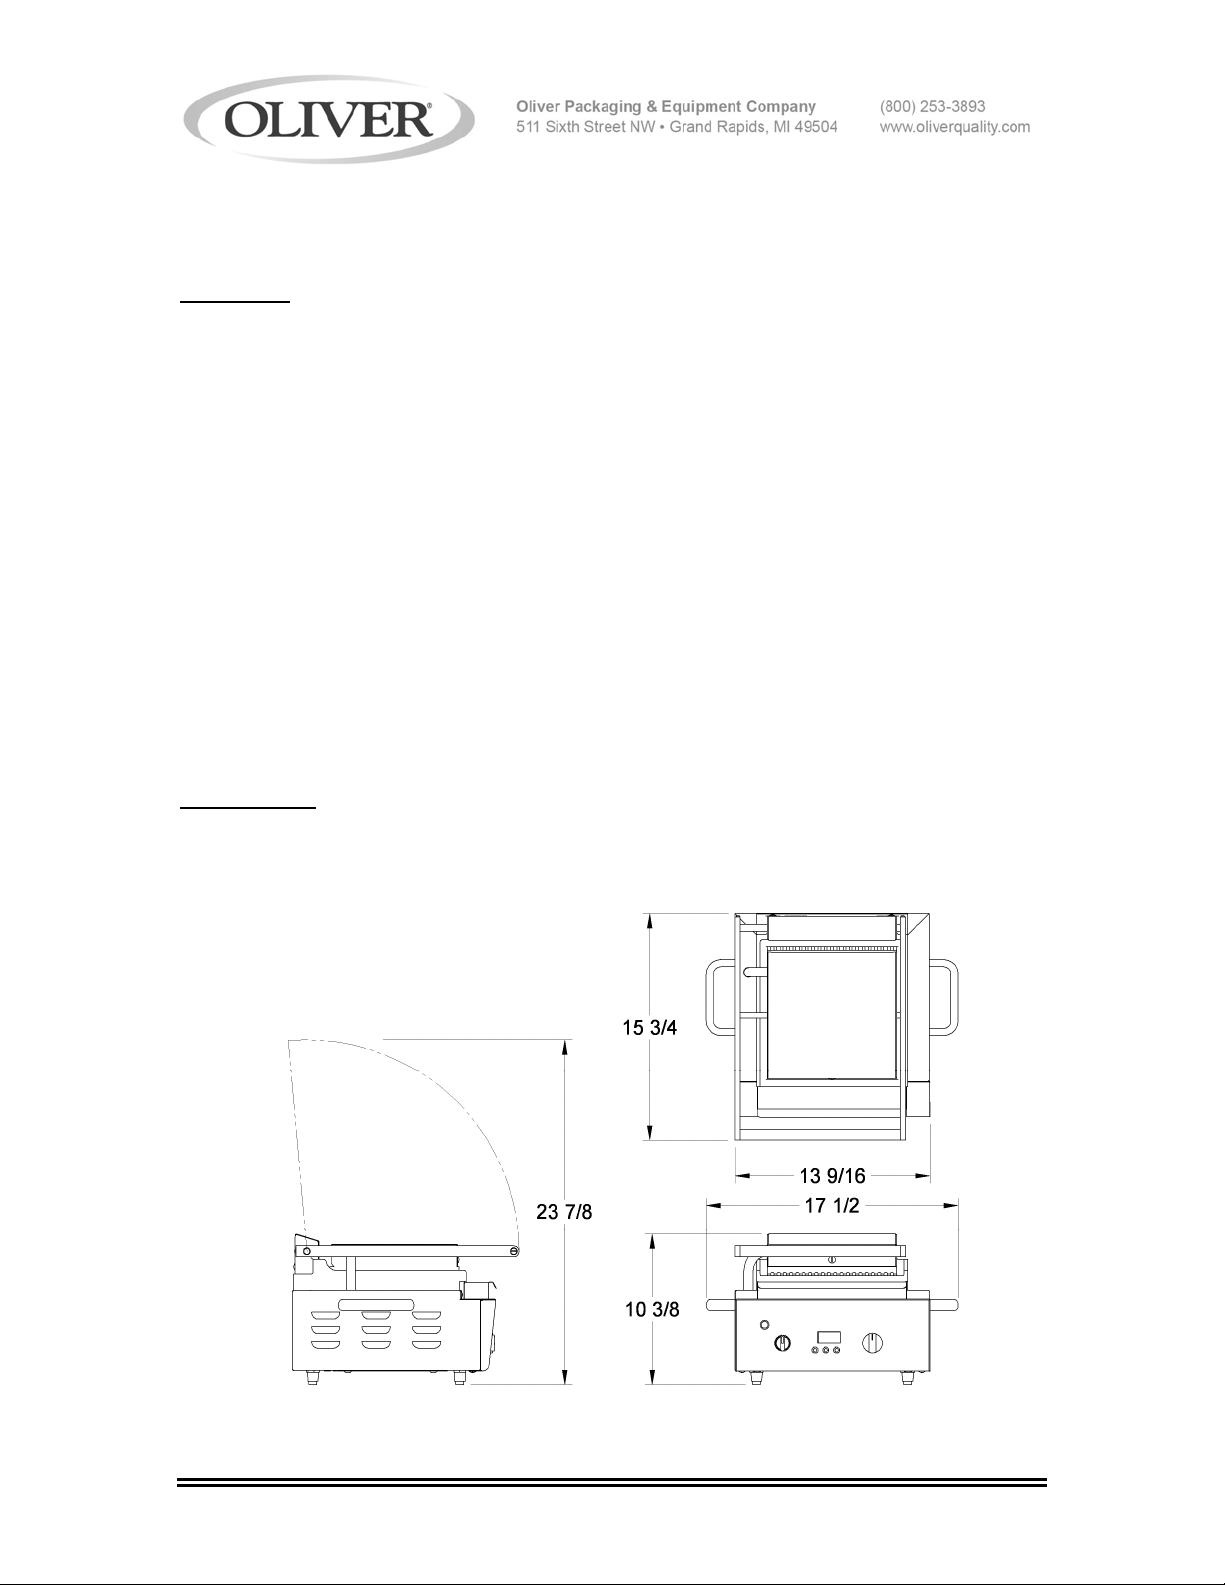
DESCRIPTION/SPECIFICATIONS ---------------------------0502S20003----------------------------2-1
Description -------------------------------------------------------------------------------------------------- 2-1
Specifications----------------------------------------------------------------------------------------------- 2-1
INSTALLATION INSTRUCTIONS ---------------------------- 0502S20004 --------------------------- 3-1
Container Inspection ------------------------------------------------------------------------------------- 3-1
Location Selection & Electrical Hook-up ------------------------------------------------------------ 3-1
Ventilation and Clearances ----------------------------------------------------------------------------- 3-1
Initial Set-up ------------------------------------------------------------------------------------------------ 3-2
Upper Platen Assist Spring Adjustment ------------------------------------------------------------- 3-2
Seasoning of the Cooking Surface ------------------------------------------------------------------- 3-2
OPERATING INSTRUCTIONS --------------------------------0502S20005 --------------------------- 4-1
Preheating -------------------------------------------------------------------------------------------------- 4-1
Temperature Selection -----------------------------------------------------------------------------------4-1
Setting the “Optional” Timer ---------------------------------------------------------------------------- 4-1
Operating Hints -------------------------------------------------------------------------------------------- 4-2
TROUBLESHOOTING -------------------------------------------0502S20006 --------------------------- 5-1
The Grille is not Heating (Indicator Light Is Not On) --------------------------------------------- 5-1
The Grille is not Heating (Indicator Light Is On) --------------------------------------------------- 5-1
Product is Either Burning or Under Cooking ------------------------------------------------------- 5-2
The Upper Platen Falls If not Held ------------------------------------------------------------------- 5-2
The Optional Timer Does Not Turn On (The Rest of the Units is Working) ---------------- 5-2
MAINTENANCE --------------------------------------------------- 0502S20007 --------------------------- 6-1
Upper Platen Assist Spring Adjustment ------------------------------------------------------------- 6-1
Cleaning ----------------------------------------------------------------------------------------------------- 6-1
RECOMMENDED SPARE PARTS -------------------------- 0502S20008 --------------------------- 7-1
REPLACEMENT PARTS SECTION
MODEL 501 PANINI GRILLES ------------------------------- 0501S20000 --------------------------- 8-1
Drawing -------------------------------------------------------------------------------------------------8-1
Parts List ----------------------------------------------------------------------------------------------- 8-2
MODEL 502 PANINI GRILLES ------------------------------- 0502S20009 --------------------------- 9-1
Drawing ------------------------------------------------------------------------------------------------ 9-1
Parts List ----------------------------------------------------------------------------------------------- 9-2
Continued

501_502
0502S20001 0-2
INDEX (Continued)
Section Description Document No. Page No.
MODEL 501 PANINI GRILLE WIRING DIAGRAMS ----- 0501S20001 ------------------------- 10-1
1-50/60-208/220/240 With Timer ---------------------------------------------------------------10-1
1-50/60-208/220/240 Without Timer ---------------------------------------------------------- 10-1
1-50/60-110/115 With Timer -------------------------------------------------------------------- 10-2
1-50/60-110/115 Without Timer ---------------------------------------------------------------- 10-2
MODEL 502 PANINI GRILLE WIRING DIAGRAMS ----- 0502S20010 --------------------------11-1
1-50/60-208/220/240 With Timers --------------------------------------------------------------11-1
1-50/60-208/220/240 Without Timers --------------------------------------------------------- 11-2
WARRANTY ------------------------------------------------------- GEN 050816
WARRANTY PROCEDURE------------------------------------ GEN 050817
RETURNED PARTS POLICY --------------------------------- GEN 050818

501_502
0502S20002 1-1
GENERAL SAFETY INSTRUCTIONS
WARNING
IT IS ESSENTIAL THAT ALL GRILLE OPERATORS AND MAINTENANCE
PERSONNEL OBSERVE THE FOLLOWING SAFETY PRECAUTIONS. IMPROPER
INSTALLATION, MAINTENANCE, OR OPERATION OF THIS EQUIPMENT COULD
CAUSE SERIOUS INJURY OR DEATH.
1. Read this manual before attempting to operate your grille. Never allow an untrained
person to operate or service this appliance.
2. Connect the grille to a properly grounded electrical supply that matches the
requirements shown on the grille’s electrical specification plate. Follow all local
building and electrical codes.
3. Do not install this appliance on or near flammable surfaces or materials including
curtains, draperies, walls etc.
4. Do not “Wash Down” or Immerse this appliance in water or other liquids.
5. Disconnect and lock-out the grille from the power supply before cleaning or servicing.
6. Observe all caution and warning labels affixed to the grille.
7. Use only proper replacement parts.
8. Wear proper, personal, protective, safety equipment.
9. Keep Hands away from the heated parts of this appliance until it has been allowed to
cool.
10. In addition to these general safety instructions, please follow the more specific safety
instructions in the rest of this operating and instruction manual.
WARNING
DO NOT USE FOR OTHER THAN ORIGINALLY INTENDED PURPOSE.

501_502
0502S20003 2-1
DESCRIPTION/SPECIFICATIONS
Description
The Oliver Models 501 & 501-N, (Single Top Platen), and Models 502 & 502-N Double
Top Platen Grilles are constructed of stainless steel with cast iron cooking surfaces. The
floating, (self leveling), top platen will remain roughly parallel to the bottom platen to a
height of approximately four inches.
The heated surfaces are thermostatically controlled with separate selection of either
heated bottom platen only or heating of both top and bottom platens. An optional timer
is also available.
The Oliver Panini Grilles, depending on the options you have selected, can be used to
prepare Quesadillas, “Panini” or gourmet sandwiches. They can grille meats,
vegetables, breakfast items like, eggs, pancakes, or French toast. They can also toast
bagels and breads or be used in many other applications.
Oliver Products Company, has served the Food Machinery Industry for over 70 years,
and we stand behind these grilles.
Specifications
Space Requirements, (Shown with Standard Options):
Model 501 & 501-N (All Dimensions are Approximate)

501_502
0502S20003 2-2
Space Requirements, (Shown with Standard Options):
Model 502 & 502-N (All Dimensions are Approximate)
Standard Electrical Options: (Others consult factory).
WARNING
THIS UNIT MUST BE CONNECTED TO A DEDICATED ELECTRICAL CIRCUIT
COMPATIBLE WITH THE LOAD THE GRILLE WILL PLACE ON IT.
Model 501/501-N Single Upper Platen Panini Grille
1 phase, 60 hz, 115VAC, 18 Amps, 1800 Watts.
1 phase, 60 hz, 208/240VAC, 10 Amps, 1685/2250 Watts.
1 phase, 50 hz, 220VAC, 9 Amps, 1890 Watts.
Model 502/502-N Double Upper Platen Panini Grille
1 phase, 60 hz, 208/240VAC, 20 Amps, 3375/4500 Watts.
1 phase, 50 hz, 220VAC, 18 Amps, 3775 Watts

501_502
0502S20003 2-3
Options (All options are not available on All models):
Smooth Top and Bottom Platens
With or Without Electronic Timers
1 inch Legs (leveling)
2-1/2 inch Flanged Legs (leveling)
2-1/2 inch Suction Cupped Legs (leveling)
4 inch Flanged Legs (leveling)
4 inch Suction Cupped Legs (leveling)
Table Stops
Net Weight
Model 501 = 55 lbs. (approximate)
Model 502 = 105 lbs. (approximate)
Shipping Weight
Model 501 = 70 lbs. (approximate)
Model 502 = 120 lbs. (approximate)

501_502
0502S20004 3-1
INSTALLATION INSTRUCTIONS
Container Inspection
Inspect the container for visible and/or concealed damage, if the equipment or container
seems to be damaged make a note on the shipping documents such as “Damaged” or
“Open” and notify the freight company asking for an inspection. Remember, the receiver
is responsible for filing damage claims. In such a situation you must retain all the
packaging until the inspection is complete to verify the damage and thus lessen the
chances that your claim will be denied.
Location Selection & Electrical Hook-up
DANGER
THIS UNIT MUST BE ELECTRICALLY GROUNDED. FAILURE TO DO SO COULD
RESULT IN SERIOUS INJURY OR DEATH.
WARNING
THIS UNIT MUST BE CONNECTED TO A DEDICATED ELECTRICAL CIRCUIT
COMPATIBLE WITH THE LOAD THE GRILLE WILL PLACE ON IT.
CAUTION
ANY STAND, COUNTER OR OTHER MOUNTING SURFACE MUST BE
CAPABLE OF SUPPORTING THE GRILLE’S WEIGHT.
Select a location for your grille which has a substantial mounting surface, such as a
countertop, table or stand, see “Caution” statement above, and which is near a
dedicated electrical service compatible with the load the grille will place on it as indicated
on the electrical data plate on the rear of the grille. Always conform to all local and
national electrical codes.
Ventilation and Clearances
The use of a vent, hood, grease extractor and/or fire extinguishing system will be
dictated and must conform to the applicable national and/or local building codes.
The following are suggested minimum clearances from combustible surfaces unless
those directed by local building codes are greater.
1 inch from each side of the unit
4 inches from the back of the unit

501_502
0502S20004 3-2
Initial Set-up
Before the first use of the grille, use the height adjustable legs provided on each unit, to
level it right to left. In addition, the rear of the unit should be set slightly higher than the
front of the unit to allow the normal cooking fluids to more easily travel to the front
grease tray.
Top Platen Assist Spring Adjustment
To allow adjustability in the amount of force required to raise or lower the top platen a
drag block has been added to each top platen hinge pin. Using a screw driver a screw
can be turned to increase or decrease the drag on the hinge pin. Increasing the drag,
(turning the screw clockwise), will restrict the movement of the upper platen’s handle.
Rotating the screw counter clockwise will free the movement of the platen allowing it to
drop from higher positions but pop up when at the lowest position. If you wish you may
make the adjustments to fit your needs. The screw is accessible from the rear of the
machine through the spring cover. Periodic adjustment of this screw may be necessary.
Seasoning of the Cooking Surfaces
NOTE
DURING INITIAL OPERATION OF YOUR GRILLE YOU MAY NOTICE A
SMALL AMOUNT OF SMOKE COMING OFF THE GRILLING SURFACES,
AND A FAINT ODOR FROM THE SMOKE. THIS IS NORMAL FOR A NEW
GRILL AND WILL DISAPPEAR AFTER THE FIRST FEW HOURS OF USE.
CAUTION
COOKING SURFACES ARE HOT USE CARE WHENEVER WORKING NEAR THEM.
Before the first use of the grill the cooking surfaces must be seasoned to minimize
product sticking. This can be accomplished by first wiping the excess oil from all
cooking surfaces. Then turn the unit on by heating both top and bottom platens to a
temperature of between 250 – 300°F for approximately 30-40 minutes. Do not be
alarmed, but during the first few hours of operation the grille may smoke as oils
associated with the manufacturing process are evaporated. After heating the grille for
30-40 minutes, (see above), spray all cooking surfaces with a non-salted vegetable oil
such as Pam ®. Allow the unit to stand at the temperature until the cooking surfaces
look dry, (about 30 minutes). Spray all surfaces a second time with Pam ® and then
heat the unit to 400°F, which will take about 10 minutes, after which the unit should be
turned off. Repeat the above procedure if necessary.

501_502
0502S20005 4-1
OPERATING INSTRUCTIONS
CAUTION
COOKING SURFACES ARE HOT USE CARE WHENEVER WORKING NEAR THEM.
Preheating
The unit should be allowed to preheat approximately 10-20 minutes before loading it with
product. Failure to preheat will likely cause unsatisfactory cooking of the first load.
Using the selector switch on the front of the unit, turn the switch from the “Off” position,
to either the bottom only heat selection, or to the bottom and top position. Set the unit to
the desired temperature, (see “Temperature Selection” below). If heating both top and
bottom platens it is best to do so with the top platen lowered to contact the bottom
platen. Dual units will have separate controls for each side of the grille.
When you select either the bottom or both top and bottom platen position on the selector
switch the “Power On” indicator light and the optional timer, (when present), should
come on, however the platen will not begin heating until a temperature above 120º F has
been selected.
Temperature Selection
Each top and bottom platen is controlled by a single thermostat. Dual grilles will have a
separate thermostat for each side of the unit. When the line on the knob is pointing
straight up the heaters will be off. Rotating the knob clockwise will turn the heaters on
starting at an approximate temperature of 120º F and if you continue to rotate the knob
in the clockwise direction they will reach a maximum temperature setting of
approximately 570º F. The approximate setting can be noted from the position of the
line on the knob relative to the numbers printed on the front panel’s legend plate.
Setting the “Optional” Digital Timer
Grilles with the optional digital timers can be set to give an audible sound at a user
specified time setting from 1 second to a maximum of 9 minutes 59 seconds. Dual units
with this option will have a timer for each side of the unit.
In addition to the display, each timer will have three buttons. From the left to the right
the buttons will be labeled “+”, “-“, and “Start/Stop”. The timer can be used without
heating the platens by turning the selector switch to either bottom or both top and bottom
platen heating, but leaving the thermostat, (temperature selection knob), set to “Off”.

501_502
0502S20005 4-2
Setting the “Optional” Digital Timer (Continued)
To increase the timer setting push and hold the “+” button for 5 seconds. The timer will
beep after which each push and release of the button will advance the setting
1 second. If you continue to hold the button after the initial beep the timer will begin to
advance rapidly. The decrease function of the timer works in the same manner except
you must press and hold the “-” button.
Once set, the timer can be used by following this simple procedure. Place the product
on the grill and push the “Start/Stop” button. The timer will begin counting down and will
begin beeping when the set time has expired. The timer will continue to beep until you
again press the “Start/Stop” button. Once the button is pressed the timer will reset itself
to last time to which it was set. It will continue to repeat this setting even if the unit is
turned off or unplugged until you purposely change it.
Setting the “Optional” 4 Menu Digital Timer
To enter time programming from the blank “--:--“ screen, press and hold the PROGRAM
button for 3 seconds. The display will now show “PROG”. To change a time on one of
the four timers, press the desired timer button. The display will now change to the
existing set time. Now press the “+” or “-“ button to change to the desired time. To
change another timer, press that particular timer button and follow the same procedure.
To exit the time programming mode, press the PROGRAM button and the timer will
return to the operating mode with the blank display of “--:--“.
To cancel a timer that is on, press and hold that particular timer’s button until it resets.
To view the time remaining on a particular timer, press the SCAN button. Continue to
press the SCAN button to toggle through all active timer times.
Rev. 8/16/06

501_502
0502S20005 4-3
CAUTION
STOPPING THE TIMER WILL NOT STOP COOKING. THE PLATENS WILL
REMAIN HEATED, YOU MUST REMOVE THE PRODUCT FROM THE GRILLE.
Operating Hints
When heating both platens of the unit during periods of disuse it is more efficient to
lower the top platen or platens to better retain heat.
During longer periods of disuse it is more efficient to turn the temperature setting down
to about 200º F. When the unit is again required it will recover quickly, usually within a
few minutes.
If you are not going to use the grill for a longer period of time, or leave it unattended, it
should be turned “OFF”.

501_502
0502S20006 5-1
TROUBLESHOOTING
DANGER
ALWAYS DISCONNECT THE GRILLE FROM THE POWER SUPPLY BEFORE
ATTEMPTING ANY TYPE OF MAINTENANCE TASK, INCLUDING
TROUBLESHOOTING.
CAUTION
COOKING SURFACES ARE HOT USE CARE WHENEVER WORKING NEAR THEM.
ALLOW SUFFICIENT TIME FOR COOLING BEFORE BEGINNING WORK.
NOTE
ON DUAL UNITS REMEMBER THAT EACH SIDE HAS SEPARATE CONTROLS.
The Grille is not Heating (Indicator Light Is Not On)
•The grille is not plugged in.
•The grille’s selector switch is in the “Off” position. Select one of the two heat
positions.
•There is no power at the outlet. (Check by plugging in another working appliance.
Check to see if a circuit breaker has tripped. If the circuit breaker has not tripped
and the circuit is still not working have a qualified electrician check the circuit.)
•The problem is with one or more of the following grille components: power cord,
indicator light, or selector switch. (Have a qualified electrician find and repair the
problem.)
The Grille is not Heating (Indicator Light Is On)
•The thermostat (temperature selection knob), is set either in the “Off” position or is
set below 120º F.
•If the thermostat is properly set and the selector switch is set to top and bottom
platen heating and both platens are not getting hot have a qualified electrician check
the selector switch and the thermostat for proper operation.
Continued

501_502
0502S20006 5-2
Trouble Shooting (Continued)
The Grille is not Heating (Indicator Light Is On) (Continued)
•If the thermostat is properly set, and working, and the selector switch is set for top
and bottom platen heating, and both platens are still not getting hot, have a qualified
electrician check the selector switch, both heating elements as well as their
connective wiring.
•If the thermostat is properly set, and working, and the selector switch is set for top
and bottom platen heating, and only one of the platens is getting hot, have a
qualified electrician check the selector switch, the heating element which is not
getting hot as well as their connective wiring.
Product is Either Burning or Under Cooking
•The thermostat, (temperature selection knob), may be improperly set, increase or
decrease the setting as required.
•Have a service technician use a temperature sensing device to compare the actual
temperature of the platens with the set temperature indicated on the front control
panel. Both platens should be heated with the top platen in the closed position.
Please realize that the numbers on the control panel are only approximate and that
the actual temperature may very +/- 25º F.
The Top Platen Falls If not Held
•Using a screw driver, (through the access hole in the spring cover), increase the
amount of drag on the top platen hinge pin. Rotating the screw in a clockwise
direction will increase the drag.
•The assist spring as failed. Have a service technician replace it.
The Optional Digital Timer Does Not Turn On (The Rest of the Unit is Working)
•Have a qualified electrician check the transformer, the timer and its connective
wiring.
The Optional 4 Menu Digital Time Does Not Turn On (The Rest of the Unit is Working)
•Have a qualified electrician check the timer and its connective wiring.
Rev. 8/16/06

501_502
0502S20007 6-1
MAINTENANCE
DANGER
ALWAYS DISCONNECT THE GRILLE FROM THE POWER SUPPLY BEFORE
ATTEMPTING ANY TYPE OF MAINTENANCE TASK,
CAUTION
COOKING SURFACES ARE HOT USE CARE WHENEVER WORKING NEAR THEM.
ALLOW SUFFICIENT TIME FOR COOLING BEFORE BEGINNING MAINTENANCE.
Top Platen Assist Spring Adjustment
To allow adjustability in the amount of force required to raise or lower the top platen a
drag block has been added to each top platen hinge pin. Using a screw driver, a screw
can be adjusted to increase or decrease the drag on the hinge pin. Increasing the drag,
(turning the screw clockwise), will restrict the movement of the top platen’s handle.
Rotating the screw counter clockwise will free the movement of the platen allowing it
drop from higher positions but pop up when at the lowest position. If you wish you may
make this adjustment to fit your needs. The screw is assessable from the rear of the
machine through the spring cover. Periodic adjustment of this screw may be necessary.
Cleaning
WARNING
HOLD THE TOP PLATEN OPEN WHILE CLEANING IT TO
PREVENT ACCIDENTAL CLOSURE.
As Required Cleaning:
We recommend the scraping of the top and bottom cooking surfaces, with the scraping
tool provided, between each load to minimize excessive carbon buildup on the cooking
surfaces. Excessive carbon buildup will decrease the cooking surface’s efficiency,
negatively affecting grille performance.
As necessary throughout the day empty the front grease tray. It can be hand washed in
a normal dish cleaning solution or placed in a dishwasher.
Continued

501_502
0502S20007 6-2
Cleaning (Continued)
Daily Cleaning
DANGER
ALWAYS DISCONNECT THE GRILLE FROM THE POWER SUPPLY BEFORE
ATTEMPTING ANY TYPE OF MAINTENANCE TASK,
DANGER
DO NOT WASH DOWN OR IMMERSE THE GRILLE IN WATER OR OTHER LIQUIDS
CAUTION
DO NOT USE ICE OR COLD WATER TO CLEAN HOT CAST IRON COOKING
SURFACES. RAPID TEMPERATURE CHANGES MAY CRACK THEM.
Disconnect the unit from the power supply and lock it out before cleaning. Allow the unit
to cool to a temperature of approximately 100º F before cleaning to prevent accidental
burns.
Most surfaces are either stainless steel or cast iron, the stainless steel surfaces can be
cleaned with a warm damp cloth and a mild detergent. Polish with a dry soft cloth.
Frequent cleanings of the stainless surfaces will keep them from yellowing due to baked
on grease.
Daily, after letting the cooking surfaces cool, scrap them thoroughly and wipe them down
with a clean cloth removing as much grease and foreign mater as possible.
Major Cleanings
Should it become necessary to remove a heavy carbon buildup on the cooking surfaces,
through a thorough scraping or other radical cleaning, it may become necessary to
re-season the grill. See “Seasoning of the Cooking Surfaces” in the “Installation
Instruction” portion of this manual.

501_502
0502S20008 7-1
RECOMMENDED SPARE PARTS
PART NUMBER PART DESCRIPTION NO. REQ’D
0501-0035 Scrapper-Panini 1
5501-7940 Insulation-Heater 2
5501-7945 Insulation-Lower (Models 502 & 502-N) 1
5501-7946 Insulation-Lower (Models 501 & 501-N) 1
The following components comprise a single Selector Switch
5708-7935 Operator-Selector Switch 1
5708-7928 Contact-NO 3
5708-7940 Block-Mounting Adaptor 1
5708-7945 Ring-Anti Rotation 1
5730-2658 Upper Tubular Heater 1000W, 208/220/240VAC 1
5730-2659 Lower Tubular Heater 1250W, 208/220/240VAC 1
5730-2660 Upper Tubular Heater 800W, 110/115V 1
5730-2661 Lower Tubular Heater 1000W, 110/115V 1
5759-2002 Thermostat 1
7030-0028 Spring-Torsion 1
Optional Parts:
5759-5040 Timer-Digital 1
5759-5042 Timer-Digital 4 Menu 1
5760-3008 Transformer 115/230 1
For Service Parts Call Oliver Products @ 800-253-3893
Rev. 8/16/06

0501S20000 8-1
MODEL 501 & 501-N PANINI GRILLES
REV. 8/2/07

0501S20000 8-2
MODEL 501 & 501-N PANINI GRILLE PARTS LIST
ITEM NO PART DESCRIPTION PART NUMBE
001 Platen-Single Lower Ribbed 0501-0002
001 Platen-Single Lower Smooth (Not Shown) 0501-0002-001
002 Heater-Tubular 1250W 208/220/240VAC 5730-2659
002 Heater-Tubular 1000W 115VAC 5730-2661
003 Plate-Lower Heater Holddown 0501-0012-001
004 Insulation 5501-7940
008 Cover-LH Spring 0501-0013-0012
010 Base-Small Single 0501-0001
013 Guide-Tube 0501-0014
016 Cover-Base Bottom 0501-0033
017 Tray-Grease 0501-0034
018 Scraper-Panini 0501-0035
019 Spacer-Bulb & Capillary Tube 0501-0037
020 Cover-Insulation 0501-0039
021 Insulation-Lower 5501-7946
024 Handle-Pull 5908-5135
025 Plate-Backing 0501-0038
102 Platen-LH Upper 9 X 9 Ribbed 0501-0003-0002
102 Platen-LH Upper 9 X 9 Smooth (Not Shown) 0501-0003-0012
103 Heater-Tubular 1000W 208/220/240VAC 5730-2658
103 Heater-Tubular 800W 115VAC 5730-2660
104 Plate-Heater Holddown 0501-0012
109 Tube-LH Conduit 0501-0004-0012
110 Ring-Retaining 5840-1128
111 Rod-Platen Pivot 0501-0005
112 Ring-E Clip 3/8” 5840-1275
113 Cover-Upper 9 X 9 Platen 0501-0006
116 Rod-LH Hinge 0501-0007-0002
117 Block-Drag 0501-0008
118 Ring-E Clip 1/2” 5840-1280
119 Spring-Torsion 7030-0028
124 Arm-Handle 0501-0009
126 Rod-Handle 0501-0010
127 Handle-Plastic 0501-0011
130 Stop-Top Platen 0501-0042
131 Screw-Wing M6 x 10 8841-9756
REV. 8/2/07
FOR SERVICE PARTS CALL OLIVER PRODUCTS @ 800-253-3893 Continued

0501S20000 8-3
MODEL 501 & 501-N PANINI GRILLE PARTS LIST (Continued)
ITEM NO PART DESCRIPTION PART NUMBER
201 Leg-1” Leveling 5912-0532
201 Leg-2-1/2” Flanged Foot 5912-0534
201 Leg-2-1/2” Suction Cupped 5912-0533
201 Leg-4” Flanged Foot 5912-0530
201 Leg-4” Suction Cupped 5912-0531
204 Adapter-Thread (1” Legs) 5800-3605
501 Panel-Front W/Timer 0501-0016-1
501 Panel-Front W/O Timer 0501-0016-101
504 Plate-Electrical Mounting 0501-0015
512 Block-Terminal 5770-7470
516 Timer-Digital (Optional) 5759-5040
517 Stand-Off (Optional Timers) 0501-0017
520 Transformer- 115/230 (Optional Timers) 5760-3008
522 Thermostat 5759-2002
523 Knob-Thermostat 5759-2050
524 Light-Pilot 208/220/230V 5709-0012
524 Light-Pilot 115V 5709-0021
525 Operator-Selector Switch 5708-7935
526 Contact-NO 5708-7928
527 Block-Mounting 5708-7940
528 Ring-Anti Rotation 5708-7945
545 Clip-3/16 Dia. 5106-8140
Parts Not Shown on Drawing
505 Cord-Power 1 Phase 115/208/220/230V 0501-0036
506 Bushing-Strain Relief 1 Ph. 115/208/220/230 5765-1125
507 Cap-Plug 15 Amp, 1 Phase 208/230V 5765-2031
507 Cap-Plug 20 Amp, 1 Phase 115V 5765-2023
543 Sleeve-Upper Heater Wires 0501-0032
549 Sleeve-Capillary Tube 0501-0040
FOR SERVICE PARTS CALL OLIVER PRODUCTS @ 800-253-3893
This manual suits for next models
3
Table of contents
Popular Grill manuals by other brands

Trisa electronics
Trisa electronics 7365.42 Instructions for use

Kenmore
Kenmore 141.153371 owner's manual

Viking
Viking 5 Series Installation use & care instructions

Targa
Targa GW 84 B1 Operating instructions and safety instructions

Diamond
Diamond PLANCHA/2-N instruction manual

BBQ Guru
BBQ Guru Cyberq Cloud manual