Olympia OL2410 User manual

OLYMPIA®OL2410
2.4GHz Digital Spread Spectrum with
Digital Answering Machine
OWNER’S MANUAL

2
Copyright
© 2002, Wave Industries Ltd. All Rights Reserved.
Reproduction, adaptation, or translation without prior written permission is
prohibited, except as allowed under the copyright laws.
First Edition: Sep 2002
Trademark Information
Olympia®is a registered trademark of Olympia International Holdings Ltd.
Warranty
The information contained in this document is subject to change without notice.
Wave Industries makes no warranty of any kind with respect to this information.
Wave Industries shall not be liable for any direct, indirect, incidental,
consequential, or other damage alleged in connection with the furnishing or use of
this information.
Printed in China

3
TABLE OF CONTENTS
IMPORTANT SAFETY INSTRUCTIONS ............................................................ 5
SAFETY INSTRUCTIONS FOR BATTERIES ..................................................... 7
1 Features .......................................................................................................... 8
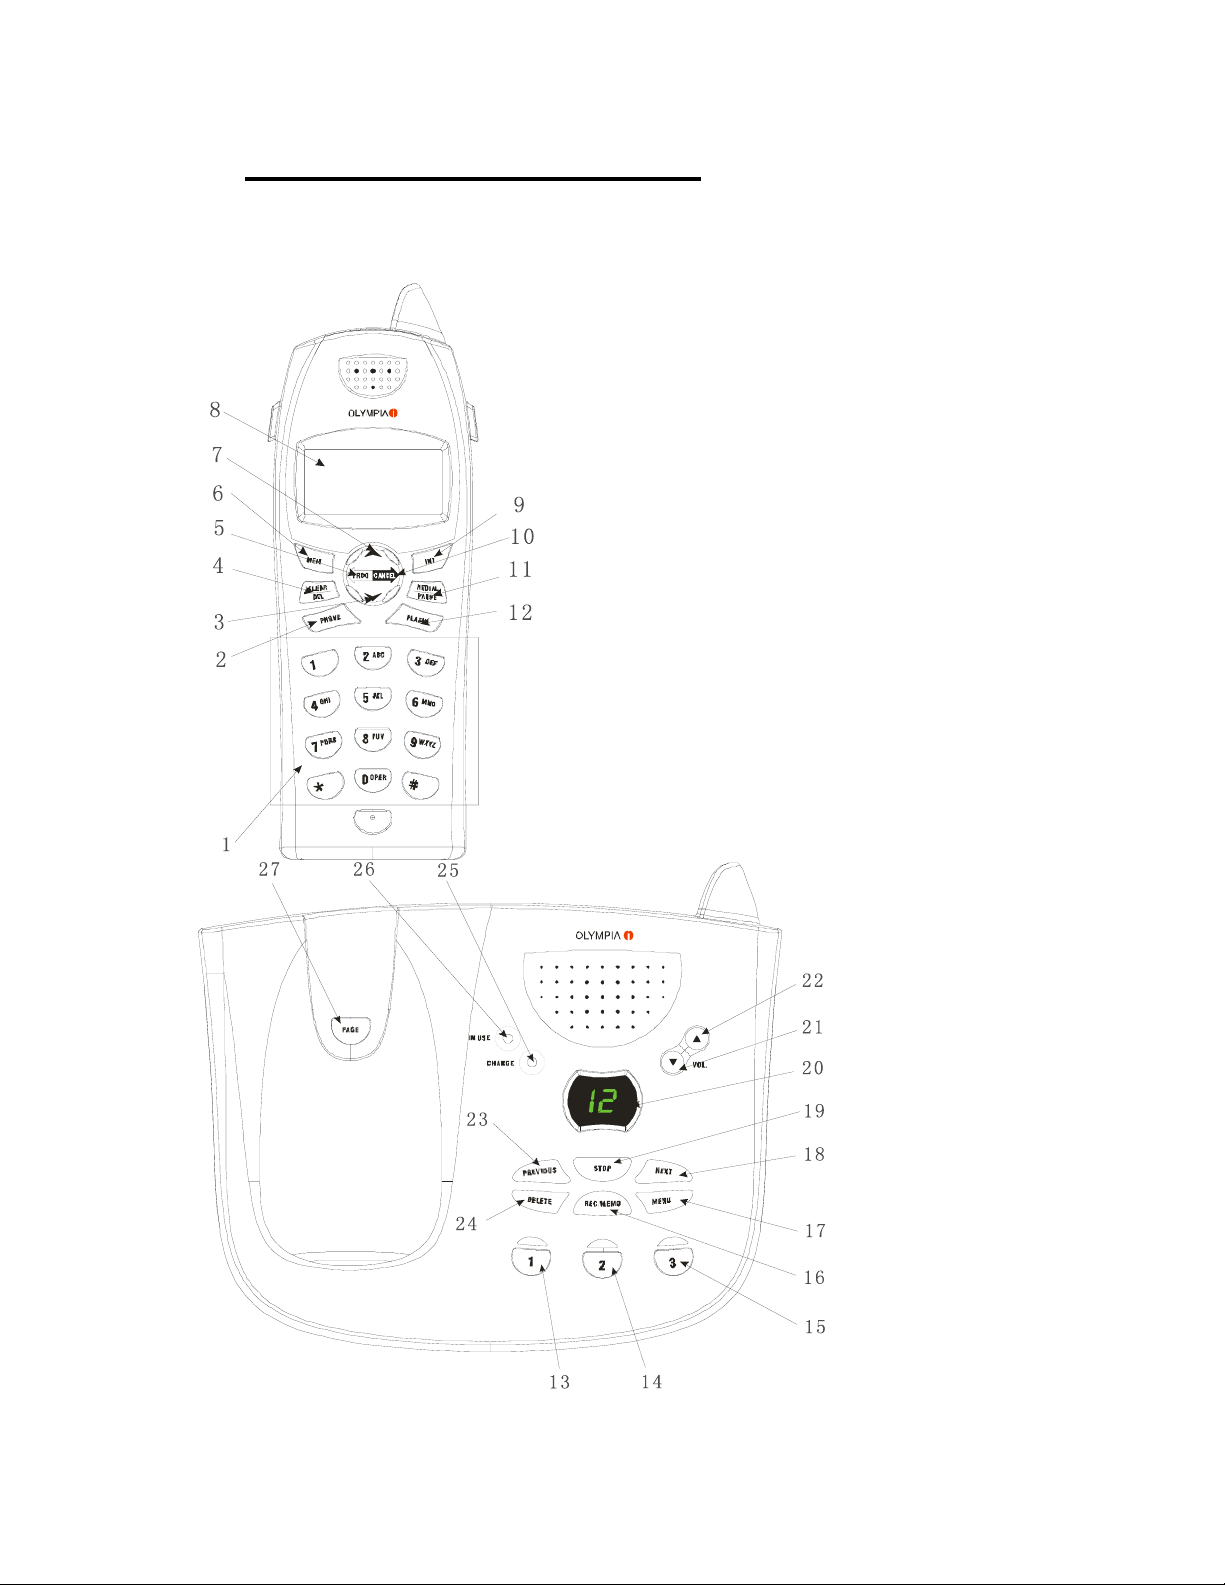
2 Layout of Keys and Indicators ..................................................................... 10
2.1 Key Functions ............................................................................................. 10
2.2 LCD Display Indications ........................................................................... 12
3 Installation and Charging of the Battery Pack.............................................. 13
4 Handset Registration Procedure ................................................................... 15
5 Display Messages & Audio Alert................................................................. 16
5.1 Display Message ......................................................................................... 16
5.2 Audible Alerting ........................................................................................ 18
6 Operation Guide ........................................................................................... 19
6.1 Making External Calls ............................................................................... 19
6.2 Redialing..................................................................................................... 20
6.3 Receiving Calls .......................................................................................... 21
6.4 Flash........................................................................................................... 21
6.5 Page Call .................................................................................................... 21
6.6 Making Internal Calls................................................................................. 22
6.7 Call Toggling ............................................................................................. 22
6.8 Call Transfer/Forward................................................................................ 23
6.9 Call Back.................................................................................................... 24
6.10 Conference ............................................................................................... 24
6.11 Muting the Microphone ........................................................................... 25
6.12 Call Waiting ............................................................................................. 25
7 Menu Structure............................................................................................. 27
7.1 Call Log ..................................................................................................... 28
7.2 Phone Book Operation ............................................................................... 30
7.3 Handset Volume......................................................................................... 34
7.4 Ring Volume.............................................................................................. 34
7.5 Ring Pattern ............................................................................................... 35
7.6 Auto Answer .............................................................................................. 36
7.7 Key Click ................................................................................................... 37
7.8 Key Lock.................................................................................................... 37
7.9 Handset Name............................................................................................ 39
7.10 Select LANGUAGE................................................................................. 39
7.11 Clear Message Waiting ............................................................................ 40
7.12 Dial Method ............................................................................................. 40
8 Overview of Telephone Functions ............................................................... 42
9 Digital Answering Machine Operation ........................................................ 47
9.1 General Operation....................................................................................... 47
9.2 Set Answer On/Off...................................................................................... 47
9.3 Setting the Clock......................................................................................... 48

4
9.4 About Announcements................................................................................ 48
9.5 Recording a Message .................................................................................. 49
9.6 Reviewing Messages................................................................................... 52
9.7 Volume Control ......................................................................................... 54
9.8 Call Screening / Intercept............................................................................ 54
9.9 Change Message Alert ................................................................................ 55
9.10 Remote Access.......................................................................................... 55
9.10 Message Window Display......................................................................... 57
9.12 Set Base Ringer......................................................................................... 58
9.13 Set Number of Rings (2/ 4 / Toll Saver) ................................................... 59
10 Consumer Information...................................................................................... 60

5
IMPORTANT SAFETY INSTRUCTIONS
BEFORE USING YOUR TELEPHONE EQUIPMENT, BASIC
SAFETY PRECAUTIONS SHOULD ALWAYS BE FOLLOWED TO
REDUCE THE RISK OF FIRE, ELECTRIC SHOCK AND INJURY,
INCLUDING THE FOLLOWING
1) Read and understand all instructions.
2) Follow all warnings and instructions marked on the product.
3) Unplug this product from the wall outlet before cleaning. Do not use liquid
cleaners or aerosol cleaners. Use a damp cloth for cleaning.
4) Do not use this product near water, for example, near a bath tub, wash
bowl, kitchen sink, laundry tub, in a wet basement, or near a swimming
pool.
5) Do not place this product on an unstable cart, stand, or table. The product
may fall, causing serious damage to the product.
6) Slots and openings in the cabinet and the back or bottom are provided for
ventilation. To protect it from overheating, these openings must not be
blocked or covered. The openings should never be blocked by placing the
product on the bed, sofa, rug, or other similar surface. This product should
never be placed near or over a radiator or heat register. This product should
not be placed in a built-in installation unless proper ventilation is provided.
7) This product should be operated only from the type of power source
indicated on the marking label. If you are not sure of the type of power
supply to your home, consult your dealer or local power company.
8) Do not allow anything to rest on the power cord. Do not locate this product
where the cord will be damaged by persons walking on it.
9) Do not overload wall outlet extension cords, as this can result in the risk of
fire or electric shock.
10) Never push objects of any kind into this product through cabinet slots as
they may touch dangerous voltage points or short out parts that could result
in a risk of fire or electric shock. Never spill liquid of any kind on this
product.
11) To reduce the risk of electric shock, do not disassemble this product.
Instead, when some repair work is required, take the unit to a qualified
technician. Opening or removing covers may expose you to dangerous
voltages or other risks. Incorrect reassembly can cause electric shock when
the appliance is subsequently used.
12) Unplug this product from the wall outlet and refer servicing to qualified
service personnel under the following conditions:
a) When the power supply cord or plug is damaged or frayed.

6
b) If liquid has been spilled into the product.
c) If the product has been exposed to rain or water.
d) If the product does not operate normally by following the operating
instructions. Adjust only those controls, that are covered by the operating
instructions because improper adjustment of other controls may result in
damage and will often require extensive work by a qualified technician
to restore the product to normal operation.
e) If the product has been dropped or cabinet has be damaged.
f) If the product exhibits a distinct change in performance.
13) Avoid using a telephone(other than a cordless type) during an electrical
storm. There may be a remote risk of electrical shock from lightning.
14) Do not use the telephone to report a gas leak in the vicinity of the leak.

7
SAFETY INSTRUCTIONS FOR BATTERIES
Safety Instructions for Batteries
Handset Battery Pack
CAUTION:
Danger of explosion if battery is incorrectly replaced. Use only an Olympia Phone
approved battery packs in the handset of your OL2410 Cordless Telephone. To
reduce the risk of fire or injury, always do the following when replacing,
discarding, or charging battery, When handling the batteries, be careful not to short
the battery with conducting materials such as rings, bracelets, and keys. The
Battery or conducting material may overheat and cause burns. Use only the
following type and size of battery pack:
FOR HANDSET UNIT:
GP60AAAH3BMX 3.6V 600mAh GPI INTERNATIONAL LIMITED
CONTAINS NICKEL-METAL HYDRIDE
BATTERY. BATTERY MUST BE RECYCLED
OR DISPOSED OF PROPERLY
1) Do not dispose of the battery in a fire. The cell may explode. Check with
local codes for possible special disposal instructions.
2) Do not open or mutilate the battery. Released electrolyte is corrosive and
may cause damage to the eyes or skin. It may be toxic if swallowed.
3) Exercise care in handling batteries in order not to short the battery with
conducting materials such as rings, bracelets and keys. The battery or
conductor may overheat and cause burns.
4) Charge the batteries provided with or identified for use with this product
only in accordance with the instructions and limitations specified in this
manual.
5) Observe proper polarity orientation between the battery(ies) and battery
charger.
6) Do not mix old and new batteries in this product.
7) Do not mix batteries of different sizes or from different manufacturers in
this product.
SAVE THESE INSTRUCTIONS

8
1 Features
•Over 16 million security codes for call security
•CID/Call Waiting CID capable – stores the 20 most recent CID records
(requires CID service from your local phone company)
•Alphanumeric display shows CID time and date plus phone status
•5 phone number redial
•Exchangeable face panels
•50 name and number phonebook
•Microphone mute feature
•Audible low battery and out of range warnings
•Headset jack
•Multiple Handset capability – up to 4
•Page function from Base
•Tone/Pulse dialing
•Key Click – programmable ON/OFF
•Key Lock – programmable ON/OFF
•Auto Answer (out of cradle) – programmable ON/OFF
•(2) two-way intercom calls can take place simultaneously
•Call Transfer – Handset to Handset
•Auto Hold during Call Transfer
•Adjustable Earpiece Volume Control (8 levels)
•Programmable Ringer OFF/Volume Control (6 levels)
•10 selectable Ringer Tones
•Rechargeable Ni-NH battery pack
•Integrated Digital Answering Machine
•Up to 15 Minute Recording Time –Including all (Outgoing Message) OGM,
MEMO and Incoming Messages (ICM).
•3 Mailboxes with LED for each mailbox
•-- Maximum OGM 1 minute
•-- Maximum Memo 1 minute
•-- Maximum ICM 1 minute
•-- Maximum Message 50
•Voice Date / Time stamp
•Voice menu
•Call screening – at Base speaker
•Remote Operation/ Activation.
•User Programmable Security Code
•Two LED indicators
•Digital volume control (8 levels, but lowest level is not muting)
•Ringer Selection (2/4/Toll Saver)

9
•Three playing modes – Normal, Skip, Repeat.
•Selective Delete– Delete one message or all messages in mailbox.
•Announce Only Mode
•Announce On / Off
•Message Full Detection

10
2 Layout of Keys and Indicators
2.1 Key Functions

11
1. Keyboard Dialing telephone numbers
2. Phone key Press to make or receive a call. Press again to end a call
3. Down key For navigation
4. Clear/Delete key Delete input / Microphone muting
5. Program key Menu selection / Confirm input
6. Memory key Phone book memory
7. Up key For navigation
8. LCD Display Provides information such as Caller ID and programming
data
9. INT key For internal calls
10. Cancel key Exit menu
11. Redial/Pause key Last number called / Pause
12. Flash key For use with call waiting service
13.Mailbox”1” Select mailbox “1”
14.Mailbox”2” Select mailbox “2”
15.Mailbox”3” Select mailbox “3”
16.Rec/Memo Record outgoing message or memo
17. Menu Go into feature menu and select a feature.
18. Next Skip to next message/Select Next Item.
19. Stop Stop Playback
20.Two LED indicators Mainly for total/new message counter.
21. Volume down Decrease loudspeaker volume
22. Volume up Increase loudspeaker volume
23. Previous Repeat the current playing message/Play Previous
message/Select Previous Item.
24.Delete Delete message
25. Charge LED Lights when Handset is charging in the base
26. IN USE LED Lights in talk mode
Flashing when ringing and no line
27. Page Press at Base to page all registered Handsets

12
2.2 LCD Display Indications
1. Caller ID Time
2. Caller ID Date
3. Ringer OFF icon (displayed when user turns the ringer off)
4. Low battery icon (on only if battery voltage is low)
5. Key lock icon (displayed when user locks the keypad)
6. In Service icon (displayed when Handset is ‘in range’ of the Base)
7. Off Hook icon (displayed when Handset is on an external or intercom call)
8. NEW icon (displayed when new Caller ID records have been received)

13
3 Installation and Charging of the Battery Pack
1) Open the battery compartment by sliding the cover down.
2) Plug the Battery Pack connector into the Handset battery socket. Place the
battery pack and wires in the compartment.
3) Close the battery compartment.
4) Mount the belt clip and one of the provided face panels on the Handset.
5) Choose the appropriate mounting bracket. The smaller bracket is for desk
or countertop installations. The larger bracket is for wall mounting. You
must use one of these brackets. Thread the telephone cord and DC power
cord through the large opening in the bracket. Plug the two cords into the
corresponding jacks on the bottom of the Base.
6) Snap the bracket into place on the back of the Base. If you are using the
desk top bracket, run the two cords through the channel at the back of the
bracket. If you are wall mounting the Base, carefully line up the slots on the
wall mount bracket with the studs on the telephone wall plate, and carefully

14
mount the telephone on the wall.
7) Connect the telephone line cord to the telephone jack, and the power supply
to a live power outlet. Make sure you are not using an outlet controlled by a
switch.
8) Place the Handset in the Base. The Handset and Base communicate with
each other automatically. This process may take a minute.
9) Leave the Handset in the Base for 10 hours so that the battery pack is fully
charged.
The CHARGE indicator on the Base glows when the Handset is charging.

15
4 Handset Registration Procedure
A Handset, which has not been registered, will display:
NOT REGISTERED
PLACE IN BASE
Plug the power supply into a live electrical outlet and the DC connector into the
bottom of the Base. Place the Handset (with battery pack plugged in) into the Base
cradle. In approximately 60 seconds, the Handset will beep, indicating
registration has been completed. The Handset display will say “READY.”
A previously registered Handset will display “OUT OF SERVICE” if taken out
of range or if the Base loses power.
OUT OF SERVICE
Return to the Base or power up the Base again, then place the Handset in the Base
cradle. In approximately one minute, the Handset will regain its registration.

16
5 Display Messages & Audio Alert
5.1 Display Message
The handset provides a number of status messages in the display either in the idle
state or during conversation.
The following status messages are shown in the idle display.
When the handset is out of range, an "out of service" message is shown in line one.
OUT OF SERVICE
When the handset has no valid registration, the display shows:
NOT REGISTERED
PLACE IN BASE
If a new battery has been inserted and the battery voltage is too low to guarantee
significant conversation time, the display shows:
PLACE IN CHARGER
When the battery pack has first reached a minimal charge (but no enough to assure
continuous operation), it will display “CHARGING.”
CHARGING
When a handset has completed registration, it will display "READY."
READY
If the phone line is disconnected, "NO LINE" is displayed.
READY
NO LINE
When the keypad is locked, the status is presented in line two.
READY
KEY LOCKED

17
If the phone line is in use (by another telephone connected to the same line), “EXT
IN USE” is displayed. It is still possible to go off-hook during this condition.
If one handset is engaged in an external call, the message is presented in line two
of the other handset’s display.
READY
EXT IN USE
In the presence of new, unplayed voicemail messages, “MESSAGE WAITING” is
displayed.
READY
MESSAGE WAITING
When there is one or more new Caller ID records in the call log, the status is
presented in line two: e.g.
READY
10 CALL/3 NEW
When the ringer is switched off, the status is presented in line two.
READY
RINGER OFF
The following messages may occur in the display during conversation.
When the battery low level is reached, the "charge battery" recommendation is
shown in line two.
TALK 1:32:56
CHARGE BATTERY
When the microphone is muted, the status is presented in line two.
TALK 1:32:56
MIC MUTE

18
5.2 Audible Alerting
Out of range
•A one-time triple beep will be heard at the Handset.
Low battery
•When off hook, a double beep will be heard in the earpiece.
•When on hook, a double beep will be heard at the Handset.
Charging
•The Handset will emit a single beep when placed in the Base charger.
Registration
•The Handset will emit a single beep indicating successful registration.
•If the registration procedure fails, the Handset will emit a double beep.
Other earpiece tones/alerts
•Conference call establishment (second handset has joined conversation)
•Busy tone
•Congestion tone
•Call waiting
•Microphone mute
•Dial tone
•Ring back tone
Other handset tones/alerts
•Illegal key press (during programming mode)
•Programming confirmation

19
6 Operation Guide
6.1 Making External Calls
6.1.1 Post Dialling
1) Press the key and wait for dial tone
2) Dial the telephone number 030 1234
3) End the call by placing the handset in the cradle or pressing the PHONE
key
6.1.2 Pre-dialling
1) Dial the telephone number; e.g. 555-5555
2) Delete any incorrect entry with short press or whole entry with long press
3) Press the key to dial the number
4) End the call by placing the handset in the cradle or pressing the PHONE
key
Inserting a Pause in Dialling String
When programming a number into the phone book, press REDIAL/PAUSE
to insert a two-second pause in the dialing sequence. This is useful when
speed dialing on a PBX system. Each press of REDIAL/PAUSE adds two
additional seconds to the pause

20
Press the key to insert a pause and “P” appears in the display.
6.2 Redialing
Each system handset stores the last 5 telephone numbers dialed.
6.2.1 Post-dialling
1) Press PHONE key and wait for dial tone.
2) Press REDIAL until you see the desired number.
3) Press PROG to dial the displayed number.
4) End your call by placing the handset in the cradle or pressing PHONE.
6.2.2 Pre-dialling
1) Press REDIAL until you see the desired number.
2) Press PHONE.
3) End your call by placing the handset in the cradle or pressing PHONE.
Other manuals for OL2410
1
Table of contents