One World Touch WM-2137-36 User manual

1
User
M
anual For WM-2137-36
Touch Monitor

2
T
able
of
C
ontents
Chapter 1
I
n
troduction
......................................................................................................................3
Chapter 2 Views of the Touch Monitor
.........................................................................................4
2.1 Front
V
iew
......................................................................................................................4
2.2
Back
V
iew
........................................................................................................................4
Chapter 3 Getting Started
.................................................................................................................4
3.1 Connect the Touch Monitor
........................................................................................4
3.2 Touch screen installation
...............................................................................................5
3.3 Adjustment and using the display..
..............................................................................5
Chapter 4
T
r
oubleshooting
................................................................................................................8

3
C
hapt
er 1
I
n
tr
o
duc
tion
T
hank
you for your choice of
purchase
.
Please read this user manual before
using
your product and refer to this or a professional technician for any queries related
t
o
the
produc
t
.
D
isclaimer
1.
This
product has been tested in accordance with the provisions of
FCC
Rules
Part 15 and complied with
Class B
digital device
r
egula
tions
.
T
he
purpose
of these provisions is to provide
reasonable protection
against
har
mful
interference in domestic
use
.
2.
This
product may not be
fully
adaptable
with other products and not suited for
other
environments
which
ar
e not
mentioned
in this user manual and
r
ela
t
ed
product
ma
t
er
ial
.
T
her
ef
or
e,
the warranty
will
only cover issues with the product
alone
.
3.
B
ecause
of technical or other external factors which leads to changes
on
product
design and specifica
tions
,
the company
will
not give a separate
notic
e
.
Warnings and
P
r
ec
autions
This
machine isa high
v
oltage
,
do not open the cabinet in order to avoid an
elec
tr
ic
shock
.
Maintenance should be
entrusted
to
pr
ofessionals
.
I
ncor
r
ec
t
methods
of
operation
may cause electric shock or fire
inciden
ts
.
To
ensur
e
your safety and the lifespan of the
machine
,
please read the following
instructions
carefully before using this
machine
.
All
operation
must comply with all
instructions
.
•
Do not use the accessory
equipment
which isnot
recommended
by
the
manufac
tur
er
.
•
Please use the machines with the supplied power
adapt
er
.
Also
please check
AC
power
adapter
specification,
if
you are not sure whether it fits your local
electricity condition, contact your distributor or
manufac
tur
er
.
•
Do not try to try to manually
fix
or alter the supplied power
adapter
.
Damaged
power cord can cause electric shock or
fir
e
.
•
Do not try to repair the machine without professional
guidanc
e
,
as the
high
voltage machine could result in the hazard of human body or the
machine
itself
.
Be
sure the machine isrepaired or
maintained
by professional
t
echnician.
•
Do not
attempt
any actions which conflict with this
manual
.
I
mproper
adjustment
of
components
which
hasn
’
t
been
mentioned
in the
instructions
could
damage
the
machine
.
•
Clean the machine before plugging in the
po
w
er
.
Please use the slightly
damp
cloth to clean the machine and
don
’
t
use liquid cleaning
detergent
or
spr
a
y
cleaner
.
Unplug the power
if
the machine
hasn
’
t
been used for a long
time
.

4
C
hapt
er 2
Views of the Touch Monitor
2.1 FrontView 2.2 Back View
C
hapt
er 3 Getting
S
tar
t
ed
3.1
C
onnect the Touch Monitor
➢Ensure that the host with the touch monitor is turned off.
➢The signal cable (VGA or DVI or HDMI) is connected to the touch monitor and
the other end is connected to the host.
➢Connect the USB cable to the touch monitor and the other end is connected to
the host.
➢Connect the audio cable to the touch display "Audio Input", connect the other
end to your computer.
➢Connect the power adapter to the touch monitor and the other end connected to
the socket.
➢Press the power button to turn on the touch monitor. (Usually set to power on
mode)

5
3.2 Touch screen driver installation
The touch monitor is plug and play with Windows7, Windows8, Windows8.1,
Windows 10 and Ubuntu14.04. If you do not have one of these operating systems and
require a driver, please contact technical support.
3.2.1 Touchscreen provides two user modes:
Mouse Mode
Support Windows XP, Windows2000, Windows 7(32bit/64bit),
Windows 8(32bit/64bit), Windows 8.1(32bit/64bit), Ubuntu 10.04, Ubuntu 11.04,
RHEL 6.0
Digitizer Mode
Support Windows7 (32bit/64bit), Windows 8(32bit/64bit),
Windows 8.1(32bit/64bit), Ubuntu 12.04.3, Ubuntu 12.04.4, Ubuntu 13.04,
Ubuntu 13.10, Ubuntu 14.04,
Kubuntu13.10, Android_x86 4.4.2,
If do not support the system, we need to modify the kernel source code and compile
or update the kernel
3.2.2 Driver installation
3.2.2.1 If the touch screen mode is compatible with the client system is connected
to power and USB touch functions can be used directly.
As in Windows7 / Windows8 / Windows8.1/ Windows 10/ Ubuntu14.04
3.3 Adjustment and using thedisplay
Generally, you do not need to touch the display may be adjusted. However, variations
in video output and application may require adjustments to your touch monitor to
optimize the display quality. For best performance, please refer to Appendix A to set
the optimum resolution and frequency. Operating in other resolutions may degrade
video performance.
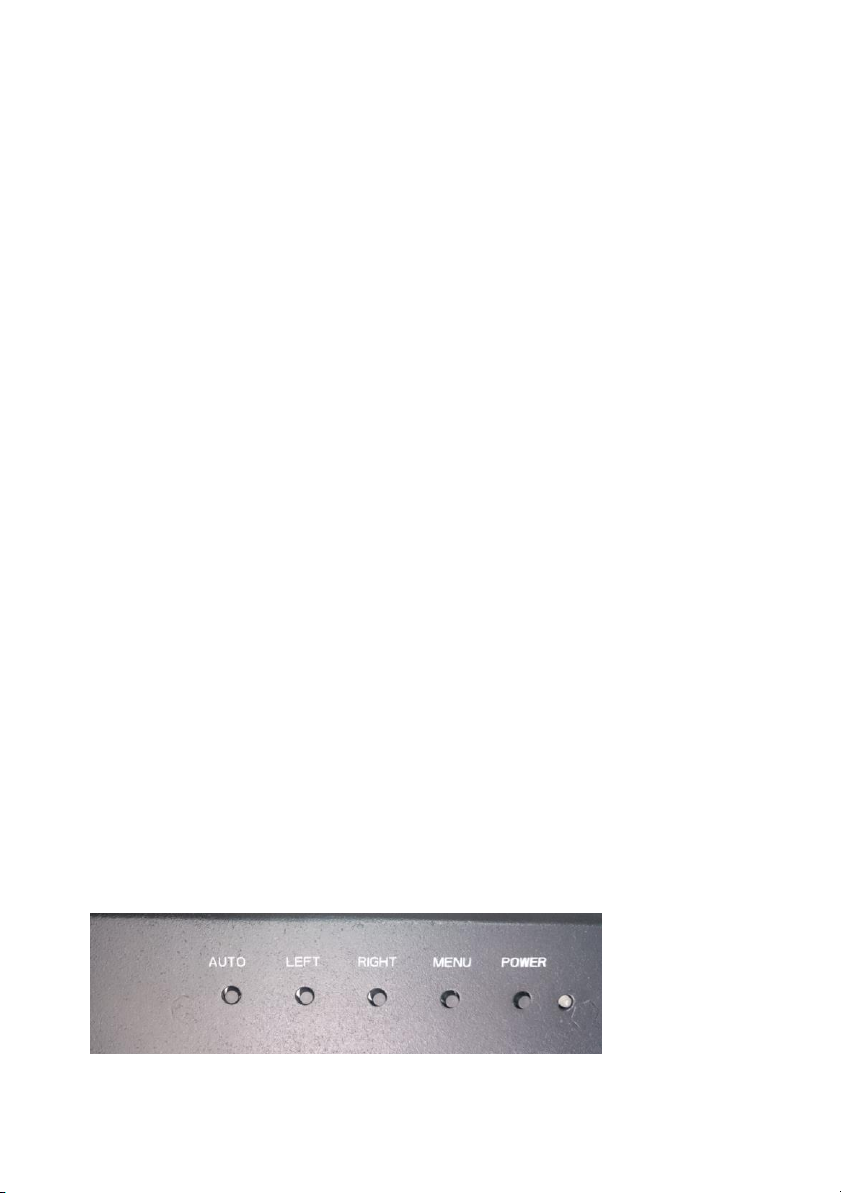
By Screen Display (OSD) menu to adjust all the settings in the monitor.
OSD keys function description:

6
➢POWER: Power switch
➢MENU: Display Menu/OK
➢RIGHT: The volume +
OSD menu options upwards
Increase the OSD option value adjustment
➢LEFT: volume –
OSD menu options down
Reduce the OSD option value adjustment
➢Auto: automatically optimize and adjust the screen setting/exit menu functions
Note: the AUTO effective automatic adjustment function only VGA mode.
The menu function description:
Image Adjustment
Brightness
Adjust the balance between light and dark shadows
Contrast
Adjust the degree of difference between darkness and lightness
Gamma
Adjust the gamma value
Position adjustment (VGA only)
Phase
The dot clock phase adjustment to fit the image data
Clock
It stretches the image horizontally
Row position
Left or right to move the image on the screen
Field position
To move the image up or down on the screen
Color adjustment
Color
5000K, 6500K, 7500K, 8200K, 9300K, 11500K, sRGB, user
OSD
Horizontal position
Left or right to move the horizontal position of the OSD menu settings
Vertical position
Move up or down the vertical position of the OSD menu settings
Transparency
OSD menu transparency settings
Display Time
OSD menu display time setting
Settings

7
Language
Select OSD display language: English, Spanish, French, German, Italian,
Portuguese, Korean, Simplified Chinese
Mute
On / off volume
Input signal
Select the input signal
Dynamic Contrast
On / off dynamic contrast; this feature increases the contrast and provide a
clearer, more detailed image quality outstanding
Ratio
Select Full and 4: 3 display
Reset
Parameter reset
Information
Display current monitor property settings

8
C
hapt
er 4
T
r
oubleshooting
F
ailur
e
Possible
R
easons
Power cannot be turned
on
•
Make sure the power button is on
(ON) position and the power cord is
properly connected to a grounded
power outlet and the monitor
No images
•
Check the power cord connection
and supply situation of
•
The signal cable is properly
connected?
(Using the D-SUB cable) Check the
D-SUB cable connection
(Using the DVI cable) Check the DVI
cable connection
"Out of Range" displayed on the screen
•
System is configured to not support
the display monitor
Picture bounces, flickers, or wave pattern
is present in the picture
•
The display may cause electrical
interference as far away from
electrical equipment
• Use your monitor is capable of at the
resolution the maximum refresh rate
Picture has color defects
(white does not look white)
• Adjust RGB color or select
color.
No touch
• Check the USB cable is connected
properly
• Drivers are installed properly
If the problem persists, please contact your local dealer or our technical service center.
Table of contents
Other One World Touch Monitor manuals