OnTruss EventBoard Basic Series User manual

OnTruss Prinz Gewerbepark - Halle 78 Bozener Str. 1 86165 Augsburg / GERMANY 1 von 27
User manual
EventBoard
Basic / Premium
Acessory parts:
TrussClip
TrussClip Safety
GripSlat
BoardBinder
BoardBinder ReleaseTool
ENGLISH
Version: 17.02.2020 / F

OnTruss Prinz Gewerbepark - Halle 78 Bozener Str. 1 86165 Augsburg / GERMANY 2 von 27
Contents
Contents..................................................................................................................................................................................2
1. Introduction..................................................................................................................................................................3
2. Technical data .............................................................................................................................................................4
3. Safety instructions....................................................................................................................................................8
4. Basics..............................................................................................................................................................................9
5. Unpacking the product .......................................................................................................................................... 10
6. Perspective................................................................................................................................................................. 10
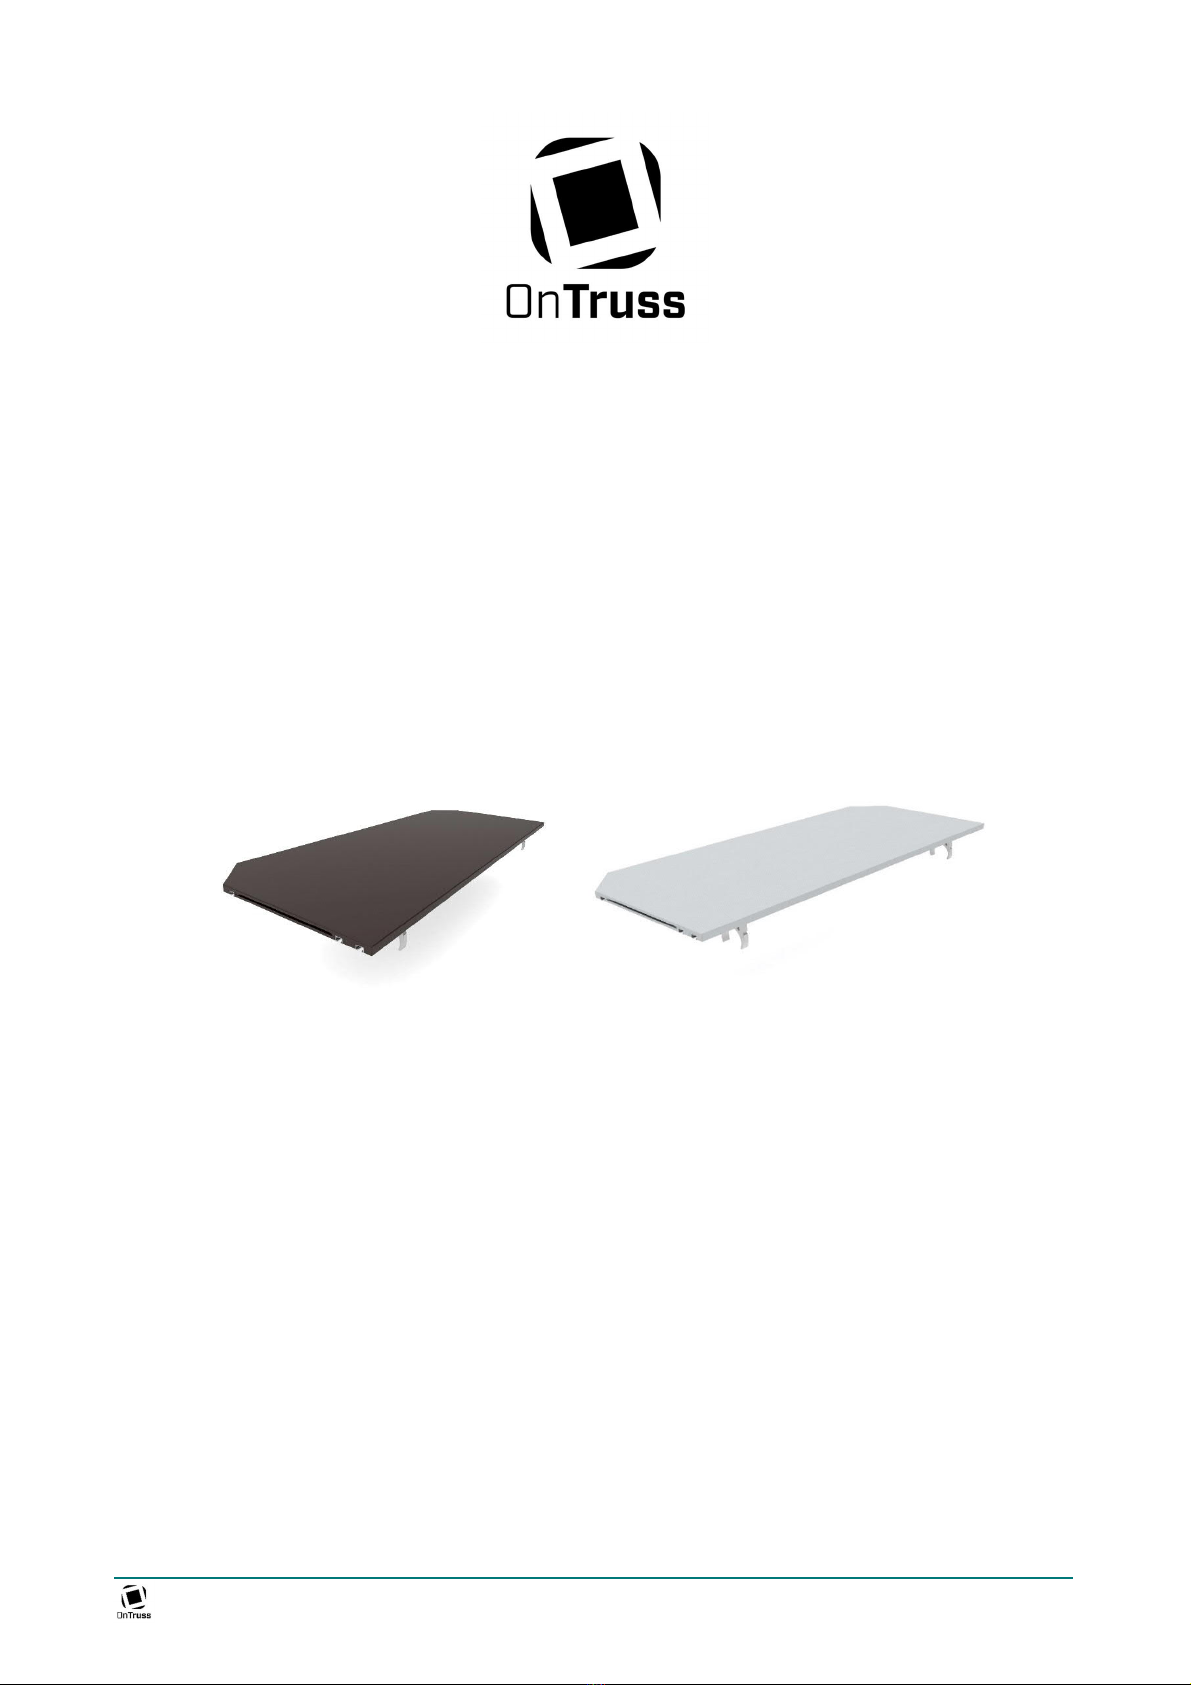
7. EventBoard - Types...................................................................................................................................................11
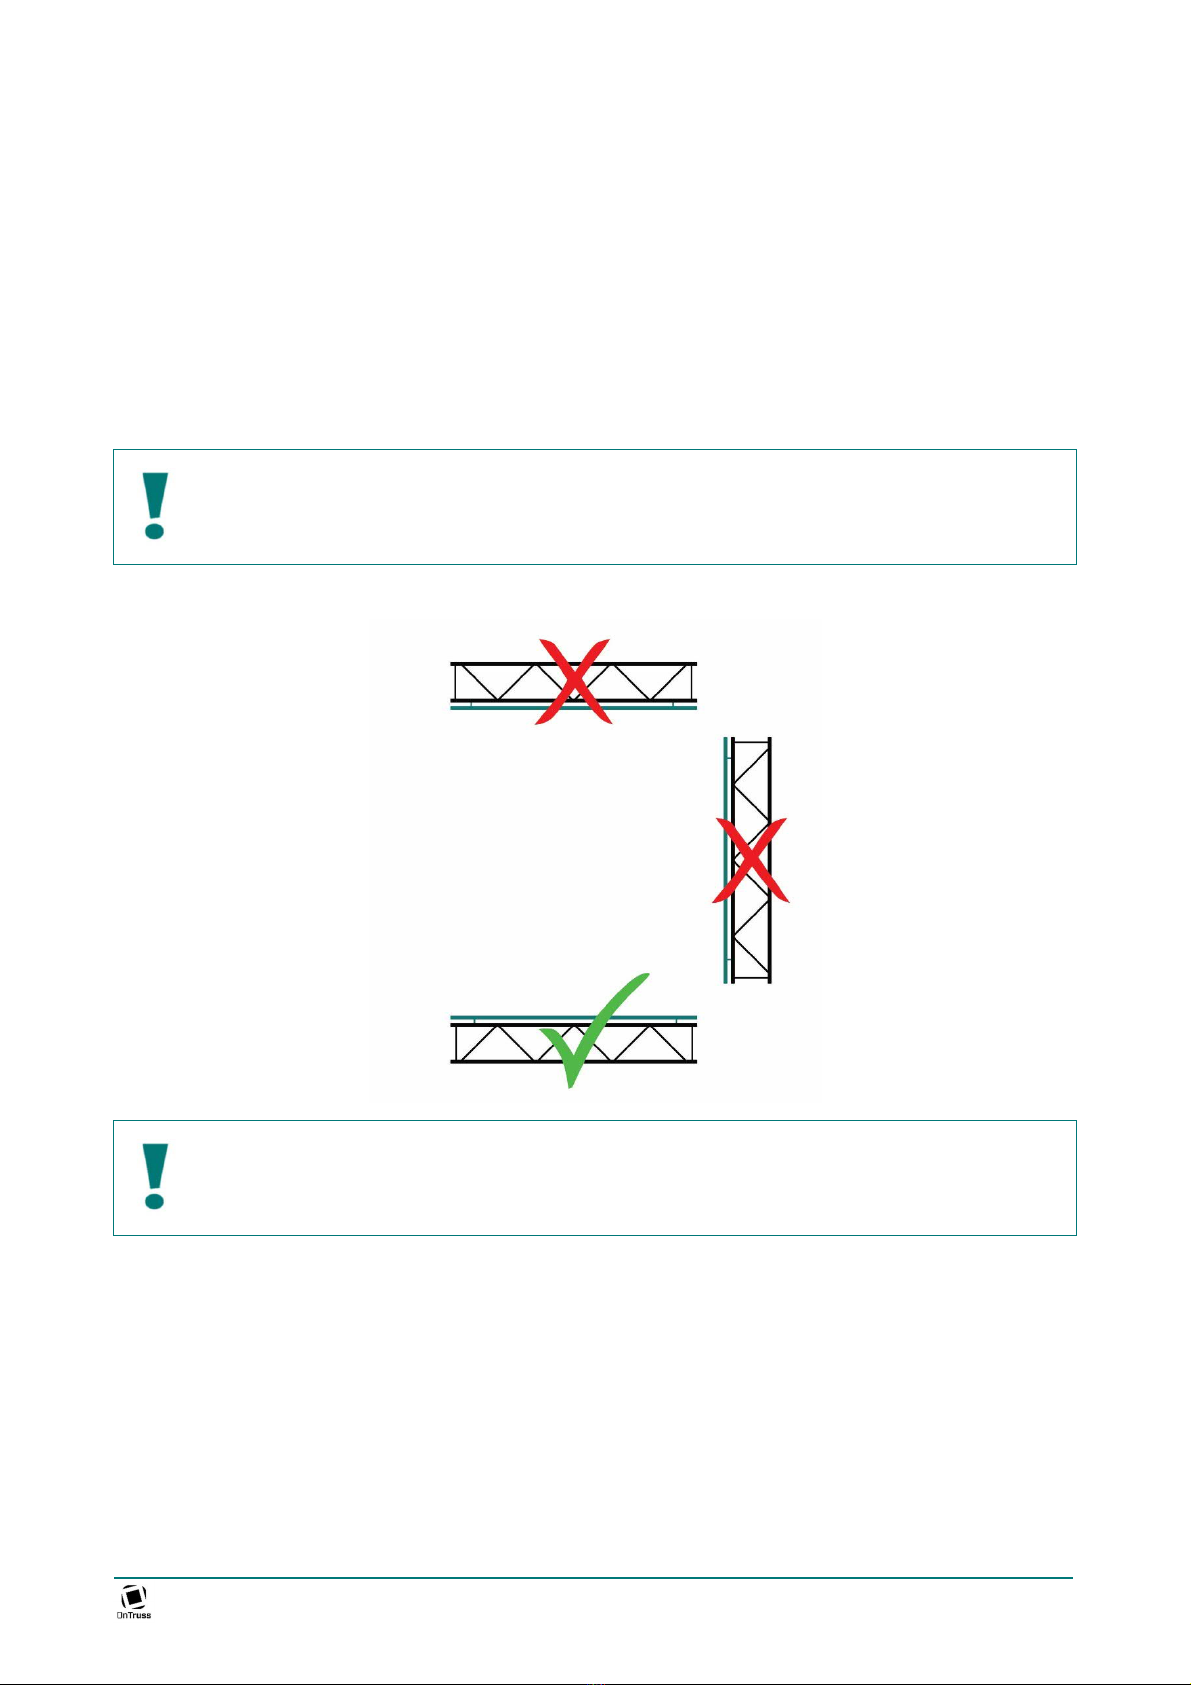
8. Truss assembly ......................................................................................................................................................... 12
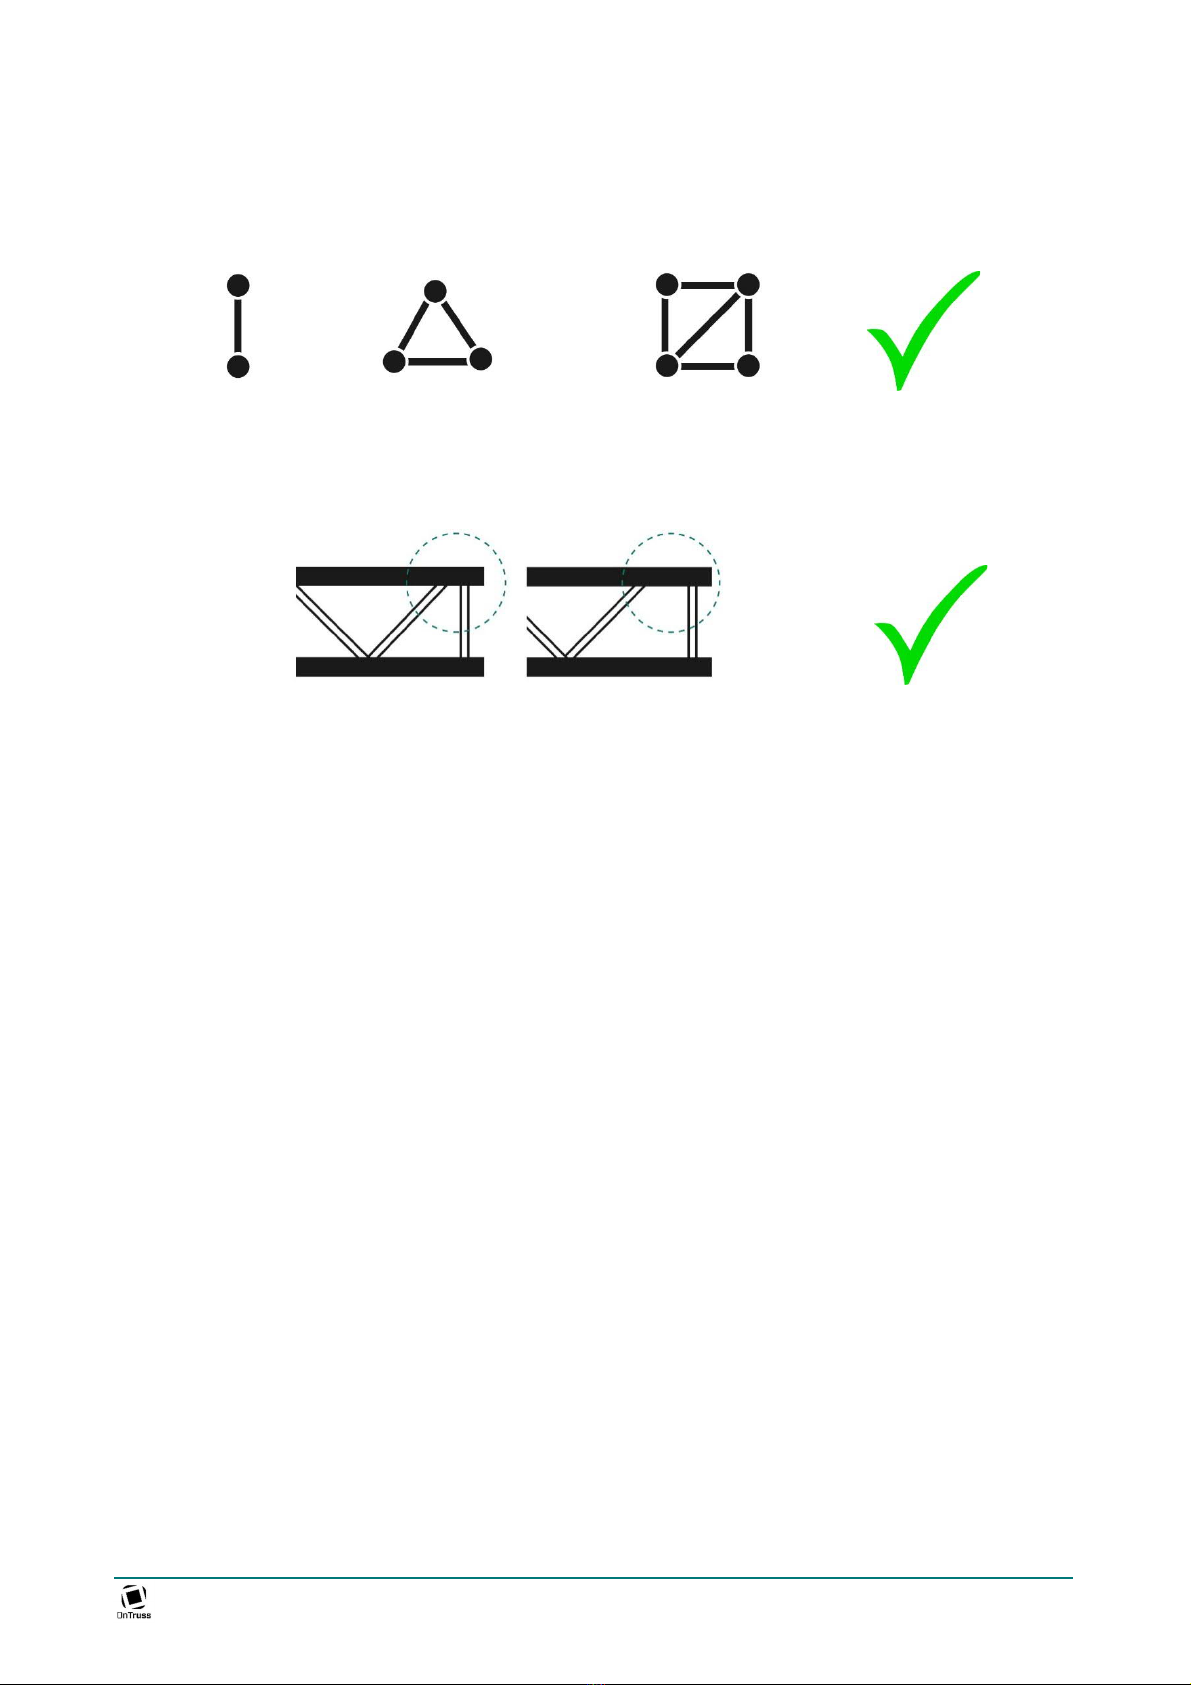
9. Mounting the TrussClips – Thanks’ to OnTruss concept........................................................................ 13
10. Mounting the EventBoards on trusses ...................................................................................................... 16
11. Locking the EventBoard on the truss........................................................................................................20
12. Integration into a roof construction............................................................................................................ 21
13. Disassembly.......................................................................................................................................................... 22
14. Design examples................................................................................................................................................. 25
15. Cleaning the EventBoards ..............................................................................................................................26
16. Service / Support................................................................................................................................................ 27

OnTruss Prinz Gewerbepark - Halle 78 Bozener Str. 1 86165 Augsburg / GERMANY 3 von 27
1. Introduction
Thanks’ for your decision and your trust in our product!
You made a good choice with OnTruss EventBoard.
These instructions apply to all OnTruss EventBoards of series Basic and Premium with a length of 50cm,
100cm and 200cm. We also describe how to use the EventBoard Corners C90A, C90C, C45A and C90I.
Furthermore, we explain how to use the accessories TrussClip, TrussClip Safety, GripSlat, BoardBinder und
BoardBinder ReleaseTool.
EventBoard has left our company in best condition. If you follow the instructions below and pay attention
to the instructions, you will enjoy this product for a very long time.
We explicitly declare that we - as the manufacturer - do not take any liability for damages
caused to the product or damages at the event caused by improper use of the product.
Please note that damages caused by manual changes to the product are not covered by warranty.
In this manual we will explain step by step how to assemble several EventBoards to a safe counter.
You can find useful videos and helpful information on our website www.ontruss.de.

OnTruss Prinz Gewerbepark - Halle 78 Bozener Str. 1 86165 Augsburg / GERMANY 4 von 27
2. Technical data
EventBoard | Dimensions & Weight
Product Type Dimensions Net weight
(without packag.)
EventBoard Basic
EventBoard Premium S050* 500mm x 400mm x 15mm 2,0 … 2,2kg
2,1 … 2,3kg
S100 1000mm x 400mm x 15mm 4,1 … 4,3kg
4,3 … 4,5kg
S200 2000mm x 400mm x 15mm 8,2 … 8,4kg
8,7 … 8,9kg
C90A 320mm x 320mm x 15mm / 40mm
(320mm x 320mm x 40mm)
~ 1,2 kg
~ 1,2 kg
C90C 530mm x 530mm x 15mm / 40mm
(530mm x 400mm x 55mm)
~ 3,05 kg
~ 3,2 kg
C45A 512mm x 512mm x 15mm / 40mm
(512mm x 400mm x 55mm)
~ 3,8 kg
~ 3,95 kg
C90I 580mm x 580mm x 15mm / 40mm
(538mm x 400mm x 55mm)
~ 3,45kg
~ 3,6 kg
The dimensions in parentheses correspond to the overall dimensions when folded.
* The straight EventBoard S050 is a non-standard component and is not included in the standard delivery program.
Accessories | Dimensions & Weight
Product Type Dimensions Net weight
(without packag.)
TrussClip
TC50
SET with 10 pcs.
SET with 24 pcs. 68mm x 60mm x 16mm 200g
480g
TrussClip Safety
TC50
SET with 10 pcs.
SET with 24 pcs. 64mm x 58mm x 8mm / 12mm 39g
94g
GripSlat SET with 10 pcs.
SET with 50 pcs. 59mm x 24mm x 4mm 38g
170g
BoardBinder Single part
SET with 2 pcs. 100mm x 24mm x 20mm 32g
64g
BoardBinder
ReleaseTool Single part 162mm x 140mm x 14,5mm 252g

OnTruss Prinz Gewerbepark - Halle 78 Bozener Str. 1 86165 Augsburg / GERMANY 5 von 27
Cases | Dimensions & Weight
Product Type Dimensions Net weight
(without packag.)
Transport case
SMALL Single part 1060mm x 400mm x 610mm
(W x D x H) 29,5 kg
Transport case
LARGE Single part 2060mm x 600mm x 610mm
(W x D x H) 54,4 kg
SMALL LARGE
Transport case SMALL
- small version (space for up to 8m EventBoard)
- chest with flap lid incl. hinge
- for safe storage of EventBoards up to 1m length incl. accessories
- removable tray insert for small accessories
- large accessory compartment underneath the tray insert
Example of a possible room layout:
- 8x EventBoard S100
- 6x EventBoard S100 + 3x EventBoard Corner C90A
- 5x EventBoard S100 + 2x EventBoard Corner C90A + 1x EventBoard Corner C90I/C90C/C45A
Transport case LARGE
- large version (space for up to 24m EventBoard)
- chest with flap lid incl. hinge
- for safe storage of EventBoards up to 2m length incl. accessories
- incl. 4 large castor dishes for stacking of one case on top
- two large accessory compartment (one of them with sections)
Example of a possible room layout:
- 12x EventBoard S200
- 8x EventBoard S200 + 4x EventBoard S100 + 6x EventBoard Corner C90A

OnTruss Prinz Gewerbepark - Halle 78 Bozener Str. 1 86165 Augsburg / GERMANY 6 von 27
EventBoard BASIC | Technical data
Property Description
Material Core
Birch multiplex, waterproof gluing,
11-times gluing according to EN 636-3,
E1 according to EN 717
Rail Aluminium, EN AW-6060
Coating Top / Bottom Phenolic resin, dark brown, smooth on both sides
(surface may be subject to color variations)
Edges Acrylate paint,
low water permeability
Color Phenol-brown Only phenol-brown available
(surface may be subject to color variations)
Usage Indoor without problems
Outdoor temporary outdoor use possible
(regular dry wiping required)
Operation Environment 0°C … 40°C
rel. humidity: 25% … 80%
Storage Environment 15°C … 35°C
rel. humidity: 20% … 75%

OnTruss Prinz Gewerbepark - Halle 78 Bozener Str. 1 86165 Augsburg / GERMANY 7 von 27
EventBoard PREMIUM | Technical data
Property Description
Material Core
Birch multiplex, waterproof gluing,
11-times gluing according to EN 636-3,
E1 according to EN 717
Rail Aluminium, EN AW-6060
Coating Top PVC coating, coarse textured
color according to color variant
Bottom PVC coating, smooth, light pearl look
color according to color variant
Edges ABS edge, 2mm, all-round,
color according to color variant
Color version* Gray RAL 7037
Black RAL 9004
White RAL 9010
Usage Indoor without problems
Outdoor suitable for outdoor use,
avoid permanent outdoor use
Operation Environment 0°C … 40°C
rel. humidity: 25% … 80%
Storage Environment 15°C … 35°C
rel. humidity: 20% … 75%
Fire behavior Flammability Class S3
(according to DIN 54837)
Smoke emission Class SR2
(according to DIN 54837)
Dropping Class ST 2
(according to DIN 54837)
* Further color variants are available on request.

OnTruss Prinz Gewerbepark - Halle 78 Bozener Str. 1 86165 Augsburg / GERMANY 8 von 27
3. Safety instructions
Stability is only guaranteed if the original OnTruss accessories are used. Please check each part for perfect
condition before use.
Our system uses event trusses of other manufacturers as substructure. Therefore please check the
condition of your trusses. All pipes must not be bent or damaged.
The construction of the counter may only be carried out on load-bearing ground and must be levelled
horizontally. If the floor is uneven you have to level out your truss construction. Spans of more than 10m are
to be avoided and may have to be supported by an additional truss stand.
EventBoard was specially designed for use as a counter and for the construction of OnTruss
furniture. Any other usage (e.g. as catwalk, stage, etc.) is prohibited.
EventBoard Basic / Premium is only allowed to be mounted horizontally1.
EventBoard Basic and EventBoard Premium is intended for horizontal use only. It’s not
permitted to mount the EventBoard overhead.
1There is one exception: If the EventBoard is used to build a seating furniture, it’s permissible to install the EventBoard for the backrest
in an upright position. It’s important to secure the backrest with the accessory “Siesta BackSupport”

OnTruss Prinz Gewerbepark - Halle 78 Bozener Str. 1 86165 Augsburg / GERMANY 9 von 27
4. Basics
You can mount EventBoard Basic / Premium on all 2-point, 3-point and 4-point trusses. The pipe distance
must be 239...240mm. The main pipe must have a diameter of 50mm.
You can mount EventBoard on all trusses. Our system works with most common manufacturers. It doesn't
matter how the bracing is done or if your trusses have end plates or not.
To build a counter you need trusses of different lengths and different types. The trusses are not included
in this delivery.
EventBoard is a useful extension to your existing truss system. The following description refer to 4-point
trusses as basic structure. Our system is especially designed for this type of truss.

OnTruss Prinz Gewerbepark - Halle 78 Bozener Str. 1 86165 Augsburg / GERMANY 10 von 27
5. Unpacking the product
Please check the EventBoard for possible damage before first use. If you find any defects on the product,
please contact your reseller immediately. If the damage was caused by transport, you should also inform
the transport company immediately.
EventBoard is packed in a carton. Please open the packaging carefully. Do not use any sharp objects (such
as knives, scissors, etc.). This could damage the EventBoard.
The packaging contains only the EventBoard. All accessories required for assembly are available
separately.
6. Perspective
EventBoard Basic / Premium is asymmetrically constructed. There is one side that extends more over the
truss than the other side. Furthermore, only one long side has the two 45° edges. Both features show you
how the board is to be mounted.
Here is an example: This man is standing on the staff side. The audience is looking to the counter.
You can also recognize the front edge by the two parallel rails which are directly next to each other.

OnTruss Prinz Gewerbepark - Halle 78 Bozener Str. 1 86165 Augsburg / GERMANY 11 von 27
7. EventBoard - Types
This is our product range of EventBoard. All boards are available in two models: Basic and Premium. These
instructions can be easily transferred to all board types.
Straight boards
S050*
Length: 50cm
S100
Length: 1m
S200
Length: 2m
* The straight EventBoard S050 is a non-standard component and is not included in the standard delivery program.
Corners & Ends
C90A
90° outer corner /
end piece
suitable for
box corner
also usable with
truss corner
C90C
90° outer corner
suitable for
truss corner
also usable with
box corner
C90I
90° inner corner
suitable for
truss corner
also usable with
box corner
C45A
45° outer corner
suitable for
135° truss corner
All corner boards are suitable for box corners and truss corners. It only depends on the grid of your
substructure which corner you can use. In the next chapter we explain which aspects are important to pay
attention to.

OnTruss Prinz Gewerbepark - Halle 78 Bozener Str. 1 86165 Augsburg / GERMANY 12 von 27
8. Truss assembly
Our system uses your event trusses as substructure. You only have to make sure that you connect the
trusses to each other in a common-sense way.
Counter height:
A common height of a counter is 108 ... 129cm up to the upper edge of the horizontal truss. You can reach
this height if the truss stands are made of these components:
108cm 129cm 125cm 108cm
1x 29cm
1x 50cm
1x Box-Corner
1x 100cm
1x Box-Corner
1x 75cm
1x Truss-Corner
2x 29cm
1x Truss-Corner
Counter length:
Using our system, it’s important that you end up with a convenient linear measure. You should always keep
the 100cm grid in mind.
This example shows you a truss set-up from the top view. Three truss stands go down to ground level
starting from the box corners and truss corners. All lengths in the drawing correspond to centimeters.
BC: Box-Corner (corresponds to 29cm) TC: Truss-Corner (outer edge: 50cm)
As you can see, the ends can terminate with and without outer corner C90A. On the left side the corner
C90A is used as an end piece. On the far right the counter ends directly with the EventBoard S200. Both
is no problem.
This example shows you that there are countless possibilities to find a suitable grid dimension for the
EventBoards.
The basic rule is that a truss must be located under all EventBoard elements (straight or corner). In most
cases the corner is placed after a straight element (S050 / S100 / S200). Of course you can also connect
two 45° corners (C45A) directly with each other.

OnTruss Prinz Gewerbepark - Halle 78 Bozener Str. 1 86165 Augsburg / GERMANY 13 von 27
9. Mounting the TrussClips – Thanks’ to OnTruss concept.
Before placing the EventBoard on truss, you have to mount our TrussClips. This part couples the EventBoard
on the truss. We carry the TrussClip as a separate accessory. You can get multiple clips in a SET from your
dealer.
The TrussClips are required almost entirely on straight sections.
You attach the TrussClips to the two main rails. The additional rail on the front edge is made for extensions.
The mounting is done with a simple 90° turn. The sense of rotation is like a screw you turn in.
Don’t overtighten the TrussClip (>90°). Turning it counter-clockwise will also damage the
TrussClip.

OnTruss Prinz Gewerbepark - Halle 78 Bozener Str. 1 86165 Augsburg / GERMANY 14 von 27
Depending on the application you need more or less TrussClips per Eventboard. Furthermore, the quantity
is related to the EventBoard length. A longer EventBoard requires more TrussClips.
This table shows you the required quantity:
Product Type Application Counter
(Arriba)
Application Furniture
(Siesta)
EventBoard Basic
EventBoard Premium S050* 4 4
S100 4 6
S200 6 8
C90A 0 0
C90C 010…42
C45A 010…42
C90I 010…42
* The straight EventBoard S050 is a non-standard component and is not included in the standard delivery program.
Please do not use too few TrussClips! Of course you can add more TrussClips than listed. This
will make your design even more stable.
1If the counter ends with a corner, we recommend to mount 1...2 TrussClips at this corner. For this purpose you use the short rail in
which the BoardBinder is normally located.
2If the furniture consists only of corners or the furniture ends with a corner, we recommend using up to 4 TrussClips. To do this,
attach the TrussClips to the short rails that are normally reserved for the BoardBinder. A simple furniture could be a table for example.

OnTruss Prinz Gewerbepark - Halle 78 Bozener Str. 1 86165 Augsburg / GERMANY 15 von 27
You can place the TrussClips anywhere you want. The marking system between the two main rails helps
you to avoid colliding with the bracing when you put the board on later.
To do this, take the first board in your hand and place it lengthwise upright on your truss.
Now you have to check where the TrussClips have to be placed best, in order to prevent them from colliding
with the bracing. You should decide on either a position on or between the marking points.
This position is valid for all TrussClips on this board.
In most cases you can also use the same position for all following boards. This will save you a lot of time.
Please check when you put on the next board that the TrussClips really fits. If you have placed truss
segments in your substructure, it is quite possible that you have to move a few TrussClips again.

OnTruss Prinz Gewerbepark - Halle 78 Bozener Str. 1 86165 Augsburg / GERMANY 16 von 27
10. Mounting the EventBoards on trusses
STEP 1
If possible, you should always start placing the boards at an outer corner. You press both boards from
above onto the truss. Then align the boards until the 45° junction fits perfectly. To do this you can still
move the boards quite easily on the truss.
If you cannot apply the boards correctly, maybe a TrussClip will collide with a bracing or an
end plate of a truss. Please check this and relocate the TrussClip.
STEP 2
Next attach the corner piece C90A. You have to insert 2 GripSlats in each groove. You can attach them to
the two straight boards or the corner C90A. Please check that both BoardBinders (#2) are inserted in the
rails at the corner piece. They must be in the rest position.
The BoardBinders and GripSlats are available as separate accessories.

OnTruss Prinz Gewerbepark - Halle 78 Bozener Str. 1 86165 Augsburg / GERMANY 17 von 27
This is the initial position of the corner. There are 2 GripSlats (#1) in each groove. Both BoardBinders are
inserted in the short rails and are in rest position (#2). You have to open the two Velcro tapes (#3).
1.
Place the corner on both straight
boards.
Check that the
connection is flush.
2.
Move now both
BoardBinders.
It snaps into the corner
and the straight board.
3.
Fasten the Velcro tapes
on the truss pipe.
Pull the Velcro tape firmly.
The corner is correctly placed when both BoardBinders are in this position.
Finally, use the two Velcro tapes to fix the corner piece. Put the Velcro around the truss pipe, guide it
through the eyelet and tighten it hand-tight to the back.
.
Info: For easier handling of the BoardBinder you can use the BoardBinder ReleaseTool for other purposes. Insert the tool at a slight
angle to the intermediate position (imprinted with a short line) and then move the BoardBinder at this angle.

OnTruss Prinz Gewerbepark - Halle 78 Bozener Str. 1 86165 Augsburg / GERMANY 18 von 27
STEP 3
Now you can continue with the installation of the straight boards.
Always use 2 GripSlats at each joint. Insert the GripSlats into the groove of a board. You can either insert
them into the board that is already mounted on the truss or you can insert them into the new one.
Mounting the GripSlats is very important. It gives the assembly extra stability and ensures a
clean plate to plate transition.
To mount a new board, place it in an angle of 10-20° on the already mounted board and insert the protruding
GripSlats into the groove. Then snap in the board onto the truss.
This is the way you proceed with all straight boards. Make sure that the transition between each plate is
flush at the end of your work. Ensure that there is no gap between the boards.

OnTruss Prinz Gewerbepark - Halle 78 Bozener Str. 1 86165 Augsburg / GERMANY 19 von 27
STEP 4
Your counter is almost ready. Finally, you just have to mount the two corners C90A as end plate. This
procedure differs slightly from step 2, viz. in the initial situation of the BoardBinder
One BoardBinder remains in the short rail of the corner. Remove the other BoardBinder and insert it
completely into the rail of the straight board. Additionally, there must be 2 GripSlats in the groove.
Attach the end piece C90A to the end of the straight board and slide the two BoardBinders. They lock into
the straight board and the end piece C90A.
This is the position of both BoardBinders when the end piece C90A is connected safely.
Finally, fasten the end piece C90A on the truss using the Velcro tapes.

OnTruss Prinz Gewerbepark - Halle 78 Bozener Str. 1 86165 Augsburg / GERMANY 20 von 27
11. Locking the EventBoard on the truss
You are obliged to secure the EventBoard to the truss. This is the only way we can guarantee the maximum
load capacity of the counter top. Furthermore, the securing brackets prevent unintentional removal of the
boards by guests. The TrussClip Safetys are placed around the truss pipe and then clipped in.
The TrussClips Safetys are optionally available. You can purchase them SET-wise from your dealer.
Please use always enough TrussClip Safety’s! You have to install at least half of all TrussClips
with the safety bracket. This is the only way to ensure that the construction is adequately
secured even if people accidentally stand on the EventBoard.
Especially on short distances you have to install TrussClip Safety’s! Due to the smaller number
of attachments and the simple shape, the boards are generally easier to remove. That’s
exactly what you prevent with the safety clips.
This manual suits for next models
15
Table of contents