OPTI Kinetics OPTI GoboPro+ LED User manual

GoboPro+ LED
1. Read and understand all instructions before using the equipment.
2. Close supervision is necessary when any appliance is used by, or near, children.
3. Care must be taken, as burns can occur from touching hot parts.
4. Do not operate appliance with a damaged cord, or if the appliance has been
dropped, or damaged, until it has been examined by a qualified engineer.
5. Position the cord so that it will not be tripped over, pulled, or come into contact with
hot surfaces.
6. If an extension cord is necessary, a cord with a current rating at least equal to that of
the appliance should be used. Cords rated for less amperage than the appliance may
overheat.
7. Always unplug appliance from electrical outlet before cleaning and servicing and
when not in use. Never yank cord to pull plug from outlet. Grasp plug and pull to
disconnect.
8. Let appliance cool completely before packing. Loop cord loosely around appliance
when storing.
9. To reduce risk of electric shock, do not immerse product in water or other liquids.
10. To reduce the risk of electric shock, do not dismantle this appliance.
11. Do not attempt to service the projector unless you are qualified and working under
the direction of the manufacturer
12. The use of an accessory attachment not recommended by the manufacturer may
cause a risk of fire, electric shock, or personal injury.
13. A safety chain or cable must be fitted to the projector and secured to an immovable
object where applicable. The securing point must be able to withstand the shock weight
of the projector should it fall.
14. After any maintenance or cleaning all parts must be absolutely dry before refitting to
the projector.
15. During focussing of the projected image beware of moving the projection lens too
far, as this may cause the lens to become separated from the projector, and perhaps to
dropped and broken which may cause injury.
16. Flammable surfaces should be 0.5m away from the front of the projector
Instructions
Important Safety Instructions
When using your projection equipment basic safety precautions
should be followed:
Designed and Manufactured in the UK by [OPTI] Kinetics 1

GoboPro+ LED
Lens Fitting & Focussing
All [OPTI] GoboPro and GoboPro+ are supplied with one lens
already fitted to the projector. If you would like to change the lens,
loosen the screw on the bottom of the lens housing and remove
the lens. Insert the new lens to a balanced position and tighten the
screw on the bottom of the lens housing.
To project a focussed image, it is necessary to finely adjust the
focussing lens after the unit has been pointed at the desired
projection surface. To adjust the focussing lens, loosen the
screw on the side of the lens housing and slide the housing
along the rails until the image is focussed. Secure the
lens housing to the rails by tightening the screw on the
side.
Power Supply
A 19V mains supply suitable for supply 100-240V AC is supplied
with an appropriate IEC power cable. The power supply is not
suitable for use in wet conditions and should be installed in a dry
location or waterproof box. The low voltage power cable can be
extended by means of 4-pin XLR extension leads. Power cores
should be capable of carrying at least 5A.
Mounting
All [OPTI] GoboPro and GoboPro+ are supplied with one u-shaped
bracket that can be mounted to any immovable surface. The
mounting bracket hole is 11mm. The angle of the u-shaped bracket
can be adjusted using the pivot handles on the side of the
projector. It is recommended that the power cable is installed at the
top of the projector in wet conditions to reduce the risk of water
ingress into the body of the projector. If the projector is to be
mounted vertically downwards, it is recommended a small disk is
installed above the projector to prevent water pooling in the back of
the unit.
Waterproof Hood
All [OPTI] GoboPro and GoboPro+ are supplied with one 200mm
long IP-rated 65 hood (suitable for 20mm-120mm lenses). To
remove the hood, gently wiggle the hood and pull the hood off. To
reattach the hood, gently wiggle and push the hood onto the
projector. Please note that there will be a different size hoods
available to be accommodate 150mm lenses and bigger. There is
a 1mm hole at the front of the hood to drain condensation. This
hole should be aligned at the bottom of the projector.
To secure the hood to the projector, affix the two supplied M4 x
12mm CSK stainless steel screws through the holes in the
mounting bracket.
Power Supply End
Projector End
Pin 1 - 0V
Pin 2 - +19V
Pin 3 - Data Link In (to projector)
Pin 4 - Data Link Out (from projector)
41
2
3
Designed and Manufactured in the UK by [OPTI] Kinetics 2

Lens Focal Length Projecon Distance to
Image Size (Rao)
45mm 1:1
60mm 3:2
85mm 2:1
120mm 3:1
150mm 4:1
GoboPro+ LED
Designed and Manufactured in the UK by [OPTI] Kinetics 3
Distance Calculation Formula
Please note all [OPTI] GoboPro and GoboPro+ can be used with
52.5mm barrel lenses so there may be other lenses available.
Gobos & Cassettes
All [OPTI] GoboPro and GoboPro+ projectors accommodate an
outside diameter of 50mm (+0 -0.1mm) rotatable gobo, and a
44mm OD (+0 -0.1mm) static gobo which can be purchased from
[OPTI] Kinetics directly. A 50mm cassette holder is supplied with
every GoboPro and GoboPro+ projector which all gobos need to
be inserted into to be projected.
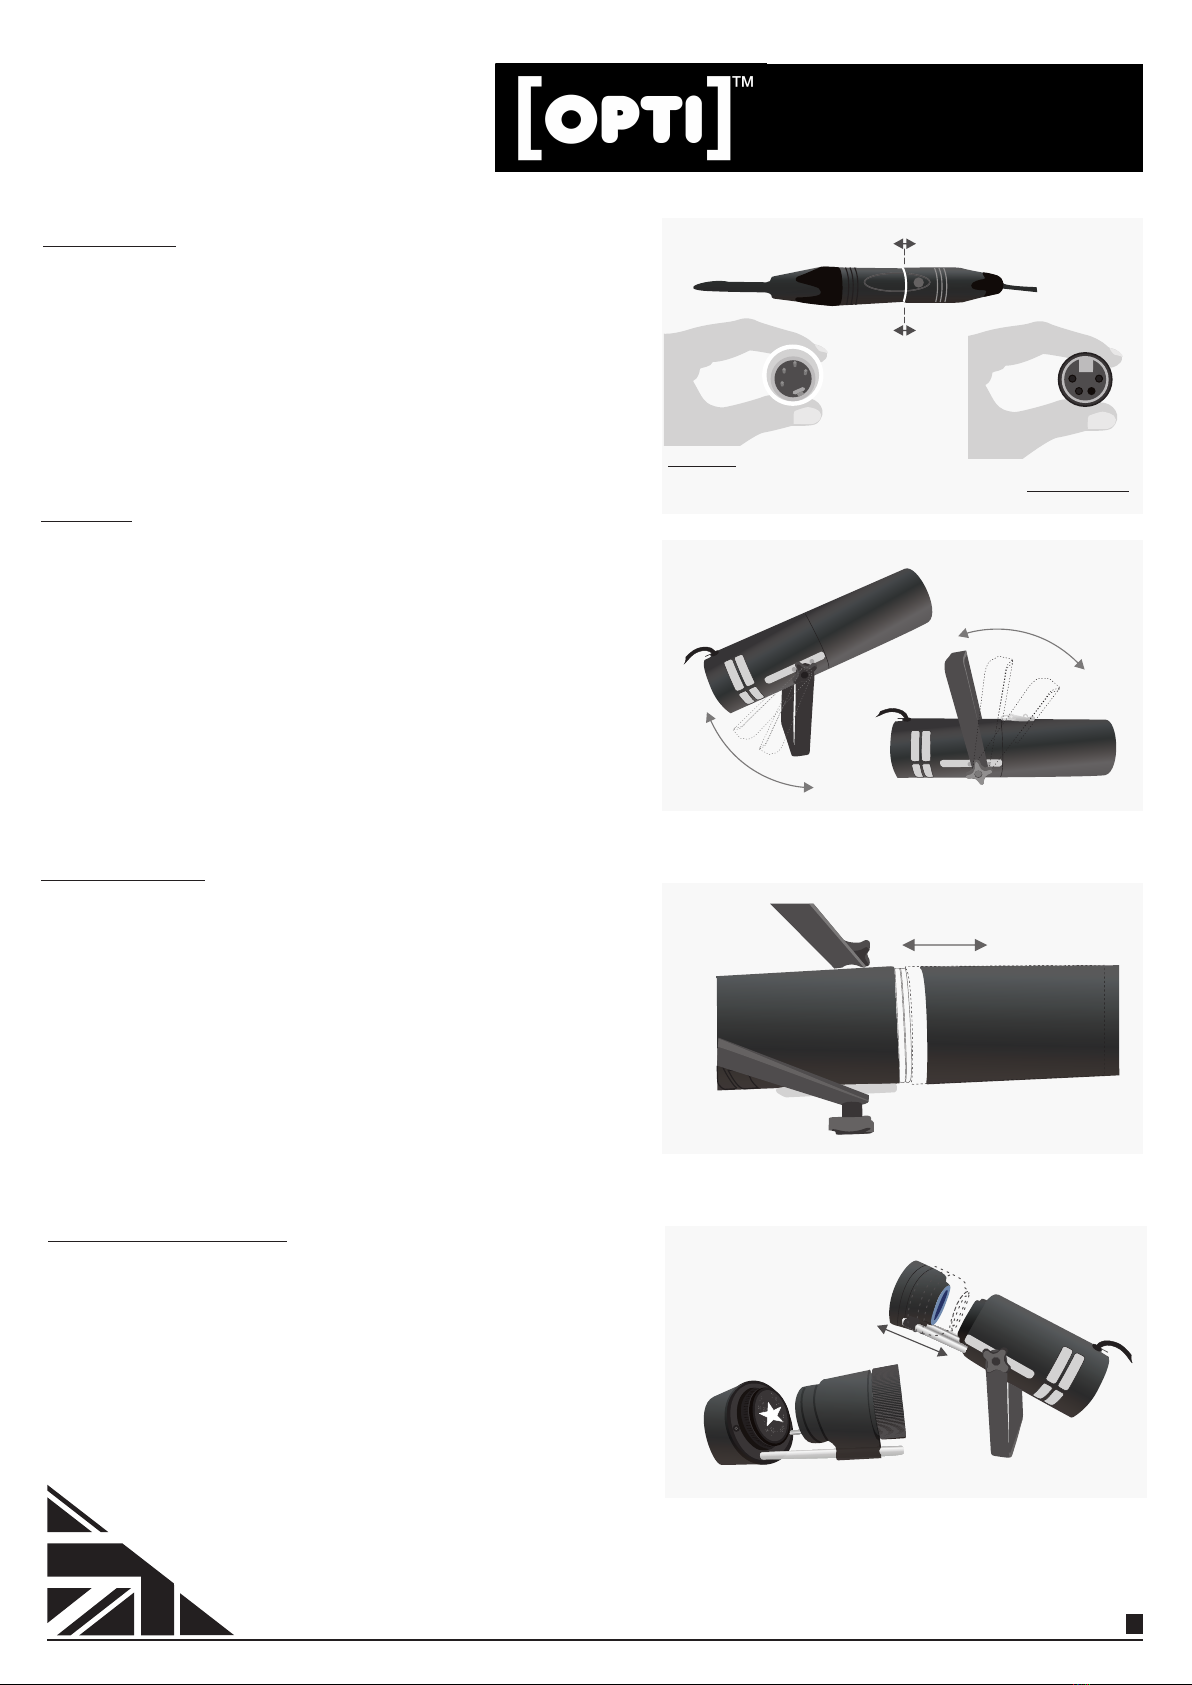
Attaching the complete cassette to the projector
Engage the cassette onto the drive gear at the bottom and gently
snap the cassette onto the projector.
Removing the complete cassette from the projector
Insert a fingernail or flat blade screwdriver into the gap between
the cassette holder and the top of the cassette and gently lever out
the cassette.
Additional cassette holders are available.
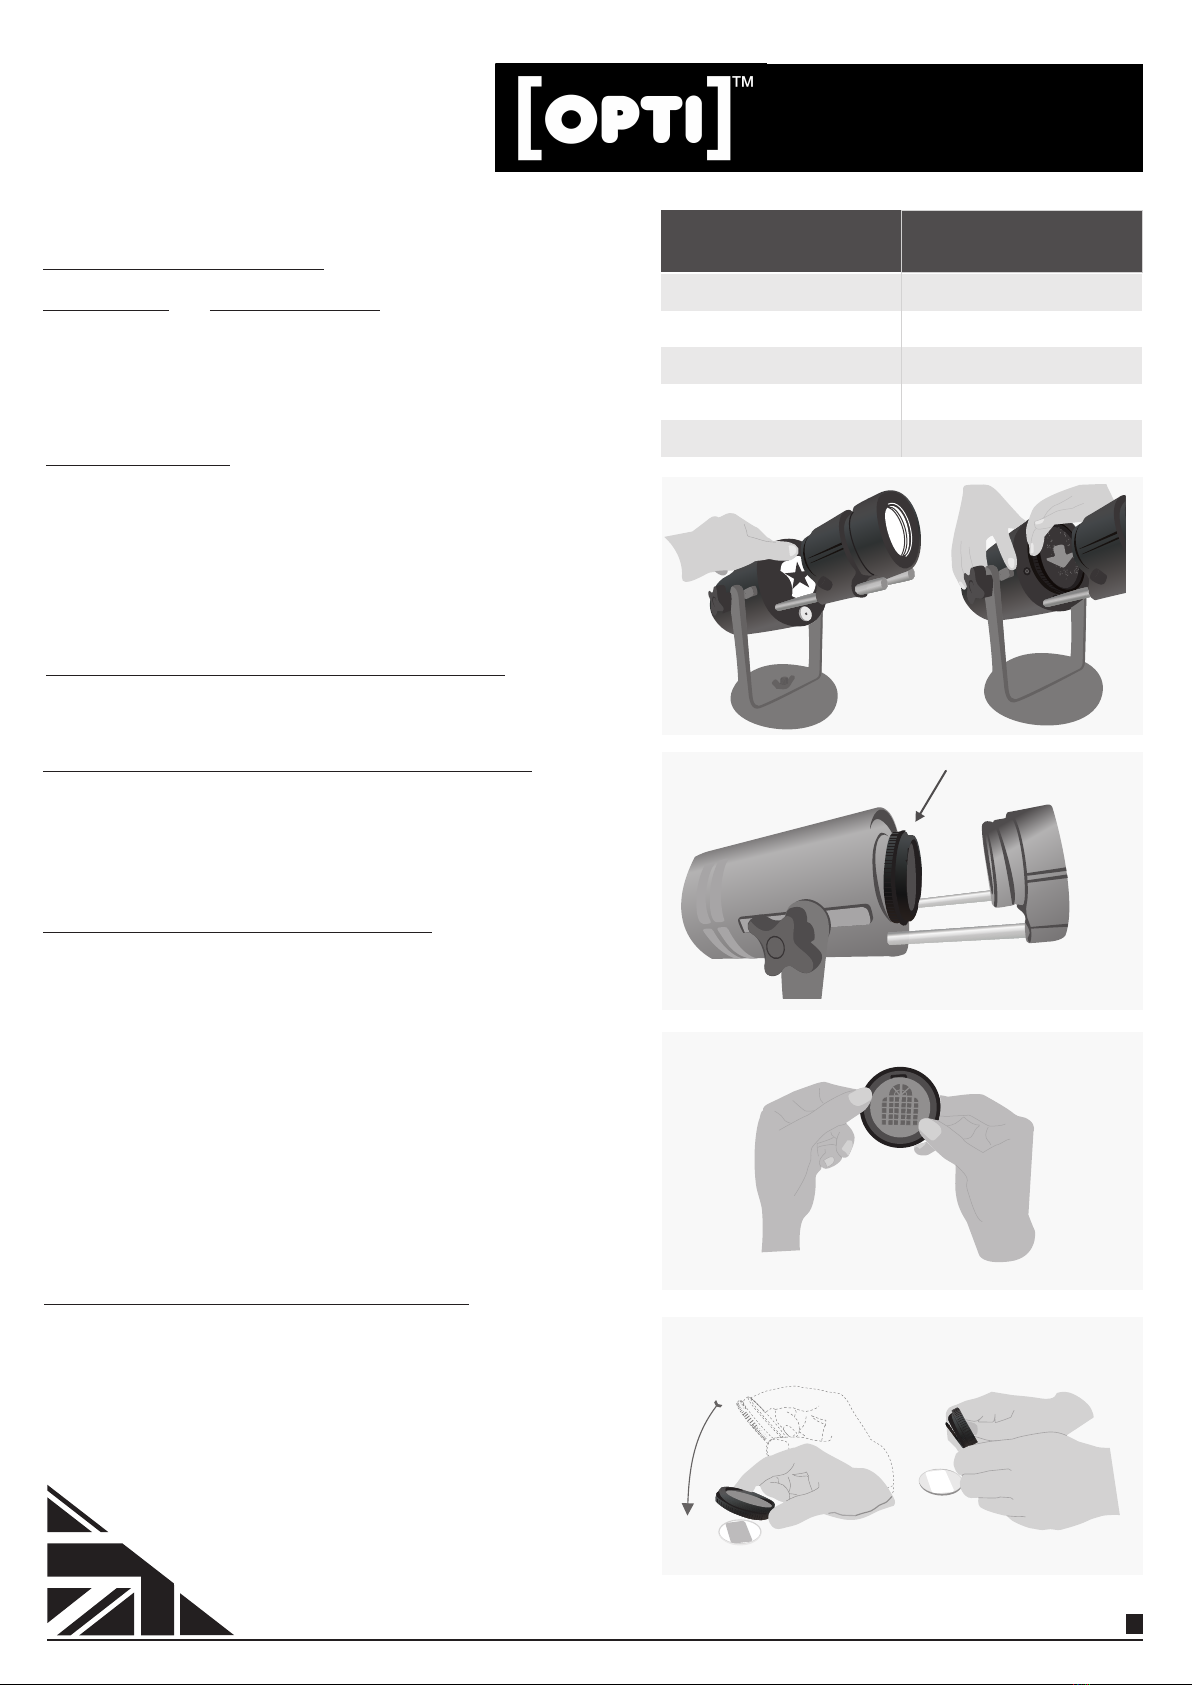
Inserting a Gobo into the cassette holder
Line up the gobo with one of the tabs on the cassette holder and
gently press the gobo using your thumbs level with the two other
tabs. When the gobo is fully inserted, you will hear a click noise.
If you are inserting a 44mm static gobo, turn the cassette holder
over and gently push into the back of cassette rotator. It is
recommended that the two image faces of the 44mm and 50mm
gobo are placed next to each other within the cassette.
It is recommended to use a separate cassette holder for each
gobo. It is recommended to warm the cassette holder before
inserting your own gobo. For example leave the cassette holder on
the radiator for a few minutes.
Lens Focal Projection Distance
Object Size Image Size
x
Removing the gobo from the cassette holder
If the gobo has just been recently used on the [OPTI]
GoboPro/GoboPro+ projector, please wait unl it is cool enough
to touch before aempng to remove the gobo from the cassee
holder. That said; it is easier to remove the gobo from the cassee
holder if it is slightly warm. Leaving the gobo on the radiator for a
few minutes can help. To remove the static 44mm gobo (if fitted)
firmly tap the cassette holder (zoom gobo facing up) onto a
hard surface. To remove the rotating 50mm gobo, gently
press the gobo out with your thumbs from the rear.

GoboPro+ LED
Technical Specificaon
[OPTI] GoboPro+ LED Projector
FG2120
Static and/or rotating image. Integral Rotator for Cassette
STANDARD= 85mm (Projector takes 52.5mm diameter object lenses). Other lenses available*
45, 60, 85, 120, 150, Zoom
Manual
75W LED
2800
3560 Lux at 1m Diameter
6500 K
Black
50mm o/d Rotating, 44mm o/d fixed. (42 image diameter).
Or 35 mm transparency with adaptor (for occassional use). Fitted to [OPTI] cassette
Manual. DMX ad Wifi Adapter Available
Dimming, control of all effect paramеters.
IP 65 with front cover fitted. Suitable for outdoor use.
Mains adaptor 19V at 4.74A. (Adaptors not to IP65).
L34 H25 W14 OD10 CM
1.6Kg
NAME:
Part Number:
Gobo Projection:
Lens Size:
Lens options:
Focus:
Light Source:
Lumens:
Brightness:
Colour temperature (Kelvin):
Colour of Projector:
Gobo Size:
Control:
Remote control:
Projection Rating:
Power Supply:
Dimension of projector:
Weight:
1
YEAR
Guarantee
0.5m
38 Cromwell Road Luton LU3 1DN England
Designed and Manufactured in the UK by [OPTI] Kinetics 4
Controlling the Image
All [OPTI] GoboPro and GoboPro+ projectors have an internal
variable speed rotator. 50mm gobos can be project static and/or
rotating images.
To control the direction of the image use the silver switch. To
rotate the image clockwise flick the silver switch upwards. To
rotate the image anticlockwise flicks the silver switch downwards.
For a static image, make sure the silver switch is centralised.
To control the speed of the rotation use the tiny black knob. To
increase the speed, twist the knob clockwise. To slow the speed of
the rotation, twist the knob anti-clockwise.
Guarantee
[OPTI] Kinetics Limited guarantees this product for 1 year from the
date of purchase from all mechanical, electrical or assembly
defect. Within this 1-year period any fault will be repaired or
remedied free of charge. To extend the warranty free of charge to
3 years, please register your [OPTI] GoboPro/GoboPro+ projector
by vising www.opkinecs.co.uk. The guarantee is void if the
projector has been opened or if a repair has been attempted by
anyone other than an [OPTI] Kinetics authorised repairer.
Table of contents
Other OPTI Kinetics Dj Equipment manuals