Opticstar PX-126 User manual

1
Updated: 23/05/2018
Opticstar PX-126. © Opticstar Ltd, 2018

2
Updated: 23/05/2018
Opticstar PX-126. © Opticstar Ltd, 2018
Opticstar Ltd, 87 Washway Road, Sale, Greater Manchester, M33 7TQ, United Kingdom.
Web: www.opticstar.com ●Email: info@opticstar.com ●Tel: +44(0)161 969 9008
Manufacturer’s Warranty
This product has a 1 year back to base warranty.
1. Do not drop your camera as this can result in serious damage.
2. Do not point the camera to a bright light source like the Sun without the appropriate filters
as this will damage the sensor.
3. Disconnect the camera from the computer when not in use.
4. Treat the camera glass window with the same care as you would of a photographic lens.
CAUTION
!

3
Updated: 23/05/2018
Opticstar PX-126. © Opticstar Ltd, 2018
O v e r v i e w .......................................................................................................4
Camera Software .......................................................................................................... 4
S o f t w a r e I n s t a l l a t i o n ...................................................................................... 4
O p t i cs t a r Sk y ..................................................................................................7
Capturing Images ......................................................................................................... 7
Capturing Video ........................................................................................................... 7
Exposure Time ............................................................................................................. 8
Gain ............................................................................................................................. 9
Configuration Option s .................................................................................................. 9
Histogram .................................................................................................................... 9
Dark Field Correction and Dark Frames ......................................................................... 9
Parameters ..................................................................................................................10
Main Menu and Icons ...................................................................................................10
Image Stacking ............................................................................................................10
Processin g and Visualising Data ..................................................................................10
T h i r d P a r t y S o f t w a r e ..................................................................................... 11
Adding DirectShow ......................................................................................................11
Removing DirectShow ..................................................................................................11
Adding ASCOM ............................................................................................................12
Removing ASCOM ........................................................................................................12
Imaging in DirectShow and ASCOM ..............................................................................13
SharpCap ....................................................................................................................13
Auto -Guiding in DirectShow and ASCOM ......................................................................13
PHD Guiding 2 .............................................................................................................13
A u t o - G u i d i n g C o m p o n e n t s ............................................................................. 14
Imaging and Auto-Guiding with Two Teles cop es ...........................................................14
Imaging and Auto-Guiding with a Single Telescope ......................................................15
T r o u b le s h o o t in g ........................................................................................... 16
USB Requirements .......................................................................................................16
Expr ess Card ...............................................................................................................16
Re-Installing the Software Drivers ................................................................................17
S u p p o r t ....................................................................................................... 18
Other Software ............................................................................................................18
Microscope Attachments ..............................................................................................18
C a m e r a D i m e n s i o n s ...................................................................................... 18
C a m e r a S p e c i f i c a t i o n .................................................................................... 19

4
Updated: 23/05/2018
Opticstar PX-126. © Opticstar Ltd, 2018
Overview
The PX-126 series of video cameras include the PX-126C (colour model) and the PX-126M (monochrome model).
The PX-126 is suitable for imaging the planets, the Moon and the Sun. It can also be used as an auto-guide camera
due to its built-in ST4-compatible auto-guide port. The camera is also suitable for microscopy when fitted with an
appropriate attachment.
Camera Software
The camera is bundled with the OpticstarSky application software for capturing and storing images and video. The
software also includes some image processing functionality such as image stacking. Optionally, the camera can be
used with some third-party application software that support Microsoft’s DirectShow standard. Support is also included
for the TWAIN communication protocol that allows third party application software to import images from digital
devices such as the PX-126.
In addition, PHD Guiding software is bundled with the camera that allows the PX-126 to be used as an auto-guider.
Auto-guiding is supported through the ASCOM software standard ensuring wide support by third party applications.
Package contents:
•Opticstar PX-126 video camera.
•C-mount to 1.25” telescope adapter (nosepiece).
•USB cable.
•Auto-guide cable.
•Setup Guide (printed).
•Software CD.
•User Manual on CD (this document).
Software Installation
The minimum computer system requirements are the following:
•Microsoft Windows (32-bit or 64-bit) XP/Vista/7/8/10 with the latest Service Pack.
•USB 2.0 port (or USB 3.0) for the camera.
Insert the CD into the drive and open the OpticstarskySetup.exe file. This program will install two pieces of software:
1. Windows driver software for PX-126.
2. OpticstarSky application software.
Please note that for solar photography, the camera should be used only with an appropriate
solar telescope and/or solar filters.
Please ensure that the camera is not connected to the computer yet.
The installation of the software should be carried out by a user with Windows administrator
permissions. Otherwise the installation may fail.

5
Updated: 23/05/2018
Opticstar PX-126. © Opticstar Ltd, 2018
Right-click the installation program and from the pop-up menu select Run as administrator. This will start the
installation process as shown on the screenshots below. Click Next to start. On the following widow, you can let the
program select the installation location and click the Install button.
The following window will display a progress bar during the installation. Once the installation is complete, the final
installation window will display the Finish button. If the option to Start OpticstarSky is ticked, pressing the Finish
button will start OpticstarSky.
Anti-virus software may attempt to block the software installation. In such cases the anti-
virus software should be temporarily disabled. Otherwise, when prompted, add the
installation files to the trusted list.

6
Updated: 23/05/2018
Opticstar PX-126. © Opticstar Ltd, 2018
Plug the camera to a USB 2.0 or USB 3.0 port on your computer. The camera will be identified as PX-
126 in Windows Device Manager and in OpticstarSky. If OpticstarSky is not already running, click the
program icon on the Windows Desktop.
In some cases, the camera may not be identified by Windows or OpticstarSky immediately after the installation. In
such cases, unplug the camera and restart the computer before continuing. Once Windows has restarted, plug the
camera to the computer and open OpticstarSky.
It is possible to check whether the installation has completed successfully
even before running OpticstarSky. Plug the camera to the computer and
open the Windows Device Manager. The camera will be listed under the
“Imaging devices” node.
To access the Device Manager, open the Windows Control Panel. In
Windows 8.1 this can be done by right-clicking on the Windows Start button
on the bottom left corner of the screen and on the popup menu select Device
Manager. In earlier operating systems click the Start button and then select
Settings > Control Panel.
The screen-shot on the right-hand side shows a successful installation with
the camera identified as PX-126. If the camera is not identified correctly then
the installation has not been carried out successfully and an exclamation
mark icon will appear next to the camera entry. Refer to the trouble shooting
section later in this manual for details.
The camera does not incorporate any optics and therefore it cannot reach focus by itself. A
C-mounted lens must be used with the camera or it must be attached to a telescope with
the nosepiece adapter that is included with the camera. To attach it to a microscope,
please use an appropriate attachment.

7
Updated: 23/05/2018
Opticstar PX-126. © Opticstar Ltd, 2018
OpticstarSky
Once OpticstarSky is running, it will list any connected cameras on the left-hand panel as PX-126C or PX-126M (A).
Click on the listed camera to activate it. The camera will display video on the main pane (D). A tab (B) will also appear
with the heading “Video [PX-126]”. The tab allows quick access to the video pane during the imaging session.
Capturing Images
Single-shot images can be captured by clicking the Snap button (E) and
can be accessed from the new tab titled 0001* at the top of the image
pane (F). Images are displayed and captured at the selected resolution
(C). The screenshot on the right shows the graphics resolutions that can
be selected. The highest resolution is selected by default.
Captured images can be saved to disk from the File menu.
Capturing Video
Video can be captured by clicking the Record button (G). A dialog window will appear asking to enter the file name
and folder that the video file will be stored.
On the following window select the type of video compression to be used. If you are not sure what to select, just leave
it at the default option which is usually the WMV format.

8
Updated: 23/05/2018
Opticstar PX-126. © Opticstar Ltd, 2018
On the following window the video capture parameters can be set. These values can be left at default settings but the
user has the options to modify these values. The bitrate can be increased if the computer’s USB bandwidth is fast
enough to handle it. The quality setting determines the degree of data compression. If quality is set at 100 then the
images are captured at the highest quality resulting in larger video files on the disk.
The Key Frames Setting determines how frequently video frames are shown on the monitor while video is being
captured on the hard disk. If this value is set too high, then the captured video will be slow and jerky. In the final
window it is possible to enter information to identify the video to be captured.
Exposure Time
In astronomy, the exposure time should be selected manually from pull down menu (H) on the left panel. Un-tick the
Auto Exposure option and set the exposure time from the sliding bar or by clicking on the time and typing the
exposure time manually in milliseconds.

9
Updated: 23/05/2018
Opticstar PX-126. © Opticstar Ltd, 2018
The valid exposure time range of the PX-126 is from 0.4 milliseconds up to 15,000 milliseconds (15 seconds).
The appropriate exposure time depends primarily on the brightness of the target and the aperture of the telescope.
The Moon for example will require a very short exposure time, typically less than 20ms (milliseconds) and a planet
less than 50ms.
The Exposure Target option is relevant if Auto Exposure is used. It adds a user set bias value to the default
automatic exposure time.
Gain
The Gain can be set from 1.00 up to 3.00. By markedly increasing the Gain value the light sensitivity of the camera
increases significantly but the image quality degrades. As a general rule, using gain at lower values is beneficial
because the exposure times may be shorter, hence minimising the side effects of the Earth’s atmosphere whilst
maintaining high image quality.
Configuration Options
In addition to the exposure time and gain, other camera parameters can be configured by accessing the pull-down
menus underneath Exposure & Gain (H) on the left-hand panel. The default values will work well for most imaging
sessions and are self-explanatory. However, some of the options are explained below.
Histogram
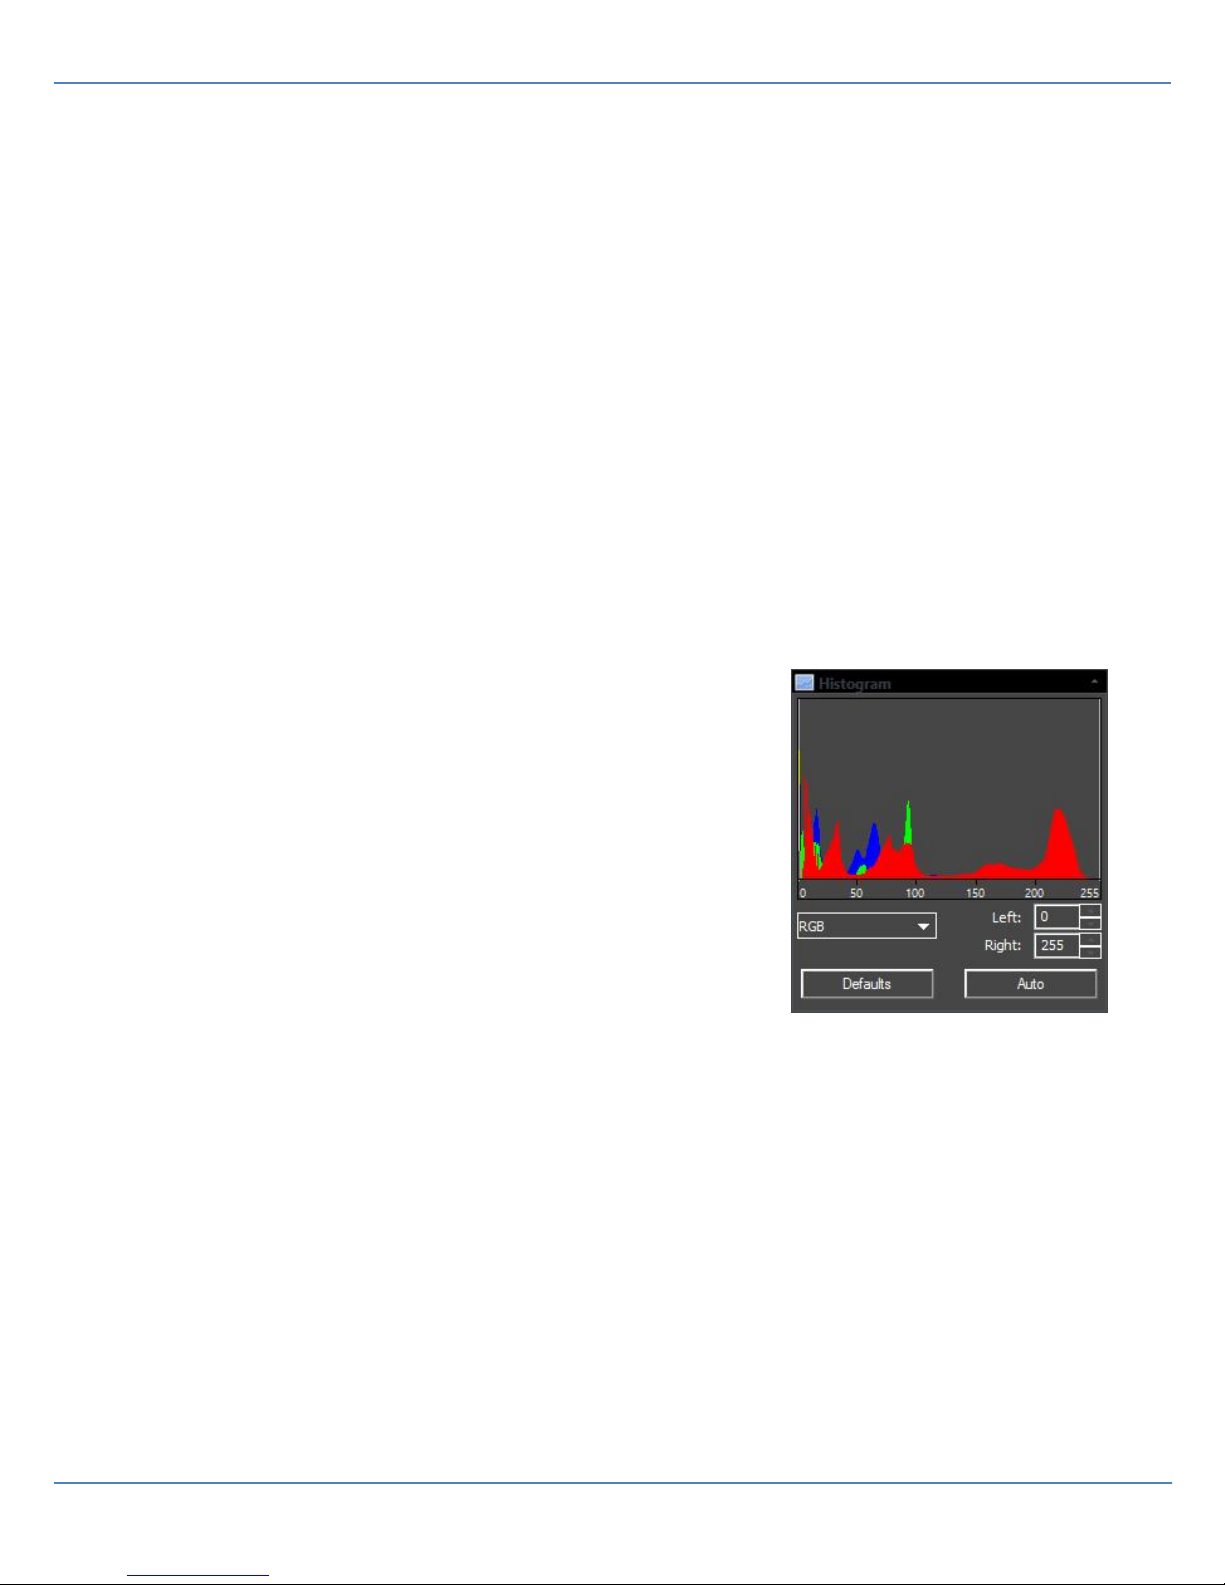
The histogram helps to visualise the composition of the captured data. The
histogram on the right represents colour image data of a single frame. The
Red, Blue and Green (RGB) graphs represent the three individual channels
that constitute the colour image. Each graph shows the number of image dots
(pixels) depending on their brightness. The horizontal graph axis represents
the brightness of the data from 0 (totally dark) to 255 (totally bright). The
vertical axis represents the number of pixels of a particular brightness.
If the Exposure Time and Gain values are not set appropriately, the graphs
will be clipped on the far left (if exposure/gain are too low) or on the far right of
the graph (if the exposure/gain are too high).
If all three RGB values are at zero, this represents black. If all three RGB
values are at 255, this represents white.
Dark Field Correction and Dark Frames
All scientific cameras introduce minute imperfections to the image inherently present in their electronics. Such factors
include signal-to-noise (S/N) ratio and thermal noise. In astronomy, dark frames can be used to counteract these
factors. Select the Dark Field Correction menu and tick the Enable option. Before clicking the Capture button,
ensure that the camera’s cap is fitted on the camera so that no light can reach the camera’s sensor at all. The number
of dark frames to be captured can be selected by changing the Quantity value. Typically, 10 frames is a good number
of dark frames. Clicking the Capture button will capture the number of dark frames specified. These frames will be
averaged out automatically creating a master dark frame.
Remove the cap from the camera and continue imaging as normal. From now on any images (light frames) captured
by the camera, will have dark frame subtraction applied to them. Effectively, the master dark frame data will be
subtracted from the light frame data to remove any imperfections.
For best results, a master dark frame should be created for each specific imaging session because the ambient
temperature between sessions can vary greatly. A dark frame created for one session may not work as well in another
session. It is also good practice to create a new dark frame when the Exposure Time and Gain settings change
significantly even within the same session.

10
Updated: 23/05/2018
Opticstar PX-126. © Opticstar Ltd, 2018
Parameters
The various values entered during an imaging session can be stored to disk for future sessions. This can save time in
future imaging sessions by loading the parameters from a previous session. These parameters include such values
such as Exposure Time, Gain and others.
Main Menu and Icons
Most of the camera functions outlined above can also be accessed from OpticstarSky’s main menu and icons at the
top of the program window.
Selecting the various options from the
main menu and the icons, allows the user
fine control over the various functions.
These options are better suited for
experienced users who already
understand how the camera works.
The Image Select icon allows the user to select a rectangular region that is smaller than the full image area. Any
imaging enhancement functions such as colour balance, contrast and others are only performed based on the data
contained within the selected region. If no region is selected, the imaging enhancement functions use the data of the
whole image area. By default, no region is selected.
Image Stacking
In astronomy, it is not possible to capture a single image that is sharp due to the Earth’s atmosphere. Atmospheric
turbulence, sky transparency and high humidity levels all play a major role on the quality of the captured images.
These conditions can vary greatly between imaging sessions. To minimize these undesirable effects, we apply to the
captured images a process called image stacking.
Stacking is the process of merging the data of many image frames into a single frame. This operation applies
mathematics to select the best parts of each frame and accumulate that information into a single frame that is of much
higher quality that any of the single frames used to construct the final image. This technique is known as stacking and
it can be accessed from the main menu at the top Process > Imaging Stacking. Stacking is applied to a video file
stored on the disk. It is not possible to capture video and apply stacking in a single operation.
Processing and Visualising Data
Many other image processing options can be accessed from
the Process pull down menu that perform advanced functions
such as noise reduction, sharpening, histogram equalization,
filtering, etc.
In addition to these functions, image visualisation tools are
included such as Surface Plot and Line Profile to help
understand the captured data. These tools will be especially
useful to more experienced users.
One other notable function is stitching. The Stich button
opens a series of options that can be customised in such a
way that a series of images can be attached next to each
other to create a single image that is much larger in size. The
Stitch icon can be accessed from the menu bar.

11
Updated: 23/05/2018
Opticstar PX-126. © Opticstar Ltd, 2018
Third Party Software
The PX-126 may be used with third party software that is compatible with Microsoft’s DirectShow multimedia standard.
DirectShow is widely supported by many imaging software applications. This functionality allows them to control
imaging devices such as the PX-126. In addition, the PX-126 includes ASCOM support. ASCOM is a software
interface standard for Microsoft Windows that allows ASCOM compliant software and devices to work together. The
following sections explain how the PX-126 can be used with third party software through its DirectShow and ASCOM
support.
Adding DirectShow
Installing DirectShow support allows the PX-126 to be used
with third party software for imaging and auto-guiding.
To install DirectShow support, open the DirectShow folder on
the CD, run OpticstarDshowSetup.exe and follow the
installation instructions.
It is recommended that the installation is performed with
Windows administrator permissions. Right-click on the file and
from the pop up menu, select Run as administrator. Follow
the instructions to compete the installation.
Sometimes, it is necessary to re-start the computer after the
DirectShow installation. The PX-126 will be identified as
Opticstar by third party programs. If it does not, unplug the
camera from the computer and restart the computer. Once
Windows has started, connect the camera to the computer and
continue.
Removing DirectShow
DirectShow compatibility can be removed at any time. In Windows 8.1 this can be done by right-clicking on the
Windows Start button on the bottom left corner of the screen and on the popup menu select Programs and Features.
In earlier operating systems click the Start button and then select Settings > Control Panel > Add/Remove
Programs.
Right-click on Opticstar OpticstarDshow entry and select Uninstall.
Please note that Opticstar does not provide technical support on third party software. The
DirectShow and ASCOM support is provided “as-is”. The information provided on these
topics does not imply that Opticstar endorses third party software in any way. The
information is merely presented for the benefit of the customer.

12
Updated: 23/05/2018
Opticstar PX-126. © Opticstar Ltd, 2018
Adding ASCOM
Installing the ASCOM software enables the PX-126 to be used as an auto-guide camera. ASCOM support
also allows the PX-126 to be used for imaging as an ASCOM compliant imaging device. There are three
steps in adding ASCOM functionality:
1. Install the ASCOM software platform.
2. Install the PX-126 ASCOM camera driver for imaging support.
3. Install the PX-126 ASCOM ST4 driver for auto-guide support.
The ASCOM software platform is freely available and can be downloaded at http://ascom-standards.org. Follow the
instructions on the downloads section of the website on how to download and install it.
Once the ASCOM platform has been installed, proceed to install ASCOM support for the PX-126, open the ASCOM
folder on the CD, run the following two installation programs:
•ASCOMOpticstarCamSetup.exe for PX-126 imaging support.
•ASCOMOpticstarST4Setup.exe for PX-126 ASCOM auto-guide support.
It is recommended that the installation is performed with Windows administrator permissions. Right-click on the file
and from the pop up menu, select Run as administrator. Follow the on-screen instructions to compete the installation
of both programs.
Removing ASCOM
ASCOM compatibility can be
removed at any time. In
Windows 8.1 this can be done
by right-clicking on the
Windows Start button on the
bottom left corner of the
screen and on the popup
menu select Programs and
Features.
In earlier operating systems
click the Start button and then
select Settings > Control
Panel > Add/Remove
Programs.
The two sets of PX-126 ASCOM drivers can be removed one at a time by right-clicking on each driver and select
Uninstall.

13
Updated: 23/05/2018
Opticstar PX-126. © Opticstar Ltd, 2018
Imaging in DirectShow and ASCOM
This section demonstrates how the PX-126 can be used in third party programs as a DirectShow camera or as an
ASCOM camera. It is assumed that all the DirectShow and ASCOM software outlined in the previous sections have
already been installed.
SharpCap
SharpCap is a simple imaging software application designed for video astronomy. It supports cameras
that offer DirectShow or ASCOM camera functionality. SharpCap can be freely downloaded at
www.sharpcap.co.uk. Please, follow the instructions on the website to how to download and install it.
Once the program has been installed and running,
the camera can be selected from the Cameras
menu at the top of SharpCap’s main window. The
camera must be connected to the computer at this
point.
The first Opticstar entry refers to the PX-126’s
DirectShow support as shown on the screenshot
on the right-hand side.
There is also a second Opticstar camera entry
referred to as ASCOM Opticstar Driver.
Selecting this option instructs SharpCap to use
the ASCOM driver to communicate with the
camera instead of the DirectShow driver.
Please note that OpticstarSky provides more
functionality than SharpCap and is better suited
for the PX-126.
Auto-Guiding in DirectShow and ASCOM
This section demonstrates how the PX-126 can be used in third party programs as a DirectShow camera and as an
ASCOM auto-guide device. It is assumed that all the DirectShow and ASCOM software outlined in the previous
sections have already been installed.
PHD Guiding 2
PHD Guiding 2 is a popular auto-guide
program. It supports auto-guide
cameras that offer DirectShow camera
support, ASCOM camera support and
ASCOM guide-port (ST4) devices.
PHD Guiding 2 can be freely downloaded at
http://openphdguiding.org/. Please follow the
instructions on the website to how to download
and install it.
Once PHD Guiding 2 has been installed and
running, click the Camera icon on the bottom left
hand corner of the program window to select the
devices that will be used to capture the image and
provide auto-guide functionality.
The PX-126 can be selected either as a
DirectShow camera or as an ASCOM camera.
Additionally, the PX-126’s auto-guide port must be
selected as an ASCOM device.

14
Updated: 23/05/2018
Opticstar PX-126. © Opticstar Ltd, 2018
The PX-126 must be connected to the computer’s USB 2.0 or USB 3.0 port. Additionally, the camera’s auto-guide port
must be connected to the telescope mount’s auto-guide (ST4) port with the RJ cable that is bundled with the camera.
The screenshots above demonstrate the two ways of configuring the PX-126 as the auto-guide camera. On the
screenshot on the left, the camera has been selected as Windows WDM-style webcam camera which is another
way of describing a DirectShow camera. The telescope mount connectivity must be made by selecting OpticstarST4
(ASCOM).
The screenshot on the right demonstrates that the camera may also be selected as ASCOM Opticstar Driver. Once
again for telescope mount connectivity OpticstarST4 (ASCOM) has been selected.
Click the Connect All button when ready to start auto-guiding.
Auto-Guiding Components
There are a number of ways you can guide a telescope but there are mainly two ways of doing so. The most versatile
method is to use two telescopes mounted on the same mount, one for imaging and the second for guiding.
Alternatively, you could use a single telescope to perform this function. While the latter method is easier, it will limit
your choice of locating a suitable guide star.
Imaging and Auto-Guiding with Two Telescopes
In general to be able to auto-guide with the Opticstar PX-126 camera you will require the following items:
1. An imaging camera, i.e. Opticstar DS-616C XL+.
2. An imaging telescope, i.e. Opticstar/Ascension 102ED Triplet APO.
3. A secondary telescope for auto-guiding, i.e. Opticstar AR80S f/5 Gold.
4. An auto-guide (ST-4) compatible mount, i.e. EQ5 PRO, EQ6 PRO, etc.
5. PC with USB2.0 or USB 3.0 ports running Windows XP/Vista/7/8/10.
6. The Opticstar PX-126 camera and software to be used as a guide camera.
7. ASCOM software platform.
8. Auto-guiding software, i.e. PHD Guiding 2.
The diagram on the following page demonstrates how the components listed above are assembled together into a
complete imaging and auto-guiding setup.

15
Updated: 23/05/2018
Opticstar PX-126. © Opticstar Ltd, 2018
Please note that the secondary telescope that is used for auto-guiding would further increase your choices for locating
a suitable guide star if it is held in collimating rings, like a huge finder scope. This would allow you to easily locate a
suitable guide-star even under very difficult conditions.
Imaging and Auto-Guiding with a Single Telescope
An alternative setup will involve a single telescope for imaging and auto-guiding purposes instead of two different
telescopes. As such you will require the following items to be able to image and auto-guide.
1. An imaging camera, i.e. Opticstar DS-616C XL+.
2. An imaging telescope, i.e. Opticstar/Ascension 102ED Triplet APO.
3. An off-axis guider
4. An auto-guide (ST-4) compatible mount, i.e. EQ5 PRO, EQ6 PRO, etc.
5. PC with USB2.0 or USB 3.0 ports running Windows XP/Vista/7/8/10.
6. The Opticstar PX-126 camera and software to be used as a guide camera.
7. ASCOM software platform.
8. Auto-guiding software, i.e. PHD Guiding 2.
The following diagram demonstrates how the components listed above are assembled together into a complete
imaging and auto-guiding setup using a single telescope.
Main imaging telescope
PX-126
Auto-guide
camera
Imaging camera
i.e. DS-616C XL+
PC Windows
XP/Vista/7/8/10
Telescope used for auto-guiding
To telescope mount with
Auto-guide port (ST-4 compatible)
Auto-guiding
software i.e.
PHD Guiding 2
USB cables
Telescope used for both imaging and auto-
guiding
PX-126
Auto-guide
camera
Imaging camera
i.e. DS-616C XL+
PC Windows
XP/Vista/7/8/10
To telescope mount with
Auto-guide port (ST-4 compatible)
Imaging Camera
control and Auto-
guiding software
USB cables
Off-axis
guider

16
Updated: 23/05/2018
Opticstar PX-126. © Opticstar Ltd, 2018
An off-axis guider provides an easy and affordable way to auto-guide with a single telescope. It minimises possible
tube flexure but has the disadvantage of having a limited field of view. Also, the amount of light that hits the
prism/mirror is relatively small making less bright stars more difficult to see and track.
Troubleshooting
If you experience difficulty in installing the camera software and drivers this may be due to a number of reasons
related to your computer, operating system and other devices already connected to it. The following sections outline
the most common issues and suggest ways in which you should be able to resolve them. Please also refer to the
documents in the Articles folder on the CD.
USB Requirements
Please ensure that your computer runs Windows XP/Vista/7/8/10 or later, has the latest service pack
updates from Microsoft. Your computer must also have USB 2.0 or USB 3.0 ports. The PX-126 camera
will not work with USB1.1. If your computer has USB1.1 ports you will need to obtain a PCI USB2.0 or
USB3.0 type card if you have a desktop computer. Likewise, a laptop computer can be fitted with an Express USB2.0
or USB3.0 card. The ExpressCard (or equivalent alternative) will need to be fully supported by your computer, in some
entry level laptops full ExpressCard support is not fully implemented.
If you have a desktop try both the USB ports on the front and back of your PC if the camera is not recognised on a
particular USB port. USB ports attached directly to the motherboard are more efficient. Please note that PCMCIA
USB2.0 cards typically do not provide the full USB2.0 bandwidth and will not work optimally with the PX-126 camera.
Express Card
To resolve such issues an ExpressCard (with USB2.0 or USB3.0 ports) should be used instead of a PCMCIA/CardBus
card due to the ExpressCard's superior speed of 2.5Gbit/s (480 Mbit/s through USB 2.0) per slot, for comparison
PCMCIA/CardBus devices connected to a computer would share a total 1.06 Gbit/s bandwidth. Express type cards
use a 34mm slot where PCMCIA/CardBus cards use 54mm slots. An ExpressCard should be connected directly to the
computer and not via a PCMCIA/CardBus card.
Beam splitter Off-axis guider Radial guider

17
Updated: 23/05/2018
Opticstar PX-126. © Opticstar Ltd, 2018
Re-Installing the Software Drivers
If the camera cannot be identified by Windows then it is possible that the software drivers have not been installed
correctly or they have been corrupted and an exclamation mark will be shown next to the camera entry in Device
Manager. In such cases, it is best to uninstall the camera. This can be done from the Device Manager in Windows.
As this point the camera must be connected to the computer.
To access the Device Manager, open the Windows Control Panel. In Windows 8.1 this can be done by right-clicking
on the Windows Start button on the bottom left corner of the screen and on the popup menu select Device Manager.
In earlier operating systems click the Start button and then select Settings > Control Panel.
1. Right-click on the PX-126 entry.
2. On the pop-up menu and select Uninstall.
3. If Windows asks to restart the computer, click yes and continue. When the computer restarts, please re-install
the software as normal.
To re-install the software please follow the instructions outlined at the start of this manual.
To uninstall the DirectShow and ASCOM software please refer to pages 11 and 12 respectively. Likewise, to uninstall
OpticstarSky follow the same procedure as for the removal of DirectShow and ASCOM software drivers. Right-click on
the entry Opticstar OptistarSky and select Uninstall.
Once the software has been uninstalled, unplug the camera from the computer and restart the computer. Before
proceeding, ensure that the latest Windows service pack has been installed from Microsoft’s Windows Update. After
any such installation, restart the computer once again. Now you are ready to re-install all the software starting with
OpticstarSky as shown at the beginning of this manual.

18
Updated: 23/05/2018
Opticstar PX-126. © Opticstar Ltd, 2018
Support
Other Software
There is some freely available third-party software that may be of interest to some users. Please note that Opticstar
cannot guarantee the suitability the software.
•RegiStax: http://www.astronomie.be/registax/
•Deep Sky Stacker: http://deepskystacker.free.fr
These programs can be used to post-process video files captured in OpticstarSky or other image capture software.
They can stack, align and enhance video files or multiple images into a single high quality “master” image.
Microscope Attachments
In order to use the camera with a microscope, one or more
attachments must be used. The attachments shown from left to right
are:
•C/CS to 23mm (x0.5),
•C/CS to 23mm (x1),
•C/CS to 30mm and C/CS to 30.5mm.
These attachments are not bundled with the camera.
Camera Dimensions

19
Updated: 23/05/2018
Opticstar PX-126. © Opticstar Ltd, 2018
Camera Specification
Specification
Opticstar PX-126
Image sensor type
1/3” CMOS
Light Sensitivity
5.5v/Lux-sec at 550nm
Sensor model
Aptina AR0130
Pixel size
3.75μm x 3.75μm
Max. Resolution
1280 x 960 pixels
Speed
28fps at 1280x960
30fps at 640x480
Data Readout
Raw at 8-bit per pixel, monochrome;
RGB colour 24-bit (PX-126C model only)
Data Output
Video and still images
White Balance
ROI White Balance/ Manual Temp-Tint Adjustment
Gain
In hardware
Auto-Guide Support
ASCOM ST4
Binning modes
1x1
Exposure
Automatic or Manual (0.4ms to 15 seconds)
Image Output
USB 2.0, 480 Mb/s (USB 3.0 compatible)
Power Requirements
DC 5V over PC USB port
Lens Mount
C Mount
Mounting Tube
23.2mm (1.25”)
Shutter type
Electronic
Mounting to telescope
C to 1.25” adapter (included)
Mounting to lens
C to T-thread M42x0.75 (not included)
Mounting to microscope
C to 23mm, C to 30mm, C to 30.5mm (not included)
Dimensions
35mm (diameter) x 63mm (length)
Weight
70g
Operation temperature
-10ºC to 50ºC
Storage Temperature
-20ºC to 60ºC
Operating Humidity
30 to 80%RH
Storage Humidity
10 to 60%RH
Computer requirements
Microsoft Windows (32-bit or 64-bit) XP/Vista/7/8/10, USB 2.0 or USB3.0
Software included
OpticstarSky, Microsoft DirectShow imaging support,
ASCOM support for imaging and auto-guiding,
TWAIN support

20
Updated: 23/05/2018
Opticstar PX-126. © Opticstar Ltd, 2018
Table of contents
Other Opticstar Camcorder manuals