manuals.online logo
Brands
  1. Home
  2. •
  3. Brands
  4. •
  5. Optimum Time
  6. •
  7. Watch
  8. •
  9. Optimum Time ULTIMATE COMPACT ENDURANCE User manual

Optimum Time ULTIMATE COMPACT ENDURANCE User manual

Ultimate Compact Endurance Watch
Also available in the Optimum Time Range:
Ultimate 3 Day Event Watch
Ultimate Event Watch
Ultimate Sailing Watch
Ultimate Football Timer
Ultimate Rugby Timer
Ultimate Hockey Timer
OPTIMUM TIME
P.O. BOX 39
Market Deeping
Peterborough
PE6 8XQ
England
Tel +44 (0) 1733 333324
Fax +44 (0) 1733 333700
MODE
SET
ADJUST
S
E
T
S
T
A
R
T
/
S
T
O
P
M
O
D
E
E
N
D
U
R
A
N
C
E
A
D
J
U
S
T
START
STOP
THE ULTIMATE COMPACT ENDURANCE WATCH
The Endurance Watch has four basic modes.
1. Time of day (hours, minutes and seconds) with date month and year
2. Stop watch with hours minutes and seconds plus time of day (hrs, mins, secs)
3. Alarm 1 (with time of day display showing) plus optional single hour stroke
4. Alarm 2 (with time of day display showing)
The display has two rows of digits, the lower row being much larger than the
upper row. In stop watch mode it is possible to have the display with large stop
watch and smaller time display or large time and smaller stop watch. It is
possible to alternate between these sizes even when the stop watch is running.
The stop watch has the letters SW before the digits and the time of day has an
icon of a clock before it so that it is clear which row is time and which is stop
watch. There is a minute alarm when the stop watch is running which sounds 3
beeps every full minute, but if not required this alarm can be easily silenced.
2
1
4
3
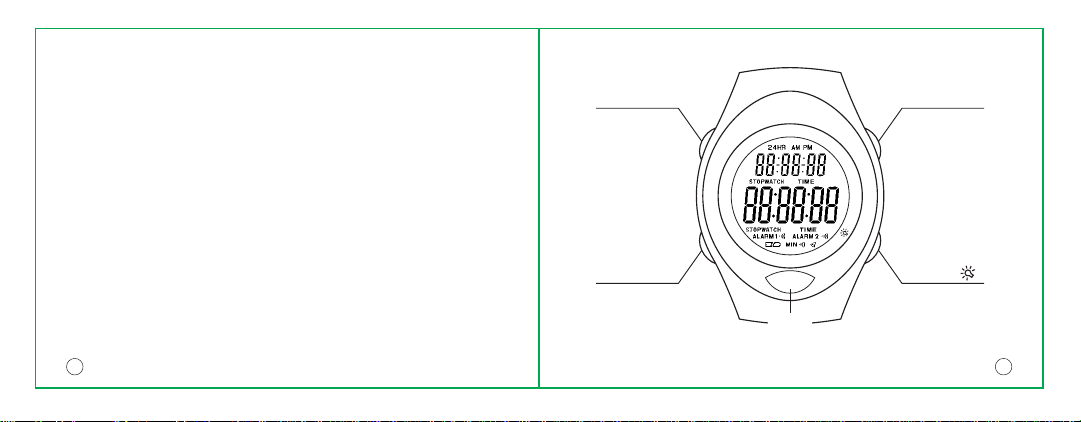
TO SET THE TIME AND CALENDAR ON THE WATCH
1. Press the "MODE" button to access the time and calendar display. (The letters "SW" will not be visible be-
cause you are not in stop watch mode, nor will either of the words Alarm 1 or Alarm 2 show because you are
not in the alarm modes).
2. Press the "SET" button and hold it down for 2 seconds. You will hear a ‘beep’ and either "AM", "PM" or "24HR"
will be flashing.
3. Press "ADJUST" to choose between 12 or 24 hour clock.
4. Press "MODE" to confirm your choice and make the hours flash.
5. Press "ADJUST" to alter the hour making sure if you are in 24 hour mode that you are not 12 hours wrong!
6. Press "MODE" to confirm and start the minutes flashing.
7. Press "ADJUST" to alter the minutes.
8. Press "MODE" to confirm and start the seconds flashing.
9. Press "ADJUST" to set the seconds to zero.
10. Press "MODE" to confirm and start the year flashing.
11. Press "ADJUST" to alter the year.
12. Press "MODE" to confirm and start the month flashing.
13. Press "ADJUST" to confirm and start the date flashing.
14. Press "START/STOP" to adjust between European date order (date, month, year), or American date order
(month, date, year).
15. Press either "SET" to confirm all your choices and exit the time setting mode or press "MODE" to go back to
stage 2 above and repeat the process.
16. If you have pressed "SET" to confirm the clock and calendar are now set.
NOTE
1. You can confirm your changes at any time using the "SET" button without having to go through the whole
sequence.
2. You can move a digit on by giving a single press or you can fast scroll through by holding the button down.
TO USE THE STOP WATCH
1. Press "MODE" to enter the stop watch function.
2. Choose between large stop watch/small time or small stop watch/large time using either "SET" button (The
stop watch has the letters "SW" before the display and the time has a clock icon before it ).
3. Press "START/STOP" to either start or stop the stop watch. This counts up only, and counts in hours, minutes,
and seconds.
4. To clear the stop watch make sure it is stopped and then press "ADJUST".
5. Whether the stop watch is running or not you can choose whether you want the stop watch or the clock on the
large digits by pressing "SET".
6. The minute alarm will sound at every minute during count up if the icon in the top right of the display is on.
7. To activate the minute alarm, stop the stop watch and zero it.
8. Press "ADJUST" and hold it down for 2 seconds until you hear a ‘beep’ which will either have turned the
minute alarm on or off depending on its previous state.
TO SET THE ALARM 1 AND THE HOUR STRIKE
1. Press the "MODE" button to access the ALARM 1 display. (The letters "SW" will not be visible
because you are not in stop watch mode, but Alarm 1 will show because you are in the alarm 1 mode).
2. Press the "SET" button and hold it down for 2 seconds. You will hear a ‘beep’ and the hours will be flashing.
6
5
3. Press "ADJUST" to alter the hour making sure if you are in 24 hour mode that you are not 12 hours wrong!
4. Press "MODE" to confirm and start the minutes flashing.
5. Press "ADJUST" to alter the minutes.
6. Press "SET" to confirm the ALARM 1 setting.
7. The alarm is switched on and off using "START/STOP" button. The Alarm 1 on icon appears just after words
ALARM 1
8. The use of the "START/STOP" button also controls the single hour strike beep which is optional, and
controlled in the ALARM 1 mode only.
9. The "START/STOP" button controls the alarm 1 and hour strike in the following order each time you press it:
Alarm 1 on only, Alarm 1 and hour strike both on, Alarm 1 off but hour strike on, and Alarm 1 and hour strike both off.
TO SET THE ALARM 2
1. Press the "MODE" button to access the ALARM 2 display. (The letters "SW" will not be visible because you
are not in stop watch mode, but Alarm 2 will show because you are in the alarm 2 mode).
2. Press the "SET" button and hold it down for 2 seconds. You will hear a ‘beep’ and the hours will be flashing.
3. Press "ADJUST" to alter the hour making sure if you are in 24 hour mode that you are not 12 hours wrong!
4. Press "MODE" to confirm and start the minutes flashing. Press "ADJUST" to alter the minutes.
5. Press "SET" to confirm the ALARM 1 setting.
6. The alarm is switched on and off using the "START/STOP" button.
TO SEE THE DISPLAY IN THE DARK
1. Press the "EL" button at any time to light up the LCD display. The EL will go out automatically approximately
3 seconds later. If you require longer illumination than 3 seconds keep pressing the button.
TO CHANGE THE BATTERY
1. Carefully unscrew the four screws
that hold the back on.
2. Remove the old battery taking
note of how it fitted.
3. Fit a new battery carefully in place
of the old one. (The battery is a
Lithium battery type CR2032). Make
sure you get the positive (+ve) facing upwards.
4. Carefully replace the case back making sure the rubber seal has not come away from its slot in the case
front. Carefully replace the four screws making sure you do not over tighten them and strip the threads.
NOTES
1. Under extreme conditions LCD watches can be affected by heat & sunlight. Your Optimum Time
watch has a high temperature display for this reason.
When affected an LCD display turns black. When allowed to cool down it will return to normal. You
should not experience this with an Optimum Time product but please avoid leaving the watch in a hot
and bright environment such as on a car dashboard.
2. Electronic watches can suffer from static electricity. This may result in a watch locking up so that
nothing functions. Optimum Time watches have static protection, but the level of static varies from
person to person. If your watch locks up, it can be corrected by pressing all of the buttons at once,
holding them down a few seconds. Unfortunately the time will need resetting after this is done.

This manual suits for next models

1

Other Optimum Time Watch manuals

Optimum Time OS 4 Series User manual

Optimum Time

Optimum Time OS 4 Series User manual

Optimum Time OS 3 Series User manual

Optimum Time

Optimum Time OS 3 Series User manual

Optimum Time Ultimate Event User manual

Optimum Time

Optimum Time Ultimate Event User manual

Optimum Time OS 5 Series User manual

Optimum Time

Optimum Time OS 5 Series User manual

Optimum Time OS 3 Series User manual

Optimum Time

Optimum Time OS 3 Series User manual

Optimum Time OS 7 Series User manual

Optimum Time

Optimum Time OS 7 Series User manual

Popular Watch manuals by other brands

Beuchat GP01 quick start guide

Beuchat

Beuchat GP01 quick start guide

Casio 2551 user guide

Casio

Casio 2551 user guide

Casio S100X user guide

Casio

Casio S100X user guide

GOLDEN STATE INTERNATIONAL 40-314 instruction manual

GOLDEN STATE INTERNATIONAL

GOLDEN STATE INTERNATIONAL 40-314 instruction manual

ETA Quarz G10.962 user manual

ETA Quarz

ETA Quarz G10.962 user manual

ODM DD99B instruction manual

ODM

ODM DD99B instruction manual

Timberland VD54 instruction manual

Timberland

Timberland VD54 instruction manual

HiFuture ZONE 2 quick start guide

HiFuture

HiFuture ZONE 2 quick start guide

Pulsar WM60 manual

Pulsar

Pulsar WM60 manual

Casio Edifice EF305-1AV manual

Casio

Casio Edifice EF305-1AV manual

Calypso Watches IKMK5807M instruction manual

Calypso Watches

Calypso Watches IKMK5807M instruction manual

Tissot NAVIGATOR WATCHES user manual

Tissot

Tissot NAVIGATOR WATCHES user manual

FOREVER CAREME KW-400 manual

FOREVER

FOREVER CAREME KW-400 manual

Fire Boltt BSW029 Troubleshooting

Fire Boltt

Fire Boltt BSW029 Troubleshooting

XPLORA XGO2 Quick user guide

XPLORA

XPLORA XGO2 Quick user guide

Bell & Ross BR-X5 Technical notes

Bell & Ross

Bell & Ross BR-X5 Technical notes

Bremont TERRA NOVA LIMITED EDITION Technical notes

Bremont

Bremont TERRA NOVA LIMITED EDITION Technical notes

Haemmer Exciter user manual

Haemmer

Haemmer Exciter user manual

manuals.online logo
manuals.online logoBrands
  • About & Mission
  • Contact us
  • Privacy Policy
  • Terms and Conditions

Copyright 2025 Manuals.Online. All Rights Reserved.