Optoma 515ST Series User manual

515ST Series
X515ST / W515ST / EH515ST / EH515TST / WU515ST / WU515TST
Perfect for space limited professional installation
Equipped with a short throw lens
5000 up lumens 1080p DLP projector
Capable of vertical and horizontal lens shift
Geometry correction - 4 corner
HDBaseT™ connectivity
Robust & reliable
Suitable for museums, simulations, exhibitions
5000+ lms
asia.optoma.com

asia.optoma.com
High Precision Short Throw Lens
Unique short throw lens with lens shift capability, with two aspherical lenses to eliminate spherical aberration,
and improve resolution and system performance.
Exceptional design and reliability
Delivering outstanding reliability, high brightness, stunning colors and spectacular image quality, the
X515ST/W515ST/EH515(T)ST/WU515(T)ST are engineered to serve the professional installation market using
short throw lens w/ pure shift capability.
Optoma’s X515ST/W515ST/EH515(T)ST/WU515(T)ST is the perfect solution for museums, exhibitions, theme
parks, simulations, arts and many others.
Outstanding brightness
From 5,000 up to 6,000 lumens*, with 10,000:1 high contrast.
Professional Installation Applications

asia.optoma.com
Installation friendly & Advanced Connectivity
Versatile System Integration Control
Protocols
Full supports for Crestron RoomView, Extron’s IP
Link, AMX dynamic device discovery and PJ-Link
protocols, keeping you in control wherever you are.
Geometric Correction
2D-Keystone with auto correction on vertical, supports
4 corners correction.
Color Matching Mode
The color matching system combines accurate
measurements across multiple projectors helps create
seamless blends every time.
24/7 Continuous Performance
Designed for uninterrupted operation. HDBaseT (EH515TST/WU515TST only)
Uncompromised Full HD video, audio, network, and
control commands all delivered without signal loss.
Multiple display mode
Include Picture by Picture and Picture in
Picture mode.

Copyright © 2017, Optoma and its logo is a registered trademark of Optoma Corporation. All other product names and company names used h erein are for identifications
purposes only and may be trademarks or registered trademarks of their respective owners. Features and specification may change without notice. All images are for
representation purposes only and may be simulated.
Input / Output
asia.optoma.com
Specification
1. RJ-45
2. FW upgrade (USB-B mini)
3. HDMI x2
4. Display Port
5. VGA 2 in / YPbPr/ connector
6. VGA 1 in / YPbPr
7. VGA-Out
8. S-Video
9. Audio 3 in for Video/ S-video
10. Audio 1 in for VGA1
11. Audio out
12. 3D Sync out
13. 12V Trigger
14. USB Power out (1.5A)
15. Microphone
16. Wired remote
17. Audio 2 in for VGA2
18. Video
19. RS232C
20. Power socket
21. Kensington lock
22. HDBaseT (SKU dependent)
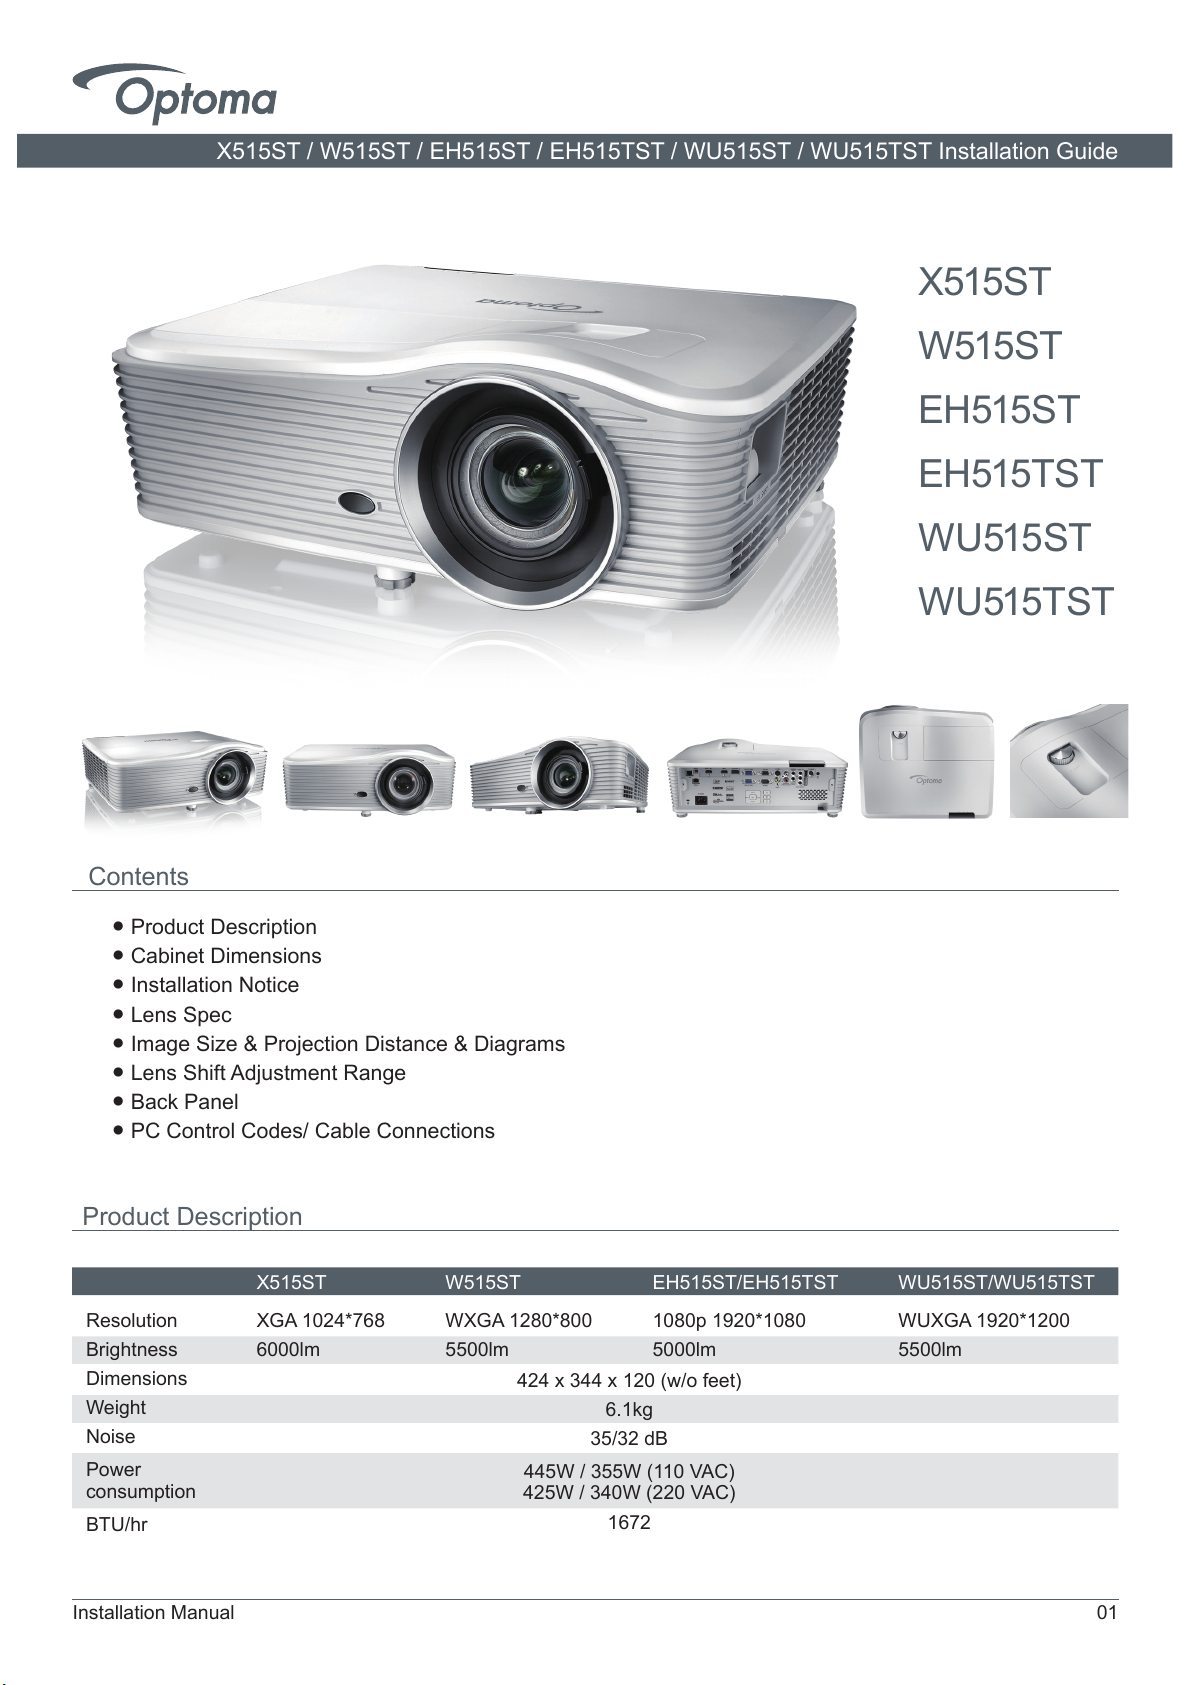
Model name X515ST W515ST WU515ST / WU515TST EH515ST / EH515TST
Display Technology
Texas Instruments DLP®technology
Native Resolution
XGA : 1024 x 768 WXGA : 1280 x 800 WUXGA : 1920 x 1200 1080p: 1920 x 1080
Brightness (ANSI lumens)
6000 5500 5500 5000
Contrast Ratio
10000:1
Display Colors
1073.4 million colors (10bit)
Projection Lens
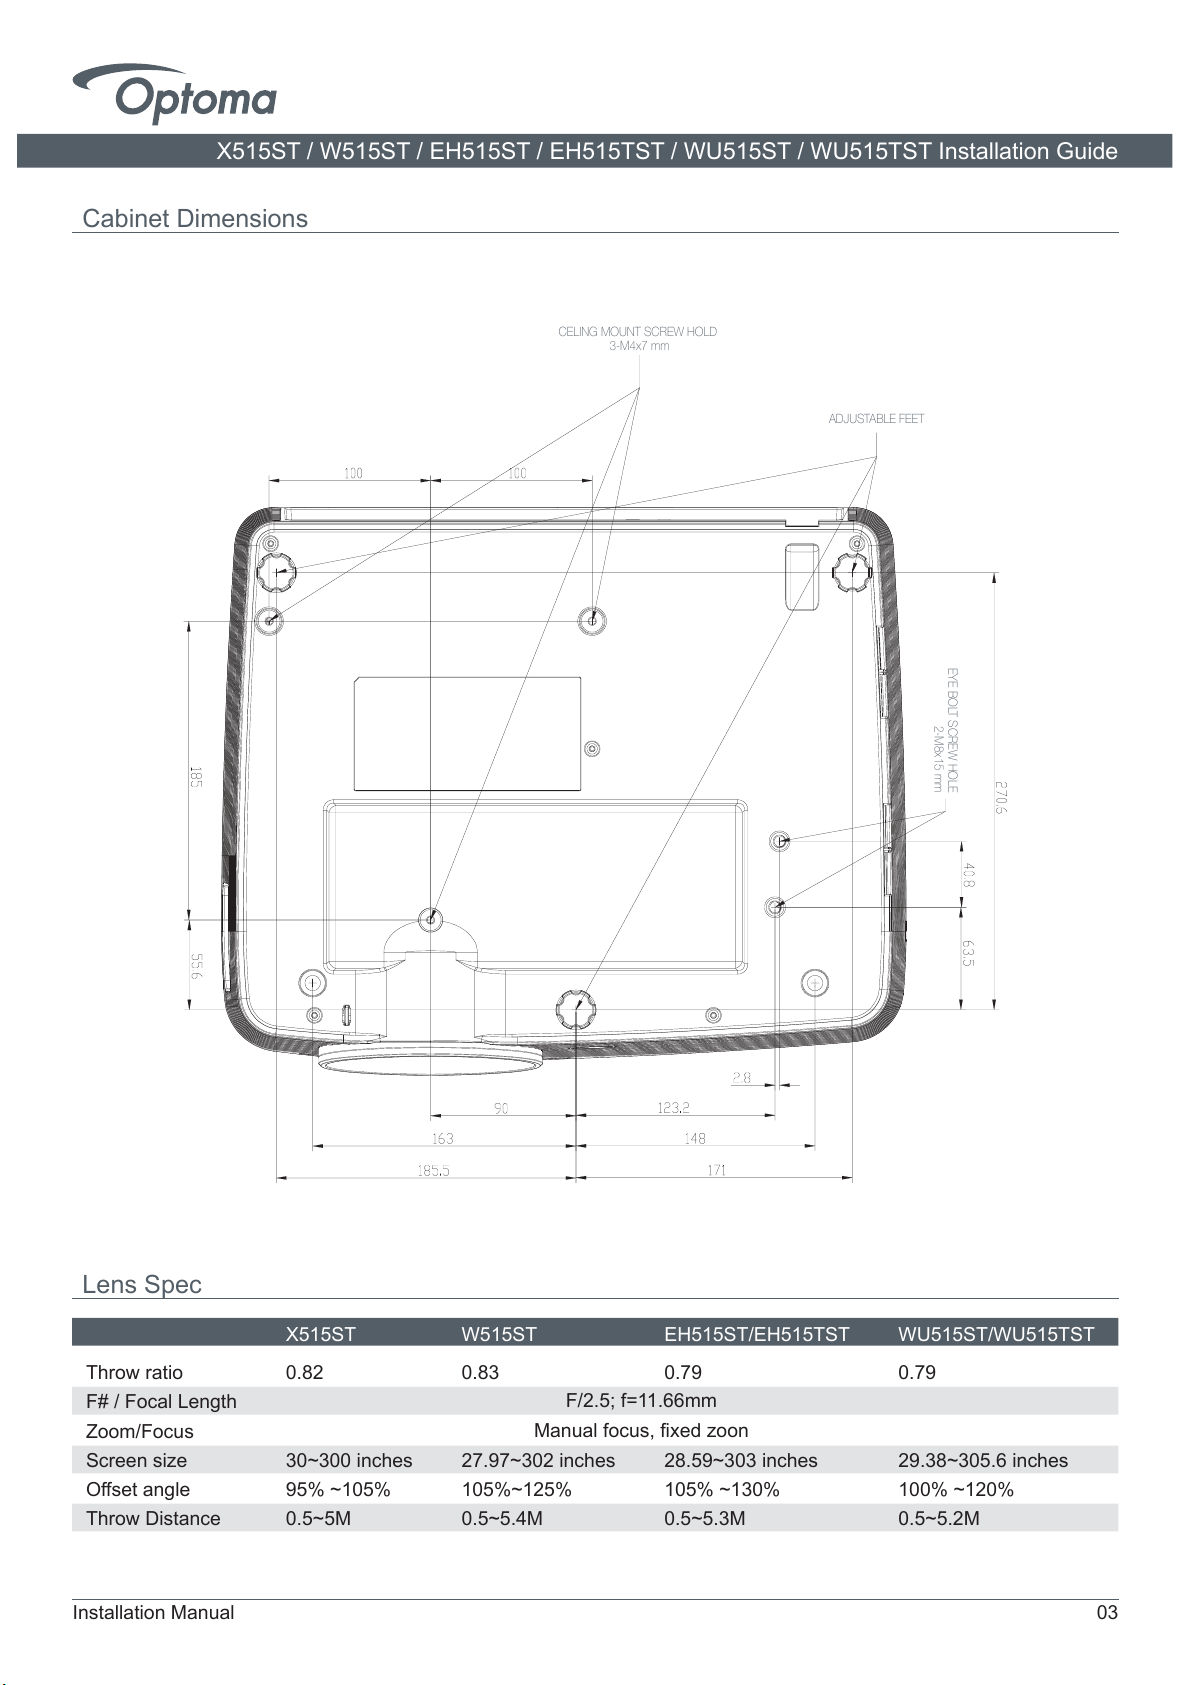
F=2.5 ; f = 11.66 mm; fixed zoom
Lens Shift
(constraints apply see
user manual for details)
Horizontal: +/-10%
Vertical: +10%
Horizontal: +/-10%
Vertical: +20%
Horizontal: +/-10%
Vertical: +20%
Horizontal: +/-10%
Vertical: +25%
Image Size
30” ~ 300” 27.97” ~ 302” 29.38” ~ 305.6” 28.59” ~ 303”
Projection Distance
0.5m ~ 5m 0.5m ~ 5.4m 0.5m ~ 5.2m 0.5m ~ 5.3m
Throw
Ratio
(Projection
distance/width) (+
-3%
tolerance)
0.82 0.83 0.79 0.79
Digital Keystone
Correction
±30° Vertical & Horizontal
Scan Rate
Horizontal : 15.375~91.146 KHz
Vertical :24~ 85 Hz (120Hz for 3D feature)
Computer Compatibility
WUXGA, 1080p, UXGA, SXGA+, SXGA, WXGA+, WXGA, HD, XGA, SVGA, VGA, Mac
Video Compatibility
PAL SECAM 576i/p, NTSC 480i/p, HD 720p/1080i/1080p
Input /
Output
In : HDMI x2 / VGA x2 /
DisplayPort x1 /
S-Video / Video / Audio (R/L) x1/
Audio in x2 / Microphone
Out :
VGA x1 , USB Type A (for
power), Audio
Control : RS232C / Wired
Remote Port / 3D Sync out /
RJ45 / 12V trigger
Service : USB
In
:
HDMI x2 / VGA x2 / DisplayPort x1
/ S-Video / Video / Audio (R/L) x1/
Audio in x2 / Microphone
Out
:
VGA x1 , USB Type A (for power),
Audio
Control
:
RS232C / Wired Remote Port
/ 3D Sync out / RJ45 / 12V trigger
Service : USB
In
:
HDMI x2 / VGA x2 / DisplayPort
x1 / HDBaseT x1* (WU515TST only)
/ S
-
Video / Video / Audio (R/L) x1/
Audio in x2 / Microphone
Out : VGA x1 , USB Type A (for
power), Audio
Control :
RS232C / Wired Remote
Port / 3D Sync out / RJ45 / 12V
trigger
Service : USB
In
:
HDMI x2 / VGA x2 / DisplayPort
x1 / HDBaseT x1* (EH515TST only)
/ S
-
Video / Video / Audio (R/L) x1/
Audio in x2 / Microphone
Out : VGA x1 , USB Type A (for
power), Audio
Control
:
RS232C / Wired Remote
Port / 3D Sync out / RJ45 / 12V
trigger
Service : USB
Uniformity
80%
Speaker
10W speaker
Noise (Eco mode)
32 dB
Lamp Type
365W
Lamp Life
(Bright/Eco/DE mode)
2500 / 3000 / 3500 hours
Dimensions
(W x D x H ) 424 x 344 x 120 mm (w/o feet)
Weight
6.1kg

Installation Manual 01
X515ST / W515ST / EH515ST / EH515TST / WU515ST / WU515TST Installation Guide
● Product Description
● Cabinet Dimensions
● Installation Notice
● Lens Spec
● Image Size & Projection Distance & Diagrams
● Lens Shift Adjustment Range
● Back Panel
● PC Control Codes/ Cable Connections
Contents
Product Description
Resolution
Brightness
Dimensions
Weight
Noise
Power
consumption
BTU/hr
XGA 1024*768
6000lm
X515ST
WXGA 1280*800
5500lm
W515ST
1080p 1920*1080
5000lm
EH515ST/EH515TST
WUXGA 1920*1200
5500lm
WU515ST/WU515TST
X515ST
W515ST
EH515ST
EH515TST
WU515ST
WU515TST
424 x 344 x 120 (w/o feet)
6.1kg
35/32 dB
445W / 355W (110 VAC)
425W / 340W (220 VAC)
1672

Cabinet Dimensions
Installation Manual 02
Air Inlet
LENS SHIFT KNOB
LENS SHIFT KNOB
FOCUS RING
IR RECEIVER
IR RECEIVER
POWER CORD LOCATION
Air Outlet
Lamp door
X515ST / W515ST / EH515ST / EH515TST / WU515ST / WU515TST Installation Guide

Cabinet Dimensions
X515ST / W515ST / EH515ST / EH515TST / WU515ST / WU515TST Installation Guide
Installation Manual 03
Lens Spec
Throw ratio
F# / Focal Length
Zoom/Focus
Screen size
Offset angle
Throw Distance
0.82
30~300 inches
95% ~105%
0.5~5M
X515ST
0.83
27.97~302 inches
105%~125%
0.5~5.4M
W515ST
0.79
28.59~303 inches
105% ~130%
0.5~5.3M
EH515ST/EH515TST
0.79
29.38~305.6 inches
100% ~120%
0.5~5.2M
WU515ST/WU515TST
Manual focus, fixed zoon
F/2.5; f=11.66mm
CELING MOUNT SCREW HOLD
3-M4x7 mm
EYE BOLT SCREW HOLE
2-M8x15 mm
ADJUSTABLE FEET

Installation Manual 04
SETUP AND INSTALLATION
Projector installation notice
Place the projector in a horizontal position.
The tilt angle of the projector should not exceed 15 degrees, nor should the
projector be installed in any way other than the desktop and ceiling mount, otherwise
lamp life could decrease dramatically, and may lead to other unpredictable damages.
X515ST / W515ST / EH515ST / EH515TST / WU515ST / WU515TST Installation Guide
Allow at least 50 cm clearance around the exhaust vent.
Ensure that the intake vents do not recycle hot air from the exhaust vent.
When operating the projector in an enclosed space, ensure that the surrounding air temperature within
the enclosure does not exceed operation temperature while the projector is running, and the air intake
and exhaust vents are unobstructed.
All enclosures should pass a certified thermal evaluation to ensure that the projector does not recycle
exhaust air, as this may cause the device to shutdown even if the enclosure temperature is with the
acceptable operation temperature range.
15°
-15°
Minimum 500mm
(19.69 inches)
Minimum 500mm
(19.69 inches)
Minimum 500mm
(19.69 inches)
Minimum 100mm
(3.94 inches)
Minimum 500mm
(19.69 inches)
Minimum 300mm
(11.81 inches)

Installation Manual 05
Image Size & Projection Distance & Diagrams
X515ST / W515ST / EH515ST / EH515TST / WU515ST / WU515TST Installation Guide
Note Vertical Lens Shift values are always calculated from the Center of Projection Lens. Therefore the distance 5.2 cm (2.05 inch)
from the Base to the Center of Projection Lens needs to be added to each Vertical Lens Shift value.
Desired Image Size Projection
Distance (C)
Diagonal Width Height Wide
m inch m inch m inch m feet
Lens Shift Range
PJ lens Center to top of image Image Shift Range
Vertical range
at the center of
Horizontal shif
(D) = (A) - (B)
Vertical range
at 1%
Horizontal
position
Vertical -
(Min) (B)
Vertical +
(Max) (A)
Horizontal
-(Left)
Horizontal
+(Right)
0.76
0.91
1.02
1.27
1.52
1.78
2.03
2.29
2.54
3.05
3.81
4.57
5.08
6.35
7.62
30
36
40
50
60
70
80
90
100
120
150
180
200
250
300
0.65
0.78
0.86
1.08
1.29
1.51
1.72
1.94
2.15
2.58
3.23
3.88
4.31
5.38
6.46
25.4
30.5
33.9
42.4
50.9
59.4
67.8
76.3
84.8
101.8
127.2
152.6
169.6
212.0
254.4
0.40
0.48
0.54
0.67
0.81
0.94
1.08
1.21
1.35
1.62
2.02
2.42
2.69
3.37
4.04
15.9
19.1
21.2
26.5
31.8
37.1
42.4
47.7
53.0
63.6
79.5
95.4
106.0
132.5
159.0
0.5
0.6
0.7
0.9
1.0
1.2
1.4
1.5
1.7
2.0
2.6
3.1
3.4
4.3
5.1
1.64
1.97
2.30
2.95
3.28
3.94
4.59
4.92
5.58
6.56
8.53
10.17
11.15
14.11
16.73
48.5
58.2
64.6
80.8
96.9
113.1
129.2
145.4
161.5
193.9
242.3
290.8
323.1
403.9
484.6
40.4
48.5
53.9
67.3
80.8
94.2
107.7
121.2
134.6
161.5
201.9
242.3
269.2
336.6
403.9
8.1
9.7
10.8
13.5
16.2
18.9
21.5
24.2
26.9
32.3
40.4
48.5
53.9
67.3
80.8
7.2
8.6
9.7
12.1
14.6
16.9
19.4
21.8
24.3
29.2
36.4
43.6
48.4
60.7
72.7
6.5
7.8
8.6
10.8
12.9
15.1
17.2
19.4
21.5
25.9
32.3
38.8
43.1
53.9
64.6
6.5
7.8
8.6
10.8
12.9
15.1
17.2
19.4
21.5
25.9
32.3
38.8
43.1
53.9
64.6
(WUXGA)
Desired Image Size Projection
Distance (C)
Diagonal Width Height
m inch m inch m inch m feet
Lens Shift Range
PJ lens Center to top of image Image Shift Range
Vertical range
at the center of
Horizontal shif
(D) = (A) - (B)
Vertical range
at 1%
Horizontal
position
Vertical -
(Min) (B)
Vertical +
(Max) (A)
Horizontal
-(Left)
Horizontal
+(Right)
0.76
0.91
1.02
1.27
1.52
1.78
2.03
2.29
2.54
3.05
3.81
4.57
5.08
6.35
7.62
30
36
40
50
60
70
80
90
100
120
150
180
200
250
300
0.66
0.80
0.89
1.11
1.33
1.55
1.77
1.99
2.21
2.66
3.32
3.98
4.43
5.53
6.64
26.2
31.4
34.9
43.6
52.3
61.0
69.7
78.4
87.2
104.6
130.7
156.9
174.3
217.9
261.5
0.37
0.45
0.50
0.62
0.75
0.87
1.00
1.12
1.25
1.49
1.87
2.24
2.49
3.11
3.74
14.7
17.7
19.6
24.5
29.4
34.3
39.2
44.1
49.0
58.8
73.5
88.2
98.1
122.6
147.1
0.5
0.6
0.7
0.9
1.0
1.2
1.4
1.6
1.7
2.1
2.6
3.1
3.5
4.4
5.2
1.64
1.97
2.30
2.95
3.28
3.94
4.59
5.25
5.58
6.89
8.53
10.17
11.48
14.44
17.06
48.6
58.3
64.8
80.9
97.1
113.3
129.5
145.7
161.9
194.3
242.8
291.4
323.8
404.7
485.7
39.2
47.1
52.3
65.4
78.5
91.5
104.6
117.7
130.8
156.9
196.1
235.4
261.5
326.9
392.3
9.3
11.2
12.5
15.6
18.7
21.8
24.9
28.0
31.1
37.4
46.7
56.0
62.3
77.8
93.4
8.3
10.1
11.3
14.0
16.9
19.6
22.5
25.2
28.1
33.5
42.1
50.4
56.0
70.0
84.2
6.6
8.0
8.9
11.1
13.3
15.5
17.7
19.9
22.1
26.6
33.2
39.9
44.3
55.4
66.4
6.6
8.0
8.9
11.1
13.3
15.5
17.7
19.9
22.1
26.6
33.2
39.9
44.3
55.4
66.4
(1080P)

Installation Manual 06
Image Size & Projection Distance & Diagrams
X515ST / W515ST / EH515ST / EH515TST / WU515ST / WU515TST Installation Guide
Note Vertical Lens Shift values are always calculated from the Center of Projection Lens. Therefore the distance 5.2 cm (2.05 inch)
from the Base to the Center of Projection Lens needs to be added to each Vertical Lens Shift value.
Desired Image Size Projection
Distance (C)
Diagonal Width Height Wide
m inch m inch m inch m feet
Lens Shift Range
PJ lens Center to top of image Image Shift Range
Vertical range
at the center of
Horizontal shif
(D) = (A) - (B)
Vertical range
at 1%
Horizontal
position
Vertical -
(Min) (B)
Vertical +
(Max) (A)
Horizontal
-(Left)
Horizontal
+(Right)
0.76
0.91
1.02
1.27
1.52
1.78
2.03
2.29
2.54
3.05
3.81
4.57
5.08
6.35
7.62
30
36
40
50
60
70
80
90
100
120
150
180
200
250
300
0.65
0.78
0.86
1.08
1.29
1.51
1.72
1.94
2.15
2.58
3.23
3.88
4.31
5.38
6.46
25.4
30.5
33.9
42.4
50.9
59.4
67.8
76.3
84.8
101.8
127.2
152.6
169.6
212.0
254.4
0.40
0.48
0.54
0.67
0.81
0.94
1.08
1.21
1.35
1.62
2.02
2.42
2.69
3.37
4.04
15.9
19.1
21.2
26.5
31.8
37.1
42.4
47.7
53.0
63.6
79.5
95.4
106.0
132.5
159.0
0.5
0.6
0.7
0.9
1.1
1.3
1.4
1.6
1.8
2.1
2.7
3.2
3.6
4.5
5.4
1.64
1.97
2.30
2.95
3.61
4.27
4.59
5.25
5.91
6.89
8.86
10.50
11.81
14.76
17.72
50.5
60.6
67.3
84.1
101.0
117.8
134.6
151.5
168.3
201.9
252.4
302.9
336.6
420.7
504.8
42.4
50.9
56.5
70.7
84.8
99.0
113.1
127.2
141.4
169.6
212.0
254.4
282.7
353.4
424.1
8.1
9.7
10.8
13.5
16.2
18.8
21.5
24.2
26.9
32.3
40.4
48.5
53.9
67.3
80.8
7.2
8.6
9.7
12.1
14.6
16.9
19.4
21.8
24.3
29.2
36.4
43.6
48.4
60.7
72.7
6.5
7.8
8.6
10.8
12.9
15.1
17.2
19.4
21.5
25.9
32.3
38.8
43.1
53.9
64.6
6.5
7.8
8.6
10.8
12.9
15.1
17.2
19.4
21.5
25.9
32.3
38.8
43.1
53.9
64.6
(WXGA)
Desired Image Size Projection
Distance (C)
Diagonal Width Height Wide
m inch m inch m inch m feet
Lens Shift Range
PJ lens Center to top of image Image Shift Range
Vertical range
at the center of
Horizontal shif
(D) = (A) - (B)
Vertical range
at 1%
Horizontal
position
Vertical -
(Min) (B)
Vertical +
(Max) (A)
Horizontal
-(Left)
Horizontal
+(Right)
0.76
1.02
1.27
1.52
1.78
2.03
2.29
2.54
3.05
3.81
4.57
5.08
6.35
7.62
30
40
50
60
70
80
90
100
120
150
180
200
250
300
0.61
0.81
1.02
1.22
1.42
1.63
1.83
2.03
2.44
3.05
3.66
4.06
5.08
6.10
24
32
40
48
56
64
72
80
96
120
144
160
200
240
0.46
0.61
0.76
0.91
1.07
1.22
1.37
1.52
1.83
2.29
2.74
3.05
3.81
4.57
18
24
30
36
42
48
54
60
72
90
108
120
150
180
0.5
0.7
0.8
1.0
1.2
1.3
1.5
1.7
2.0
2.5
3.0
3.3
4.2
5.0
1.64
2.30
2.62
3.28
3.94
4.27
4.92
5.58
6.56
8.20
9.84
10.83
13.78
16.40
48.0
64.0
80.0
96.0
112.0
128.0
144.0
160.0
192.0
240.0
288.0
320.0
400.1
480.1
43.4
57.9
72.4
86.9
101.4
115.8
130.3
144.8
173.7
217.2
260.6
289.6
362.0
434.3
4.6
6.1
7.6
9.1
10.7
12.2
13.7
15.2
18.3
22.9
27.4
30.5
38.1
45.7
4.1
5.5
6.8
8.2
9.6
11.0
12.3
13.7
16.5
20.6
24.7
27.5
34.3
41.1
6.1
8.1
10.2
12.2
14.2
16.3
18.3
20.3
24.4
30.5
36.6
40.6
50.8
61.0
6.1
8.1
10.2
12.2
14.2
16.3
18.3
20.3
24.4
30.5
36.6
40.6
50.8
61.0
(XGA)

Installation Manual 07
EH515TST / WU515TST
X515ST / W515ST / EH515ST / WU515ST
Back Panel
12V
OUT
AUDIO2-IN
AUDIO OUT
WIRED REMOTE
AUDIO1-IN
(VGA1)
(VGA2)
(VIDEO/S-VIDEO)
L
R
AUDIO3-IN
S-VIDEO
VGA-OUT
VGA1-IN / YPbPr
VGA2-IN / YPbPr / RS-232C
VIDEO
LAN
HDBaseT
USB Power
Out (1.5A)
12V
OUT
3D SYNC
Out (5V)
HDMI 1 / MHL HDMI 2 DisplayPort
MOUSE
SERVICE
12V
OUT
AUDIO2-IN
AUDIO OUT
WIRED REMOTE
AUDIO1-IN
(VGA1)
(VGA2)
(VIDEO/S-VIDEO)
L
R
AUDIO3-IN
S-VIDEO
VGA-OUT
VGA1-IN / YPbPr
VGA2-IN / YPbPr / RS-232C
VIDEO
LAN USB Power
Out (1.5A)
12V
OUT
3D SYNC
Out (5V)
HDMI 1 / MHL HDMI 2 DisplayPort
MOUSE
SERVICE
5
3
4
8
2
6
1
7
Enter
Keystone Correction
Power
Information
Menu
Re-Sync
Source
Four
Directional Select Keys
Temp LED
Lamp LED
On/Standby LED
1.
2.
3.
4.
5.
6.
7.
8.
9.
10.
11.
12.
X515ST / W515ST / EH515ST / EH515TST / WU515ST / WU515TST Installation Guide
Lens Shift Diagrams
V+
V–
V+
V–
A
V
5.2 cm
H
C
B
1
4
3
3
2
Base
Wall
1. Center of projection lens.
2. Projection image while lens shift at the highest position.
3. Horizontal shift range: 10% H.
4. Vertical shift range: 20% V.

Installation Manual 08
PC Control Codes
SEND to projector
232 ASCII
Code
HEX Code Function Description
~XX00 1 7E 30 30 30 30 20 31 0D Power ON
~XX00 0 7E 30 30 30 30 20 30 0D Power OFF (0/2 for backward compatible)
~XX03 1 7E 30 30 30 33 20 31 0D Mute On
~XX03 2 7E 30 30 30 33 20 30 0D Off (0/2 for backward compatible)
~XX12 1 7E 30 30 31 32 20 31 0D Direct Source Commands HDMI1
~XX12 15 7E 30 30 31 32 20 31 35 0D HDMI2
~XX12 20 7E 30 30 31 32 20 32 30 0D Displayport
~XX12 5 7E 30 30 31 32 20 35 0D VGA1
~XX12 8 7E 30 30 31 32 20 38 0D VGA1 Component
~XX12 6 7E 30 30 31 32 20 36 0D VGA 2
~XX12 13 7E 30 30 31 32 20 31 33 0D VGA2 Component
~XX12 9 7E 30 30 31 32 20 39 0D S-Video
~XX12 10 7E 30 30 31 32 20 31 30 0D Video
~XX12 21 7E 30 30 31 32 20 32 31 0D HDBaseT (only exists in "T" SKU)
Baud Rate : 9600
Data Bits: 8
ASCII code
Parity: None
Stop Bits: 1
Flow Control : None
UART16550 FIFO: Disable
Projector Return (Pass): P
Projector Return (Fail): F XX=01-99, projector's ID, XX=00 is for all projectors
Note: There is a <CR> after all ASCII commands 0D is the HEX code for <CR> in ASCII code.
RS232 protocol function list
~XX20 1 7E 30 30 32 30 20 31 0D Display Mode Presentation
~XX20 2 7E 30 30 32 30 20 32 0D Bright
~XX20 3 7E 30 30 32 30 20 33 0D Movie
~XX20 4 7E 30 30 32 30 20 34 0D sRGB
~XX20 5 7E 30 30 32 30 20 35 0D User
~XX20 7 7E 30 30 32 30 20 37 0D Blackboard
~XX20 13 7E 30 30 32 30 20 31 33 0D DICOM SIM.
~XX20 9 7E 30 30 32 30 20 39 0D
SEND from projector automatically
232 ASCII
Code
HEX Code Function
Projector Return
Description
when Standby/Warming/Cooling/Out of
Range/Lamp fail/Fan Lock/Over
Temperature/ Lamp Hours Running Out/
Cover Open
INFOn n=0 Standby
n=1 Warming
n=2 Cooling
n=3 Out of Range
n=4 Lamp fail
n=6 Fan Lock/
n=7 Over Temperature
n=8 Lamp Hours Running Out
RS232 commands by TELNET
Telnet Port : 23
X515ST / W515ST / EH515ST / EH515TST / WU515ST / WU515TST Installation Guide

User manual
DLP®Projector

English
2
TABLE OF CONTENTS
SAFETY ............................................................................................... 4
Important Safety Instruction....................................................................................................... 4
3D Safety Information ................................................................................................................ 5
Copyright ................................................................................................................................... 6
Disclaimer .................................................................................................................................. 6
Trademark Recognition ............................................................................................................. 6
FCC ........................................................................................................................................... 7
Declaration of Conformity for EU countries ............................................................................... 7
WEEE ........................................................................................................................................ 7
INTRODUCTION .................................................................................. 8
Package Overview..................................................................................................................... 8
Standard accessories ................................................................................................................ 8
Optional accessories ................................................................................................................. 8
Product Overview ...................................................................................................................... 9
Connections.............................................................................................................................. 10
Keypad ..................................................................................................................................... 11
Remote ..................................................................................................................................... 12
SETUP AND INSTALLATION ............................................................. 13
Installing the projector .............................................................................................................. 13
Connecting sources to the projector ......................................................................................... 15
Adjusting the projector image ................................................................................................... 16
Remote setup ........................................................................................................................... 17
USING THE PROJECTOR .................................................................. 19
Powering on / off the projector.................................................................................................. 19
Selecting an input source ......................................................................................................... 21
Menu navigation and features .................................................................................................. 22
OSD Menu tree......................................................................................................................... 23
Image menu.............................................................................................................................. 30
Image Advanced menu ............................................................................................................. 31
Image advanced signal (RGB) menu ....................................................................................... 33
Image advanced signal (video) menu....................................................................................... 34
Display menu ............................................................................................................................ 34
Display 3D menu ...................................................................................................................... 42
Setup menu .............................................................................................................................. 43
Setup Security menu ................................................................................................................ 44
Setup Audio Settings menu ...................................................................................................... 45
Setup advanced menu.............................................................................................................. 46

English 3
Setup network LAN settings menu ........................................................................................... 47
Setup network control settings menu ....................................................................................... 49
Setup network control settings menu ....................................................................................... 50
Options menu ........................................................................................................................... 55
Options menu (continued) ........................................................................................................ 56
Options remote settings menu.................................................................................................. 57
Options advanced menu........................................................................................................... 58
Options lamp settings menu ..................................................................................................... 60
Options menu ........................................................................................................................... 60
Options optional lter settings menu ........................................................................................ 61
3D Setup................................................................................................................................... 62
MAINTENANCE .................................................................................. 63
Replacing the lamp ................................................................................................................... 63
Replacing the lamp (continued) ................................................................................................ 64
Cleaning the dust lter .............................................................................................................. 65
ADDITIONAL INFORMATION ............................................................ 67
Compatible resolutions ............................................................................................................. 67
Image size and projection distance .......................................................................................... 69
Determining the lens shift center position................................................................................. 74
Projector dimensions and ceiling mount installation ................................................................. 77
RS232 protocol function list ...................................................................................................... 78
IR remote codes ....................................................................................................................... 86
Using the Information button .................................................................................................... 88
Troubleshooting ........................................................................................................................ 89
Warning indicators .................................................................................................................... 90
Specications ........................................................................................................................... 93
Optoma global ofces ............................................................................................................... 94

English
4
SAFETY
The lightning ash with arrow head within an equilateral triangle is
intended to alert the user to the presence of uninsulated "dangerous
voltage" within the product's enclosure that may be of sufcient
magnitude to constitute a risk of electric shock to persons.
The exclamation point within an equilateral triangle is intended to alert
the user to the presence of important operating and maintenance
(servicing) instructions in the literature accompanying the appliance.
Please follow all warnings, precautions and maintenance as recommended in this user's guide.
Important Safety Instruction
Do not block any ventilation openings. To ensure reliable operation of the projector and to protect from
over heating, it is recommended to install the projector in a location that does not block ventilation.
As an example, do not place the projector on a crowded coffee table, sofa, bed, etc. Do not put the
projector in an enclosure such as a book case or a cabinet that restricts air ow.
To reduce the risk of re and/or electric shock, do not expose the projector to rain or moisture. Do not
install near heat sources such as radiators, heaters, stoves or any other apparatus such as ampliers
that emits heat.
Do not let objects or liquids enter the projector. They may touch dangerous voltage points and short
out parts that could result in re or electric shock.
Do not use under the following conditions:
± In extremely hot, cold or humid environments.
(i) Ensure that the ambient room temperature is within 5°C ~ 40°C
(ii) Relative humidity is 10% ~ 85%
± In areas susceptible to excessive dust and dirt.
± Near any appliance generating a strong magnetic eld.
± In direct sunlight.
Do not use the projector in places where ammable gases or explosives gases may be present in the
atmosphere. The lamp inside the projector becomes very hot during operation and the gases my ignite
and result in a re.
Do not use lens cap when projector is in operation.
Do not use the unit if it has been physically damaged or abused. Physical damage/abuse would be
(but not limited to):
± Unit has been dropped.
± Power supply cord or plug has been damaged.
± Liquid has been spilled on to the projector.
± Projector has been exposed to rain or moisture.
± Something has fallen in the projector or something is loose inside.
Do not place the projector on an unstable surface. The projector may fall over resulting in injury or the
projector may become damaged.
Do not block the light coming out of the projector lens when in operation. The light will heat the object
and my melt, cause burns or start a re.
Please do not open or disassemble the projector as this may cause electric shock.
Do not attempt to service the unit yourself. Opening or removing covers may expose you to dangerous
voltages or other hazards. Please call Optoma before you send the unit for repair.
See projector enclosure for safety related markings.

English 5
The unit should only be repaired by appropriate service personnel.
Only use attachments/accessories specied by the manufacturer.
Do not look into straight into the projector lens during operation. The bright light may harm your eyes.
When replacing the lamp, please allow the unit to cool down. Follow instructions as described on
pages 63-64.
This projector will detect the life of the lamp itself. Please be sure to change the lamp when it shows
warning messages.
Reset the "Lamp Reset" function from the on-screen display "Options > Lamp Settings" menu after
replacing the lamp module (refer to page 60).
When switching the projector off, please ensure the cooling cycle has been completed before
disconnecting power. Allow 90 seconds for the projector to cool down.
When the lamp is approaching to the end of its life time, the message "Lamp life exceeded." will show
on the screen. Please contact your local reseller or service center to change the lamp as soon as
possible.
Turn off and unplug the power plug from the AC outlet before cleaning the product.
Use a soft dry cloth with mild detergent to clean the display housing. Do not use abrasive cleaners,
waxes or solvents to clean the unit.
Disconnect the power plug from AC outlet if the product is not being used for a long period of time.
Note: When the lamp reaches the end of its life, the projector will not turn back on until the lamp module has been
replaced. To replace the lamp, follow the procedures listed under “Replacing the Lamp” section on pages
63-64.
Do not setup the projector in places where it might be subjected to vibration or shock.
Do not touch the lens with bare hands
Remove battery/batteries from remote control before storage. If the battery/batteries are left in the
remote for long periods, they may leak.
Do not use or store the projector in places where smoke from oil or cigarettes may be present, as it
can adversely affect the quality of the projector performance.
Please follow the correct projector orientation installation as non standard installation may affect the
projector performance.
3D Safety Information
Please follow all warnings and precautions as recommended before you or your child use the 3D function.
Warning
Children and teenagers may be more susceptible to health issues associated with viewing in 3D and should be
closely supervised when viewing these images.
Photosensitive Seizure Warning and Other Health Risks
Some viewers may experience an epileptic seizure or stroke when exposed to certain ashing images
or lights contained in certain Projector pictures or video games. If you suffer from, or have a family
history of epilepsy or strokes, please consult with a medical specialist before using the 3D function.
Even those without a personal or family history of epilepsy or stroke may have an undiagnosed
condition that can cause photosensitive epileptic seizures.
Pregnant women, the elderly, sufferers of serious medical conditions, those who are sleep deprived or
under the inuence of alcohol should avoid utilizing the unit's 3D functionality.
If you experience any of the following symptoms, stop viewing 3D pictures immediately and consult a
medical specialist: (1) altered vision; (2) light-headedness; (3) dizziness; (4) involuntary movements
such as eye or muscle twitching; (5) confusion; (6) nausea; (7) loss of awareness; (8) convulsions;
(9) cramps; and/ or (10) disorientation. Children and teenagers may be more likely than adults
to experience these symptoms. Parents should monitor their children and ask whether they are

English
6
experiencing these symptoms.
Watching 3D projection may also cause motion sickness, perceptual after effects, disorientation, eye
strain and decreased postural stability. It is recommended that users take frequent breaks to lessen
the potential of these effects. If your eyes show signs of fatigue or dryness or if you have any of the
above symptoms, immediately discontinue use of this device and do not resume using it for at least
thirty minutes after the symptoms have subsided.
Watching 3D projection while sitting too close to the screen for an extended period of time may
damage your eyesight. The ideal viewing distance should be at least three times the screen height. It
is recommended that the viewer's eyes are level with the screen.
Watching 3D projection while wearing 3D glasses for an extended period of time may cause a
headache or fatigue. If you experience a headache, fatigue or dizziness, stop viewing the 3D
projection and rest.
Do not use the 3D glasses for any other purpose than for watching 3D projection.
Wearing the 3D glasses for any other purpose (as general spectacles, sunglasses, protective goggles,
etc.) may be physically harmful to you and may weaken your eyesight.
Viewing in 3D projection may cause disorientation for some viewers. Accordingly, DO NOT place your
3D PROJECTOR near open stairwells, cables, balconies, or other objects that can be tripped over, run
into, knocked down, broken or fallen over.
Copyright
This publication, including all photographs, illustrations and software, is protected under international copyright
laws, with all rights reserved. Neither this manual, nor any of the material contained herein, may be reproduced
without written consent of the author.
© Copyright 2017
Disclaimer
The information in this document is subject to change without notice. The manufacturer makes no representations
or warranties with respect to the contents hereof and specically disclaims any implied warranties of
merchantability or tness for any particular purpose. The manufacturer reserves the right to revise this publication
and to make changes from time to time in the content hereof without obligation of the manufacturer to notify any
person of such revision or changes.
Trademark Recognition
Kensington is a U.S. registered trademark of ACCO Brand Corporation with issued registrations and pending
applications in other countries throughout the world.
HDMI, the HDMI Logo, and High-Denition Multimedia Interface are trademarks or registered trademarks of HDMI
Licensing LLC in the United States and other countries.
IBM is a trademark or registered trademark of International Business Machines, Inc. Microsoft, PowerPoint, and
Windows are trademarks or registered trademarks of Microsoft Corporation.
Adobe and Acrobat are trademarks or registered trademarks of Adobe Systems Incorporated.
DLP , DLP Link and the DLP logo are registered trademarks of Texas Instruments and BrilliantColorTM is a
trademark of Texas Instruments.
All other product names used in this manual are the properties of their respective owners and are
Acknowledged.

English 7
FCC
This device has been tested and found to comply with the limits for a Class B digital device pursuant to Part 15
of the FCC rules. These limits are designed to provide reasonable protection against harmful interference in a
residential installation. This device generates, uses and can radiate radio frequency energy and, if not installed and
used in accordance with the instructions, may cause harmful interference to radio communications.
However, there is no guarantee that interference will not occur in a particular installation. If this device does cause
harmful interference to radio or television reception, which can be determined by turning the device off and on is
encouraged to try to correct the interference by one or more of the following measures:
Reorient or relocate the receiving antenna.
Increase the separation between the device and receiver.
Connect the device into an outlet on a circuit different from that to which the receiver is connected.
Consult the dealer or an experienced radio/television technician for help.
Notice: Shielded cables
All connections to other computing devices must be made using shielded cables to maintain compliance with FCC
regulations.
Caution
Changes or modications not expressly approved by the manufacturer could void the user's authority, which is
granted by the Federal Communications Commission, to operate this projector.
Operation Conditions
This device complies with Part 15 of the FCC Rules. Operation is subject to the following two conditions:
1. This device may not cause harmful interference and
2. This device must accept any interference received, including interference that may cause undesired operation.
Notice: Canadian users
This Class B digital apparatus complies with Canadian ICES-003.
Remarque à l'intention des utilisateurs canadiens
Cet appareil numerique de la classe B est conforme a la norme NMB-003 du Canada.
Declaration of Conformity for EU countries
EMC Directive 2014/30/EC (including amendments)
Low Voltage Directive 2014/35/EC
R & TTE Directive 1999/5/EC (if product has RF function)
WEEE
Disposal instructions
Do not throw this electronic device into the trash when discarding. To minimize pollution and ensure
utmost protection of the global environment, please recycle it.

English
8
INTRODUCTION
Package Overview
Carefully unpack and verify that you have the items listed below under standard accessories. Some of the items
under optional accessories may not be available depending on the model, specication and your region of
purchase. Please check with your place of purchase. Some accessories may vary from region to region.
The warranty card is only supplied in some specic regions. Please consult your dealer for detailed information.
Standard accessories
Carry bag Lens cap VGA cable
Optional accessories
Note: Optional accessories vary depending on model, specication and region.
Projector Remote 2x AAA batteries Power lead
Documentation
CD User Manual
Warranty Card*
Basic User Manual
F3
On
Geometric
Mode
Correction PIP/PBP
Off
F1 F2
AV Mute
ENTER
Source
Volume D Zoom
Info.
VGA
1
S-Video
2
HDMI1
3
HDMI2
Format Freeze Remote
ID All
HDBaseT
4
Video
5
DVI
6
BNC
7
YPbPr
8
DisplayPort
9
3D
0
Re-Sync
Menu
Note: * For European warranty Information, please visit www.optomaeurope.com.
This manual suits for next models
6
Table of contents
Other Optoma Projector manuals

Optoma
Optoma EP783S User manual

Optoma
Optoma ZH507 User manual

Optoma
Optoma X351 User manual

Optoma
Optoma H79 User manual

Optoma
Optoma ML750ST User manual

Optoma
Optoma Projector User manual

Optoma
Optoma ZU606Te User manual

Optoma
Optoma EX536 User manual

Optoma
Optoma EP719 User manual

Optoma
Optoma Theme Scene HD82 User manual

Optoma
Optoma EH500 User manual

Optoma
Optoma HD230X User manual

Optoma
Optoma HD66 User manual

Optoma
Optoma DLP User manual

Optoma
Optoma DS551 User manual

Optoma
Optoma EH415ST User manual

Optoma
Optoma DS325 User manual

Optoma
Optoma HD83 User manual

Optoma
Optoma S303 User manual

Optoma
Optoma EX685UT User manual