manuals.online logo
Brands
  1. Home
  2. •
  3. Brands
  4. •
  5. Optoma
  6. •
  7. Projector
  8. •
  9. Optoma EP757 User manual

Optoma EP757 User manual

1
English
Usage Notice
Precautions ........................................................................................................ 2
Introduction
Product Features ............................................................................................... 4
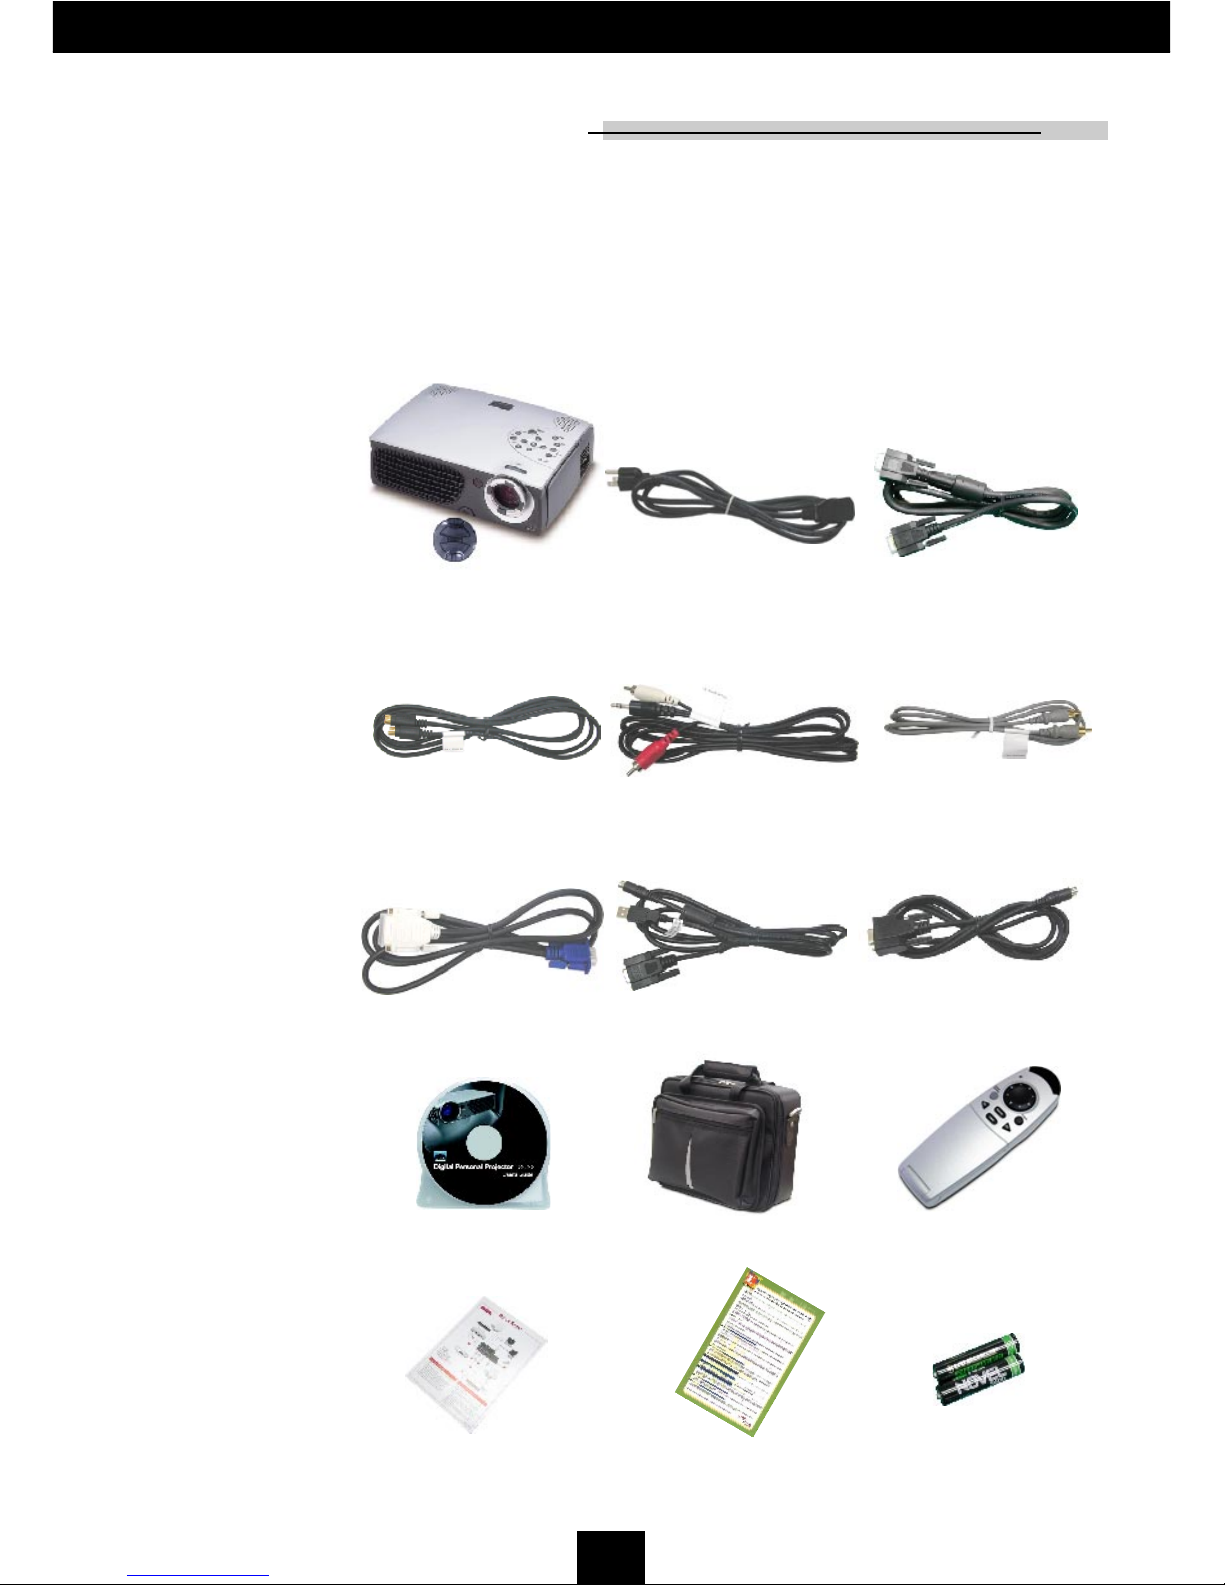
Package Overview ............................................................................................. 5
Product Overview............................................................................................... 6
Main Unit ...................................................................................................... 6
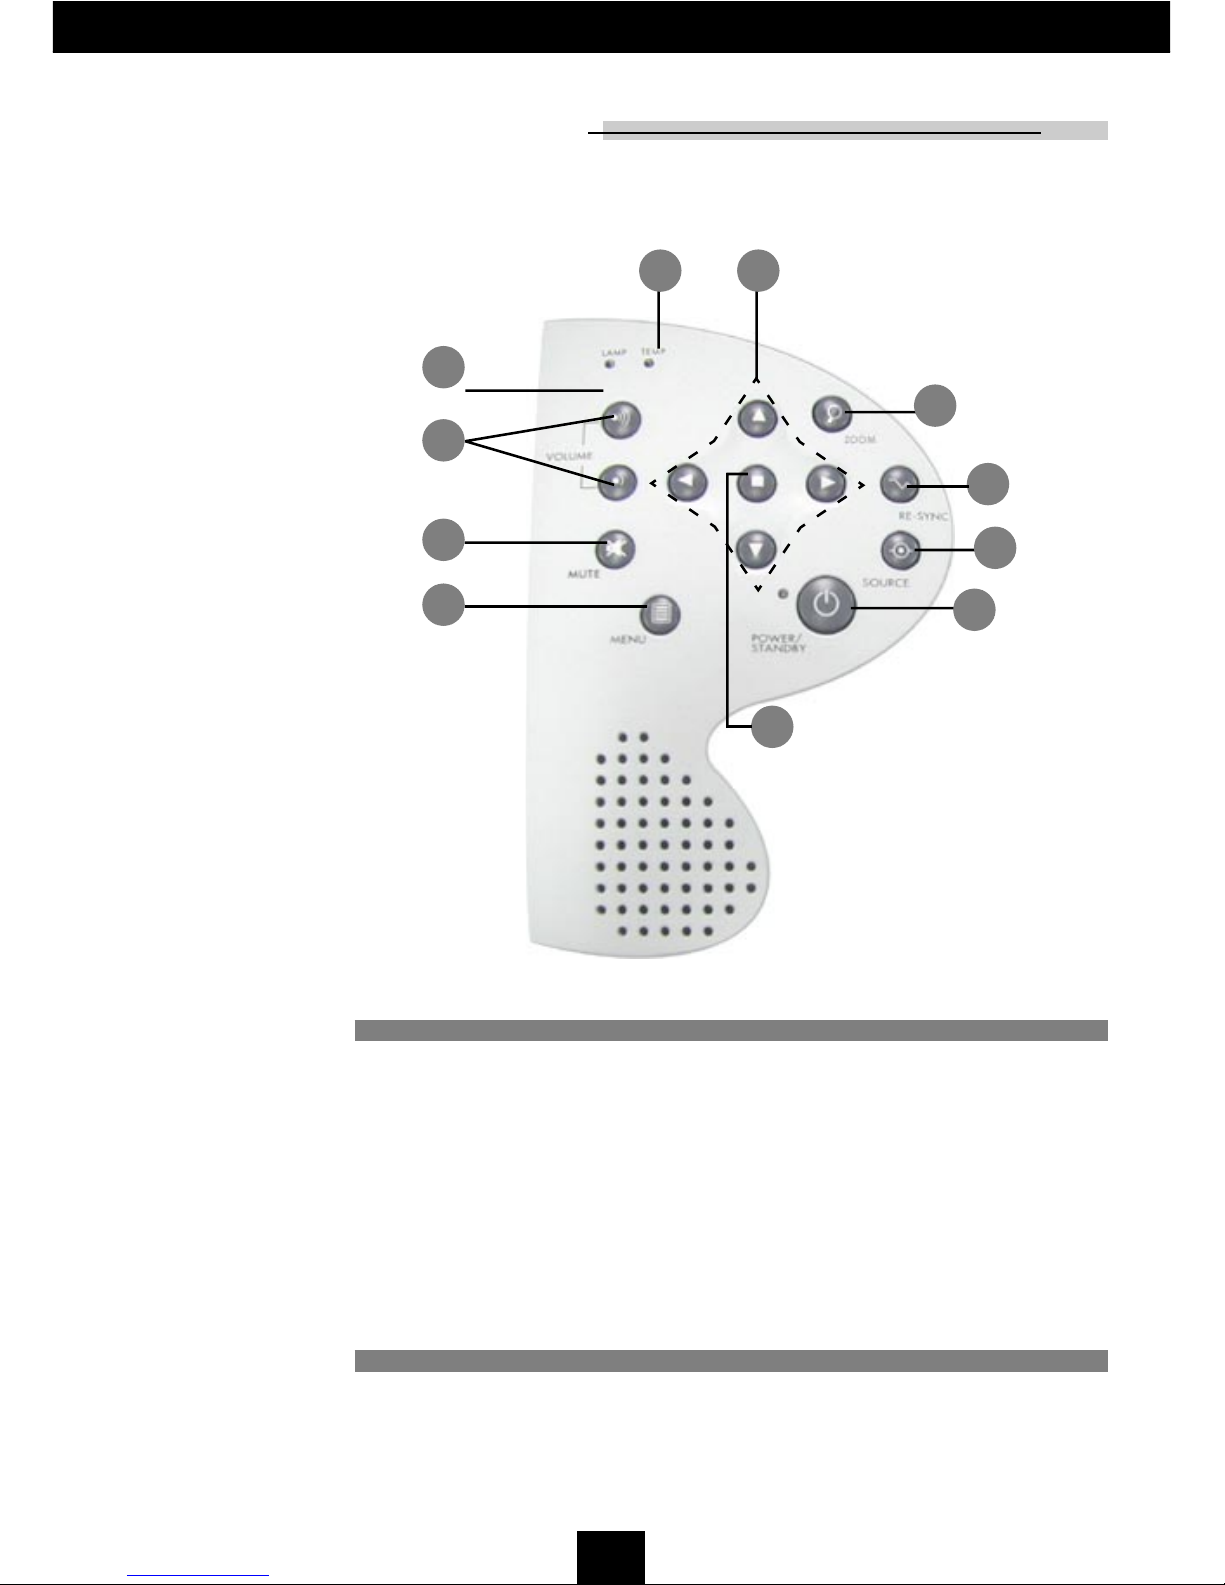
Panel Control ................................................................................................ 7
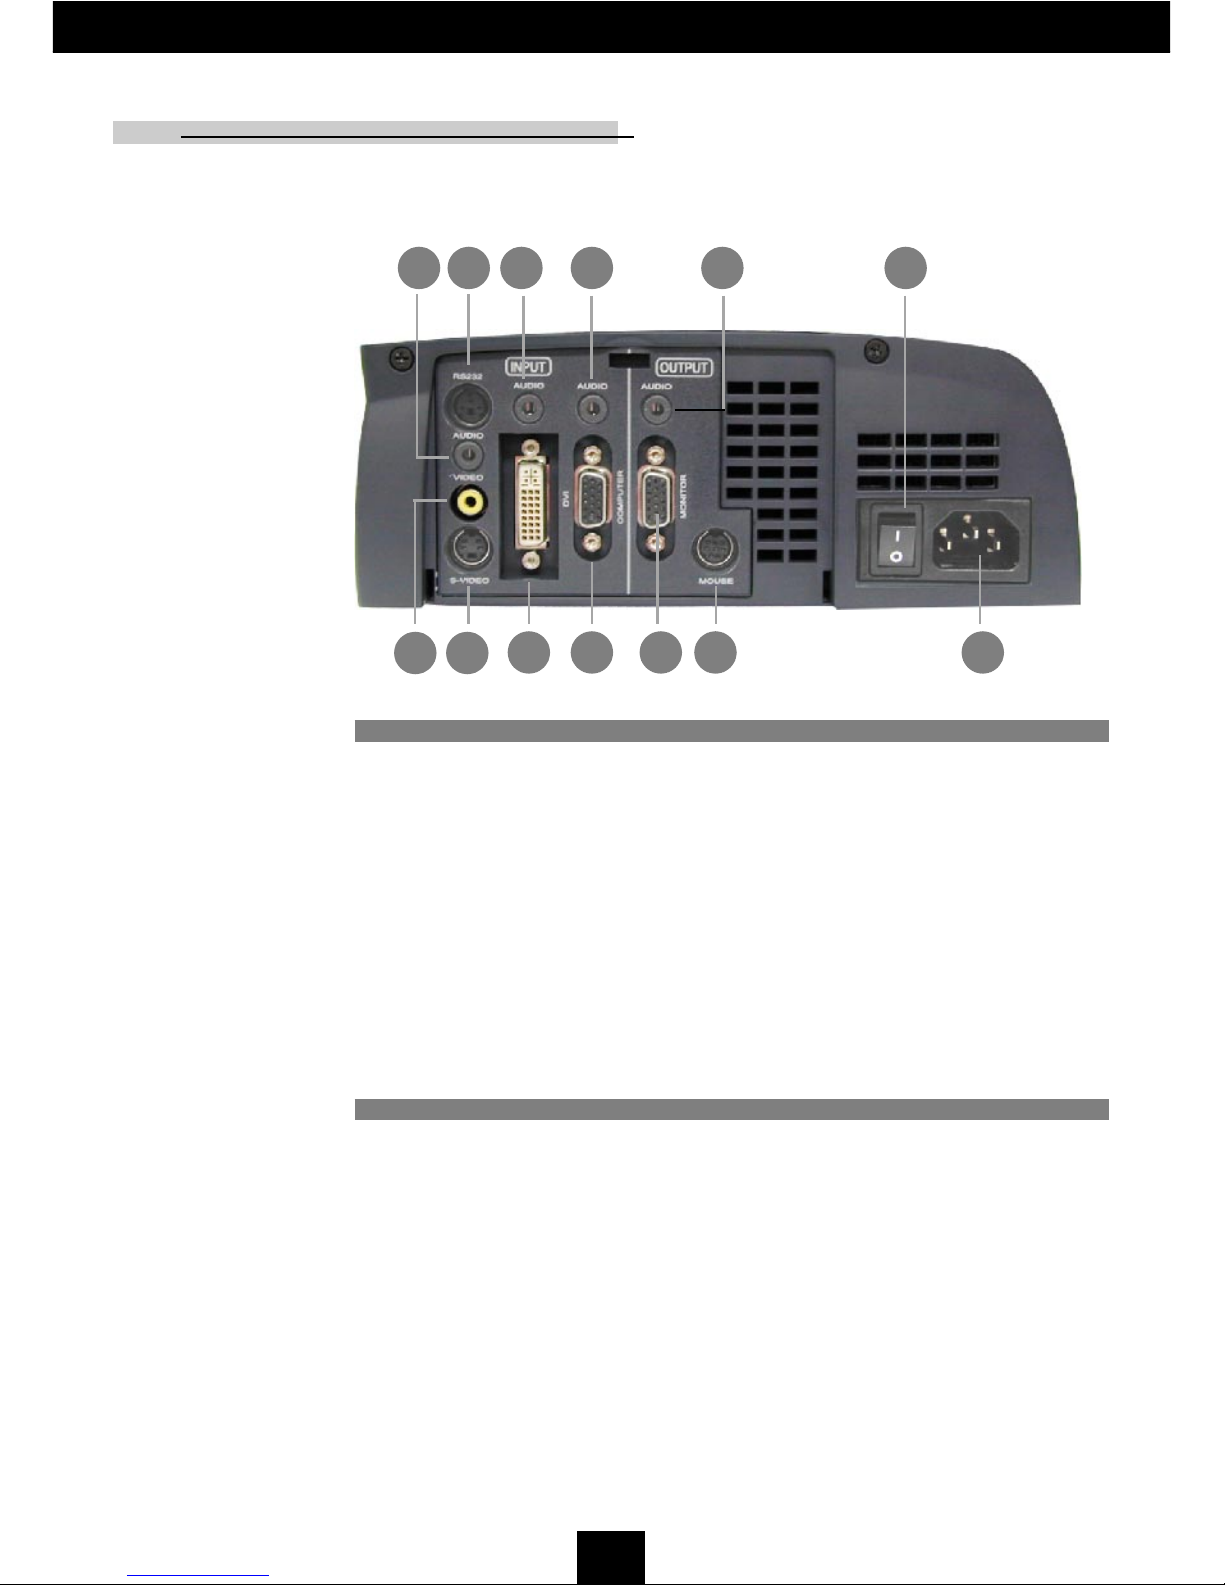
Connection Ports .......................................................................................... 8
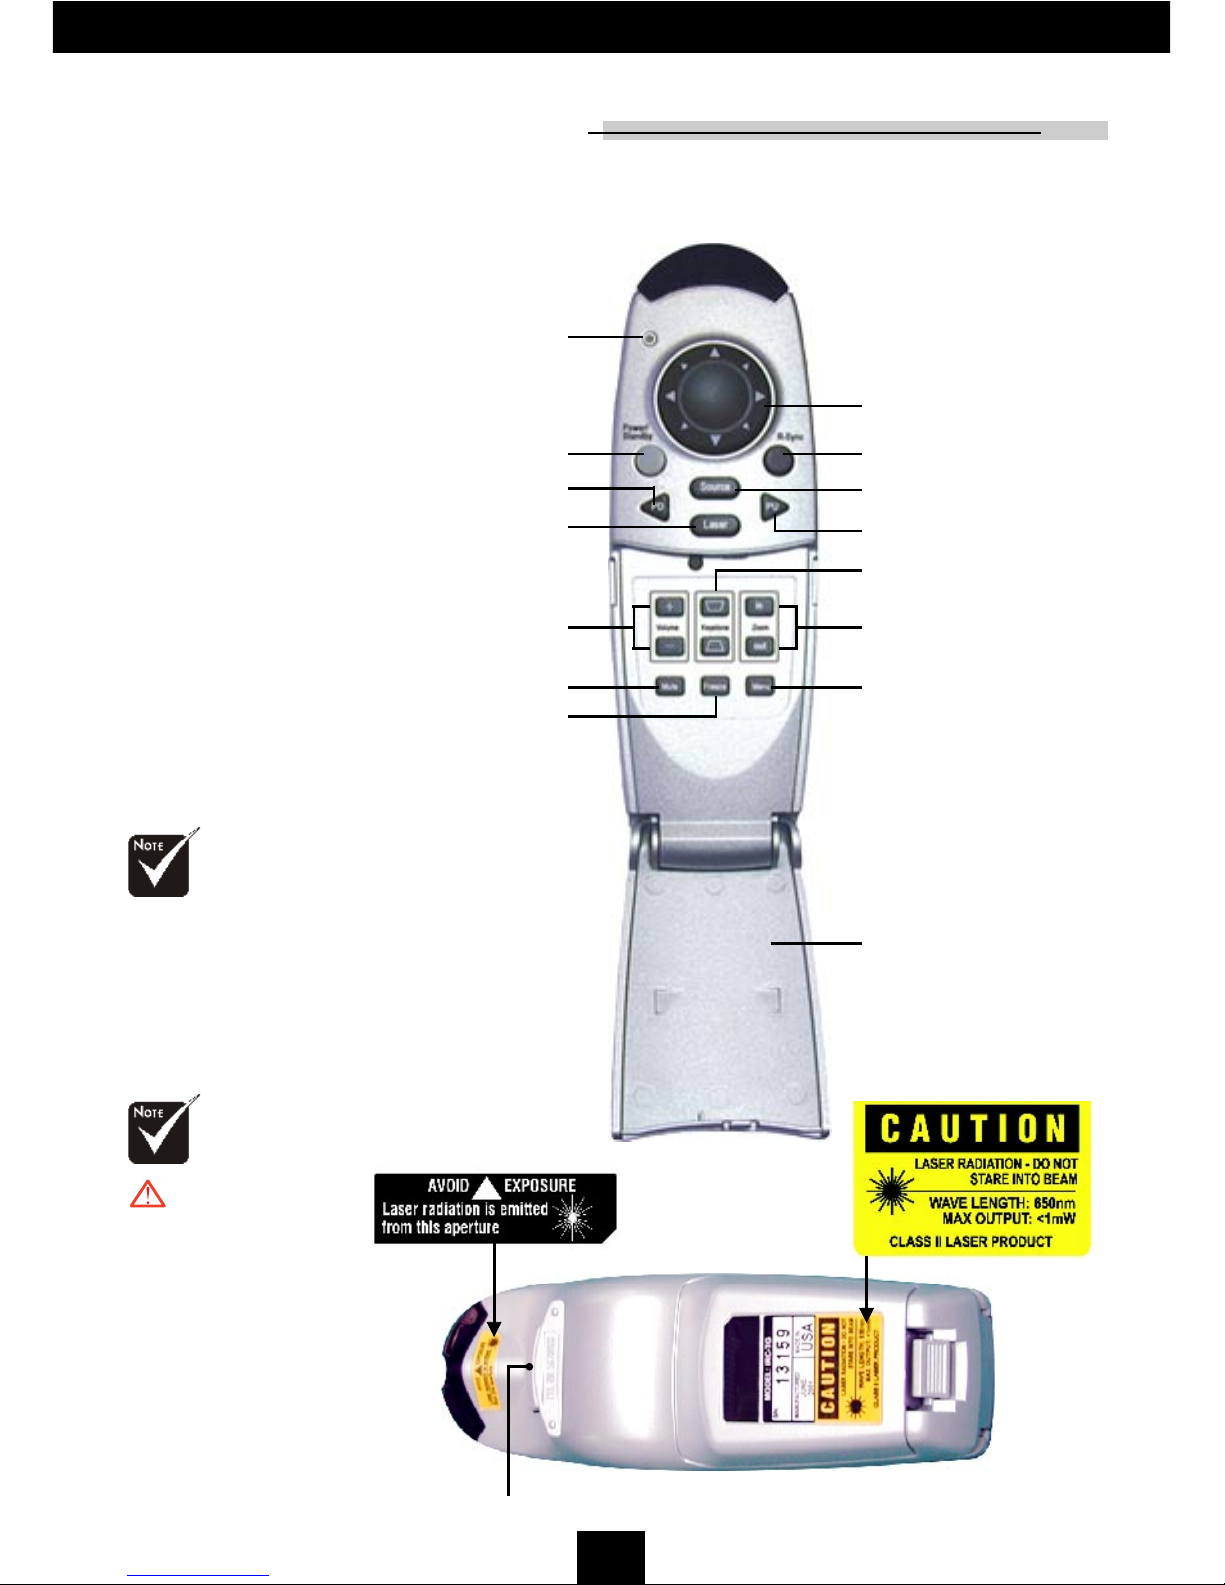
Re ote Control with Mouse Function & Laser Pointer ................................ 9
Installation
Connecting the Projector ................................................................................... 10
Powering On/Off the Projector ........................................................................... 11
Powering On the Projector ........................................................................... 11
Powering Off the Projector ........................................................................... 12
Adjusting the Projected I age ........................................................................... 13
Adjusting the Projector Height...................................................................... 13
Adjusting the Projector Zoo /Focus ............................................................ 14
Adjusting Projection I age Size .................................................................. 14
User Controls
Panel Control & Re ote Control ........................................................................ 15
On-Screen Display Menus ................................................................................ 18
How to Operate ............................................................................................ 18
I age-I (Co puter ode) ............................................................................ 19
I age-I (Video ode)................................................................................... 20
I age-II (Co puter ode) ........................................................................... 22
I age-II (Video ode).................................................................................. 23
Audio ............................................................................................................ 24
Language ..................................................................................................... 25
Manage ent (Co puter ode) ................................................................... 26
Manage ent (Video ode) .......................................................................... 28
PIP (Co puter ode) .................................................................................. 30
Appendices
Troubleshooting ................................................................................................. 31
Changing the La p ............................................................................................ 34
Specifications ..................................................................................................... 35
Co patibility Modes ........................................................................................... 36
Table of Contents
2
English
Usage Notice
Precautions
Follow all warnings, precautions and maintenance as recom-
mended in this users guide to maximize the life of your unit.
Warning- Do not look into the lens. The bright light may hurt
your eyes.
Warning- To reduce the risk of fire or electric shock, do not
expose this product to rain or moisture.
Warning- Please do not open or disassemble the product as this
may cause electric shock.
Warning- When changing the lamp, please allow unit to cool
down, and follow all changing instructions.
Warning- This product will detect the life of the lamp itself.
Please be sure to change the lamp when it shows
warning messages.
Warning- When replacing the lamp for a new unit ensure the
Lamp eset option is selected in the projectors menu.
Warning- When switching the projector off, please ensure the
projector completes its cooling cycle before
disconnecting power.
Warning- When connecting the projector to computer, please turn
on the projector first.
Warning- To reduce the risk of injury to the eyes, do not look
directly into the laser light on the remote control and do
not point the laser light into anyones eyes. This remote
control contains a Class II laser product.
Warning- When the lamp reaches the end of its life, it will burn
out and may make a loud popping sound. If this
happens, the projector will not turn back on until the
lamp module has been replaced. To replace the
lamp, follow the procedures listed under Changing
the Lamp.
3
English
Do:
vTurn off the product before cleaning.
vUse a soft cloth moistened with mild detergent to clean the
display housing.
vDisconnect the power plug from AC outlet if the product is not
being used for a long period of time.
Dont:
vBlock the slots and openings on the unit provided for
ventilation.
vUse abrasive cleaners, waxes or solvents to clean the unit.
vUse under the following conditions:
- Extremely hot, cold or humid environment.
- In areas susceptible to excessive dust and dirt.
- Near any appliance generating a strong magnetic field.
- Place in direct sunlight.
Usage Notice
4
English
Product Features
This product is an XGA single chip .7 DLPTM projector. The
outstanding features of it are listed as follows:
uTrue XGA, 1024 x 768 addressable pixels
u6.6 lbs (2.99 kgs) compact design
uSingle chip DLPTM technology
uPureProgressiveTM processing technology for the highest
possible video quality
uNTSC/NTSC4.43/PAL/PAL-M/PAL-N/SECAM and
HDTV compatible
uHigh-tech DVI connection for digital and analog video
connectivity
uFull function remote with mouse control and laser
pointer
uMultimedia audio integration
uUser friendly multilingual on-screen display menu
uAdvanced electronic keystone correction and high quality
full screen re-scaling image
uUser friendly control panel
uLuxurious carrying case included
uSXGA compression and VGA, SVGA re-sizing
u250 Watts user replaceable UHP AC lamp
uMac compatible
Introduction
5
English
Power Cord
S-Video Cable
VGA Cable
emote Control with
Mouse Function and
Laser Pointer
Audio Cable Jack/ CA
DVI to D-15 Cable
Battery x 2
Users Guide
Introduction
Composite Video Cable
Projector with lens cap
Package Overview
This projector comes with all the items shown below. Check to
make sure your unit is complete. Contact your dealer immedi-
ately if anything is missing.
Carrying Case
Quick Start Card Warranty Card
emote Mouse Y Cable S232 Cable
6
English
Introduction
Main Unit
Product Overview
1. Panel Control
2. Power Connector Power Switch
3. Connection Ports
4. Focus ing
5. Zoom Lens
6. Zoom ing
7. Speaker
8. emote Control eceiver
9. Elevator Button
10. Elevator Foot
1
2
3
4
5
8
6
7
10
7
English
Panel Control
Introduction
1. Lamp Warning LED
2. Temperature Warning LED
3. Volume
4. Mute
5. Menu (On/Off)
6. Four Directional Select Keys
7. Enter
8. Zoom
9. e-sync
10. Source
11. Power /Standby
1
3
4
511
10
8
6
2
7
8
English
Connection Ports
1 S232 Input Connector
2. Audio Input for Video
3. Composite Video Input Connector
4. S-Video Input Connector
5. Audio Input for DVI
6. DVI Input Connecter
7. Audio Input for Computer
8. PC Analog Signal/HDTV/Component Video Connector
9. Audio Output Connector
10. Monitor Loop-through Connector
11. emote Mouse Input Connector
12. Power Switch
13. Power Connector
Introduction
2
34
5
6
7
810
12
13
1
11
9
English
Remote Control with Mouse Function & Laser
Pointer
Introduction
Source
e-sync
Freeze
Keystone Correction
Power / Standby
Volume ( + / - )
Mute
Multi-Directional
Selector
Menu
Laser Pointer
Zoom In /
Zoom Out
Page Up
LED
Cover
Page Down
vClose the cover of the
remote control when
you want to use the
remote mouse.
Enter Key
Caution : To
reduce the risk of
injury to the eyes, do
not look directly into
the laser light on the
remote control and do
not point the laser light
into anyones eyes.
This remote control
contains a Class II laser
product.
10
English
Installation
1. Power Cord
2. VGA Cable
3. S-Video Cable
4. Audio Cable Jack/ CA
5. Composite Video Cable
6. DVI to D-15 Cable
7. emote Mouse Y Cable
8. S232 Cable
9. D-15 to CA Cable for HDTV/
Component (optional)
Connecting the Projector
vTo ensure the projector works well with your computer, please
configure the display mode of your graphic card to make it less
than or equal to 1 24 X 768 resolution. Make sure timing of the
display mode is compatible with the projector. Refer to the
Compatibility Modes section on page 36.
S-Video Output
Video Output
1
2
3
4
6 7
Digital Tuner Output
Digital Tuner Output Antenna
RS232
AUDIO
VIDEO
S-VIDEO
AUDIO AUDIO AUDIO
DVI
COMPUTER
MONITOR
MOUSE
INPUT OUTPUT
GB
S232
USB
5
8
11
English
Lens cap
Power / Standby
Power Switch
1
2
3
Powering On the Projector
1. emove the lens cap.
2. Ensure that the power cord and signal cable are securely
connected.
3. Turn on the main power switch on the side of the projector
and allow the projector to warm up for 1-2 minutes. 
4. Turn on the lamp by pressing Power/Standby button on
the control panel. 
The startup screen will display and count down for 20
seconds and the Power/Standby indicator will light solid
amber.
The LAMP LED indicator will light solid green.
5. Turn on your source (computer, notebook, or video player ,
etc.). The projector will detect your source automatically.
vIf the screen displays No Signal , please make sure the signal
cables are securely connected.
vIf you connect multiple sources at the same time, use the Source
button on the Remote Control or Panel Control to switch.
Powering On/Off the Projector
vTurn on the projector
first and then the
computer.
Installation
12
English
Installation
Powering Off the Projector
1. Press the Power/Standby button to turn off the projector
lamp.
2. After pressing the Power/Standby button, you will see a
message Power off the lamp? on the on-screen display.
Press the Power/Standby button again to confirm.
Otherwise the message will disappear after 5 seconds.
3. Power/Standby LED indicator will light solid amber for
about 30 seconds. After the Power/Standby indicator
starts flashing, you can turn off the main power switch on
the side of the projector.
If you want to turn on the projector again, you must press
the Power/Standby button within 90 seconds of the
indicator flashing.
4. Do not turn on the projector immediately following a power
off procedure.
vWhen the LAMP indicator flashs green for about 1 seconds,
you will see a message Fan Fail on the on-screen display. Please
contact your local dealer or our service center.
vWhen the TEMP indicator lights solid orange, it indicates the
projector has been overheated. You will see a message Over
Temperature on the on-screen display. The projector will
automatically shut itself down.
Under normal conditions, the projector can be switched on again
for your presentation. If the problem persists, you should contact
your local dealer or our service center.
13
English
The projector is equipped with an elevator foot for adjusting the
projector height.
To raise the projector:
1. Press the elevator button .
2. aise the projector to the desired display angle , then
release the button to lock the elevator foot into position.
3. Use  to fine-tune tilt-adjustment.
To lower the projector:
1. Press the elevator button.
2. Lower down the projector, then release the button to lock the
elevator foot into position.
3. Use  to fine-tune tilt-adjustment.
Adjusting the Projected Image
Adjusting the Projector Height
Elevator Button Elevator Foot
1
2
3
Installation
14
English
.xaM "1.82 "8.37 "0.321 "2.271 "5.122 "1.642
.niM"4.32"5.16"5.201"5.341"5.481"1.502
)HxW(.xaM "68.61x"84.22 "82.44x"40.95 "8.37x"4.89 "23.301x"67.731 "09.231x"02.771 "66.741x"88.691
)HxW(.niM"40.41x"27.81"09.63x"02.94"05.16x"00.28"01.68x"08.411"07.011x"06.741"60.321x"80.461
'47.3 '48.9 '4.61 '79.22 '35.92 '18.23
Focus ing
Zoom ing
Adjusting the Projector Zoom / Focus
You may adjust zoom ring to zoom in / out. otate the zoom ring
counter-clockwise to zoom in and clockwise to zoom out. To
focus the image, rotate the focus ring until the image is clear. The
projector will focus at distances from 3.74 feet to 32.81 feet (1.14m
to 10.00m)
Adjusting Projection Image Size
Screen
(Diagonal)
Screen
Size
Distance
vThis graph is for users reference only.
Installation
15
English
User Controls
Remote ControlPanel Control
Panel Control & Remote Control
There are two ways for you to control the functions: Remote
Control and Panel Control.
Use the Remote Control
Power / Standby
4efer to the Power On/Off the Projector section on page
11~12.
Source
4Press Source to choose GB, DVI-Digital, DVI-Analog,
S-Video, Composite, Component and HDTV sources.
Re-Sync
4Automatically synchronizes the projector to the input source,
when you press this button while the remote control cover is
opened.
4If the remote control cover is closed, the Mouse/ e-Sync button
functions like the right mouse button.
16
English
User Controls
Multi-Directional Selector
4When you close the cover of remote control, this key can be used
as a mouse to control direction.
vThe above function is only enabled with the connection
between computer and projector by RS232 cable.
4When the cover of remote control is opened, this key can be
used for the operation for OSD display.
Page Up (Computer mode only)
4Use this button to page up.
Page Down (Computer mode only)
4Use this button to page down.
Laser
4Aim the remote at the viewing screen, press and hold this button
to activate the laser pointer.
Menu
4Press Menu to open the on-screen display (OSD) menus and
press key to select menu items. To exit OSD, press the
Menu button again. The projector will save any change you
made automatically.
Freeze
4Press the Freeze button to still the screen image.
Mute
4Use to mute sound.
Volume + / -
4Increases/decreases speaker volume.
Keystone + / -
4Adjust image distortion caused by tilting the projector. (±16
degrees)
Zoom In
4Press in button of zoom function to magnifies an image up to
a factor of 32 times on the projection screen.
Zoom Out
4Press out button of zoom function to diminishes the zoom in
image.
v
Page Up / Page Down :
Under remote mouse
connected status only.
17
English
Enter
4Confirm your selection of items, when you open the front cover
of remote control.
4If the remote control cover is closed, the Enter button functions
like the left mouse button.
Use the Panel Control
Power / Standby
4efer to the Power On/Off the Projector section on page
11~12.
Source
4Press Source to choose GB, DVI-Digital, DVI-Analog,
S-Video, Composite, Component and HDTV sources.
Re-Sync
4Automatically synchronizes the projector to the input source.
Zoom
4When you press Zoom button, the zoom icon appears on the
screen. Press or button to zoom in or zoom out of the
image.
Four Directional Select Keys
4Use to select items or make adjustments for
your selection.
Enter
4Confirm your selection of items.
Menu
4Press Menu to open the on-screen display (OSD) menus and
press key to select menu items . To exit OSD, press the
Menu button again. The projector will save any change you
made automatically.
Mute
4Use to mute sound.
Volume
4Increases/decreases speaker volume.
User Controls
18
English
User Controls
How to operate
4The Projector has multilingual On-Screen Display(OSD) menus that
allow you to make image adjustments and change a variety of
settings. In computer source, the OSD will be the Computer
OSD. In video source, the OSD will be the  Video OSD. The
projector will detect the source automatically.
4To open the OSD menu, press the Menu button on the emote
Control or Panel Control.
4When OSD is displayed, press key to select main items.
E.g.: Image-Ig Image-IIg Audiog Languageg Managementg
PIPgImage-I...
While making selection on a particular page, press Enter key to
go into submenu.
4Press key to select the required item and adjust the
settings by key. When a specified item is selected, the
color of the item will change from yellowish brown to blue.
E.g.:Brightnessg Contrastg Color Temp.g Zoomg Keystoneg
Brightness...
4While using key to adjust the parameter or required
function in the items of the submenu, confirm all the functions of
the main menu by pushing Enter button after all/part of the
items have been modified. Press Enter button to confirm, and
the screen will be back to the main menu at once. Only
key is enabled now.
4To exit the OSD, press the Menu button again.
On-Screen Display Menus
19
English
Image-I
(Computer mode)
AudioImage-I Image-II
Language Management
Brightness
Contrast
Color Temp.
Zoom
Keystone
Co puter ode
White Segment
Low igh
Brightness
Adjusting the brightness of the image.
4Press the to darken image.
4Press the to lighten the image.
Contrast
The contrast controls the degree of difference between the lightest
and darkest parts of the picture. Adjusting the contrast changes
the amount of black and white in the image.
4Press the to decrease the contrast.
4Press the to increase the contrast.
Color Temperature
Adjust the color temperature. The range is from 0 to 3. The
factory default is 2. With the higher temperature, the screen
looks colder; with the lower temperature, the screen looks warmer.
Zoom
4Press the to Magnify an image up to a factor of 32 times on
the projection screen.
4Press the to Diminish the zoom in image.
Keystone (Keystone Correction)
Adjust image distortion caused by tilting projection. (±16 degrees)
White Segment
Use the white segment control to set the white peaking level of
DMD chip. 0 stands for minimal peaking, and 10 stands for
maximum peaking. If you prefera stronger image, adjust toward
the minimum setting. For a smooth and more natural image, adjust
toward the minimum setting.
PIP
User Controls
20
English
User Controls
Image-I
( ideo mode)
AudioImage-I Image-II
Language Management
Brightness
Contrast
Color
Tint
Sharpness
Video ode
White Segment
Brightness
Adjusting the brightness of the image.
4Press the to darken the image.
4Press the to lighten the image.
Contrast
The contrast controls the degree of difference between the lightest
and darkest parts of the picture. Adjusting the contrast changes
the amount of black and white in the image.
4Press the to decrease the contrast.
4Press the to increase the contrast.
Color
The color setting adjusts a video image from black and white to
fully saturated color.
4Press the to decrease the amount of color in the image.
4Press the to increase the amount of color in the image.
White Segment
Use the white segment control to set the white peaking level of
DMD chip. 0 stands for minimal peaking, and 10 stands for
maximum peaking. If you prefer a stronger image, adjust toward
the maximum setting. For a smooth and more natural image, adjust
toward the minimum setting.
Tint
The tint adjusts the color balance of red and green.
4Press the to increase the amount of green in the image.
4Press the to increase the amount of red in the image.

Other manuals for EP757

3

This manual suits for next models

3

Other Optoma Projector manuals

Optoma DV20 Instruction manual

Optoma

Optoma DV20 Instruction manual

Optoma ML750ST-M User manual

Optoma

Optoma ML750ST-M User manual

Optoma MovieTime DV11 User manual

Optoma

Optoma MovieTime DV11 User manual

Optoma TX615-3D User manual

Optoma

Optoma TX615-3D User manual

Optoma EH505 User manual

Optoma

Optoma EH505 User manual

Optoma TW635-3D User manual

Optoma

Optoma TW635-3D User manual

Optoma EP720i User manual

Optoma

Optoma EP720i User manual

Optoma EW536 Technical manual

Optoma

Optoma EW536 Technical manual

Optoma HD25 User manual

Optoma

Optoma HD25 User manual

Optoma DW322 User manual

Optoma

Optoma DW322 User manual

Optoma PRO8000 User manual

Optoma

Optoma PRO8000 User manual

Optoma TX612-3D User manual

Optoma

Optoma TX612-3D User manual

Optoma TX773 User manual

Optoma

Optoma TX773 User manual

Optoma TH1060 User manual

Optoma

Optoma TH1060 User manual

Optoma TW610 User manual

Optoma

Optoma TW610 User manual

Optoma HD21 User manual

Optoma

Optoma HD21 User manual

Optoma DLP 11695 User manual

Optoma

Optoma DLP 11695 User manual

Optoma ES388 User manual

Optoma

Optoma ES388 User manual

Optoma ZH350 User manual

Optoma

Optoma ZH350 User manual

Optoma Optoma DX606V User manual

Optoma

Optoma Optoma DX606V User manual

Optoma Optoma PRO150S User manual

Optoma

Optoma Optoma PRO150S User manual

Optoma DW318 Manual

Optoma

Optoma DW318 Manual

Optoma EW1691e User manual

Optoma

Optoma EW1691e User manual

Optoma HD8300 User manual

Optoma

Optoma HD8300 User manual

Popular Projector manuals by other brands

Brookstone Big Shot manual

Brookstone

Brookstone Big Shot manual

Panasonic PTD7500U - DLP PROJECTOR operating instructions

Panasonic

Panasonic PTD7500U - DLP PROJECTOR operating instructions

WE-EF FLC301 Installation and maintenance manual

WE-EF

WE-EF FLC301 Installation and maintenance manual

Projectiondesign evo XGA user guide

Projectiondesign

Projectiondesign evo XGA user guide

Philips LC4331 user guide

Philips

Philips LC4331 user guide

Panasonic PTL300U - LCD PROJECTOR Brochure & specs

Panasonic

Panasonic PTL300U - LCD PROJECTOR Brochure & specs

Sanyo PLC-XU4000 owner's manual

Sanyo

Sanyo PLC-XU4000 owner's manual

Casio XJ-V100W user guide

Casio

Casio XJ-V100W user guide

3M MP7770 Service manual

3M

3M MP7770 Service manual

Epson PowerLite 8300i withEasyMP.net module supplementary guide

Epson

Epson PowerLite 8300i withEasyMP.net module supplementary guide

Hitachi CP-X8 user manual

Hitachi

Hitachi CP-X8 user manual

Eiki EIP-WX5000 Setup manual

Eiki

Eiki EIP-WX5000 Setup manual

ViewSonic PJ506D - SVGA DLP Projector Comparison chart

ViewSonic

ViewSonic PJ506D - SVGA DLP Projector Comparison chart

Epson EH-TW8000 Service manual

Epson

Epson EH-TW8000 Service manual

Runco LightStyle LS-12HBd Quick setup guide

Runco

Runco LightStyle LS-12HBd Quick setup guide

BOXLIGHT XP-56d user manual

BOXLIGHT

BOXLIGHT XP-56d user manual

Christie GraphXMASTER DLV1400-DX Specifications

Christie

Christie GraphXMASTER DLV1400-DX Specifications

Maxell MP-WU8101W user manual

Maxell

Maxell MP-WU8101W user manual

manuals.online logo
manuals.online logoBrands
  • About & Mission
  • Contact us
  • Privacy Policy
  • Terms and Conditions

Copyright 2025 Manuals.Online. All Rights Reserved.