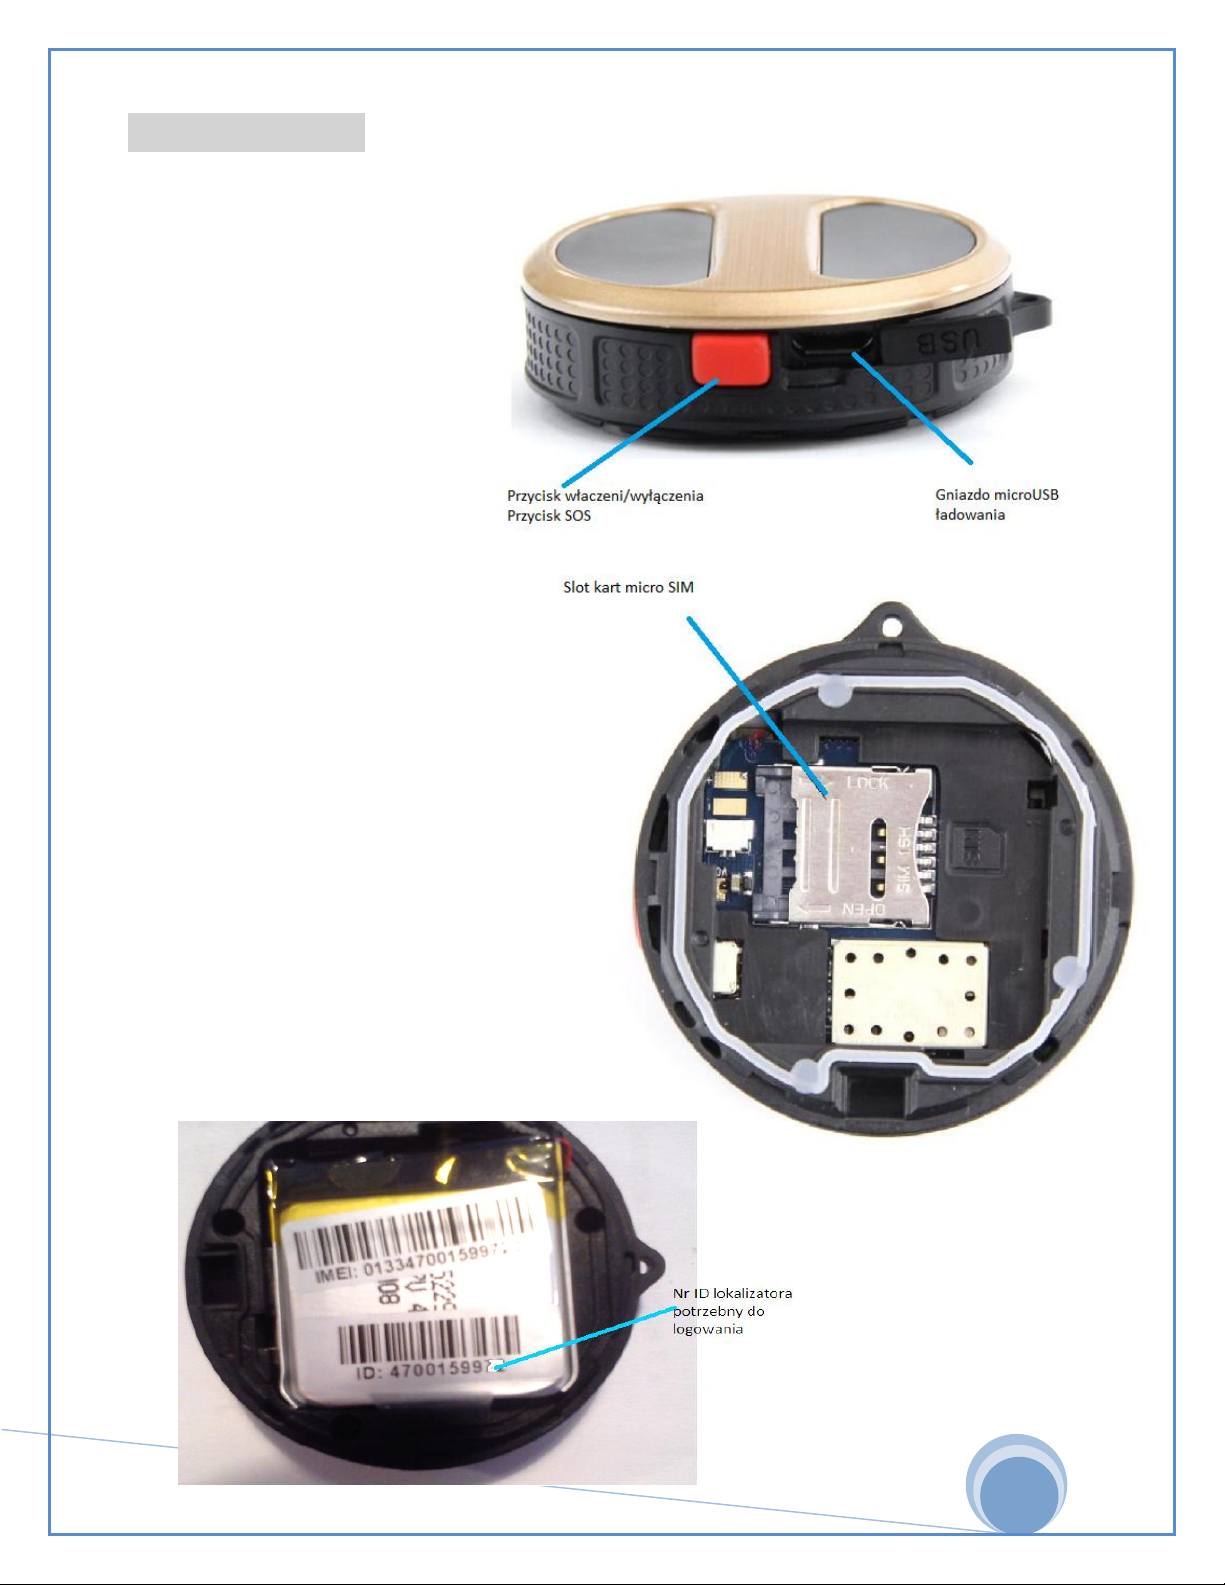
Orllo Smart Life G-SPY User manual

USER MANUAL
ORLLO G-SPYORLLO G-SPY

1
Thank you for your trust and for choosing ORLLO.
This manual contains information on technical specifications and operation of the device, its functions and
settings as well as correct installation.
Please read this content carefully operating instructions before the first
use.
Following the instructions is a condition for the proper functioning and use of the device.
We wish you satisfaction with using the device.

2
Technical Specifications:
• Power supply: Built-in battery
• Charging time: 2-3 hours
•Standby time: Up to 3 days
• Tracking: GPS / GPRS signal
•Micro SIM card slot
• Range: Global
•Weight: 30g
•Dimensions: Diameter 40x10mm
INCLUDED:
• ORLLO G-SPY locator
• USB cable
•Screwdriver and screw
• Fastening key ring
• Instructions in Polish for download from www.orllo.pl/download

3
Before using the device for the first time:
1) Before using, read the entire manual to properly handle and 1) Before using, read the entire manual to properly handle and
use the device.
2) Avoid contact of the device with moisture, dust and do not expose to direct action 2) Avoid contact of the device with moisture, dust and do not expose to direct action
sun rays.
3) Extremely low or high temperatures can lead to very fast 3) Extremely low or high temperatures can lead to very fast
damage to the battery or the entire device.
4) Do not use the USB cable for other purposes than charging. 4) Do not use the USB cable for other purposes than charging.
5) When you notice that your device's battery is damaged, do not charge it 5) When you notice that your device's battery is damaged, do not charge it
use the device
IMPORTANT:
•The device is not waterproof or waterproof
•When the device does not change the location position, please change the refresh time to a more frequent one. After waiting about 5
minutes, the position should be correct.
•Specifications subject to change due to upgrades or upgrades. The actual product may differ from the demonstration
product.
•Damage caused by improper use and storage of the device is not covered by free repair.
•Do not mount the device near radio transmitters, it may cause interference.
•The SIM card inserted into the locator cannot have a PIN code.
•The SIM card should be active, have funds on the account and should have GPRS cellular data enabled.
•The card that was delivered with the locator should be registered at the service point of the operator due to the new
Act, which has been in force since January 2, 2017.
•The locator should be turned off before removing / inserting the SIM card.
•The device's battery should be charged at temperatures between 0 ° C and 40 ° C
•To charge the device, use the original microUSB cable with a longer plug.
•The device should be mounted in a place where there is a good GPS signal.
•Location accuracy in rooms, buildings may be disturbed and incorrect. Only a
connection with a GPS satellite guarantees an accuracy of 10-20 meters. When the device
has no GPS signal, it automatically switches to tracking after LBS (Location Based
Services) (accuracy [100-1500m] depends on the number of BTS stations nearby). Services) (accuracy [100-1500m] depends on the number of BTS stations nearby).

4
TECHNICAL DESCRIPTION

5
TECHNICAL DESCRIPTION
• The LED indicates the current device status
• Charging - blue LED is on; the LED goes off automatically if the device is fully charged.
•Normal operation - in normal operation, the LED goes out after a few seconds, which ensures discretion.
•GSM error (no connection) - LED is blinking, restarting the device every 10 minutes.
• SOS signal - if the SOS number is entered correctly, the LED lights up after pressing the red button for 3
seconds.

6
Starting the device
1. Installing the SIM card (The SIM card must be active for outgoing calls as well 1. Installing the SIM card (The SIM card must be active for outgoing calls as well
incoming, and also have funds on the account including data / GPRS).
2. Open the back cover, remove the battery. 2. Open the back cover, remove the battery.
3. Install the SIM card into the SIM card slot, and then replace the battery. 3. Install the SIM card into the SIM card slot, and then replace the battery.
4. Install the back cover and tighten the screw with a screwdriver. 4. Install the back cover and tighten the screw with a screwdriver.
5. Turn on by pressing the power / sos button for 3 seconds. 5. Turn on by pressing the power / sos button for 3 seconds.
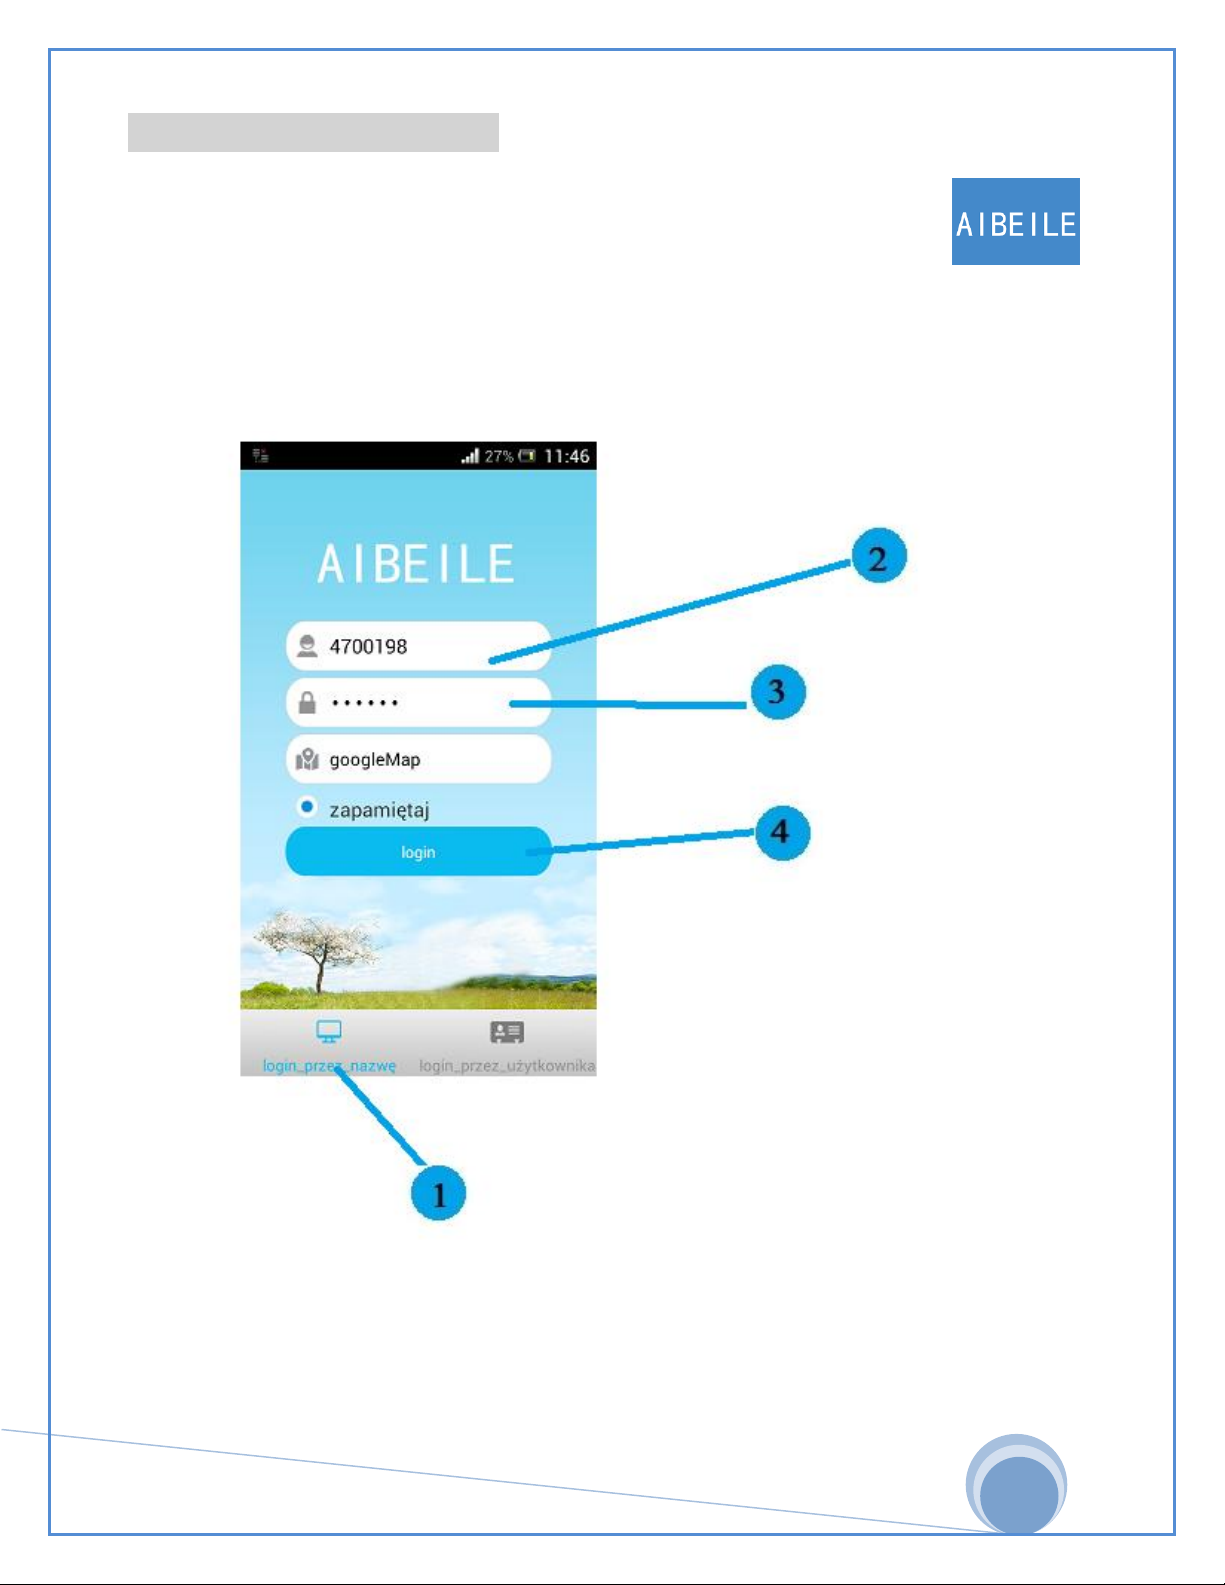
6. Scan the QR code (p. 10) to download and install the application on a mobile phone from 6. Scan the QR code (p. 10) to download and install the application on a mobile phone from
Android / IOS system.
7. Username: device ID code. 7. Username: device ID code.
8. Password: 123456 (default password that can be changed in the application settings) 8. Password: 123456 (default password that can be changed in the application settings)
The device is operated and located using:
•Mobile application for smartphones
• WWW pages (only logged position preview)
The device turns on by pressing the red button for approx. 3 seconds. The blue LED lights up and then goes into
normal operation mode (the LED goes out). Turning off the device is possible through the mobile application or
after removing the sim card.
First configuration:
The locator is configured by default on the network "T-mobile / Heyah- recommended" after inserting this operator's The locator is configured by default on the network "T-mobile / Heyah- recommended" after inserting this operator's The locator is configured by default on the network "T-mobile / Heyah- recommended" after inserting this operator's
card, the blue GSM LED should go out and the locator should be online (device tracking possible).
After inserting the card of another operator the locator may not work properly (blue diode
LED is flashing), you must set the APN name, to do this send the appropriate SMS command:
pw, 123456, APN, APN name, user name, password, MCCMNC #
Example:
pw, 123456 - the beginning of the command remains unchanged (use lowercase)
APN name = internet (for most operators) user name = none (for most
operators) Password = none (for most operators) MCC = 260 ( ang.
Mobile
operators) Password = none (for most operators) MCC = 260 ( ang.
Mobile
operators) Password = none (for most operators) MCC = 260 ( ang.
Mobile
Country Code) (
value for Poland 260)
Country Code) (
value for Poland 260)

7
MNC = this value should be set for a specific operator ( ang.
Mobile Network Code)
MNC = this value should be set for a specific operator ( ang.
Mobile Network Code)
MNC = this value should be set for a specific operator ( ang.
Mobile Network Code)
Adopted MNC values for operators: T-mobile MNC =
02 PLAY MNC = 06 PLUS MNC = 01 Orange MNC
= 03
Values for other operators at:
https://www.uke.gov.pl/tablice/KodMnc-
list.do; jsessionid = D25DFBBD8A03B225587F965CE6BFF1F5? execution = e1s1
Sample text sent to the locator, APN setting for PLAY network:
Pw, 123456, APN, internet ,,, # 26006
Locator response:
APN: Internet; user:; passwork:; userdata: 26006.
After waiting for about 2 minutes, the blue LED should go out and the locator should show Online. When the LED
is still flashing, please restart the device.
Attention:
When the device is offline check the SIM card, account validity and available funds on the account.

8
ID number the device is on a battery or a box (the ID number is the login of the mobile application and website). ID number the device is on a battery or a box (the ID number is the login of the mobile application and website).
The device must be turned on when setting the main monitoring number. The main number is set after installing
the application and entering the command icon.
QR codes to download the application on the phone

9
Using the mobile application
After downloading and installing the application, open it. Application name "AIBEILE" [ ]
1. After opening the application, select login by name 1. After opening the application, select login by name
2. Enter the ID located on the battery of the locator starting from 47 ...... 2. Enter the ID located on the battery of the locator starting from 47 ......
3. Enter the default password 123456 3. Enter the default password 123456
4. Select login - login will follow 4. Select login - login will follow

10
When you log in to the application, a map with the location of the device will appear:
1. Basic information about the locator (name, power-up status, battery status, location) 1. Basic information about the locator (name, power-up status, battery status, location)
2. Shortcut to locator status messages. 2. Shortcut to locator status messages.
3. Layer switching (map, satellite view). 3. Layer switching (map, satellite view).
4. The location of our phone (indicates the distance in a straight line between the locator and 4. The location of our phone (indicates the distance in a straight line between the locator and
phone).
5. Information about the locator (name, activation status, date, time, speed, direction).
6. Indicates the location of the device. 6. Indicates the location of the device.
7. It indicates the location of our phone. 7. It indicates the location of our phone.
8. Go to location history. 8. Go to location history.
9. Go to locator main settings. 9. Go to locator main settings.

11
Main locator settings menu:
1. Geo-fence arrangement 1. Geo-fence arrangement
(Click in the upper right corner "+" to add a new zone. Set the appropriate place on the map. Set the radius
distance via "+", "-" on the map in the given place (default radius is 100 meters, it is recommended to set the
radius to min. 300 meters). Name the zone accordingly. Save the settings by clicking [SAVE] in the bottom
right corner.)
2. Alarm setting (Application alarm settings on the phone). 2. Alarm setting (Application alarm settings on the phone).
3. Device message (device notifications). 3. Device message (device notifications).
4. Command (Device settings described below). 4. Command (Device settings described below).
5. Instructions in English. 5. Instructions in English.
6. Logging out of the application. 6. Logging out of the application.

12
1) [Working mode] - device work mode (refreshing the locator position). The more frequent the time1) [Working mode] - device work mode (refreshing the locator position). The more frequent the time
refresh rate, the more battery consumption. Default setting: 10min
• 1min (GPS starts every 1min and updates device location data) operating time 8 hours 1min (GPS starts every 1min and updates device location data) operating time 8 hours
• 10 min (GPS starts every 10min and updates device location data) operating time 48 hours 10 min (GPS starts every 10min and updates device location data) operating time 48 hours
• 1 hour (GPS starts every 1 hour and updates device location data) operating time 72 hours 1 hour (GPS starts every 1 hour and updates device location data) operating time 72 hours
2) [Admin number] - setting the main number. 2) [Admin number] - setting the main number.
3) [Emergency number] - setting the SOS number (the device will call the number assigned as SOS 3) [Emergency number] - setting the SOS number (the device will call the number assigned as SOS
after pressing the red button).
4) [Whitelist] - list of phone numbers with main number permissions. 4) [Whitelist] - list of phone numbers with main number permissions.
5) [Voice monitoring] - a list of phone numbers that can be tapped from the locator. 5) [Voice monitoring] - a list of phone numbers that can be tapped from the locator.
6) [Do not distrub] - the device switches into energy saving mode (setting is appropriate 6) [Do not distrub] - the device switches into energy saving mode (setting is appropriate
time range).
7) [Language time zone] - language and time zone setting. 7) [Language time zone] - language and time zone setting.
8) [Device off] - remote device shutdown. 8) [Device off] - remote device shutdown.
9) [device info] - information about the device. 9) [device info] - information about the device.
10) [Change password] - change the application login password. 10) [Change password] - change the application login password.

13
Location via WWW platform
Enter or copy the following address to display the login page:
http://ry.i365gps.com/Login.aspx?language=pl
1. Choose Polish
2. Check the login via IMEI
3. Enter ID on the battery or locator box 3. Enter ID on the battery or locator box 3. Enter ID on the battery or locator box
4. Enter the default password 123456
5. Click Go -> login will start
Note: Enter the ID in the IMEI field, and the ID and IMEI on the battery.

14
MAIN SCREEN OF THE WWW PLATFORM AFTER LOGGING:
When the locator is connected (online) to the network is green, when it is not connected it is gray (offline).
When not connected (offline), check the SIM card and battery status.
Particular attention should be paid to the condition of the item. If the device is in a room (building), the position will
be shown after LBS. When the device is outside, the status should change to GPS.be shown after LBS. When the device is outside, the status should change to GPS.be shown after LBS. When the device is outside, the status should change to GPS.be shown after LBS. When the device is outside, the status should change to GPS.
Stop- locator without traffic Stop- locator without traffic
Movement 0.45- locator in motion, current speed 0.45 Km / h Movement 0.45- locator in motion, current speed 0.45 Km / h
Attention:
It is not possible to manage the locator via the www platform, location and data preview as well as
checking the device history is available.

15
SEE THE ORLLO CAMERA TESTS IN "PC WORLD":
•Camera Monitoring 2017
•Car Camera Ranking 2017
•Latest Car Cameras 2017
•Car Navigation and GSM Car Camera
•GPS trackers - car, for a child, a dog, a cat, a bicycle etc.
•Test of the ORLLO FALCON 4K Car Camera
•Test Car Camera ORLLO RX-630GA PRO
•Sports Camera Test and Comparison: GOPRO vs ORLLO vs YI
WATCH TESTS, EXPERTS TIPS, CAMERA VIDEOS, VIDEO PRESENTATIONS:
Subscribe to the channel ORLLO ELECTRONICS EUROPESubscribe to the channel ORLLO ELECTRONICS EUROPE
Like us on facebook / orllo.plLike us on facebook / orllo.pl
Table of contents