otometrics AURICAL Aud User manual

AURICALAud
User Guide
Doc. No.7-50-1270-EN/07
Part No.7-50-12700-EN

Copyright notice
© 2012,2017GNOtometricsA/S. All rights reserved. ® Otometrics, the OtometricsIcon, AURICAL, MADSEN, ICS and HORTMANN
are registered trademarks of GNOtometricsA/S in the U.S.A. and/or other countries.
Version release date
2017-03-12 (153432)
Technical support
Please contact your supplier.
Otometrics - AURICAL Aud
2

Table of Contents
1 Device description 4
2 Intended use 4
3 Unpacking 5
4 Installation 5
5 Connecting accessories to AURICALAud 6
6 Powering the device 8
7 Connecting AURICAL Aud to OTOsuite 9
8 On-screen controls 9
9 PC keyboard controls 10
10 Toolbar icons in the Audiometry Module 10
11 Proper transducer placement 12
12 The Masking Assistant 13
13 Performing tone audiometry 16
14 Performing speech audiometry 17
15 Service, cleaning and calibration 19
16 Other references 20
17 Technical specifications 20
18 Definition of symbols 34
19 Warning notes 34
20 Manufacturer 37
Otometrics - AURICAL Aud 3

1 Device description
AURICAL Aud AURICAL AudHI-PRO2 AURICAL Aud
with speaker unit
AURICAL AudHI-PRO2
with speaker unit
AURICAL Aud is a PC-controlled audiometer for testing a person's hearing.The audiometer is operated from the OTOsuite
Audiometry Module PC software.
• With AURICAL Aud you can perform all standard audiometric tests, tone and speech audiometry and special tests.
• With AURICAL Aud with HI-PRO2 you can program hearing instruments.
• You can connect other devices easily through the built-in USB Hub, and AURICALAud provides the necessary con-
nections to carry out probe microphone measurements using the OTOsuite PMM module, and counseling using the
OTOsuite Counseling and Simulations module.
Note •For information about the PMM software, see the manual for AURICAL FreeFit and the PMM module, and for
information about the Counseling and Simulations software, see the manual for AURICAL Visible Speech and the Coun-
seling and Simulations module.
2 Intended use
AURICAL Aud and the Audiometry module
Users: audiologists, ENTs and other health care professionals in testing the hearing of their patients.
Use: diagnostic and clinical audiometric testing.
AURICAL Aud with HI-PRO2 and the Audiometry module
Users: audiologists, ENTs, hearing instrument dispensers and other health care professionals.
Use: As for AURICAL Aud, and hearing instrument fitting.
Speaker unit
Users: audiologists, hearing instrument dispensers and other health care professionals.
4 Otometrics - AURICAL Aud
1 Device description

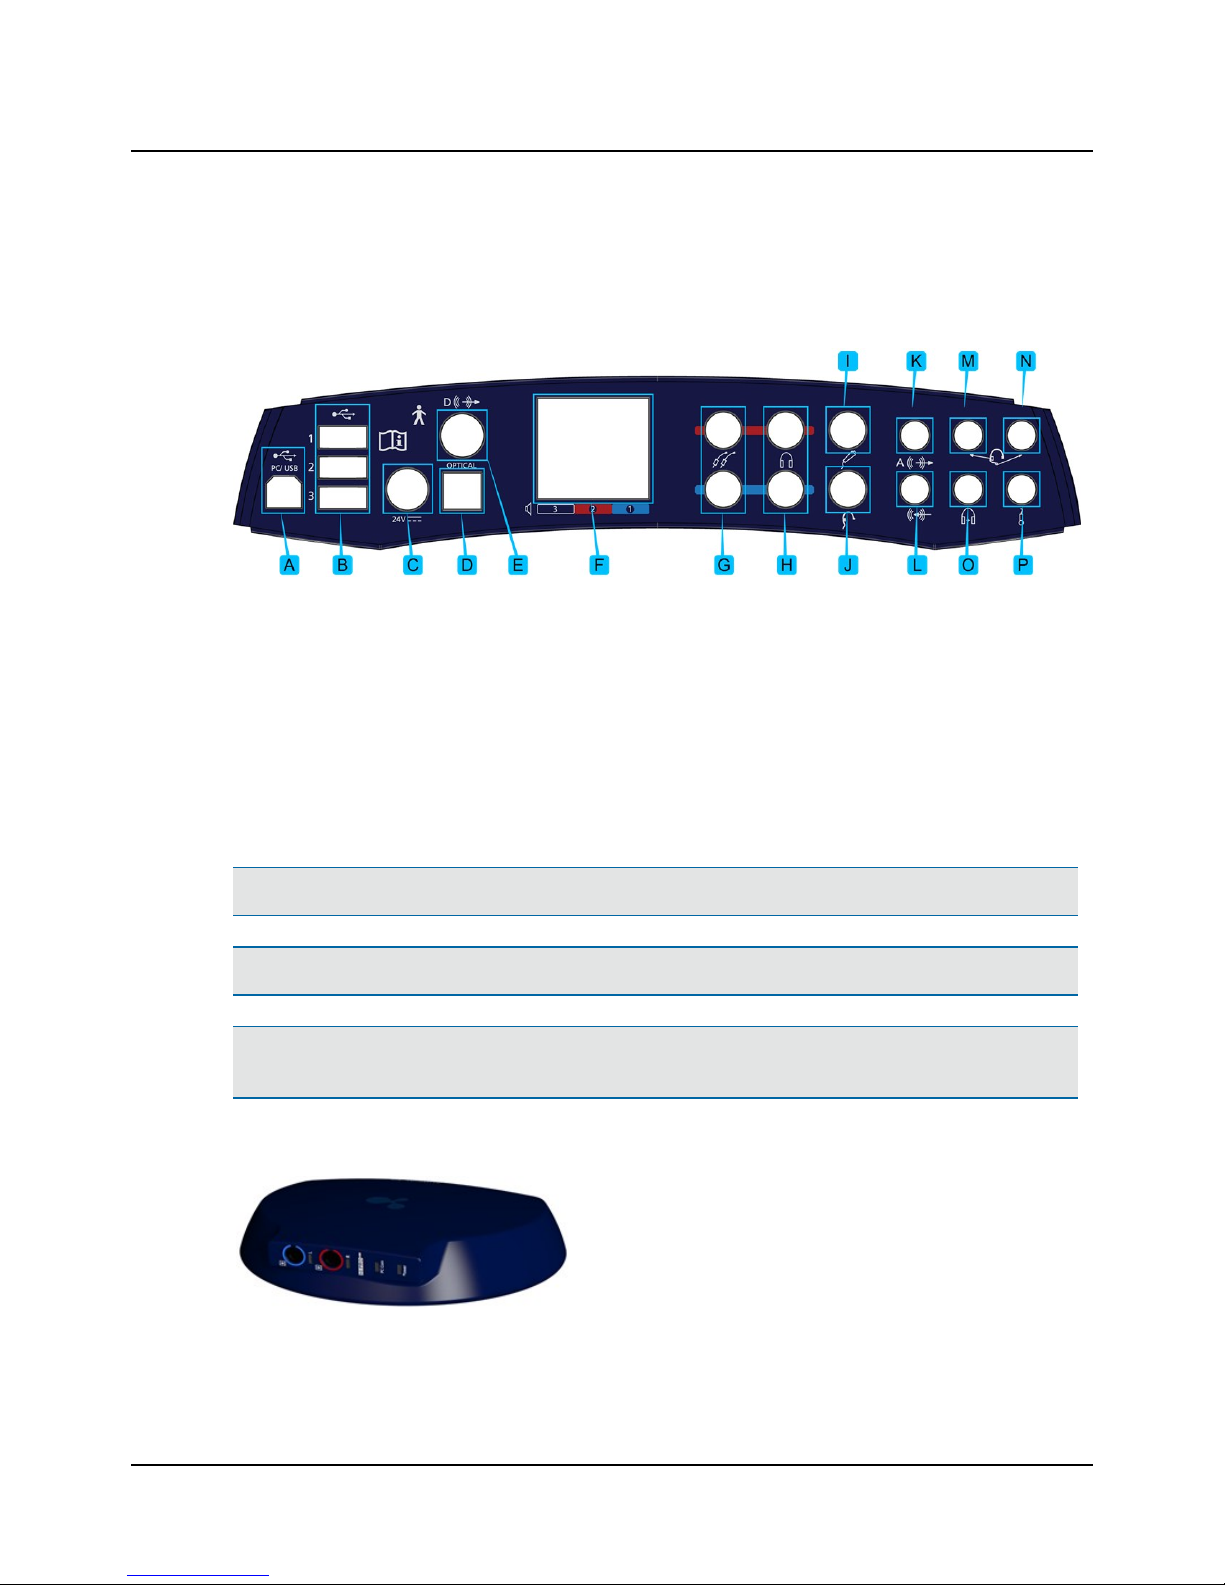
Use: The AURICAL speaker unit is intended to present audio signals. The AURICAL speaker unit is for use with AURICAL Aud
and the Audiometry module, with AURICALFreeFit and the OTOsuite PMM module and the OTOsuite Counseling and Sim-
ulations module.
2.1 Typographical conventions
The use of Warning, Caution and Note
To draw your attention to information regarding safe and appropriate use of the device or software, the manual uses pre-
cautionary statements as follows:
Warning •Indicates that there is a risk of death or serious injury to the user or patient.
Caution •Indicates that there is a risk of injury to the user or patient or risk of damage to data or the device.
Note •Indicates that you should take special notice.
3 Unpacking
1. Unpack the device carefully.
When you unpack the device and accessories, it is a good idea to keep the packing material in which they were
delivered. If you need to send the device in for service, the original packing material will protect against damage dur-
ing transport, etc.
2. Visually inspect the equipment for possible damage.
If damage has occurred, do not put the device into operation. Contact your local distributor for assistance.
3. Check with the packing list to make sure that you have received all necessary parts and accessories. If your package is
incomplete, contact your local distributor.
4. Check the Test Report (Calibration Certificate), make sure that the transducers (headphones and bone oscillator) are
the correct ones, and that they comply with the ordered calibration standards.
4 Installation
Install OTOsuite on the PC before you connect to AURICAL Aud from the PC.
For instructions on installing OTOsuite, see the OTOsuiteInstallation Manual, which you can find on the OTOsuite install-
ation medium (disk or memory stick).
To mount AURICAL Aud on the wall or under the desktop, see the AURICAL AudReference Manual.
AURICAL Aud is fully assembled on delivery, and you simply have to connect cables.
Otometrics - AURICAL Aud 5
3 Unpacking

Caution •To connect AURICAL Aud to the PC, use the supplied USB cable. The cable length must not exceed
3 m (approx. 10 feet).
AURICAL Aud
A. External power supply cable
B. USB cable between AURICAL Aud and the PC
AURICAL speaker unit
A. USB cable between AURICAL Aud and the PC
B. External power supply cable
Connecting to OTOsuite
• Run the OTOsuite Configuration Wizard to connect to and set up communication with AURICAL Aud: Select Tools>
Configuration Wizard
5 Connecting accessories to AURICALAud
The installation must be carried out in accordance with IEC 60601-1-1 plus addendum in the form of Part 1:
General provisions -1 and UL 60601-1, CAN/CSA-C22.2 NO 601.1-90. The supplementary provisions on the reli-
ability of electro-medical systems.
It is a general rule for all electrical equipment used in the proximity of the client that:
• The connected equipment must comply with IEC 60601-1 and/or IEC 60601-1-1
except for the PC, and equipment connected to the line in and the line out sockets of AURICAL Aud.
6 Otometrics - AURICAL Aud
5 Connecting accessories to AURICALAud

See also General warning notes ►36.
For a detailed description of the connection panel, see the AURICAL AudReference Manual.
Connection panel - AURICAL Aud
A. PC/USB connection
B. Powered USB connections for accessories
C. External power supply
D. Sound field speaker output (optical digital line-out)
E. Sound field speaker output (coaxial digital line-out)
F. Sound field speakers (power output)
G. Insert earphones
H. Headphones - air conduction
I. Patient Responder
J. Bone oscillator
K. Speaker, Analog (line output)
L. Line-in
M. Operator monitor headset - headphones
N. Operator monitor headset - boom microphone
O. Counseling and Simulations headphones
P. Talk-back microphone
Note •Blue corresponds to Left and red corresponds to Right.
Warning •Use only the power supply provided by Otometrics.
Caution •When you connect other electrical equipment to AURICAL Aud, remember that equipment that does not
comply with the same safety standards as AURICAL Aud can lead to a general reduction in the system's safety level.
Connection panel - HI-PRO2
The HI-PRO2 connection panel contains the sockets for hearing
instrument connection cables, and light indicators relating to PC
communication and powering.
Otometrics - AURICAL Aud 7
5 Connecting accessories to AURICALAud

A. Hearing instrument connection cables
B. PC communication, light indicator
C. Power, light indicator
Connection panel - AURICAL speaker unit
To access the AURICAL speaker unit connection panel, remove the speaker cover.
A. USB to AURICAL Aud
B. BT (Bluetooth) for PMM communication
C. 24V DC out power supply to AURICAL Aud
D. 24V DC in for external power supply
E. Speaker input for connecting to AURICAL Aud
Connecting external speakers
External speakers can be connected to AURICAL Aud via powered output terminals or line-out terminals. In both cases you
should contact your service department for installation and calibration. See also Calibration ►20.
6 Powering the device
AURICAL Aud is powered through an external power supply connected directly to the mains outlet.
Warning •AURICAL Aud is not provided with a mains switch.
To connect AURICAL Aud to the mains supply, plug the mains plug into the wall mains outlet.
To disconnect AURICAL Aud from the mains supply, pull the mains plug out of the wall mains outlet. Do not position
the unit so that it is difficult to pull the mains plug out of the wall mains.
1. Plug the external power supply into the Power socket in the connection panel.
2. Plug the mains plug of the external power supply into an AC mains outlet with a three-wire protective ground.
8 Otometrics - AURICAL Aud
6 Powering the device

Switching on AURICAL Aud
Use only the power supply specified in Technical Specifications.
1. Connect the mains plug of the external power supply directly to an AC mains outlet with a three-wire
protective ground.
2. Switch on the mains supply.
3. The On/Off indicator on AURICAL Aud lights green.
AURICAL Aud AURICALAud with HI-PRO2
Switching off AURICAL Aud
1. To switch off AURICAL Aud, disconnect the power supply from the mains outlet.
7 Connecting AURICAL Aud to OTOsuite
When you use AURICAL Aud for the first time, run the Configuration Wizard to set up the connection between AURICAL
Aud and OTOsuite. After you have configured OTOsuite for the first time, if AURICAL Aud is turned on when you open the
Control Panel in OTOsuite, then AURICAL Aud will connect to OTOsuite automatically. Otherwise, you can connect
AURICAL Aud as follows:
1. Switch on the device.
2. Launch OTOsuite.
3. In the OTOsuite toolbar, click Control Panel.
4. In the Control Panel, click Connect.
8 On-screen controls
Test controls provide a means of operating the audiometer if you use the mouse and on-screen options to perform tests.
• To enable test controls, select Tools> Options> Audiometry> General> On-screen controls> Show> On.
Otometrics - AURICAL Aud 9
7 Connecting AURICAL Aud to OTOsuite

Silence Mode
Silence Mode allows you to control tone levels and presentation by hovering the mouse cursor over the respective on-
screen controls. This is particularly useful when the operator of the audiometer and the person being tested are in the
same room.
• To enable silence mode, select Tools> Options> Audiometry> General> On-screen controls> Silence Mode> On.
• To change the level and frequency by more than one click at a time, use the mouse scroll wheel.
9 PC keyboard controls
You can open a separate PDF-file to have a proper view of the keyboard short-
cuts.
After you install OTOsuite, you can find OTOsuite manuals and related doc-
umentation on your PC. In the Start menu, open OTOsuiteManuals, which
contains an overview with links to all manuals.
Note •The actual position of the keys may depend on your keyboard
type.
10 Toolbar icons in the Audiometry Module
The icons available in the toolbar depend on the test function that you have selected.
10 Otometrics - AURICAL Aud
9 PC keyboard controls

Audiometry icons
Tone audiometry
Speech audiometry
Menu item Icon Description
Combined Audiogram Click to toggle between viewing both ears in a single audiogram (com-
bined audiogram) or both a left and a right audiogram on your screen.
Combined View
• Click to view both ears in a single audiogram.
Split View
• Click to view separate audiograms for each ear.
Masking Assistant Enable or disable the Masking Assistant.
The Masking Assistant causes an unmasked threshold to flash repeatedly
if masking is recommended.
Standard / All / High
frequencies
The graph shows up to 20,000 Hz. AURICAL Aud presents stimulus up to
12,500 Hz.
• Click to choose between viewing:
Standard Frequencies
Displays the audiogram from 125 to 8000 Hz.
All Frequencies
Displays the audiogram from 125 to 20,000 Hz.
High Frequencies
Displays the audiogram from 8000 to 20,000 Hz.
New Audiogram Select new audiogram. You will be prompted to save or cancel current
data.
Otometrics - AURICAL Aud 11
10 Toolbar icons in the Audiometry Module

Menu item Icon Description
Frequency Resolution The options for frequency resolutions are 1/6, 1/12, 1/24 and 1/48
octave as well as 1 Hz. Select the different tone stimulus resolutions
from the toolbar or from Tools> Options> Audiometry> General.
You can store up to 24 points for each audiometry curve. You will be
prompted if you try to store more than the maximum number of points.
Monitoring Enables or disables the monitor speaker for monitoring stimuli presen-
ted to the patient from the Stimulus or Masking channel.
Talk Forward Enables communicating with the patient in the sound booth. This will
display the Talk Forward dialog box, where you can control the talk for-
ward microphone sensitivity and the output level (in dB HL) to the
patient.
Select Orientation Click to select the perspective of the patient's ears as presented on the
screen for graph and table views.
You can also select the location of the stimulus control.
11 Proper transducer placement
Headphones
1. Loosen the headband and place both the left and right side of the headphones simultaneously.
Note •If the headphones are not placed properly, there is risk of causing the ear canal to collapse which will result in
elevated thresholds.
2. Aim the center of the headphones towards the patient's ear canals and gently place them against the ears.
3. Tighten the headband while holding the headphones in place with your thumbs.
4. Examine the placement of the headphones to make sure they are level, and properly positioned.
Insert Earphones
Young children tolerate insert earphones better than headphones.
1. Select the largest foam eartip that will fit into the patient's ear.
If the eartip is too small the sound will leak out and the dB level will not be accurate at the eardrum.
Insert earphones have greater attenuation between ears especially at the low frequencies; this reduces the need for
masking.
2. It is best to clip the insert earphone transducers behind the child or on the back of their clothing and then fit the
foam eartip into the child's ears.
12 Otometrics - AURICAL Aud
11 Proper transducer placement

Bone Oscillator
Note •For unmasked bone thresholds, you can store binaural data:
- Selecting Binaural bone in the routing section of the control panel.
Note •If there is a difference of 10dB or greater between the bone conduction threshold and the air conduction
threshold of the same ear, masking is needed. The Masking Assistant can assist you in determining which thresholds
need to be masked.
Note •If the SRT of the test ear and the SRT or PTA of the nontest ear differ by 45dB or more, masking is needed.
If the SRT of the test ear and the bone conduction PTA of the nontest ear differ by 45 dB or more, masking is needed.
Mastoid placement
1. Move any hair covering the mastoid out of the way and place the flat round part of the bone oscillator securely on the
boniest portion of the mastoid without any part of the transducer touching the external ear.
2. Make sure the bone oscillator is tight on the mastoid but still comfortable.
3. If you are going to perform masking with earphones, position the other end of the bone oscillator headband over the
patient's temple on the opposite side of the head so that the headband of the earphones and bone oscillator fit on
the patient's head.
Loudspeaker placement
The environment in which sound-field audiometry is performed may affect the sound field near the patient.
The performance of loudspeakers for AURICAL Aud was tested by Otometrics under free-field conditions in a large
anechoic chamber. Sound pressure level, frequency response and distortion were measured by a microphone placed 1 m
from the front of the speaker.
When speakers are installed in other types of environment, the characteristics of the resulting sound field should eval-
uated by qualified personnel.
12 The Masking Assistant
If the Masking Assistant is enabled, it will at all times check for frequencies that may require testing with
masking. This also applies to old audiograms imported from NOAH or XML as long as a supported transducer
was stored with the data.
The Masking Assistant is a tool provided to help you with an indication that there may be frequencies where testing with
masking1is recommended.
1(Katz, J., Lezynski, J. (2002). Clinical Masking. In J. Katz, ed., Handbook of Clinical Audiology, Williams and Wilkins, Bal-
timore.)
Otometrics - AURICAL Aud 13
12 The Masking Assistant

• The audiogram symbol will flash at the specific frequencies where contralateral masking may be recommended1.
• The masking criteria are configurable so that you can
set them up to match your local recommendations for
masking. You can for instance choose either frequency
specific criteria, which increases the efficacy of your
work, or the traditional "one-level-fits-all" criteria.
Select the Tools> Configuration Wizard> Audi-
ometry -Configure... > Masking Assistant to set up
the masking criteria.
All masking signals are calibrated in effective masking.
How does the Masking Assistant work?
Terminology
AC AC test ear
ACc AC contra
BC BC
BCc BC contra
Min IA Minimum inter-aural attenuation.
When is masking required?
Masking is recommended when the following conditions are met:
AC AC > ACc + Min IA
or AC > BCc + Min IA
BC BC < AC - x* dB
Only stored thresholds measured without masking are checked. Levels which did not evoke a response are excluded from
the check. This means that as soon as a masked threshold has been stored, the flashing stops for that frequency.
* denotes configurable Air/Bone gap criterion (Tools> Configuration Wizard> Audiometry -Configure...> Masking
Assistant).
1Based on criteria described in Clinical Masking, Essentials of Audiology, Stanley A. Gelfand, Thieme 1997, and Meas-
urement of Pure Tone Hearing Thresholds, Audiologists’ Desk Reference - Vol 1, James W. Hall III, H. Gustav Mueller
III, Singular Publishing Group 1997. and Munro K.J., Agnew N. A comparison of inter-aural attenuation with the Ety-
motic ER-3A insert earphone and the Telephonics TDH-39 supra-aural earphone. Br J Audiol 1999; 33: 259-262.
14 Otometrics - AURICAL Aud
12 The Masking Assistant

Min IA is frequency specific
These are the Min IA tables for TDH-39 and Otometrics Inserts used in the Masking Assistant 1.
Min IA (supraaural phone: TDH-39), frequency specific
Hz dB
125 35 Katz & Lezynski, (2002)
250 48 Munro & Agnew, BJA (1999)
500 44 Munro & Agnew, BJA (1999)
750 40 N/A - fulfill traditional approach
1000 48 Munro & Agnew, BJA (1999)
1500 40 N/A - fulfill traditional approach
2000 44 Munro & Agnew, BJA (1999)
3000 56 Hall J.W. III & Mueller G.H. III / Munro & Agnew, BJA (1999)
4000 50 Katz J / Munro & Agnew, BJA (1999)
6000 44 Hall J.W. III & Mueller G.H. III / Munro & Agnew, BJA (1999)
8000 42 Katz J / Munro & Agnew, BJA (1999)
Min IA insert phone
Hz dB
125 60 N/A - traditional value
250 72 Munro & Agnew, BJA (1999)
500 64 Munro & Agnew, BJA (1999)
750 60 N/A - traditional value
1000 58 Munro & Agnew, BJA (1999)
1500 60 N/A - traditional value
2000 56 Munro & Agnew, BJA (1999)
3000 58 Munro & Agnew, BJA (1999)
4000 72 Munro & Agnew, BJA (1999)
6000 54 Munro & Agnew, BJA (1999)
8000 62 Munro & Agnew, BJA (1999)
1Katz, J., Lezynski, J. (2002). Clinical Masking. In J. Katz, ed., Handbook of Clinical Audiology, Williams and Wilkins, Bal-
timore. Munro, K.J., Agnew, N. A comparison of inter-aural attenuation with the Etymotic ER-3A insert earphone and
the Telephonics TDH-39 supra-aural earphone. Br J Audiol 1999; 33: 259-262. Hall, JW., MUELLER, HG. (1997). The audi-
ologists’ desk reference, Volume I., Singular Publishing Group, San Diego.
Otometrics - AURICAL Aud 15
12 The Masking Assistant

13 Performing tone audiometry
A. Quick Select panel
B. Test Options panel
C. Monitor/Level panel
Whenever the test buttons and other functions are used, you can use the corresponding keys on the keyboard, or the on-
screen controls located at the top of the screen or in the Control Panel to the left.
For detailed examples of audiometric testing, see the AURICAL Aud Reference Manual.
1. Select the Tone screen in the OTOsuite Audiometry module.
2. Prepare the patient. If you wish to instruct the patient after you have placed the transducers on the head of the
patient, you can use the Talk Forward button. You can talk to the patient to adjust the patient communication levels
when Talk Forward is active.
3. In the Control Panel, select test conditions for ear, transducer, unmasked/masked, and test type.
4. Select the test frequency with the Right/Left arrow buttons (or on keypad).
5. Select the stimulus level with the Up/Down arrow buttons (or on keypad).
6. Present the tone stimulus with the Present button or the space bar on the keypad.
7. Use the Store button (the S key on the keypad) to store the data point and proceed to the next frequency.
8. Repeat steps 4 to 7 until all the measurements you need have been completed. If needed, did you test:
– Both ears
– Air conduction
– Bone conduction
– Masking (Mask button or M on the keypad
– Audiogram threshold, MCL and UCL
9. Save the audiogram.
16 Otometrics - AURICAL Aud
13 Performing tone audiometry

Note •White noise can be selected for masking of pure tones. The white noise signal is calibrated for pure tone effect-
ive masking, i.e. the white noise sound pressure level varies with the pure tone frequency. If you wish to obtain a cer-
tain white noise level measured in dB SPL, you should use Conversion Table 2 to determine the appropriate
attenuator setting. See AURICAL Aud ►20
14 Performing speech audiometry
A. Quick Select panel
B. Test Options panel
C. Monitor/Level panel
Whenever the test buttons and other functions are used, you can use the corresponding keys on the keyboard, or the on-
screen controls located at the top of the screen or in the Control Panel to the left.
For detailed examples of audiometric testing, see the AURICAL Aud Reference Manual.
1. Select the Speech screen in the OTOsuite Audiometry module.
2. If needed, click the Scoring and Playing icon to set up word or phoneme scoring.
3. Prepare the patient. If you wish to instruct the patient after you have placed the transducers on the head of the
patient, you can use the Talk Forward button. You can talk to the patient to adjust the patient communication levels
when Talk Forward is active.
4. In the Control Panel, select test conditions for ear, transducer, unmasked/masked, and test type.
5. Select the stimulus level with the Up/Down arrow buttons (or on keypad).
6. Select speech input signals.
You can choose from either microphone input or recorded input source. Combining recorded Source A and Source B
as Input sources in the Test Options section of the Control Panel will replace the audiometer speech masking with a
recorded input.
7. Select your speech input from the right-click menu in the control panel (or for Source A or Source B from the drop-
down lists in the Test Options section of the Control Panel).
– Int.CD (CD material in CD/DVD drive)
Otometrics - AURICAL Aud 17
14 Performing speech audiometry

– Int.File (integrated OTOsuite Speech Material or regular sound files)
– Line In (analog input from external sound players, eg. CD, MD, MP3 or cassette recorders connected to the audi-
ometer via the Line In input).
Important •If an external playback device is used to generate speech stimuli via the line input, care must be
taken to ensure that the player has a flat frequency response in the range 125 to 6300 Hz. The maximum allow-
able deviation from the average response level is +/-1 dB; the average response level should be measured over the
range 250 to 4000 Hz.
Both the headset microphone and the desktop microphone are ready for use and do not require calibration or
equalization procedures. The headset microphone should be turned to a position just below the operator’s
mouth. The desktop microphone should face the operator.
If an external playback device is used to generate speech stimuli via the line input of AURICAL Aud, only a high
quality CD player or similar device should be used; tape recordings may not provide a sufficient signal to noise
ratio. Preferably, the external device should deliver its output via a fixed-level line out connector. The input gain
on AURICAL Aud should be adjusted to obtain a 0 dBVU reading when the calibration signal is played by the
external device.
8. You can find speech material files in the File/track/list selection drop-down list.
Caution •You should only use speech materials with a stated relationship between the level of the speech signal
and the calibration signal.
Speech materials delivered on CD or other media are normally accompanied by a description of this relationship.
You should follow the instructions supplied with the speech materials, using the VU-meter in OTOsuite for adjust-
ment of input gain.
If you are using built-in speech materials supplied with OTOsuite, the speech levels have been adjusted according
to the original speech material instructions.
Note •Speech signals are calibrated in dB HL.
18 Otometrics - AURICAL Aud
14 Performing speech audiometry

If you are using an integrated word list, the word list is shown on the screen.
9. Present the word lists with the Play button.
10. Use the Correct (+) and Incorrect (-) buttons or click directly on the key word to score.
11. Store the current data as the result, either by clicking Store in the highlighted field, or
by pressing (S) on the keyboard.
12. Repeat until all the measurements you need have been completed.
15 Service, cleaning and calibration
Warning •Under no circumstances disassemble AURICAL Aud. Contact your supplier. Parts inside AURICAL Aud must
only be checked or serviced by authorized personnel.
15.1 Service
Warning •For the sake of safety and in order not to void the warranty, service and repair of electro-medical equip-
ment should be carried out only by the equipment manufacturer or by service personnel at authorized workshops. In
case of any defects, make a detailed description of the defect(s) and contact your supplier. Do not use a defective
device.
15.2 Cleaning
The device
• Remove dust using a soft brush.
• Use a soft, slightly damp cloth with a small amount of mild detergent or approved non-caustic medical grade dis-
infectant wipes to clean the unit according to local infection control regulations.
Keep the unit away from liquids. Do not allow moisture inside the unit. Moisture inside the unit can damage the instru-
ment and it may result in a risk of electrical shock to the user or patient.
Accessories
These parts are in constant contact with your patients and should therefore be kept clean.
• Headphones
Use a non-alcohol based wipe (e.g. Audiowipe) to clean the headphones between patients.
• Eartips for Insert Earphones
Otometrics - AURICAL Aud 19
15 Service, cleaning and calibration

The eartips are disposable and therefore should not be cleaned or re-used.
• Bone oscillator
Clean the bone oscillator between patients, e.g. with a non-alcohol based antibacterial wipe, such as Audiowipes.
Disposal
There are no special requirements for the disposal of eartips, i.e. they can be discarded according to local regulations.
15.3 Calibration
Annual calibration
The audiometer, headphones, bone oscillators, and sound field speakers must be calibrated once a year by your authorized
service department.
Caution •Note that calibration has been performed only on the transducers supplied! If you wish to use any other
transducer for testing with the device, please contact your local distributor first.
16 Other references
For more information, see the online Help in OTOsuite, which contains detailed reference information about AURICAL
Aud and the OTOsuite modules.
For instructions on installing OTOsuite, see the OTOsuiteInstallation Manual, which you can find on the OTOsuite install-
ation medium (disk or memory stick).
17 Technical specifications
17.1 AURICAL Aud
Type identification
AURICAL Aud is type 1081 from GNOtometricsA/S.
Channels
Two separate and identical channels.
Frequency range
Insert earphones: Standard frequencies: 125 - 8000Hz
20 Otometrics - AURICAL Aud
16 Other references
Other manuals for AURICAL Aud
1
This manual suits for next models
1
Table of contents