Outdoor Theater Systems Recreation Series User manual

Recreation Series
15 Foot Screen/8” Speakers
Instruction Booklet

1
General Safety Information
This warning symbol indicates a safety
precaution or possible hazard. When this
symbol appears, you must use extreme
caution and follow the instructions properly.
Listed below are important general safety
warnings:
Never use near water, rain, or any wet
conditions.
Never use without the anchor system.
Always have two people to raise and
lower the screen
Always remove the speakers from the
stands when adjusting their height.
Use only 3-wire extension cords that have
a 3-prong grounding type plug.
Use only a GFCI protected outlet.
System Contents
1- Projector
1- Streaming Stick
1- White Stretch Screen
1- Black Non-Stretch Screen
1- Active Speaker
1- Passive Speaker
1- Speaker Cord
4- Tripod Stands
1- Audio Cable (2X2 RCA)
1- 3.5mm RCA Adapter
6- Tie Down Straps with Hooks
6- Ground Twist Stakes
1- Outlet Strip
1- Extension Cord
2- Bungee Cords
1- Carry Bag for Screen and Tripods
1- Carry Bag for Electronics
1- Flashlight
1- Parts Bag (2 Eye Bolts, 2 Wing Nuts,
2- Spring Clips)
Power Supply Connections
Indoors
The system must be grounded
while in use to prevent electrical
shock. In the event of a
malfunction, this grounding will
provide a path of least resistance
for the electrical current.
Outdoors
Use only a GFCI protected outlet.
GFCI stands for Ground Fault Circuit
Interrupter. If you are unsure if your
outlet is GFCI protected, you should
consult with a professional
electrician.

1. Open the tripod stands by loosening
the lower knob and separate the legs
until fully extended. Tighten the lower
knob to secure. Repeat this step for
the second stand and position it
approximately 10.5 feet away from
the first stand.
2. Insert the eyebolts into the top
hole of the stands and tighten
them into place with the wingnuts.
3. From the center of the stand
take one large step out and twist
one stake into the ground 3 feet
to your left and the other stake 3
feet to your right. Repeat this step
for the other stand.
4. Loosen the height adjustment
knob and raise the top tube up to
the height of the sixth hole. Insert the
pin into the sixth hole. Tighten the
knob to secure the tube. Repeat this
step for the other stand.
5. Hook the first tiedown strap into the
eyebolt at the top of the stand and
connect its other end to the center
twist stake. Connect the second tie
down strap to the hook of the first
strap and connect the bottom end
to the back tiedown stake. Connect
the third tie down strap to the hook
of the first strap and connect the
bottom end to the front tie down
stake. Be sure to leave a little slack in
the straps, you will tighten them fully
momentarily. Repeat this step for the
other stand.
Step 5b
Step 5a
System Assembly
Step 5c
Step 1
Step 2
Step 4
Step 3
2

6. Unfold the black screen. Using the Spring Clips,
attach the black screen’s D-Rings, Velcro side
forward, to the eye bolt at the top of the stand.
Repeat this step for the other stand.
7. Take the white screen and with the Velcro
facing inward, secure it to the black screen using
the Spring Clips and Velcro along the top.
8. Raise the middle pole of the tripod stand to
the fourth hole and insert the pin. Repeat this
step for the other stand.
9. Now, tighten all 6 tie down straps to ensure a
secure and smooth viewing surface.
10. Take a bungee cord and hook one end onto the lower
adjustment knob of the tripod stand. Wrap the bungee
under and around the base of the stand. Attach the other
end of the bungee cord to the bottom corner of the black
and white screens. Repeat this step for the other stand.
3
Step 6
Step 7
Step 10b
Step 10a
11. Open the tripod stands for the speakers. Tighten the
lower knob to secure the legs in place. Set the stands on
level ground at each side of the screen.

13. Set-up a small table for the projector and Blu-ray player
approximately 20 feet in front of the screen. * Please note that
you must provide the grounded extension cord to the set-up
table and a GFCI electrical outlet. It is not supplied with your
system.
14. Plug the power strip into your provided extension cord and
power source. Plug in the power cords for the projector,
Streaming Stick, and the provided extension cord into the
power strip.
15. Connect the Streaming Stick to the
projector using the HDMI cable. Plug one end
into the HDMI output of the Streaming Stick
and the other end into the HMDI input of the
projector.
16. Plug the end of the RCA Cable into the
red and white audio outputs on the
projector. Run the other end of the RCA
audio cable to the active speaker and plug
it into the red and white inputs on the back
of the speaker. Set the speaker mode to “NO
DISK”.
17. Run the extension cord to the
active speaker and plug the
speaker power cord into the
extension cord.
4
Step 13
12. Plug the power cord into the back of the active speaker.
Attach the active speaker to a tripod stand. There is a hole in
the bottom of each speaker that will mount on top of the
tripod. Secure it in place by tightening the knob on the back of
the speaker. Repeat for the passive speaker. On the back of
the active speaker, plug the metal connector of the speaker
cable into the output that is labeled “Speaker Out”. Run the
other end of the cable to the passive speaker and push and
twist the plastic connector to lock into place.
4
You’re Finished!
Enjoy your new Theater System!
Step 12a
Step 12b
Step 16
Step 14-15

5
Reference this diagram for correct system
wiring. The component cables are shown in
blue and the power cords in red.
Wiring Schematic
Streaming Stick
Streaming Stick
Because the projector must be hard wired for audio, the
speaker mode must be set to “NO DISK”. THE PROJECTORS ARE
NOT BLUETOOTH.
The Speakers are Bluetooth compatible for other audio
applications. Set the speaker mode to Bluetooth and you will
find them listed as “Savi” to pair with your media device.
FM Radio may also be used on the speakers by selecting the
“RADIO” mode. You can scan to different channels by using
the buttons on the back of the speaker or remote control.
Speaker Notes

Warranty Information
The projection screen has a 16:9 ratio
format. The projector can display in
either 16:9 or 4:3 ratio formats. To
change the aspect ratio please refer
to the projector manual.
You may need to move the projector
closer or father away from the screen
or adjust the feet to appropriately size
the picture with the screen.
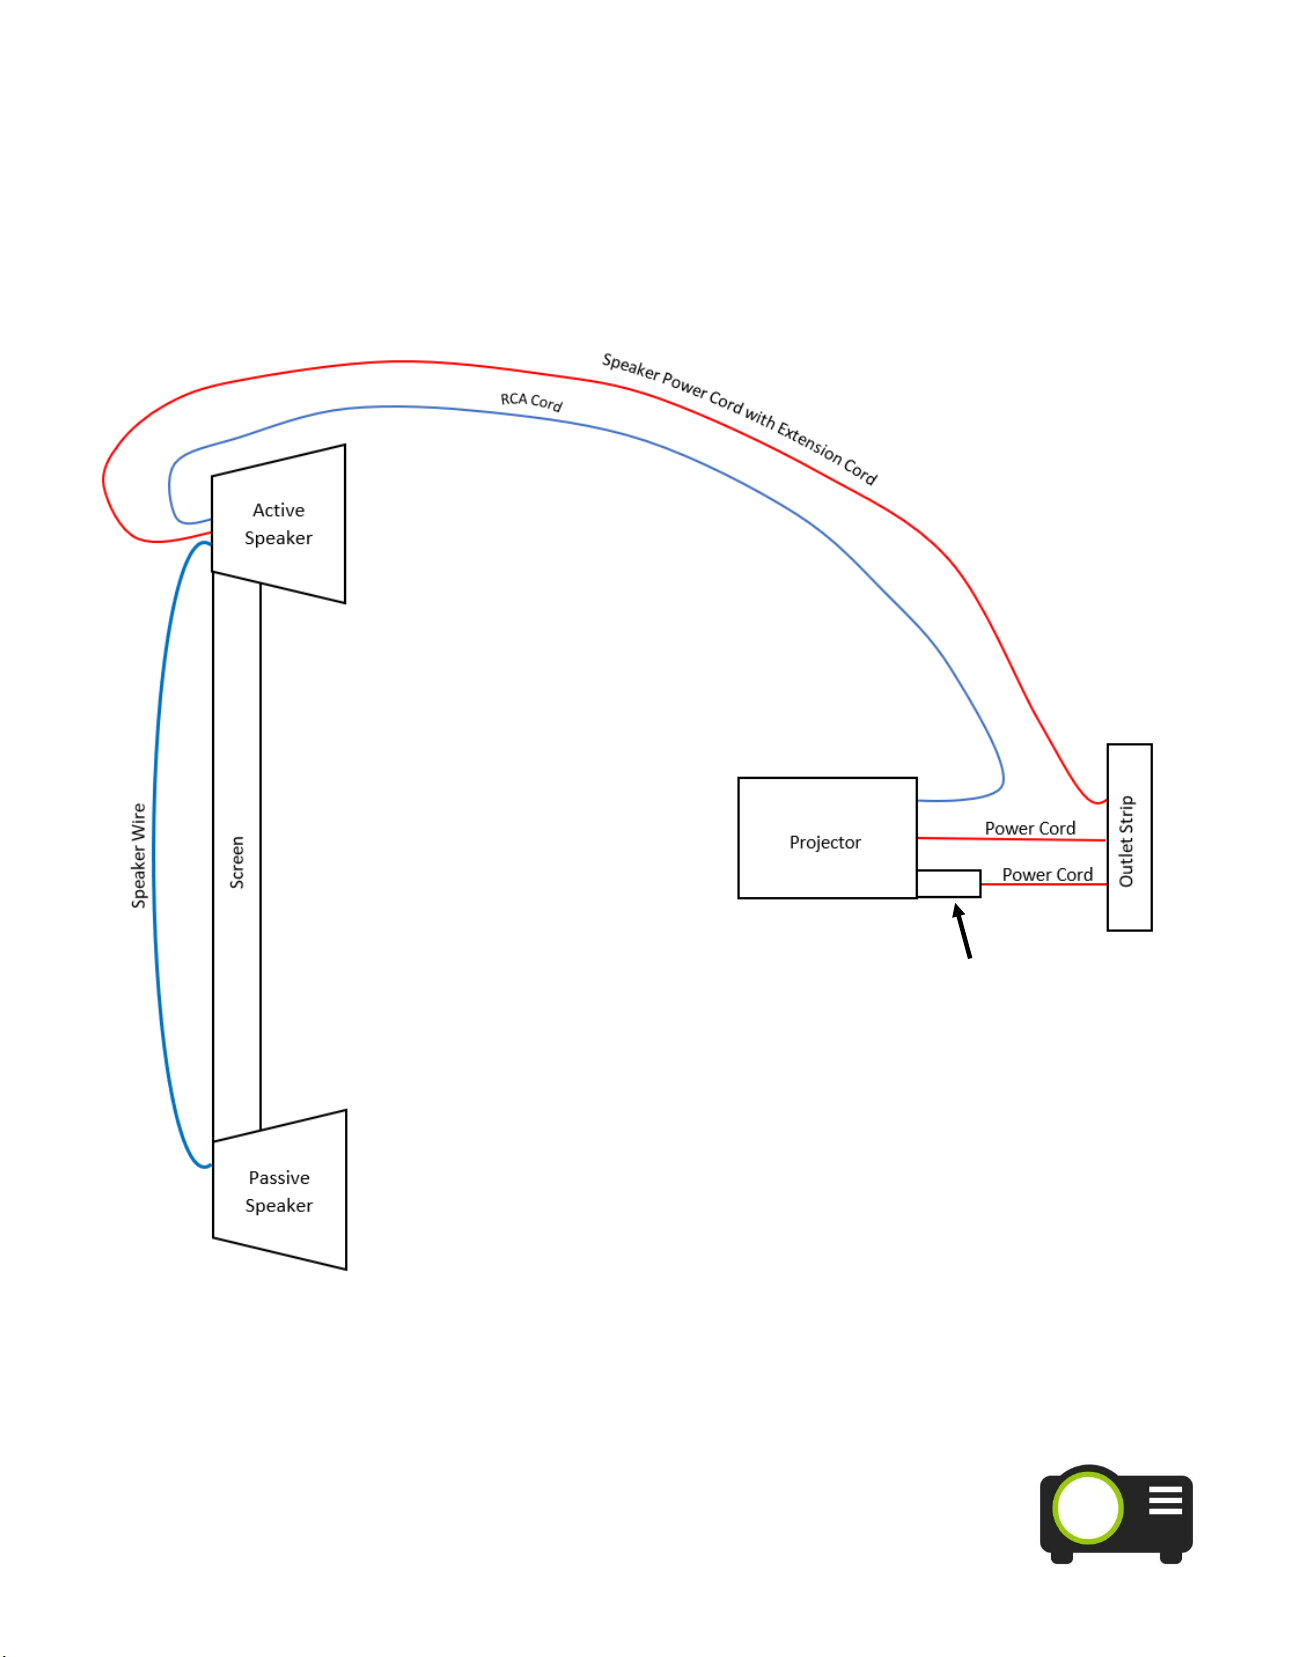
Make sure the power is on to each of
the components: Outlet Power Strip,
Projector, Streaming Stick, and
Speakers.
To view a reference video of this
assembly visit Youtube.com and
search Backyard Theater Systems
Setup Video.
Alternate Rear
Projection Assembly
Use only the white stretch screen without the
black backdrop.
Assemble the projector and Streaming Stick
behind the screen, shooting the image through
the white screen.
You will need to flip the image on the projector
so that the picture is not reversed on the
viewing surface. This can be done directly from
the projector remote control by pressing the
button directly below PC with this image:
Outdoor Theater Systems warrants
manufacturing defects in original
material, including original parts and
workmanship, under normal use and
conditions for a period of one year from
the date of purchase in the U.S.A. With
your dated proof of purchase, we will
provide repair service for labor and parts
or replace the product at our discretion.
For repair or replacement email us at
instructions on where to ship products for
repair or replacement.
Projectors and Streaming Stick are
covered under their own respective
warranties.
This warranty does not cover damages
from negligence, misuse, abuse,
accident, failure to follow operating
instructions, commercial use, rental,
repairs by an unauthorized facility, or
products purchased, used, serviced, or
damaged outside of the U.S.A.
Packing for Storage
or Transportation
The Oblong Carry Bag Contains:
2-Tripod Stands, 6-Twist Stakes, 6- Tie
Down Straps, 1-White Stretch Screen,
1- Black Screen, 2- Spring Clips, 2-
Bungee Cords
The Rectangular Carry Bag Contains:
Projector, Streaming Stick, Speakers,
Multiple Outlet Strip, Extension Cords,
Flashlight, RCA Cable
Trouble Shooting
6

7120 Shady Oak Road
Eden Prairie, MN 55344
952-513-7764
www.outdoortheatersystem.com
info@outdoortheatersystem.com
Table of contents
Other Outdoor Theater Systems Home Theater System manuals