6
Outlaw Audio
Owner’s Manual
To connect the M8 Subwoofer using high level inputs:
1. Turn off all system components and unplug the receiver and/or amplifier
and the M8 from their AC power source.
2. Locate the front left/right speaker output terminals on your receiver or
amplifier.
In cases where thereare both “A” and“B”terminals, the“A” terminalsshould
be used. Disconnect any wire that is presently connected to these terminals.
3. Using the same type of speaker wire used for your other speaker
connections; connect the left and right channel speaker outputs of your
receiver or amplifier to the M8’s “Speaker Level Input”.
NOTE: Be sure to connect the speaker wires to the appropriate speaker
input connections located on the back of the M8, making certain that
the polarity (–/+) on the receiver or amplifier matches the polarity on
the connections of the subwoofer amplifier. In most cases this means
connecting the red terminal on the receiver or amplifier to the red
terminal on the M8, but always check the markings on the rear panel
to insure “+ to +” and “– to –“ connections.
4. Plug the M8’s power cord into an un-switched AC outlet.
CAUTION: Due to the power requirements of the M8, it must not
be connected to the accessory outlets on a receiver or processor. If a
power-strip or surge protector is used, make certain that it is rated to
accommodate the M8’s power requirements.
5. Reconnect your receiver and/or amplifier to the AC power source.
6. Proceed to the “Setting The M8’s Controls” section to learn about the
M8’s controls and how they operate.
Subwoofer Placement
Placement of your subwoofer is a critical component in maximizing the perfor-
mance of your M8. Placement influences the subwoofer’s “perceived” frequency
response, sound pressure level (SPL), and overall accuracy. Since each listening
room differs in virtually every aspect, the ideal location will also vary.
An easy way to find the right spot to place your new M8 is to experiment with what
we call the “Subwoofer Switch Trick.” This process puts the subwoofer where you
normally sit and then lets you play the role of the subwoofer.
1. Place the subwoofer as close to your favorite listening position as possible. If
possible, place the unit in front of your couch or easy chair, right in the room’s
“sweet spot.” Provided that there is no damage to your furniture, you may even
place the subwoofer on the chair or couch, but remember that the M8 is heavy,
and the Outlaws are not responsible for any damage to your furniture or for
arguments this might cause with other members of the household!
2. Activate the test tone from your processor or receiver’s internal test tone generator,
or use your favorite test disc so that pink noise plays through the subwoofer. While
the test tone is playing, walk around your room to find the spots where you hear
the best bass response. Sometimes this may be in the center of the room, while
in other cases you may find the best spot in a corner or along a side wall.
3. Turn off the test tone and move the subwoofer to the location where you hear
the best bass response. If that location is unacceptable or impractical, repeat
the procedure to the spot that is the best compromise between bass performance
and aesthetic considerations.
3. Connect one end of the subwoofer cable to the subwoofer or L/Mono
output on the receiver or processor.
4. Locate the connection labeled L/Mono on the rear panel of the M8 and
connect the other end of the subwoofer cable to that jack.
5. Plug the M8’s power cord into an un-switched AC outlet.
CAUTION: Due to the power requirements of the M8, it must not
be connected to the accessory outlets on a receiver or processor. If a
power-strip or surge protector is used, make certain that it is rated to
accommodate the M8’s power requirements.
6. Reconnect your processor or receiver to the AC power source.
7. Proceed to the “Setting the M8’s Controls” section to learn about the
M8’s controls and how they operate.
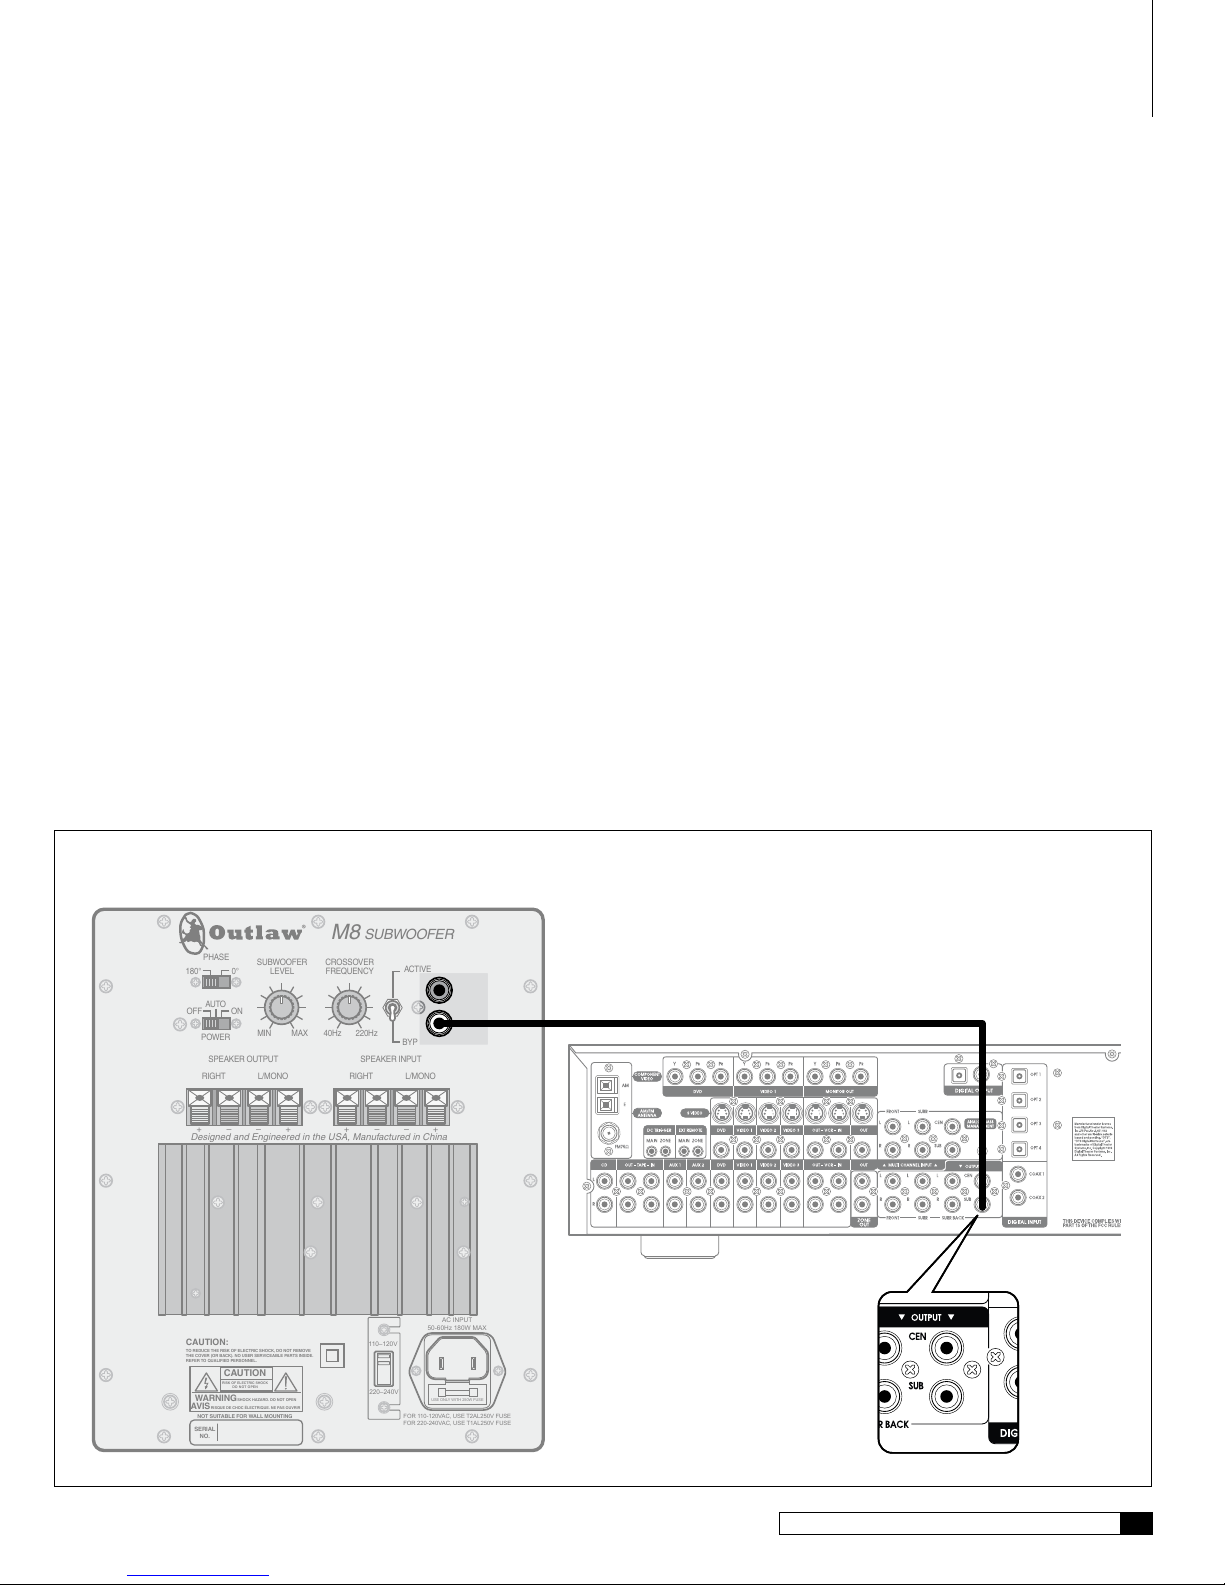
Connecting to a System without a Subwoofer
Preamp Output, but with Standard Left/Right
Preamp Outputs
If your system does not have a dedicated subwoofer preamp output, but has left/right
preamp outputs, you can use these jacks to connect your receiver or processor to the
subwoofer amplifier. See Diagram 2 on the next page.
To connect an M8 Subwoofer using standard Left/Right preamp outputs:
1. Turn off all system components and unplug the processor or receiver
and the M8 from their AC power source.
2. Locate the “Left/Right preamp outputs” on the rear panel of your
receiver or processor.
Some audio products that do not offer digital surround processing will
have these types of jacks. If your receiver or processor does not have this
type of output you will need to follow the “Connecting to a system with no
pre-amp outputs” instructions that follow this section.
3. If using an external power amplifier; connect a Y-Adapter/Splitter to the
left and the right pre-amp outputs (one for each output). If a separate
amplifier is not being used, connect a pair of RCA cables to the left and
right preamp output and skip ahead to Step 5.
4. Connect one set of the pre-amp outputs created by the Y-Adapters/
Splitters directly to your power amplifier with a pair of RCA cables.
5. Locate the connections labeled “Right” and “L/MONO” on the rear
panel of the M8.
6. Connect the remaining pre-amp output connections to the “RIGHT”
and “L/MONO” connections on your M8 with a pair of RCA cables.
7. Plug the M8’s power cord into an un-switched AC outlet.
CAUTION: Due to the power requirements of the M8, it must not
be connected to the accessory outlets on a receiver or processor. If a
power-strip or surge protector is used, make certain that it is rated to
accommodate the M8’s power requirements.
8. Reconnect your processor or receiver to the AC power source.
9. Proceed to the “Setting the M8’s Controls” section to learn about the
M8’s controls and how they operate.
Connecting to a System with no Preamp Outputs
If no low level subwoofer or standard left/right output is available, you will need to
run speaker wires from your main amplifier or receiver to the subwoofer amplifier.
See Diagram 3 on the next page.
Setup GUide