Ovation Systems AfterBurner-2 User manual

User Guide
Manual Issue 1.42 Ovation Systems Ltd. Page 1
AfterBurner-2 Firmware 1.4 www.ovation.co.uk
AfterBurner-2
Time-Lapse DVD
Video Recorder
User Guide
Ovation Systems Ltd.
Springfield Barn
London Road
Milton Common
Oxfordshire
OX9 2JY
UK
Tel: +44 1844 279 638
Fax: +44 1844 279 071
Email: support@ovation.co.uk
Web: www.ovation.co.uk

User Guide
Manual Issue 1.42 Ovation Systems Ltd. Page 2
AfterBurner-2 Firmware 1.4 www.ovation.co.uk
Contents
1Introduction .................................................................................................................... 3
2Quick-Setup Guide......................................................................................................... 4
2.1 Installation......................................................................................................................................... 4
2.2 Operation Overview........................................................................................................................... 4
2.3 Front Panel Controls.......................................................................................................................... 4
2.4 Record Set-up................................................................................................................................... 5
2.5 Start / Stop Recording ....................................................................................................................... 7
2.6 Record Pause ................................................................................................................................... 7
2.7 Burning a DVD .................................................................................................................................. 8
2.8 Playing DVDs.................................................................................................................................... 9
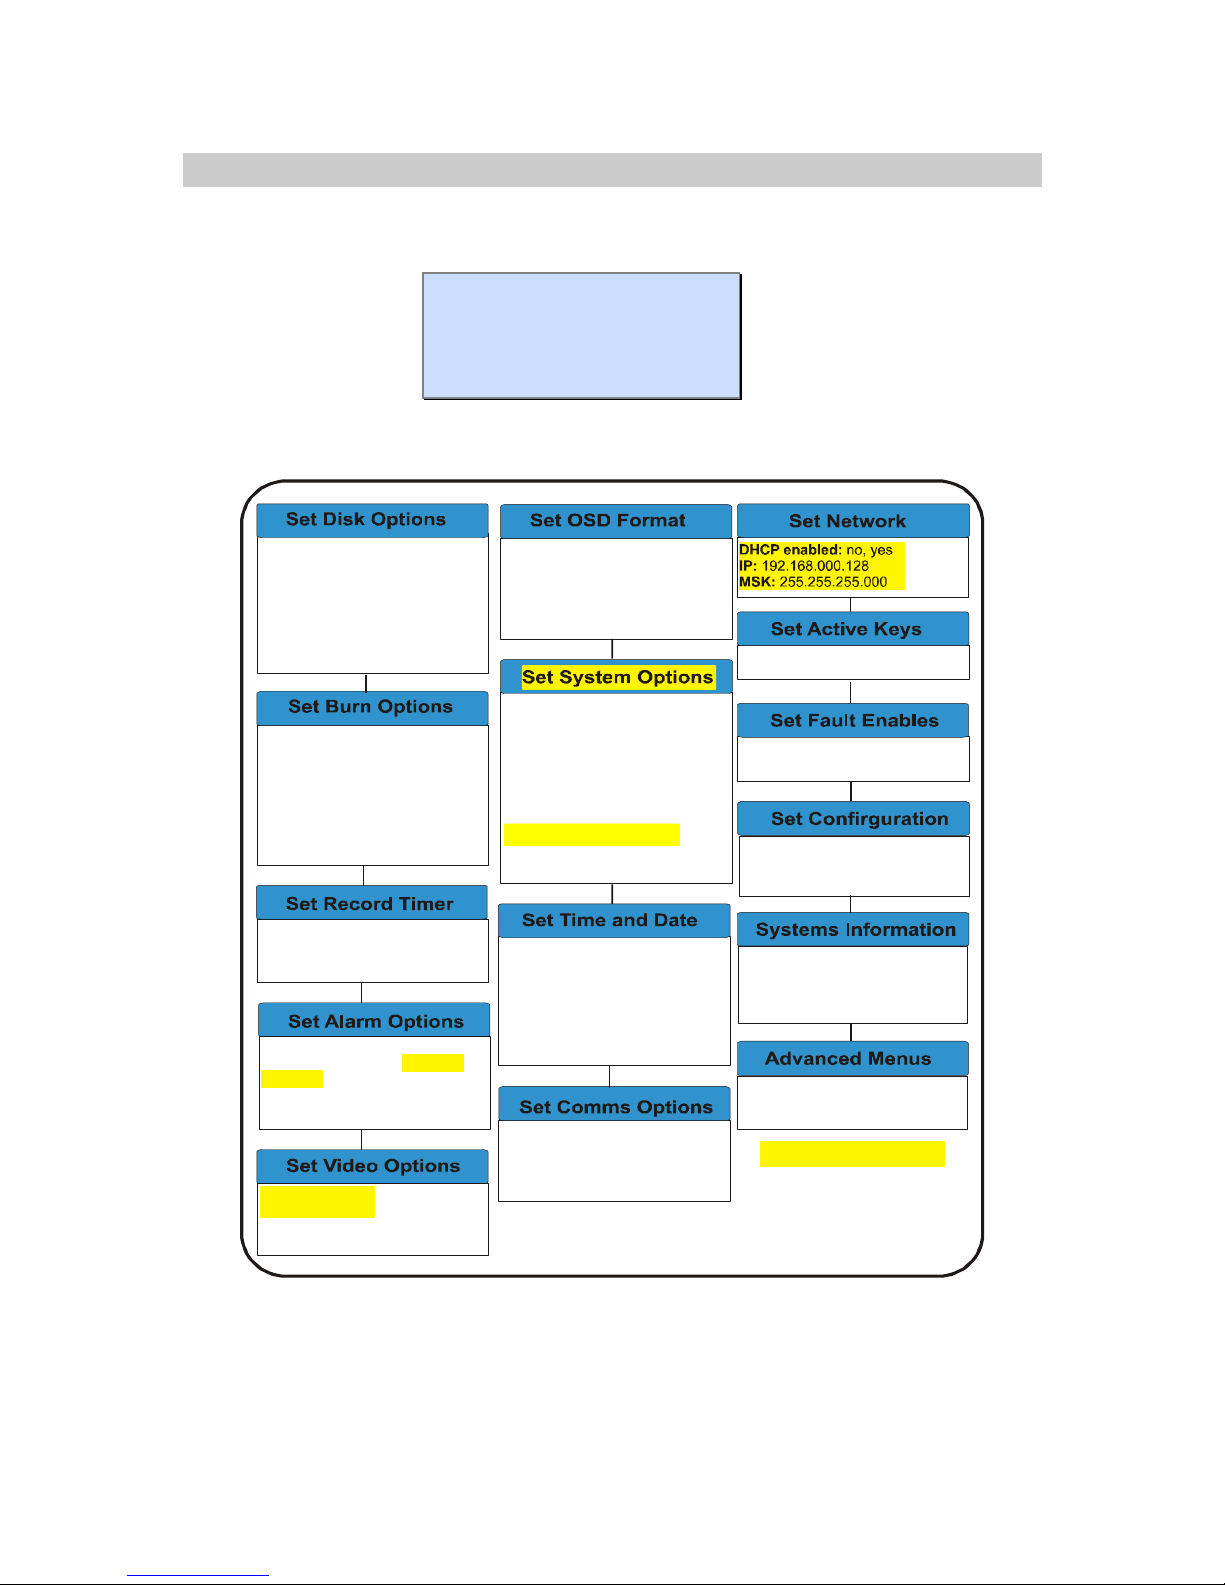
3Advanced Menus.......................................................................................................... 10
3.1 Set Disk Options.............................................................................................................................. 11
3.2 Burn Options ................................................................................................................................... 12
3.3 Set Record Timer ............................................................................................................................ 13
3.4 Set Alarm Options ........................................................................................................................... 14
3.5 Set Video Options............................................................................................................................ 15
3.6 Set Onscreen Display (OSD) Format................................................................................................ 16
3.7 Set System Options......................................................................................................................... 18
3.8 Set Time & Date.............................................................................................................................. 19
3.9 Set Comms Options......................................................................................................................... 20
3.10 Set network’ menu:.......................................................................................................................... 20
3.11 Set Active Keyes ............................................................................................................................. 21
3.12 Set Fault Enables ............................................................................................................................ 21
3.13 Set Configuration............................................................................................................................. 22
3.14 System Information:......................................................................................................................... 22
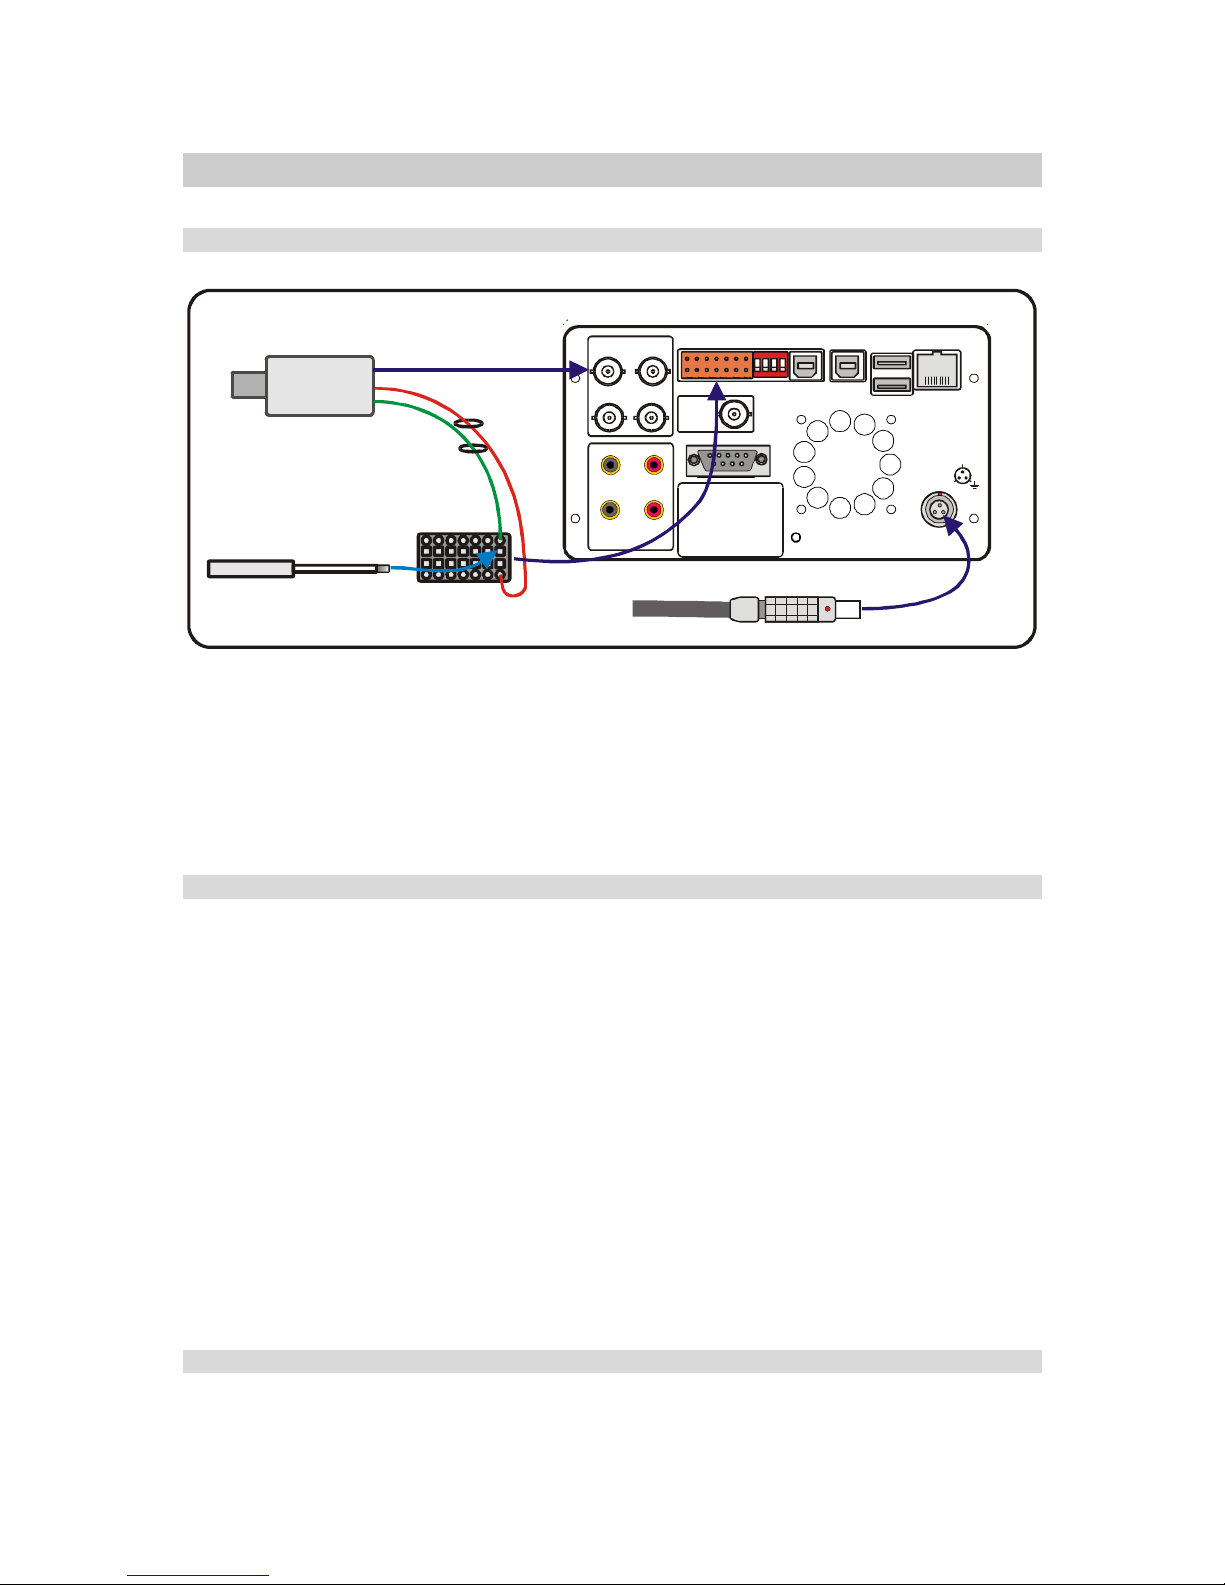
4Rear Panel Interface..................................................................................................... 22
4.1 External I/O & Control...................................................................................................................... 23
4.2 Rear Panel Configuration Switches .................................................................................................. 25
4.3 Examples of External Control........................................................................................................... 26
5Ethernet Port ................................................................................................................ 26
5.1 Setting the IP Address ..................................................................................................................... 27
5.2 Webpage Interface .......................................................................................................................... 28
5.3 File List Webpage............................................................................................................................ 29
5.4 Alarm List Webpage ........................................................................................................................ 30
5.5 Motion Detection ............................................................................................................................. 31
6AfterBurner-2 PC Configuration Utility ....................................................................... 32
6.1 Installing the PC Configuration Utility................................................................................................ 32
6.2 Running the PC Configuration Utility ................................................................................................ 33
6.3 Picture in Picture Setup ................................................................................................................... 33
6.4 Motion Detection ............................................................................................................................. 34
7Firmware Upgrades...................................................................................................... 35
7.1 CD Disk Upgrade ............................................................................................................................ 35
7.2 Ethernet upgrade............................................................................................................................. 35

1Introduction
Designed specifically for police video surveillance operations, AfterBurner-2 is able to record
video in real-time, or in time-lapse, to DVD write once disks. Once burnt, the disks are
viewable on either a PC or consumer market DVD video players.
AfterBuner-2 replaces the highly successful AfterBurner-1 DVD recorder and retains all the
capabilities of its predecessor. The basic operation of AfterBurner-2 is essentially the same
as AfterBurner-1 with the addition of the following key features:
Ethernet port with a webpage interface that allows for remotely configuring the
AfterBurner, previewing the video inputs, listing and downloading files and alarm
events.
Four video inputs with an internal picture-in-picture video quad with 27 preset
screen layouts together with one user programmable setting.
Motion detection on all four video inputs. Motion detection zones can be setup
using the Ethernet port or via a PC configuration utility.
12 V DC output added to the rear panel external control & I/O connector for
powering cameras.
Optional MD5 hash coding of the video files to provide an additional data
integrity check.
Please Note:
With firmware version 1.4 the USB ports have limited functionality. The USB-2 ports for
viewing files on the disk / MultiBurner will only be available via a future firmware upgrade.

2Quick-Setup Guide
2.1 Installation
12 3
4
VIDEO
OUT
SERIAL
1234567
8 9 10 11 12 13 14
ab c d CONFIG
INTERNAL
DISK
EXTERNAL
DRIVES ETHERNET
VIDEO IN
1
3
2
4
IN
OUT
AUDIO
LR
IN
1Alm Start
2Alm Stop
3Record
4Time
5Chain
6Wake Up
7Ground
OUT
8 Re cord
9 Di sk Ful
10 Alarm
11 T im e
12 Ch ain
13Fault
14 DC Power
POWER
+12V DC @ 3.5A (max)
+12V
NC
+12 V DC
(500mA Max)
DC Ground
Video to Input 1
Camera
To open the wire receptacle, insert
small flat-bladed screwdriver
horizontally into the square hole.
Figure 1: Basic AfterBurner-2 Installation
Basic installation is shown in Figure 1 above. The camera is connected to video input 1
and the DC power supply connected to the “Power” input. Further cameras can then be
connected to video inputs 2,3,4. AfterBuner-2 can be used to provide 12 V DC power to
external cameras, with a maximum current of 500mA via the rear panel I/O connector
(as shown in Figure 1).
2.2 Operation Overview
AfterBurner is primarily intended for use in long-term police surveillance operations.
Video is recorded to its internal hard drive and evidence is then burnt to DVD. Each
DVD holds up to 3 hours of real-time video, which can be extended to 24 hours (or
more) when set to record in time-lapse (which increases record time per DVD by storing
fewer pictures per second).
AfterBurner-2 writes video to its internal hard disk and when it has enough data, and
there is a blank DVD in its drive, it automatically burns a DVD. If there is no DVD in the
drive, AfterBuner-2 continues to record to the internal disk. Files are then be selected
and burnt as required via the front panel LCD and keypad (See Section 2.7, page 8).
NB: Afterburner is a video (and audio) recorder and is not a player. The only way to
view the recordings is by burning them onto DVD or downloading files from the internal
hard disk via the USB or Ethernet ports.
2.3 Front Panel Controls.
The front panel controls are shown below.

ON
STBY
RECMun+
Mun- DVD
Figure 2: AfterBurner-2 Buttons.
JKL MNavigation buttons
Mnu+ / Mnu- Steps though main menu items (At any point, pressing for
more than 2 seconds exits all menus).
REC Starts / stops recording (shows red when recording, flashing
red when recording in time-lapse).
DVD Powers up DVD drive, opens / closes tray, starts DVD burn.
ON Power-up unit.
STBY Power down unit (standby for timer modes).
In general, the “Mun+” or “Mun-“ keys are used to navigate a list of top-level menus. The J
Mkeys are then used to scroll through the list of items within that top-level menu. The
selected parameter within the menu list is shown flashing and is adjusted by using the K L
keys. Once a parameter has been adjusted, it is automatically stored when moving to the
next menu.
TipMAt any point when navigating the LCD menus, it is possible to return to the start-up
screen by pressing the either the “Mun+” or “Mun-“ keys for 2 seconds.
The
buttons list the files on
the internal disk. Once selected,
press “DVD” to burn. buttons
scroll through the file properties.
LCD scrolls through various key
settings and status.
enter the Advanced menus
Burn:
Eject:
Auto Mode, Manual only, at
given time.
Manual, when burnt
MB No. of copies:
1, 2, 3, 4, 5, 6,
7, 8
DVD:
Quality:
Set time per DVD 24hr
default
Very low, low, medium,
high, very high
Video only, audio + video, audio
Figure 3: AfterBuner-2 Top Level Menus
2.4 Record Set-up
As standard, AfterBurner-2 is shipped configured for 24 hour time-lapse recording (at 2
pictures per second) in medium quality. This may be altered by pressing the “Mnu+” key
3times to show the following screen:
Set Record Mode
===================

DVD: 24.0h 2.08fps
Quality: M Vid-only
Initially, the record time per DVD flashes, indicating it may be altered by the KLkeys.
Once set to the required record time per DVD, press Mto scroll to the next parameter,
in this case video quality. Again use KLto select the required quality setting. Press
Mto enable / disable audio recording. Audio recording should only be enabled in real-
time record modes, as audio is not useful with time-lapse video (even when shown as
enabled).
TIPMPressing the “MENU” key, or letting the screen time-out, stores the new
configuration.
DVD: 2, 4, 6, 8, 10, 12, 18, 24, 36, 48 Hours, 7 days, 1 month, 1 year.
Estimated record time per DVD disk.
fps: record rate in frames per second (fps) or frames per minute
(fpm) calculated from the record time / quality settings.
Quality: VH (very high), H(high), M(medium), L(low) VL (very low).
Record Mode: Video only: video only recording (default)
Aud+Vid: audio & video recording (use with real-time recording
only)
Aud-mode: records a stereo audio track along side a low
resolution video feed extending record time to approximately 8
hours per DVD.
NB: a video feed to the AfterBurner (preferably black) is required
for Audio-Mode operation.

2.5 Start / Stop Recording
Once the record time per DVD, quality and burn options are configured, the recorder
starts recoding by pressing the “REC” key. This key will show constant red when
recording in real-time, flashing red when recording in time-lapse. Pressing the record
key again causes the unit to enter“Stop” or “Record-Pause” (see below).
Whilst recording, the LCD scrolls though a summary of the machine’s status including:
Whether recording is taking place, in either time-lapse, real-time or record-
pause.
The size of the video file so far (4.7 GB max)
Estimated burn time, taking into account if burn “at given time” option has been
set in the “Set Burn Mode” main menu
The remaining free space, shown as GB and estimated time, on the internal
hard disk (except endless loop mode).
2.6 Record Pause
Record-pause mode is selected in the “Set System Options” advanced menu (Section
3.7, page18). In this mode, pressing the “Record” button whilst recording causes
AfterBurner to “Pause” indicated by a slowly flashing record button. A short press of the
“Rec” button then starts recording again to the same file.Pressing the record button for
2seconds stops recording and closes the file on the hard disk.
TIPMThis mode is especially useful when the recorder is being started and stopped
frequently as all the recordings are appended to one DVD file, rather than
generating many separate files.

2.7 Burning a DVD
1From the default screen, press the “MENU” once to show a list of files on the hard
disk. The file to be burnt may be selected by the K L keys. For each file, the start
times, finish times & dates are shown as well as the number of times the file has
been burnt to DVD disc.
Set Burn file #001
===================
$09:21 05Apr Burnt
09:20 06Apr no
TIPMWhen a file is shown, pressing the Mkey scrolls through additional
information about the file including size, duration, frames per second, whether
alarms were active etc.
TIPMIt is possible to change the file-listing screen to sort the files showing the
oldest or youngest file fist along with either a sequential or unique file number.
See Section 3.2 page 12, “Set Burn Options”
NB: If AfterBurner is recording, the current file will be shown with an end time
of “now”. If this file is selected to be burnt, the resulting DVD contains video
up to the point when the burn commenced. AfterBurner will continue to record
to the same file while burning the DVD.
2Once the required file is displayed, press the “DVD” key. This powers up the DVD
drive and checks for a blank DVD disk.
3If a “Tray Empty” message is shown, press the “DVD” key again to open the DVD
tray (at this point, the tray can also be opened by the DVD drive’s own eject button).
Place a blank DVD±R disk in the tray and close by pressing the “DVD” key. The LCD
shows “Checking tray..” for a few seconds and then shows “Media blank”when
the DVD is ready to burn. If the media is not blank, the LCD shows “DVD burnt”.
4Press the “DVD” button once more. At which point AfterBurner gives the option to
abort the burn within 10 seconds. The LCD then shows “Preparing image” >
“Burning lead-in” > “Burning xx% done” > “Burning lead-out”.
NB: For a full DVD (4.7GB) burning takes approximately 15 minutes
TIPMIt is possible to configure the system to automatically open the DVD tray to
open once a burn has been completed. See Section 3.2, page 12.

5
2.8 Playing DVDs
The DVDs produced by AfterBurner are formatted for playing on standard (consumer
market) DVD players. The disks may also be played on a PC with a suitable DVD player
application.
Playing time-lapse recordings
Time-lapse recordings appear to playback at a fast rate because frames have been
dropped from the recording. Most DVD players have the ability to replay in slow motion,
which will show the recording closer to real-time. E.g. playing a 24-hour time-lapse
recording (with a time-lapse rate of 1 in 12) at 1/8 speed will be close to real-time.
Playing back time-lapse recordings at normal rate has the advantage of showing all the
recorded information condensed into 2 to 3 hours, speeding-up the general review
process. Pause, slow motion forwards and backwards allows closer examination of any
specific events.
TIPMOvation Systems offer a PC application called DVD Explorer,which is designed
specifically for the review of AfterBurner DVDs. DVD Explorer provides quick
navigation to any date and time on the DVD review along with the ability to single
step forwards and backwards. For more information see:
www.ovation.co.uk/DVD_Explorer/
Chapter Markers
Most DVD players have the ability to jump to DVD chapters so, to aid navigation,
AfterBurner adds a chapter maker to every 5 minutes of real-time video (approximately
24 markers per disk). With time-lapse recordings the time between markers is extended
by the time-lapse ratio e.g. in 24 hour mode the 5 minutes x 12 = 60 minutes.
If AfterBurner is set to alarm mode, a chapter marker is inserted at the point of each
alarm, up to a maximum of 99. If there are more than 99 alarms, the DVD file on the
internal hard disk is closed and a new file opened. Please note that when alarm mode
is active, chapter markers are no longer inserted every 5 minutes.
DVD Serial Number
Each DVD is burnt with unique DVD volume label. The format is DVDxxxx-yyyyyyyy,
where xxxx is the serial number of the AfterBurner and yyyyyyyy is a unique date code.

3Advanced Menus
The advanced menus are accessed by pressing the “MENU” key until “Advanced
Menus” is shown. Then press Mto enter this option.
Advanced Menus
===================
to enter
The advanced Menu items are shown below:
Timer:
1, 2, 3, 4
- Disabled, daily, manual
range, monthly
Mnu, Rec, DVD, Stby,
DSK:
Quick Erase:
Full Erase:
Disk Format:
Endless loop, stop on
unburnt, stop when full
No, Yes
No, Yes
No, Yes
Pick:
Index:
Join Files:
Full Verify:
Oldest unburnt, youngest
first
Sequential, unique
No, Yes
Off, On
OSD:
Locale:
Set A,B,C,User,D,E,F, None
UK, EU, USA, AU, UNI
Enter time and date
Country:
Daylight Savings:
Time-Sync:
select from list
Off / On
03.00am, None, FR-
Record Pause:
Audio format:
Auto Shutdown:
MD5 video files:
DVD Type:
Off, Stop, Timer,
Both
MPEG, AC-3,
LPCM
Smart, Off, On
no / yes
Normal, Dual
Comm1:
Unit:
38400, 19200, 09600,
57600
1 to 60
Systems Integrators Use Only
Default values:
Load CD/DVD Ini:
No, Yes
No, Yes
Version:
Serial No.
Disc Capacity: 120GB, 250GB
>> to exit
PIP,
Inputs
Level
various
auto, fixed
,auto, fixed
-Colour, mono
New for AfterBurner-2
Alm Mode:
Alm rate:
Alm time:
Disabled, start/stop
Enter fps
HH, MM, SS
on closed, on opened, motion
detection
Figure 4 Advanced Menu Items

3.1 Set Disk Options
Set disk options
===================
DSK: endless loop
Quick wipe: No
DSK: endless loop: (default) the unit fills the disk as it records. Once full,
AfterBurner then automatically overwrites the oldest data.
stop when full: stops recording when the internal disk is full (i.e.
no overwrite).
stop on unburnt: keeps recording to the hard disk in a loop
(overwriting the oldest data) until it encounters an un-burnt DVD
file.
Quick erase: (Yes/No) use the KLbuttons to select yes and then Mtwice to
invoke a quick disk erase that clears the file tables (takes about 10
sec).
Full erase: (Yes/No) use the KLbuttons to select yes and then Mtwice to
invoke a full disk erase, clearing all data on the disk (takes about
60 mins).
TIPFUnless security is of prime importance, quick erase is usually
sufficient as a full erase can take up to an hour.

3.2 Burn Options
Set the disk burn / display options.
Set burn options
=====================
Pick: youngest first
Index #: Sequential
Pick: youngest first: (default) shows the youngest file first in the “Set
Burn File” menu.
oldest unburnt: shows the oldest unburnt file first in the “Set Burn
File” menu.
Index #: Sequential / Unique: (default Sequential) show files in the “Set
Burn File” menu with sequential file number always starting from 1,
or show files with a unique reference number (not starting from 1
and not necessarily sequential).
Join files: No/Yes: (default off) join small files together (up to 1 GB in total)
before burning. With this option “on”, AfterBurner will join as many
files as possible (up to a total of 1 GB) starting with the selected file
in the “Set Burn File” menu (see Section 2.7) Once used, this
option will automatically return to the “off” setting.
NB: Once executed, “Join Files” is not reversible.
Full Verify: on/off: (default off) switches verify on/off after burning DVD.
Selecting this option increases the DVD burn time by 50%.

3.3 Set Record Timer
Menu to set-up the 4 internal record timers. Press Mto enter this option.
Set Record Timer
===================
Timer #1: range
10 Jan to 15Jan
Use the K L keys to select the timer (1 to 4) to be adjusted. Pressing Mthen adjusts
the timer options, which are as follows:
Disabled: default.
Range: allows AfterBurner record for a preset start and stop times each day,
over range of dates.
Monthly: record for a preset period of time, over a range of dates every month.
Period: record from a start date & time to end date and time.
Daily: record for a preset period of time on selectable days of the week.
To select a timer option user the Menter and the K L to set the times / dates.
Every:--MoTuWeThFr--
REC: 07:00 – 07:45
In the case of the Daily option set the start and stop times using the arrow keys as
normal. When the flashing cursor moves to the days of the week, Kenables the day
position, Ldisables.
NB: Once set-up, the timer is enabled whenever the unit is left on or in standby.
NB: If the unit is waiting for the timer activation and the user presses record,
AfterBurner will immediately start recording and then stop at the next time off time.

3.4 Set Alarm Options
Allows Afterburner to increase its picture record rate under control of external alarms
inputs (pins 1 & 2 of the external control I/O connector, see Section 4.1). There are
various alarm modes described below which are selected by the K L keys:
Set alarm options
===================
Mode: start/stop
Alm rate: 25 fps
Alm mode: Disabled: (default) both alarm inputs are disabled.
Motion detection: Alarms on internal motion detection See Section
5.5 page 31 and Section 6.4 page 34 about how to set up motion
detection.
On opened: AfterBurner remains in alarm mode whilst pin1 “Alarm
Start” is not connected to ground.
On closed: AfterBurner remains in alarm mode whilst pin 1 “Alarm
Start” is connected to ground.
Start/Stop: Starts an alarm when pin 1 “Alarm Start” of the external
control connector is connected to ground, stops when pin 2, “Alarm
Stop” is connected to ground.
Alm Rate:Adjust the picture record rate during alarm.
Alm Time: The minimum duration of the alarm in hours, minutes & seconds.
Only applicable for “On opened” and “On closed” modes.
NB: The timer is constantly re-triggered whilst the input is active. (ie
timer clock starts from when the Alarm input last went inactive).
For more information regarding the hardware alarm inputs see Section 4, page 22.

3.5 Set Video Options
This menu controls the video input configuration.
Set Video Options
===================
Pip: Full size
Inputs: Auto
Pip: Sets the configuration of the input video quad. There are 22 preset
modes and it is recommended to use a video monitor connected to
the “Video Out” BNC to set the “Pip” (picture in picture) mode.
Inputs: Auto / Fixed. Controls how the video inputs are allocated. Auto
maps the first valid video input to be camera 1, next valid input as
camera 2 etc…
Level: Auto / Fixed: Automatic level control or manual (default: auto)
Fixed video may be adjusted for both gain (default 100%) and
offset (default 0%). NB: If the video gain and offset is changed in
fixed mode, please remember it will need to be reset before use
with another camera.
Colour / Mono: colour or monochrome input mode (default: Colour).
NB: it is recommended to use the video monitor output to check everything is operating
as expected when adjusting the video input configuration.

3.6 Set Onscreen Display (OSD) Format
This menu controls on -screen display configuration:
Set OSD Format
===================
OSD: Set A
Locale: UNVERSAL
NB: it is recommended to use the video monitor output when adjusting the OSD format.
Set A, B, C, D: 4 preset onscreen display mode showing date and time at the top
and bottom of the screen
User: User configuration of the onscreen display (see next page).
None: On screen display disabled.
Locale: Universal (eg 25Nov2008), UK & Eire (eg 28.11.2008), Europe (eg
2008-11-28), America (eg 11/28/2008) , Australia (28.11.200)
29Feb2005
29Feb2005
2005/04/29
14:49:34
29Feb2005
14:52:51
25.0fps
29Feb2005
14:52:51
14:49:55
14:49:55
Set A Set B Set C
Set ESet D
User Configured
Figure 5: Preset OSD Modes.
User OSD Set-up:

It is possible to setup a custom format of the onscreen display by the front panel LCD or
the via the webpage interface / AfterBuner-2 Configuration PC software (Section 6.3
page 33) and webpage interface.
Enter user OSD custom setup mode by pressing Mat the flashing “User” prompt.
There are 5 possible on-screen items that can be set-up to show a number of
parameters, along with the position, colour and format.
Set OSD Format
===================
1: Y:00 X:21 Green
Date: ddMonyyyy
The following describes the adjustable parameters of the LCD screen example above.
1: 1to 5: OSD item being adjusted. By default (. 1: Date, 2: Time,
3: Frame rate, 4: disabled, 5: disabled)
Y:00 text vertical position (line number, max 11).
X:21 text horizontal position (left is 0, 29 is right)
Green text colour (selectable from 8 colours)
Date This lower line shows the parameter for this item number and
format to be displayed. There are a number of viewable parameters
including date & time (in various formats), picture record rate, frame
number, internal PSU temperature, and choice of two user-defined
20-character text strings.
NB: Text in the middle of the screen (lines 4 to 7) flashes indicating that it is only shown
on the video monitor output and not recorded. This allows status messages to be shown
onscreen without interfering with the recoded video.
TIPMIt is also possible to set up the onscreen display via the web interface (Section
5.2, page 28) and PC configuration utility (section 6.3, page 33)

3.7 Set System Options
Set System Options
===================
Record Pause: Off
Audio Format: 25 fps
Record Pause: On / Off (default off). Selects Record-pause mode where pressing
the record key whilst recoding causes the unit to enter record
pause. Pressing the record key for 2 seconds stops recording. See
Section 2.6 page 7.
Audio format: MPEG: (default) standard MPEG-1 layer 2 audio compression at bit
rate of 256 kbps.
LPCM: Linear pulse code modulation. Uncompressed audio (16 bit,
48kHz sampling) with a bit rate of 1.536 Mbps.
AC-3: Dolby digital audio compression, bit rate 256 kbps.
NB: LPCM and AC-3 may have problems with playback on certain
players, especially in “high” and “very high” video quality modes.
Auto Shutdown: Smart: (default) AfterBurner will stay on unless a timer is active
when it will enter stand-by after 5 minutes of idle operation.
On: AfterBurner will enter standby after 5 minutes of idle operation.
Off: AfterBurner will not enter standby.
MD5 Video files: No / Yes (default “No”). Produces a 32 byte hash code of the video
(.VOB) files which can be subsequently used as data integrity
check. The has code is written with the video files to DVD or can
be viewed via the web interface (Section 5.3, page 29). NB:
Enabling hash coding of the video files doubles the burn time.
DVD Type: Normal / Dual: (default normal) selects whether the unit will burn
single (normal) 4.7 GB DVDs or Dual layer (8.4 GB) DVDs.
IMPORTANT:if Dual mode selected, it will not be possible to burn
the recordings to standard (single layer) DVDs.

3.8 Set Time & Date
Sets the internal clock and Daylight Savings Time mode.
Set Time & Date
===================
12:40 Tue 15Mar2010
Timezone: UTC+0 BST
Use the KLand the Mto set up the time and date and Daylight savings time option:
Country: Select country. This setting is used to calculate the dates used for
daylight savings time
Daylight savings: On / Off.
Pressing Magain configures the external synchronisation of the AfterBurner clock via
pin 4 of the external I/O control connector. External time-code radio receiver required.
See Section 4.1, page 23.
Time-sync: None: Time-sync disabled
3:00am: (default) resets clock to 03:00:00 am on contact to
ground for ????
UK-MSF: Lock to external Rugby time-code receiver (UK)
DE-DCF: Lock to external DCF time-code receiver (Germany)
US-WWVB: Lock to external WWVB time-code receiver (USA)
JP-JJY: Lock to external JJY time-code receiver (Japan)

3.9 Set Comms Options
Set Comms Options
===================
COM1: 38400,8,N,1
No ctrl RS232
Set-up of the RS232 port. The above items should not be altered unless there is a
specific reason to do so.
3.10 Set network’ menu:
The ‘Set network’ menu is used to configure AfterBurner-2 ’s Ethernet port.
Set Network
===================
DHCP enabled: Yes
IP: 192.168.000.128
DHCP enabled: Yes/No.(Default “Yes”) when set to ‘Yes’ AfterBurner-2 will
automatically request an IP address from a DHCP server. The
assigned IP address is shown in the “IP” setting below. When set to
“No” the IP address can be set manually.
IP: xxx.xxx.xxx.xxx / DHCP.When “DHCP enabled” is set to ‘No’ a static
IP address and subnet mask can be set manually entered by using
the JMKLbuttons. The default static IP address is
‘192.168.0.128’, subnet mask ‘255.255.255.0’.
NB: a power cycle is required for a change in IP address to take
effect.
Table of contents